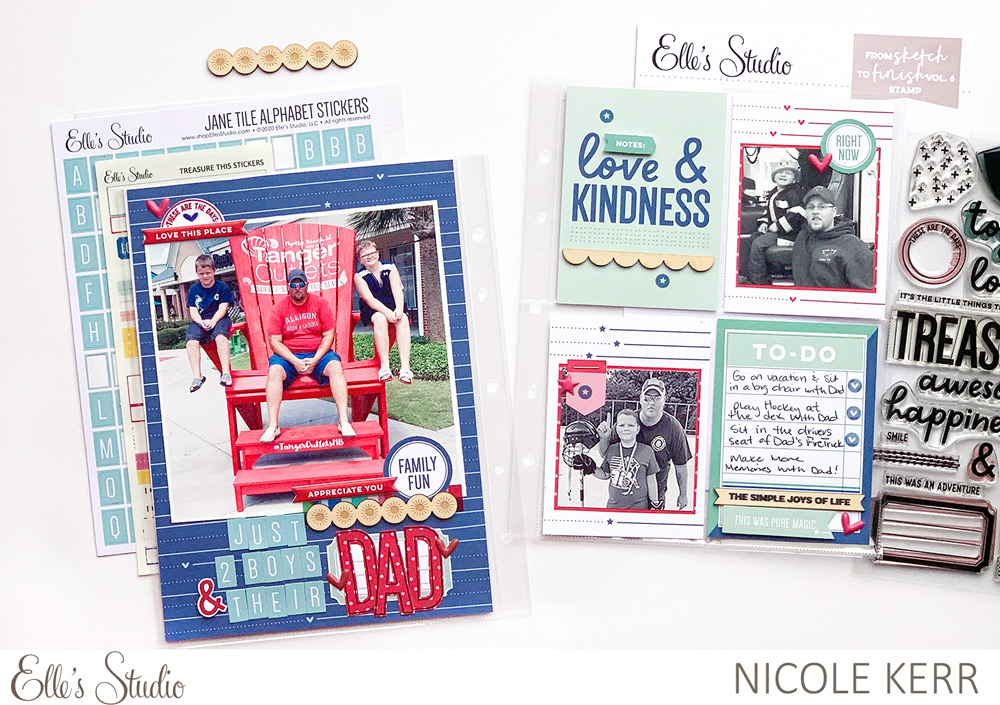
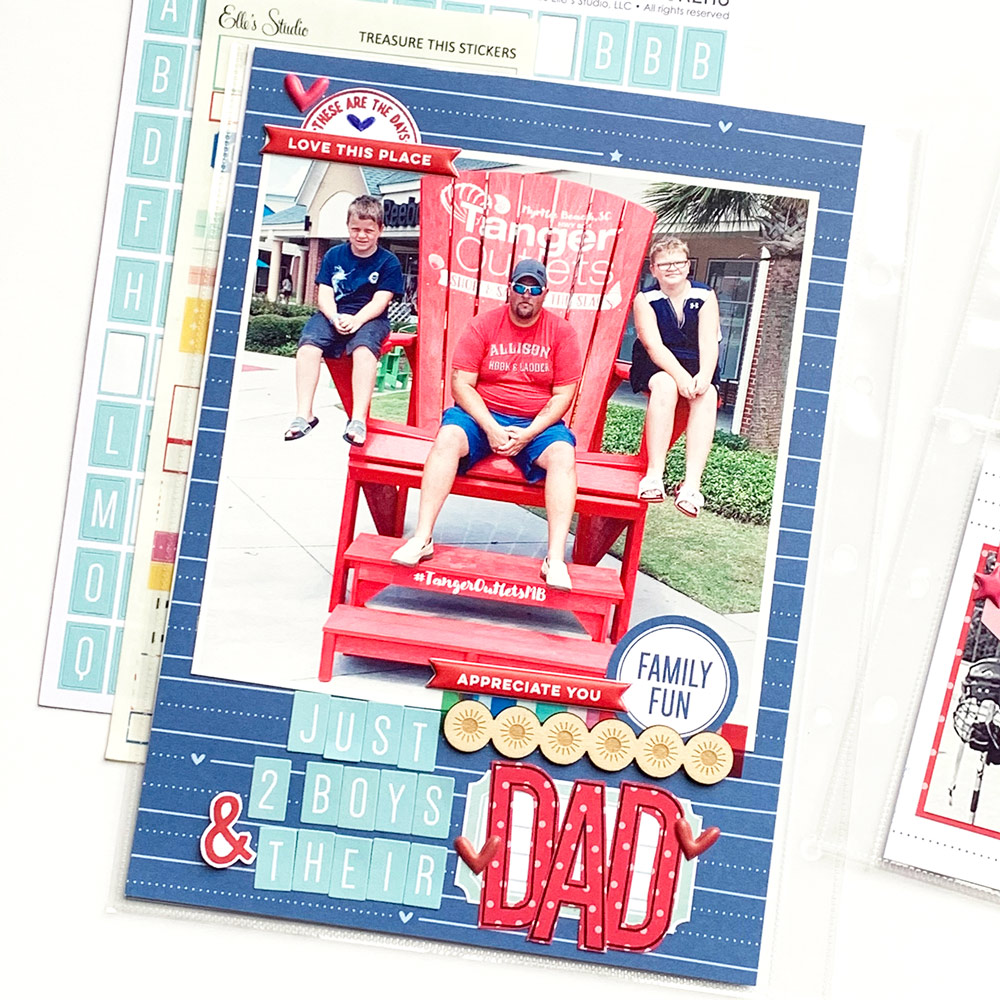
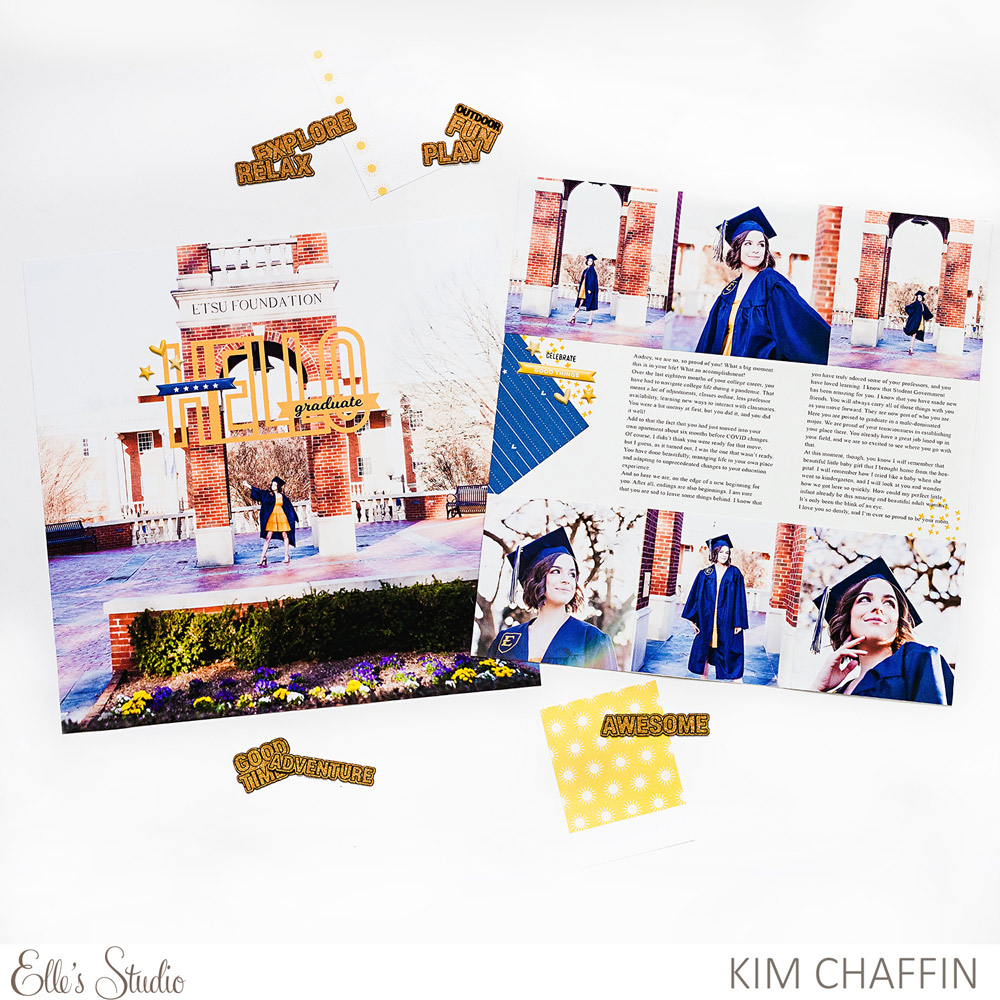
Hello crafty friends! Nicole here and today I’m sharing just how versatile the May 2021 kit and add-ons are for documenting Father’s Day memories! The navy, teal and red really caught my eye for this spread and were the foundation colors that I ran with to document the love and kindness of my husband and the time he spends with our two boys!
The title is a combination of the light teal Jane Tile Alphabet Stickers and stamping of the Large Jane Alphabet stamped on patterned paper. Because the red paper for the word “DAD” was so bold, I broke up the red and blue with a stamped label from the From Sketch to Finish Vol. 6 Stamp to brighten it up and add a pop of a lighter color.
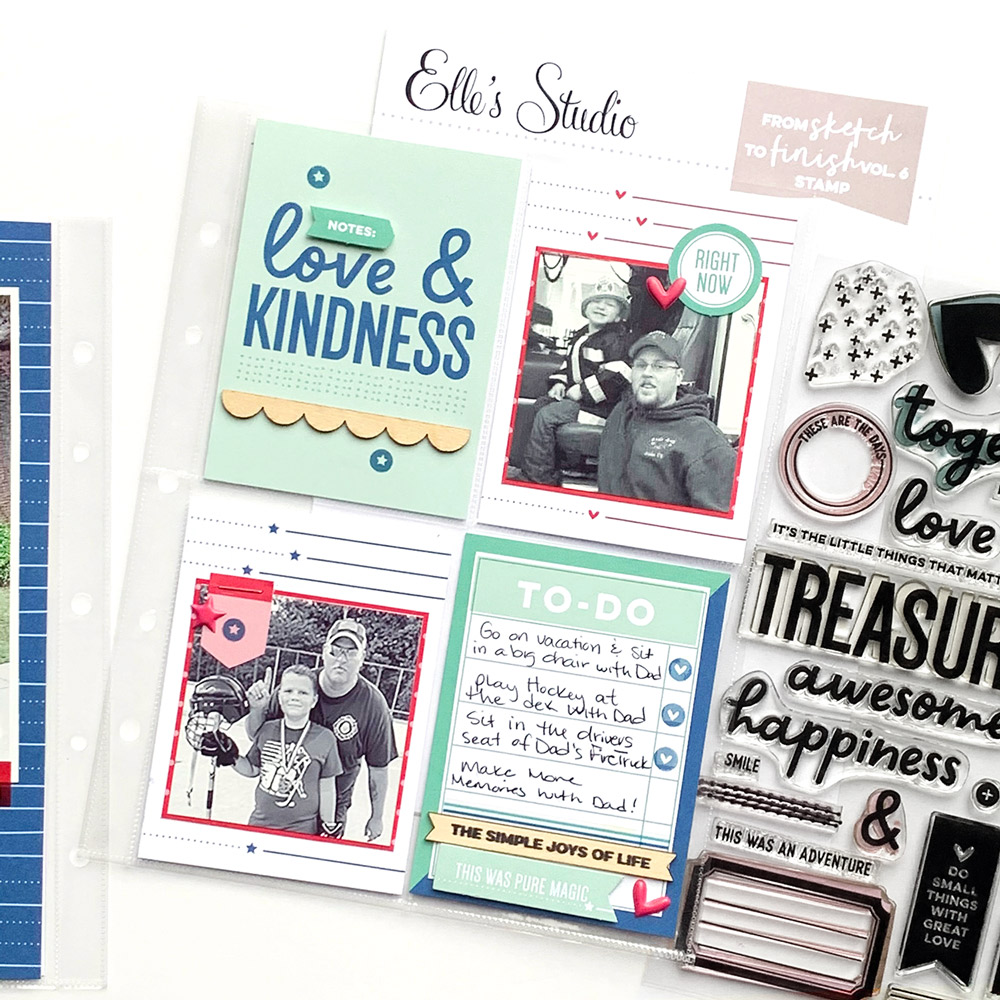
For the right side of my spread, I used the blue star and red heart tags from the May 2021 Kit to highlight the photos of my boys with their dad. I added a small label and a puffy element to each of these tags and that was it. I really wanted the design on these two cards to stand out the most.
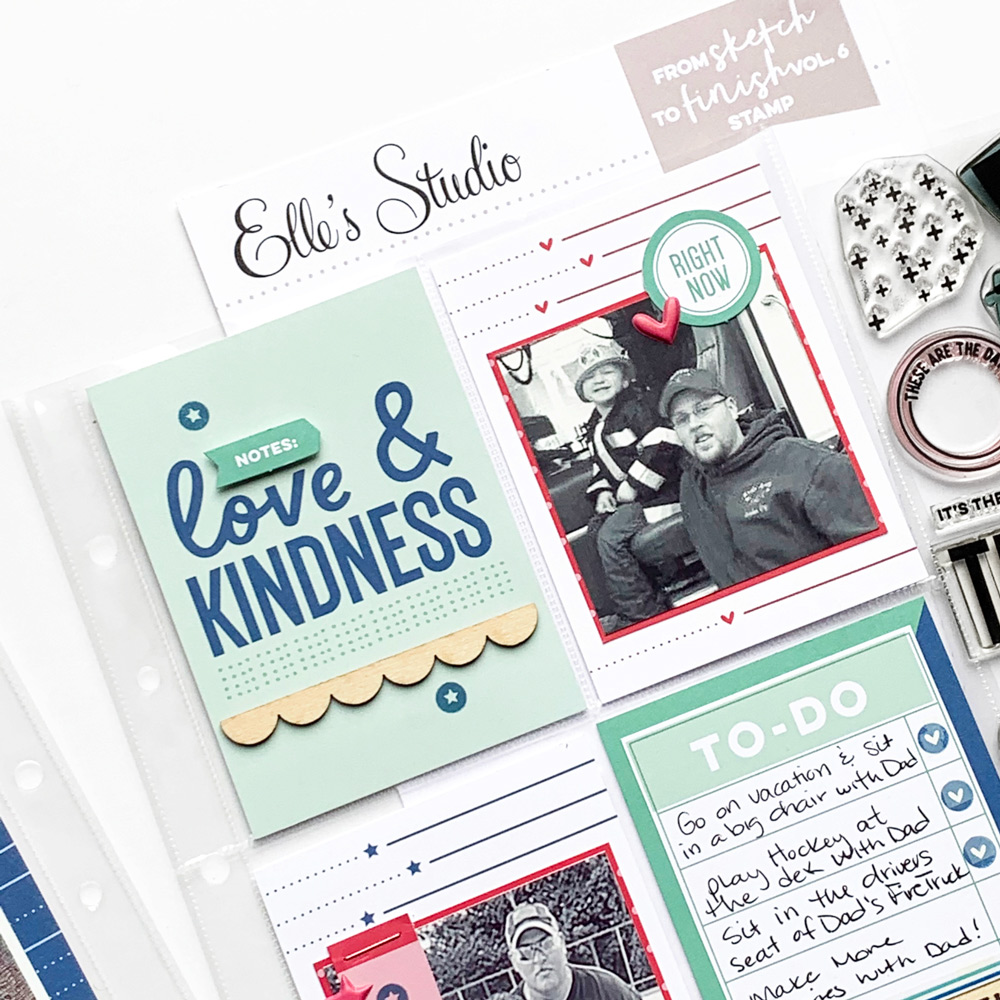
For a few final details, I embellished the “love & kindness” card with a small amount of stamping, a notes flag, and a scalloped border from the Wood Veneer Borders. For my journaling, I trimmed down the “To-Do” tag and added another tag to bring in more of the darker blue on that side of my spread. I added a bullet list documenting each of the events the pictures were showing with a heart stamp noting they were “checked” off the list. I also added a few final details with another flag, puffy heart and another banner wood veneer, but this time, I stamped a sentiment on it to give it a little something more.
Thank you so much for joining me today! I hope you’ve been inspired to document all of your Father’s Day moments using our May 2021 kit and add-ons!
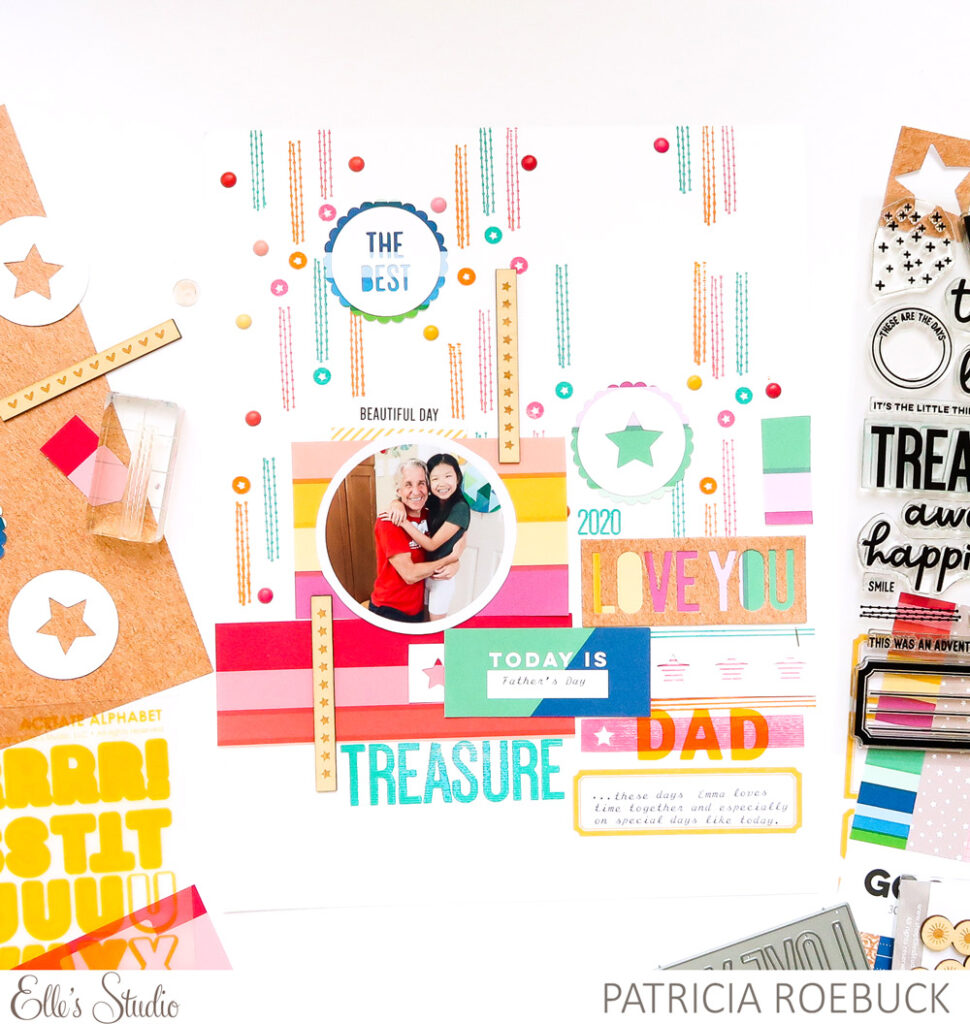
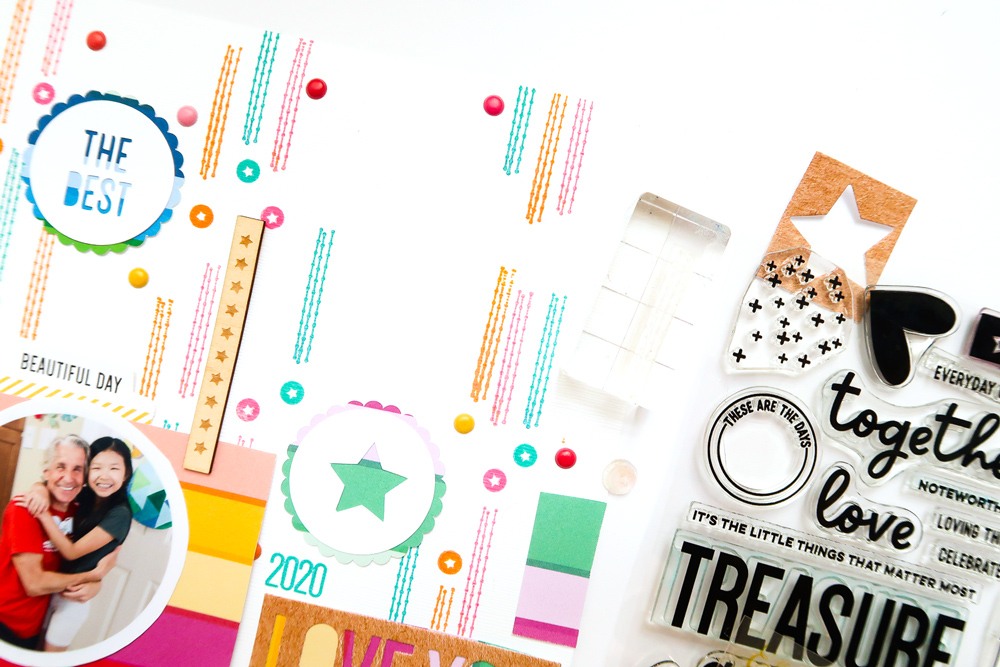
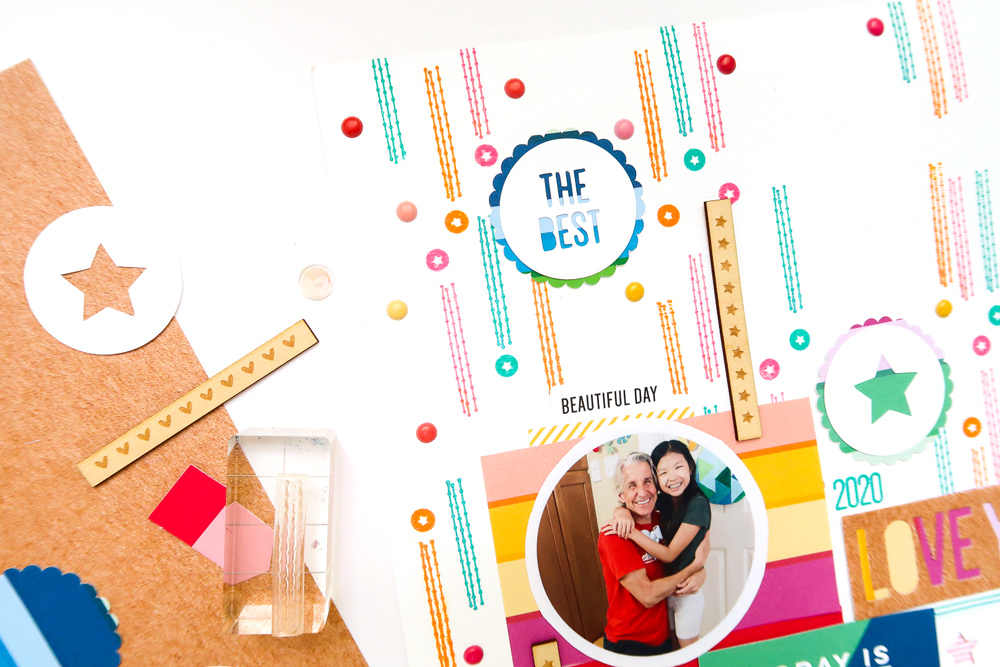
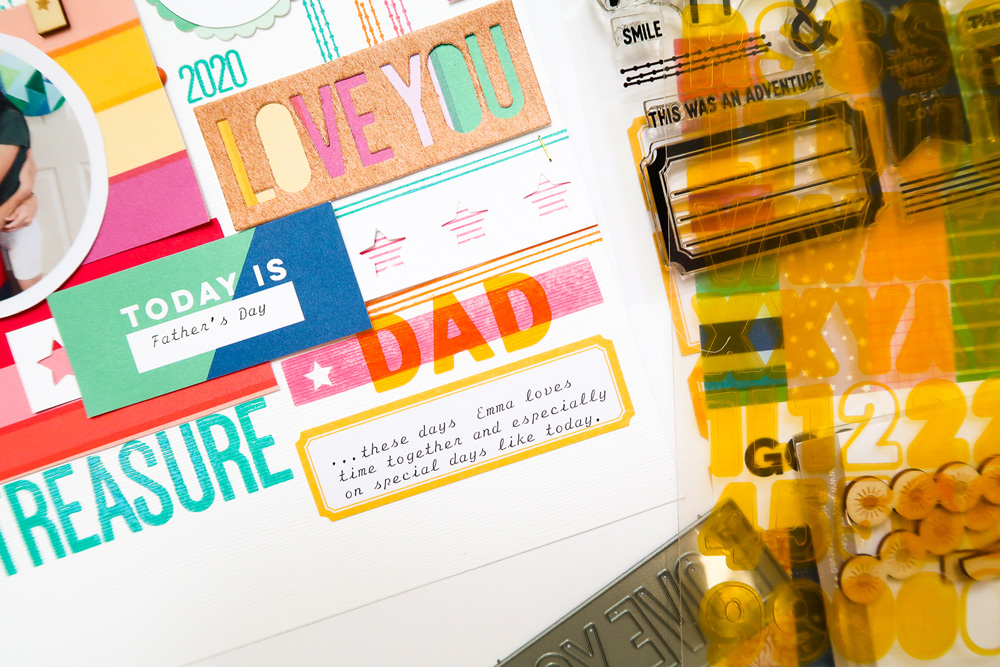
Hello Elle’s Studio friends, it’s Patricia with you! Today is all about Father’s Day here on the blog, and I will walk you through how I created an 8.5 x 11 inch layout using the May 2021 kit and add-ons as well as the new, exclusive From Sketch to Finish Vol. 6 Stamp!
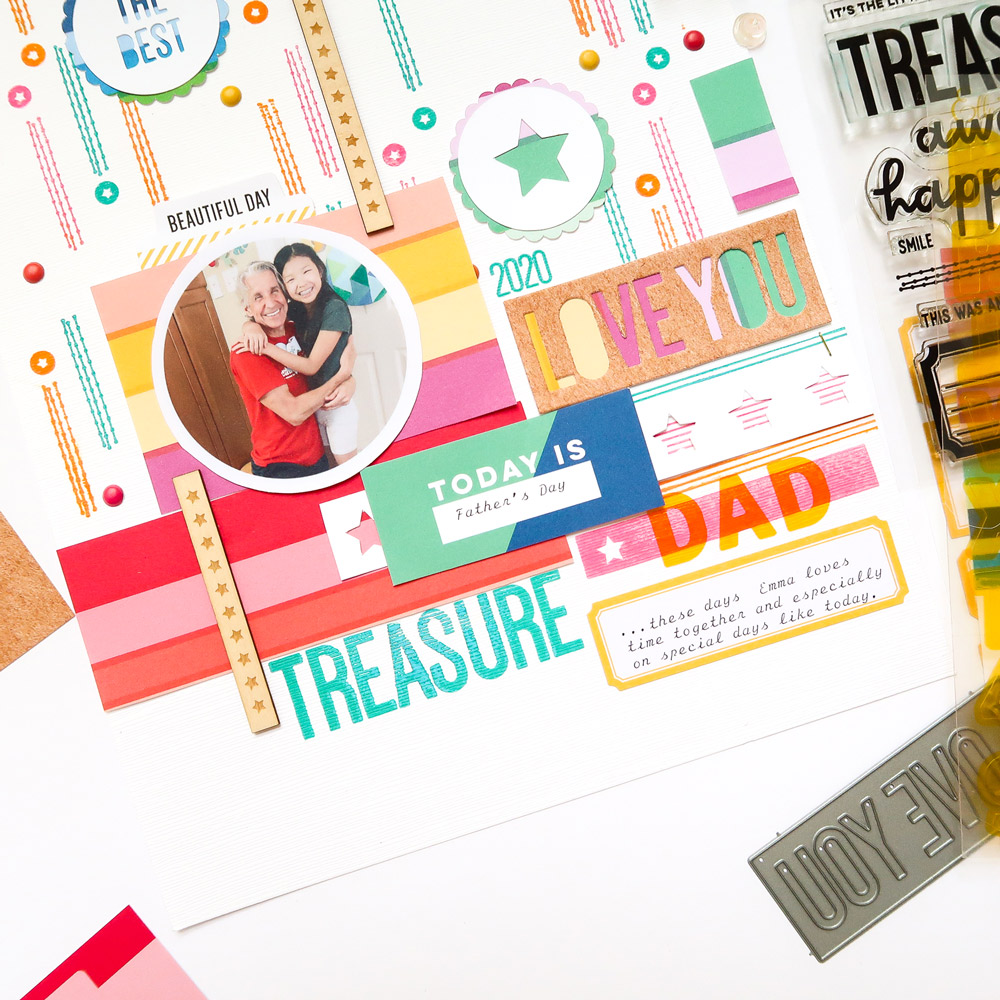
With this being all about Dad, I was inspired to use the scalloped circles from the May 2021 Cut Files that feature ‘the best’ and a star in the center. That inspiration led me to create a circle photo using Photoshop Elements and the cookie cutter tool. I placed the circles and photo on the page, creating a triangle, and then I started stamping using the From Sketch to Finish Vol 6 Stamp and three different colors to create a festive background at the top.
I stamped the stitched lines vertically and then used the small star circle to finish my festive background. To continue with this look and feel, I also added dots from the Tiny Shapes and Dots Puffy Stickers.
To break up the vertical design of my festive confetti look at the top, I added horizontal lines using the large lines image from the From Sketch to Finish Vol 6 Stamp in the same three ink colors. Next, I layered the start border cut file over these stamped lines. To create more horizontal lines, I use various sizes of the Good Times Paper Stack striped patterned paper, creating a blocked effect under part of the cut out stars, photo, the ‘Love You’ Knockout Words Metal Die, and a piece by itself on the right. This same pattern paper was used as the scalloped cut out circles to create more color while keeping it simple.
The last few details are a trimmed May 2021 Kit tag with ‘Father’s Day’ typed on to it, and the star Wood Veneer Borders placed vertically.
Use the May 2021 Cut Files to create the start of your next layout, and see where it takes you! Have fun creating those special pages about Dad!
Show us how you are documenting the special guys in your life using our products! Post in our Elle’s Studio Facebook Group or on Instagram using the hashtag #EllesStudio!
Comments Off on Treasuring Dad with Patricia Roebuck | Share This
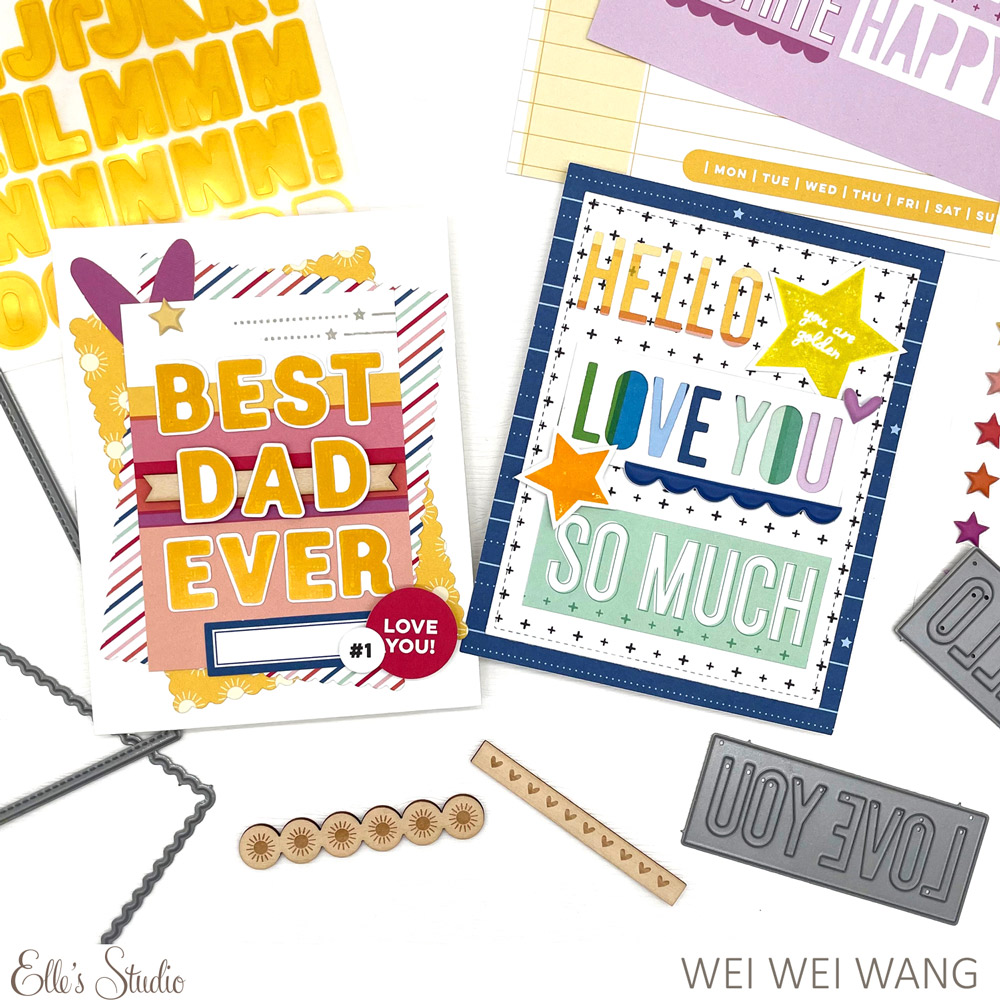
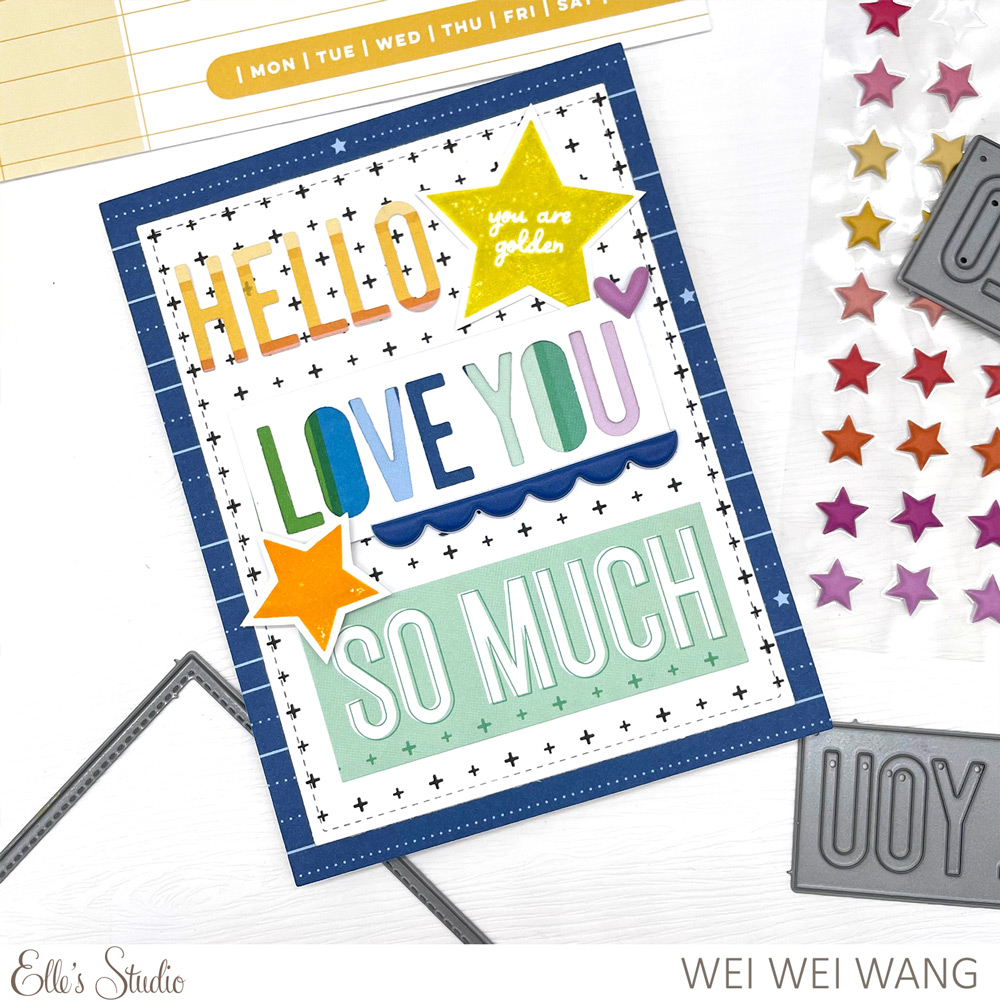
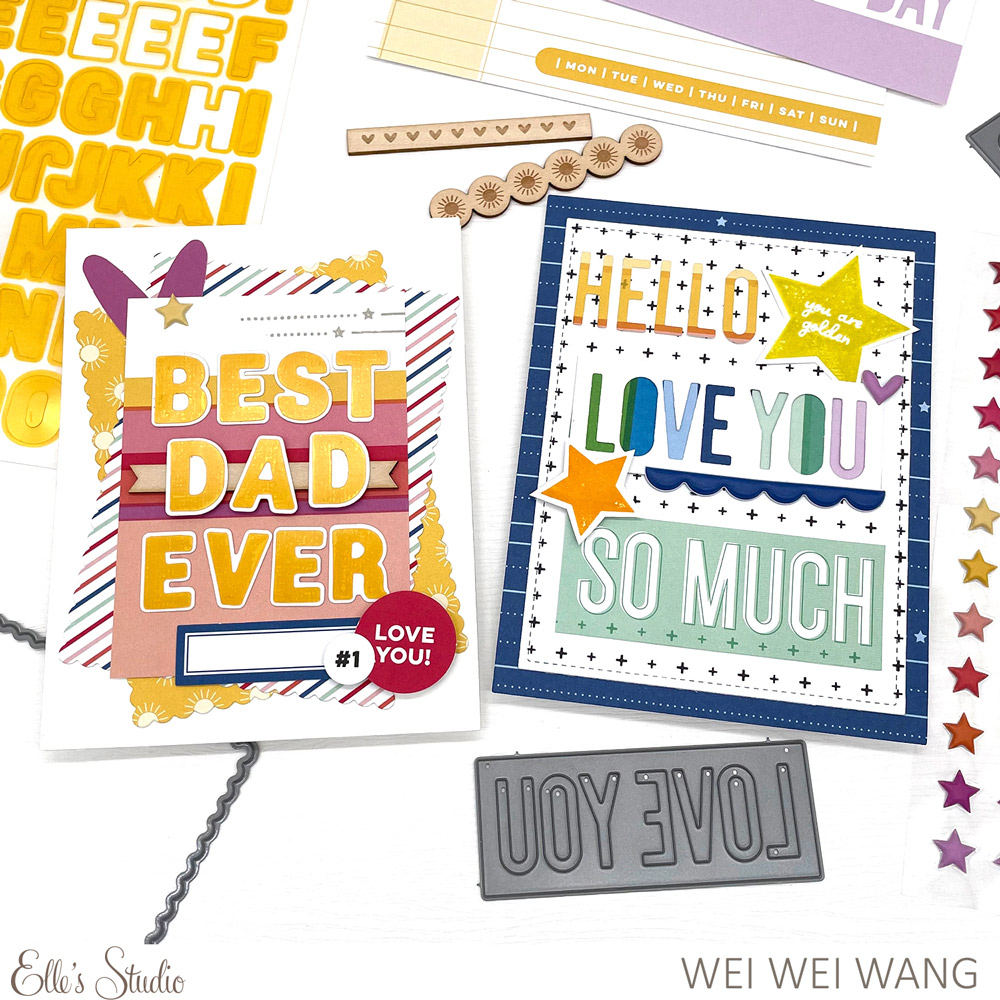
Hello Elle’s Studio friends! It’s Wei Wei here to share two Father’s Day cards created with the May 2021 kit and add-ons. I know that there are some Mother’s Day theme tags in the May kit, but I hope to inspire you to take some time to create a couple of cards for the fathers and grandfathers in your life.
For the first card, I showcased an assortment of die cuts. First, I chose blue patterned paper from the Good Times Paper Stack as my card base. I also used Layered Card Metal Die to cut a piece of cross patterned paper just smaller than the card base.
On the top layer, I added two stars from the From From Sketch to Finish Vol. 6 Stamp. I really really love that solid star with the “you are golden” phrase in the middle.
On the second card, I chose one tag from the May Kit as my background. The title was built with Yellow Parker Acetate Alphabet Stickers. Because the tag is colorful and the acetate alphabet is transparent, I backed the stickers with white die cuts, cut from the Parker Alphabet Metal Die, to make my tile stand out. I added the Wood Veneer Border under the word “Dad” to help it stand out.
To finish off, I layered two pieces of patterned papers from the Good Times Paper Stack behind the card front.
Thanks for stopping by! I am excited to see what cards you create using the May 2021 kit and add-ons in the shop!
Show us what you’re crafting for Dad using our products! Share your layouts, cards and more in our Elle’s Studio Facebook Group, or on Instagram using the hashtag #EllesStudio!
Comments Off on Fantastic Father’s Day Cards with Wei Wei Wang | Share This
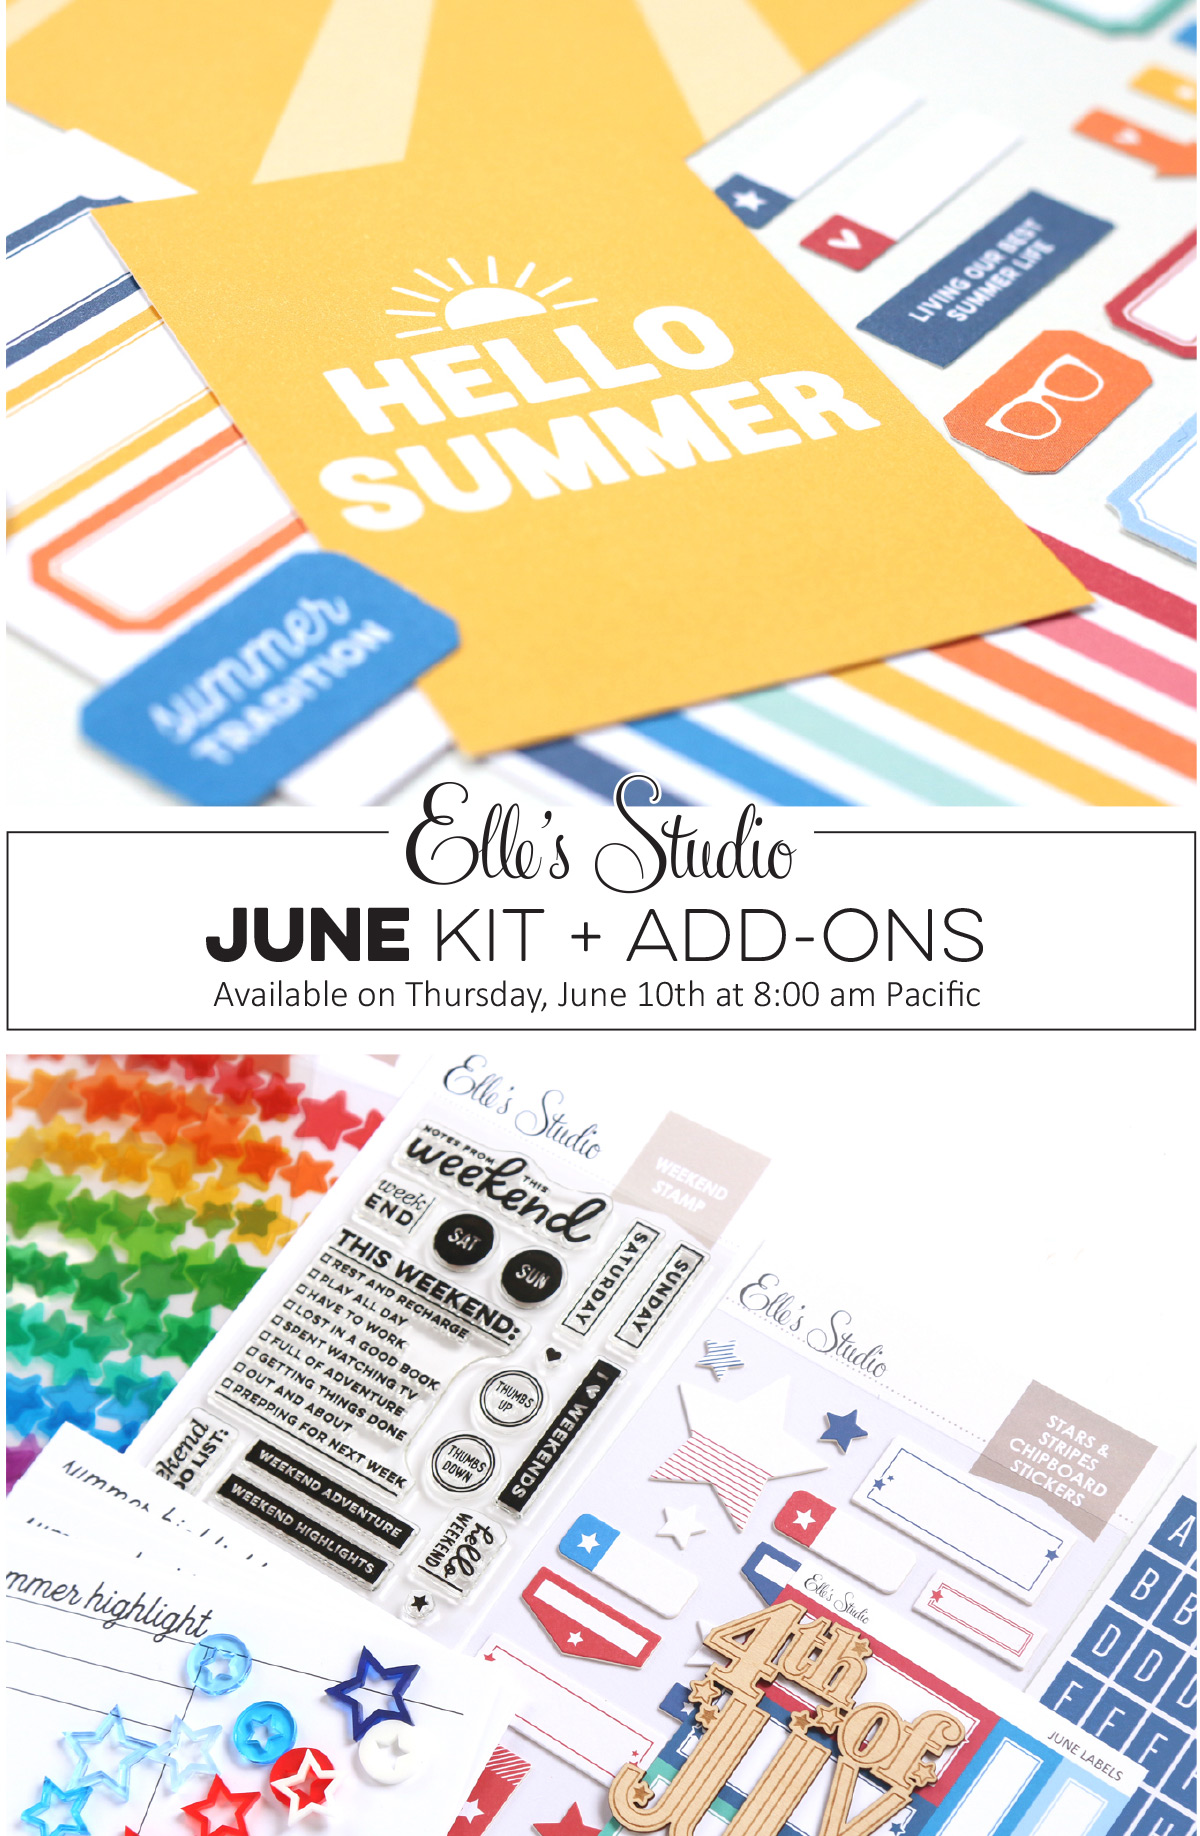
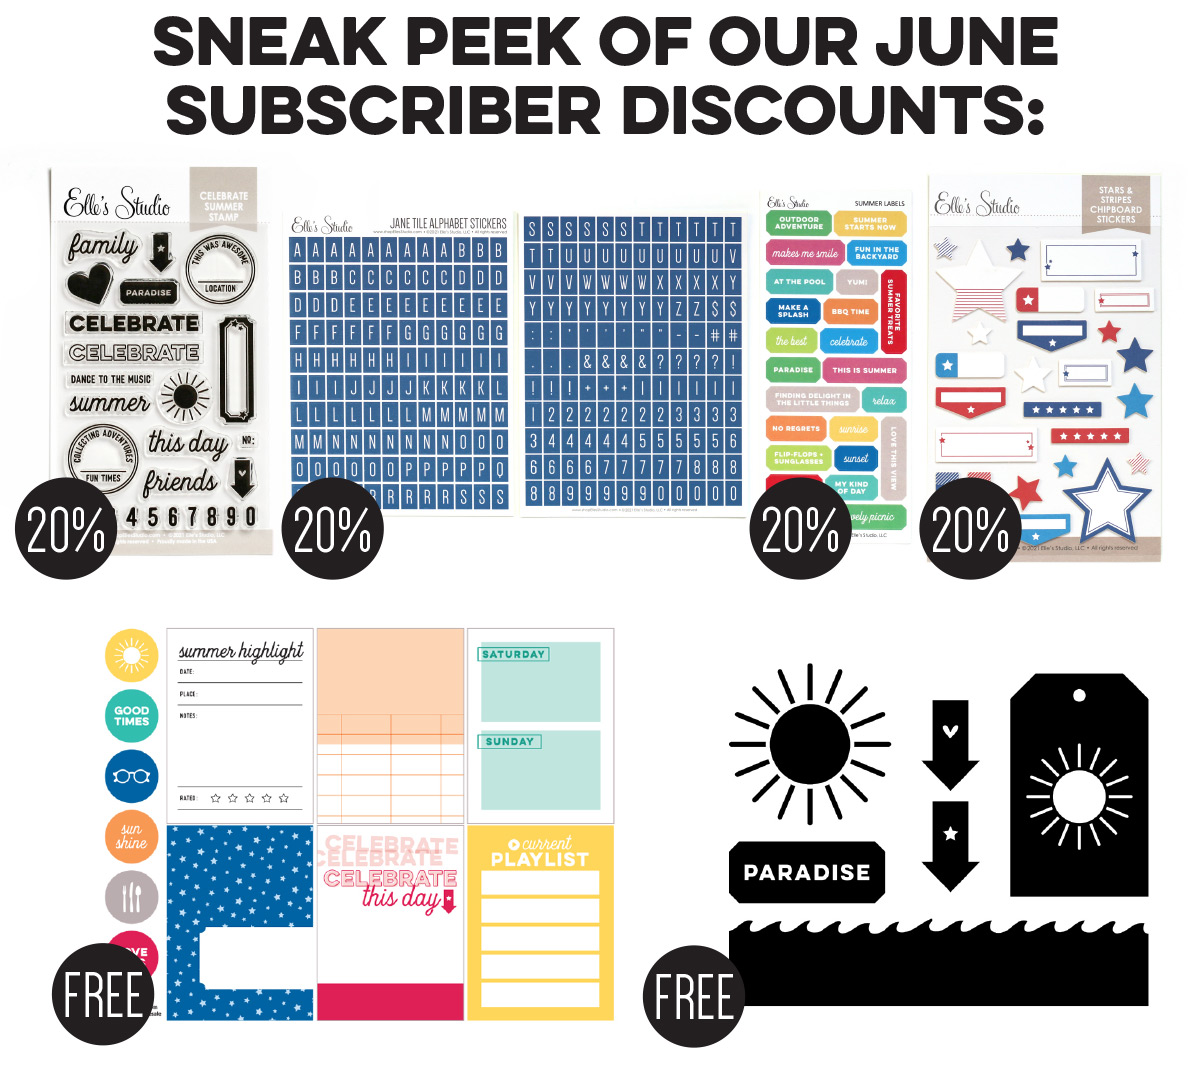
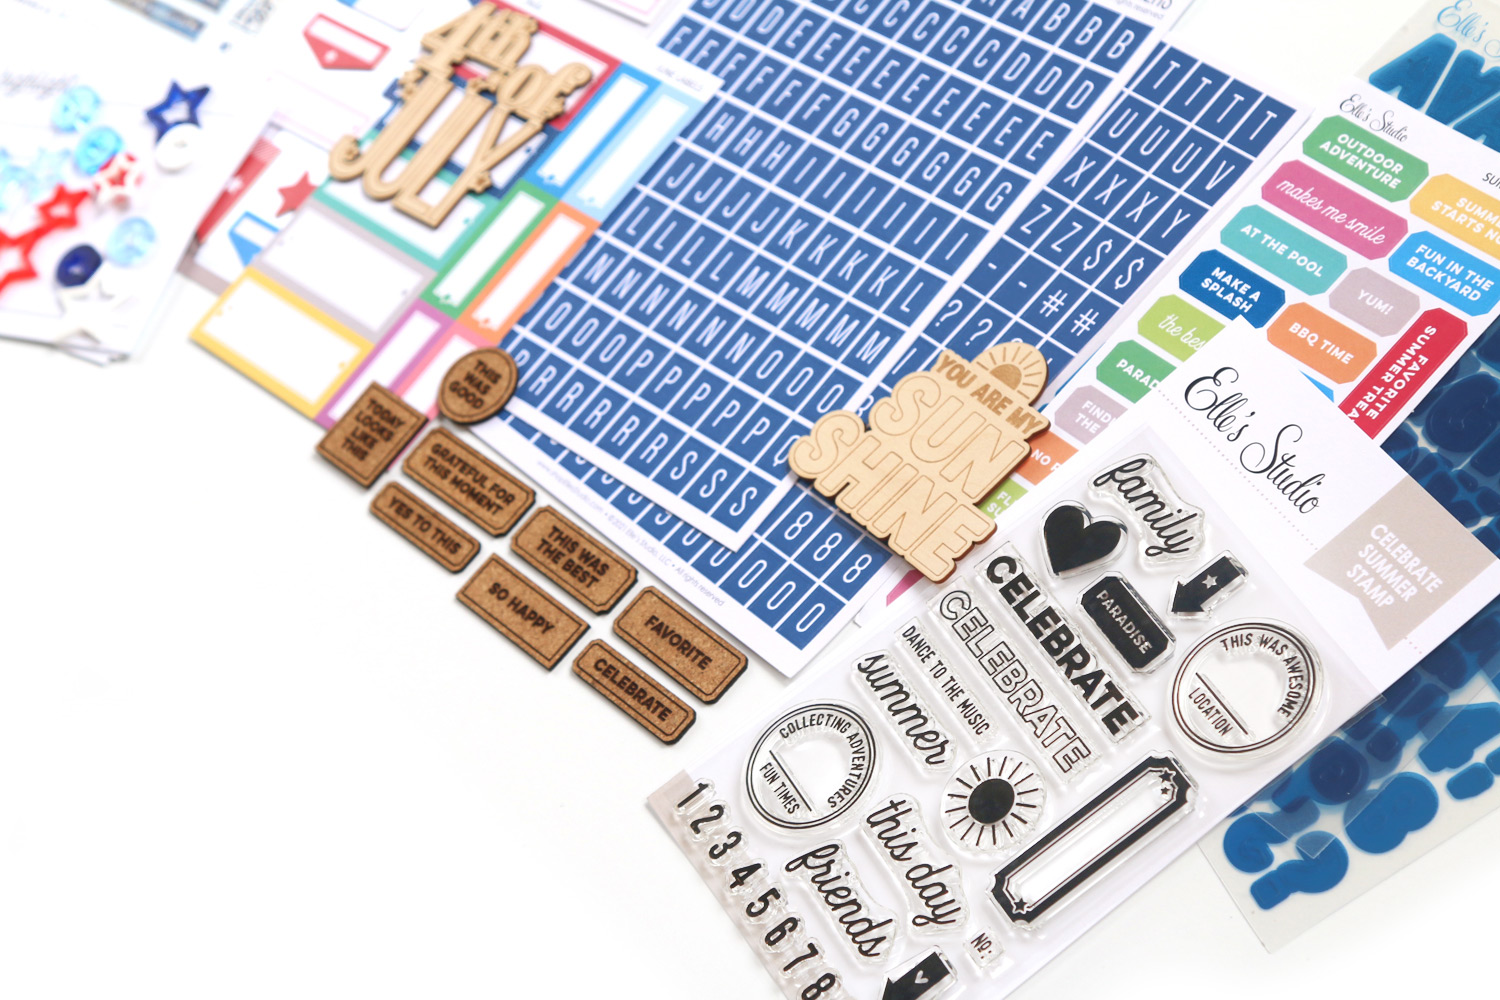
Our June kit + coordinating add-ons reveal is almost here and we can’t wait to share with you all the new and exclusive products that will be available soon! Our reveal will be full of the perfect products to document your June stories and take you right into the month of July! This month, our June kit will include 3 – 4 x 6 inch tags, 18 – 3 x 4 inch tags, and 27 die cuts!
Not a subscriber? You can pre-order our June kit now and lock in our $9.99 kit price by starting a subscription today! You’ll want to choose our SUBSCRIBE & SAVE option to get signed up and start your subscription with our June kit. We will then hold your kit and you’ll be ready to bundle and save at our June 10th reveal! Details on how to bundle with your subscription order will be emailed to you once you have purchased this product.
Kit subscribers, don’t forget! Along with being able to bundle any products from our shop that will ship for FREE with your kit during our 24-hour bundling period, starting on the 10th at 8:00 am Pacific each month, our subscribers will also have access to special discounts on select items! These discounted items can be found in our SALE section during our 24-hour bundling period, and you must be logged into your kit subscriber account to see them. Quick note: Our kits and add-ons are available without a subscription each month, too.
We are so excited to share all of these new products with you and see how you use them on your projects! Make sure you set your alarm and mark your calendar for Thursday, June 10th at 8:00 am Pacific! We hope to see you there!
Comments Off on A sneak peek of our June 10th reveal! | Share This
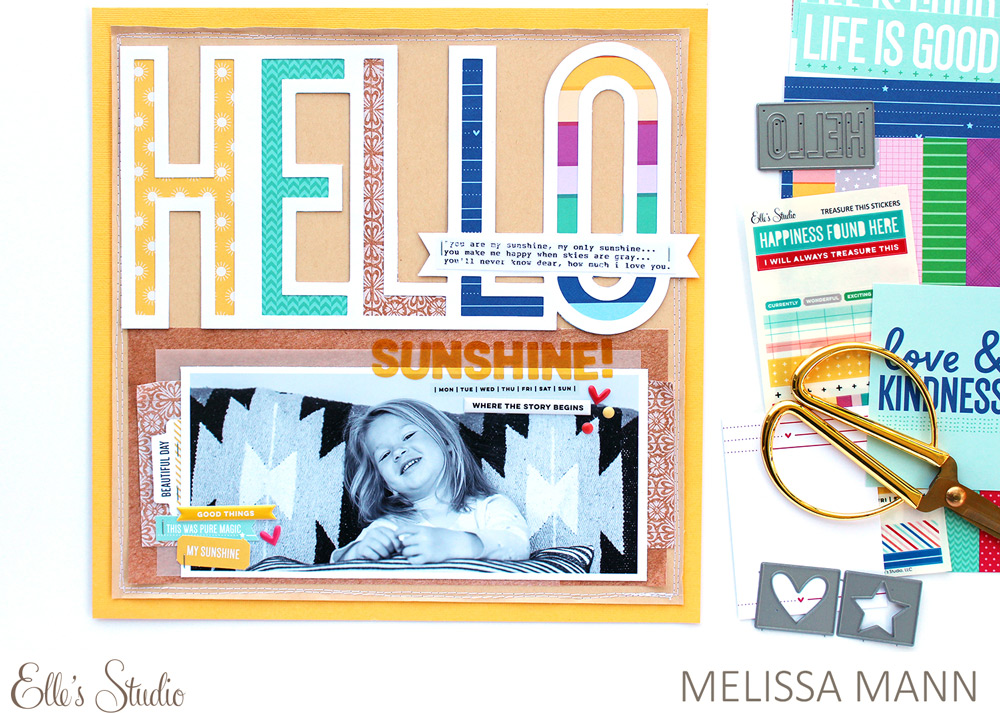
Now that our newest sketch class, From Sketch to Finish Vol. 6, has been released, we’re sharing how our design team has been inspired by it over the next few weeks! Today, we’re kicking this fun new blog feature off with TWO of our team members, Nicole Kerr and Melissa Mann, who are sharing different takes on sketch 9 from the class! Let’s take a look at what they created!
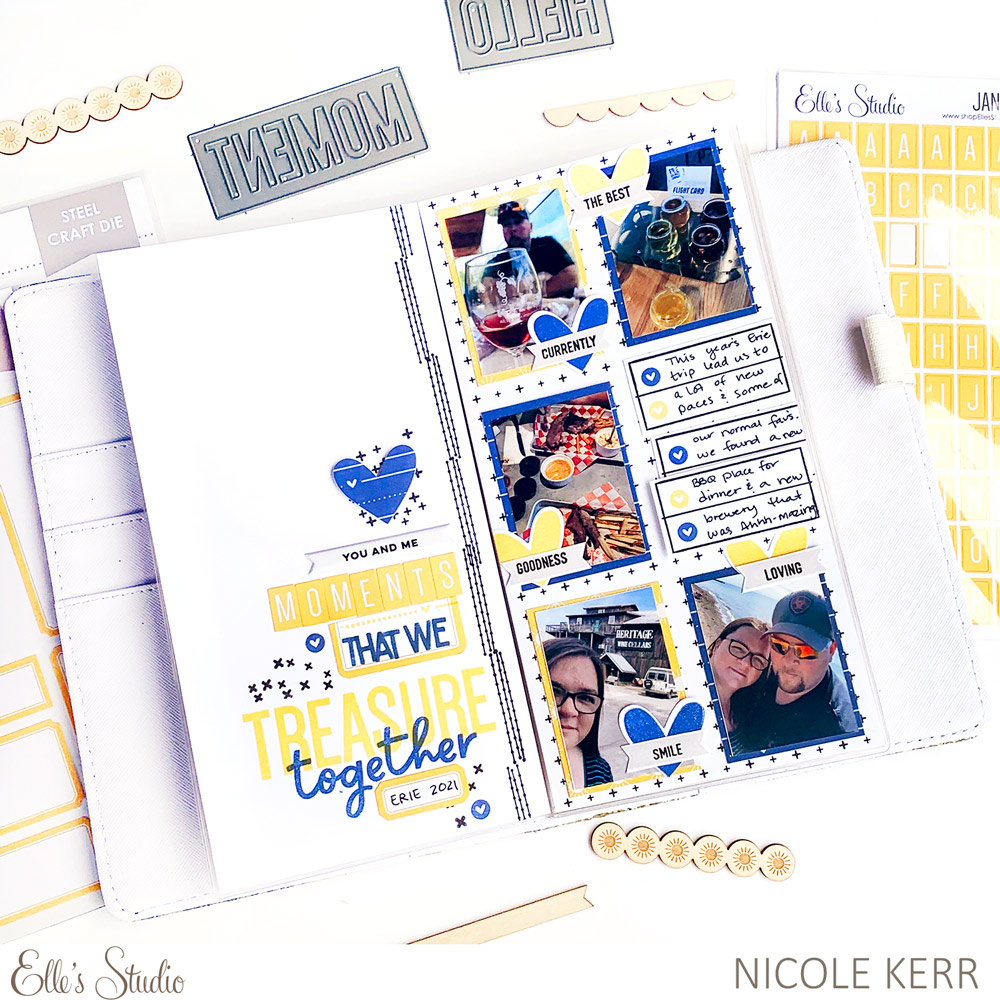
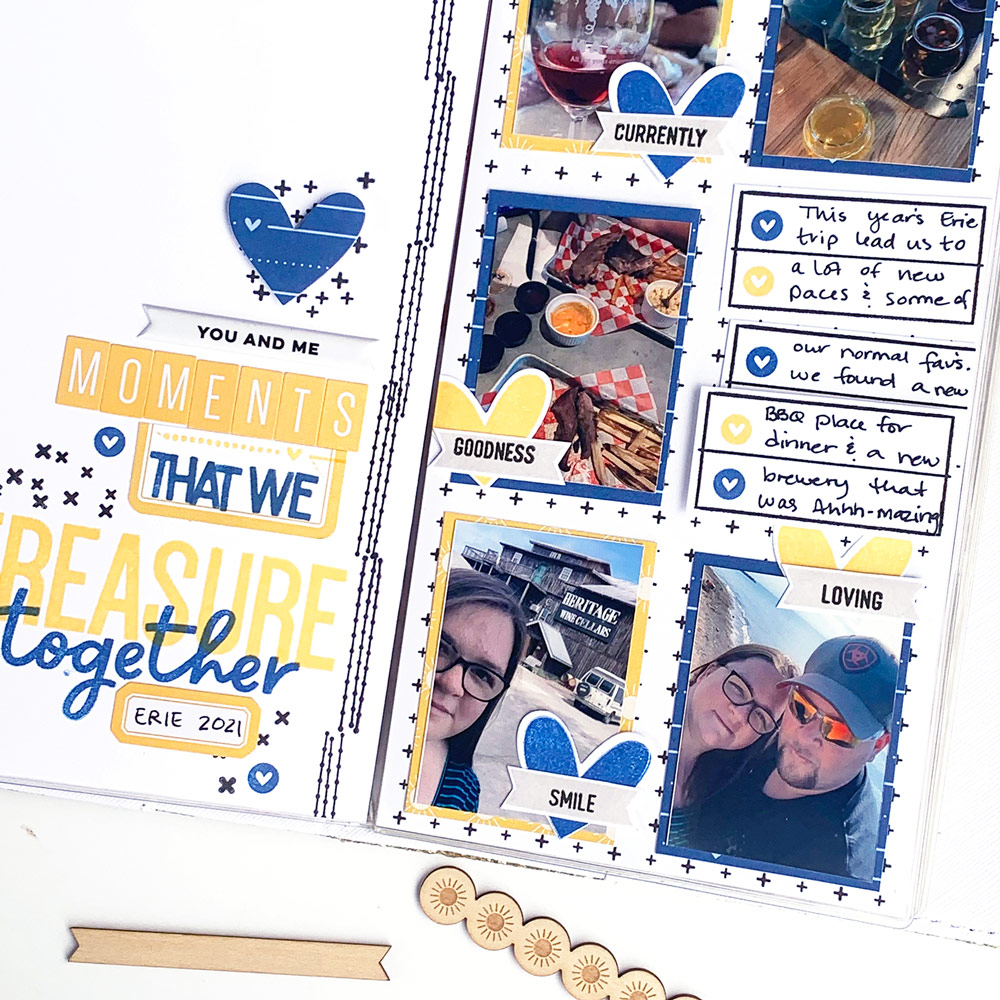
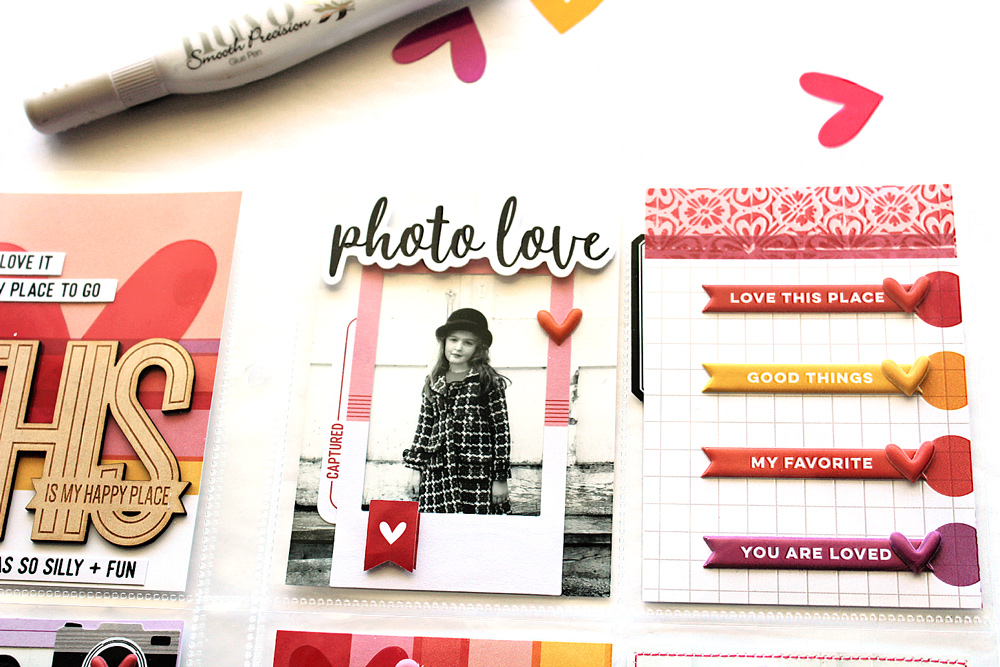
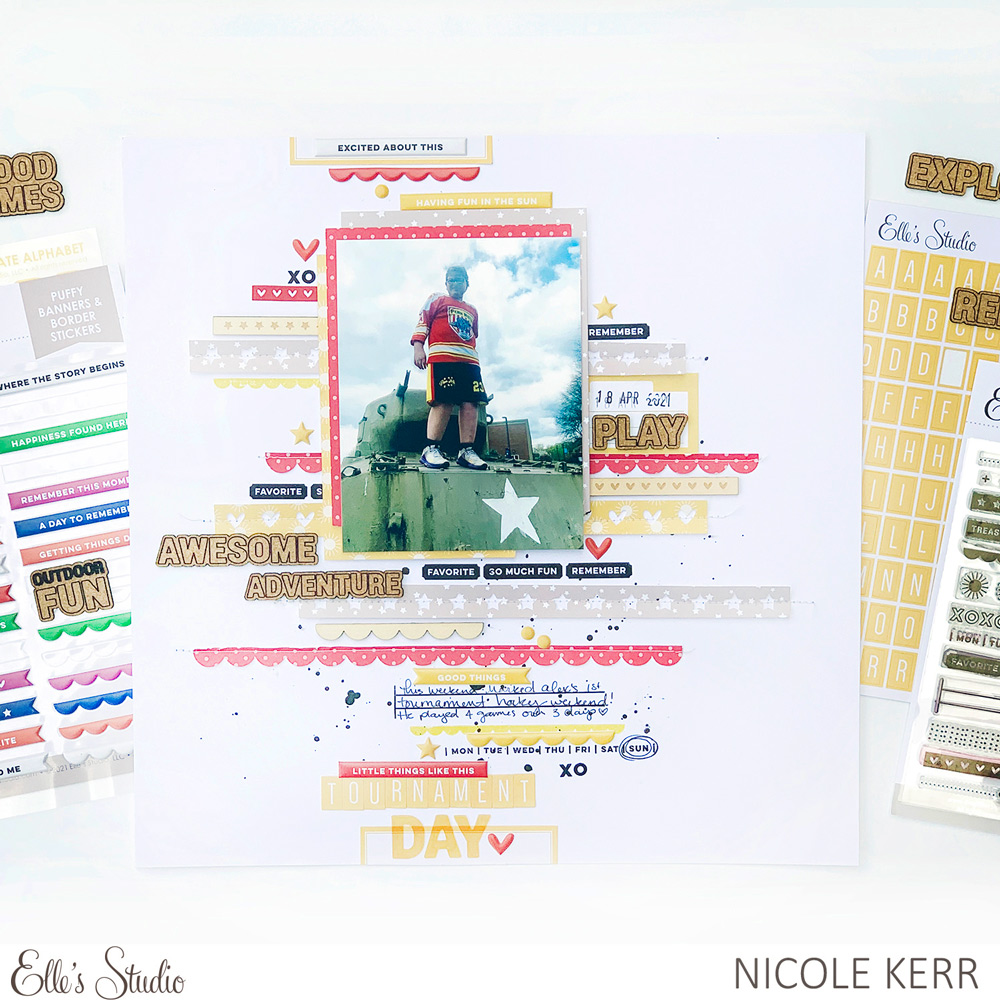
Hello everyone! It’s Nicole here and today I’m super excited to be sharing a project using sketch 9 from From Sketch to Finish Vol. 6. These sketches are so good and this is definitely one of my favs! I absolutely love working with sketches and I love how versatile they can be to not only give a jumping off point for layouts, but also travelers notebook pages. For this sketch, I transformed it to use on a TN layout as opposed to a scrapbook page as originally intended:
When I look at this sketch, I see three main components. First, the large title that is right aligned. Second, I see two vertical lines of stamping. Lastly, the square photo spots. When I laid out my notebook pages, I made sure that these three elements were prominent.
The title was easy to carryover on the left side of the spread, accenting that right alignment with vertical stamping. The right side of my spread I used for the square photos and a journaling spot. Because a TN is smaller than a traditional layout, I used the numbered spaces provided in the sketch for my journaling, which I added using the From Sketch to Finish Vol. 6 Stamp. Instead of using the stars with numbers to tie the two areas together, I kept the same theme with hearts, but used descriptive words on the banners that described the photos that they were on. This sketch was easy to use in my traveler’s notebook, and I can’t wait to try out the others using this format, too!
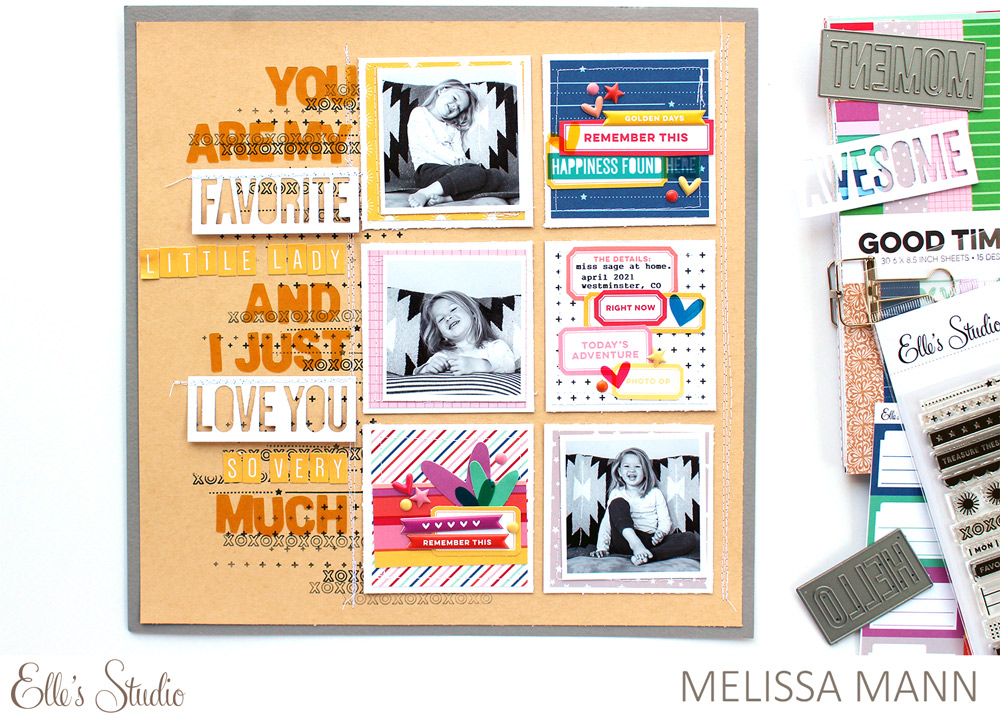
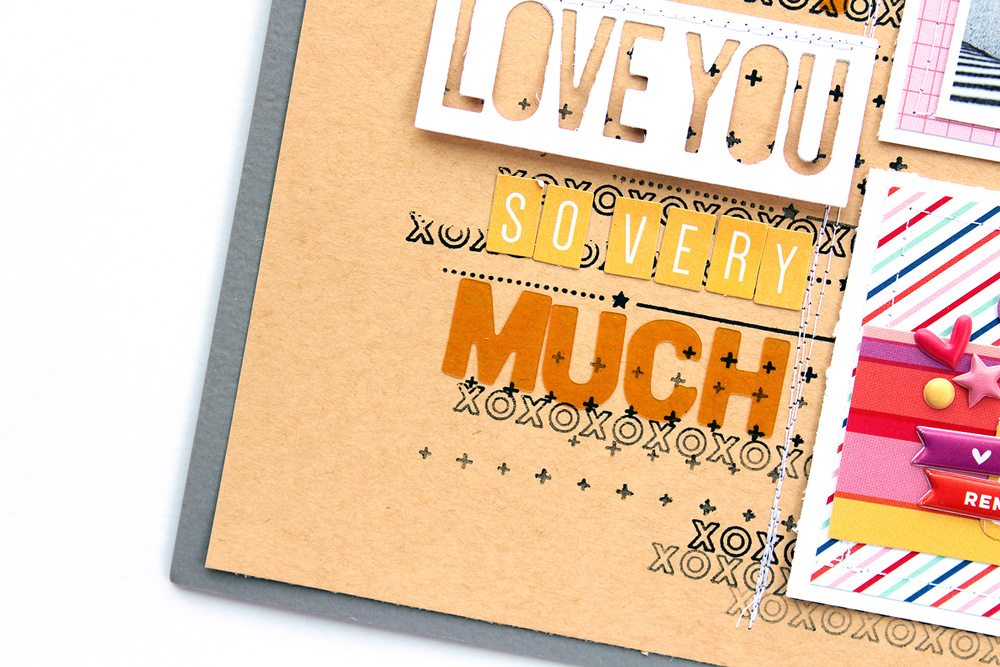
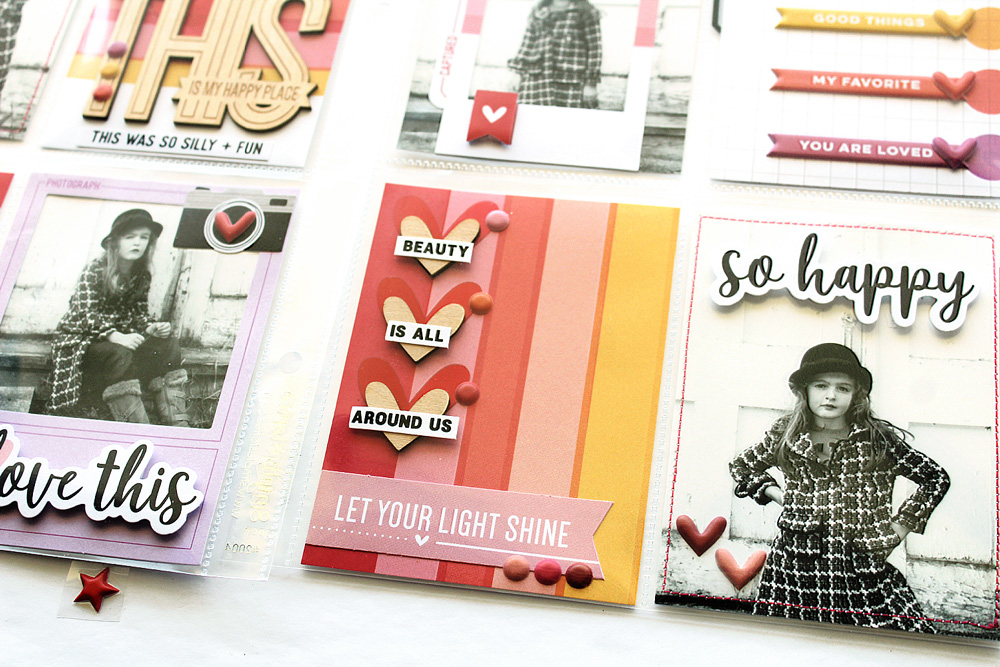
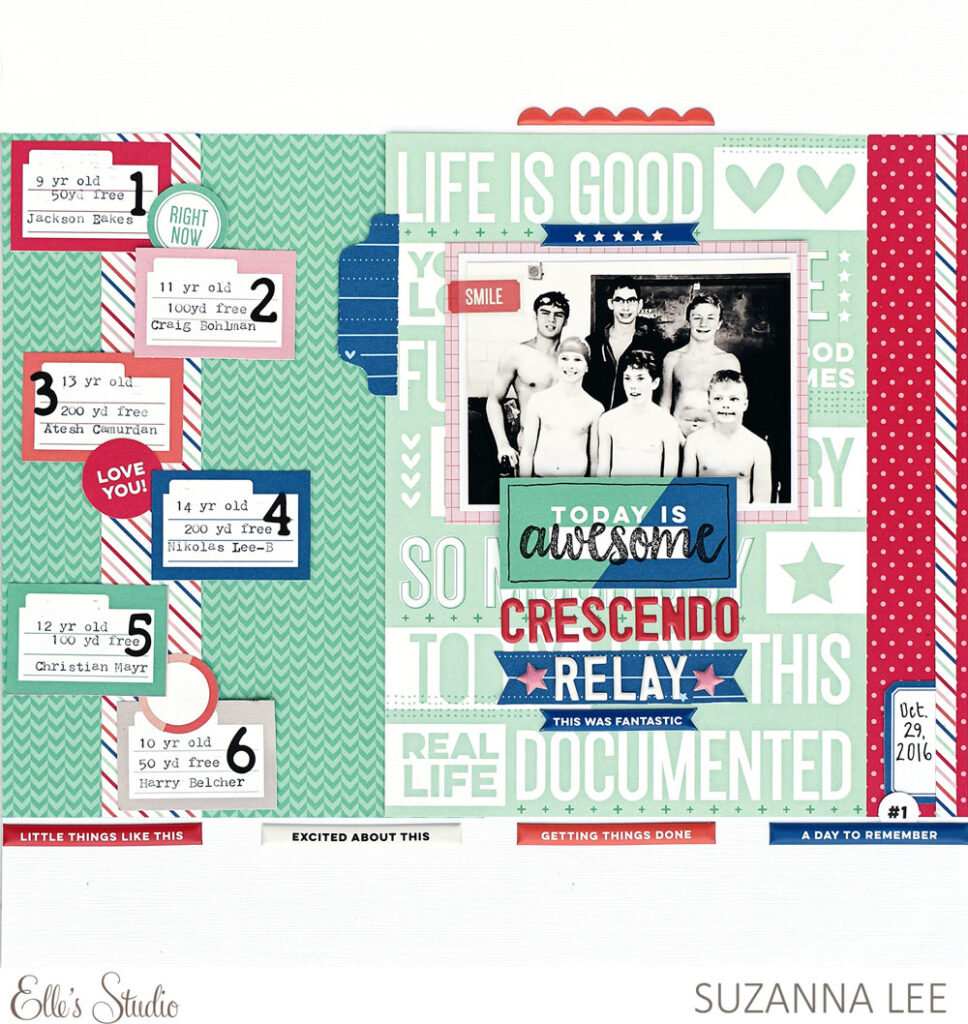
This is Melissa here with you today and I’m excited to be on the blog with Nicole to share our take on sketch 9 from From Sketch to Finish Vol. 6. As soon as I saw this sketch, I knew that it would be a great one to lift. I loved the grid design and the long title!
I stamped some of the borders from the new Fun with Borders Stamp down the length of my layout. I knew I wanted to layer my title on top of the stamped borders. I created the grid of boxes to the right hand side using patterned paper from the Good Times Paper Stack.
Once I had all the boxes layered down, I placed my photos and various embellishments such as the Yellow Cardstock Label Stickers, Puffy Banners and Border Stickers, and Acetate Heart Stickers. Once I had all of this adhered down, I worked on my title to the left of my grid. I used various alphabet stickers and the new Knockout Words Metal Die to create my title. It was so much fun using all of the different fonts and different sized stickers to create this lengthy title! We can’t wait to see what you have created using the new From Sketch to Finish Vol. 6 class! Thanks for joining us today!
We can’t wait to see what YOU create! Share how any of our new sketches in the class inspire you to create by posting your project in our Elle’s Studio Facebook Group or by posting on Instagram using the hashtag #EllesStudio!
Comments Off on From Sketch to Finish Inspired with Nicole Kerr and Melissa Mann | Share This
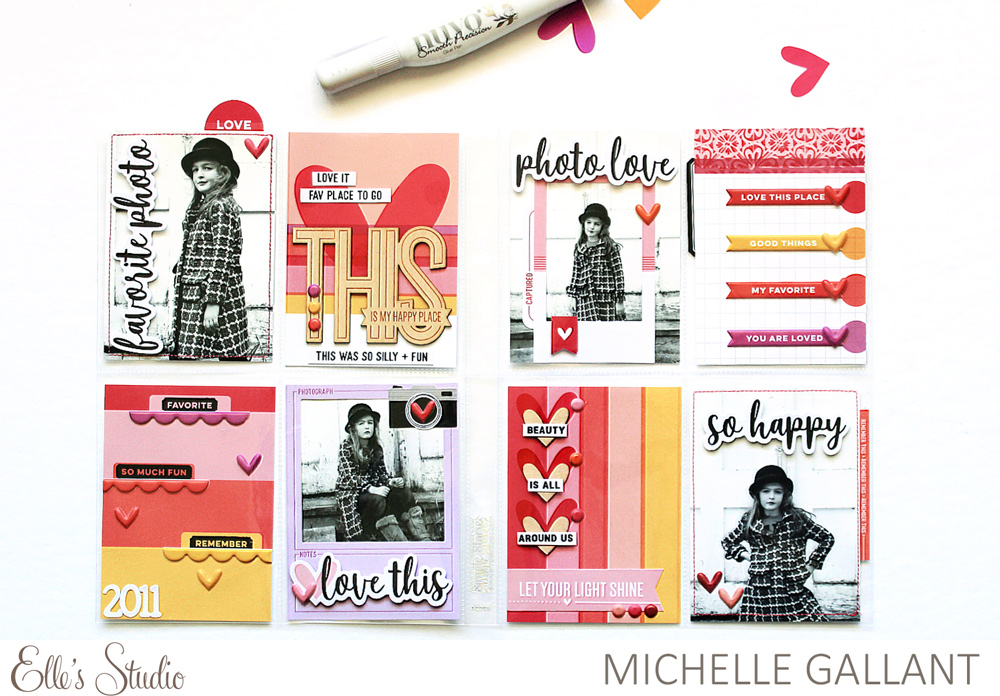
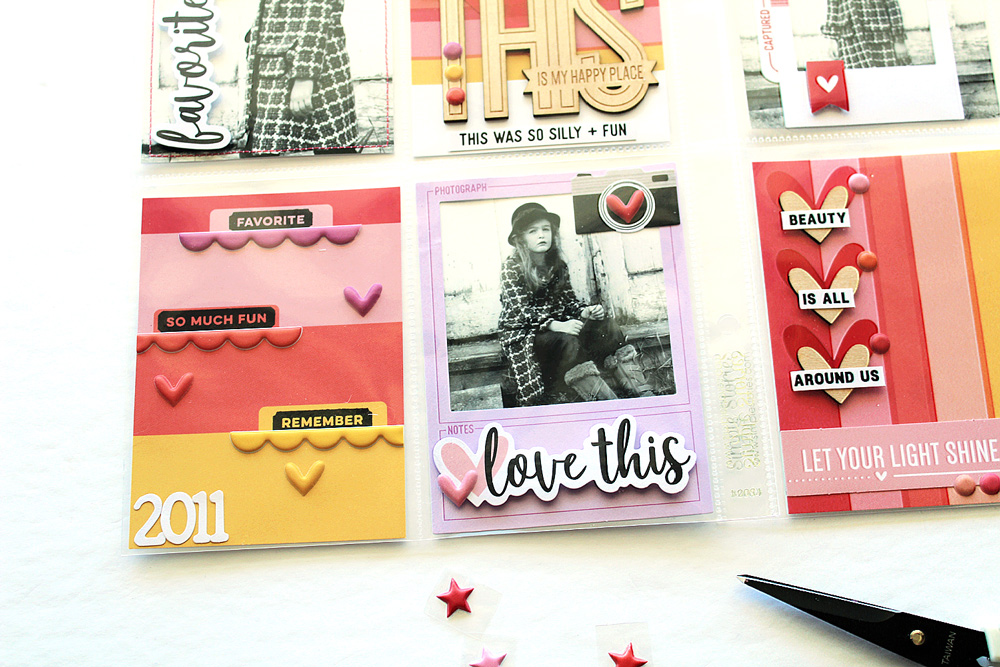
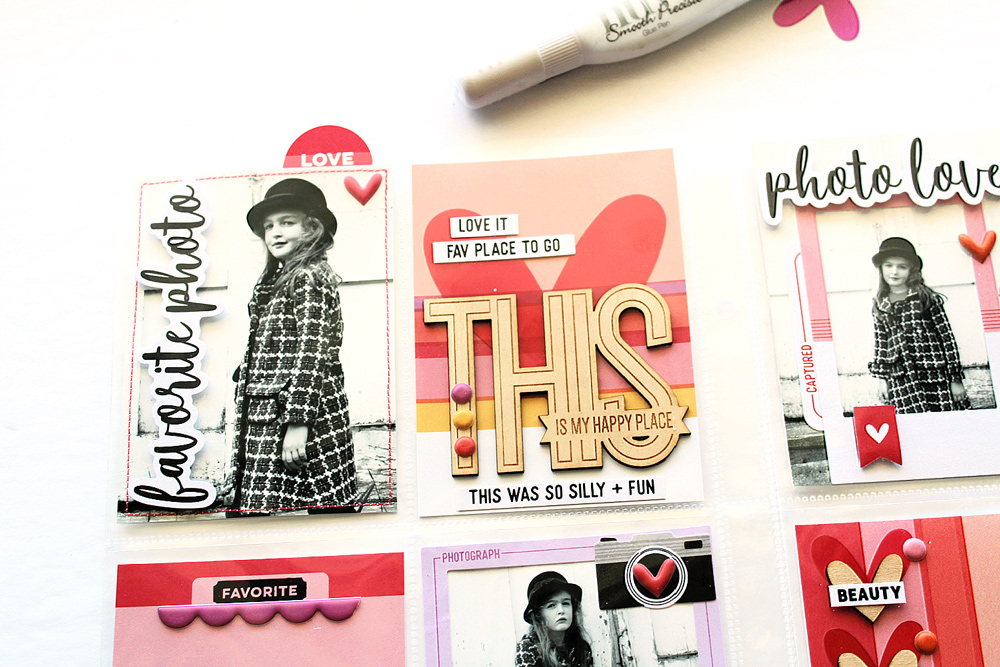
Hey everyone, it’s Michelle Gallant, and I’m happy to be here again today with another guest post! While I created a layout for my first post, I decided to make a pocket page spread this time. I have to admit, pocket pages are not something I have a lot of experience with—I’m usually a layout girl, but I had so much fun creating this new project:
I very often like to work in color themes. Earlier this month I used blues and greens, this time I decided to use pink, yellow and orange. The building in my photos was teal so I printed my photos in black and white. Problem solved!
My daughter has always been such a good sport when it came to taking photos of her. She is always up for anything. I’m pretty lucky right? Look at this pose!
I think word stickers are my all time favorite embellishment. I use them on all my projects and the banners from the Puffy Banners and Border Stickers were perfect to go along with this tag from the May 2021 Kit.
Thanks for stopping by, and I hope I’ve inspired you to create using your May 2021 kit and add-ons in pockets!
Hi everyone! my name is Michelle Gallant and I live in New Brunswick, Canada with my two teenagers and two cats. I started scrapbooking when my kids were little because I had so many photos of them. Little did I know that it would turn into a passion that’s still going strong 15 years later! I don’t have a specific style, it tends to change with my mood. But I do love to use cut files and add lots of bits and pieces to my projects.
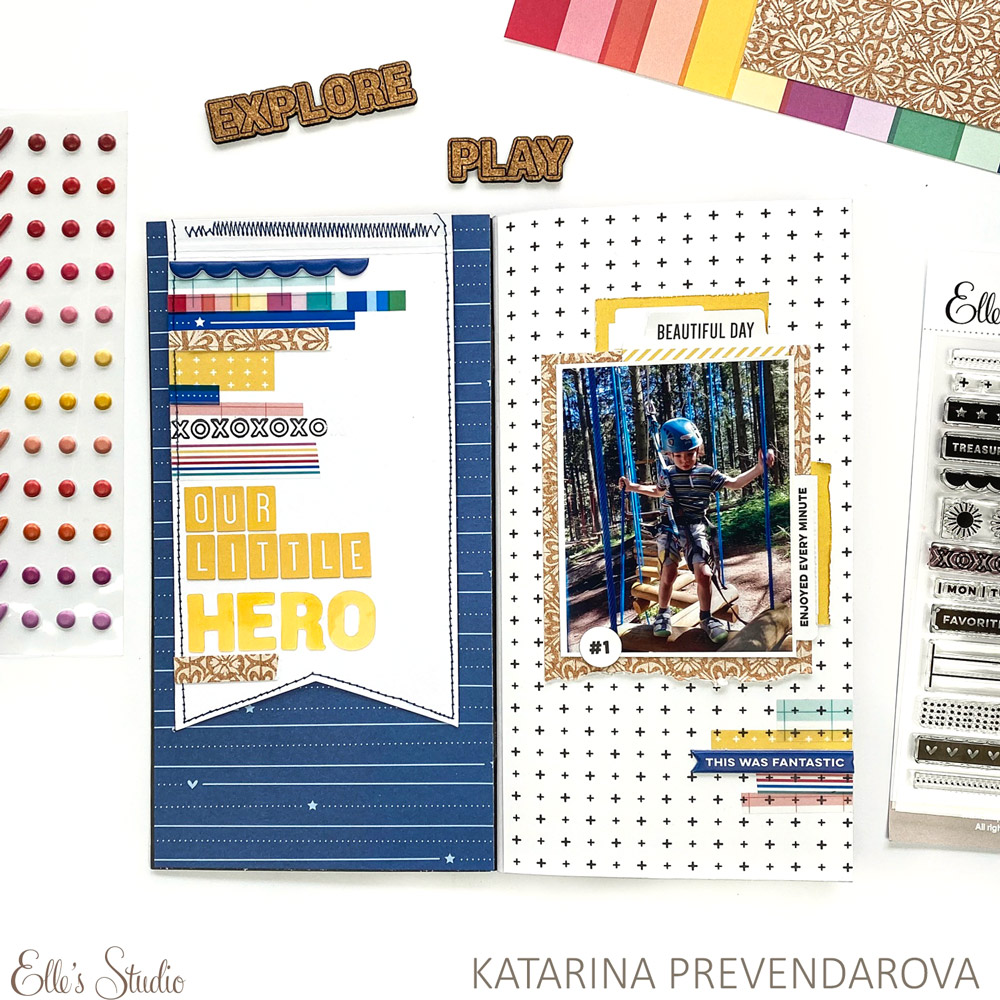
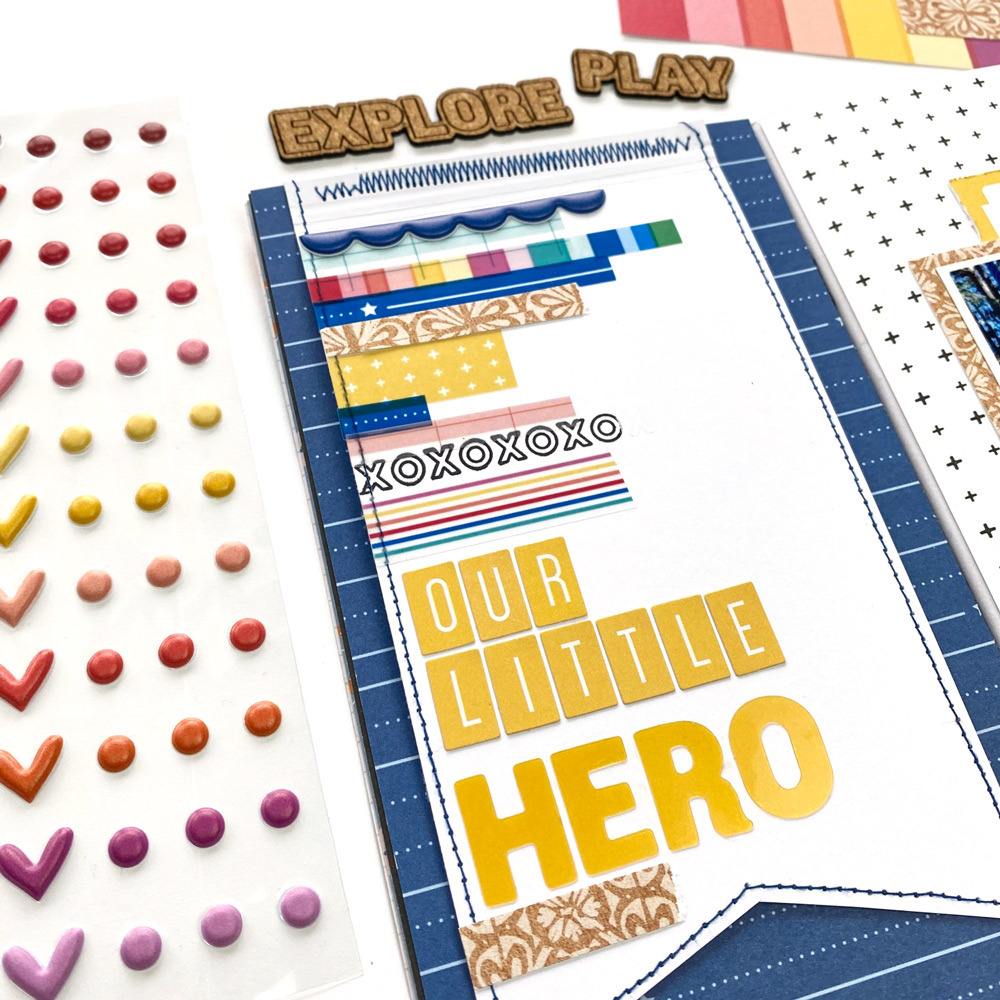
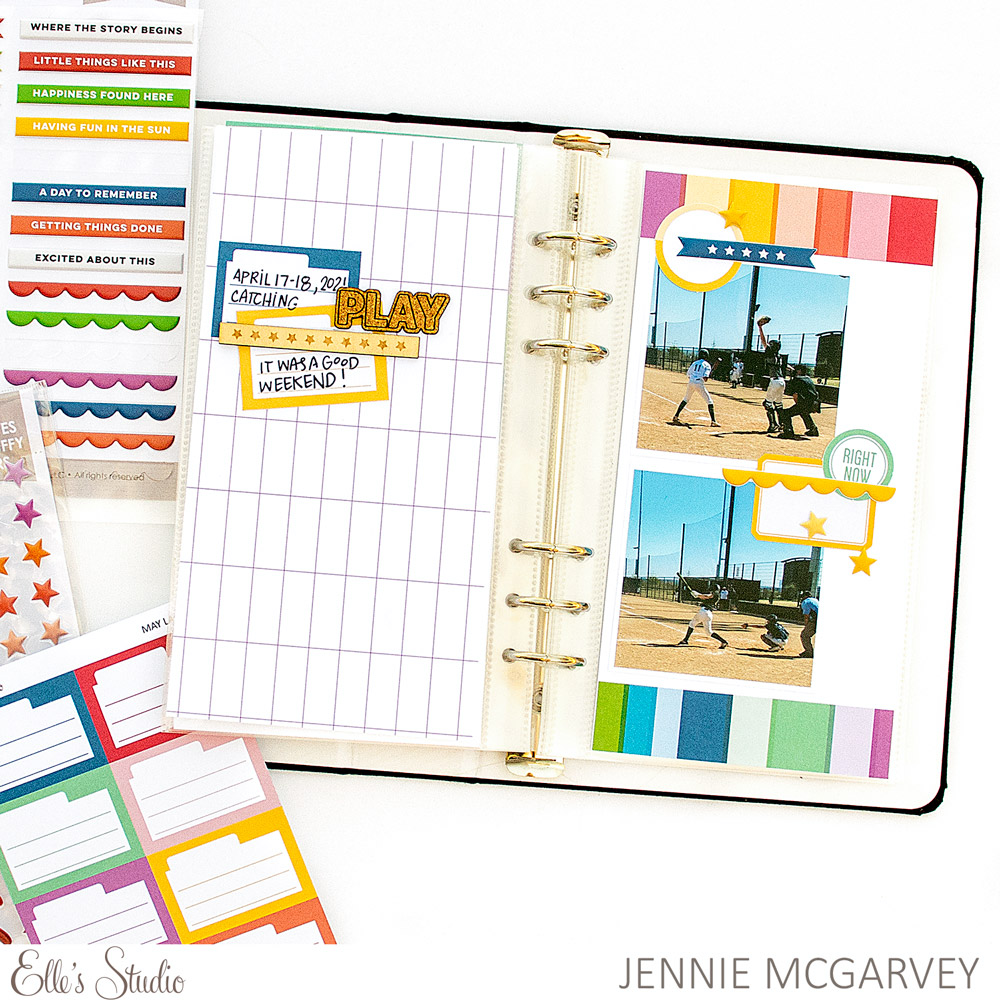
Hi, friends! It’s Katarina again with a little bit of inspiration created from the gorgeous May 2021 kit and add-ons. This time I focused on the oh-so-fun Treasure This Vellum Stickers. I created a traveler’s notebook spread—let’s have a look!
I started off by selecting two patterned papers from the new Good Times Paper Stack for my background. Next, I cut a big banner using a piece of white cardstock and machine stitched around it with a navy thread, plus I zig-zag stitched it to the blue background paper to create a flap.
I chose a perfect journaling tag from the May Kit, distressed its edges and placed it behind my banner flap. I added some more detail to it using the amazing From Sketch To Finish Vol. 6 Stamp.
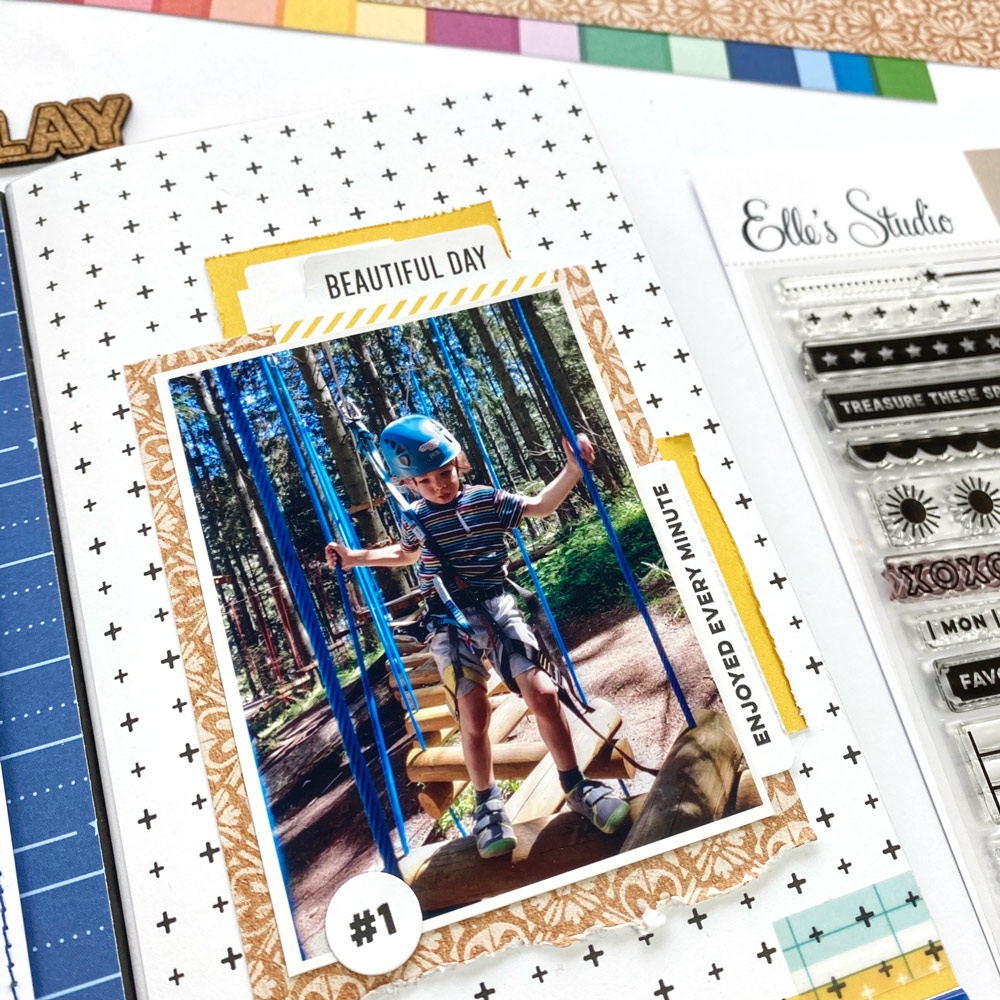
I backed the photo of our little climber with the beautiful floral patterned paper from the Good Times Paper Stack and added a couple of die cuts from the May Kit.
The most fun part was playing with the Treasure This Vellum Stickers. I created a cascade of these stickers on the left edge of my banner and also on the other side of my spread to balance everything out. To me, these stickers look the best when more of them are used together! They can be layered, combined with other textures such as stamping, puffy stickers or patterned papers as in my case. I added the “xoxo” banner stamp from the Fun with Borders Stamp, blue scalloped border and banner from the Puffy Banners and Border Stickers. I also added two stripes of the patterned paper that I used behind my photo, again, to allign the two sides of my spread.
I cut a yellow May Label in half and used it behind the two die cuts near my photo. It helped balance out the yellow heavy left side and also it made the die cuts stand out better. My final step was to add a circle banner behind my journaling tag and stamp “in one word” with the From Sketch To Finish Vol. 6 Stamp, just because the adventure I was documenting was “in one word: awesome”!
I really loved playing with the May products, especially with the Treasure This Vellum Stickers. Check out this process video on my YouTube channel if you’d like to watch me creating this fun interactive spread:
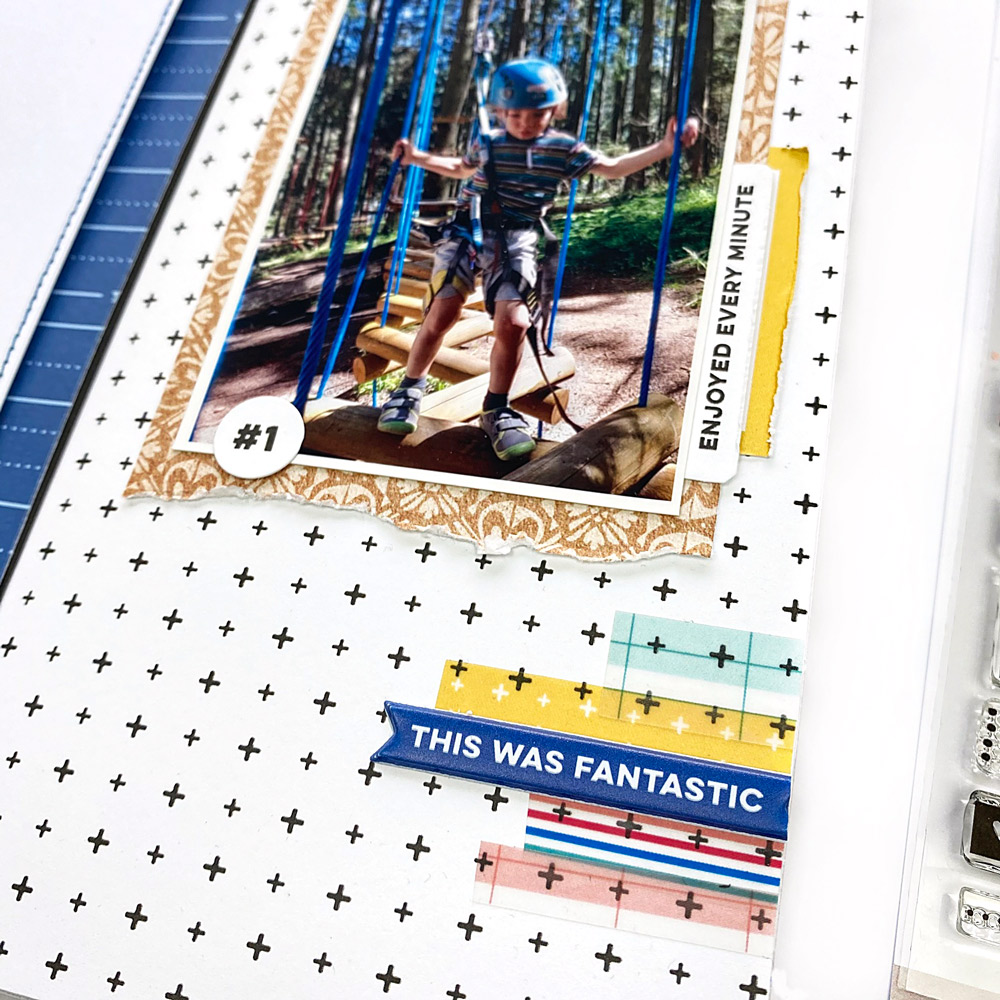
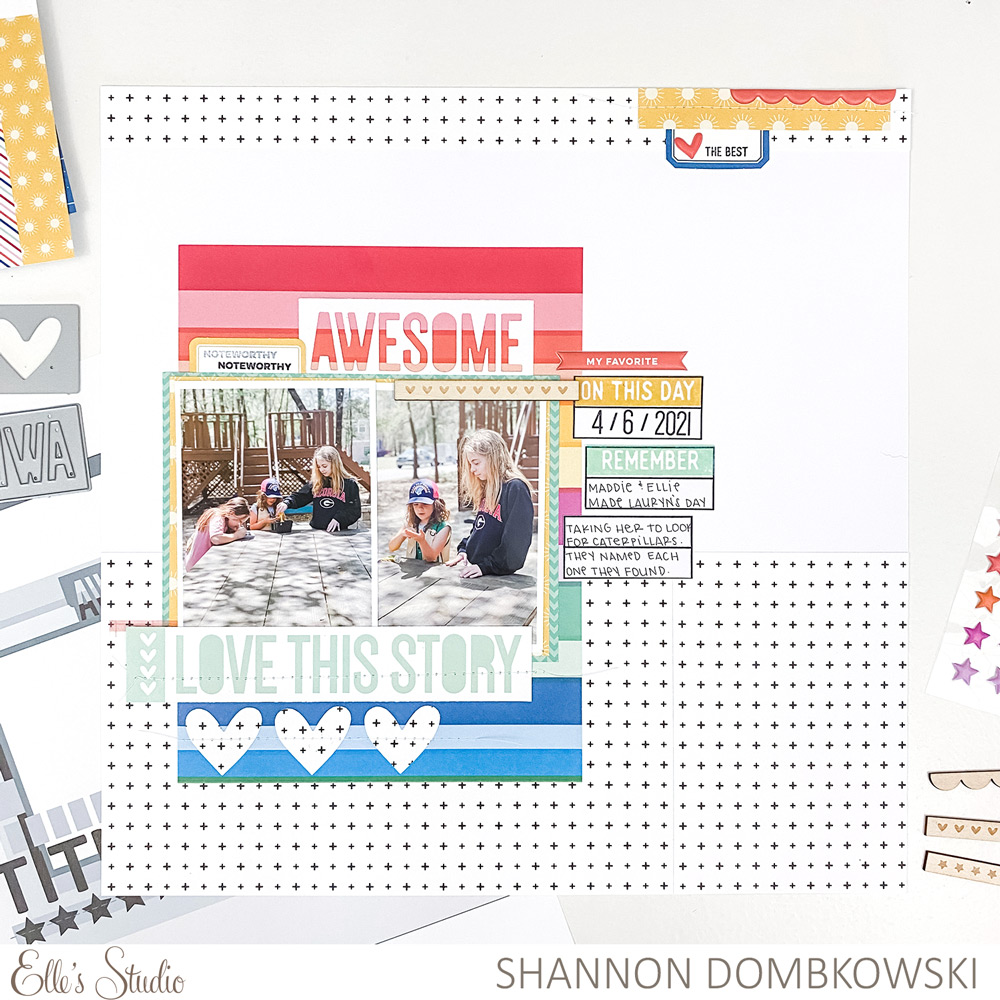
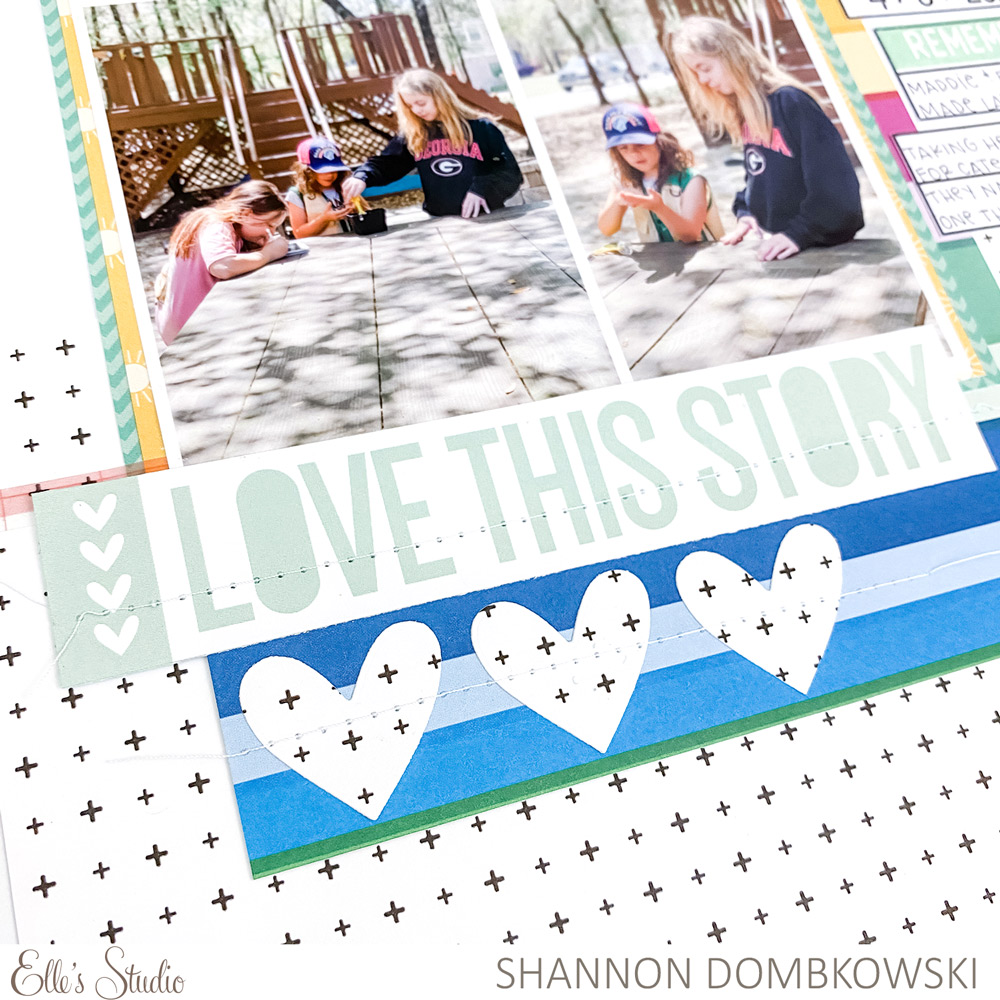
Hello friends! It’s Shannon here with a page that was inspired by the brand new From Sketch to Finish Vol. 6 Digital Class, just released yesterday in the shop! This class is packed with fantastic sketches to get you started on your pages and the contributors for this class have provided some fantastic samples to jumpstart your creativity. Be sure to add this to your toolbox—you won’t be disappointed!
I absolutely love starting with a sketch. It takes so much guess work out of the process while still allowing me to be creative and add my own touches. Here’s my take on Sketch 7 using the May 2021 kit and add-ons:
Let’s start with the photos and the tile. The sketch has one horizontal photo, but I’m terrible at taking photos in landscape orientation! I decided to look for two vertical photos to use in that space instead. I kept the title in the same place as the sketch. Instead of using alpha stickers or die cuts, I opted to cut a strip of a piece of patterned paper from the Good Times Paper Stack to use as my title. Finally, I use the Knockout Words Metal Die to cut out hearts using the same patterned paper that I used for the background. I added a little stitching to finish off this portion of the page.
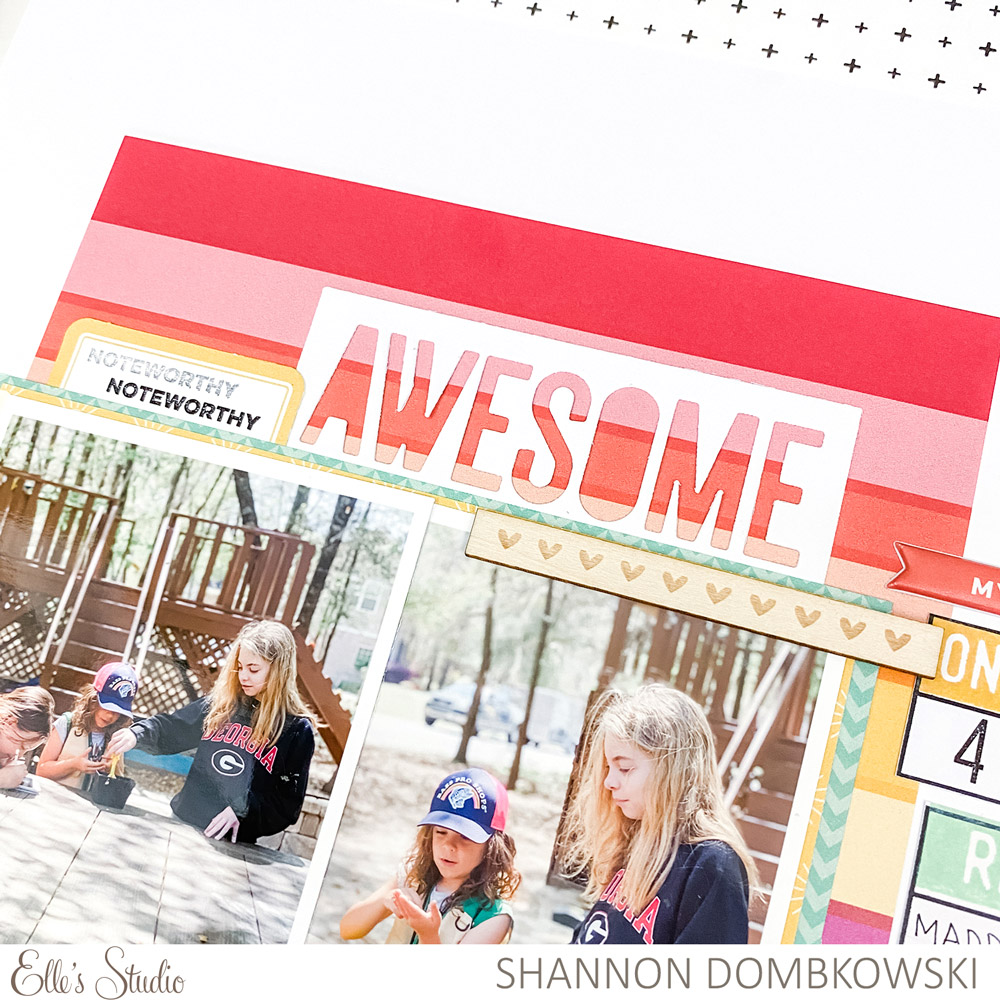
Next, I embellished the top of my photos. I stuck pretty close to the sketch here. I love striped paper behind bold cut out letters like this. I used the Knockout Words Metal Die with a scrap piece of the same white cardstock that I used for my background. You may notice that I’m using a lot of whites for my accents. That’s because I chose a bold, colorful patterned paper to use as the base behind my photos. I don’t want to overwhelm the page with too much color.
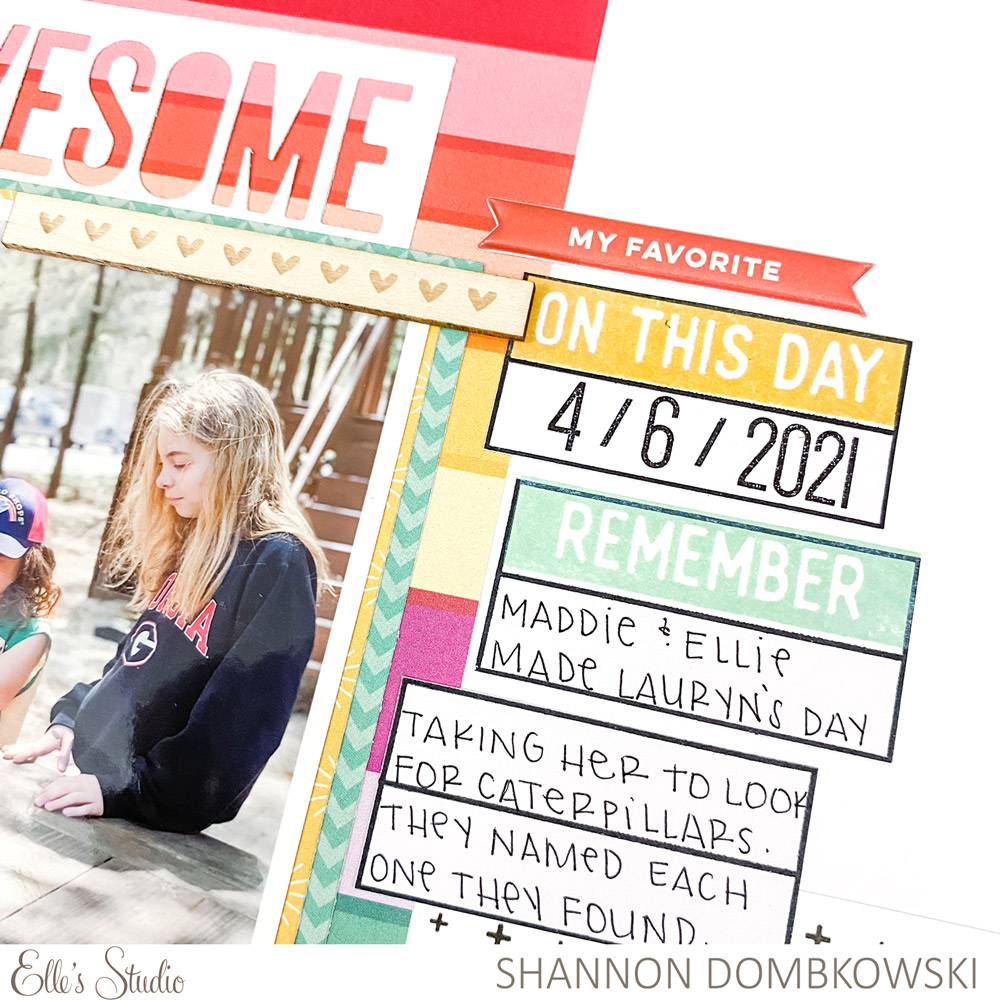
Now, let’s look at the journaling. These split rectangles in the From Sketch to Finish Vol. 6 Stamp are perfect for little bits of journaling! You could stamp them right on your background, but I was too nervous that I would mess up the whole page, so I opted to stamp them onto scrap paper instead. That way, I could also layer them over my patterned papers. The From Sketch to Finish Vol. 6 Stamp also has those great title rectangles that fit into the boxes. I picked out a couple of ink pads that match the colors on my page to make my journaling boxes stand out.
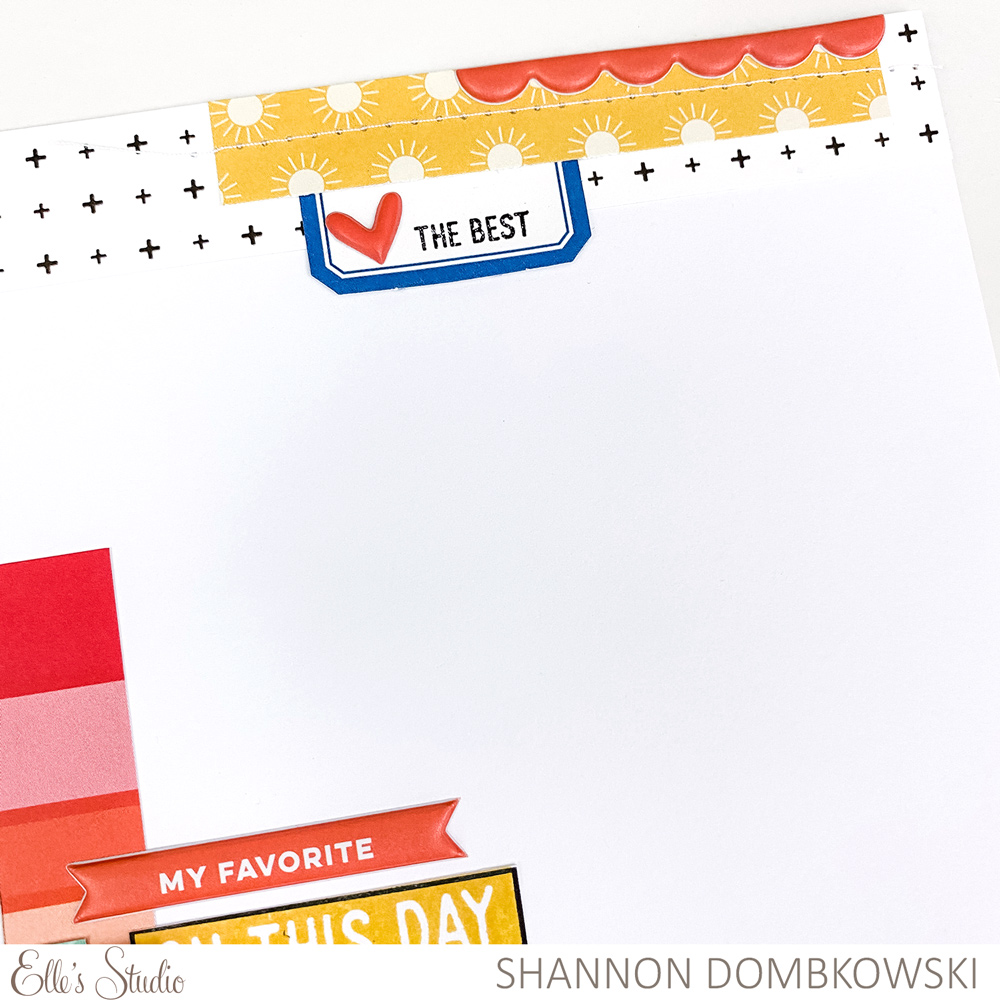
Finally, I added a few colorful touches in the upper right corner of my page. I looked at what colors I really wanted to pull out of the patterned paper and my other embellishments. Then, I set to find products with those colors in my supplies. I like the balance that this cluster brings in pulling the whole page together.
Thank you for coming along to see my take on Sketch 7 from the newest From Sketch to Finish Vol. 6 Digital Class. I hope I’ve inspired you to pick up the class and let yourself be inspired by the amazing sketches!
We are so excited to share nine more inspiring design team projects with you today using the May 2021 kit and add-ons! We hope they inspire you to take a look at the contents in your box in a new way, and be sure to pin your favorites for your future creative time!
Just in case you needed more ideas to use our latest products, check out our From Sketch to Finish Vol. 6 class, just released today, and learn more about it HERE!
Comments Off on May Design Team Inspiration: Volume Three | Share This
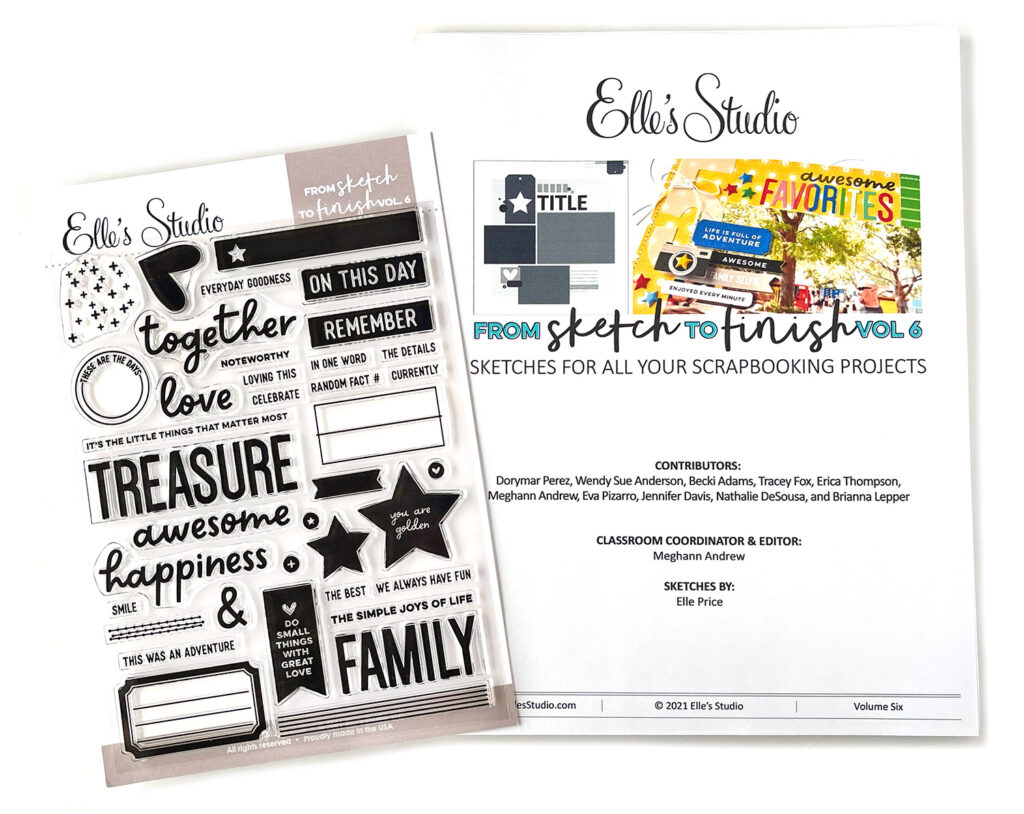
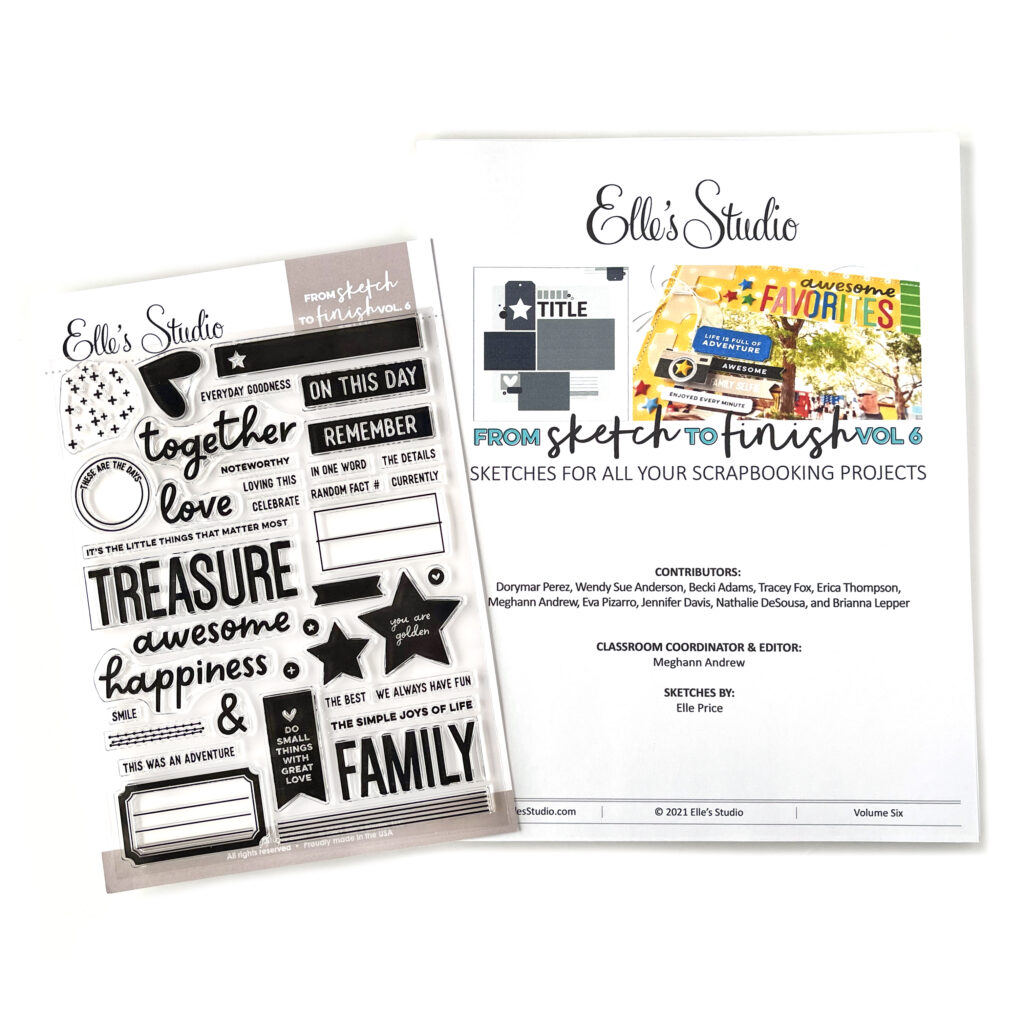
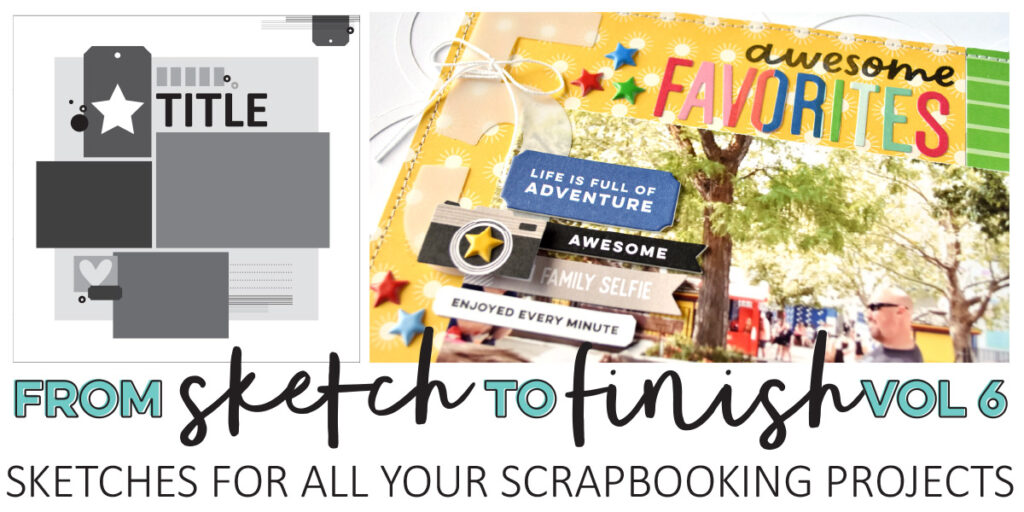
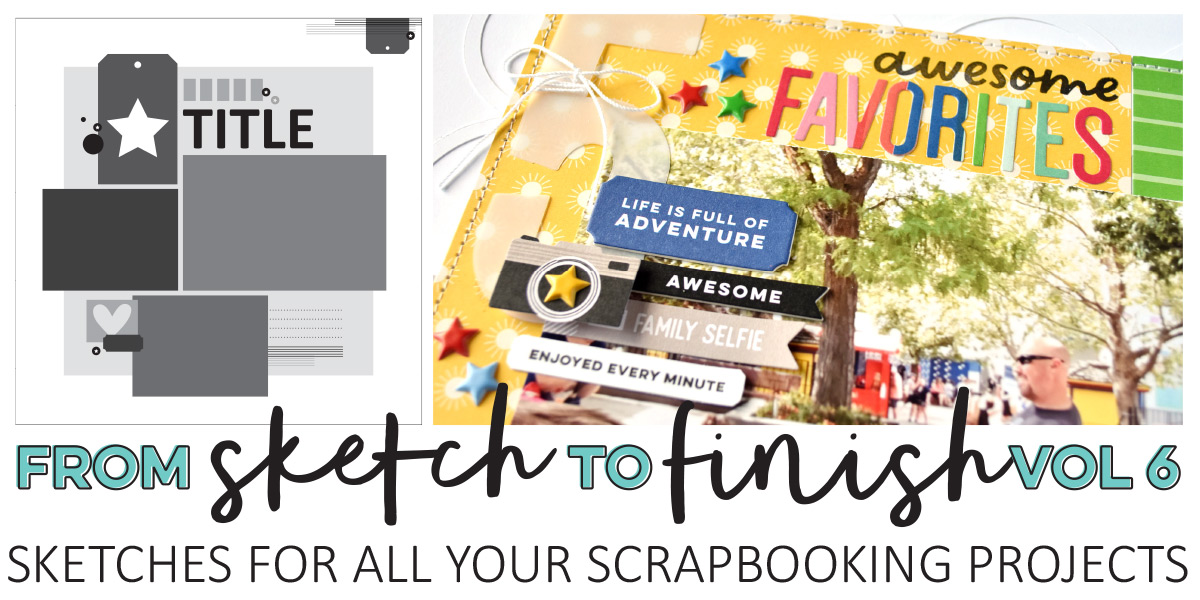
We are SO excited to announce that From Sketch to Finish Vol. 6 is now available in our shop at a special introductory rate to celebrate! Simplify your scrapbooking process by starting with a sketch from this new, self-paced class, which will take the guesswork out of the process and will allow to you create layouts you love in no time!
Kit subscribers: Make sure you check your email for your BONUS coupon that will allow you to SAVE an extra $5 off our Vol. 6 sketch class and/or our Vol. 6 sketch class + stamp bundle, this week only! The email was sent out on Friday, May 21st and again on Sunday, May 23rd.
Volume 6 is a 70+ page PDF self-paced class that contains 50 never seen before, exclusive sketches that will keep you inspired all summer long, along with cut files to expand your layout possibilities! You’ll start out with 10 different sketches and 10 contributors each sharing two layouts they created from a sketch. You will get to read their tips and see how they interpreted each sketch to fit their unique and beautiful styles on the 20 different layouts they’ve created. Next, the class features 20 full-page sketches that will have you on your way to creating projects in no time! Then, our class ends with another 20 bonus sketches that were inspired by the final outcome of our contributors projects and you’ll be amazed at how differently they turned out! It is a great example of how sketches can inspire you to get creative! For double-page layout lovers, we’ve also included several examples on how to stretch a sketch to create a two-page layout, that we know you will love!
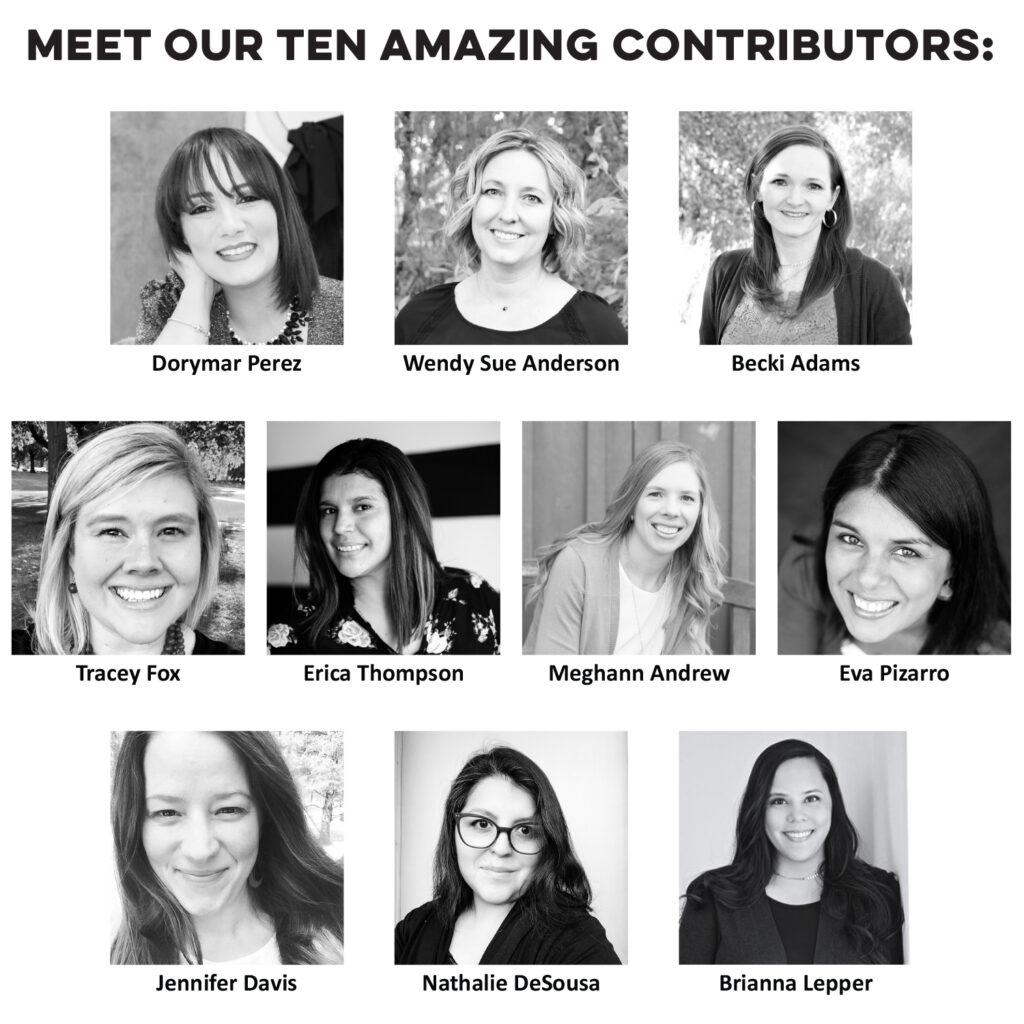
My name is Dorymar Pérez, I am from “La Bella Isla del Encanto”, Puerto Rico! and I have lived in Connecticut for six years. I have 2 beautiful young girls and have been happily married to the love of my life for 18 years. Since I was a child, my favorite hobbies were drawing and making crafts. I discovered the wonderful world of scrapbooking 14 years ago; my husband invited a friend who hosted a scrapbook party at my house, and I fell in love with it instantly! Since that day, I can’t stop designing and creating! I am fortunate to be on the Design Teams for prestigious Scrapbook companies and I also had the opportunity to create projects for two of the most important stores in PR. I love to design very detailed projects, with many interactive elements. I always try to use all the items from the collection.
Hi there! My Name is Wendy Sue and I am so excited to be a part of Elle’s Studio Class ! J I live in a beautiful mountain valley in Utah with my incredible husband, Brad and two of our awesome boys, who are both in high school. We also have a wonderful daughter who is all grown up and married and attending grad school and another amazingly handsome and talented son who is also living away at college! I’ve always been a scrapbooker – I remember working with rubber cement (gasp!) and stickers (the kind you lick) with my mom when I was tiny! I graduated from Utah State University with a degree in accounting, and although that’s my “day job,” I think I’d much rather use paper for creating fun projects than for recording and calculating numbers! This hobby has definitely helped me focus on the most important aspects of my life—FAMILY—and I’ll forever be grateful for the lessons I’ve learned, people I’ve met, and wonderful opportunities that have come my way through this amazing industry. I love connecting with fellow crafters and memory keepers, so let’s be friends!
Becki Adams has been a designer within the crafting industry since 2007. She has taught numerous in-person workshops and online classes. Additionally, she has worked with many manufacturers and industry leaders, including American Crafts, Bella Blvd, Echo Park Paper, Hip Kit Club, Elle’s Studio, Simple Stories, Scrapbook and Cards Today magazine, and Stamp and Scrapbook Expo. Becki shares her work with her Instagram community daily and posts new content to YouTube channel regularly. Throughout her career, Becki has developed a style that is clean, colorful, and classic. Passionate about papercrafting, Becki considers memory keeping more than just a hobby. It is her creative release as well as a way of preserving memories for her loved ones.
Tracey Fox is a self-proclaimed “scrapbookin’, feminist nerd” living in central Ohio with her husband and cats. She has degrees in Music Education and Women’s Studies and currently works full-time as a fundraising data analyst for a large university. Needing something to do with all of her college photos, she started scrapbooking in 2004 and has never looked back. Tracey is the host of the Scrappy Like a Fox Facebook group, and she enjoys issuing scrappy challenges like #scrappychristmasinjuly, #scrappytrendwatch, and the #jamfoxcrafterscollab to the online crafty community. She has served on the creative teams for Elle’s Studio, Freckled Fawn, ColorCast Designs, Paper Issues, and Feed Your Craft. She has also guest-designed for numerous crafty companies and has contributed class content for ScrapHappy, The Awesome Ladies Project, Crafty Jen Schow, and Get it Scrapped. Find Tracey online at Instagram @scrappylikeafox, in her Facebook group, or at traceyfox.com.
Erica Thompson, also known as Erica Rose Creates, has been a scrapbook designer and educator for over 6 years. She got her start with crafting in middle school when she was given a scrapbook for Valentine’s Day. She loved taking photos and documenting her time in school and with her friends. This has carried through her adulthood and she continued her passion for documenting with her family. Erica loves to explore when creating, though she loves clean, white space with splashes of color using inks and mists. More recently her signature style has included cut files, which she enjoys backing with pattern papers. Erica currently serves on the Pinkfresh Studio, Jillibean Soup, Doodlebug Design, and Bella Blvd design teams. Past design teams include The Cut Shoppe and Clique Kits, and she has guest designed for Paige Evans and Catherine Pooler Designs. She has also been featured in publications such as Creative Scrapbooker and Scrapbook & Cards Today.
Meghann Andrew is a 30-something wife, mother of two and creator of all-the-things, living in the Chicago suburbs. Her background in interior design gave her a love for the principles of design, which she incorporates into all of her papercrafting projects. When she’s not playing with pretty paper, you can find her coordinating content for both Scrapbook & Cards Today and Elle’s Studio, in her home gym, running or hiking on a trail, or in the kitchen, sharing her love of food with the ones that she loves.
Hello everyone, my name is Eva Pizarro, I’m 39 years old and live in Santiago, Chile with my husband Marco and my son Lorenzo. I began scrapbooking in 2007 while I was living in Italy and since then I haven’t stopped! I love to be able to create something beautiful and creative every day! I love playing with colors and paper and having some me time during the day. I also love to keep my family memories and leave a part of myself in my project’s journaling. Often my projects tell how I fell, my fears and joys and I love that my future generation is going to be able to get to know me better reading our history. I love to cook, eat chocolate, embroidery, knit and taking long walks on the beach.
I live in a small tourist town in Northern Wisconsin with my family and our sweet cocker spaniel puppy. When I’m not reading, enjoying the outdoors with family and friends, or busy homeschooling my daughter, you can find me in my craft room. I’ve been scrapbooking now for over 18+ years. Longer if you count when I played with paper and stickers as a child (pretty paper has always been my love). I’ve worked at local scrapbook stores (until they closed their doors) and have worked with various manufacturers and kit clubs throughout the years. Scrapbooking to me is celebrating my passion for living and life. I am genuinely so excited to have been invited to share my love of this craft with Elle’s Studio!
Nathalie is a stay-at-home wife and mom to two teenagers and their Boston Terrier baby from Toronto, Canada. She has been enamored with paper since the day her mom gave her a set of pens and colored paper pad to play with at a very young age. She has kept a detailed journal throughout her life and started transforming her memories from words to a more visual format just a couple years ago. She describes her style as always evolving and loves to combine black and white photography with color, mixed media, texture and words. When she is not working on a new entry for her scrapbooks, you can find her out for a walk with her camera in hand, reading a book, out with friends, or enjoying a good book, black coffee, and dark chocolate, in no particular order.
Hi! My name is Brianna and I’ve been scrapbooking a little over 15 years. When I’m not creating in my craft room, I enjoy spending time with my 2 boys and 3 dogs. You’ll see them on a lot of my layouts! We are military and are currently stationed in Northwest Louisiana and we love it!
From Sketch To Finish Vol. 6 is available with an exclusive and BIG 6 x 8 inch stamp (while supplies last) that was designed just for this class! The possibilities are endless, and in the class, our contributors will show you how they used the stamp on their layouts! For those who aren’t into stamping, we’ve also made the class available without the stamp, too.This class comes as a downloadable PDF file. Once you have purchased the class, you will receive a link to download the class. Please make sure you save the class to your computer. If purchase the class with the stamp option, the stamp will ship asap.
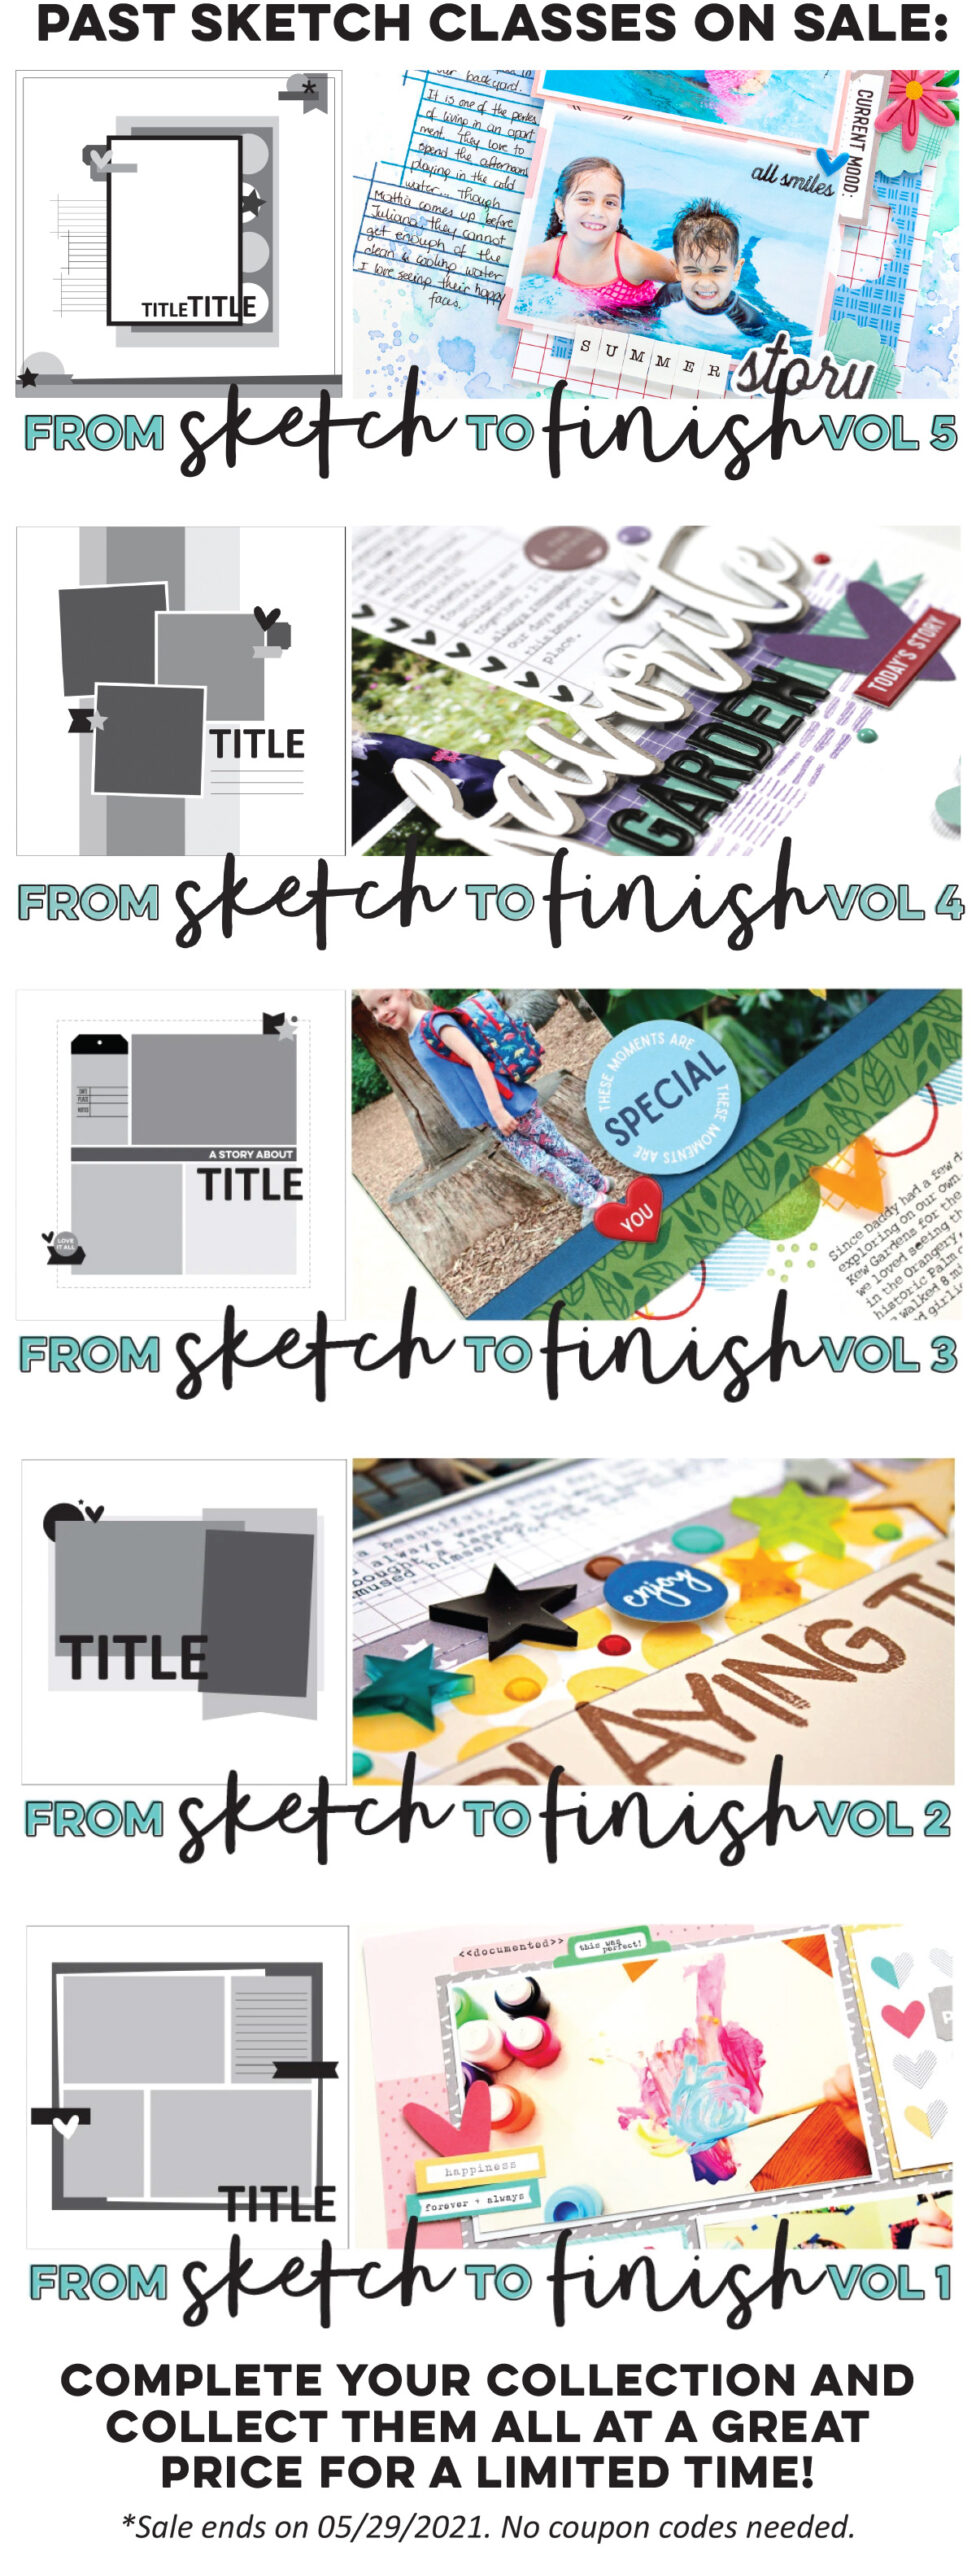
Take advantage of our special introductory price by purchasing the class now – the 6 x 8 inch stamp alone is a $24 retail value! We have also put all past sketch classes on sale, too! Complete your collection and collect them all at a great price for a limited time! *Sale ends on 05/29/2021 or while supplies last.
We can’t wait to see how these classes inspire you! Make sure you share your projects with us in our Facebook group and make sure you use the #EllesStudio hashtag when posting on Instagram for a chance to be featured on our feed and win a gift certificate to our shop!