Valentine’s Week: Mini Valentines with Meghann Andrew

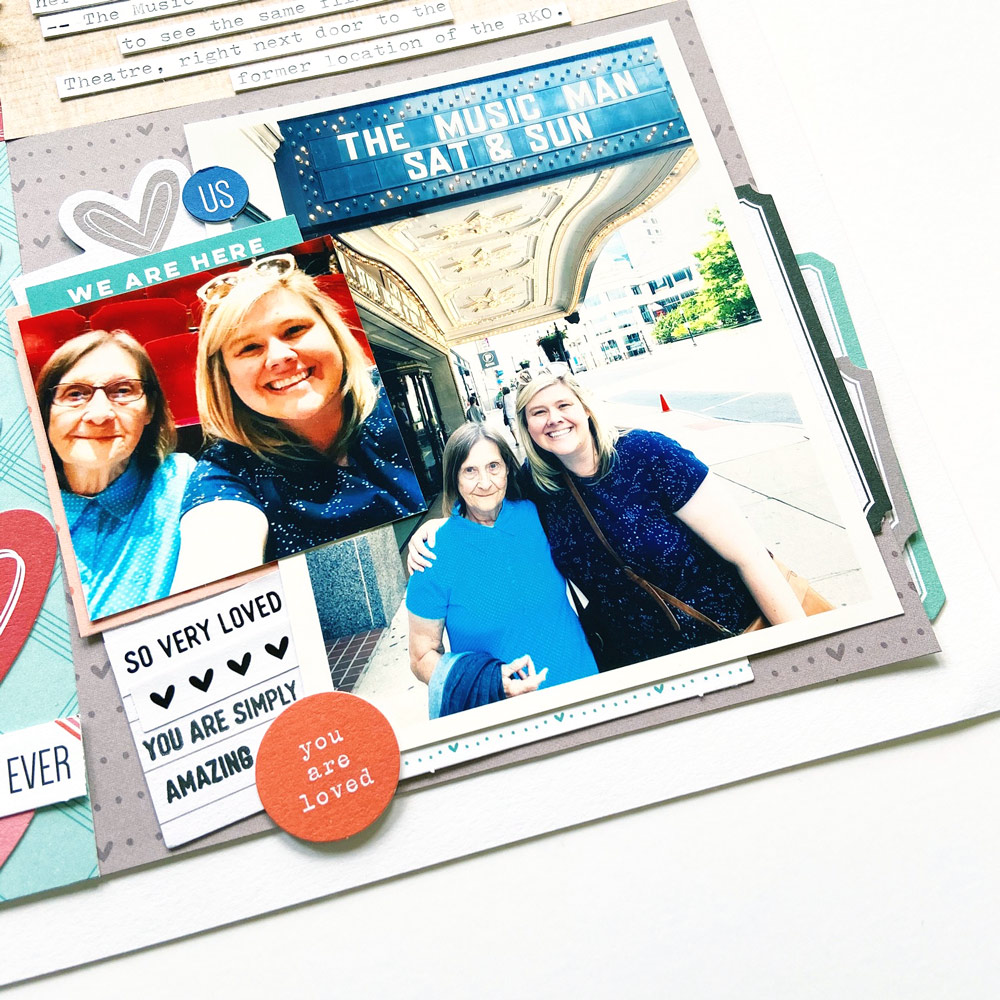
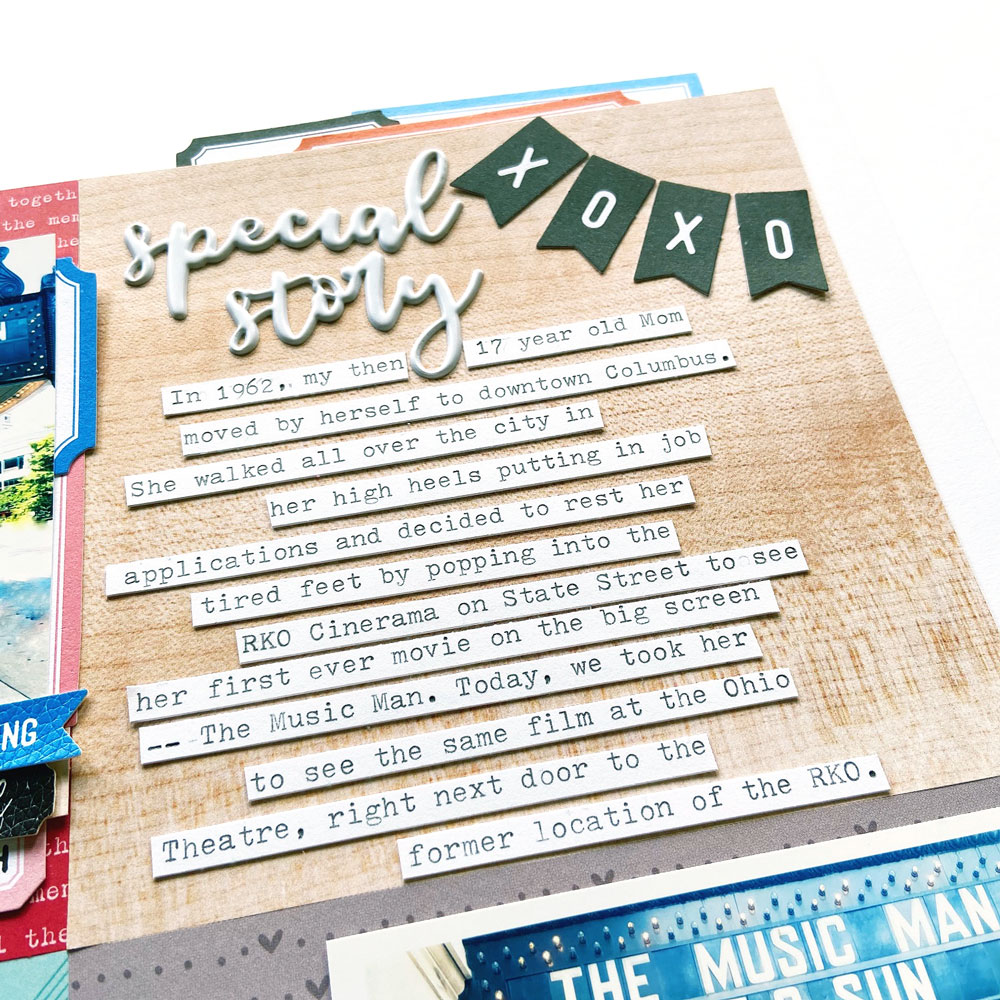
Hello, Elle’s Studio friends! It’s Meghann Andrew with you, and I am so excited to kick off a special week here on the Elle’s Studio blog today, Valentine’s Week! All this week, the design team will be sharing projects full of LOVE, meant to inspire you to create something that shows someone how much you care, or records your love for someone or something!

Today, I’m starting of this week by making things mini! The 3″ x 4″ tags from our January 2020 Kit and the new True Love Printables are not just for layouts, pocket pages or traveler’s notebooks—they also make the most perfect mini valentines to share with the people you love! Take a look:

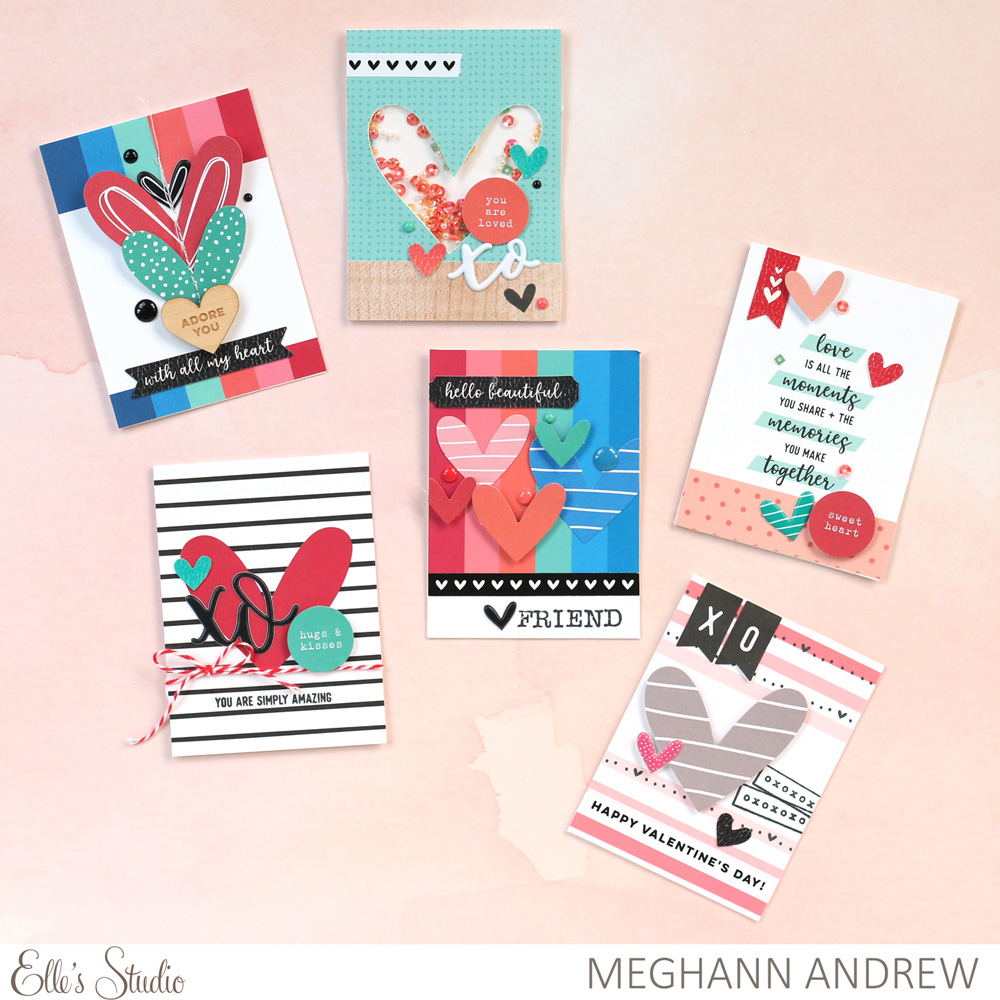
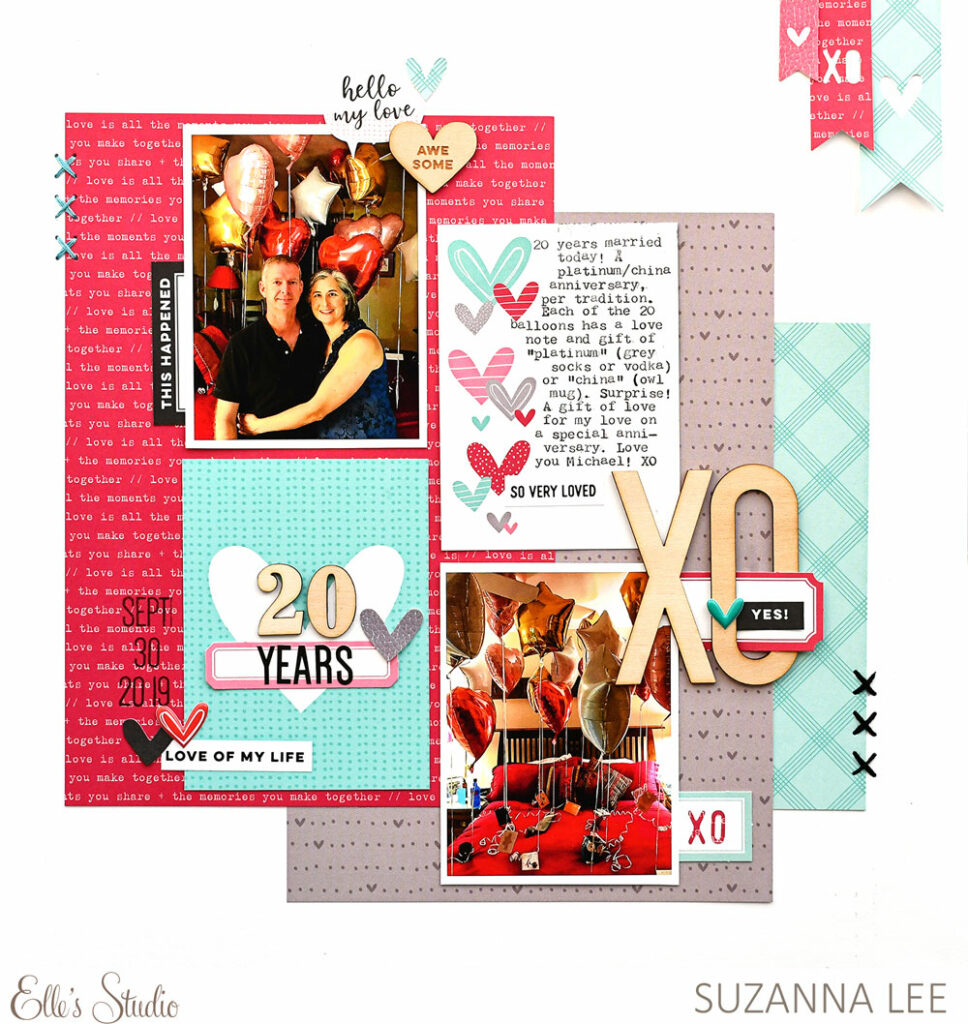
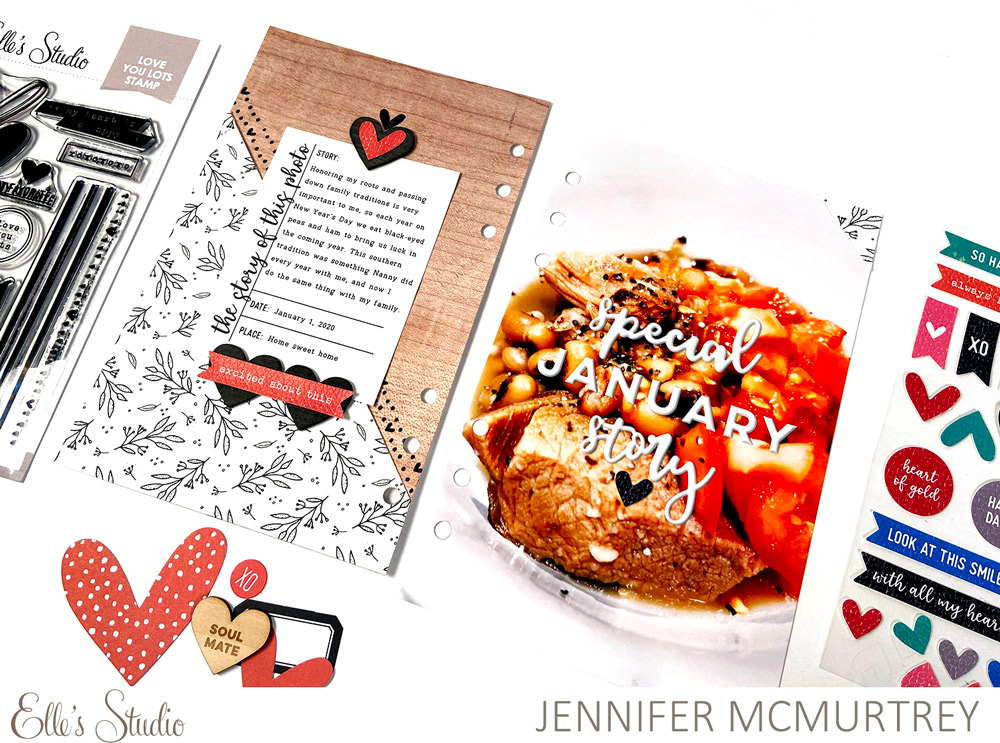
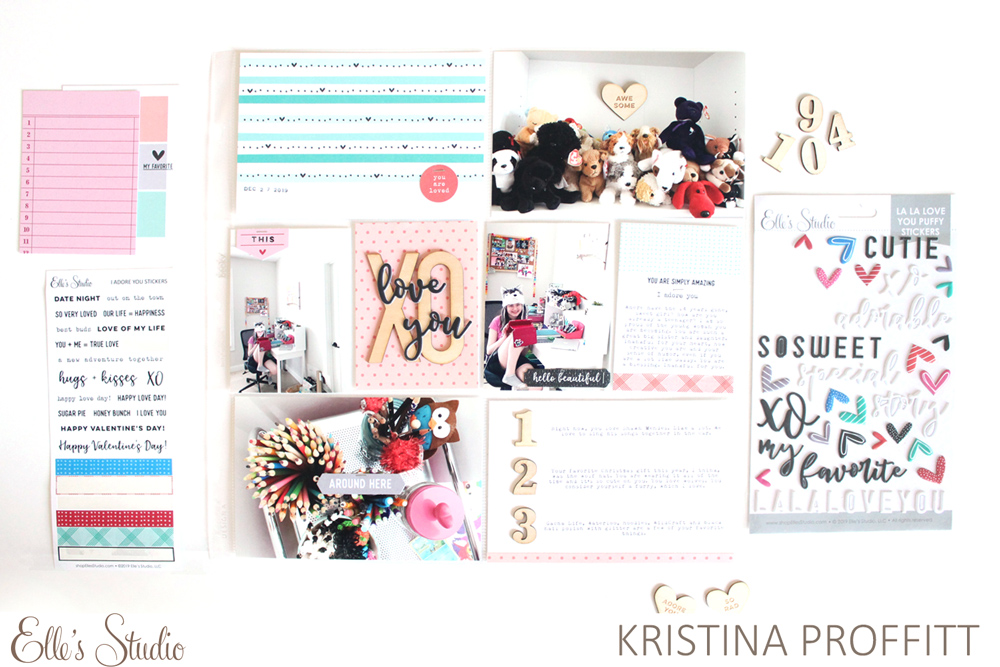
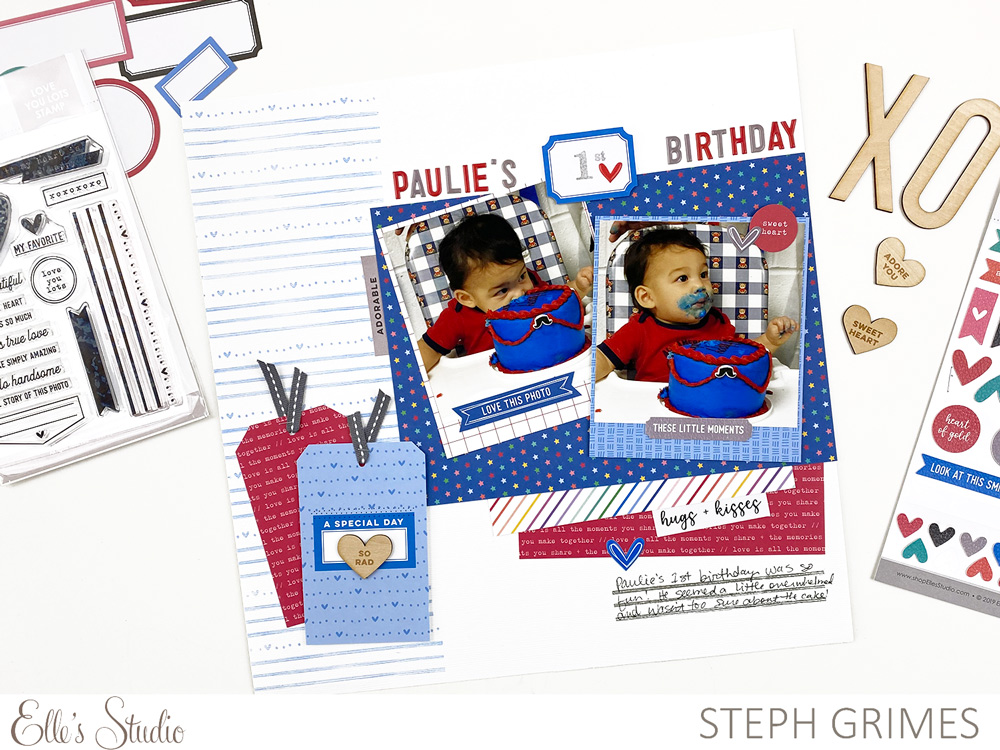
Supplies | January 2020 Kit, True Love PrintablesI Adore You StickersYou Are Loved Die CutsLa La Love You Puffy Stickers, Little Moments Leatherette StickersWood Veneer SweetheartsLove Is 6 x 8.5 Paper StackLove You Lots Stamp, Hazel Alphabet Stamp

Using the carefully coordinated January kit and add-ons, it was easy to put these mini cards together in no time at all!

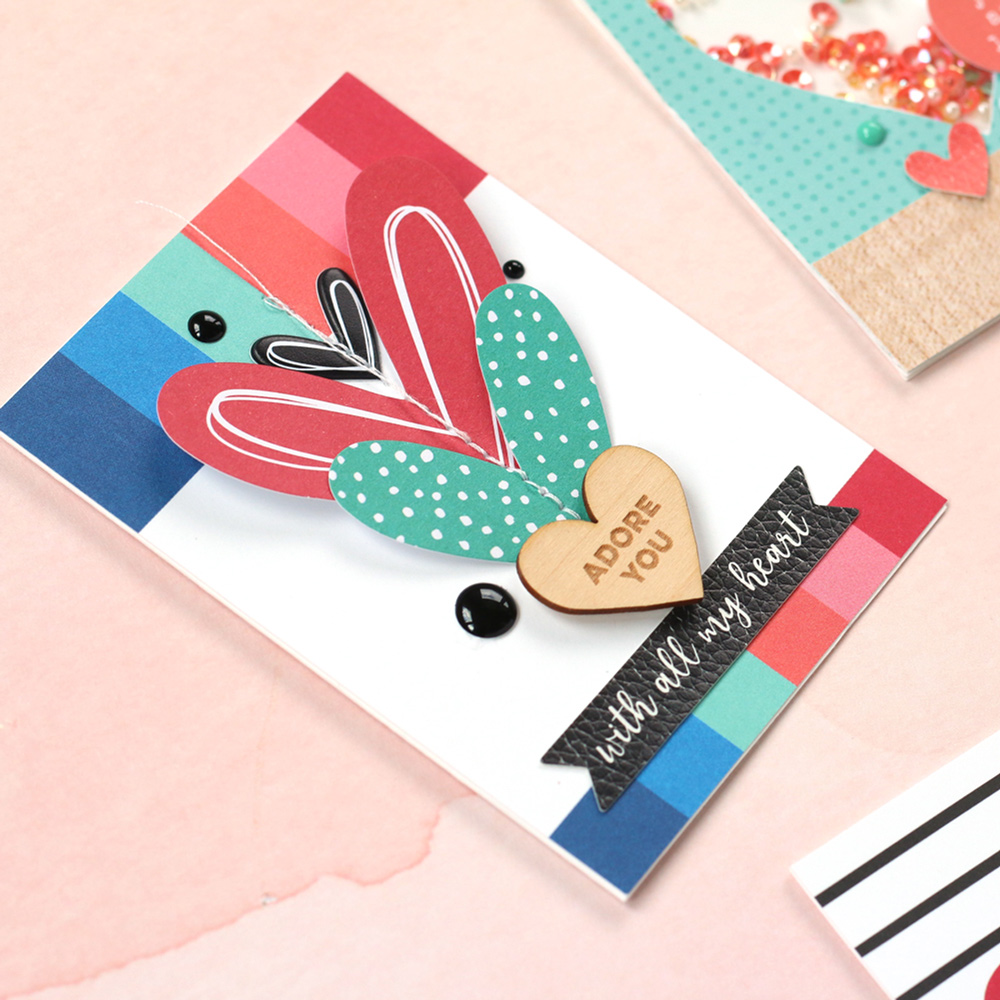
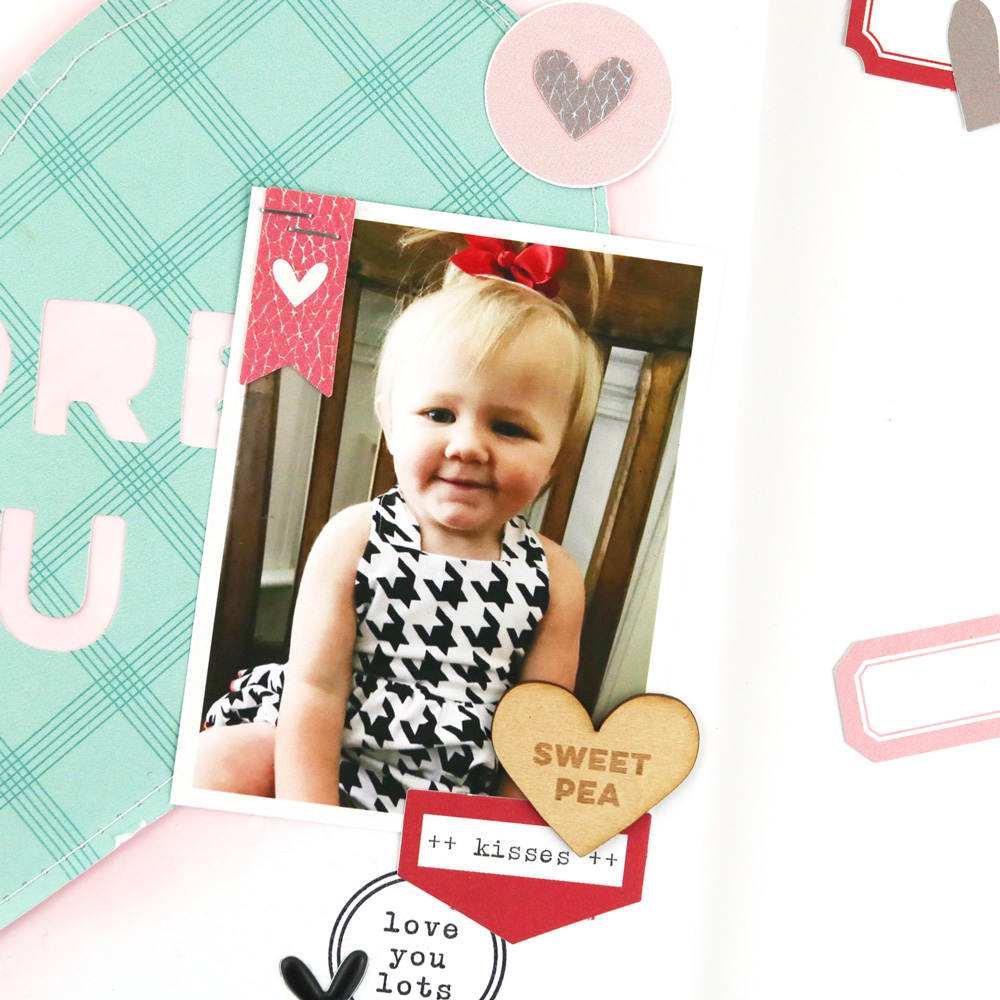
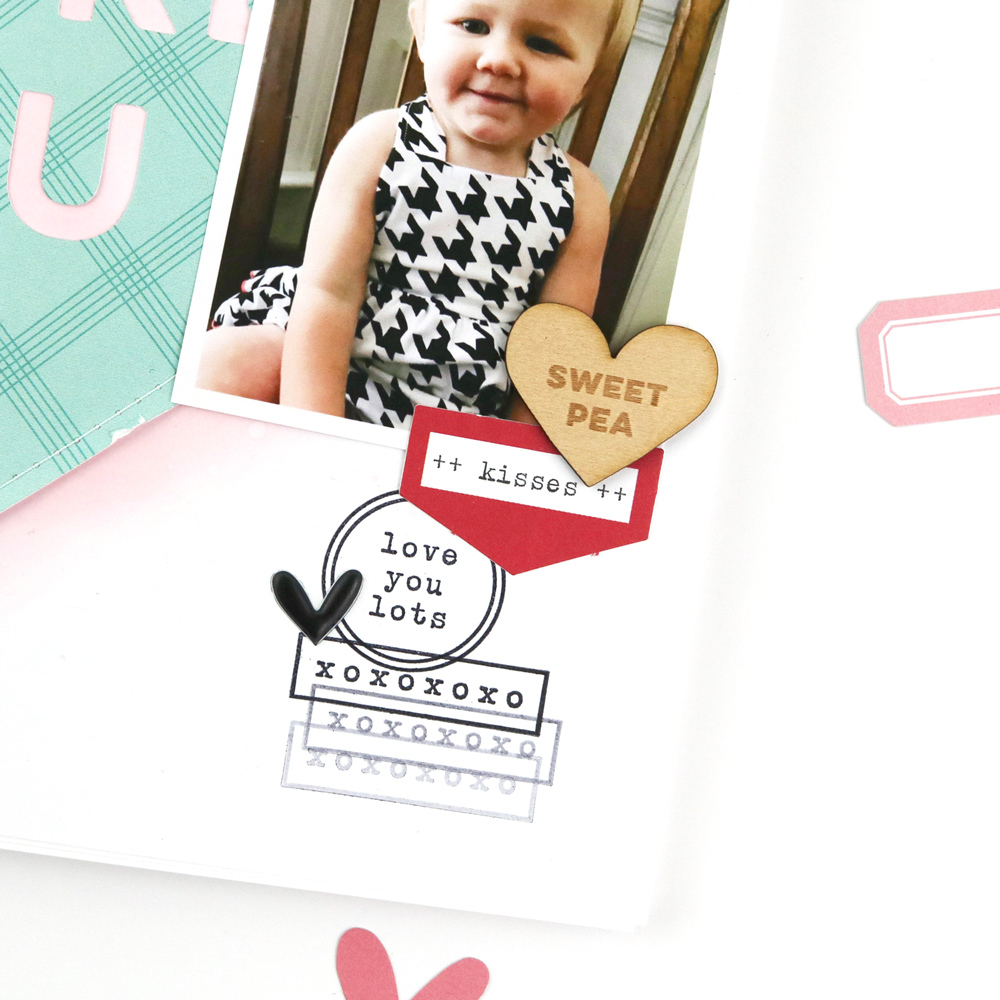
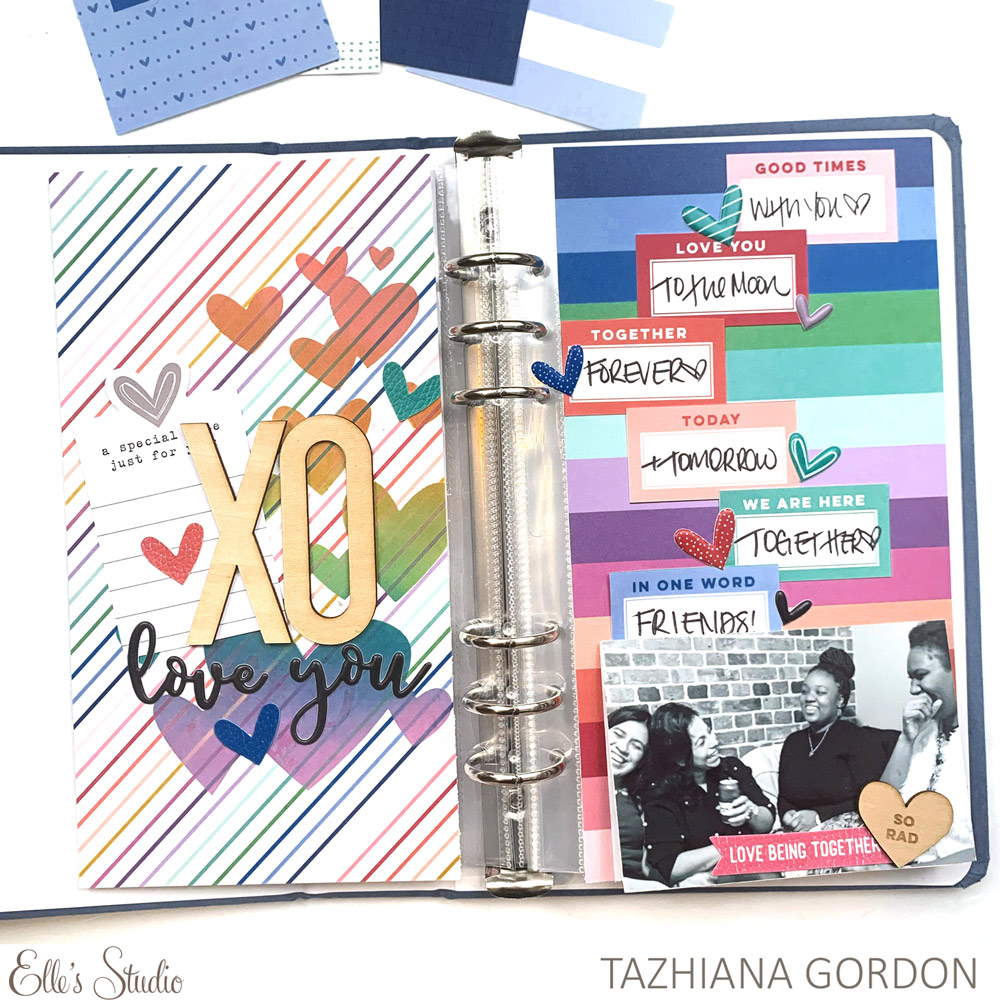
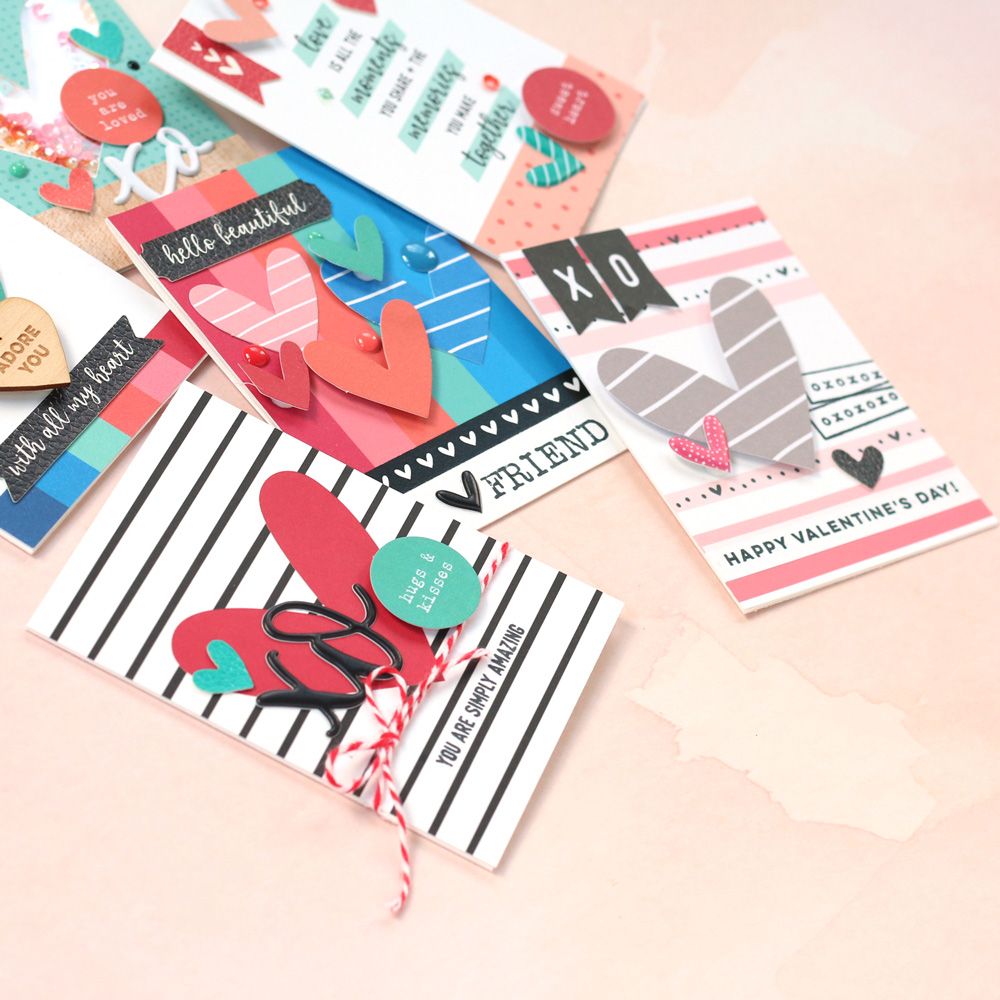
This tag from the January 2020 Kit included a large journaling area in the center, which turned out to be perfect for adding a cascade of hearts create from the You Are Loved Die CutsLa La Love You Puffy Stickers and Wood Veneer Sweethearts. I added the second part of my sentiment using the Little Moments Leatherette Stickers, which also added a pop of contrast again the colorful border at the base.

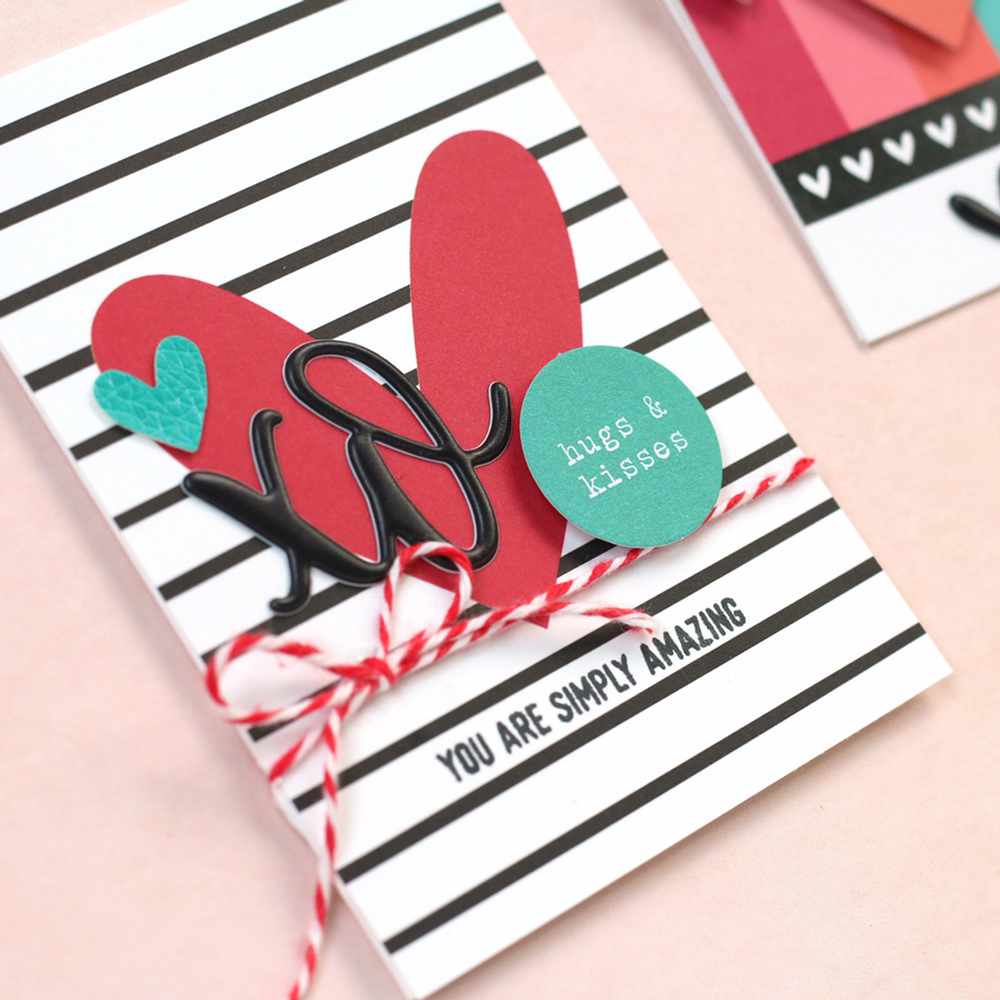
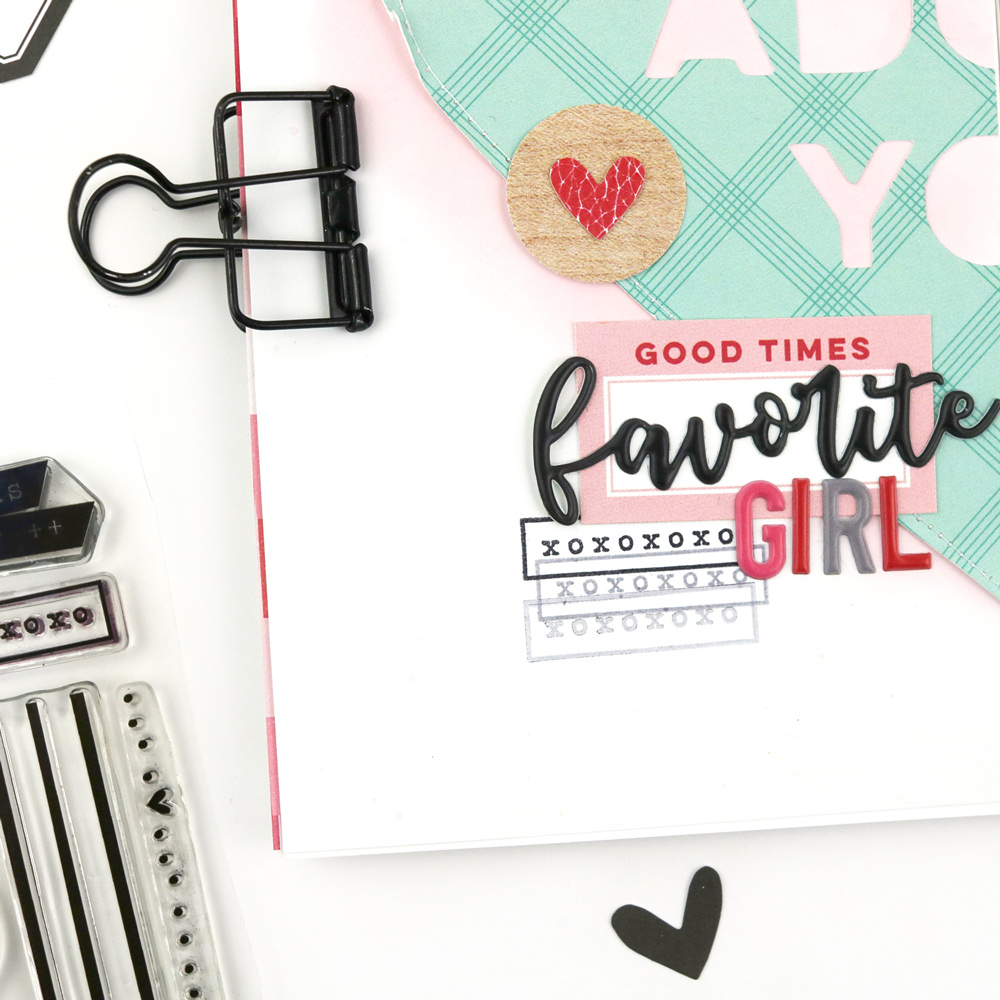
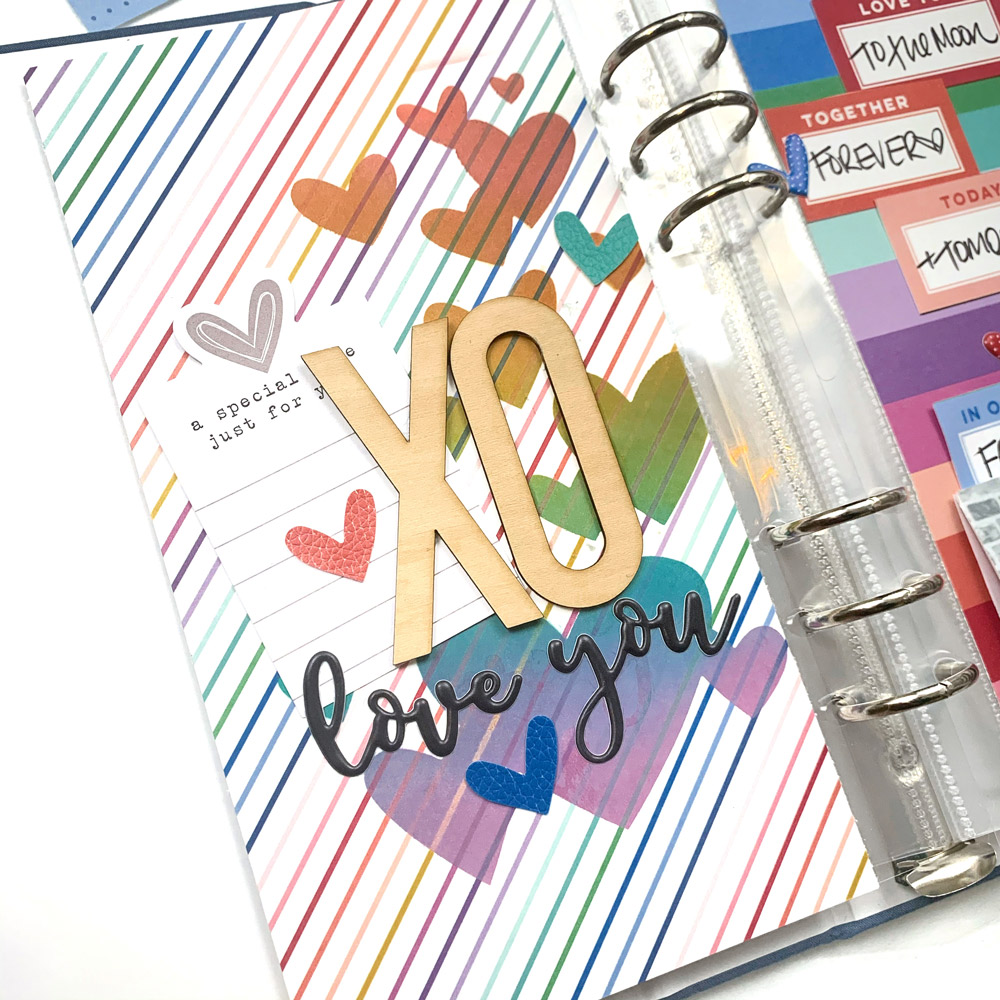
This card came together easily, as the large red heart tag from the January 2020 Kit created the perfect background to add a few embellishments to: the “hugs & kisses” You Are Loved Die Cut, “XO” La La Love You Puffy Sticker and teal heart Little Moments Leatherette Sticker. I added the sentiment, which fit perfectly between the stripes, using the Love You Lots Stamp and tied the whole thing off with red baker’s twine.

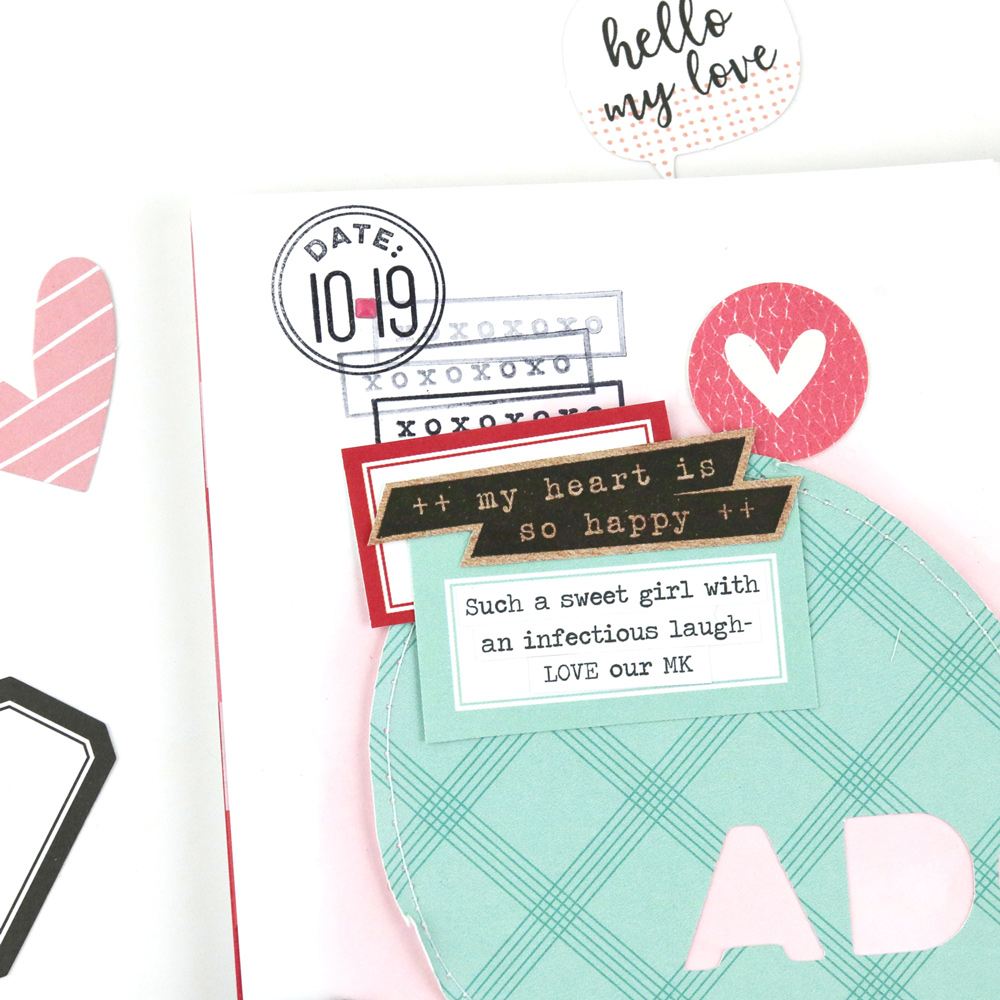
This tag from the True Love Printables included a white heart, which I cut out to make into a shaker card, adding an acetate window and a sequin mix filling. At the base, I added the warm wood border using the Love Is 6 x 8.5 Paper Stack, and topped it with the white “XO” La La Love You Puffy Sticker. The “you are loved” You Are Loved Die Cut added the perfect sentiment, and was balanced with two Little Moments Leatherette Stickers. The top left corner needed some contrast, so I added the heart border I Adore You Sticker, and balanced that with a black stamped heart at the bottom using the Love You Lots Stamp.

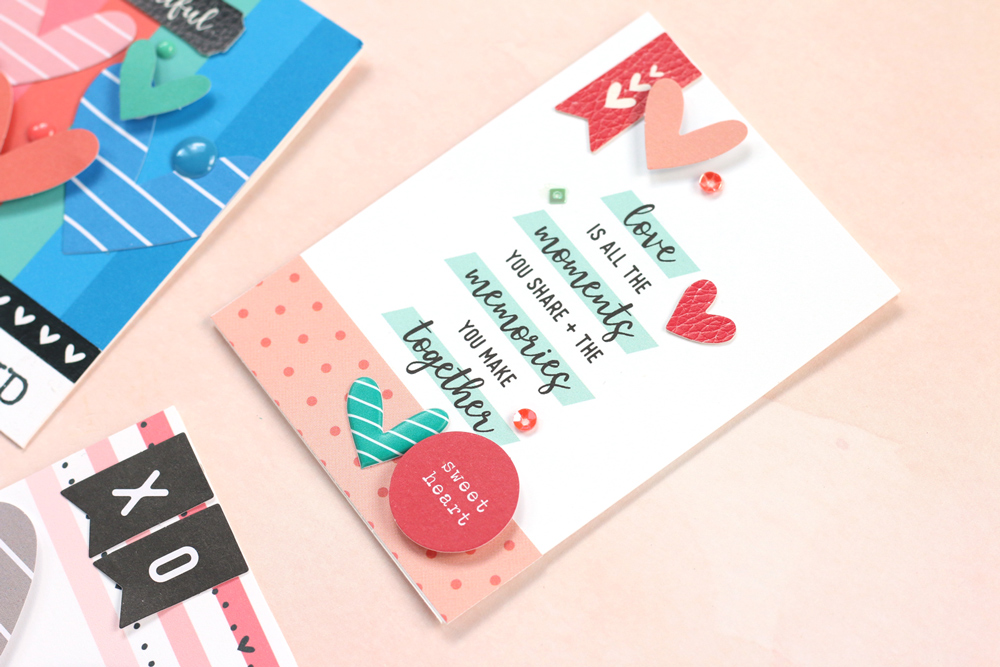
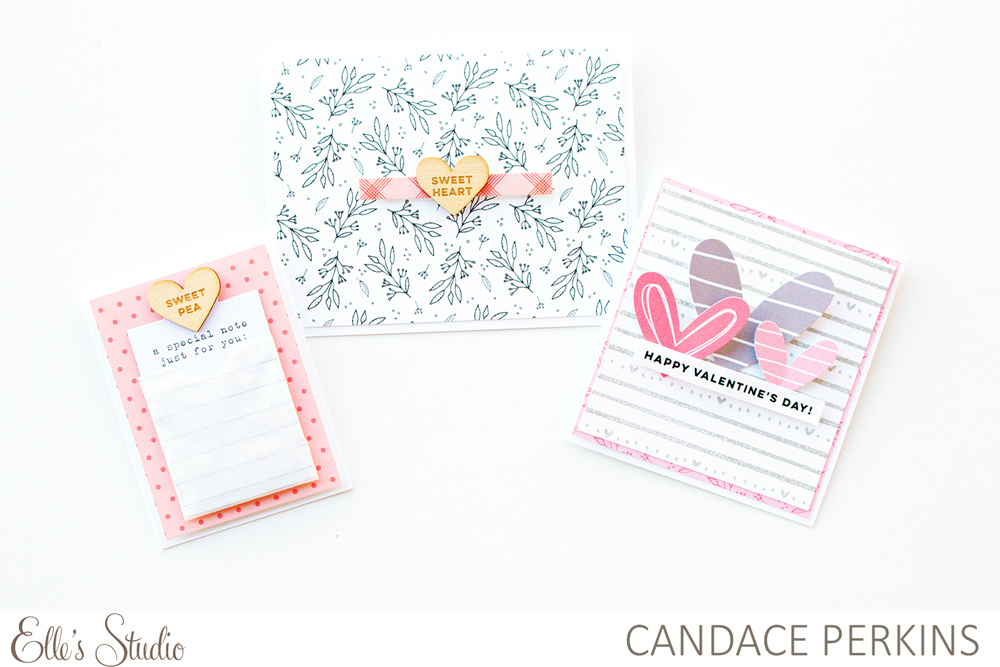
This card was the simplest to create, because the beautiful sentiment tag, found in the January Kit did most of the work for me! I simply added a border of peach polka dots using the Love Is 6 x 8.5 Paper Stack, the “sweet heart” and peach heart You Are Loved Die Cuts, a Little Moments Leatherette Sticker banner and heart, and a teal heart La La Love You Puffy Sticker. Nothing complicated to be found here!

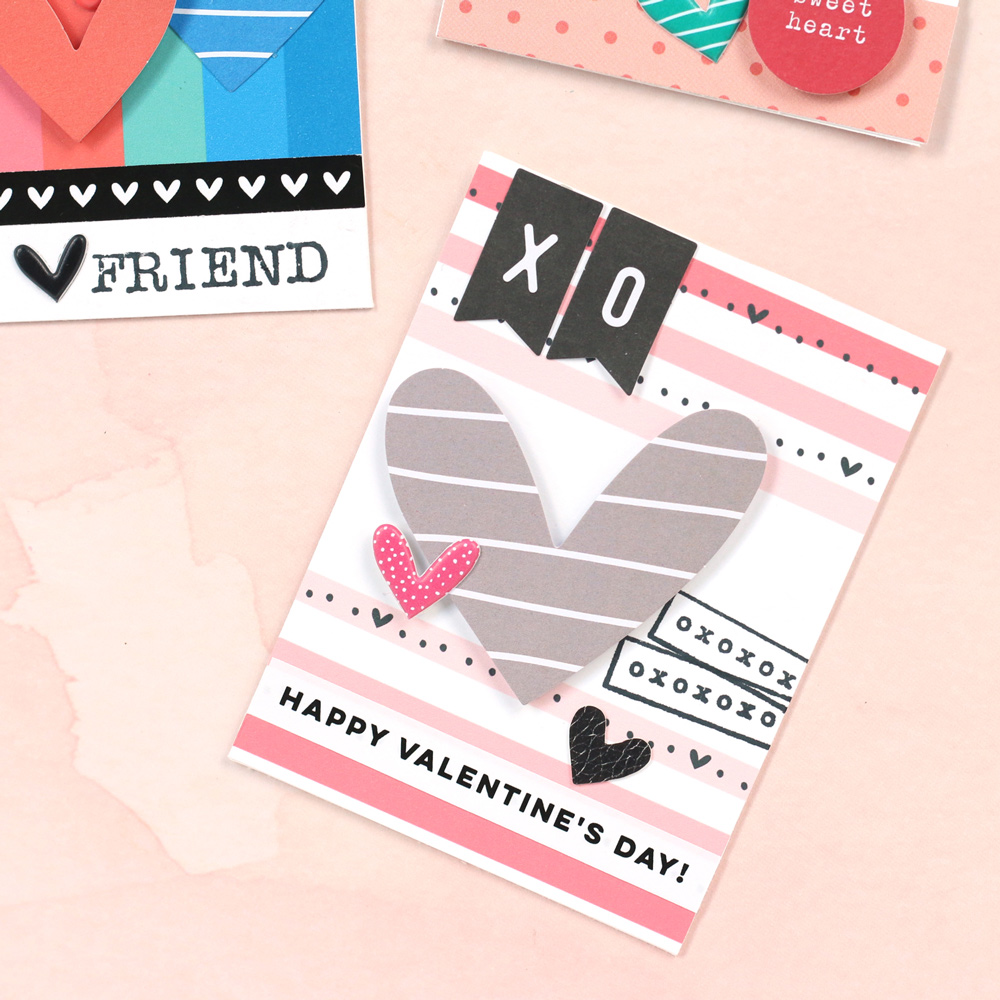
This was another simple design, began by using the pink striped tag from the True Love Printables. Stamping the “xo” borders from the Love You Lots Stamp pointed directly to the large gray You Are Loved Die Cut, which I accented with two more hearts from the La La Love You Puffy Stickers and Little Moments Leatherette Stickers. To balance the black heart, I added the “XO” banners from the You Are Loved Die Cuts at the top, and my sentiment, from the I Adore You Stickers, fit perfectly between stripes at the base of the card.

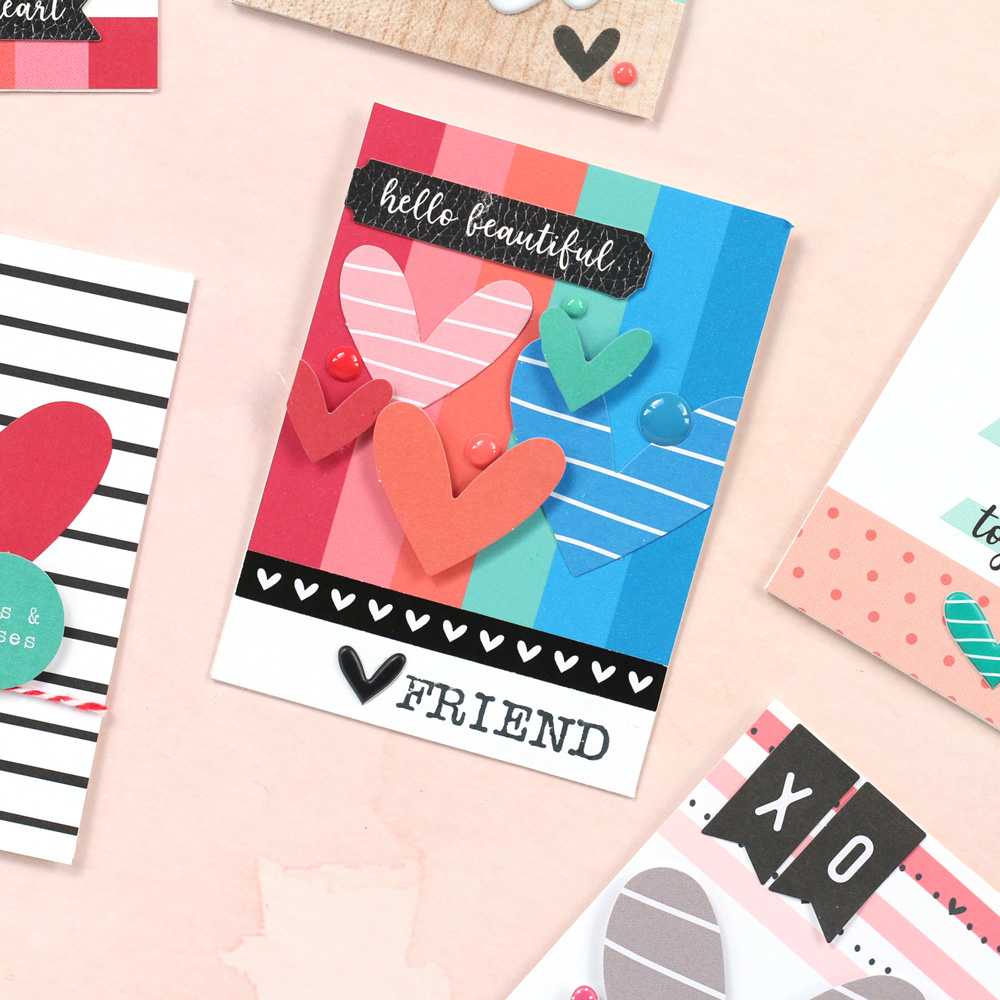
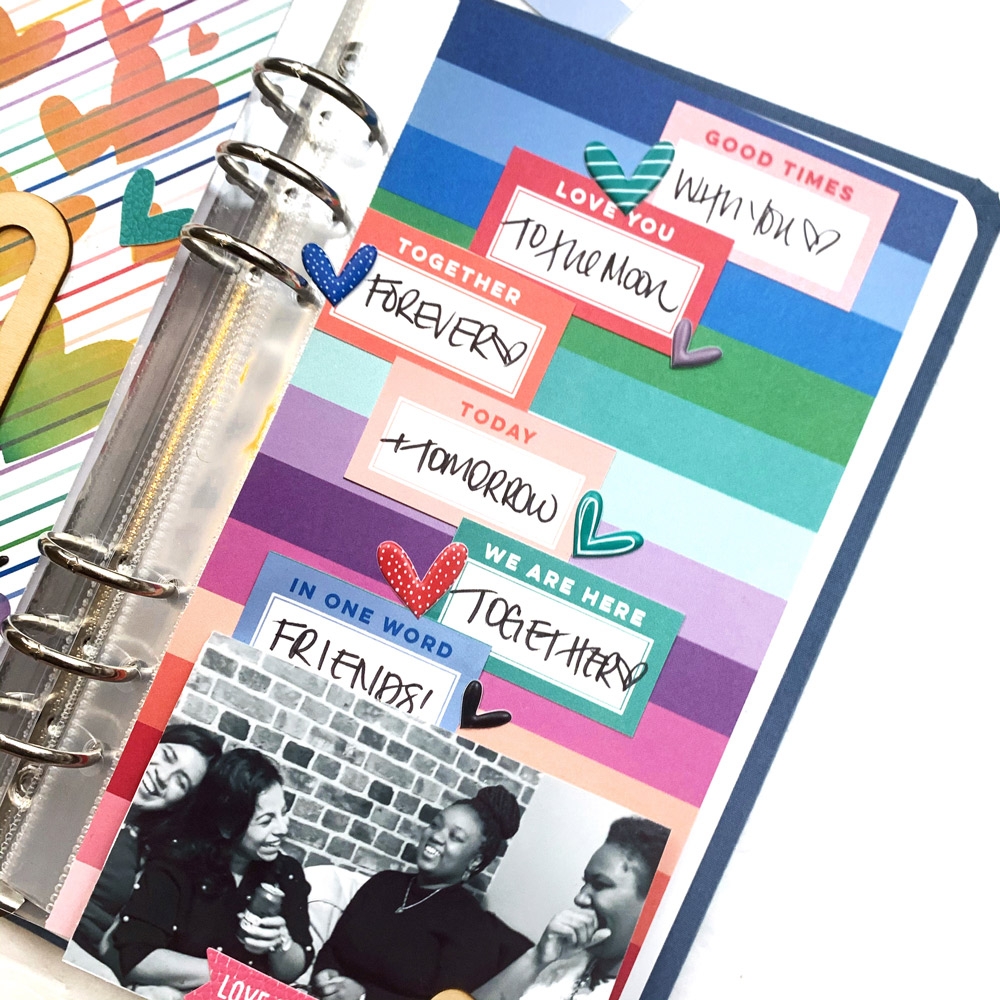
This card, began with the colorful, striped tag from the True Love Printables, is my favorite! I wanted that bold pop of black against those beautiful colors, so I added the heart border from the I Adore You Stickers and the “hello beautiful” Little Moments Leatherette Sticker. Next, I added five heart You Are Loved Die Cuts to coordinate with the colors on the background, popping some up with dimensional adhesive, and cutting the excess from the edges. Last, I added the “friend” sentiment using the Hazel Alphabet Stamp—my favorite alpha in the shop!—and a black La La Love You Puffy Sticker heart.

Each one of these mini 3″ x 4″ cards was so fun to create, and I love that each one is so individual! You can see how each one came together in my quick process video below! Grab a cuppa and get inspired to create your own mini valentines using the January kit and add-ons this week!

Thanks so much for stopping by! Be sure to show the ones that you love how much you care by creating something handmade—these mini valentines are a perfect option, but stop back tomorrow as our Valentine’s Week continues to get an idea for sweet gift packaging, too!

January #EllesStudio Spottings on Instagram

We just love seeing how you document your memories using our products, and by using the #EllesStudio hashtag on Instagram, it makes it easy for us and our fellow Elle’s Studio fans to be inspired by YOU! These six paper crafters used the hashtag this month, and we can’t wait to share their projects with you!

We just love both of these colorful, mixed-media projects! On the left, Melinda (@m_sweetman) created an amazing scrapbook layout using our retired Noteworthy collection—the perfect products to complement her fun photo! On the right, Victoria (@sahmiam) used our solid Large Jane Alphabet Stamp to add her title to her amazing bible journal. Be sure to check out the other pages on her feed!

We always love how Rachel (@scrapwithrachel) uses our products, and her fun combination of red, black and gray using our labels, Typewriter Keys Puffy Alphabet Stickers, Puffy Icon Stickers, and black Jane Alphabet Stickers just pops off of her traveler’s notebook spread to record game time! On the right, Kara (@karaperrien) created a beautiful pocket page to record real life using our past Monthly Kits, Wood Veneer Butterflies, Everyday Tabs Stamp and Metal Die. We just love her combination of journaling tags and embellishments!

Let’s continue with pockets, shall we!? On the left, Emily (@emilyscrapbooks) is busting the Monthly Kits from her stash to record May 2019, and we love how she added labels around her spread to tell more of the story! On the right, we spy some cute babies documented by Erin (@erin.loves.paper) with our October 2019 Kit and October Wood Veneer. What a beautiful collection of photos, beautifully documented!

Just for sharing their projects, these six paper crafters will each win a $10 gift certificate to the shop! Thank you so much for posting your projects and using the #EllesStudio hashtag, ladies! Please email us at info@shopellesstudio.com to claim your prize!

Will YOU be featured next month? Simply use our products on your next project and post to Instagram using the hashtag #EllesStudio for a chance to be featured here on our blog, and win a gift certificate to the shop! We can’t wait to see what you make!

A sneak peek of our February 10th reveal!

Our February kit + coordinating add-ons reveal is almost here and we can’t wait to share with you all the new and exclusive products that will be available soon! Our reveal will be full of the perfect products to document your February stories and take you right into the month of March! This month, our February kit will include 3 – 4 x 6 inch tags, 18 – 3 x 4 inch tags, and 26 die cuts!

Not a subscriber? You can pre-order our February kit now and lock in our $9.99 kit price by starting a subscription today! You’ll want to choose our SUBSCRIBE & SAVE option to get signed up and start your subscription with our February kit. We will then hold your kit and you’ll be ready to bundle and save at our February 10th reveal! Details on how to bundle with your subscription order will be emailed to you once you have purchased this product.

Kit subscribers, don’t forget! Along with being able to bundle any products from our shop that will ship for FREE with your kit during our 24-hour bundling period, starting on the 10th at 8:00 am Pacific each month, our subscribers will also have access to special discounts on select items! These discounted items can be found in our SALE section during our 24-hour bundling period, and you must be logged into your kit subscriber account to see them. Quick note: Our kits and add-ons are available without a subscription each month, too.

We are so excited to share all of these new products with you and see how you use them on your projects! Make sure you set your alarm and mark your calendar for Monday, February 10th at 8:00 am Pacific! We hope to see you there!

Pockets in Progress with Nathalie Leonelli

Although at first glance, our January kit and extras may seem geared toward sharing and celebrating love, but design team member Nathalie Leonelli is with us today to show that these products are so much more versatile than they may seem! Nathalie has created a monthly pocket page spread, for the month of September using our latest products, and we think you’ll be surprised at how beautifully they help to record her stories! Let’s see what she created.

Hello, Elle’s Studio fans! I am here today to share my latest pocket pages that I created with the January kit and extras. I record our daily life monthly in a 9″ x 12″ album and wanted to show you that the new release, even with its Valentine’s Day vibe, works wonders for any time of the year! Since I am a bit behind in my 2019 album, I decided to work on the month of September and I really like the result!

Supplies | January 2020 Kit, January Labels, You Are Loved Die Cuts, I Adore You Stickers, Valentine Multi Color Puffy Alphabet StickersLittle Moments Leatherette Stickers, Wood Veneer Sweethearts, Wood Veneer Numbers, September Wood Veneer, Mini Dated Extras Stamp, Mini Days of the Week Stamp

It was easy to put together as I used all ready made tags from the January Kit. I tested two color combinations with the same kit: first blue and red but that overpowered my pictures too much, so I preferred my second try with pink and teal with the addition of red accents. 

To maintain the continuity of my album, I used the large September Wood Veneer on the top left photo and then proceeded to create a visual triangle of wood veneers with some Wood Veneer Numbers and a heart from the Wood Veneer Sweethearts pack.

I liked mixing both the Mini Dated Extras Stamp and Mini Days of the Week Stamp to fit the day and date right onto my tag, shown above. I also like that the Mini Dated Extras Stamp has all the months written in full and that they are small enough to fit onto a label, like the red one found in the January Kit, below.

One of my go-to ways of journaling is to create random lists of facts/events and I found a fun way to mark each one using the periods from the Valentine Multi Color Puffy Alphabet Stickers. They add an unexpected touch of color!

One last “tip” before I go and play some more with my kit: the original tag above comes with a big red heart printed on it, to which I added a teal die cut from the You Are Loved Die Cuts, but I stapled them both in a way that makes it look as if both were added to the background. I have used this technique with other types of tags, for example when a label is preprinted onto the background. I think it tricks the eye to think that there is more depth!

Thank you for stopping by today! I hope to have inspired you to use your January kit and extras no matter what month or week you are working on in your pocket albums!

Share your pockets with us on Instagram using the hashtag #EllesStudio! Just for sharing, you could win a gift certificate to our shop to purchase even more Elle’s Studio goodies!

Lovely Layers on a Traveler’s Notebook Spread with Marsha Farris

We love traveler’s notebooks, and our products are sized perfectly to use in your TN spreads! This smaller-format way of memory keeping is easy to store, travels easily, and can be just as beautiful as any full-sized layout! Today, new design team member Marsha Farris is with us to share her love for creating in a traveler’s notebook, using our latest products to create the sweetest spread! Let’s take a look!

Hey, friends!  It’s Marsha here today, and I’m excited to be sharing my first blog post with you as part of the Elle’s Studio design team!  

I love documenting in a traveler’s notebook format, and I could not resist using one of the fun cut files from the January 2020 Cut Files, as a feature on my layout.  I paired it with the amazing January 2020 Kit and add-ons to document a photo of my sweet little niece.  

Supplies | January 2020 Kit, January 2020 Cut Files, January Labels, La La Love You Puffy StickersValentine Multi Color Puffy Alphabet StickersLittle Moments Leatherette StickersWood Veneer SweetheartsLove Is 6 x 8.5 Paper StackLove You Lots StampMini Dated Extras Stamp

To begin the spread, I enlarged the “Adore You” sweetheart from the January 2020 Cut Files to fit in my traveler’s notebook.  I cut it out using the teal plaid pattern from the Love Is 6 x 8.5 Paper Stack. Using my sewing machine, I added a bit of stitching around the edges of the heart. I always love the texture machine stitching adds to a page! Next, I used some light pink stamping ink and a sponge blending tool to add ink to the white background of the layout.  It’s such an easy technique that adds lots of interest to a spread. I trimmed the cut file in half to fit in the spread and adhered it to the layout, lifting the edges of the heart to add a little more texture.

To highlight the photo, I used one of the Wood Veneer Sweethearts, a label from the January Kit, and a Little Moments Leatherette Sticker. For the area above the photo, I punched a pink circle from the polka dotted pattern in the Love Is 6 x 8.5 Paper Stack, and layered a Leatherette Sticker heart over it.  

The Love You Lots Stamp was perfect for adding some stamping to the background below the photo.  I used my “go-to” black ink to layer a couple of the stamps from the set and did some repeat stamping.

For the title of the layout, I used a puffy word sticker from the La La Love You Puffy Stickers and alpha stickers from the Valentine Multi Color Puffy Alphabet Stickers, layering them over a cut-apart label from the January Labels. To repeat the circular element from the other side of the spread, I punched another circle from the woodgrain patterned paper in the Love Is 6 x 8.5 Paper Stack and layered a leatherette heart over it.  I did a little more repeat stamping below the title using the Love You Lots Stamp.  

For the final embellishment area on the layout, I layered some labels from the January Kit and the January Labels. I printed my journaling on the computer, cut it into strips and added it to one of the labels.  I did a bit more stamping using the Love You Lots Stamp onto the woodgrain patterned paper, trimming it out to use as an embellishment above the journaling.  I also stamped directly onto the background using the same stamp set and added the date using the Mini Dated Extras Stamp. This is such a versatile date stamp, perfect for any layout! As a final touch, I added a circle heart sticker from the Little Moments Leatherette Stickers.  

I love the way this traveler’s notebook layout came together using this fun cut file, paired with the gorgeous January 2020 Kit and add-ons. Thanks so much for stopping by today!  I can’t wait to see how you use the cut files and kit this month to document your memories! 

Die Cut Love with Tracey Fox

How much are you loving the colorful variety in the January kit and extras? I knew when I saw all of the colorful hearts inthe You Are Loved Die Cuts that I needed find a way to use them all together, and that’s just what I did on this layout! The hearts and the love themed sentiments in the January products inspired me to create a layout documenting a very special day out with my mom. 

Supplies | January 2020 Kit, January LabelsYou Are Loved Die Cuts, I Adore You Stickers, La La Love You Puffy Stickers, Little Moments Leatherette StickersLove Is 6 x 8.5 Paper StackLove You Lots Stamp

For the design of my layout, I created four separate quadrants on the page using squares of patterned paper cut from four different papers from the Love Is 6 x 8.5 Paper Stack. I wanted these quadrants to house different parts of my story: two for photos, one for my journaling, and one for those awesome You Are Loved heart die cuts! 

After I adhered my photos in the top left and bottom right quadrants of my design, I decorated them with embellishments from the January Kit, La La Love You Puffy Stickers, Little Moments Leatherette Stickers, I Adore You Stickers, January Labels, and the Love You Lots Stamp. Blank labels, like the ones in the You Are Loved Die Cuts are always some of my favorite embellishments, because they can so easily be tucked behind photos and layers to create extra interest. The new Little Moments Leatherette Stickers are also so cool, and I love how they add a completely different texture to my projects.  

I love how this page design gave me a whole section of the layout for my long journaling, which I typed, cut into strips and adhered onto the lovely wood grain patterned paper from the Love Is Paper Stack. I am so glad I got this story documented in my scrapbook, because it was such a special day that built on a story my mom has been telling me ever since I can remember. The little “X” and “O” die cut banner flags from the You Are Loved Die Cuts made a lovely decoration for this otherwise simple section of my page. 

The most fun part of making this layout was filling the last quadrant of my page with those pretty heart You Are Loved Die Cuts! They were so fun to layer up, spreading out the colors and patterns and sizes for a pleasing arrangement. It can be so tempting to hoard a pretty product like this or to only use a few pieces at a time to make the package last longer, but sometimes, it’s so fun and satisfying to use an entire package of something, and when you group a large number of like objects in a design, it creates a much bigger impact! 

Thanks for stopping by the blog today and for checking out my process for making this page. And if you haven’t picked up the January kit and extras yet, be sure to run to the shop to grab yours while supplies last!

Teach Me Tutorial: Creating Custom Pockets with Jess Forster

Hands up if this has every happened to you: You finally sit dow to make a pocket page layout, only to find out that you don’t have the right size pockets in your page protector to fit your journaling tags and photos! Today I am here to show you how you can use the Fuse Tool from We R Memory Keepers to create custom pockets with the pocket pages that you already have on hand so you can use all the tags in your monthly kits. Who doesn’t love to using up all their ES stash!?

Supplies | January 2020 Kit, You Are Loved Die Cuts, I Adore You Stickers, La La Love You Puffy Stickers, Little Moments Leatherette Stickers, Love Is 6 x 8.5 Paper Stack

In this layout, I documented the story of a recent date night. I was inspired to tell this story because of the 3″ x 4″ “Date Night Details” card from the January 2020 Kit. However, when I sat down to record the story, neither my tags, nor my photos fit into the pocket pages that I wanted to use. Enter in the Fuse Tool to save the day!

In this pocket page layout, I used the Fuse Tool three times. First, on the 9″ x 12″ page protector, I converted the two 4″ x 6″ pockets into 3″ x 4″ pockets by fusing a seam in the middle. I also created a 4″ x 6″ and 6″ x 8″ pocket on the 6″ x 12″ page protector. I did this by letting the fuse tool warm up for 15 minutes. I also used a silicone mat with a grid to help me draw straight lines. Holding the Fuse like pencil, I rolled it back and forth a few times, with just enough pressure to to not burn a hole in the page protector. 

I created a custom title tag for the new 4″ x 6″ pocket by cutting a piece of the Love Is 6 x 8.5 Paper Stack, layering it with a large black You Are Loved Die Cut label and the “favorite” word from the La La Love You Puffy Stickers. I love that I could include an enlarged photo of my husband and I, to add extra detail to the visual story of date night. 

Simply put: the Fuse Tool helps you to alter the design of your page, which in turn can help you use up your stash of Elle’s Studio journaling tags, so that you can be ready for next month’s kit to arrive! I hope this post inspires you to think outside the pockets and try something new!

Thanks for looking!

Want to try out this technique? Show us what you create on Instagram by using the hashtag #EllesStudio, or in our Elle’s Studio Facebook Group!

Good Times with Friends with Tazhiana Gordon

In this season of love, it’s important to remember the people we don’t share romantic feelings for, like our friends! We can celebrate our relationships with them and let them know how much we care just as much as we do our sweetheart! Guest designer Tazhiana Gordon is back to share her final post as our January guest designer, and she’s sharing a traveler’s notebook spread that celebrates friendship! Let’s take a look:

Hello, friends! I am super sad that the month is over and I have to say goodbye to you all but I get to share one more project using the January kit and add-ons, and it features RAINBOWS, because rainbow is my favorite color!

Supplies | January 2020 Kit, January Labels, You Are Loved Die Cuts, La La Love You Puffy Stickers, Little Moments Leatherette Stickers, XO Wood Veneer, Wood Veneer Sweethearts, Love Is 6 x 8.5 Paper Stack, Mini Dated Extras Stamp

I started off by pulling that white paper with the rainbow diagonals from the Love Is 6 x 8.5 Paper Stack and used a heart stencil to add some distress inks, both to repeat the rainbow color scheme as well as to repeat the hearts in this month’s products. I thought the rainbow stencil on the striped paper came out so good and I was really pleased I went for it!

On the right side, to reinforce the rainbow theme, I pulled out the striped paper from the same Love Is Paper Stack. I thought all of the bright colors went together perfectly with the mostly white striped paper. To begin embellishing, I staggered the January Labels in contrasting order to the rainbow stripes and added a quick word of journaling to each label. I love that they read like a sentence once they were all laid out. On the bottom of the page, I began to arrange my photo cluster. 

I made a flip element using my photo and two of the journaling tags from the January 2020 Kit and added my journaling to the inside tag of the flip. Net, I used the Mini Dated Extras Stamp to add the date in grey ink and added some hearts from the You Are Loved Die Cuts to fill the empty space. Finally, I added a banner using the Little Moments Leatherette Stickers and a Wood Veneer Sweetheart to finish embellishing the cluster. 


On the left side, I used a white tag from the You Are Loved Die Cuts to ground the XO Wood Veneer and added the “love you” La La Love You Puffy Stickers below to complete my title. Next, I scattered some Little Moments Leatherette Stickers on that side and embellished the labels on the right side with La La Love You Puffy Sticker hearts and called the layout done!

You can see how this spread came together here, in my process video:

It has been such a joy making and sharing with you all this month. I hope you were inspired to pick up your own Elle’s Studio January products and tell some stories in ways you might not have before. Thank you and keep it crafty, friends! 

Hi! I’m Tazhi and I’m a 29 year old crafter from Brooklyn, NY. I live with my husband and two kittens, Astoria and Minerva. 

I discovered the whole idea of memory keeping a few years ago and always kept albums of photos throughout high school. It wasn’t until August of 2016 that I stumbled onto the memory keeping community on Instagram and plunged headfirst down this rabbit hole. Since then, I’ve added different mediums to my repertoire and I think I’ve finally developed a personal style. I love just about all mediums this hobby has to offer, from pocket pages to large traditional scrapbooking. I think there is deep, deep value in telling your own story and not letting someone else tell it for you, and that is what keeps me attached to the glue and the paper and the stickers. When I’m not making, I’m drooling over what other people are making, writing or listening to music. It’s an absolute joy to be able to share my stories with you! 

Thank you so much, Tazhiana, for guesting for us this month! We loved seeing all of your colorful, layered creations using the January kit and add-ons in a pocket page spread, on a beautiful layout, and this traveler’s notebook spread!

We know that Tazhiana inspired you, but why let it stop here? Follow her at the links below to see what she’s creating in the future!

Blog – https://preciselytazhi.wordpress.com/

IG – https://www.instagram.com/preciselytazhi

FB – https://www.facebook.com/preciselytazhi

Youtube – https://www.youtube.com/tazhianagordon

Sketch Day with Kristina Proffitt

Each month during 2020, we are sharing two different sketches with you, geared toward boosting your creativity and helping you to create in a time crunch! We’d love for you to take these sketches and create with them, sharing your projects on Instagram using the hashtag #EllesStudio and in our Elle’s Studio Facebook Group!

Today, we’re excited to see how design team member Kristina Proffitt is simplifying today’s sketch to fit her style, proving that there is no right or wrong way to use a sketch! Let’s take a look!

Hi friends! Can you believe it’s already the end of January? Wow. Happy 2020 to you! I’m here today to share a super great sketch with you and share my take on it! 

First of all, here is the sketch I was working with:

Here is the layout that I created based on the sketch:

Supplies | January 2020 Kit, You Are Loved Die Cuts, La La Love You Puffy Stickers, Valentine Multi Color Puffy Alphabet Stickers, Love Is 6 x 8.5 Paper Stack, Love You Lots Stamp 

I decided to create an 8.5″ x 11″ layout using the sketch. Just because a sketch is sized at 12″ x 12″, that doesn’t mean you have to recreate it at that size. This sketch worked perfectly for this size of layout!

The first thing that I did was cut a sheet of the gray heart patterned paper from the Love Is Paper Stack and placed it in the center of my layout. Next, I printed three photos of my dog Marlie with her favorite dog toys (her carrot in particular) and placed them a on top, at varying heights. I loved the layered look in the sketch, so I cut a strip of the striped paper from the Love Is Paper Stack and adhered that along the top of the gray patterned paper. I’m not big on layering, but you can take an idea from a sketch and put your own spin on it to simplify!

I loved the large title on the sketch, but decided to instead add a circle that I cut out from the “love you lots” dotted patterned paper from the Love Is Paper Stack to use it in its place. I added the “favorite” word of my title, along with hearts from the La La Love You Puffy Stickers to the right of my circle, and although it’s not as predominant as the sketch layout, I still love it. I paired the script word with the sans-serif font in the Valentine Multi Color Puffy Alphabet Stickers to complete the title. It is so fun to mix and match fonts, sizes and colors in a title!

I loved the numbers on the photos in the sketch and this element worked perfectly for my page. I used tags from the January Kit, a label die cut from the You Are Loved Die Cuts and another circle punched from the dotted patterned paper in the Love Is Paper Stack to create little resting spots for each of the numbers. 

The big “XO” on the sketch inspired me to use the “X” and “O” banners from the You Are Loved Die Cuts. I stapled them onto the photo—super simple!

Lastly, I decided to print out my journaling and include it at the bottom of the layout, instead of the top of the layout like the sketch. I loved the colorful strip that I added on the top, so I repeated that along the bottom, too. For the large element on the bottom right, I decided to use a heart from the You Are Loved Die Cuts, stamping “this is true love” from the Love You Lots Stamp to the top. I also added border cut from a tag in the January Kit right above the journaling for a bit of whimsy. 

I really love how a single sketch can be so inspiring. You can create a project exactly like the sketch or let the inspiration you get from the sketch direct your creativity. I did a little bit of both with this layout, and I love the way it turned out. I highly recommend using sketches from time to time to not only stretch your creativity, but to also give your creativity a reboot! It’s a great way to be inspired, use your products and get your stories told!

January Design Team Inspiration: Volume Three

Welcome to the third installation of our Design Team Inspiration posts! In case you missed them, check out the January reveal and volume two posts for even more cards, layouts, traveler’s notebooks and pocket pages created using the January kit and add-ons! We know that these projects will inspire you to record your special memories and document the ones you love this month:

Valentine’s Cards by Candace Perkins – supplies used | January 2020 KitYou Are Loved Die CutsWood Veneer SweetheartsLove Is 6 x 8.5 Paper Stack

Our Story by Marsha Farris – supplies used | January 2020 KitI Adore You StickersYou Are Loved Die CutsLa La Love You Puffy StickersLittle Moments Leatherette StickersWood Veneer Sweethearts, Wood Veneer NumbersLove Is 6 x 8.5 Paper StackLove You Lots Stamp, Stanley Jr. Alphabet Stamp

20 Years by Suzanna Lee – supplies used | January 2020 KitJanuary 2020 Cut Files, January LabelsI Adore You StickersYou Are Loved Die CutsLa La Love You Puffy StickersWood Veneer Sweethearts, XO Wood VeneerWood Veneer NumbersLove Is 6 x 8.5 Paper StackMini Dated Extras Stamp

XOXO by Amanda-jayne Baldwin – supplies used | January 2020 KitI Adore You StickersYou Are Loved Die CutsLa La Love You Puffy StickersLittle Moments Leatherette Stickers, Wood Veneer SweetheartsLove Is 6 x 8.5 Paper Stack

Special January Story by Jennifer McMurtrey – supplies used | January 2020 KitJanuary 2020 Cut FilesLa La Love You Puffy Stickers, Monthly Puffy Stickers, Little Moments Leatherette Stickers, Love Is 6 x 8.5 Paper StackLove You Lots Stamp

You Are Loved by Kristina Proffitt – supplies used | January 2020 KitYou Are Loved Die CutsI Adore You StickersLa La Love You Puffy StickersLittle Moments Leatherette Stickers, XO Wood Veneer, Wood Veneer Numbers,  Love Is 6 x 8.5 Paper StackLove You Lots Stamp

He Loves by Melissa Mann – supplies used | January 2020 Kit, January 2020 Cut Files, January 2020 Print and Cut LabelsYou Are Loved Die CutsI Adore You Stickers, La La Love You Puffy StickersLittle Moments Leatherette StickersLove Is 6 x 8.5 Paper Stack, Love You Lots Stamp

First Birthday by Steph Grimes – supplies used | January 2020 Kit, January LabelsYou Are Loved Die CutsI Adore You StickersLa La Love You Puffy StickersValentine Multi Color Puffy Alphabet Stickers, Little Moments Leatherette Stickers, Wood Veneer SweetheartsLove Is 6 x 8.5 Paper Stack, Mini Days of the Week Stamp

Show us what you’re creating with your monthly kit and add-ons! Share on Instagram using the hashtag #EllesStudio, or with fellow ES fans in our Elle’s Studio Facebook Group—a place where you can find more inspiration and friendly chats!