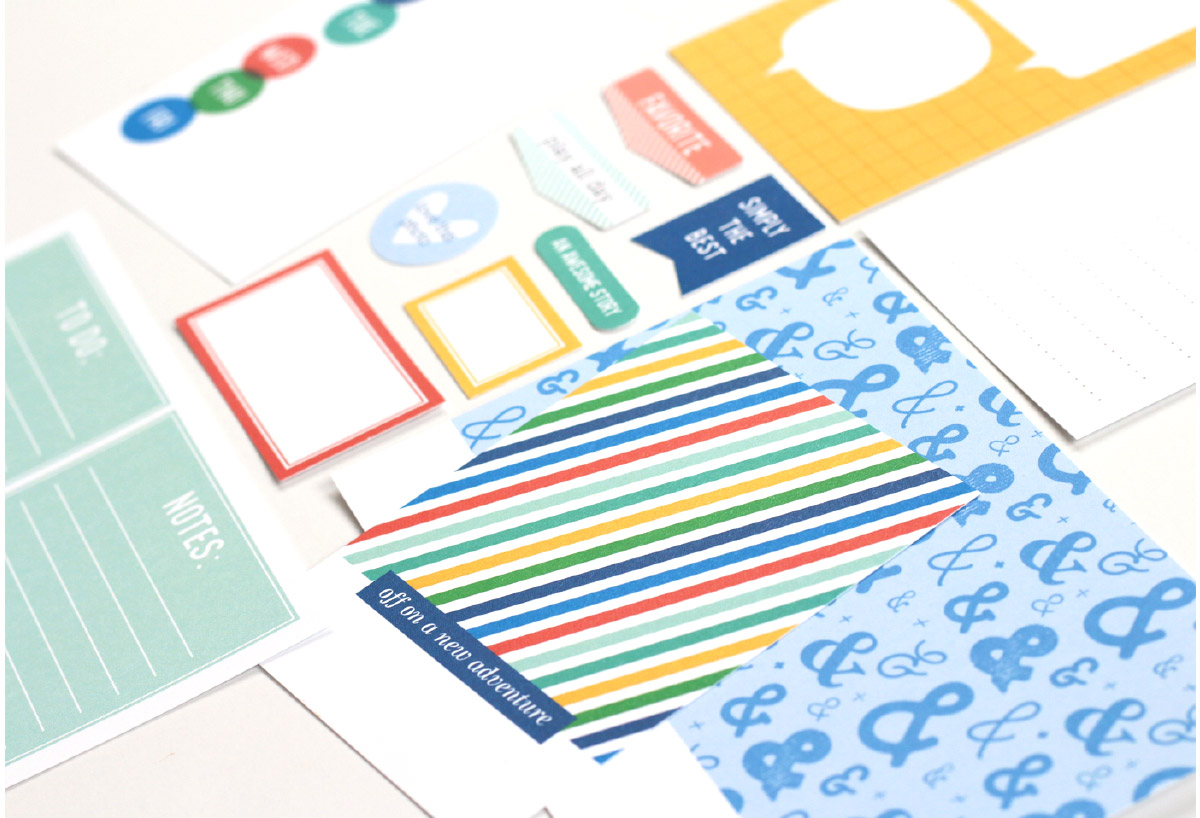
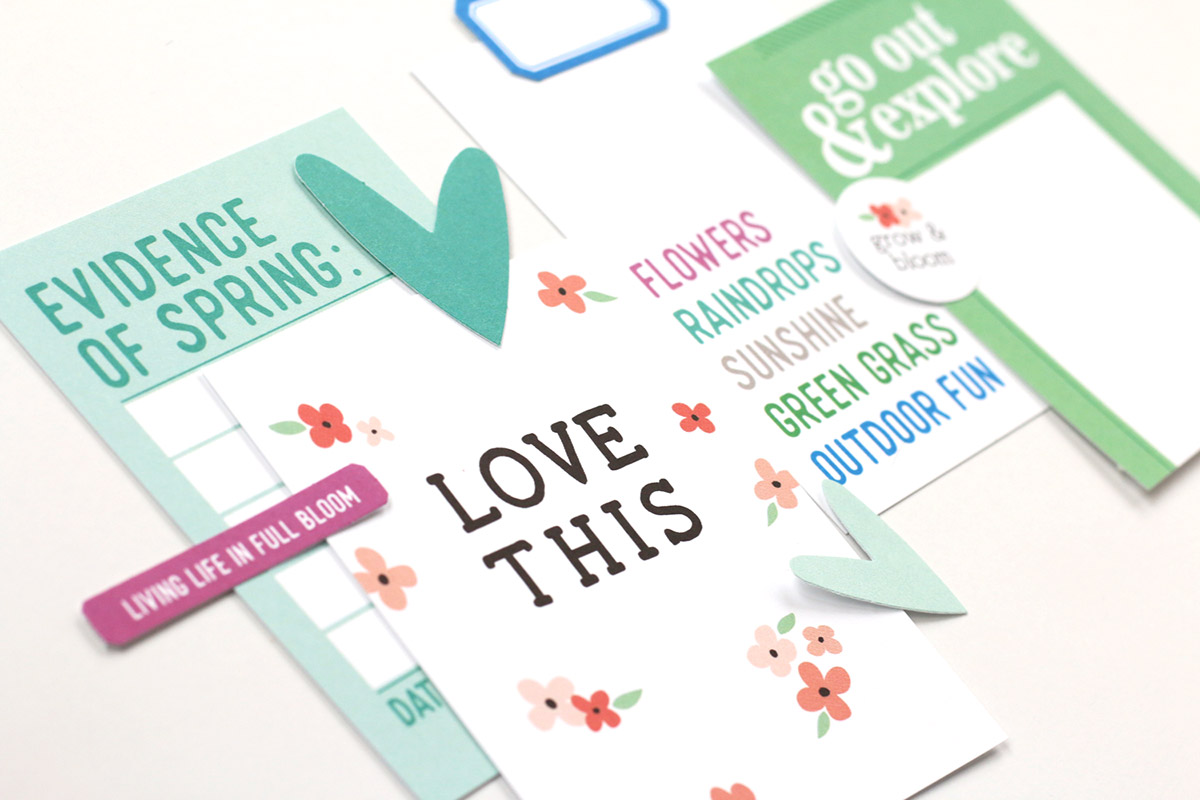
We are just two days away from our March kit and add-ons reveal and we are so excited to be able to share these fun sneak peeks of the beautiful projects our team made using all the new products that will be available soon! Our March reveal will be full of exclusive products that we’ve designed and will have you ready to document your March stories and take you right into April!
Not a subscriber? Don’t wait any longer! You can pre-order our March kit now and lock in our $9.99 kit price by starting a subscription today! You’ll want to choose our SUBSCRIBE & SAVE option to get signed up and start your subscription with our March kit. We will then hold your kit and you’ll be ready to bundle and save at our March 10th reveal! Details on how to bundle with your subscription order will be emailed to you once you have purchased this product.
Kit subscribers, don’t forget! Along with being able to bundle any products from our shop that will ship for FREE with your kit during our 24-hour bundling period, starting on the 10th at 8:00 am Pacific each month, our subscribers will also have access to special discounts on select items! These discounted items can be found in our SALE section during our 24-hour bundling period, and you must be logged into your kit subscriber account to see them. Quick note: Our kits and add-ons are available without a subscription each month, too.
This month we also have a special SURPRISE: We are excited to be celebrating 13 years in business this month and we are so thankful for all of your support and friendship over the years! We love and appreciate you all so much! Look for fun giveaways during the month on our Instagram account! Plus, all of our current and new kit subscribers will be receiving and Elle’s Studio pen with their March kit subscription!
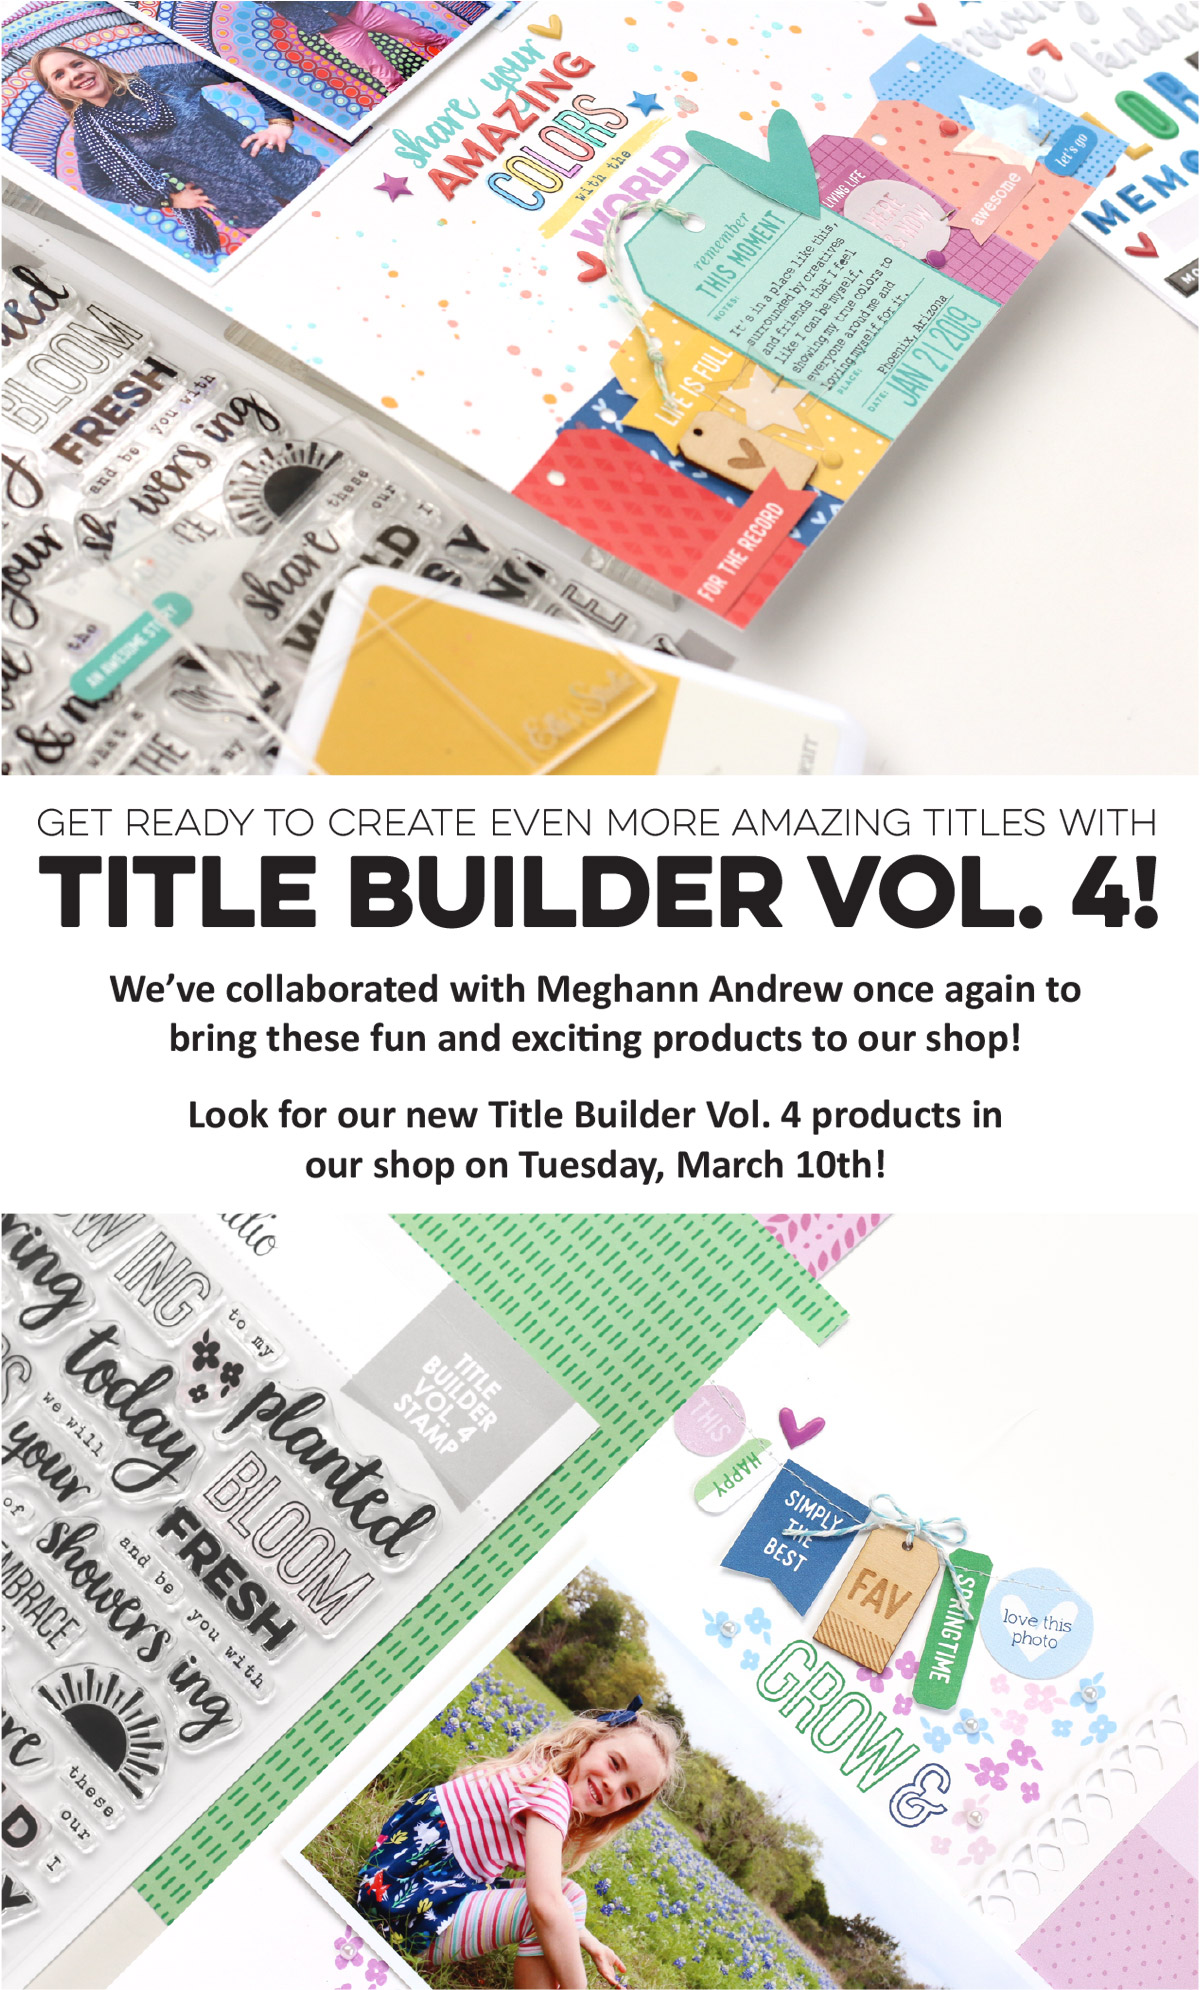
Also coming to our shop on Tuesday, March 10th is our next installment of our Title Builder collection! Get ready to use our new Title Builder Vol. 4 stamp and puffy stickers to create even more amazing titles! Our Title Builder products are designed by Meghann Andrew to help you create titles using a mix of stamped words and phrases. You’ll have endless possibilities by varying your words and ink colors, along with adding stickers and other products!
Make sure you set your alarm and mark your calendar for this Tuesday, March 10th at 8 am Pacific! We hope to see you there!
Comments Off on March Design Team Sneak Peeks | Share This
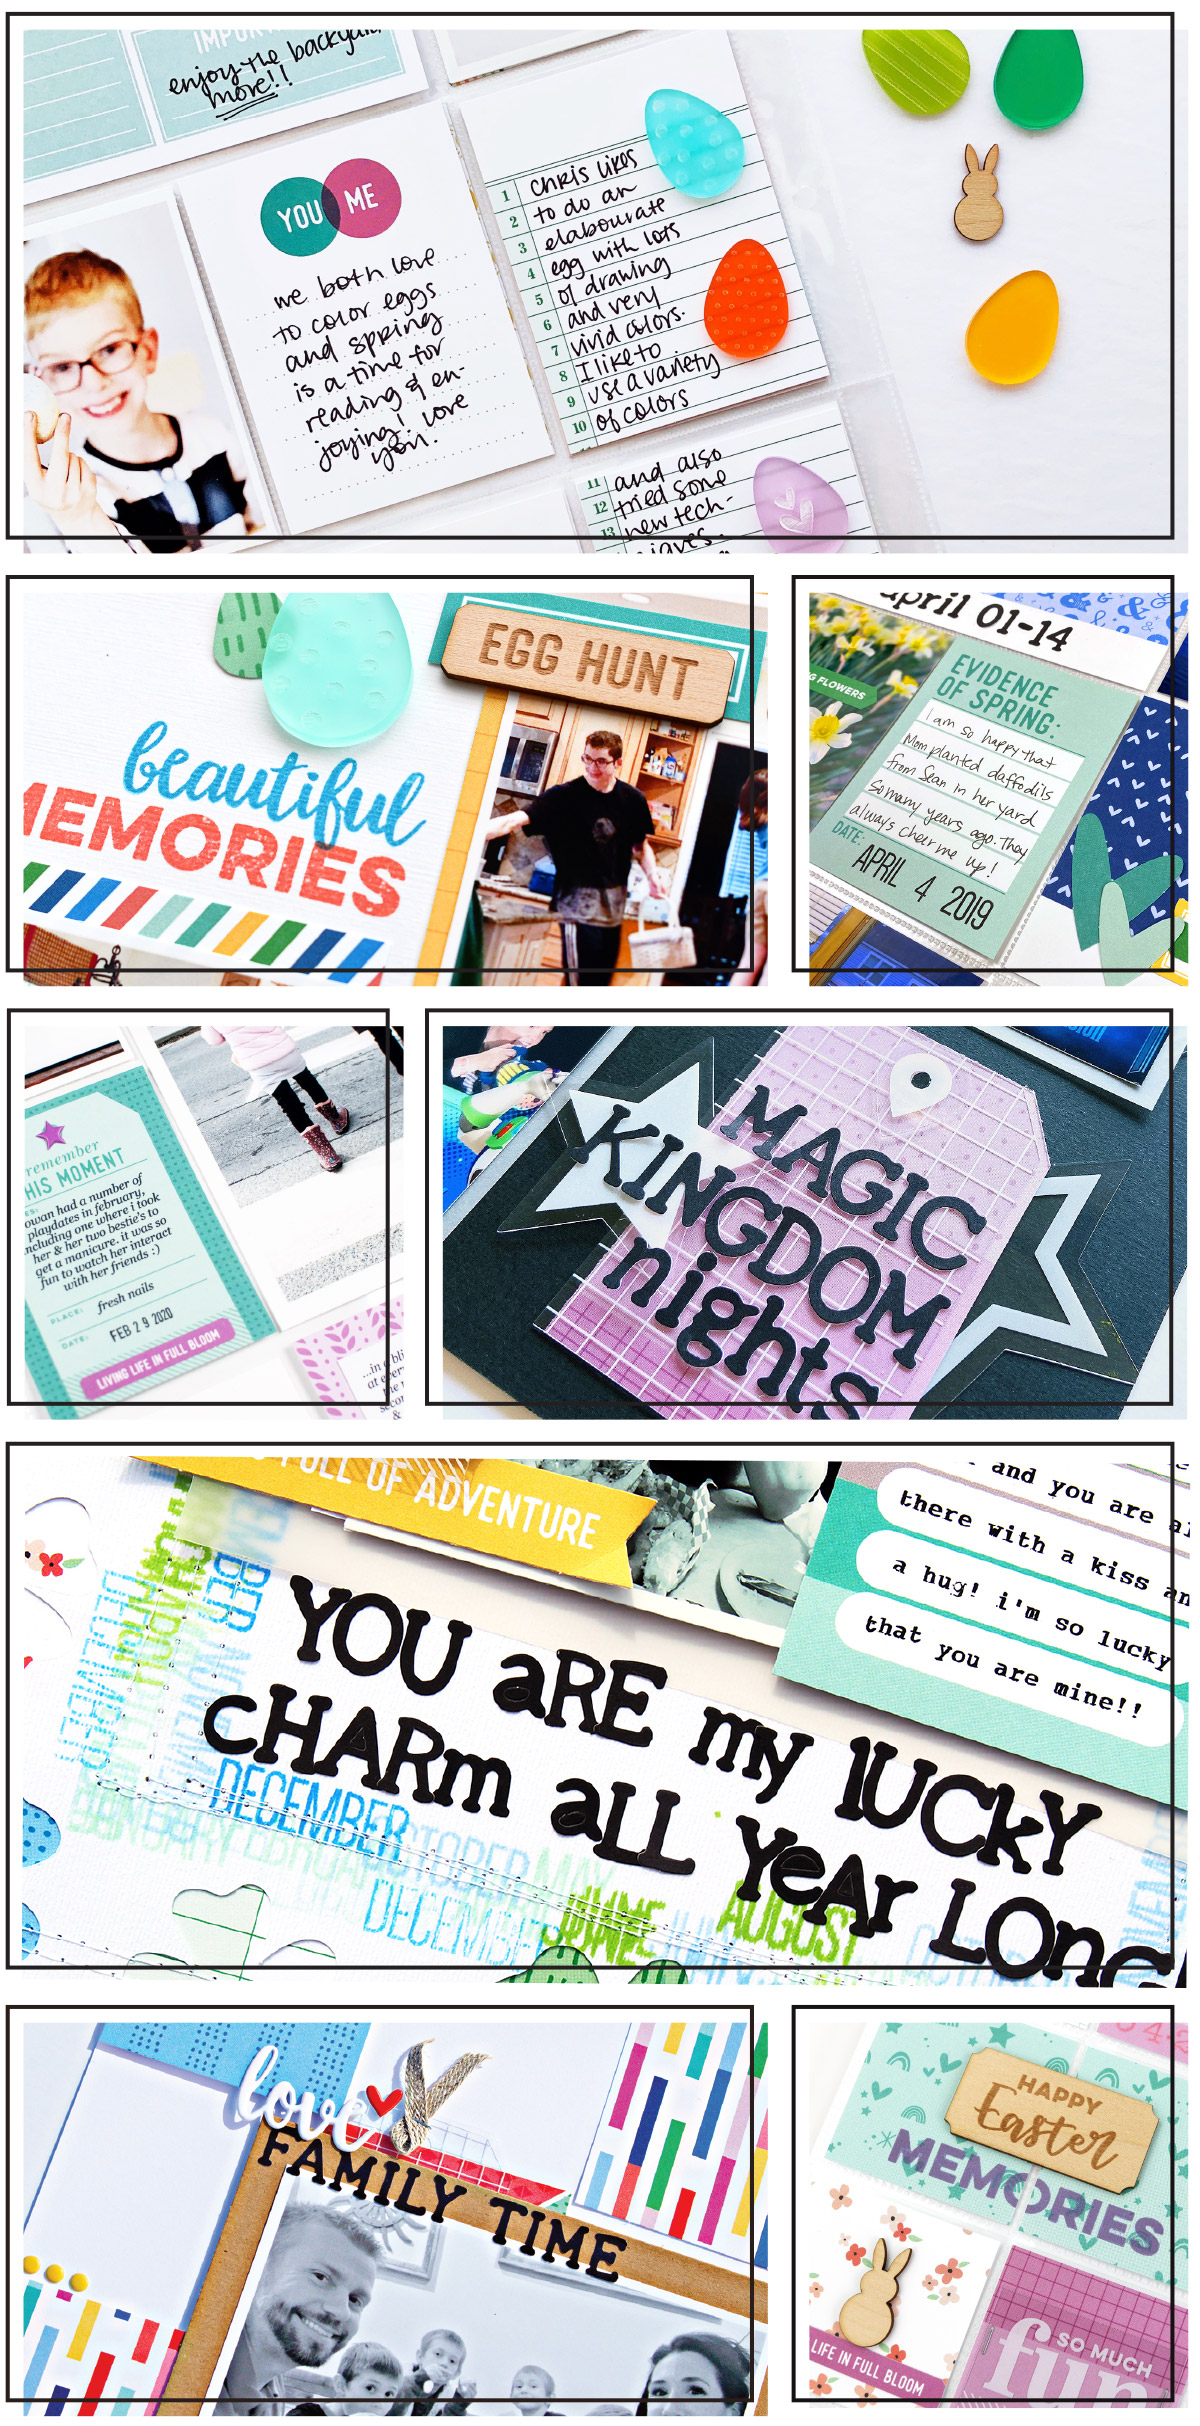
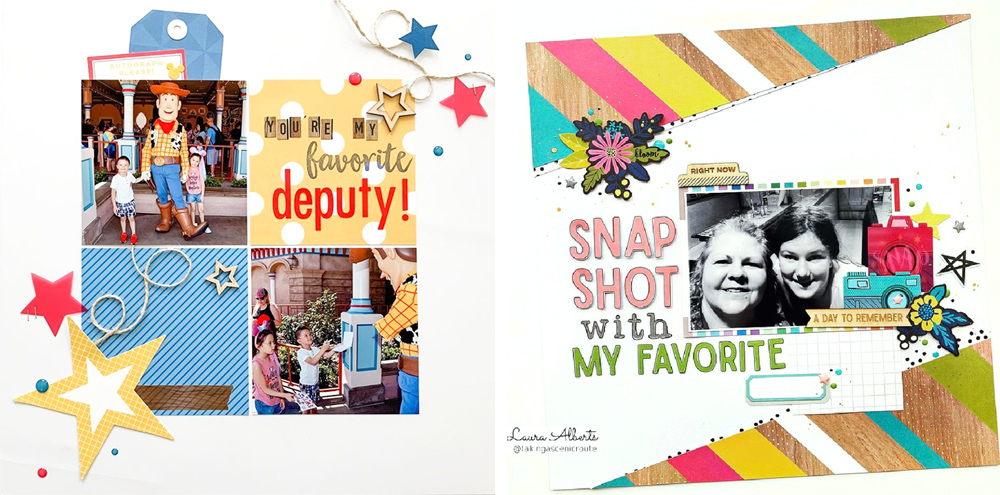
Here are Elle’s Studio, we have had a great start to 2020, and it looks like our friends have, too! We have seen some fabulous projects created with the #EllesStudio hashtag on Instagram, and we’d like to share the six that were posted in February that caught our eye:
On the left, Youngmei (@scrappytoki) created a wonderful layout to record a fun, Disney moment using our retired paper stacks and Title Builder stamp! What a fun grid design! On the right, Laura (@takingascenicroute) created a gorgeous layout using our retired Noteworthy collection. We just love her title work using Paper #5!
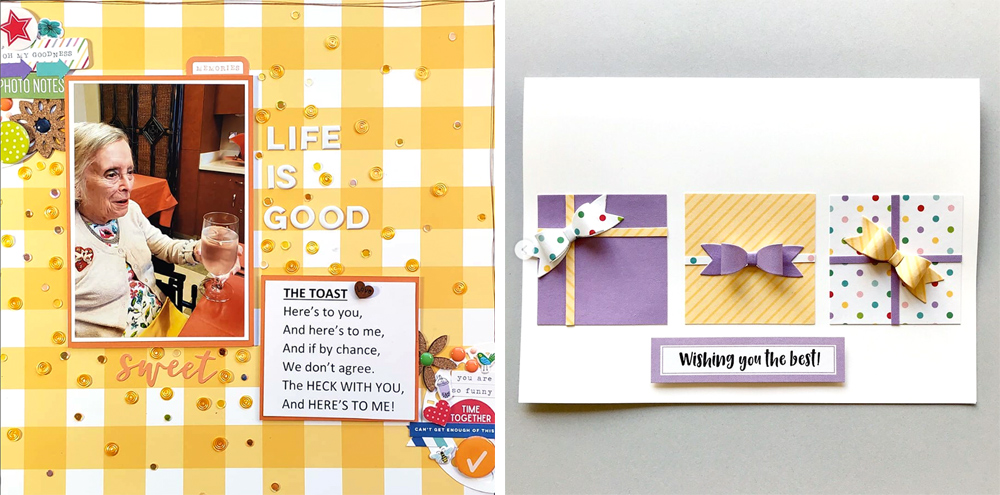
Yellow makes us happy, and these two projects just scream spring to us! On the left, Liza Jane (@worktoscrap) documented a fun birthday using our Hello Happy Puffy Words and die cuts from our monthly kits and collections. What a celebration! On the right, Sharon (@s_gurlcreates) created this card using our Springtime Paper Stack inspired by a blog post from DT member Candace Perkins, and we think it is just gorgeous!
Just for sharing their projects, these six paper crafters will each win a $10 gift certificate to the shop! Thank you so much for posting your projects and using the #EllesStudio hashtag, ladies! Please email us at info@shopellesstudio.com to claim your prize!
Will YOU be featured next month? Simply use our products on your next project and post to Instagram using the hashtag #EllesStudio for a chance to be featured here on our blog, and win a gift certificate to the shop! We can’t wait to see what you make!
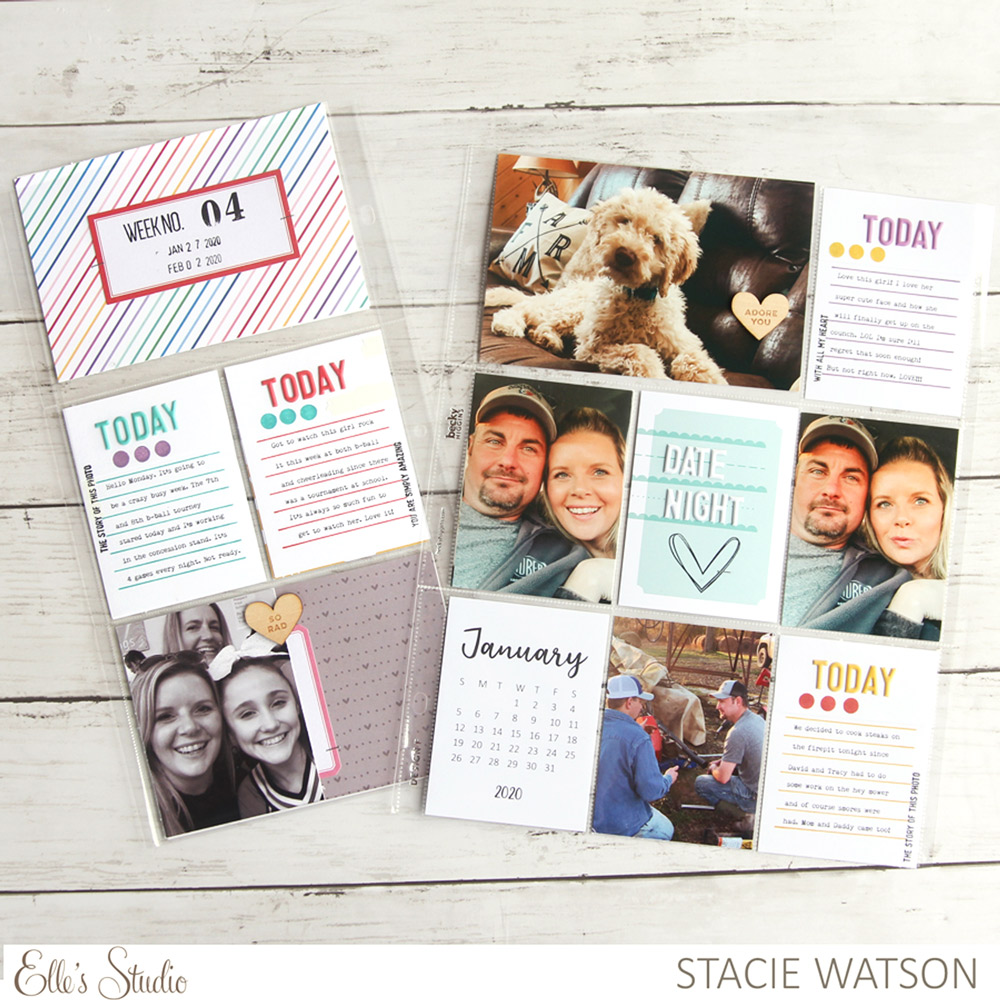
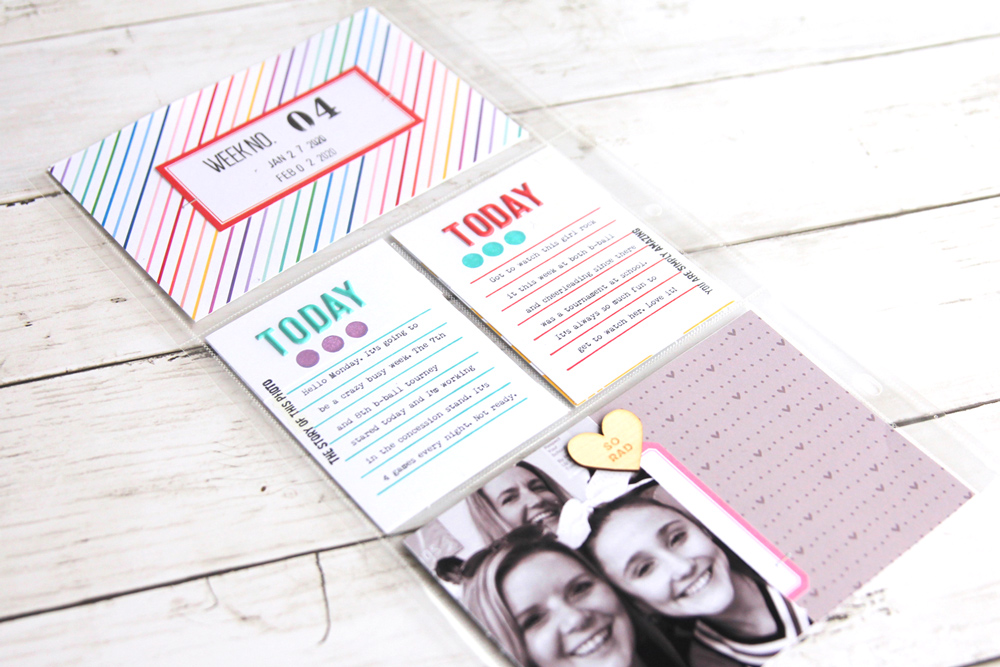
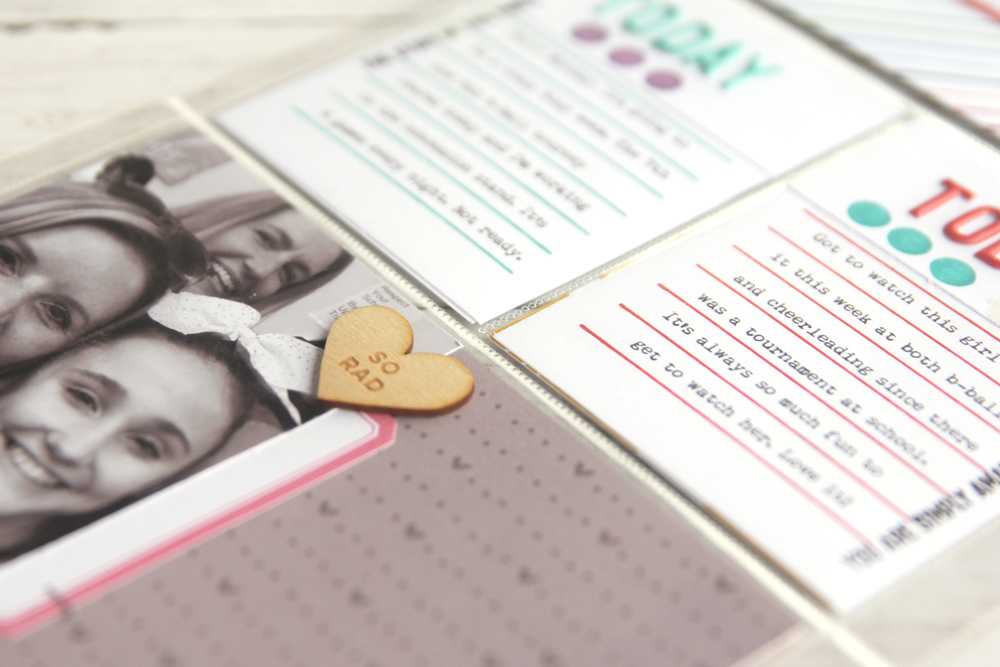
Repetition is one of the principles of design that brings any page together by creating similar shapes, colors or other elements that our brain can easily process. Today, design team member Stacie Watson is sharing how she used repetition and her Noted Vol. 2 Stamp to create a quick, but beautiful pocket page spread. Let’s take a look!
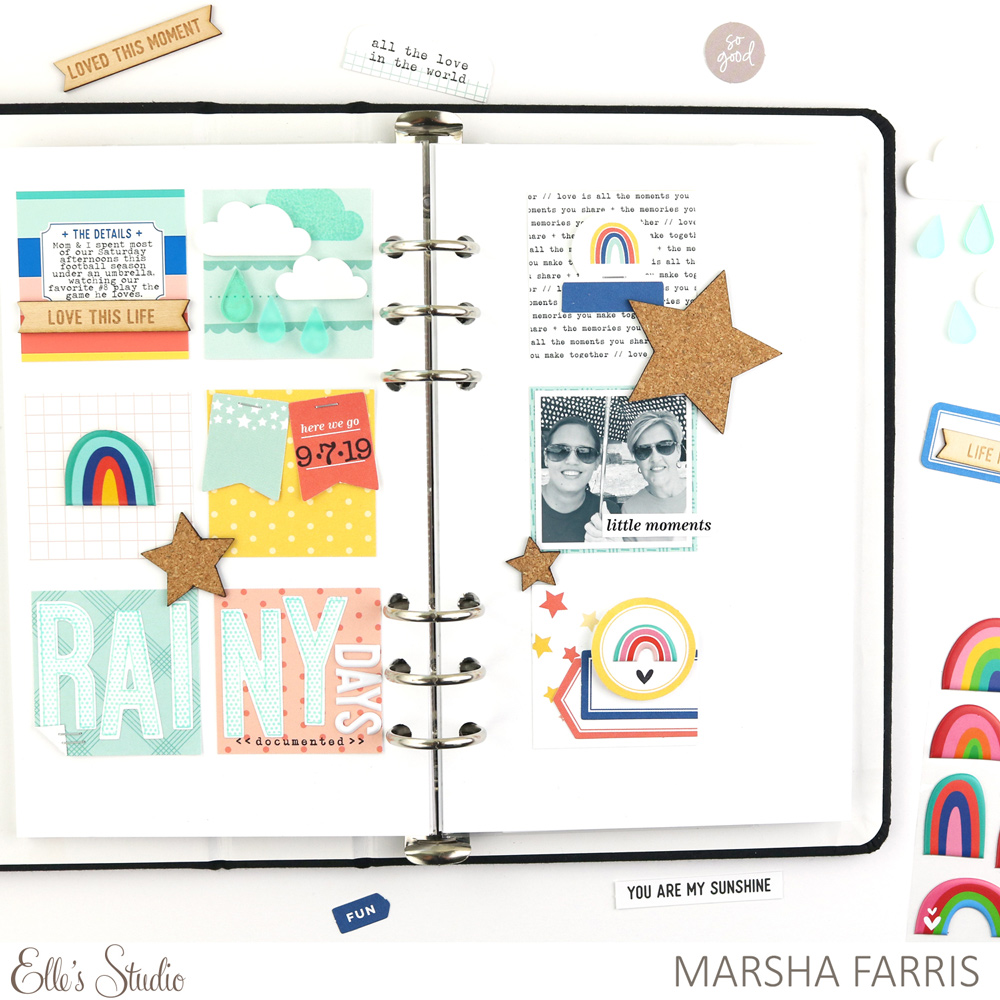
Hey hey y’all! It’s Stacie back with you today to share a new pocket page spread. Maybe just like you, I am behind on my 2019 and 2020 albums. One thing I’ve learned over the years when it comes to scrapbooking (in any form) is that sometimes, easy is key. There are a lot of times I want to work on something, but don’t have hours on end to spend in my craft room. This is where easy and repetition go together, using the Noted Vol. 2 Stamp and a selection of Elle’s Studio puffy alphabet stickers!
Going into this spread, I knew that I wanted to keep it simple and get it done. Using the Noted Vol. 2 Stamp was the perfect way to keep it simple and get it done! With the Noted Vol. 2 Stamp there are several different journaling options to choose from, but in the end though I decided to go with the simple straight-lined stamp.
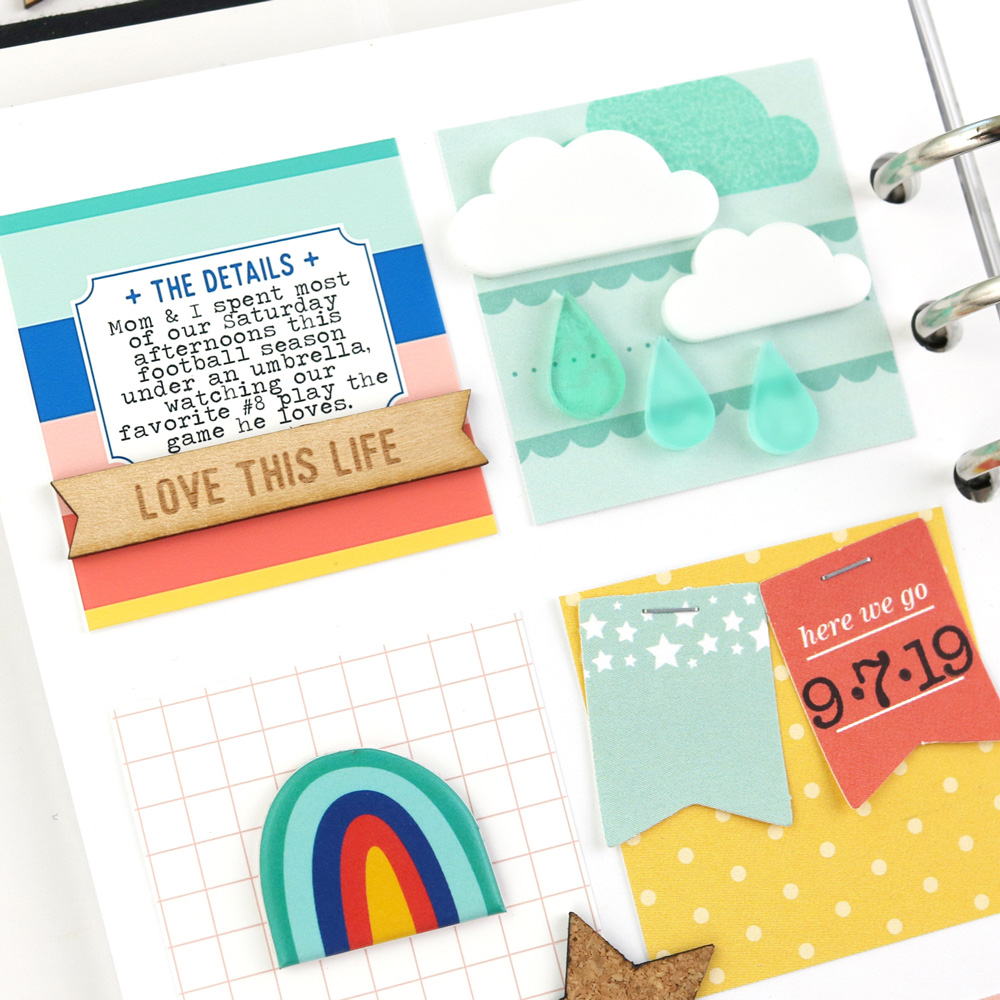
I loved the colorful, striped paper in the Love Is 6 x 8.5 Paper Stack and knew that I wanted to use that as my title card for the spread. From there, I printed out the photos I wanted to use so I would know how many journaling tags I needed to create. Making the journaling tags was super simple and I love how they turned out! I chose some inks to match the colors in the striped paper from Love Is 6 x 8.5 Paper Stack and cut down white cardstock to a 3″ x 4″. I am not a fan of my handwriting and most of the time I print out my journaling. Keeping that in mind, I knew that I wanted the stamp to be in the same spot on all the journaling tags (to keep from having to measure multiply times when I set up my layer in Photoshop). To make sure it was in the same exact place on all four tags I used my Tim Holtz Stamp Platform. It took me less than five minutes to stamp out the tags in different colors.
After the tags were all stamped, I set up my blank layer in Photoshop, typed out and printed my journaling. Since they were all stamped in the same spot on the same size paper I only had to set this up once. I then added the puffy alphabet sticker “today” word to the top of each tag in the coordinating color of the Noted Vol. 2 Stamp lines.
Of course, no page is complete without some embellishments! Sticking with the same colors from the striped paper in the Love Is 6 x 8.5 Paper Stack and ink colors that were used, I added the small circle stamp from the Months of the Year Stamp. To add a little contrast, I stamped a different phrase stamp from the Love You Lots Stamp on each of the tags in black.
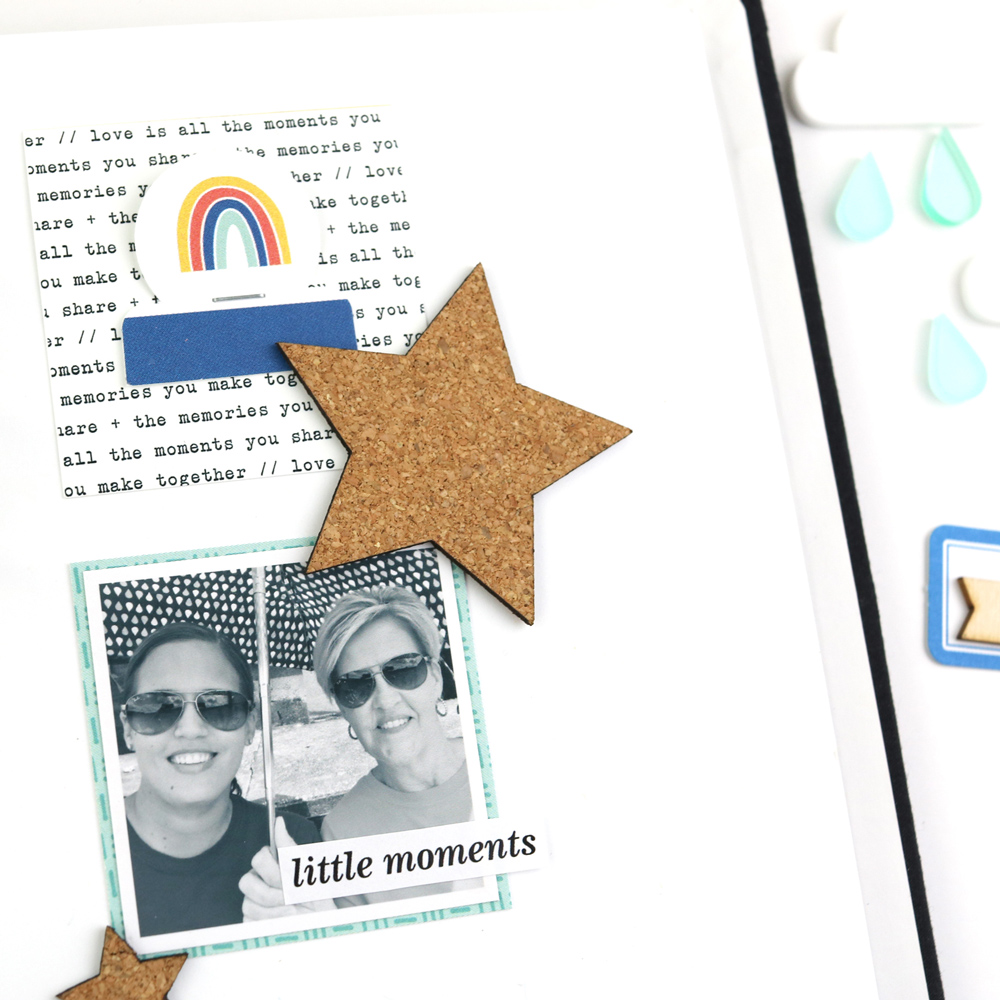
Once the journaling tags were completed, I added the rest of my embellishments to the page. I included Die Cut Labels and the Wood Veneer Sweethearts. I’m happy with how quickly the spread came together and the overall look of it. I also like knowing that since I have the Noted Vol. 2 Stamp, I can easily recreate this look or use one of the other stamps to make a similar spread look completely different.
I hope this inspires you to keep your process simple and easy, and for you to use your Noted Vol. 2 Stamp to create some journaling tags of your own! I can’t wait to see what you come up with!
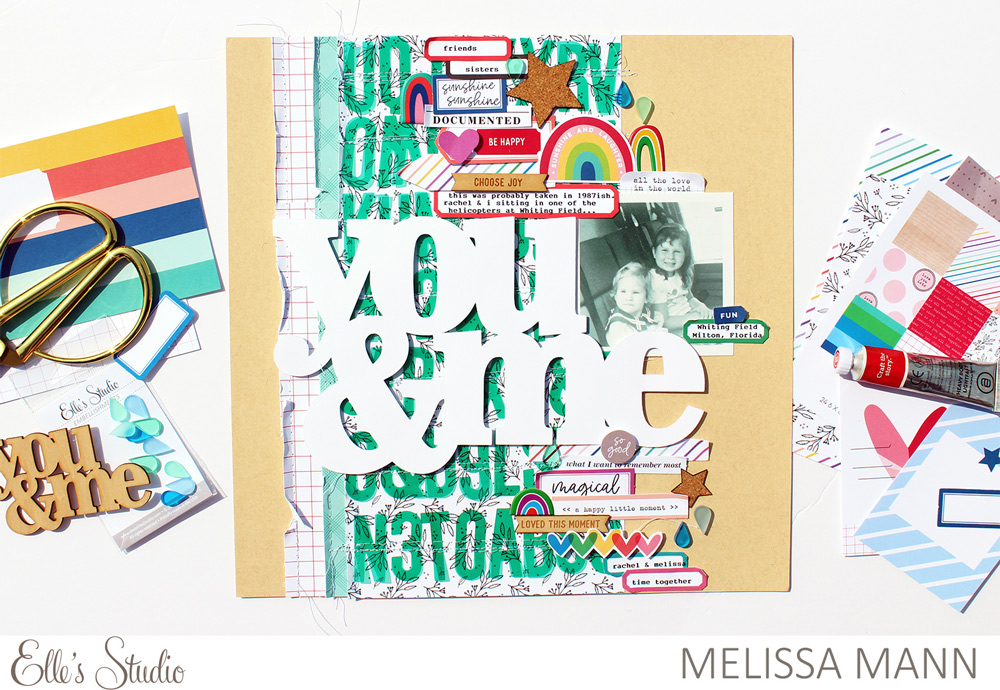
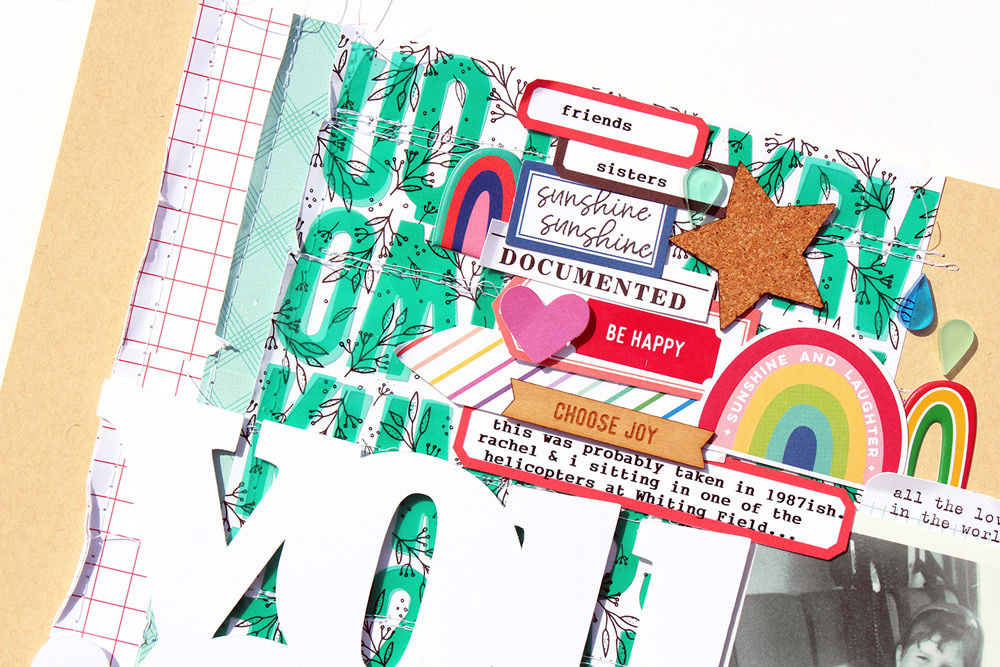
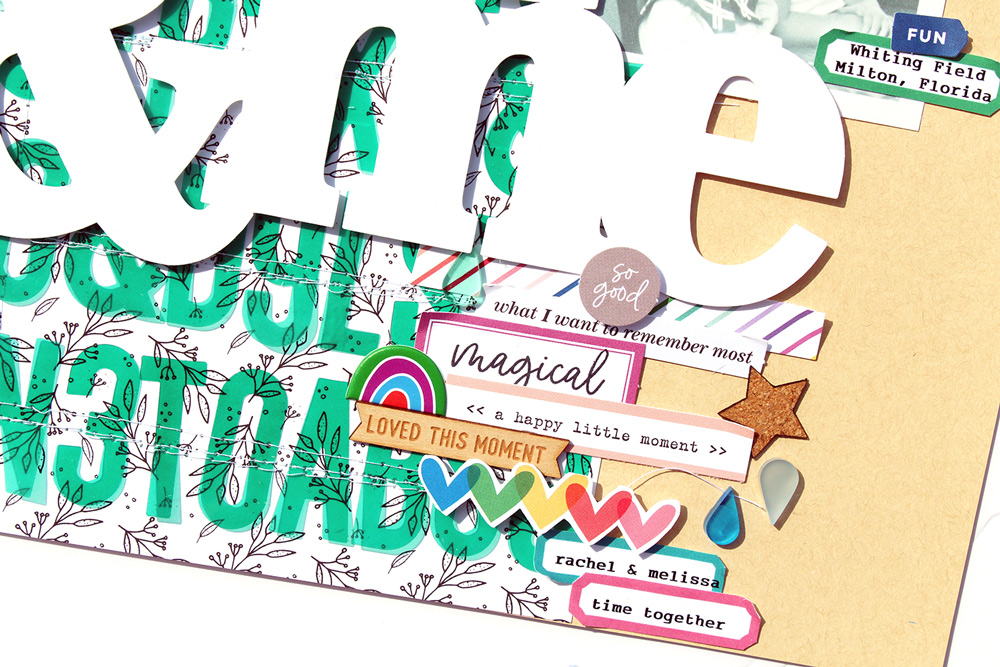
Inspiration is everywhere, and with an old photo, design team member Melissa Mann was transported back to a familiar stationary design that she loved as a child to create her new layout. Let’s find out what inspired her to create a fun and colorful new page!
Hello again, friends! This is Melissa with you on the blog today and I have one more project that I made using my February 2020 Kit and add-ons!
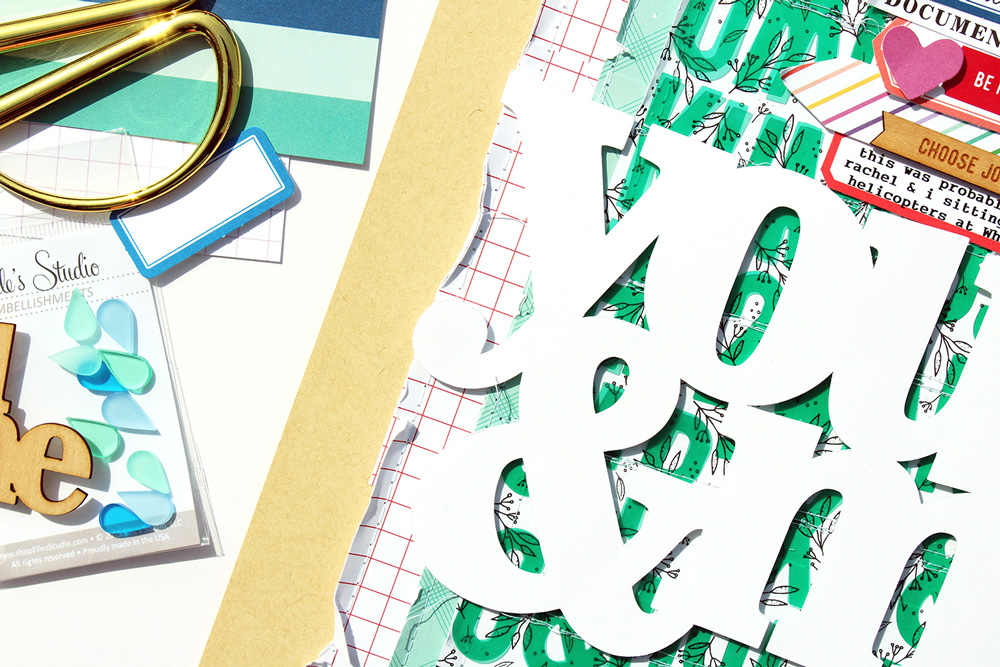
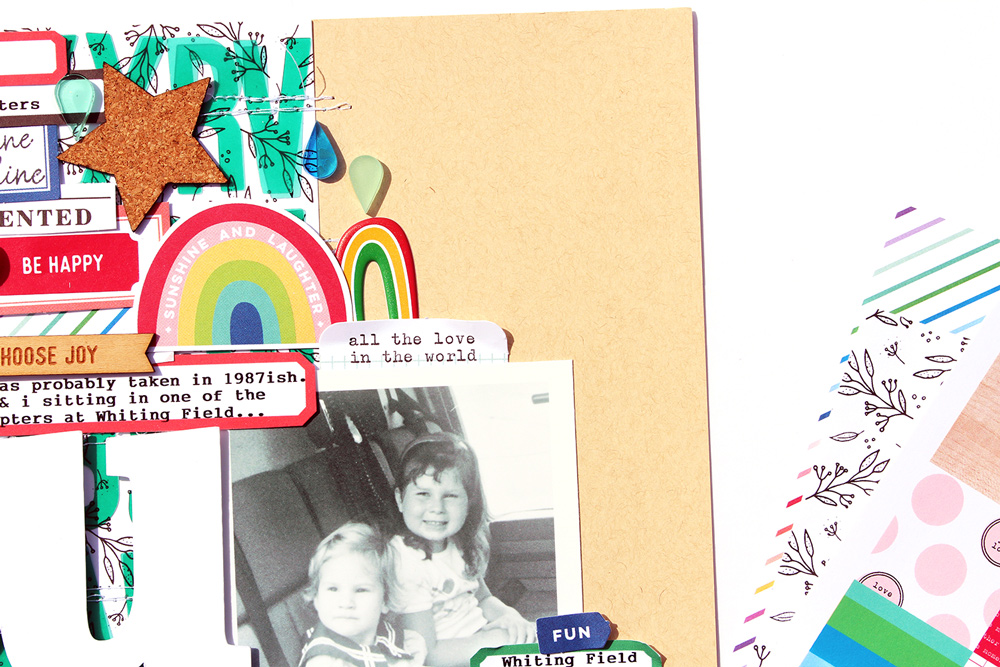
I found this old picture of my sister and I a couple of weeks ago and saved it so that I could scrap it later on. When I started to plan this project, that picture immediately popped up in my head and I knew I wanted to use it with the “You & Me” cut file from the February 2020 Cut Files as my BIG title. The picture was not in great condition, so I scanned it in and then converted it into a black and white photo. I already knew that I was going to be using a LOT of color on this layout and decided that a black and white photo would work best against all the color.
One of the things I remember most about growing up in the eighties and nineties is the love affair I had with all things Lisa Frank—all the color, rainbows and hearts! There was SO much of that in the February 2020 Kit that I knew it would be easy to mimic those design elements on this project. While I was looking for the bits and pieces I wanted to use, I found several of the 3″ x 4″ journaling tags in the February Kit that I was able to cut down or cut out a shape and include on my project. Always remember that you don’t need have to use those journaling tags whole—they can be used in so many different ways!
I printed off a sheet of the February 2020 Print and Cut Labels and used those to type up several small sentiments, or stamp on using the Sunshine & Laughter Stamp. I stacked these on the layout with the other stickers and die-cuts above and below my title. It’s super easy to run these through my typewriter and type up exactly what I want and then cut them out.
I hope you have enjoyed using your February kit this past month! Remember that the digital items that coordinate with the kit each month can make a BIG impact on your projects! Plus, you can use them over and over and over again!
As always, make sure you share your Elle’s Studio projects with us on Instagram using the hashtag #EllesStudio and in our Elle’s Studio Facebook Group! Thanks for stopping by!
Comments Off on Inspired by Childhood Iconography with Melissa Mann | Share This
With our March kit and add-ons soon approaching, you may feel the need to use what you have left over from your February kit and extras, and design team member Amanda-jayne Baldwin is here to help! She’s sharing some wonderful and creative ways to “scrap your stash,” and we know her post will leave you inspired this week! Let’s take a look:
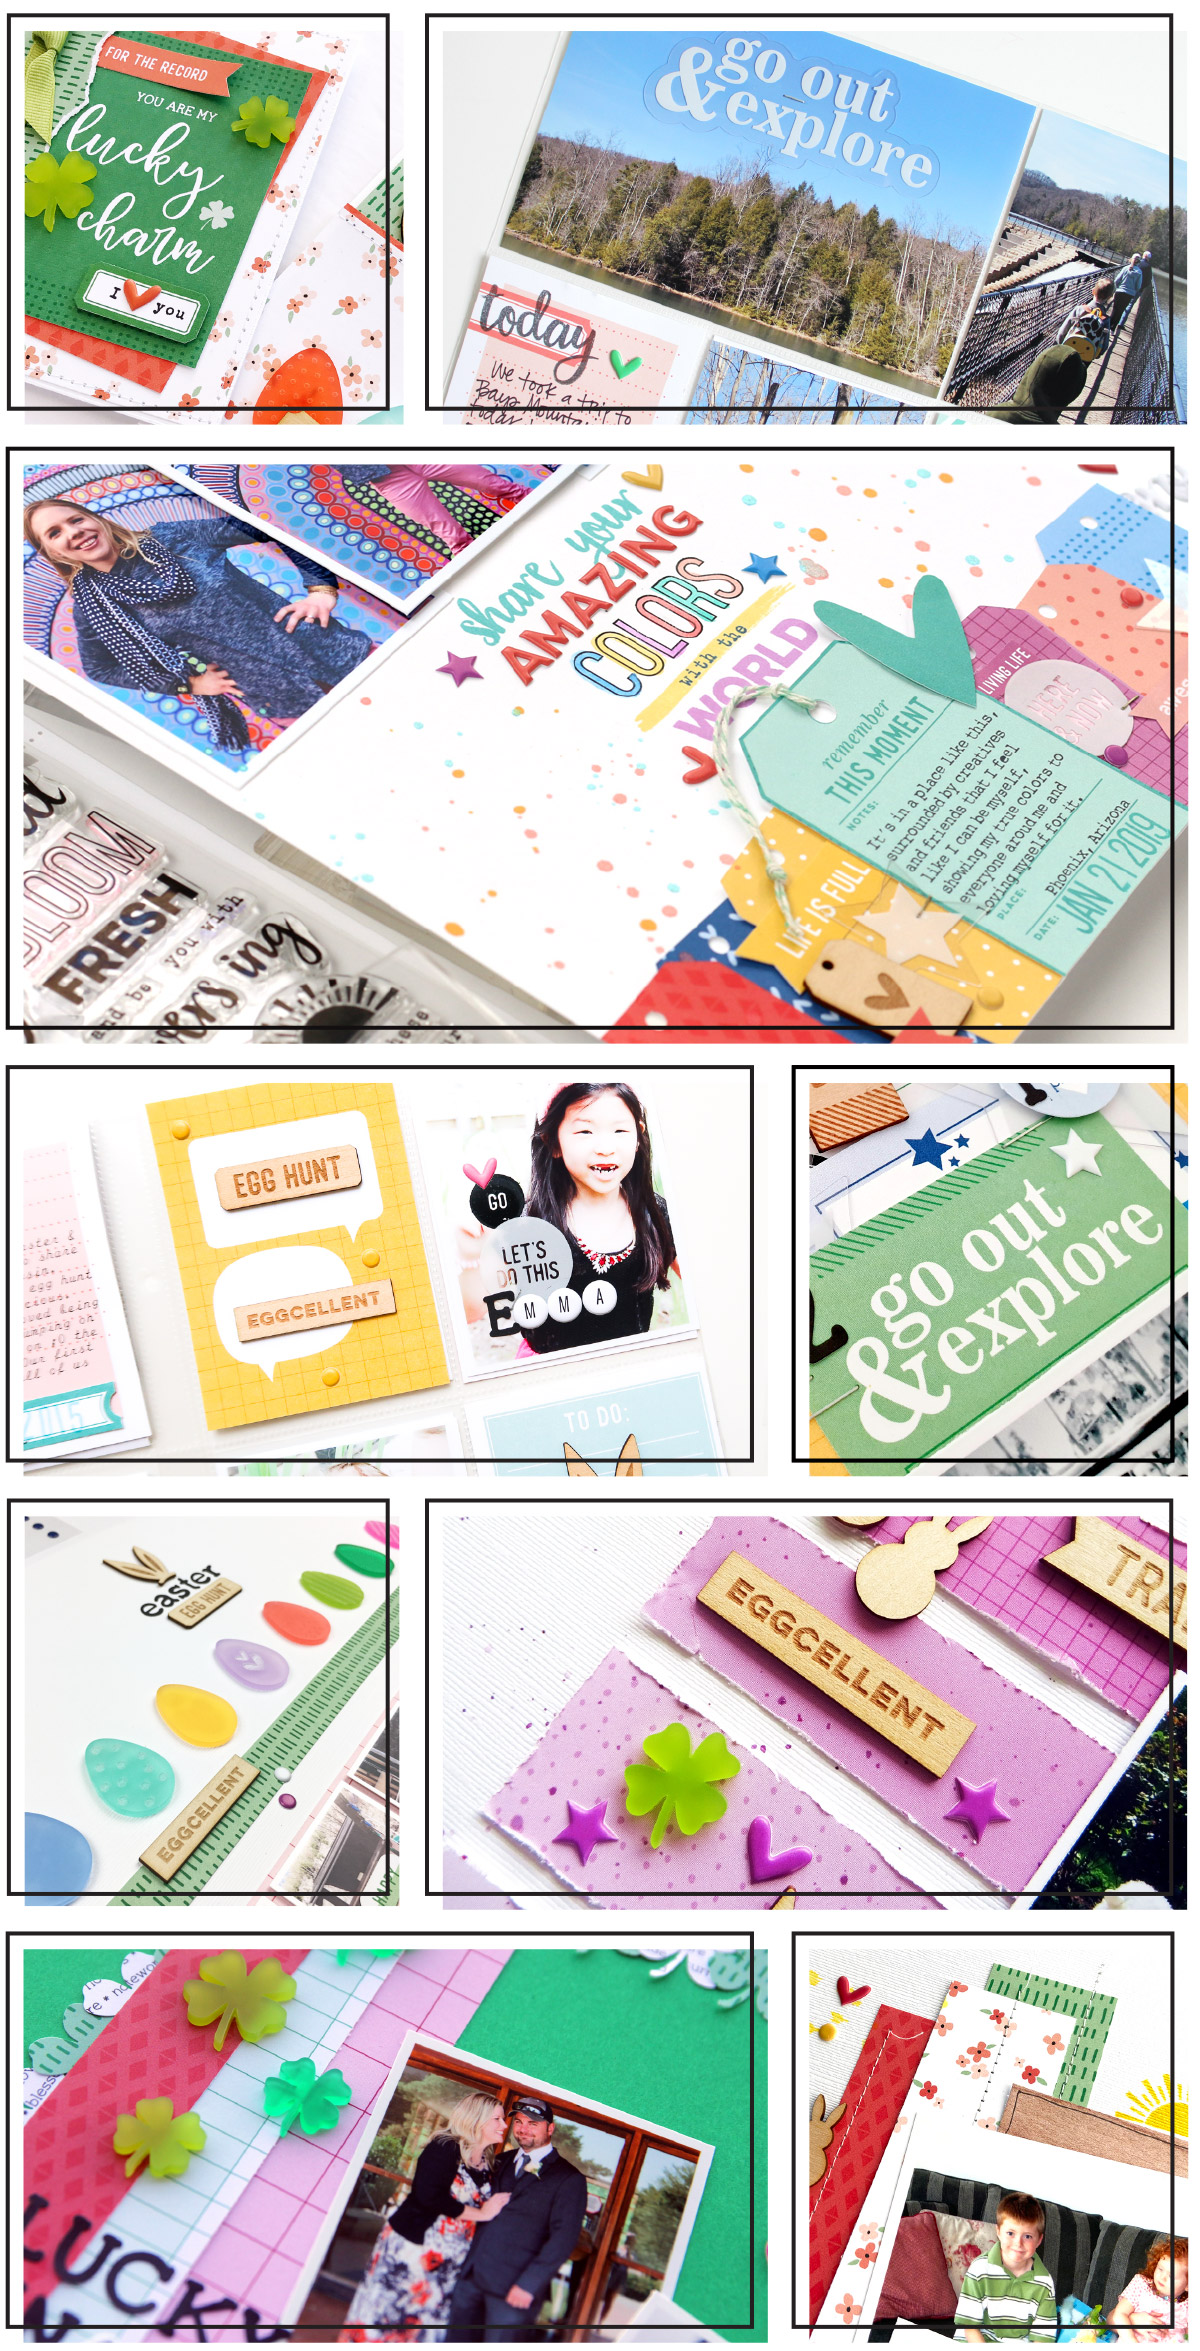
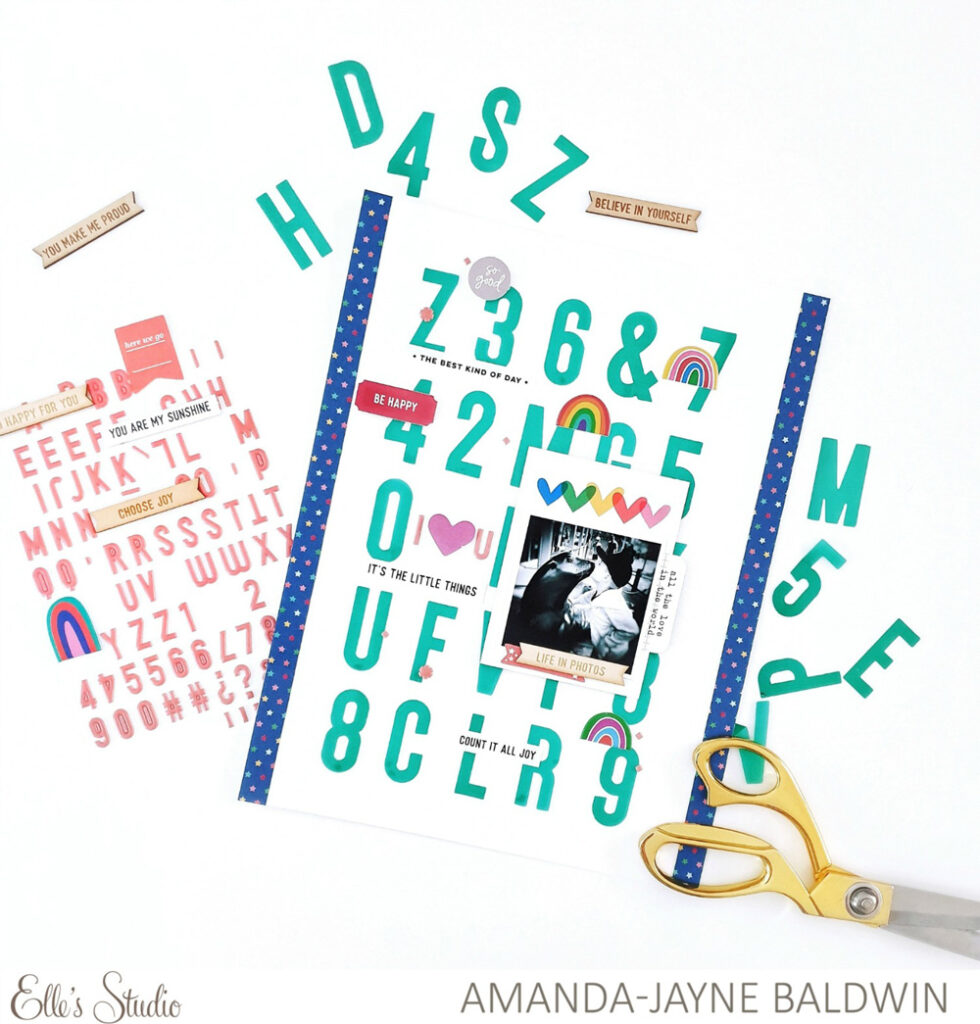
Hi Elle’s Studio friends! It’s Amanda here, and I’m back to share more “scrap your stash” inspiration while we eagerly await our new March products!
It’s no secret that the February Kit and add on items have been firm favorites of mine – I mean, all.the.rainbows!!! La la looooooove! Seriously though, the February Kit and new releases are so good that I created up a storm and I am now truly maxmizing my ‘left overs’ to create one more scrapbook page for today’s post!
Here’s what I pulled together with my ‘scraps’:
Oh wow! What a bright & fun page! You’d never know that I was struggling on a shortage of supplies! Such a clever design! Let’s take a closer look:
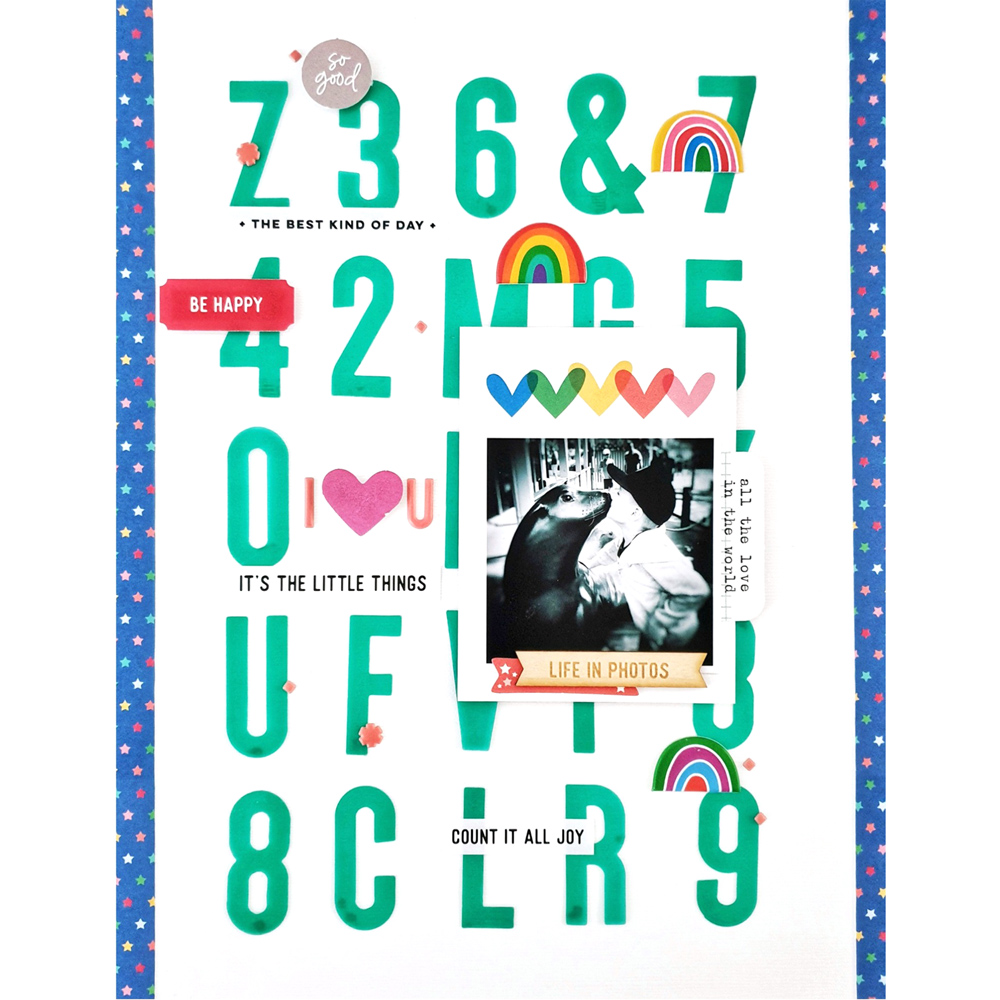
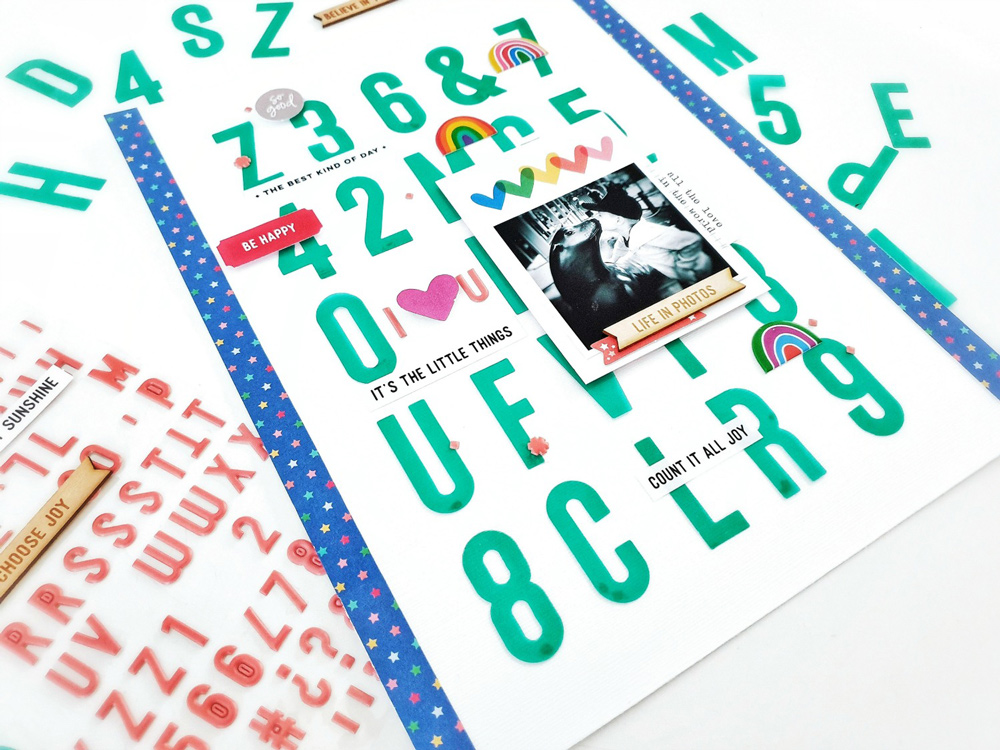
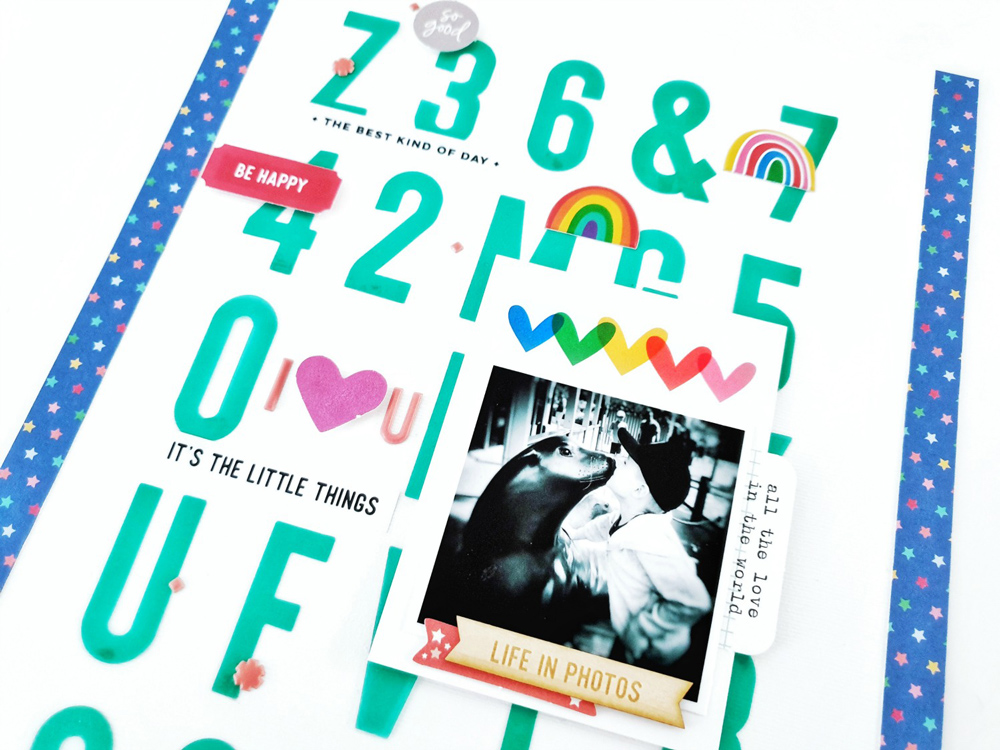
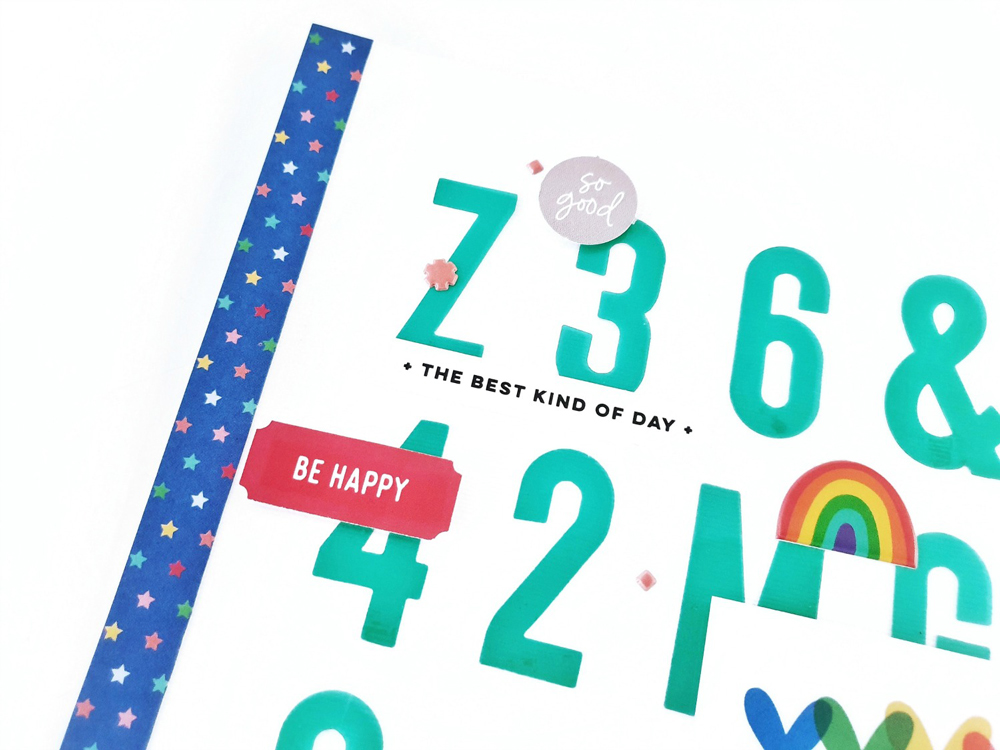
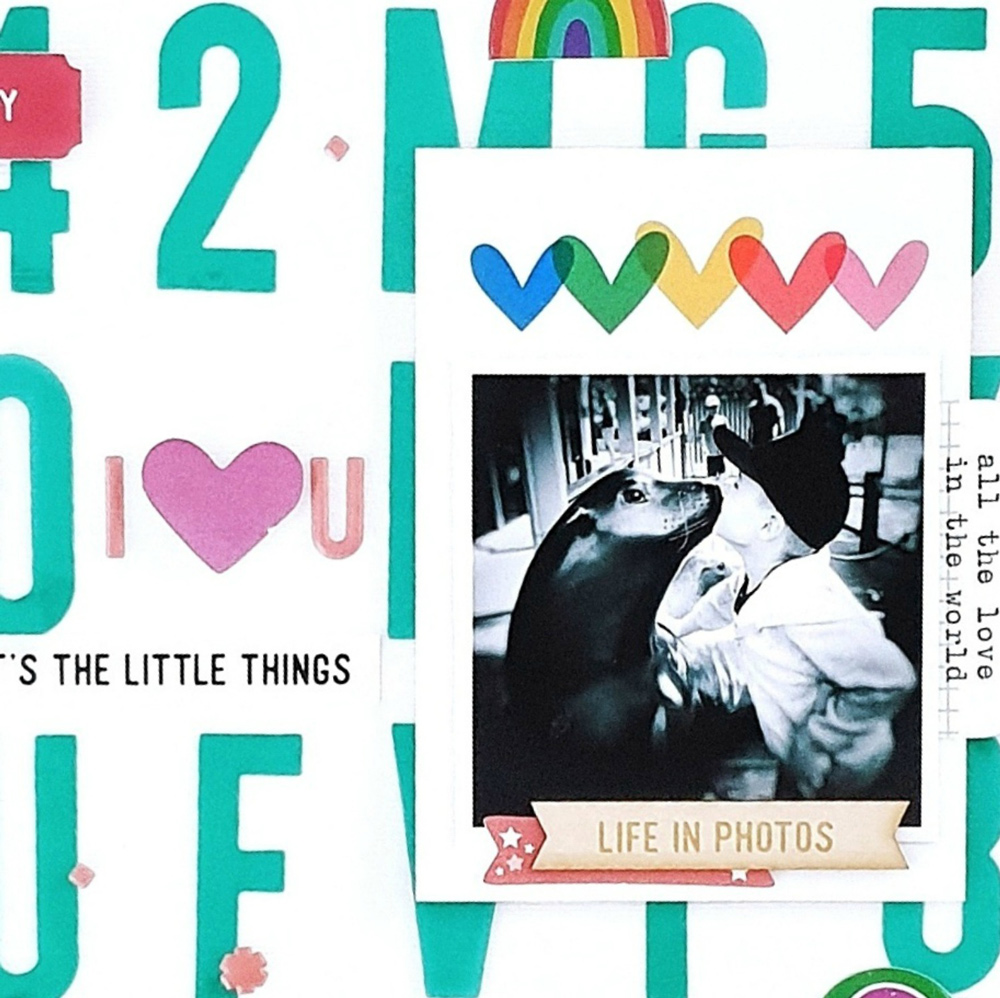
As you already know, I used all.the.things earlier in the month and didn’t have much left of anything, except those Teal Acetate Alphabet letters. I had used all the popular letters and there were not many word options left. The solution? Use them in a random grid to create a fun background for this otherwise minimalist design! Not only did this add a bright pop of color to my white base, the Teal Acetate Alphabet also created the appearance of a ‘full’ page design!
To add more color and interest to my design, I trimmed the left and right sides of my 8.5″ x 11″ layout with half-inch strips of the blue star pattern from the Love Is Paper Stack. To create the look of an 11″ inch paper, I simply butted the strips together, careful to maintain the pattern design so the joint wouldn’t be visible. This is another great way to incorporate the appearance of more detail in your pages, using only scraps of patterned paper in your stash!
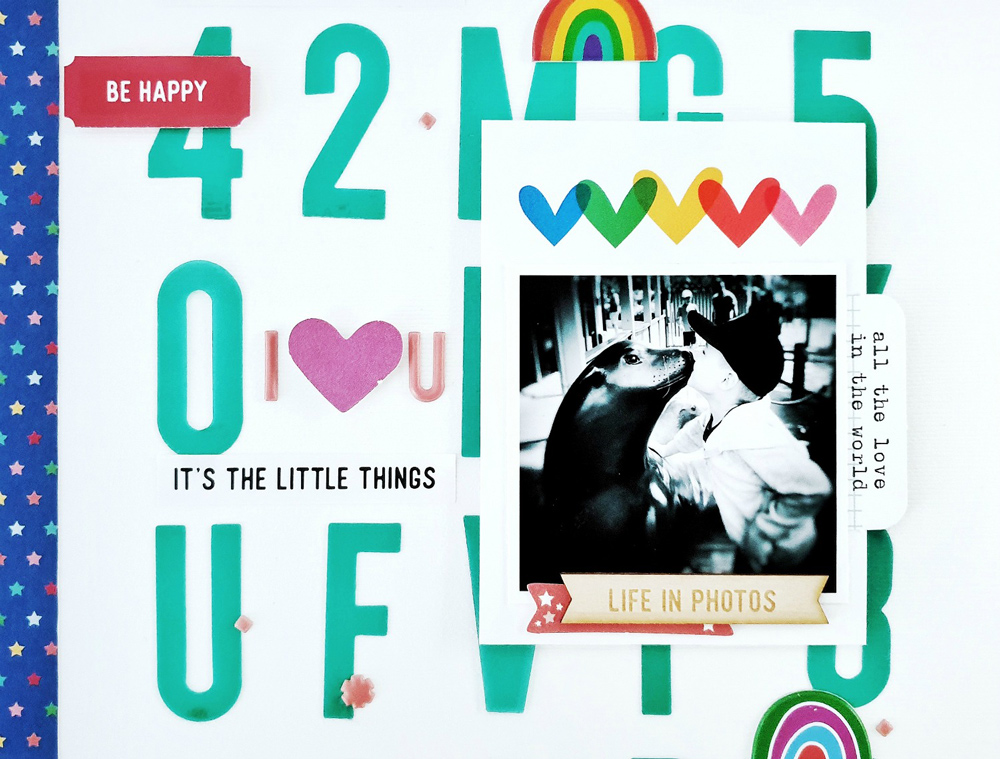
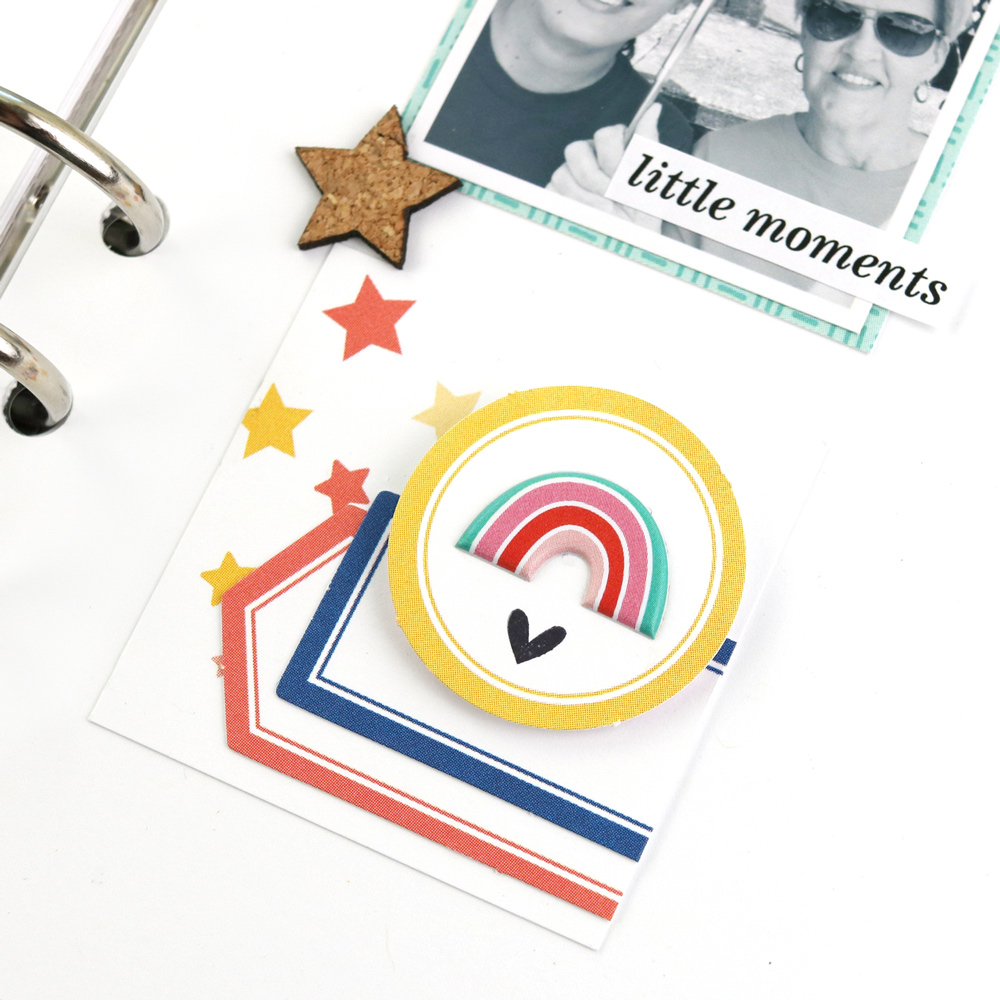
With only a few of the tags left over from my February Kit, I decided to use one that had a bright and colorful design—the rainbow heart tag—and enhanced the playfulness of my page. With so many bright details on my layout, I opted to use a black and white version of my photograph so that it would remain the focal point. For further emphasis, I foam mounted the tag so it really stood out over the rest of the page.
To ‘fill’ the gaps in this simple design, I gathered all my ‘left over’ stickers and positioned them on and around that fun Teal Acetate Alphabet base. I used the Be Happy Stickers to create sentiment spots and to cut through some of the teal color. This helped to create balance, and encouraged movement into the design. The inclusion of the Puffy Rainbow Stickers really strengthened the whimsical and playful theme of my page too!
It’s the little things, quite literally, that can make a page!
I hope my “scrap your stash” post today has inspired you to get creative with your left over supplies, and that your March Kit isn’t too far away! I can’t wait to share more with you!
Thanks so much for stopping by today!
Share how you are finishing off your February kit and add-ons with us by posting your projects on Instagram using the hashtag #EllesStudio, or share with other Elle’s Studio fans in our Facebook Group!
Comments Off on Scrap Your Stash with Amanda-jayne Baldwin | Share This
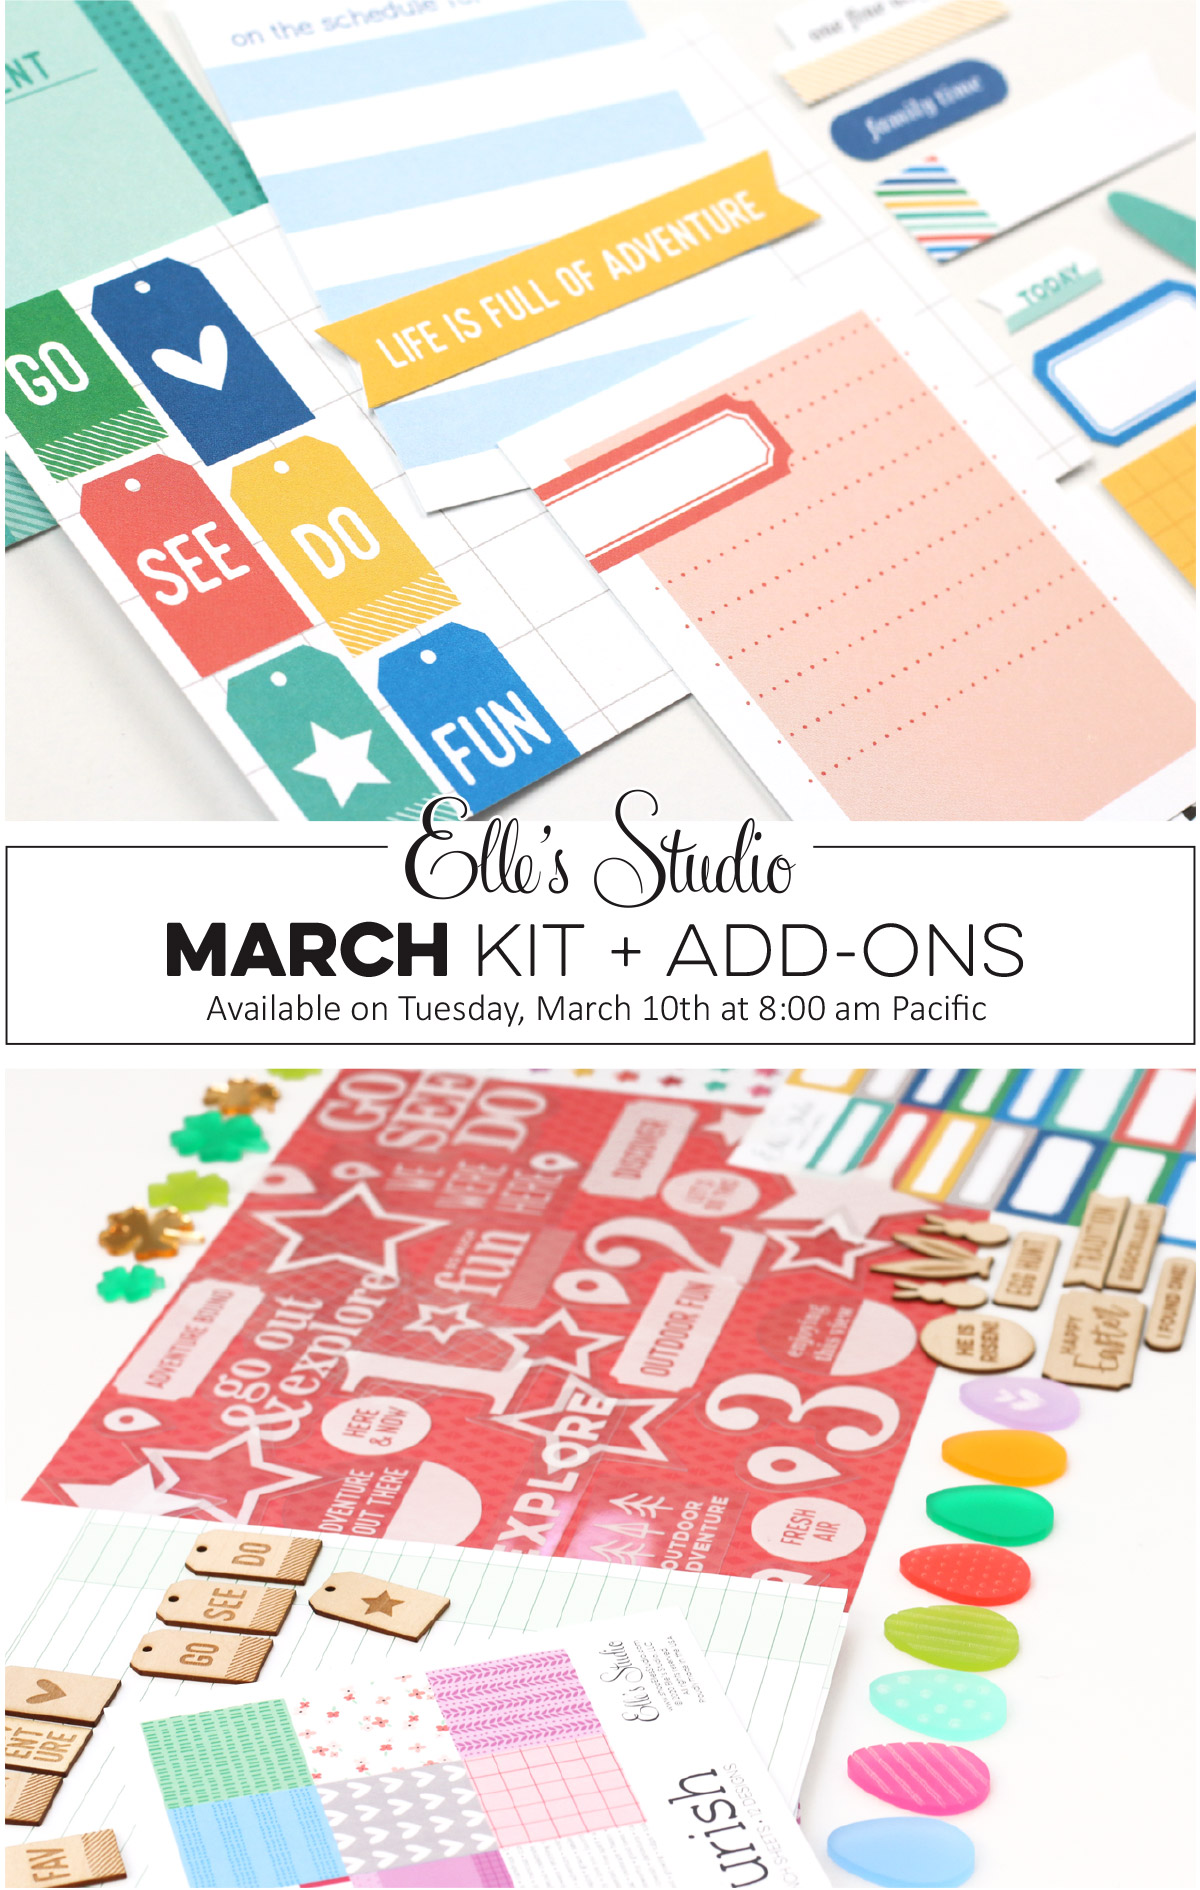
Our March kit + coordinating add-ons reveal is almost here and we can’t wait to share with you all the new and exclusive products that will be available soon! Our reveal will be full of the perfect products to document your March stories and take you right into the month of April! This month, our March kit will include 3 – 4 x 6 inch tags, 18 – 3 x 4 inch tags, and 27 die cuts!
Not a subscriber? You can pre-order our March kit now and lock in our $9.99 kit price by starting a subscription today! You’ll want to choose our SUBSCRIBE & SAVE option to get signed up and start your subscription with our March kit. We will then hold your kit and you’ll be ready to bundle and save at our March 10th reveal! Details on how to bundle with your subscription order will be emailed to you once you have purchased this product.
Kit subscribers, don’t forget! Along with being able to bundle any products from our shop that will ship for FREE with your kit during our 24-hour bundling period, starting on the 10th at 8:00 am Pacific each month, our subscribers will also have access to special discounts on select items! These discounted items can be found in our SALE section during our 24-hour bundling period, and you must be logged into your kit subscriber account to see them. Quick note: Our kits and add-ons are available without a subscription each month, too.
This month we also have a special SURPRISE: We are excited to be celebrating 13 years in business this month and we are so thankful for all of your support and friendship over the years! We love and appreciate you all so much! Look for fun giveaways during the month on our Instagram account! Plus, all of our current and new kit subscribers will be receiving and Elle’s Studio pen with their March kit subscription!
Also coming to our shop on Tuesday, March 10th is our next installment of our Title Builder collection! Get ready to use our new Title Builder Vol. 4 stamp and puffy stickers to create even more amazing titles! Our Title Builder products are designed by Meghann Andrew to help you create titles using a mix of stamped words and phrases. You’ll have endless possibilities by varying your words and ink colors, along with adding stickers and other products!
We can’t wait to share all of these new products with you and to see how you use them on your upcoming projects! Make sure you set your alarm and mark your calendar for Tuesday, March 10th at 8:00 am Pacific! We hope to see you there!
Comments Off on A sneak peek of our March 10th reveal! | Share This
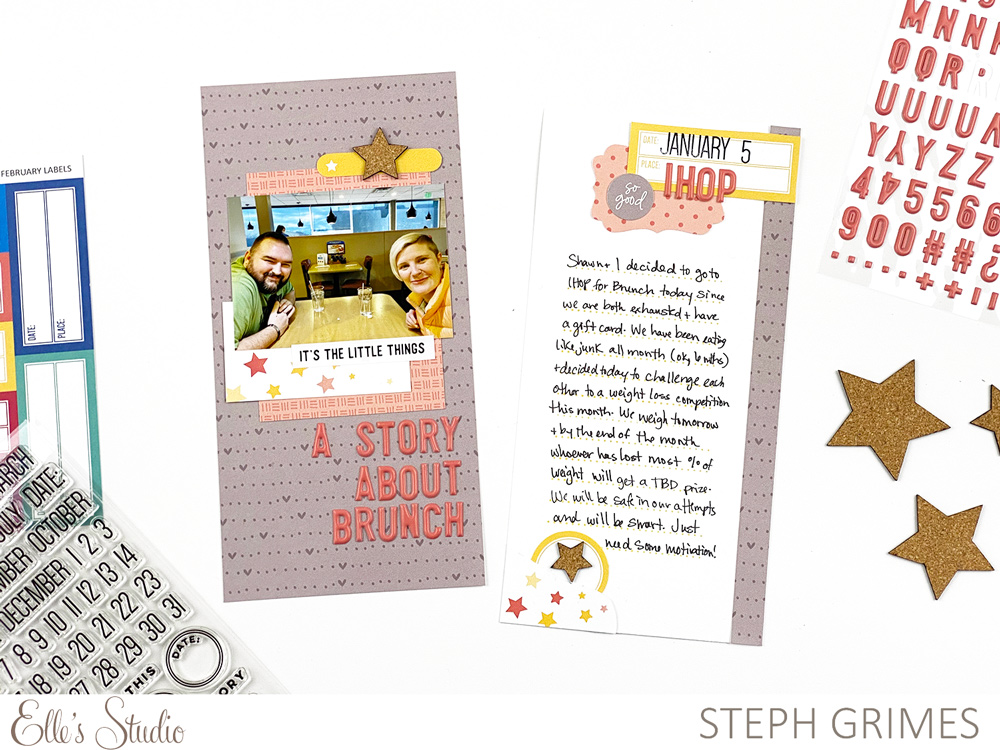
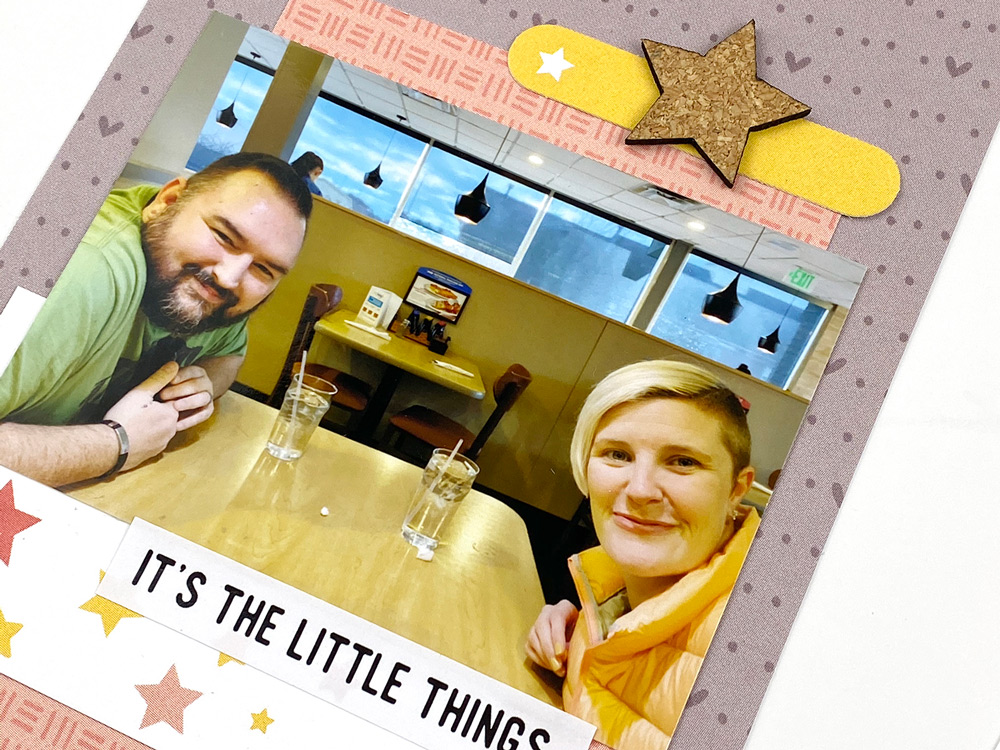
Have you ever decided to mix up your scrapbooking format, only to find yourself at a loss on how to design on a smaller or larger scale? Today design team member Steph Grimes is here to help anyone who wants to try out a traveler’s notebook format, and she’s sharing wonderful design tips for how to make the transition as smooth as possible!
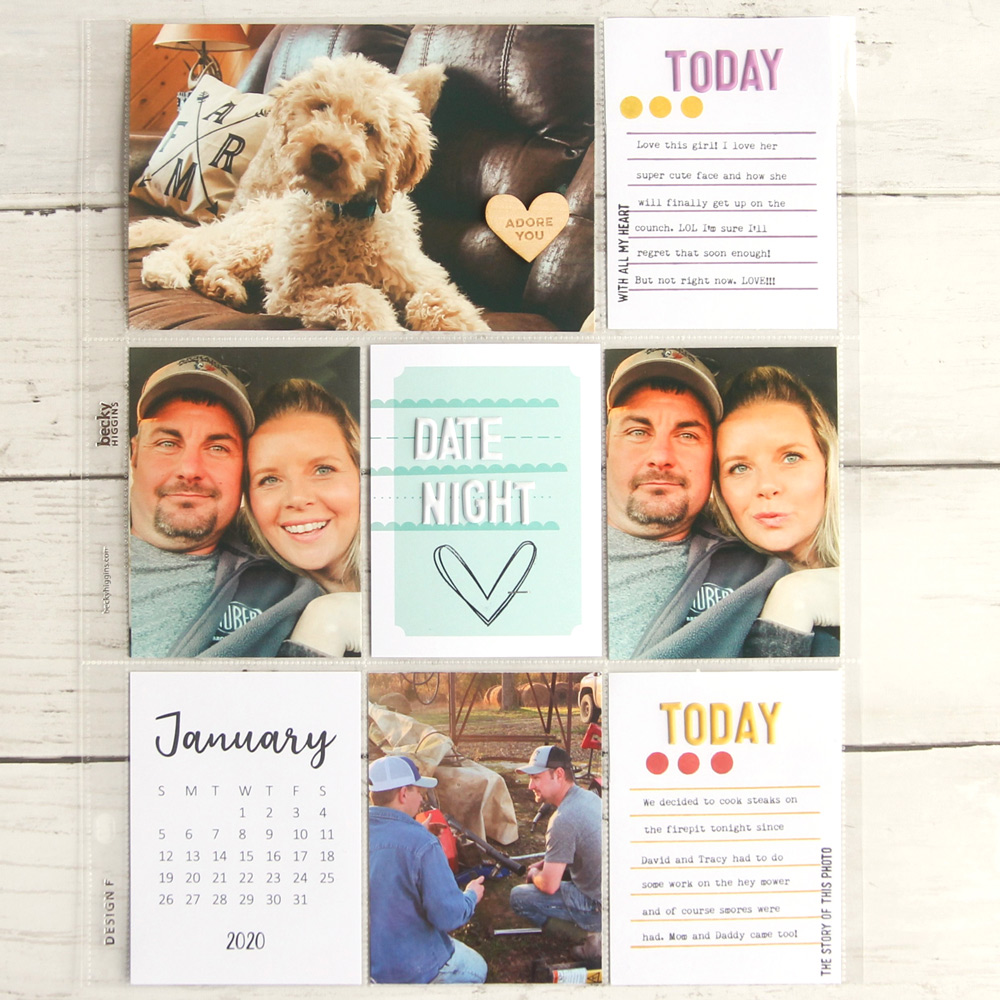
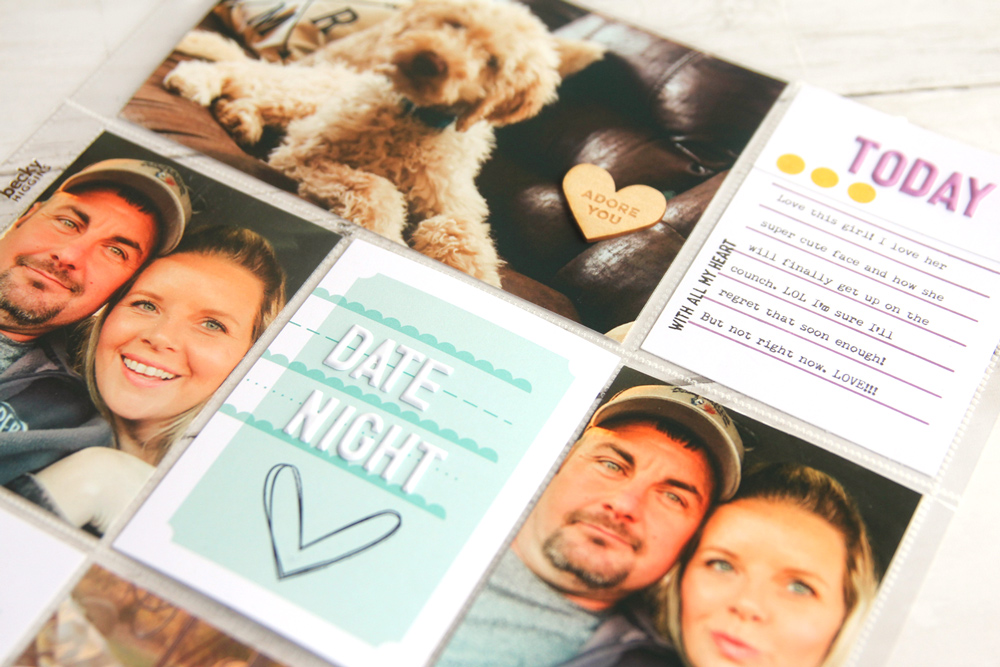
Hello friends! For those of you who follow me, you may know that I am most comfortable in pockets. However, this year I am really stretching outside my comfort zone to try more projects outside of pocket pages. One of the projects I am currently working on is a traveler’s notebook for this winter full of selfies and mini stories about me and my life right now. I have not worked in this format very much and while I like the size, it’s proven a little challenging for me. So as I was working on this spread, I decided I would set myself up for success by focusing on a few easy design elements that could help me pull this page together. Today I’d like to share those with you in case you also would like to try them out on a traveler’s notebook project!
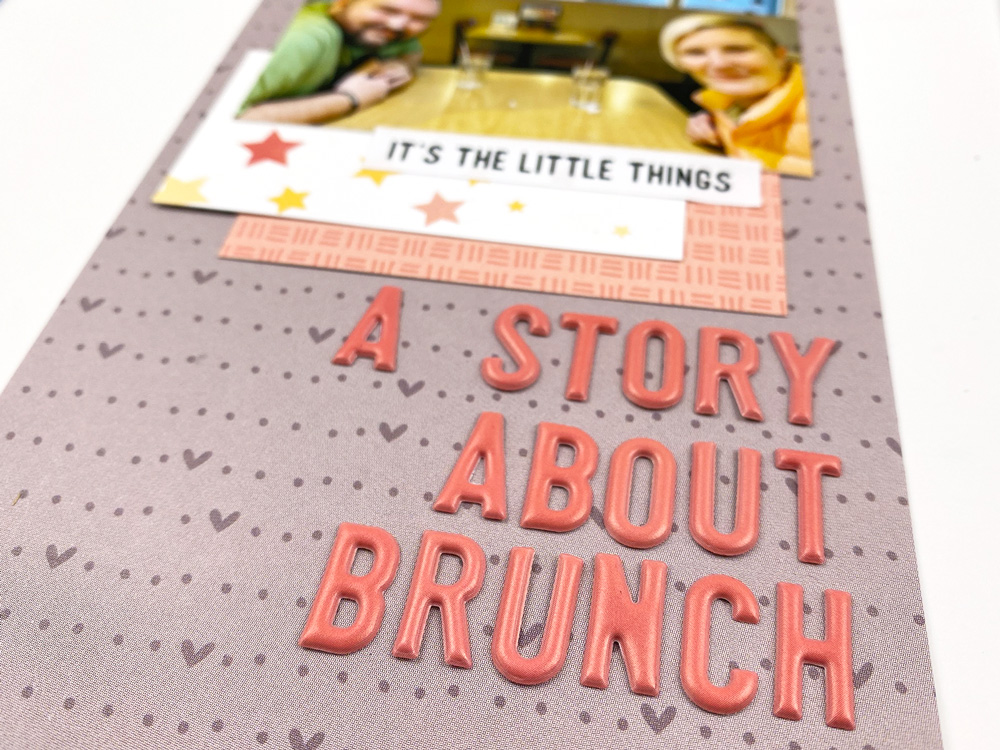
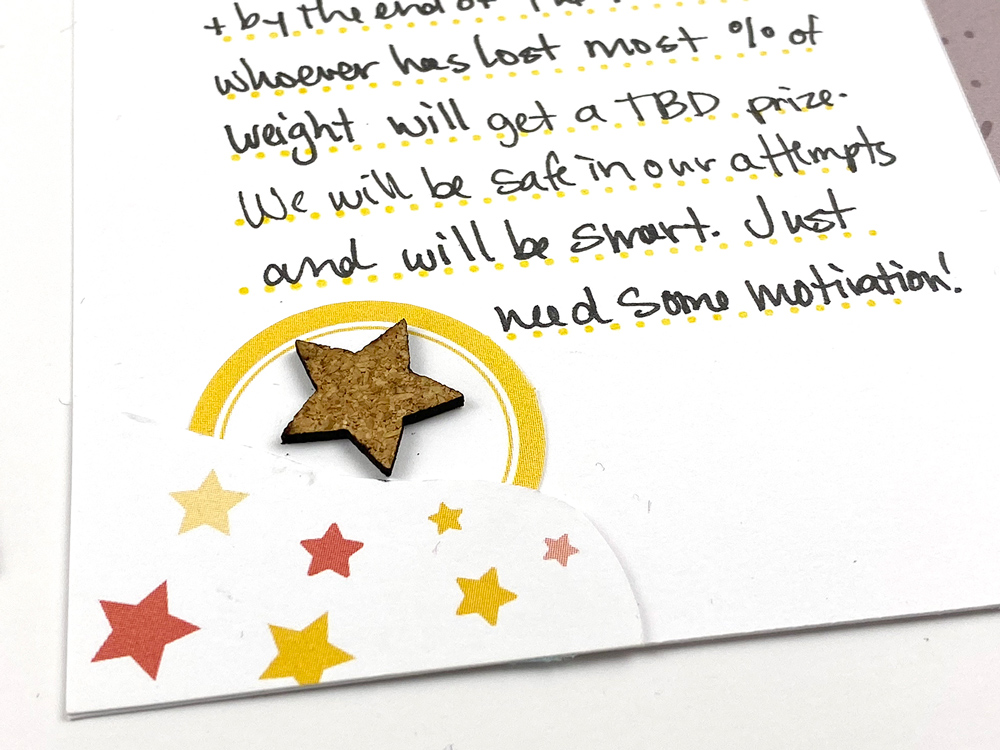
Repetition is a great design element on all projects, but can work especially well in a traveler’s notebook because you’re working in such a small space. It can make a larger, collective impact when elements are repeated. In this spread, I repeated a few colors and shapes. I used the gray heart paper from the Love Is Paper Stack and cut a smaller strip of it to add to the edge of the second page. I also repeated coral and yellow hues in my embellishments. I repeated the Cork Stars, one on each page. I especially like to carry elements across both pages as I find that also helps to bring them together to look more cohesive.
Design Element #2 – Alignment
Don’t be afraid of playing with alignment. Sometimes, you will want everything to have the same alignment on a page, and other times, like in this case, it will be more eye-pleasing to mix it up. My photo and journaling are both aligned in the center on each page because those are the highlights of this spread, so for my other clusters I experimented with left and right alignment to create some visual balance. I decided to align my title on the right to bring some weight to the bottom right of the first page and help lead your eye to the second page.
Design Element #3 – Creating a Visual Triangle
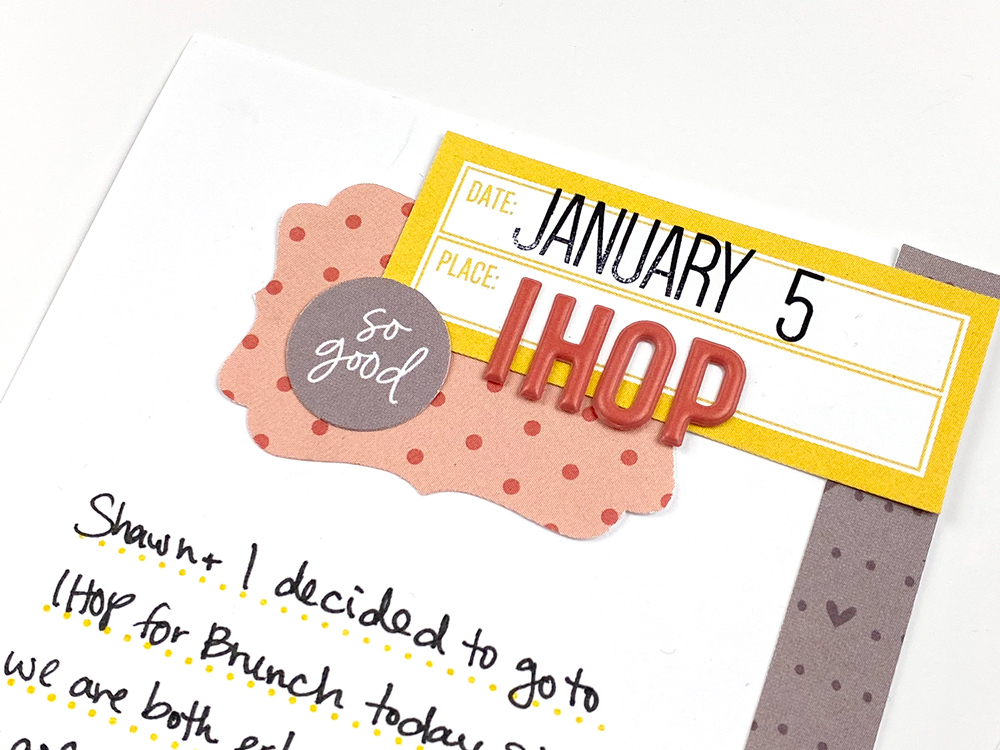
I like to work to create a visual triangle in most of my spreads and layouts, but I found it to be really helpful in this layout as I was trying to make decisions about what to add. I have two main triangles happening here: The first I made from the yellow labels—the one with the tiny star printed on it on the left, then down to the yellow circle label, both from the February 2020 Kit die cuts, and up to the yellow “Date / Place” label from the February Labels. The second triangle is made up of the coral 3” x 4” journaling tag on the left page, the title made from the Coral Puffy Alphabet Stickers, and then up to the top right corner of the right page where I have more Coral Puffy Alphas and a punched piece of coral patterned paper from the Love Is Paper Stack. These two triangles help make this a balanced layout.
Other Tips for Traveler’s Notebooks:
A few extra tips I have for working in traveler’s notebooks:
Layer It Up | It can be hard to work in a traveler’s notebook because you may not want to add a lot of bulky items. I didn’t stick to that so much in this layout, using the Cork Stars and the Coral Puffy Alphabet Stickers that have a bit of dimension to them. A good way to add interest and texture without a lot of bulk is layering! If you decide to work with flat elements only, like paper, labels, and flat stickers, you can still achieve depth in your project by layering all those pieces up on top of each other. I think this is a great way to keep traveler’s notebook spreads from seeming flat or boring, without adding a bunch of bulk to your notebook.
Make Your Supplies Work for You | Don’t be afraid to use your supplies the way you want to, and the way you feel they are going to best suit your project. I think one of the biggest “a-ha” moments that come to me when working in a smaller format like a traveler’s notebook, is that I can alter the supplies to fit my needs. In this spread, it was cutting apart the 3″ x 4” journaling tag with the coral and yellow stars printed on it from the February 2020 Kit. I loved that tag, and it worked perfectly with the colors of this spread, but I couldn’t figure out how to use it and get the most out of it as a whole piece. As soon as I thought to cut it into two different pieces, it came right together for me.
So there you have it, three design techniques (and two bonus tips!) for traveler’s notebook projects. Do you like working in traveler’s notebooks? Do you have any tips you’d like to share for working in this size? Please share them on Instagram and use the hashtag #ellesstudio, or in our Elle’s Studio Facebook Group. We would love to hear what your thoughts!
Comments Off on Traveler’s Notebook Design Tips with Steph Grimes | Share This
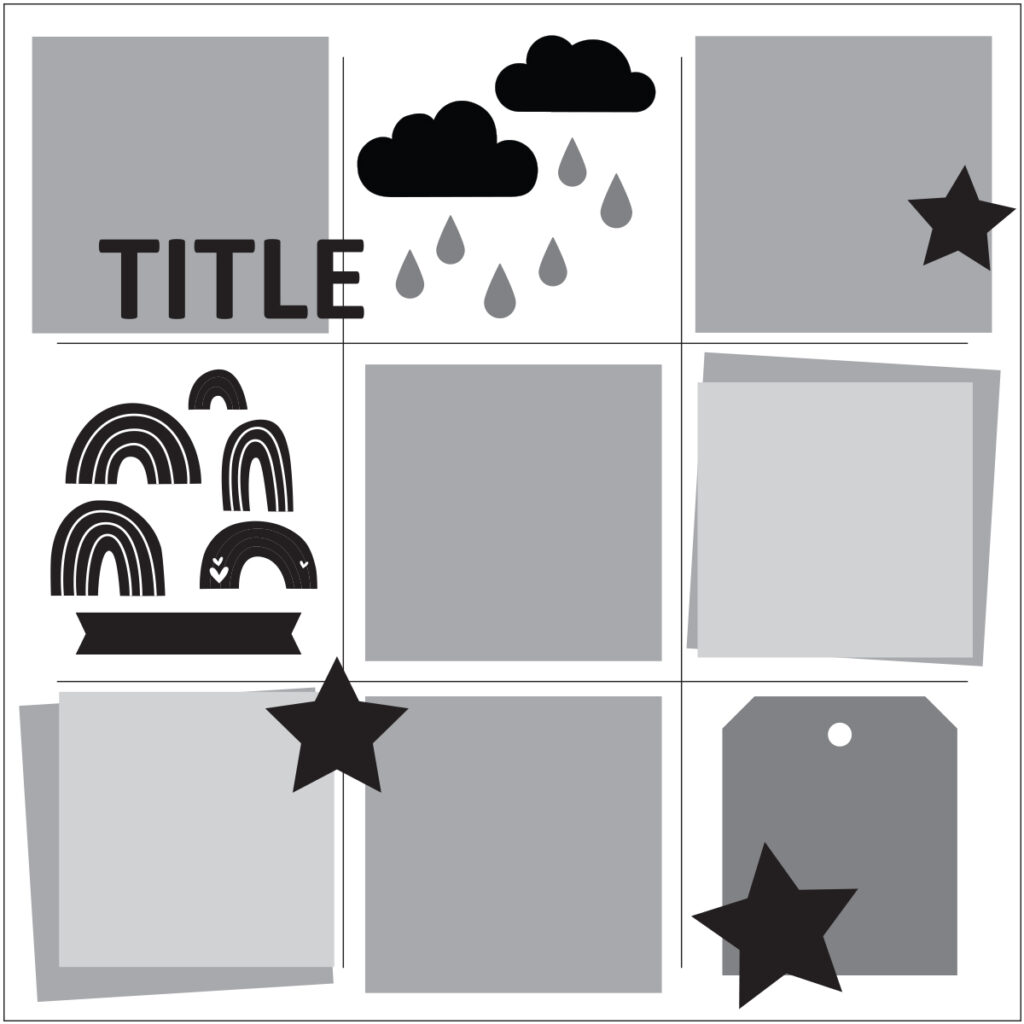
Hey, friends! It’s Marsha and I’m so excited to be here sharing an Elle’s Studio sketch day project with you! Using a sketch is such a great way to jump-start your creativity, and today’s sketch is sure to do just that with its fun grid design:
Here’s a look at the project that I created using the sketch:
For my project today, I chose to create a traveler’s notebook album layout, even though the sketch is sized for a 12″ x 12″ layout. That’s one of the great things about a sketch: you can interpret it any way that you like!
To begin the layout, I trimmed two pieces of white cardstock to 5″ x 8.25″ to fit in the album and serve as base pages for the spread. Because the sketch features a grid design, I decided to use 2″ squares so that it would fit on my album, spanning across both pages. I chose three of the journaling tags from the Love Is Printables and resized them to 2″ x 2″ in Photoshop. I also typed my journaling onto one of the printable tags. Next, I looked through the Polka Dot Journaling Tags, the February Kit journaling tags, and the Love Is 6 x 8.5 Paper Stack and chose some tags and papers to trim into 2″ squares. I arranged the squares on the layout so that the colors were spread across the pages. Because the layout features nine squares, I chose to put six on one page and three on the other page.
For the other side of the spread, I stapled one of the die cut tabs from the February Kit to the trimmed journaling tag. I adhered my photo to another journaling tag and added a phrase sticker from the Be Happy Stickers.
On the last square in the grid, I layered some die cut labels from the February Kit. Then, I added a Puffy Rainbow Sticker and stamped a heart from the Sunshine & Laughter Stamp. To finish off the spread, I followed the sketch and added Cork Stars to a few areas on the layout.
Thank you for stopping by the blog today! I hope I have inspired you to create a layout using this fun sketch. We can’t wait to see your interpretation!
Show us what you have created with this sketch by posting your project on Instagram using the hashtag #EllesStudio, or in our Elle’s Studio Facebook Group! We’d love to see how you interpret this sketch for your project and style!
Comments Off on Sketch Day with Marsha Farris | Share This
We know that your focus on a layout is usually with the words and photos, but don’t forget about the important role a title can play! It can introduce your story and become a big design element, as Suzanna Lee is showing us today with a new layout! Let’s take a look!
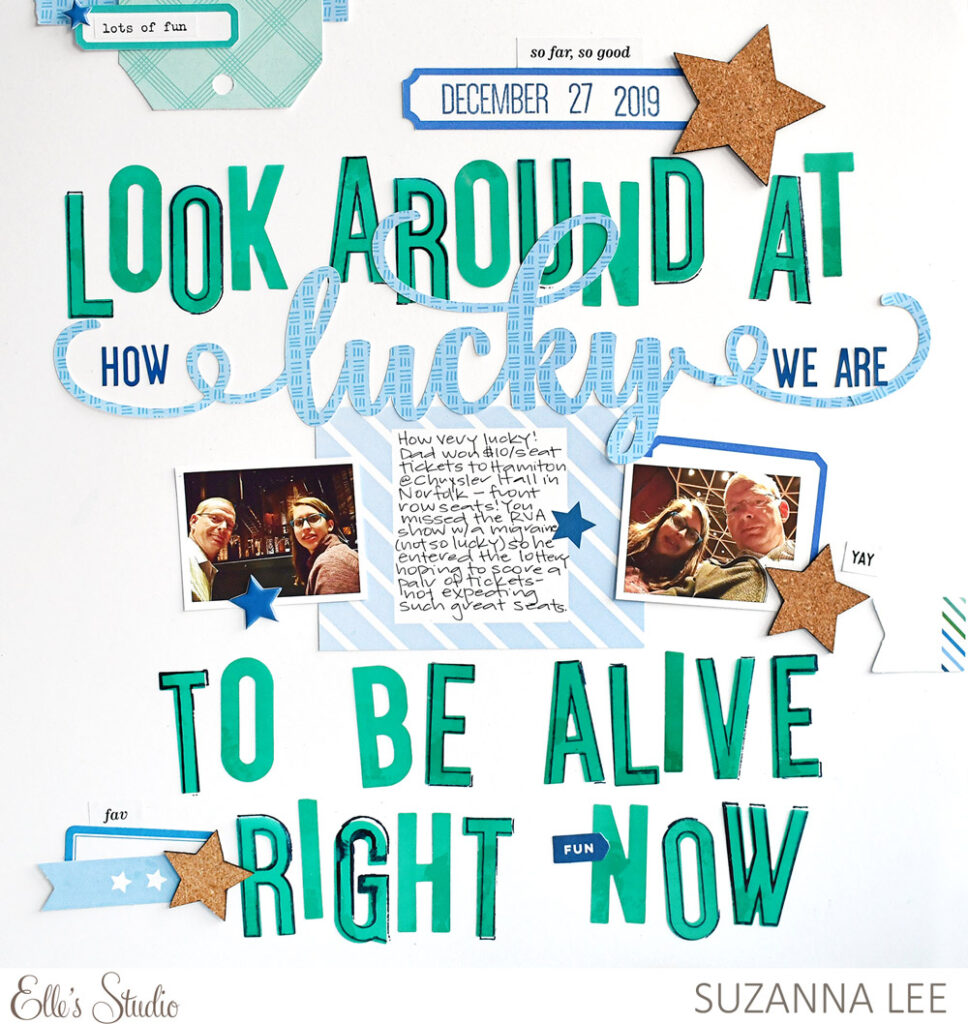
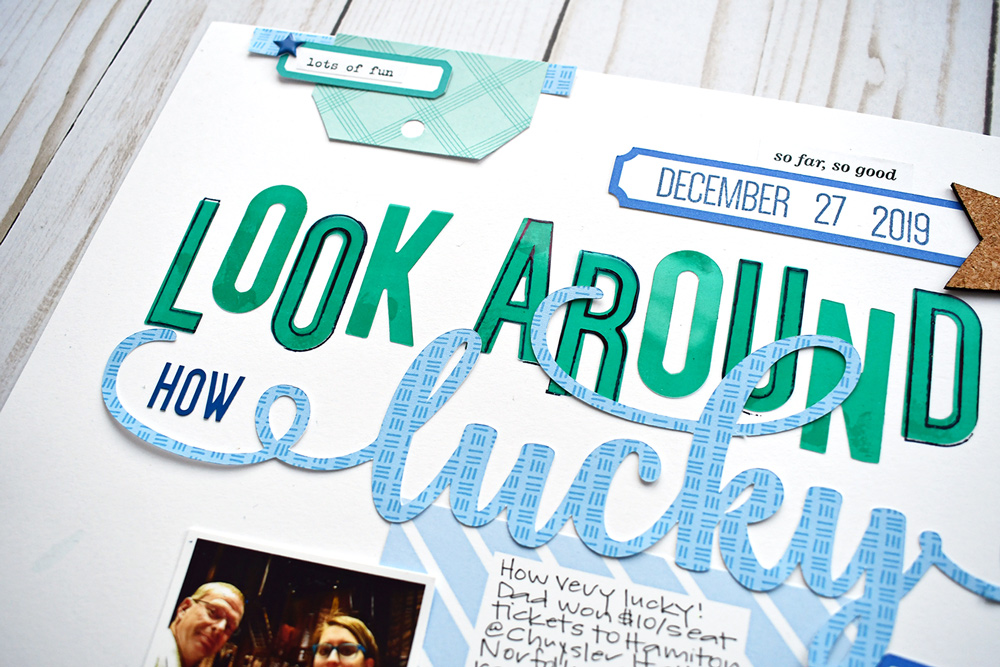
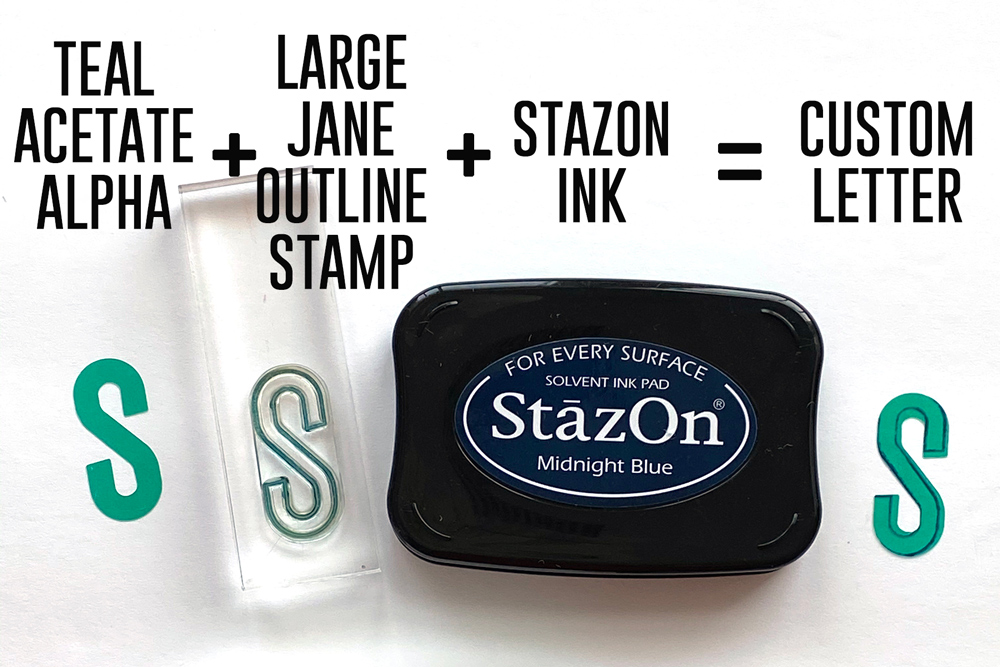
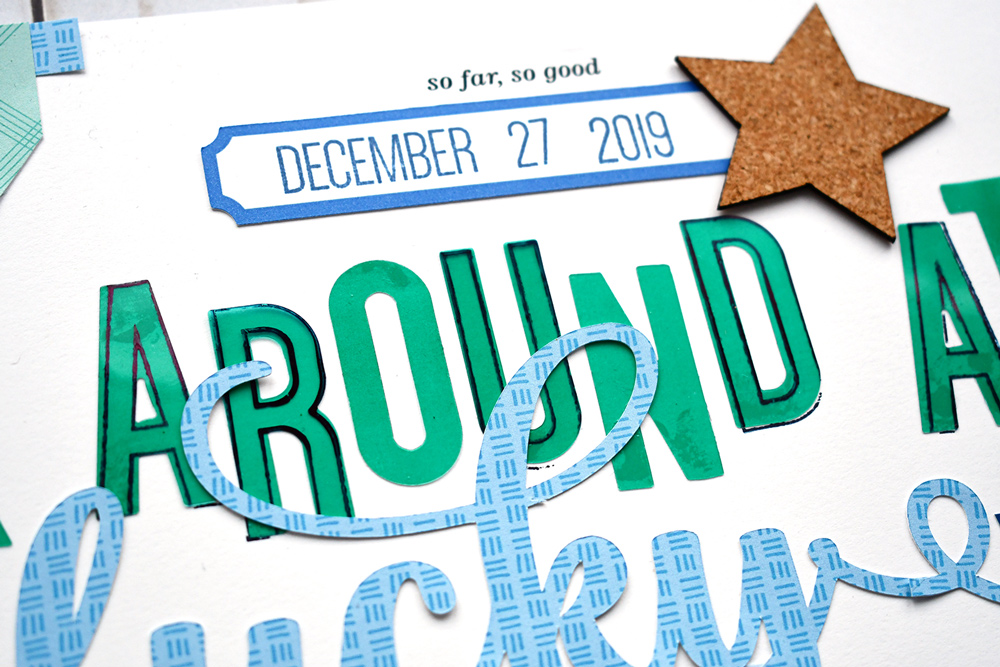
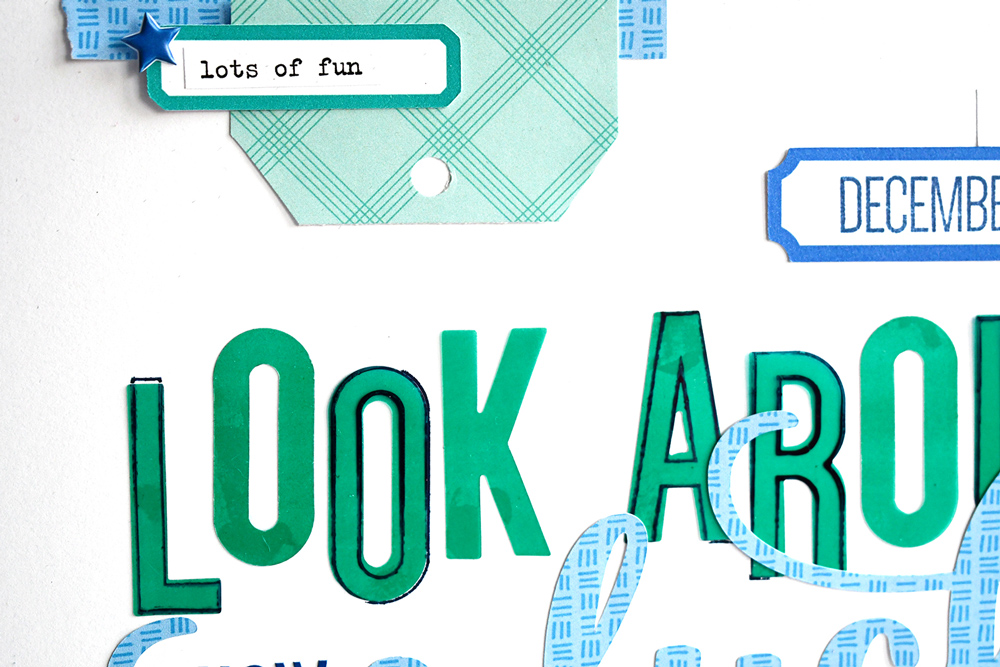
Hi ya scrappy peeps! It’s Suzanna here today! By now you have all seen, shopped and received your February kit and the amazing Teal Acetate Alphabet, both of which I’m using today for this large titled layout. It’s teal-ly goodness is further adorned using the Large Jane Alphabet Stamp to add some variety and personalize the look of the letters.
In reality, this layout is rather simple as the bulk of the layout is the title. The title is a combination of the stamped Acetate Alphabet, Jane Alphabet Stickers and a digital word. The subject of this layout is how my husband and daughter won lottery tickets to see Hamilton—front row tickets for $10 a seat! It was only fitting to use a quote from the production.
The construction of the layout was a simple process. Most of my time and effort was dedicated to arranging the Teal Acetate letters and cleaning the stamps. I was short a “T” so had to perform some “reconstructive surgery” and turn an “F” into a “T”. Not all that involved! Stamping over that particular “T” makes it less noticeable.
Stamping on the acetate letters is easy with the outline Large Jane Alphabet Stamp as they are a coordinating shape and size. It’s best to use StazOn ink as you need the solvent ink to stamp on non-porous surfaces, such as the acetate.
Additional fun features on this layout are the Cork Stars, available with this release. Some phrase stickers from the Be Happy Stickers punctuate the layout with appropriate phrases.
I have a process video of how this layout came together and how I stamped over the Teal Acetate Alphabet if you are more a visual learner. Check it out:
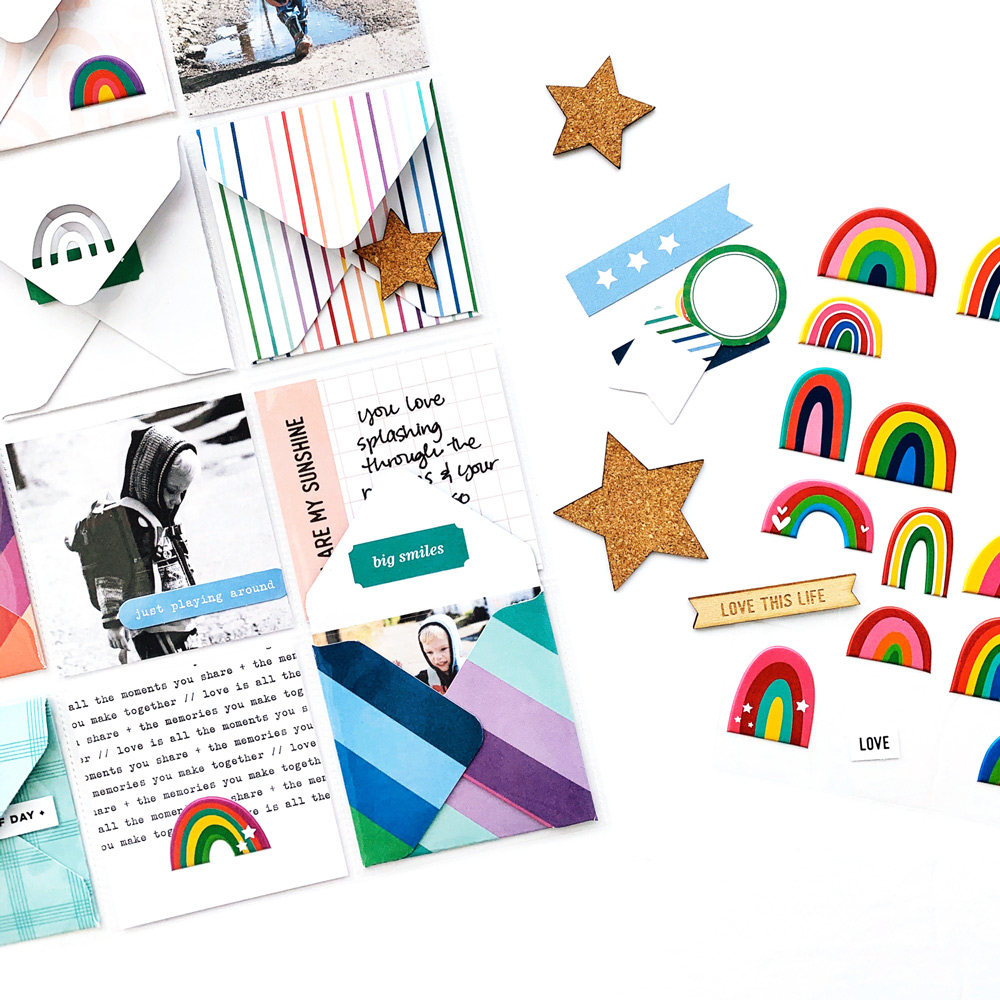
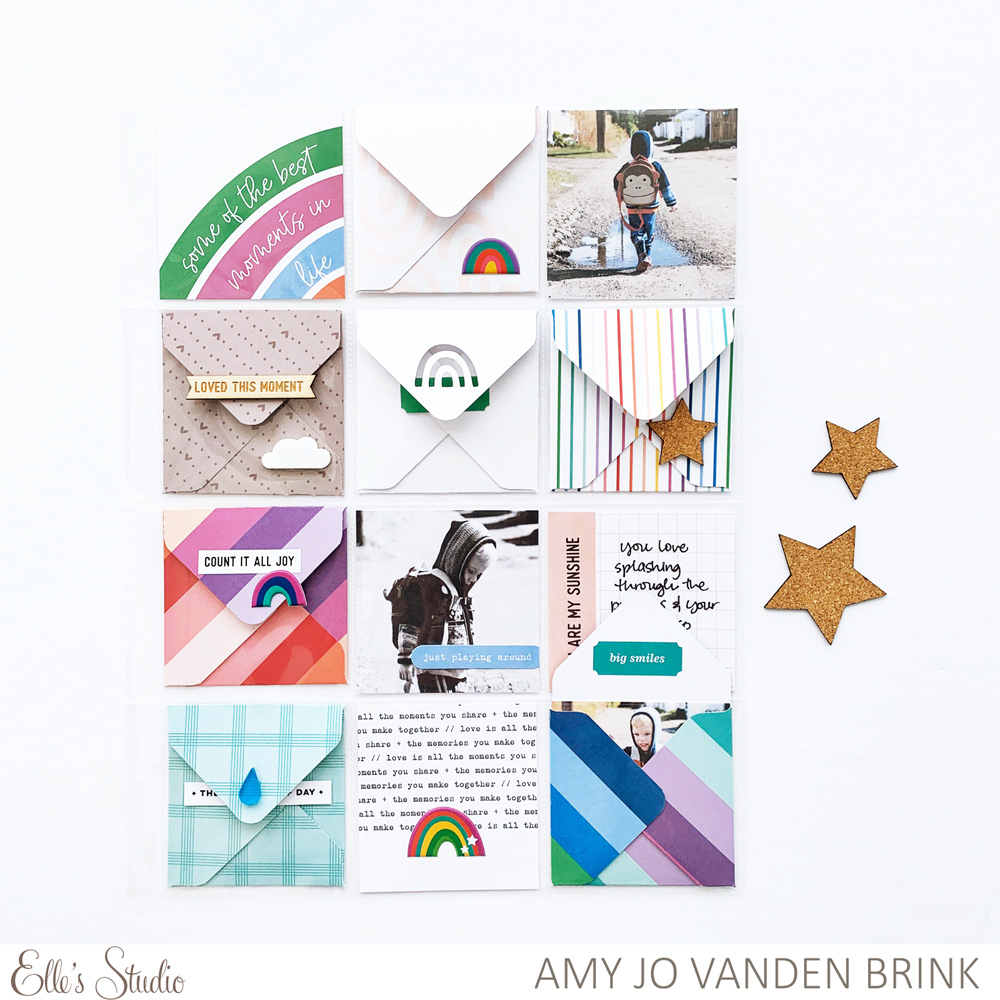
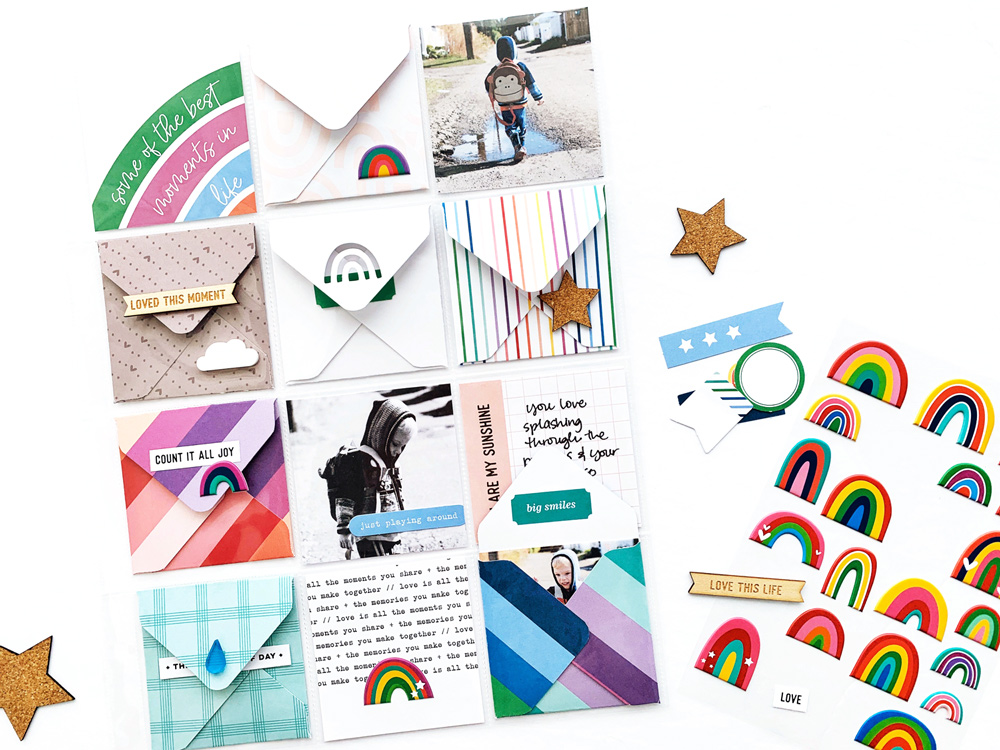
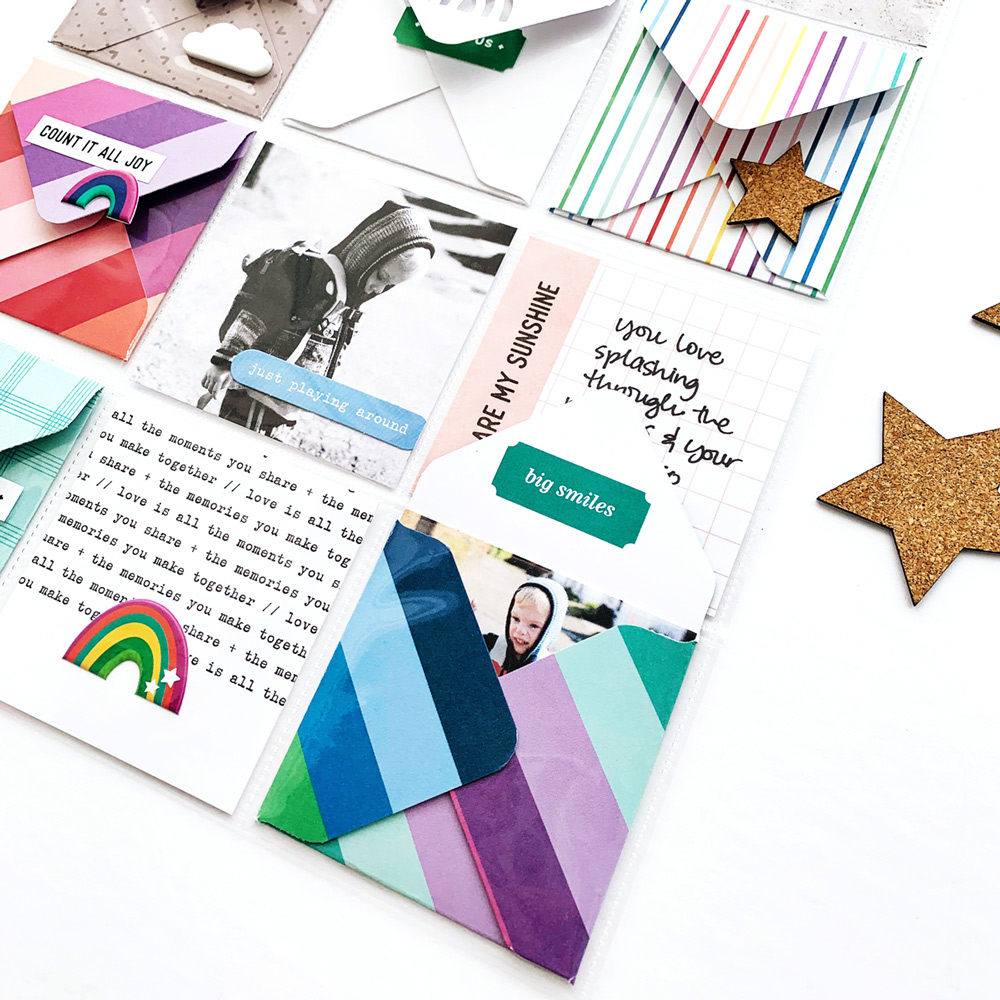
Creativity does not need to be completely out of the box, or the pocket, as design team member Amy Jo Vanden Brink is showing us today with one colorful and interactive project for our Teach Me tutorial! Let’s take a look, and get inspired to try something new this week!
Hi! It’s Amy here, and I am so excited to share a very interactive pocket page with you today! I used the tags and embellishments from the February 2020 kit and extras to make a page for some adorable photos I had of my son stomping around in some puddles:
To begin, I wanted to make an envelope that fit in the 3″ x 3″ pockets of my 9″ x 12″ page protector. Because the pockets themselves are 3″ x 3″, I had to do a bit of trial and error to find the perfect dimensions to create the envelopes. I cut my paper to 4-7/8″ square, then using an envelope punch board I scored the first mark just between the 2 3/8″ and 2 1/2″ mark. I rounded all the corners of my envelopes and because I was putting them in the pockets, I didn’t need to adhere them together, the pockets keep them closed.
Check out how I created this page, and made my envelopes in this process video:
This project would be very easy to create as a 12″ x 12″ layout instead of a pocket page, you would simply have to adhere the envelopes in a grid pattern to replicate the look! I hope you find a way to use this idea in your own scrapbooking, it is such a great way to hold onto little memories and photos.
Show us how you are inspired by Amy Jo’s envelope project! Share your project on Instagram using the hashtag #EllesStudio, or in our Elle’s Studio Facebook Group!
Comments Off on Teach Me Tutorial: An Interactive Envelope Page with Amy Jo Vanden Brink | Share This