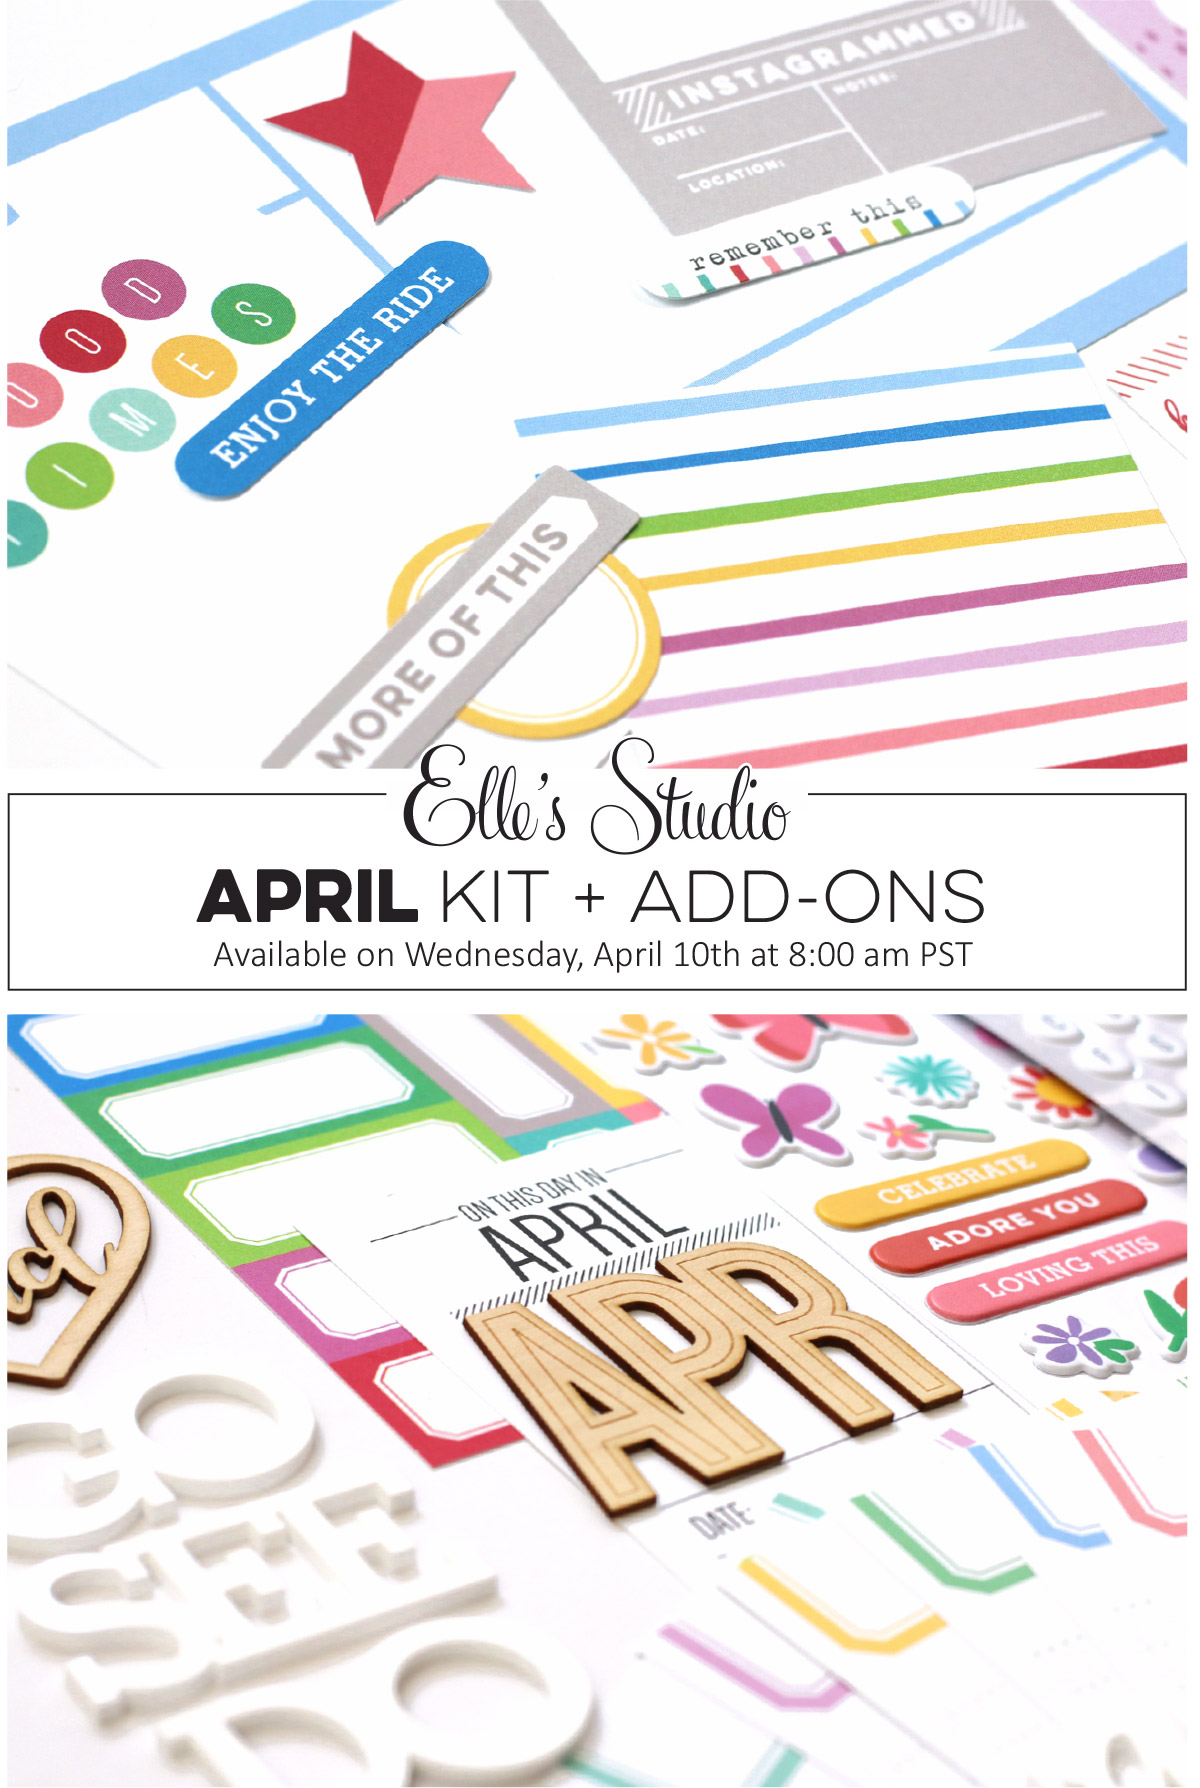
We are so excited for our April kit + coordinating add-ons reveal that will be taking place in just a couple of days! Our reveal will be full of the perfect exclusive products to capture your April stories! April’s kit will include 3 – 4 x 6 inch tags, 18 – 3 x 4 inch tags, and 26 die cuts!
Get ready to pick up our April kit for our launch day special pricing of only $9.99 on Wednesday, April 10th, at 8:00 am PST. After the 10th, our kits go back to their regular price of $11.99. Or, you can lock in the $9.99 price anytime by starting a subscription! And subscribers, don’t forget! You’ll be able to bundle anything from our shop (including the new add-ons) with your monthly kit for FREE (USA subscribers) or reduced (International) shipping!
Not a subscriber? Don’t wait any longer! We only have a handful of spots left were you can start with our March kit now! Or, wait until April 10th to sign up and start with our April kit! With a monthly subscription, you will be guaranteed a kit each month, lock in our launch day special price of $9.99 + shipping, and receive FREE (USA) or reduced (International) shipping on anything added to your box each month during our 24 hour bundling period (starting on the 10th at 8:00 am PST and ending on the 11th at 8:00 am PST). Along with more time to shop, our subscribers will also have access to special discounts on select items during the 24 hour bundling period! These discounted items can be found in our SALE section during bundling, and you must be logged into your kit subscriber account to see them. Quick note: Our kits and add-ons are available without a subscription each month, too.
Make sure you set your alarm and mark your calendar for Wednesday, April 10th at 8:00 am PST! If you haven’t signed up for our newsletter, make sure you do to receive a reminder when everything is available for sale! We hope to see you there!
Comments Off on A sneak peek of what is coming on April 10th! | Share This
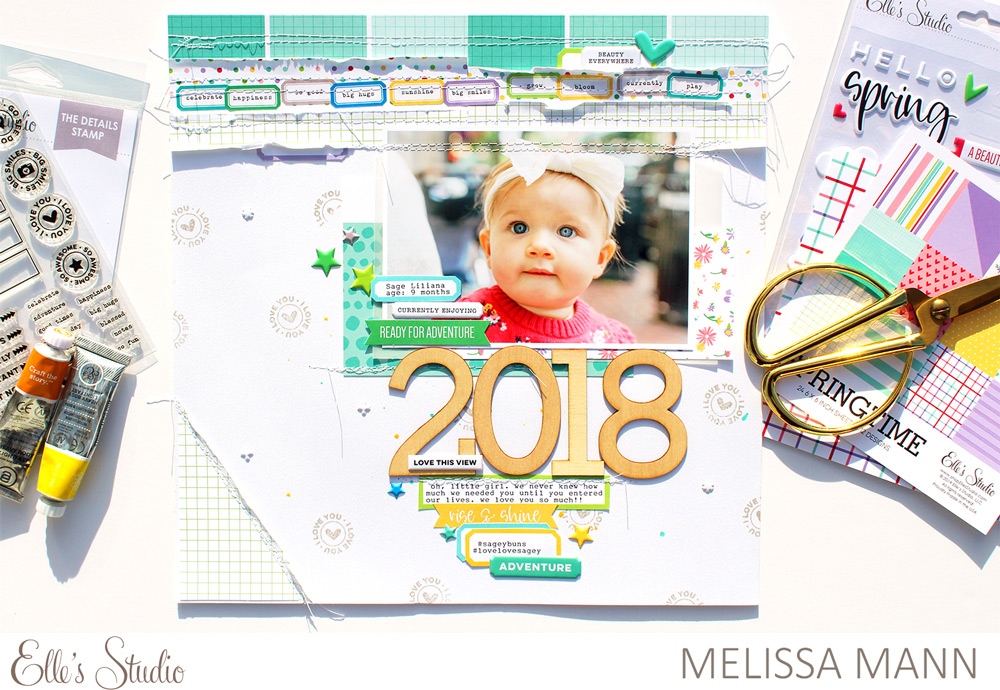
Our design team has been loving our Large Jane Alphabet Stamp, in all of the different forms that it comes in, and with the new Large Jane Alphabet Metal Die, creating a fabulous project with the large numbers and letters is easy to do, just like Melissa Mann is sharing with us today! Let’s see what she created.
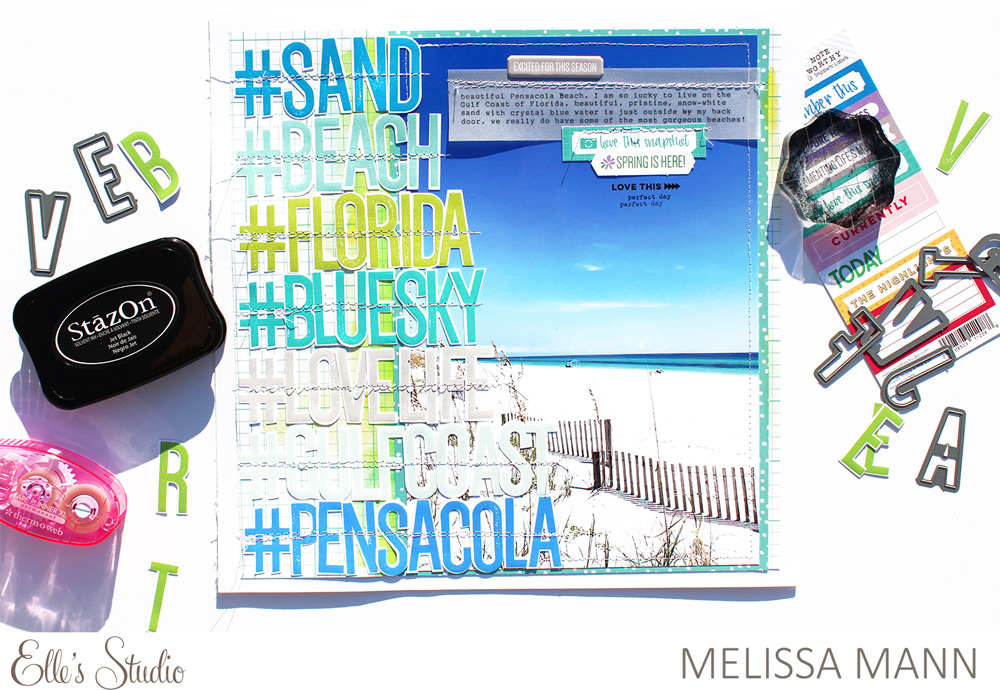
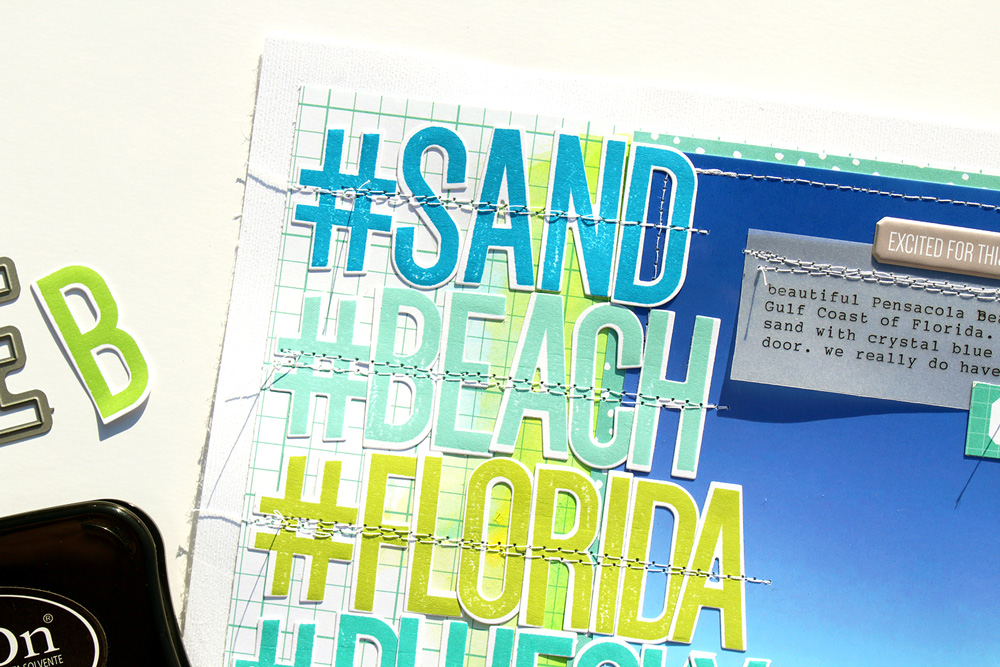
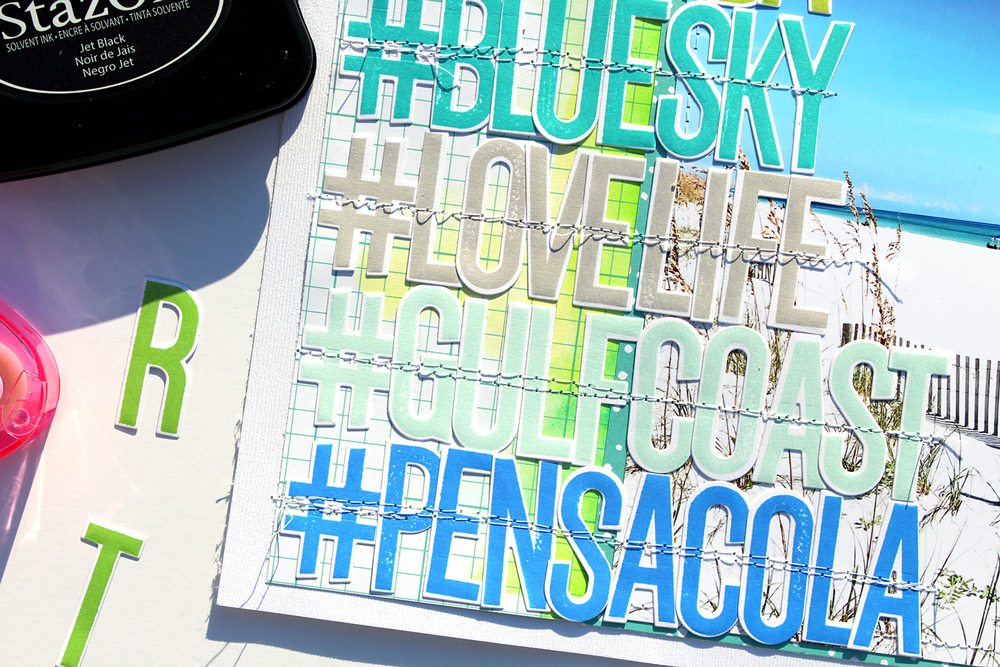
Happy spring, everyone! It’s Melissa here with you on the blog today and I’m super excited about the project I’m sharing with you. As you may or may not know, Elle’s Studio offers a FABULOUS alphabet stamp set called Large Jane, which comes in solid, outline, stripes and dots, and also has a corresponding die cutting set! My goal for this layout was to emphasize the alphabet stamp and make it shine on this project.
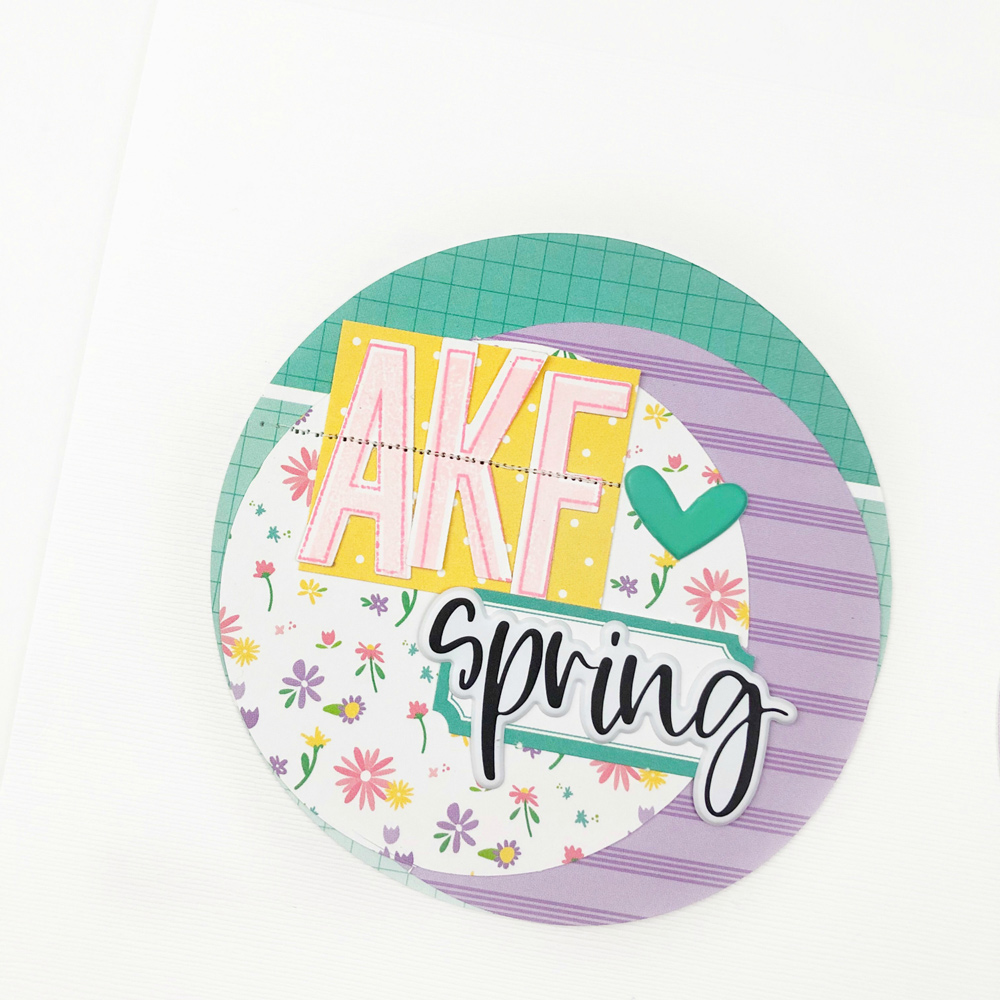
I wanted to create a series of hashtags, like those that are so popular on social media platforms these days AND I really wanted to capture this gorgeous photo of Pensacola Beach that I had taken last year. I printed the photo BIG to go along with the over-sized Large Jane Alphabet Stamp. I placed my photo on the right side of my layout and stitched it down. Then came the fun part! I stamped out my hashtags in corresponding blue and green inks on white card stock and cut them out using the Large Jane Alphabet Metal Die.
Once I had die cut all of the letters out, I placed the words down the left hand side of the layout, overlapping the picture, and stitched them all down. I placed my hashtags from shortest to longest. Because there was so much already going on with the super long title, I kept the rest of my embellishments and journaling fairly simple.
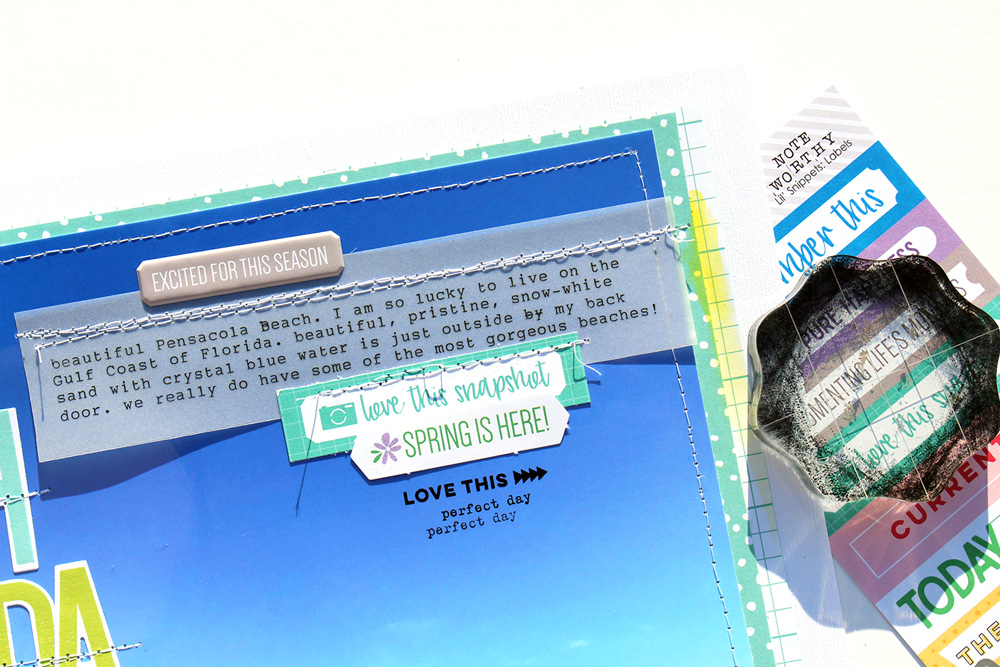
I typed my journaling onto a piece of vellum and stitched it to the upper right hand corner of the photo. I layered the “spring is here!” tag from the March 2019 Kit, the “love this snapshot” tag from the Noteworthy Word Labels and a Spring Puffy Sticker around the journaling and then lastly, stamped some phrases using The Details Stamp!
We love the beautiful colors and patterns in our newest paper stack, the Springtime 6 x 6 Paper Stack, and today, design team member Ashley Laura is here to show us how she’s using, and cutting these pretty patterns to create something special! Let’s take a look!
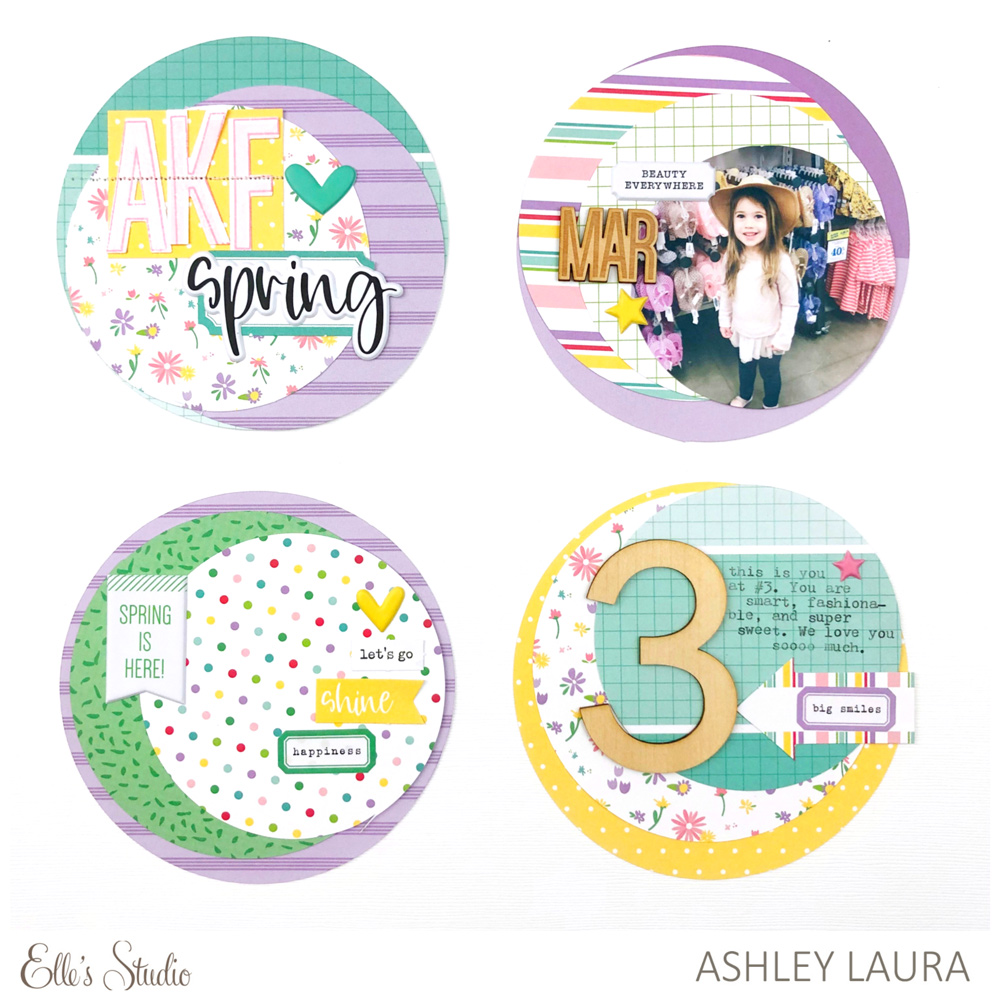
Hey y’all! It’s Ashley here, back with a fun project focusing on the Springtime 6 x 6 Paper Stack from the recent March release! I am SO excited to be using these beautiful patterned papers! I love finding new ways to use patterns, but I also love cutting up paper in fun layers to create an inspiring, yet simple project for others to recreate.
I have an ancient circle-cutter tool in my stash and I just had to pull it out for this project. I started playing with the patterns in the Springtime 6 x 6 Paper Stack to see how I wanted them layered. Quick tip: If you are using a white background, make sure to use a more solid pattern as your bottom layer so that whites do not clash, ultimately looking as if your circle is cut off.
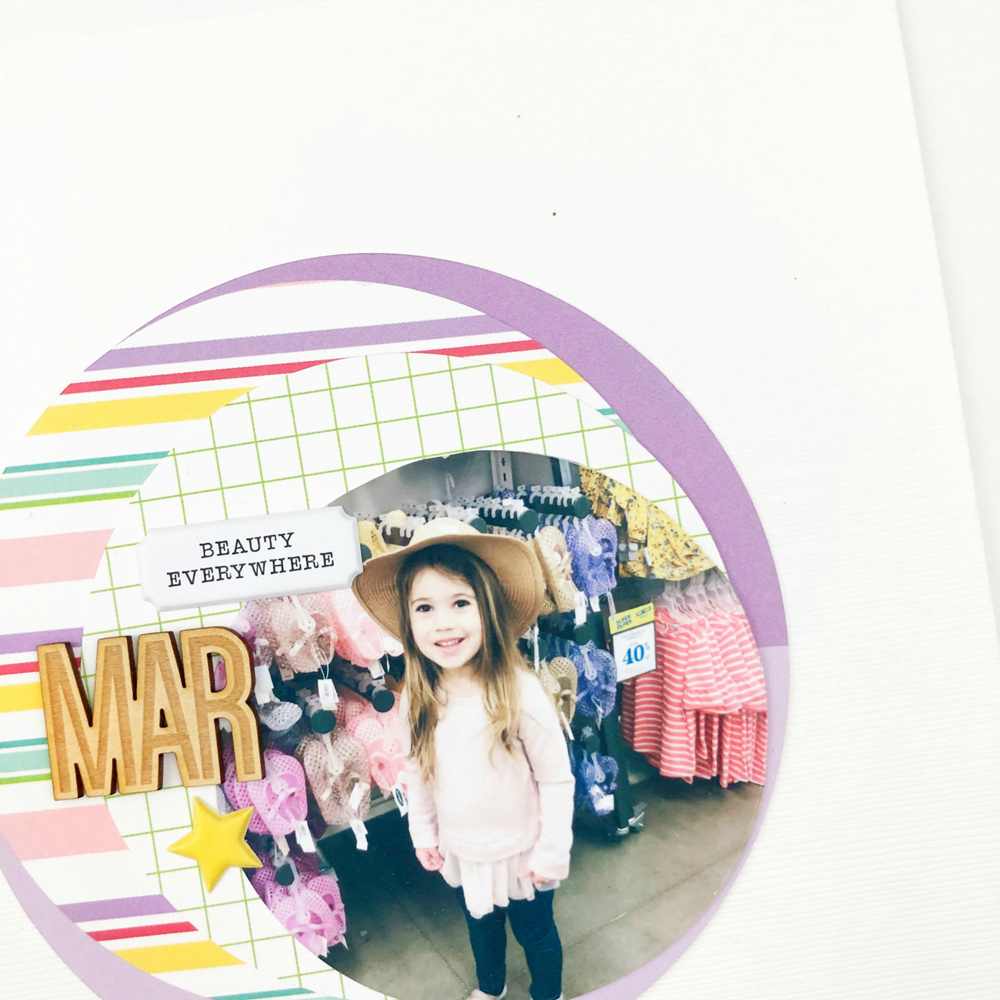
I knew I had this “springy” photo in my stash of my daughter acting fashionable while we were out shopping. I knew I had to create a layout using this photo, mainly because we were specifically shopping for spring clothes, but also because she is precious. (I’m aware that I am biased!)
I love adding my daughter’s initials to photos and projects. I never really thought about how important this was until I was looking through my parent’s old photos and I caught myself asking “who is this,” when referring to different siblings. What better way to add initials than with the Large Jane Alphabet Stamp and Metal Die? I also added a little stitching for extra texture.
I’ll be the first to say that I am not much of a journaler. I just can’t seem to love my handwriting on a layout. My quick-fix for that is using my typewriter to add some sweet words to go along with the photo.
Grab your Springtime 6 x 6 Paper Stack and your punches, circle cutter, or any other crafty tool that you have in your stash and create something unusual with your patterned paper! Thanks for stopping by!
Comments Off on Springtime Circles with Ashley Laura | Share This
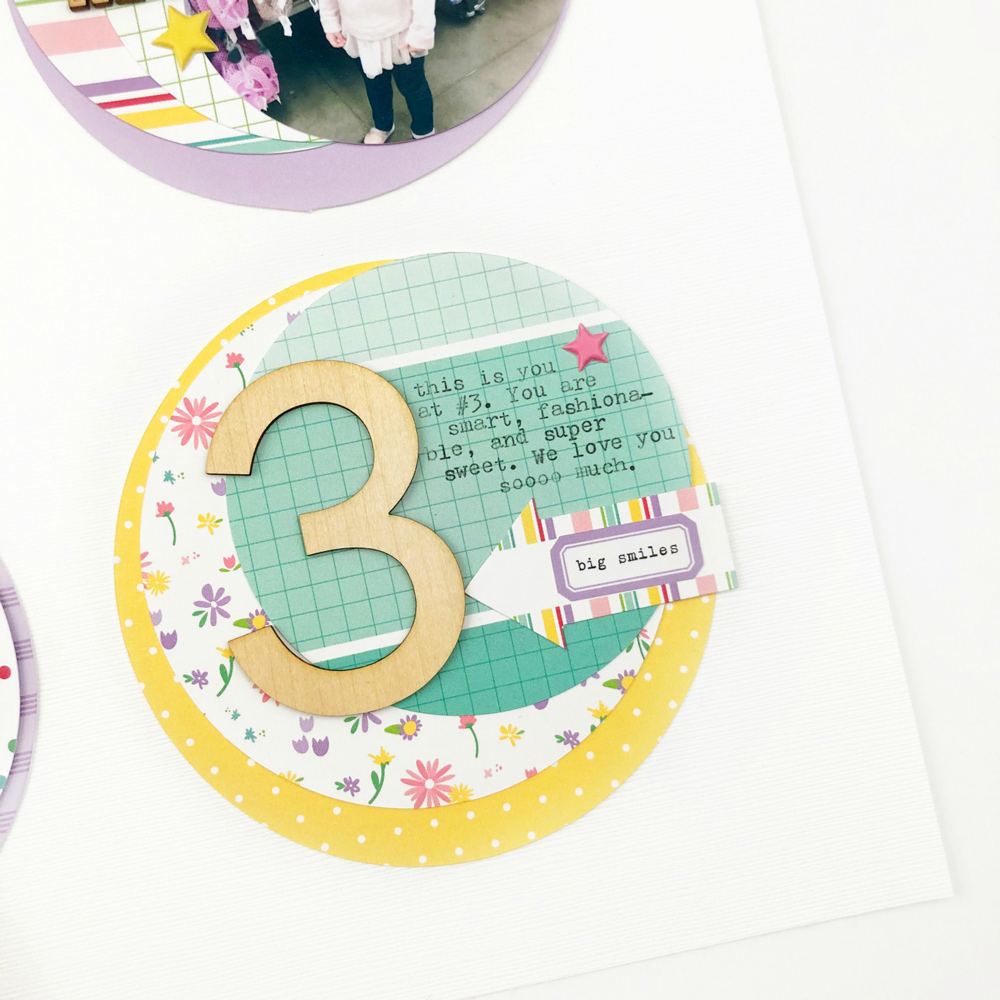
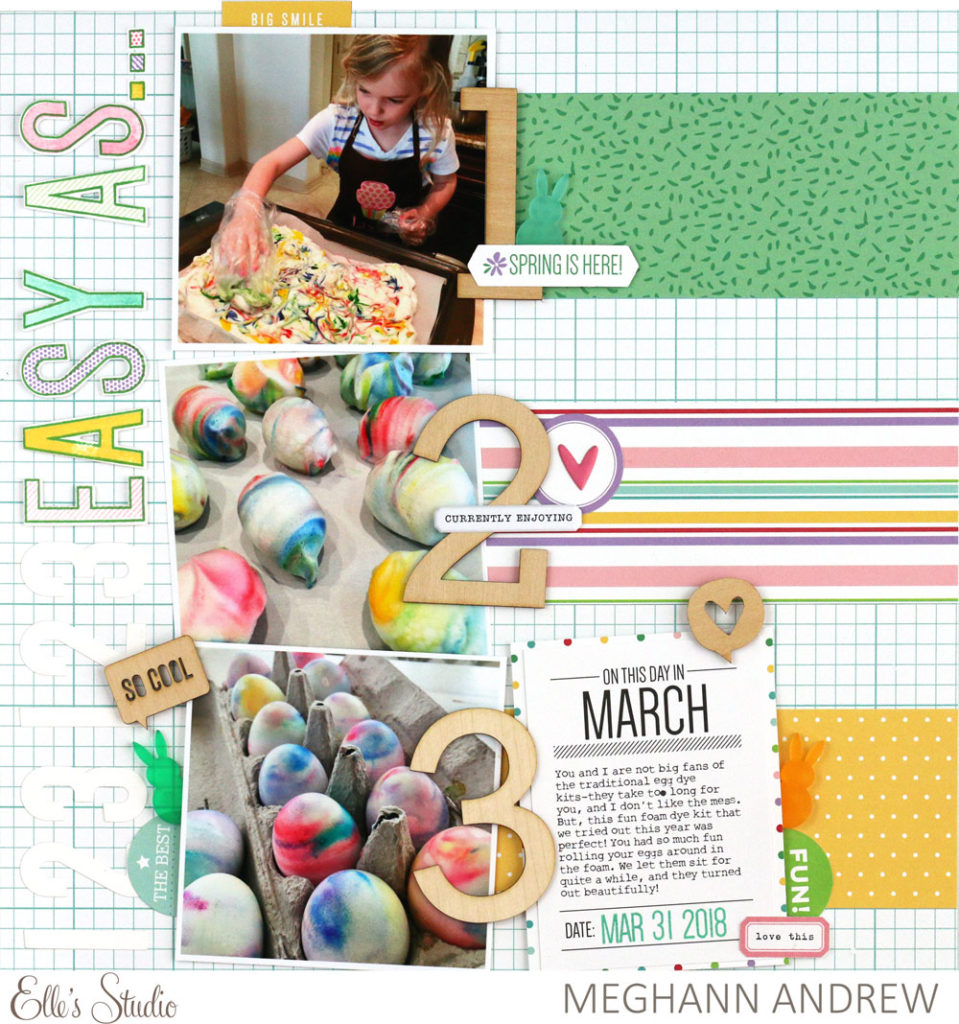
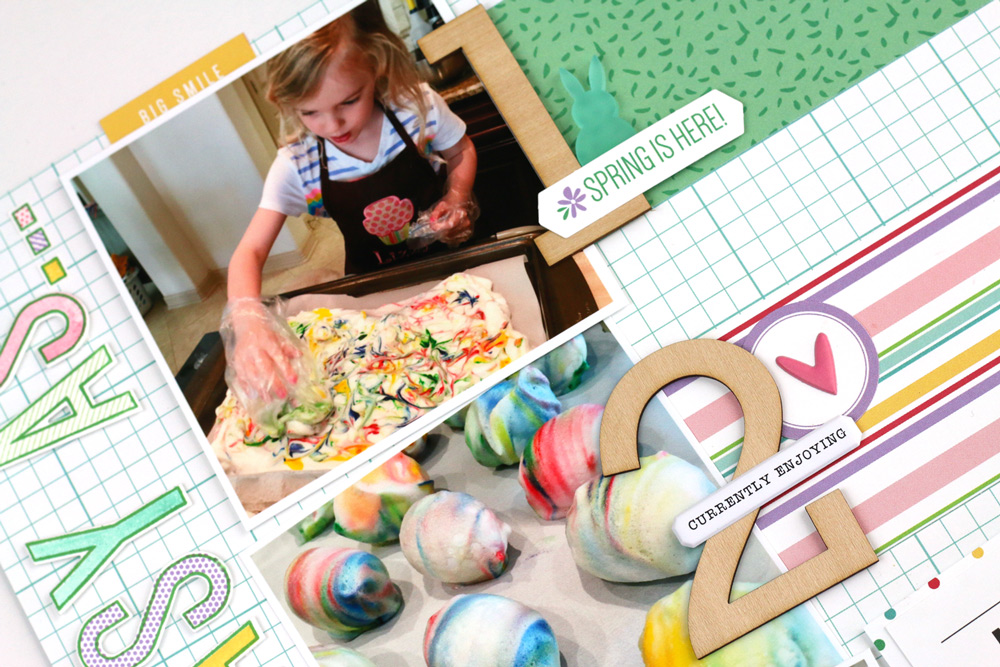
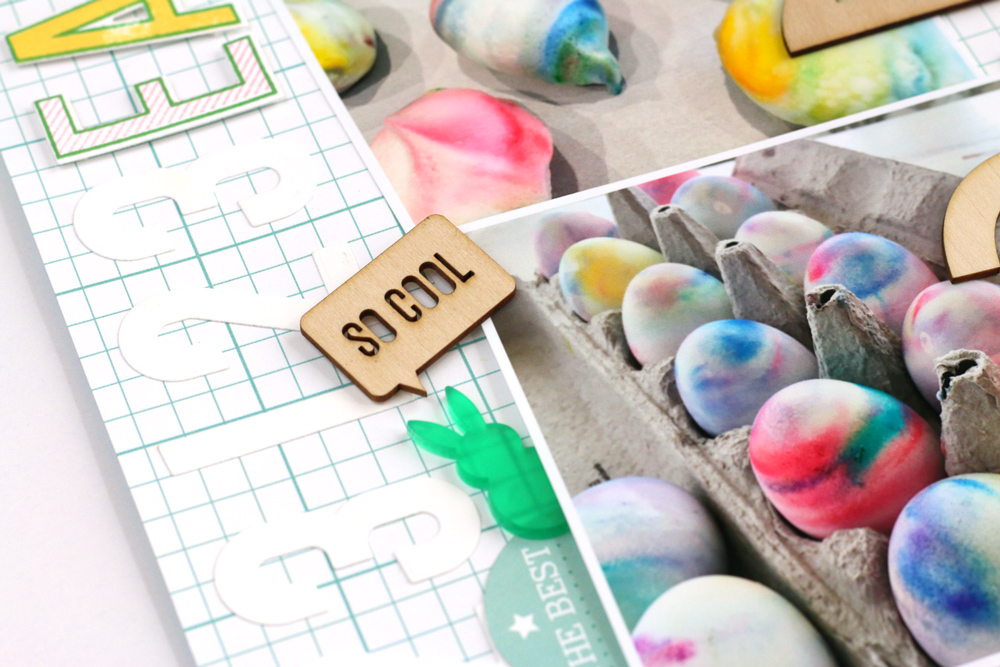
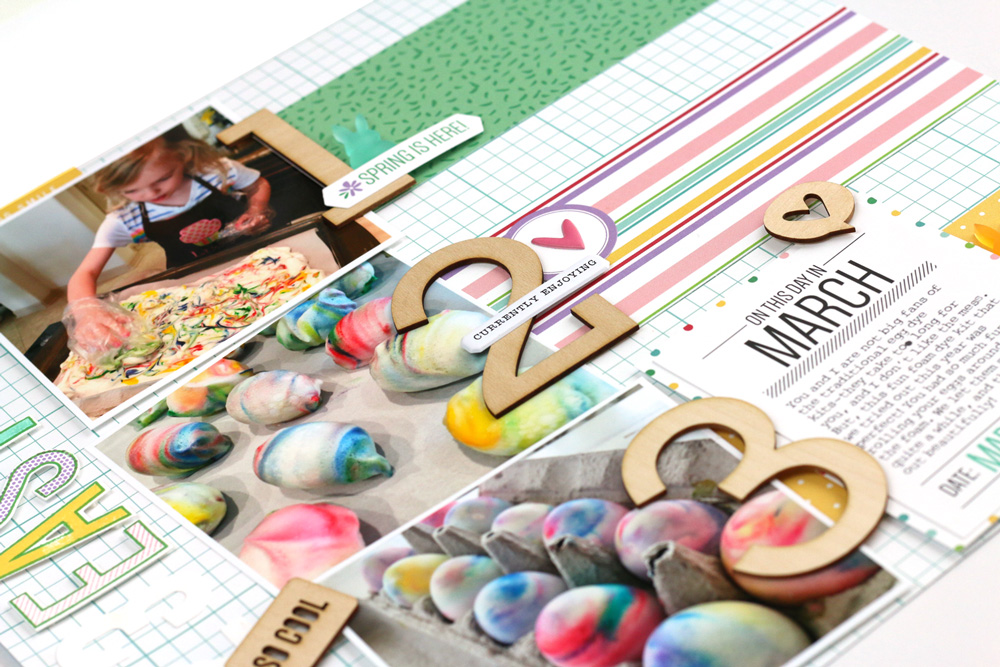
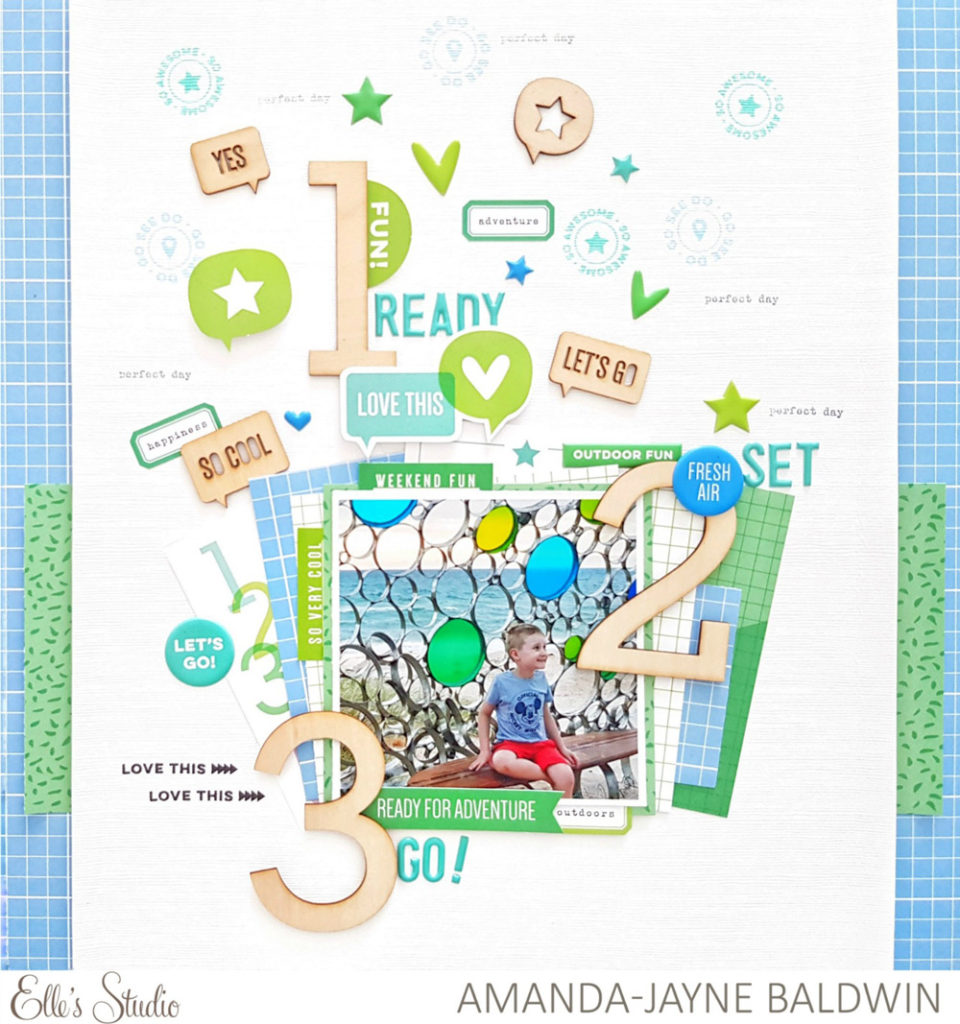
Hey there, ES friends! It’s Meghann Andrew, and I’m excited to be back on the blog with you today! Much of our life is done in succession—tasks and chores, days and goals typically have a beginning, middle and end. Today, I decided to document a fun Easter activity in a three-step succession using the new Large Wood Veneer Numbers. Take a look at how it turned out! Creating it was as easy as one, two, three!
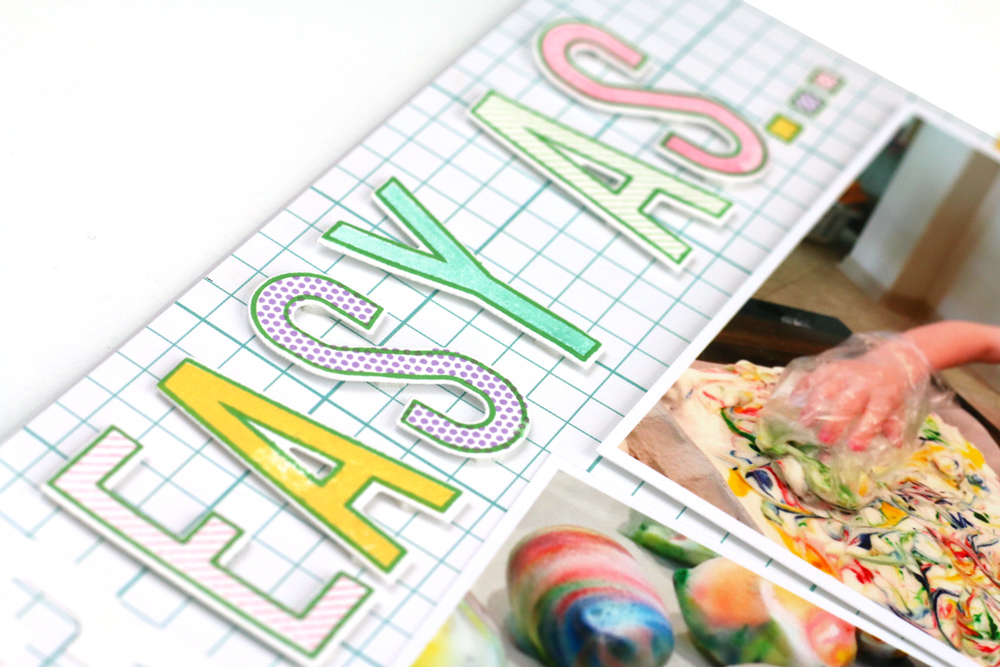
My daughter decorating Easter eggs last year was the perfect activity to document in succession on this 12″ x 12″ layout. I printed three photos at 4″ square, and ran them in a vertical line on the left side of my layout, leaving room to the left for my title, which I added using the Large Jane alphabet and numbers stamps and dies! I took the pretty pastel colors for my alphas from the colors in the Springtime 6 x 6 Paper Stack, and I cut 3″ wide pieces from three patterns in this stack to run from the right edge of the page to my photos.
It was easy to come up with a title! I had three photos, so I used the numbers 1, 2 and 3 Large Wood Veneer Numbers. Using them made me think of the phrase, “as easy as one, two, three!” Once my base elements were adhered, it was time to embellish, and add my journaling.
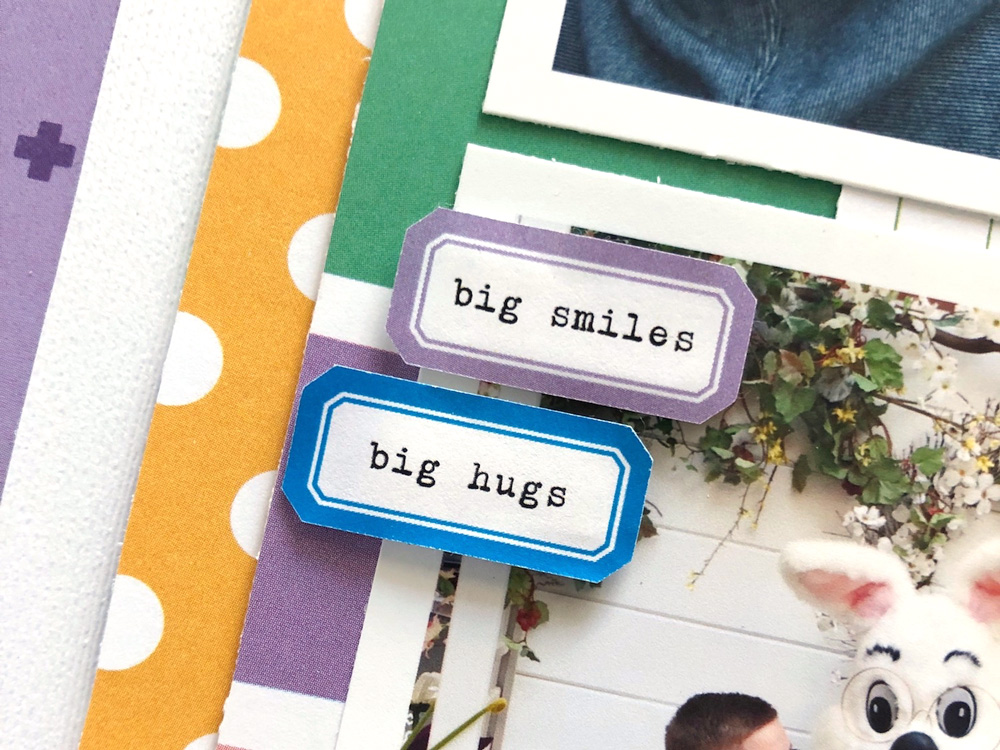
On numbers 1 and 2, I added die cuts from the March 2019 Kit, Spring Puffy Stickers and another Little Acrylic Bunny peeking out from behind my number. At the top of my first photo, I added the “big smile” March Label to add that pop of yellow to to the top of my page.
What moments in your life can you document in succession using these wonderful Large Wood Veneer Numbers? Whether it’s only three numbers, or twelve, on a layout or in a pocket, we’ve got you covered with the perfect product!
We love our newest paper stack addition to the shop, the Springtime 6 x 6 Paper Stack! This lovely bundle of 6″ x 6″ patterned paper comes without adhesive, so you don’t have to worry about tearing off a clean edge! Let’s take a look at five different ideas on how you can make the most of this stack of spring time pattern and color!
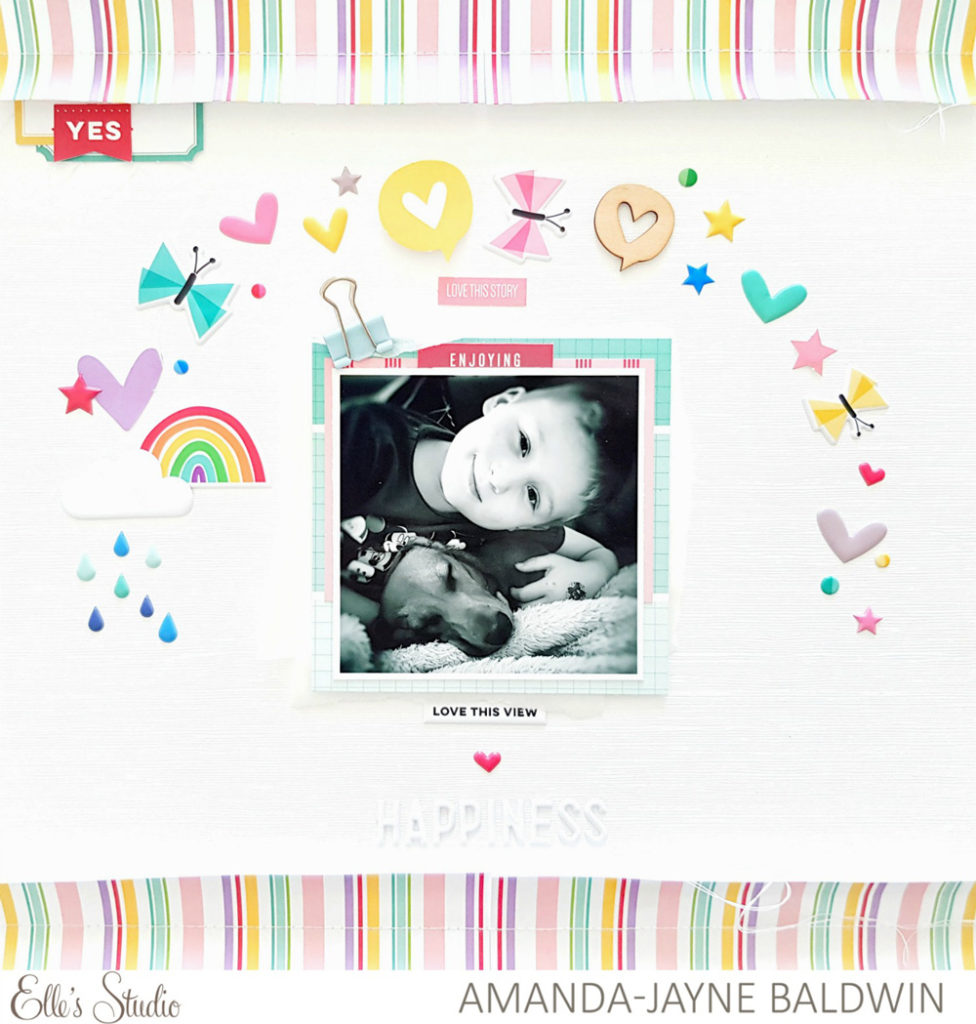
Add a strip of pattern to the top and base of your layout, the way that Amanda Baldwin did here. Even though the paper sizes are 6″ squared, it’s easy to butt two pieces against each other to span the width of your layout. We especially love how Amanda added texture and dimension to the page by curling the edge of her paper!
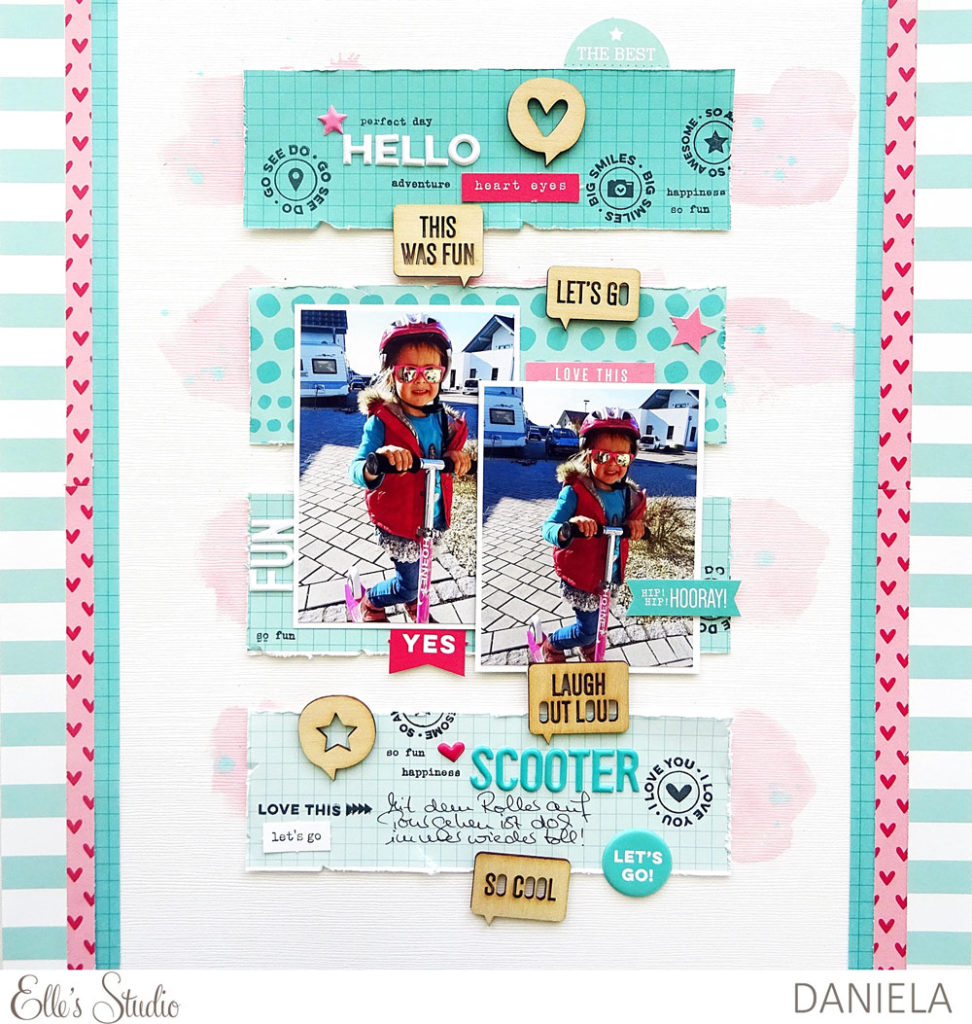
3. Cut apart your patterns!Daniela cut the ombre teal grid pattern into three separate pieces, keeping them separate on the background of her layout. She even added in the fun teal dot 4″ x 6″ tag from our March 2019 Kit to coordinate!
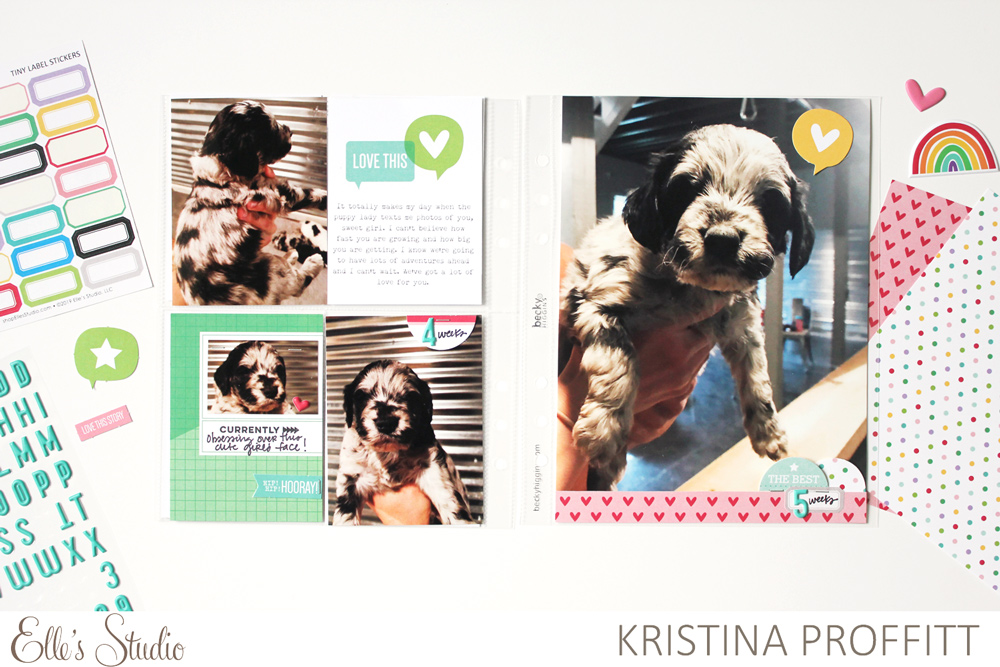
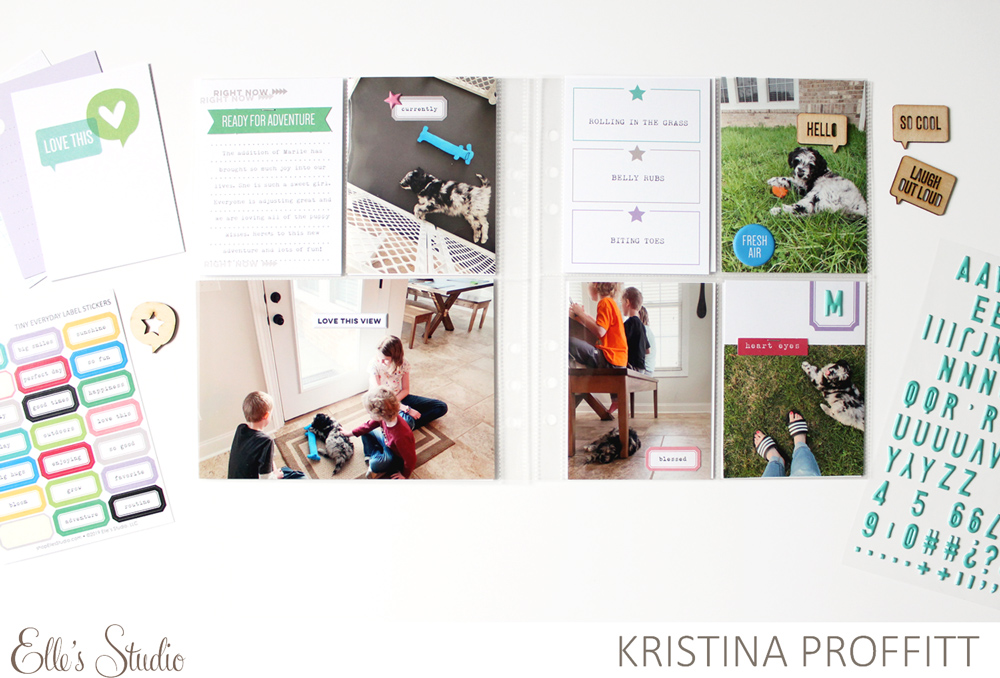
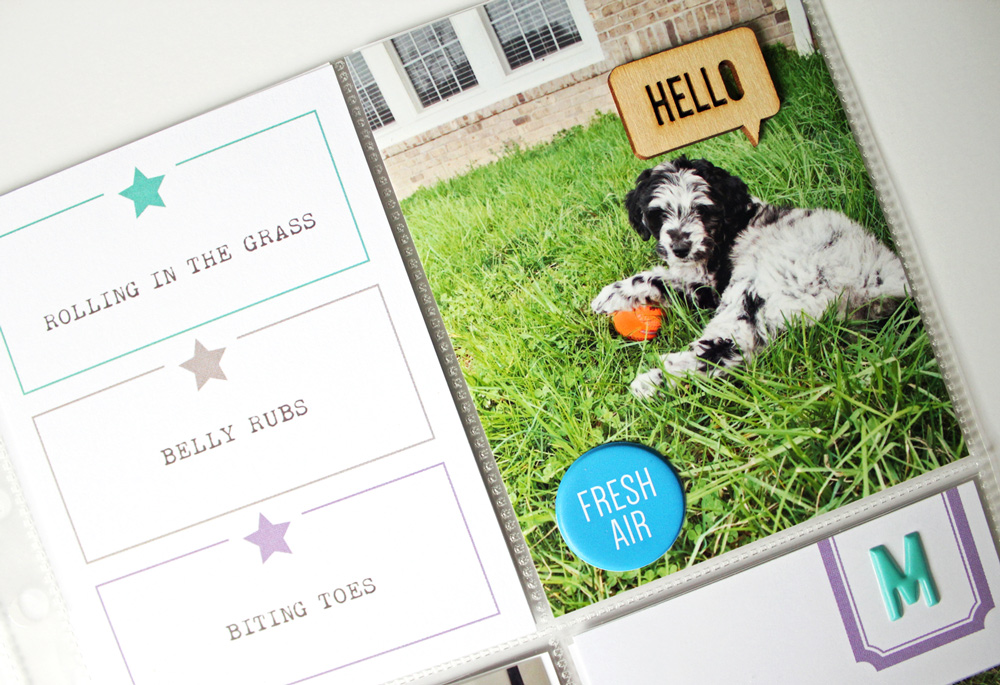
4. Add a border directly to your photo, the way that Kristina Proffitt did here using the pink and red heart pattern. It was the perfect addition to her sweet puppy photo, and gave her a shelf to add extra embellishment to the bottom corner.
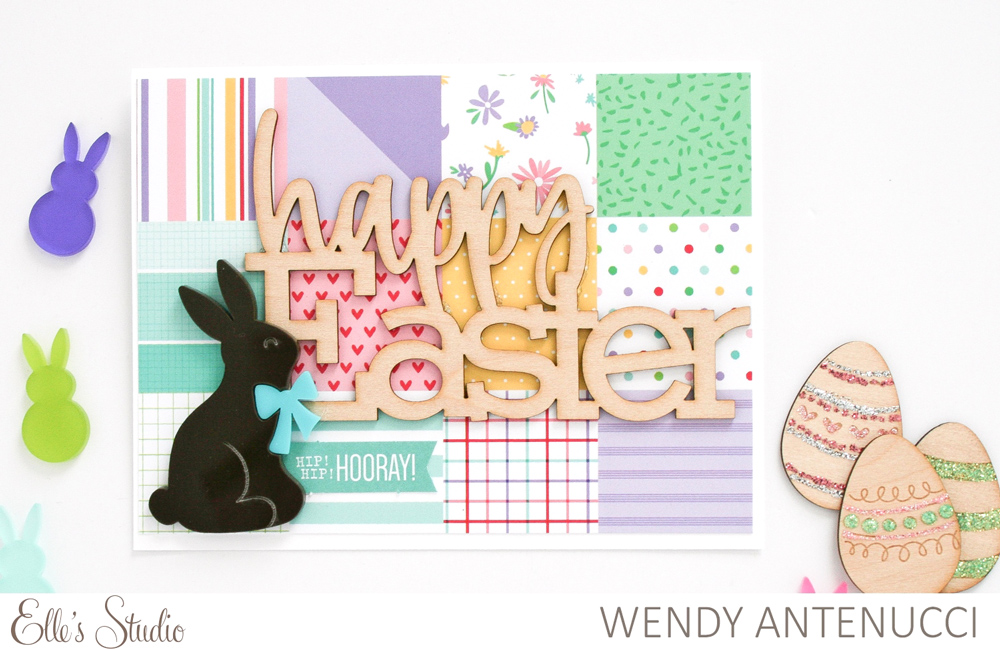
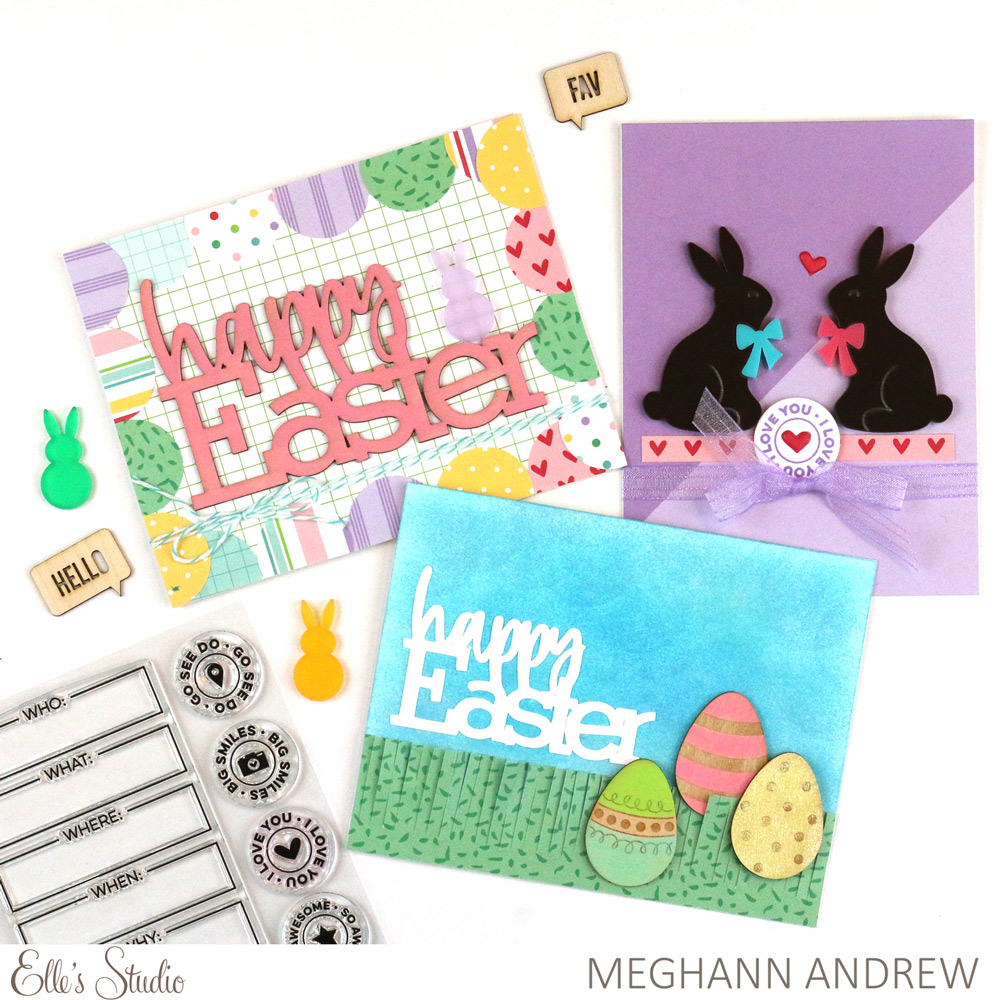
5. Use the pattern image on the Springtime Paper Stack packaging, the way that Wendy Antenucci did here to create her “happy Easter” card background! The small sized squares are perfect for cards and traveler’s notebooks, and you get to use each of the patterns at once without cutting into your sheets!
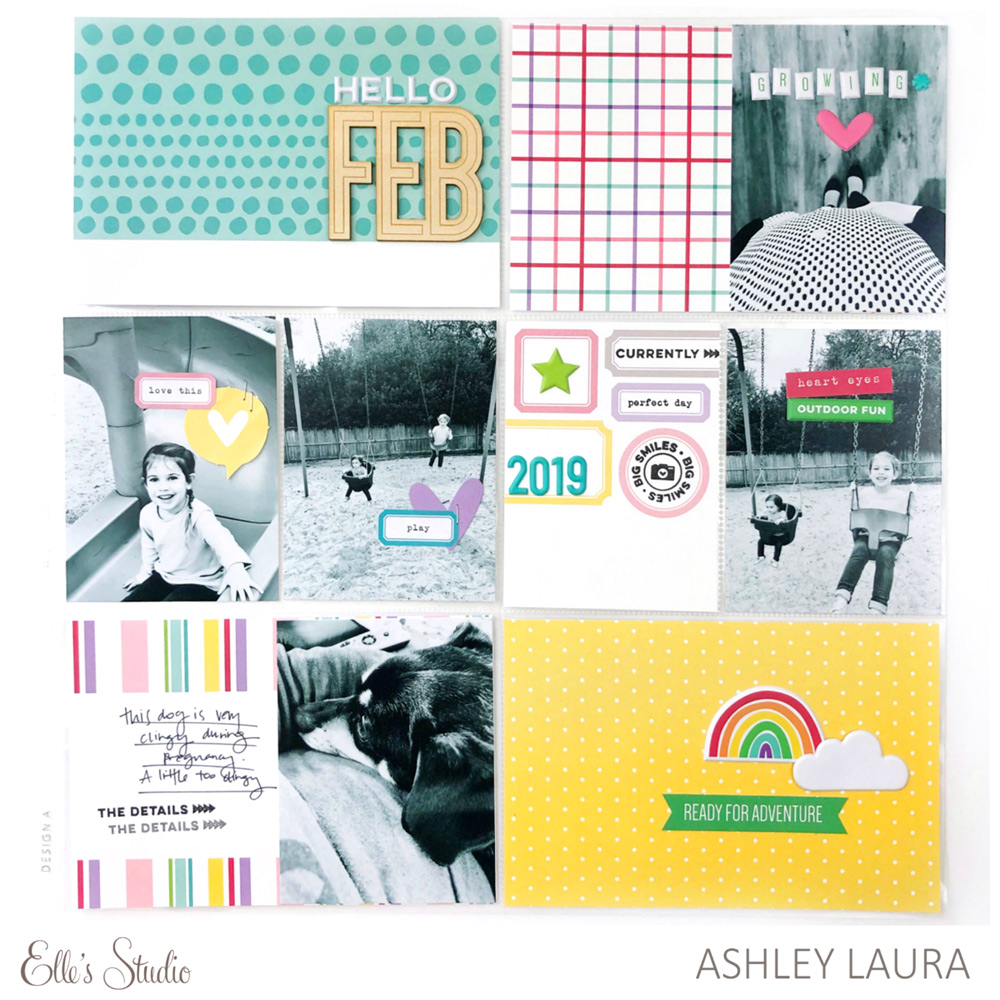
Do your family members (and that includes family pets, too!) have their own albums? Today, design team member Kristina Proffitt is sharing how she’s starting a new album all about her family’s new, furry addition, using our March Kit and add-ons! Let’s take a look!
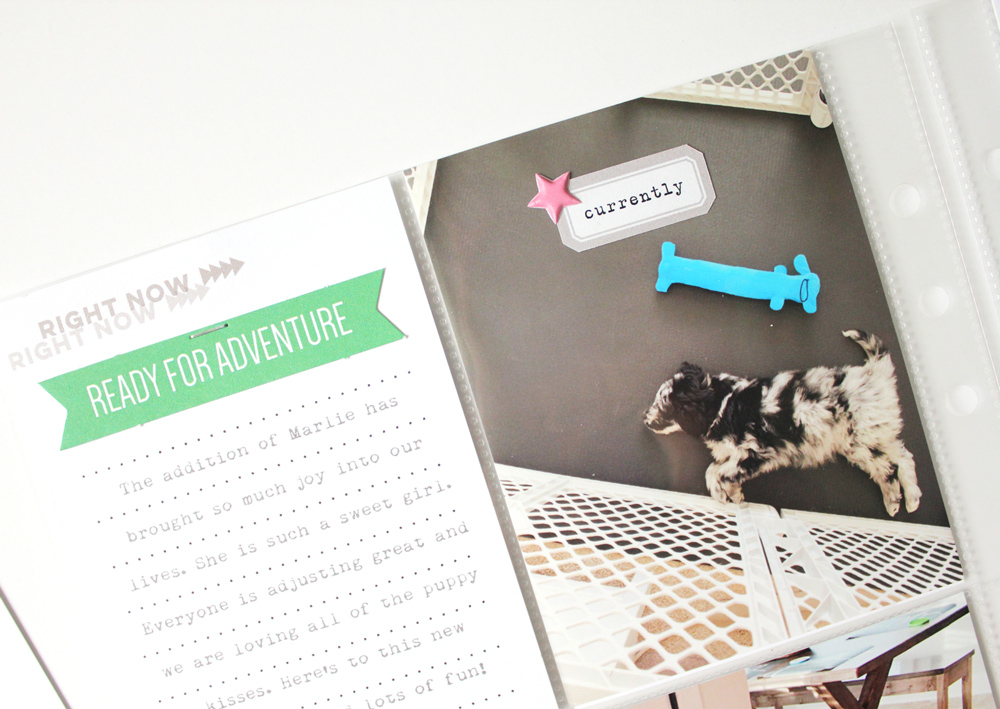
In our family, we’re a bit puppy obsessed at the moment because we just brought home our sweet girl a couple of weeks ago. As you can imagine, I’ve been taking a few photos—ok, it’s more than a few—so I decided to put her first year in a sweet little 6″ x 8″ album that had just been sitting on my shelf empty. These 6″ x 8″ pocket pages are the perfect size for her, and Elle’s Studio goodies are the perfect products to fill them!
I love printing directly on the journaling cards to keep the font & look consistent throughout and I am really loving the Tiny Everyday Label Stickers, too. The fact that the font on them is a typewriter font is perfect and to me, it’s just the right amount of embellishment for a smaller photo. Of course, I had to add a little bit of pink with the star puffy sticker from the Spring Puffy Stickers. I also love taking die cuts from the monthly kit and using my tiny attacher to staple them onto the journaling tags to give them a different look. It’s such an easy thing to do and they turn out really cute! The die cuts are SO versatile!
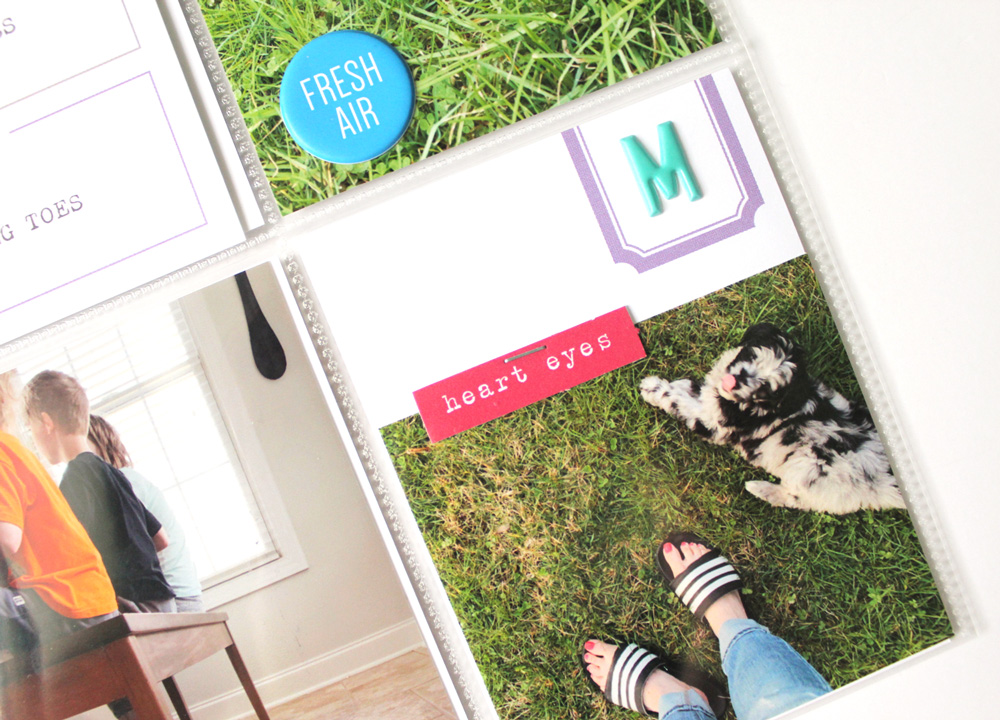
I also love to add photos to the journaling tags. Even if there are lines for journaling, you can totally make them your own by adding a photo or multiple photos to them. This journaling tag had a grid on it, but instead of journaling on it, I thought I’d print out a 3″ x 3″ photo and adhere it directly to the tag. The shape on the top right of the card was the perfect spot for a “M” monogram using the Teal Puffy Alphabet Stickers.
I used this star journaling tag from the March 2019 Kit to list three of Marlie’s favorite things right now. I also love adding simple embellishments to photos to give them a bit more depth and to tell the story of the photo even more. Doesn’t it look like Marlie might be saying, “Hello” in the photo? Or maybe it’s more like, “Lady, you’re taking my photo again?” Ha! Either way, I loved adding the Wood Veneer Speech Bubble to my photo.
If you want to create a little scrapbook for your favorite pet, you can easily pull it altogether using photos and any of the March Kit and add-ons. Coordinating is easy (it’s already done for you!) and there are so many cute embellishments that you can use to add just that little bit extra. It’s SO simple!
I have a feeling that this album is going to be pretty full by Marlie’s first birthday and I’m sure this won’t be the last that you’ll see of her. My apologies in advance, friends. Off to snap some more pictures of my sweet new furry bestie!
Show us how you are filling your pockets with ES product! Share on on Instagram using our hashtag #EllesStudio and join our Elle’s Studio Facebook Group, so that you have another space to share and be inspired by fellow ES fans!
Comments Off on Documenting Puppies in Pockets with Kristina Proffitt | Share This
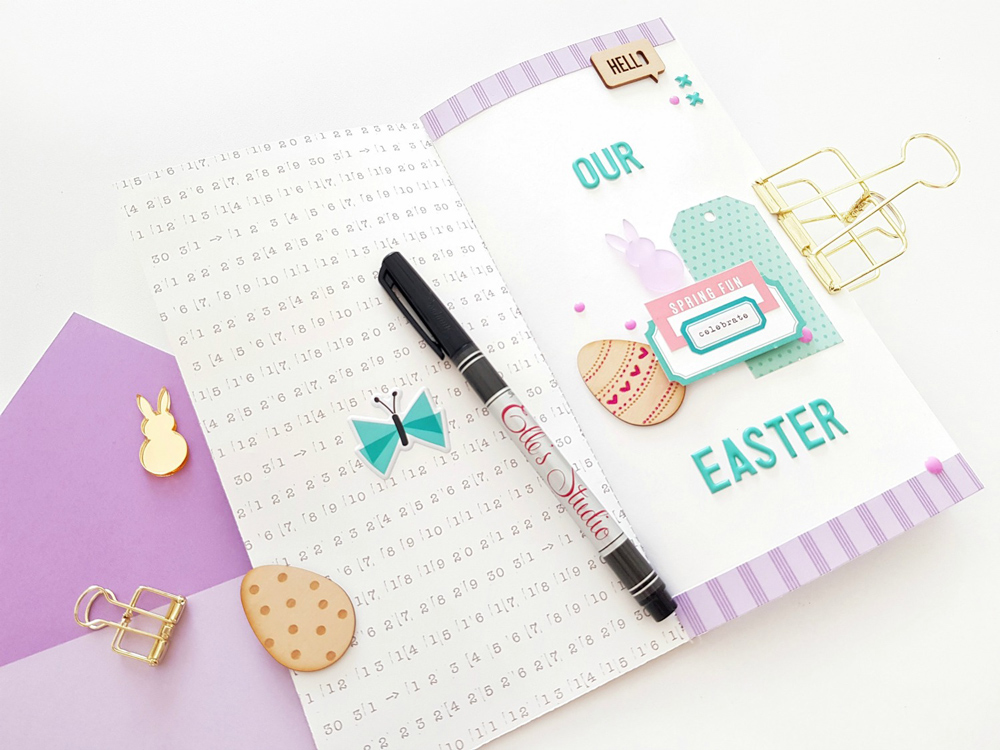
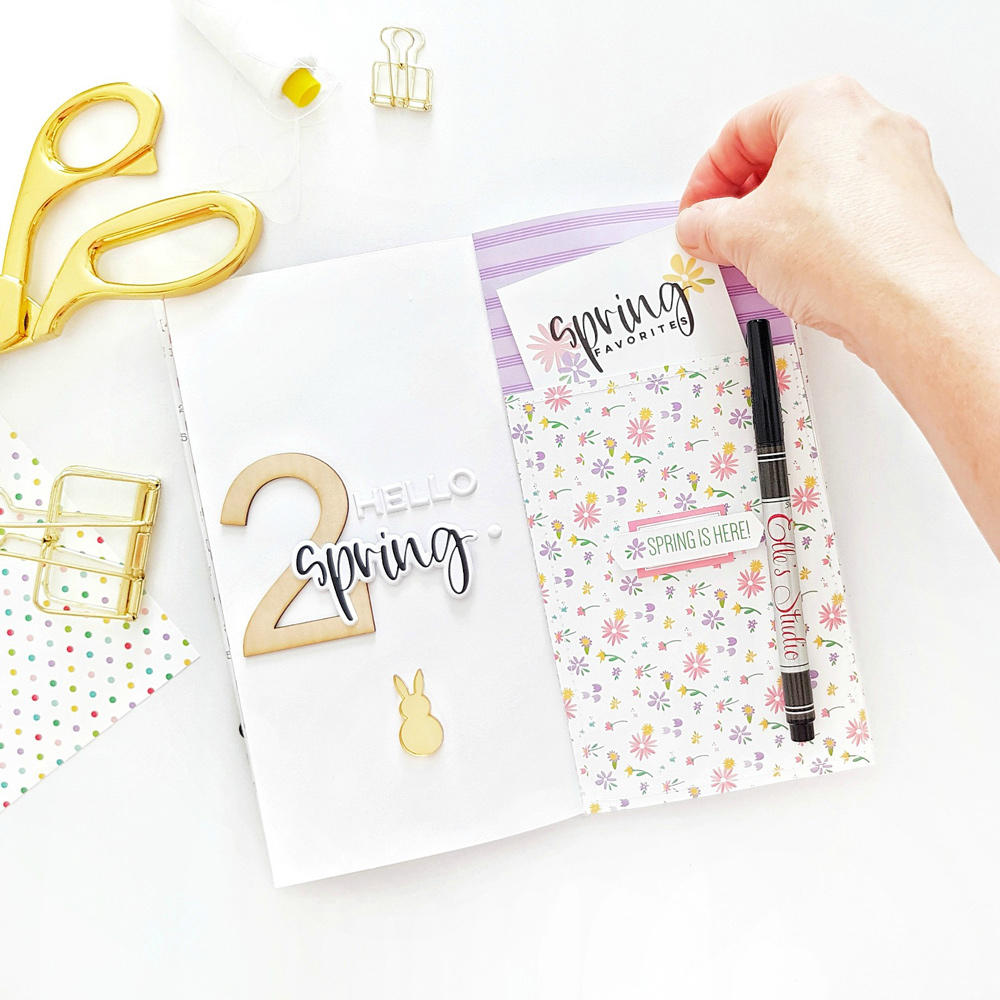
Hi Elle’s Studio Friends! Welcome back to the blog for more March Kit inspiration! This month’s kit and exclusive add on items are perfect for all your memory keeping needs, and today I am sharing how I used these supplies to create a completed, spring and Easter themed traveler’s notebook insert!
Think December Daily goes small scale & Easter style! Here’s a look at my TN front cover:
Isn’t this fun?! Such a simple, but very sweet traveler’s notebook insert to document all your Easter memories with!
To create this notebook, I trimmed a sheet of the yellow striped paper from the Noteworthy 12″ x 12″ Paper Collection to 8 3/4″ x 8 1/4″. Next I trimmed 10 sheets of plain white paper (I like to use 180gsm watercolor paper) to 8 1/4″ x 8 1/4″. I placed the patterned paper cover onto the slightly smaller sheets of white paper, and scored down the center to create a ‘spine’. To hold it all into place, I machine stitched along the scored line, and voila! A custom-made TN insert ready to record those memories!
What a sweet opening page! I decorated the reverse side of the cover with a simple butterfly puffy sticker from the Noteworthy Puffy Stickers. On the opposite page, I trimmed a 1/2″ strip of the Springtime 6 x 6 Paper Stack, and attached it to the top and bottom of my page. I also applied lots of lovely embellishments including that very cute Wood Veneer Easter Egg. To make it pop just a little more, I partly colored it with a magenta gel ink pen. Speaking of veneers, you’ll also spy that fabulous Speech Bubble at the top of my page! Love it! The pale purple Little Acrylic Bunny is a very sweet addition to the embellishment cluster too!
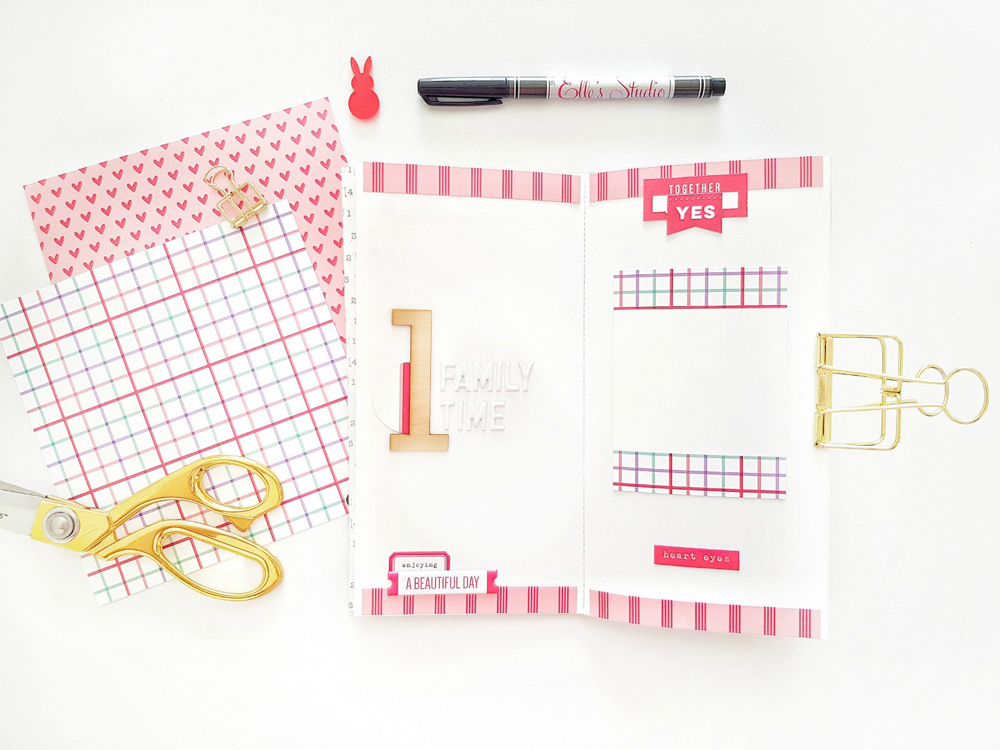
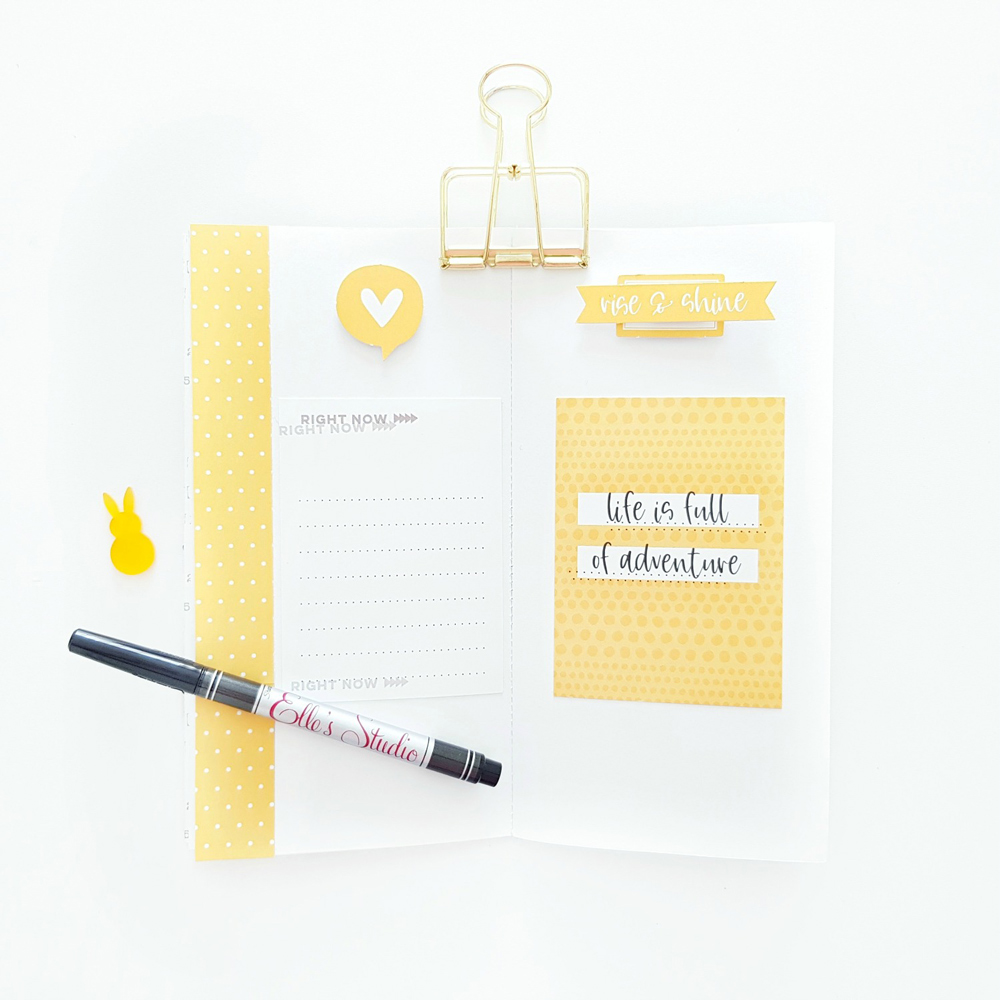
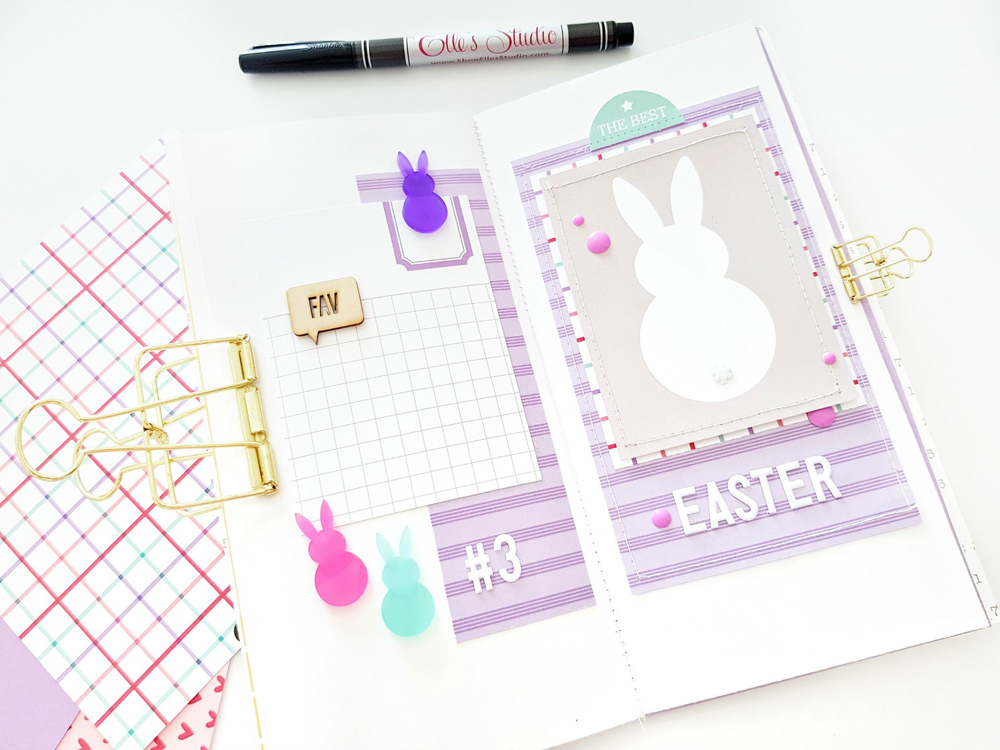
Further inside my TN, you’ll notice that I divide my Easter story into ‘chapters’. This helps me to organize how I will document, photograph and record our memories made this Easter. Chapter 1 is ‘Family Time.’
I opted for a simple design here, and trimmed the colorful red stripe March Kit 3″ x 4″ journaling tag into 1/2″ strips. I attached these strips to the center tops and center bases of both pages. On the left hand side, I added the chapter number and title with the Large Wood Veneer Numbers and White Puffy Alphabet Stickers. I also tucked a small die cut from the March Kit beneath the number one. At the base of this page, I also added a Tiny Everyday Label Sticker, as well as a Spring Puffy Sticker. Cute!
On the right hand side, I glued a 3″ x 4″ journaling tag from the March Kit to the center of my page. This is where I’ll add my first family photograph from our upcoming Easter. For finishing touches, I adorned the page with more coordinating die cuts from the March Kit, and the “together” March Label, too!
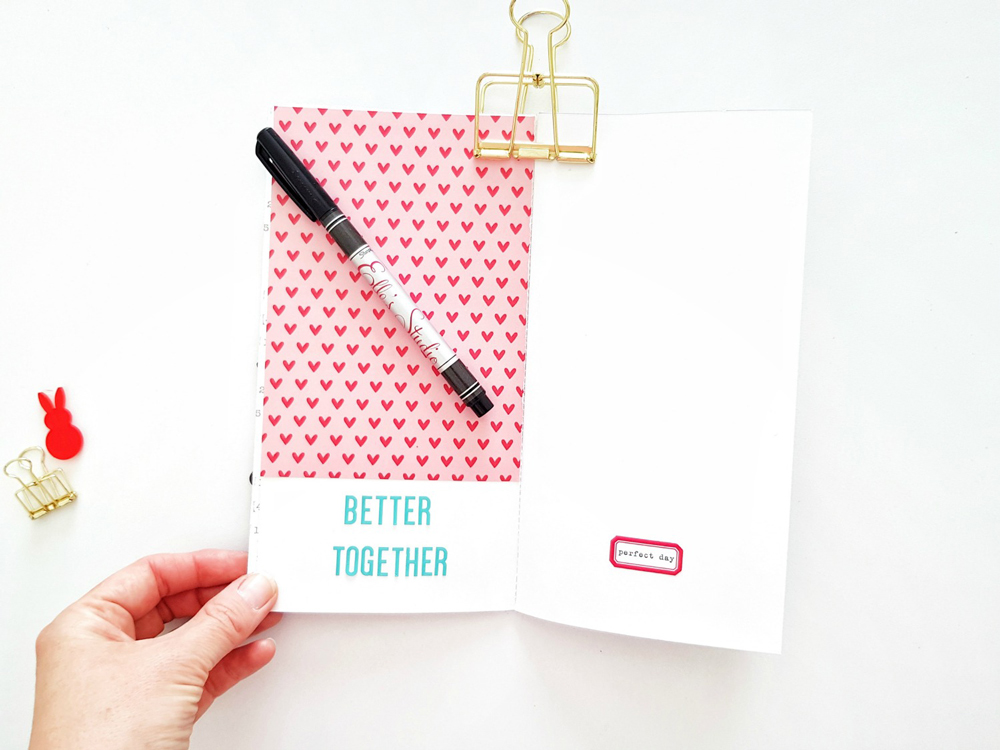
Here’s another ‘ready to go’ page for this chapter:
How sweet is that Springtime patterned paper?! Again, I’ve kept to a simple layout design, and am just waiting for my 6″ x 4″ family portrait photograph to be glued onto the right hand side, to balance that patterned paper. Cute!
I just adore interactive elements in any notebook or mini album, so stitching a journal pocket with the Springtime papers was a given! To highlight the spring feel, I chose that floral paper & coordinating journaling tag from the March Kit.
Here are a few more simple pages awaiting photos and memorabilia from this season:
Isn’t this happy?! I created a monochromatic page with the all the yellow items in the March Kit. Nothing says sunshine and happiness more than yellow! I have ensured that my pages leave ample room for journaling and a photo, or two! Here’s another fun spring page:
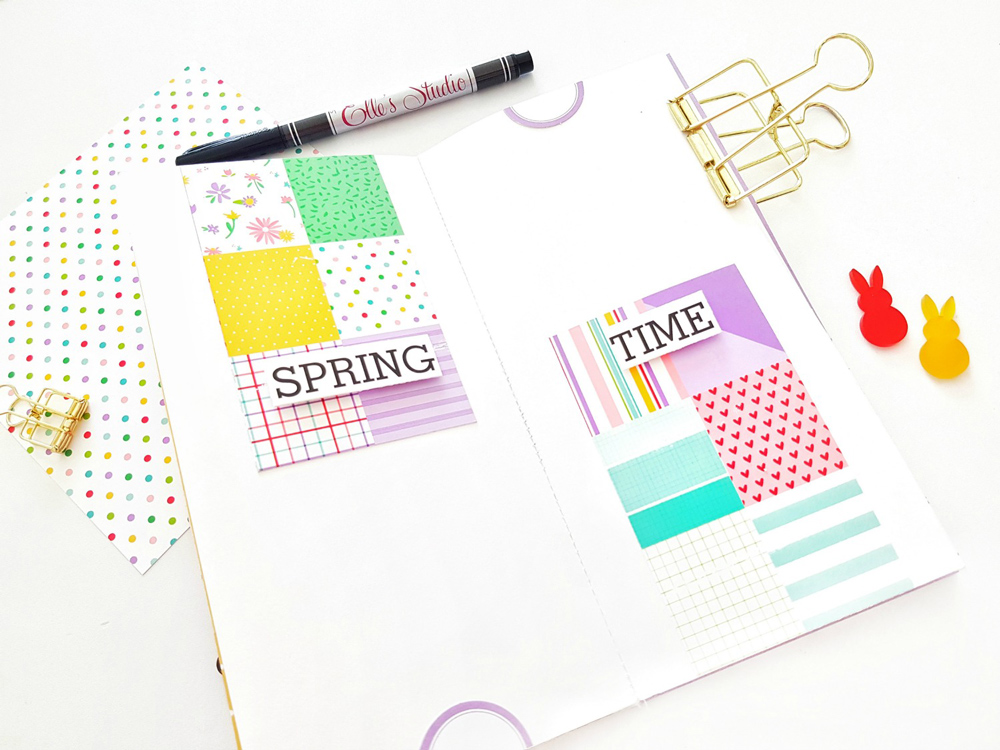
Oh, how cool is this? I created this fun spread by cutting up the Springtime 6 x 6 Paper Stack packaging label, and added a die cut from theMarch Kit. So simple, and so effective!
Eeep! That Chocolate Acrylic Bunny is errrrything! Possibly my fave item from the add-ons this month!
That’s just a brief look at my Easter TN using the fabulous March Kit and new releases! Now all I need to do is get out my big girl camera for Easter, and take those photos! Ready, set, Easter is a GO!
I hope my post inspired you to go ahead & create a traveler’s notebook to record your Easter memories with! Thanks so much for stopping by today!
If you’ve been inspired by Amanda’s ready-to-document TN insert, share your own project on Instagram using the #EllesStudio hashtag, or in our Elle’s Studio Facebook Group!
Comments Off on Creating a Spring Traveler’s Notebook Insert with Amanda-jayne Baldwin | Share This
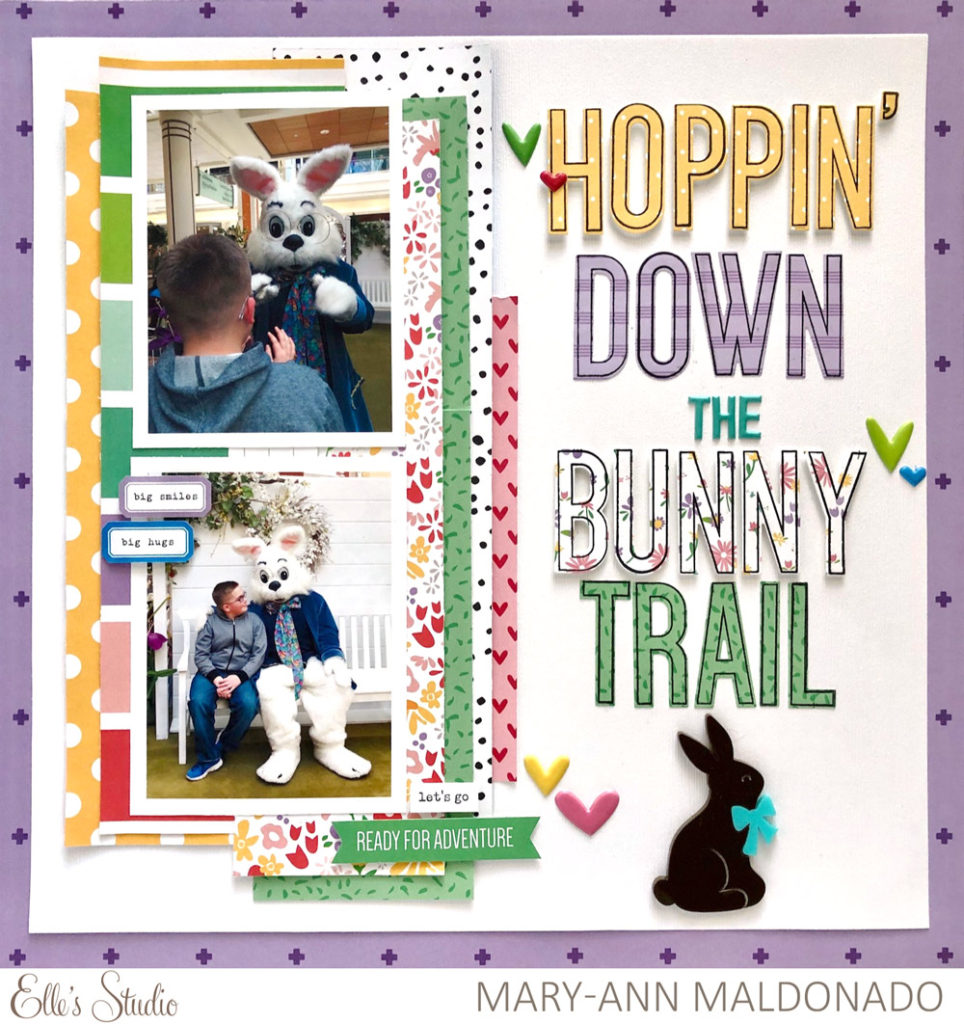
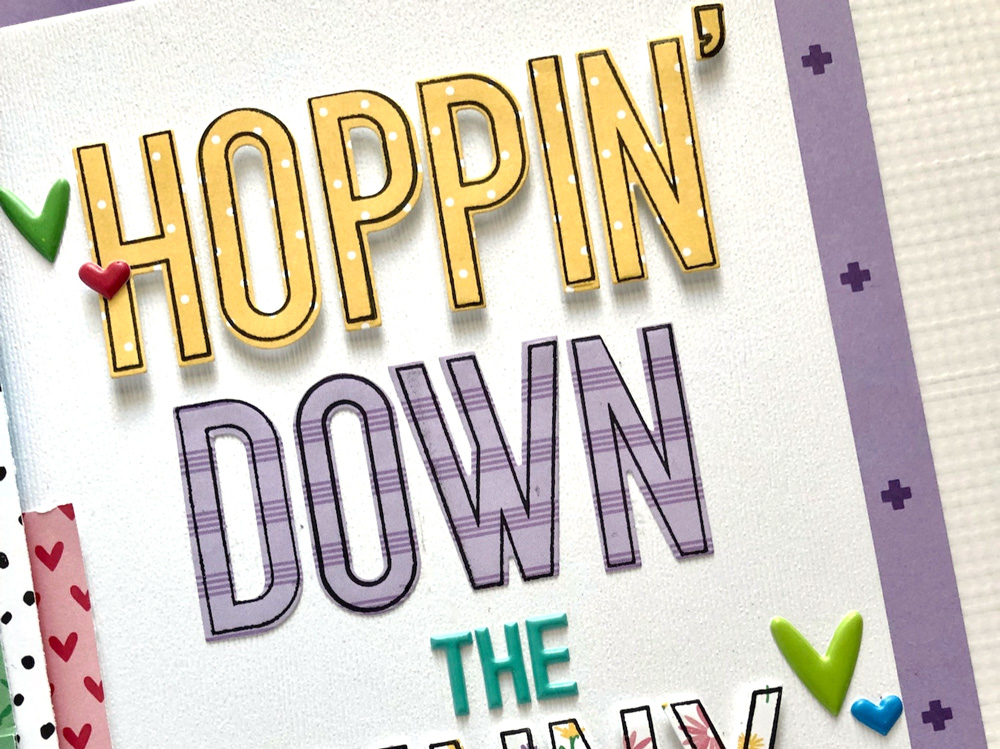
A clever title can be as simple as a children’s song and our Large Jane Alphabet Stamps, as design team member Mary-Ann Maldonado is showing us on her lovely new layout today. Let’s take a look!
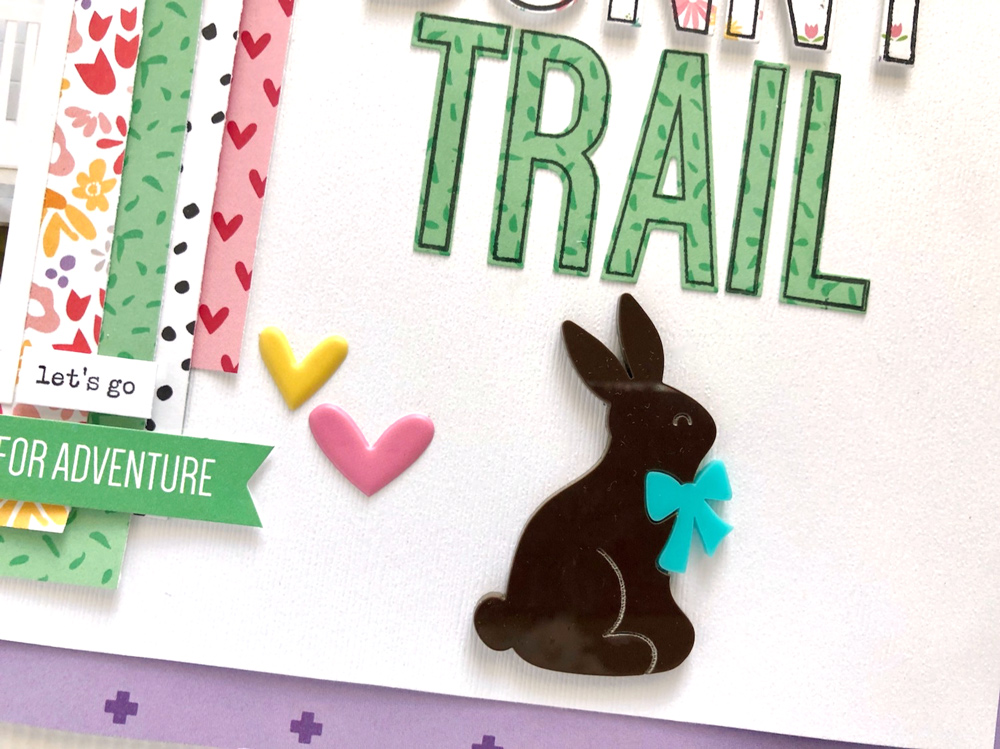
Hello Elle’s friends! I am super excited to share my layout with you today! I had so much fun creating this multi-patterned title using the Large Jane Alphabet Stamps. I was at a crop with several other friends who were seriously mad at me! I kept singing my title, which then got stuck in their heads for the entire day, which I thought was hilarious! But seriously, look how fun it is: each word, using a different patterned paper from the Springtime 6 x 6 Paper Stack. Paired it with the Chocolate Acrylic Bunny was a bonus for the bottom of my spread!
Under my photos, I cut strips of various 12″ x 12″ colorful papers from the Noteworthy, Live Laugh Love and Family Fun paper collections that would match the color scheme I was trying to achieve for the layout.
I added the Tiny Everyday Label Stickers that matched my project. The phrases just happened to be perfect! I used foam for a little bit of added dimension. Layering them over the photos helps bring your eye to that photo.
As much as I love ALL of the acrylics in the March release, I really love how this Chocolate Acrylic Bunny stands out against all the pastels and white that I used. Directly under my title, was the perfect place for him to get cozy!
Thanks for stopping by. Be sure to hit the shop and check out these Large Jane Alphabet Stamps. You are going to love the different patterns. Don’t forget to use the hashtag #EllesStudio when you use them, too!
Comments Off on Hoppin’ Down the Bunny Trail with Mary-Ann Maldonado | Share This
We have loved the traveler’s notebook spread and mini album that March guest Melissa Morrelli has shared with us this month. Her clean, documentary style works perfectly with ES product! Today, she has another traveler’s notebook spread to share with us, and we know it will inspire you to document a single day in more detail. Let’s see what she created!
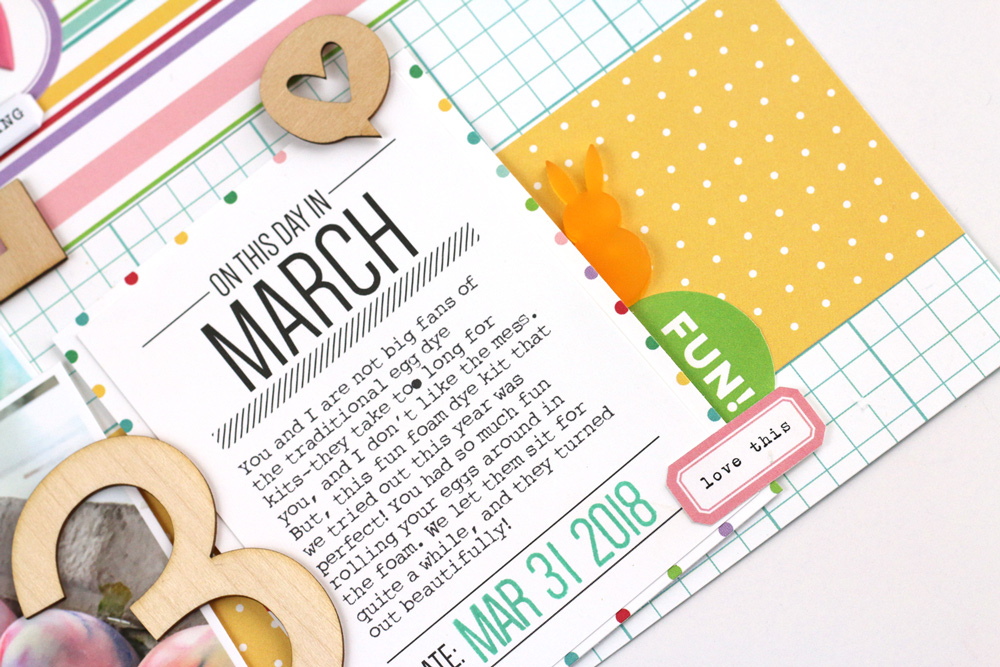
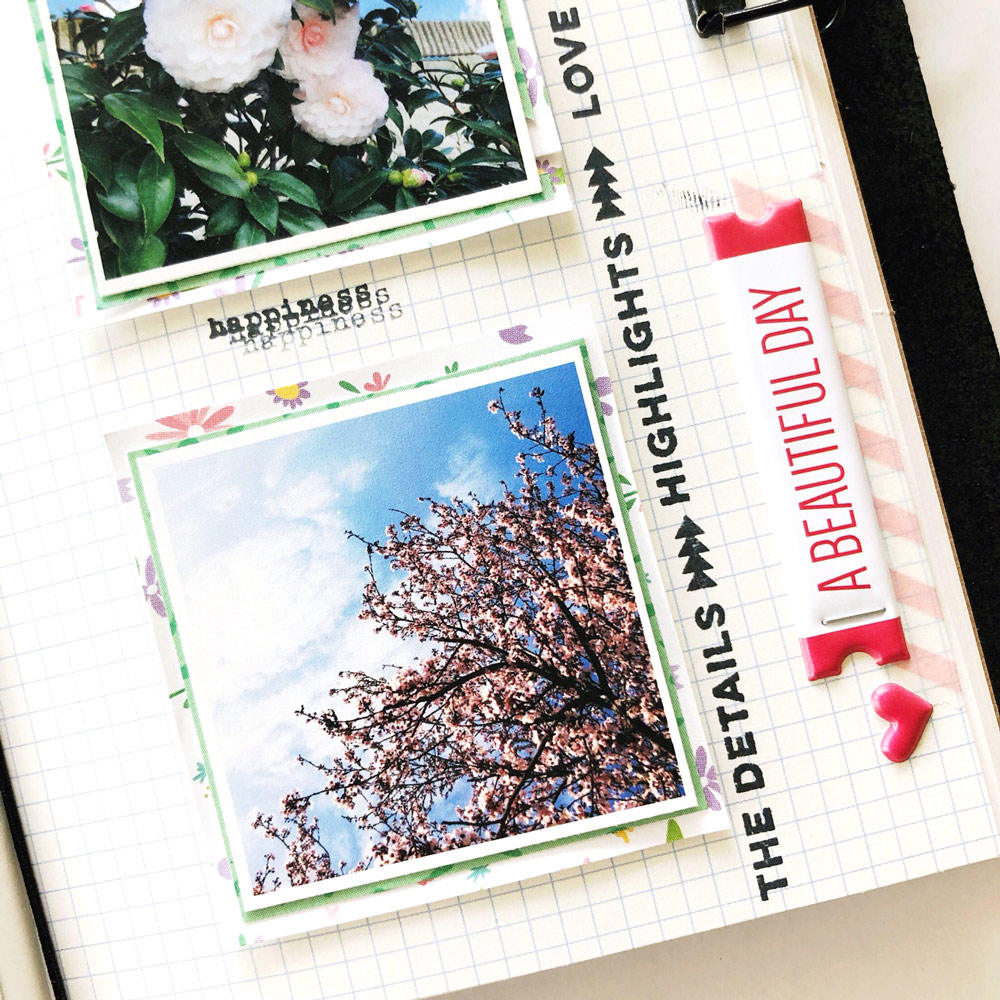
Hi friends! It’s Melissa here back to share my final project using the March Kit and extras. Today’s project is another traveler’s notebook spread. As much I appreciate the compact size of a traveler’s notebook, there have been times when I’ve wanted to document more than 1-2 pictures. My go to method for sharing multiple photos in my traveler’s notebook is making a photo strip or grid of some sort with smaller sized photos.
When creating a photo strip/grid, the first thing I decide on is how many pictures I want to use on my layout. Then I can decide on what size I should print my photos at. For this layout, I wanted to share three photos, so I went ahead and printed my photos at 2.25″ x 2.25″.
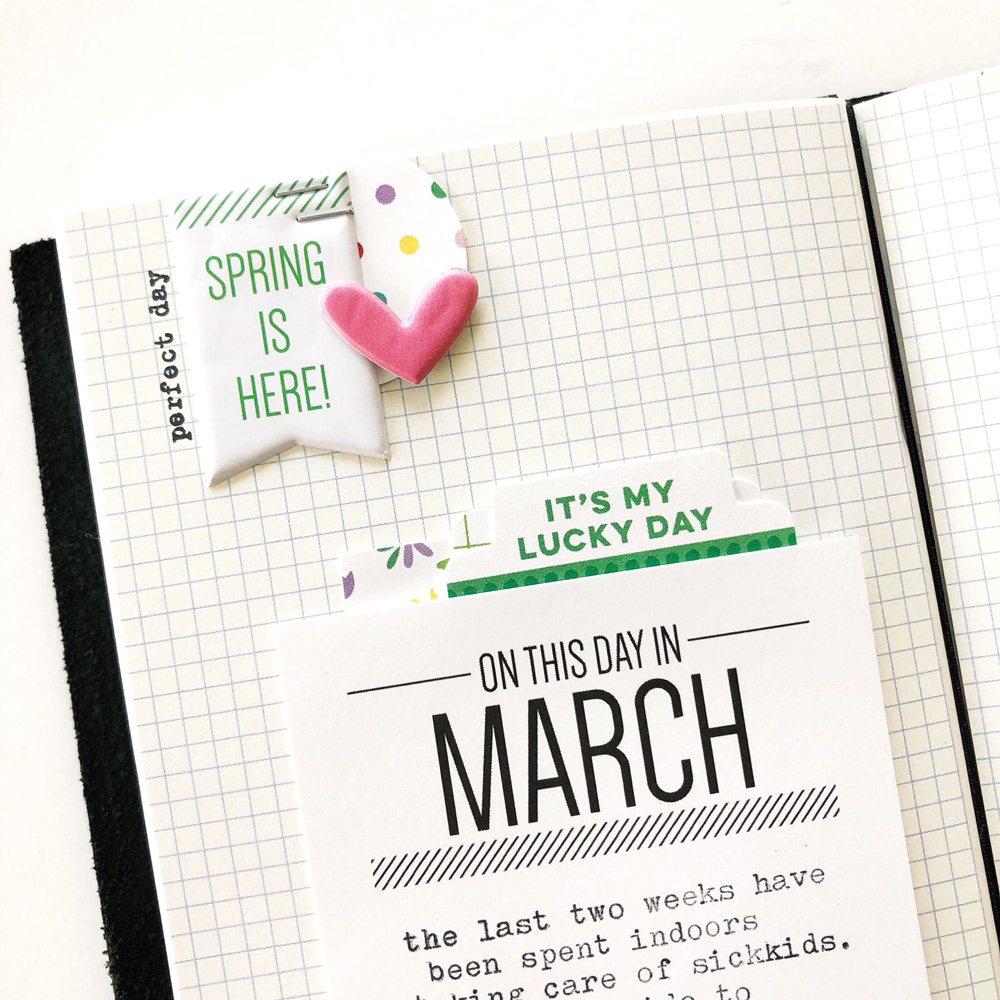
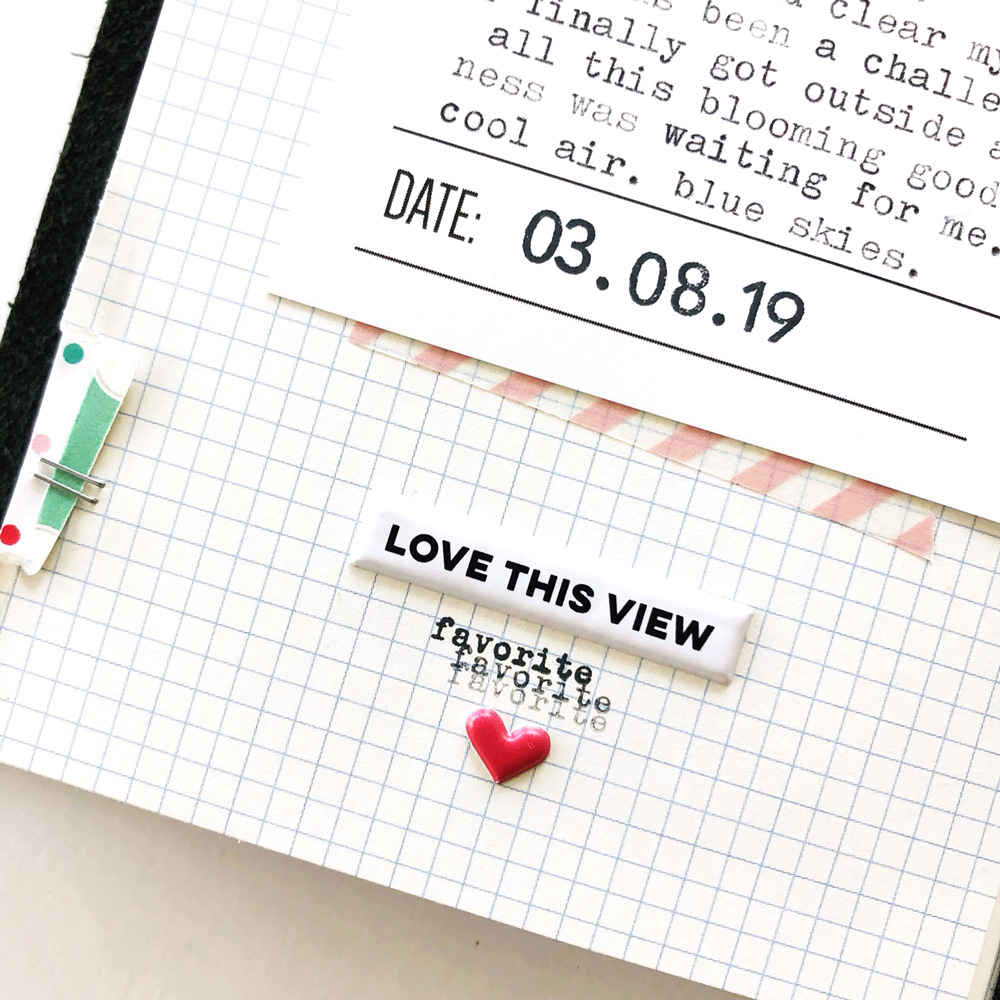
For my background, I used some grid paper. On the right side of my layout, which is where I decided I wanted to place my photos, I backed all three of my photos with the cute floral and green grass looking paper from the Springtime 6 x 6 Paper Stack. Then I moved over to the left side. I typed out my journaling on one of the awesome On This Day In March Journaling Tags. Once I had the placement of my photos and journal tag that I was happy with, I adhered them down to the background.
To embellish this layout, I knew I wanted to use the “Spring is Here!” Spring Puffy Sticker. I created a little cluster with it, a pink puffy heart and a circle I punched from the cute polka dot paper from the Springtime 6 x 6 Paper Stack. I used mostly puffy stickers to embellish throughout this layout. I also used small scraps of paper and the “It’s My Lucky Day” tab from the March 2019 Kit behind my journaling tag. Then, I grabbed The Details Stamp and added a few of the small phrases throughout the layout. I also used the bolder phrases with the arrows to stamp up against the entire length of my photo strip.
As a last minute decision, I tore the edges of my paper on the left side (towards the bottom) and right side (towards the top) to add in just a tiny bit more of that super cute polka dot paper. I folded over the ripped edges and stapled them down with my tiny attacher.
It has be a real pleasure, friends. I hope I’ve inspired you to create something fun this month!
Hello, Elle’s Studio fans! I’m Melissa Morrelli, an obsessed picture taker and story teller. I am so thrilled to be a guest designer this month for Elle’s Studio. My absolute favorite method for documenting my family stories is in a traveler’s notebook—I really appreciate the compact size! My other paper love is making mini albums for special occasions (birthdays, holidays and vacations.) I live in California with my family, my favorite subject to photograph and tell stories about. We are an active family and we love the outdoors (you can always find us where the wild things are!) There’s never a dull moment in my life and there is always a story to tell.
I really hope I have inspired you to make something fun!
Thank you so much for your beautiful projects this month, Melissa! Be sure to follow her Instagram feed, @melissamorrelli, for more mini album and traveler’s notebook inspiration.
Comments Off on On This Day in March with Melissa Morrelli | Share This
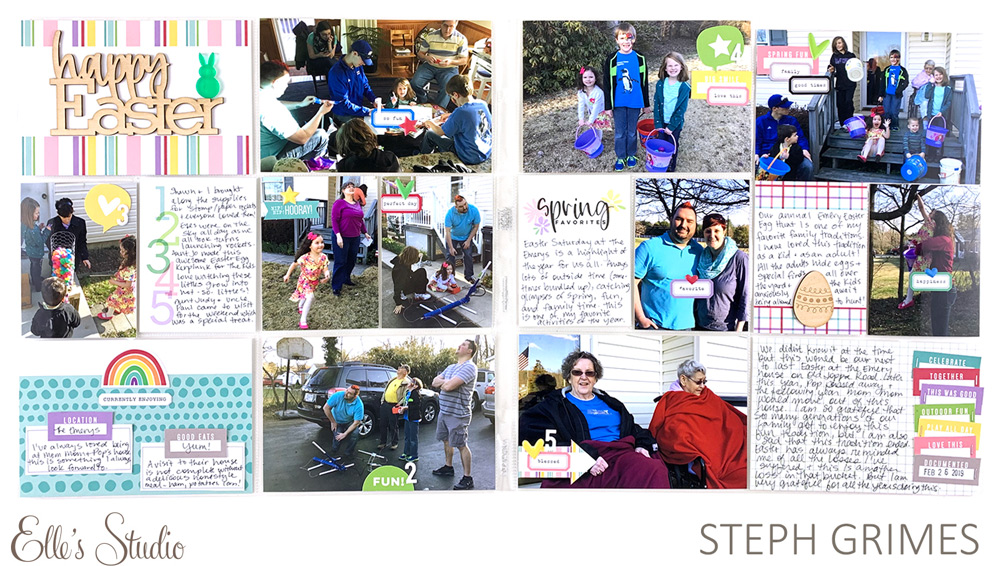
Our design team has been inspiring us all month with projects using our March Kit and add-ons. Today we have nine more to share with you, that we know will have you wanting to get your Easter greeting cards created, and documenting your favorite spring memories on scrapbook layouts and in pockets! Let’s take a look!
We can’t wait to see what you have created with our March Kit and extras! Be sure to share on on Instagram using our hashtag #EllesStudio and join our Elle’s Studio Facebook Group, so that you have another space to share and be inspired by fellow ES fans!