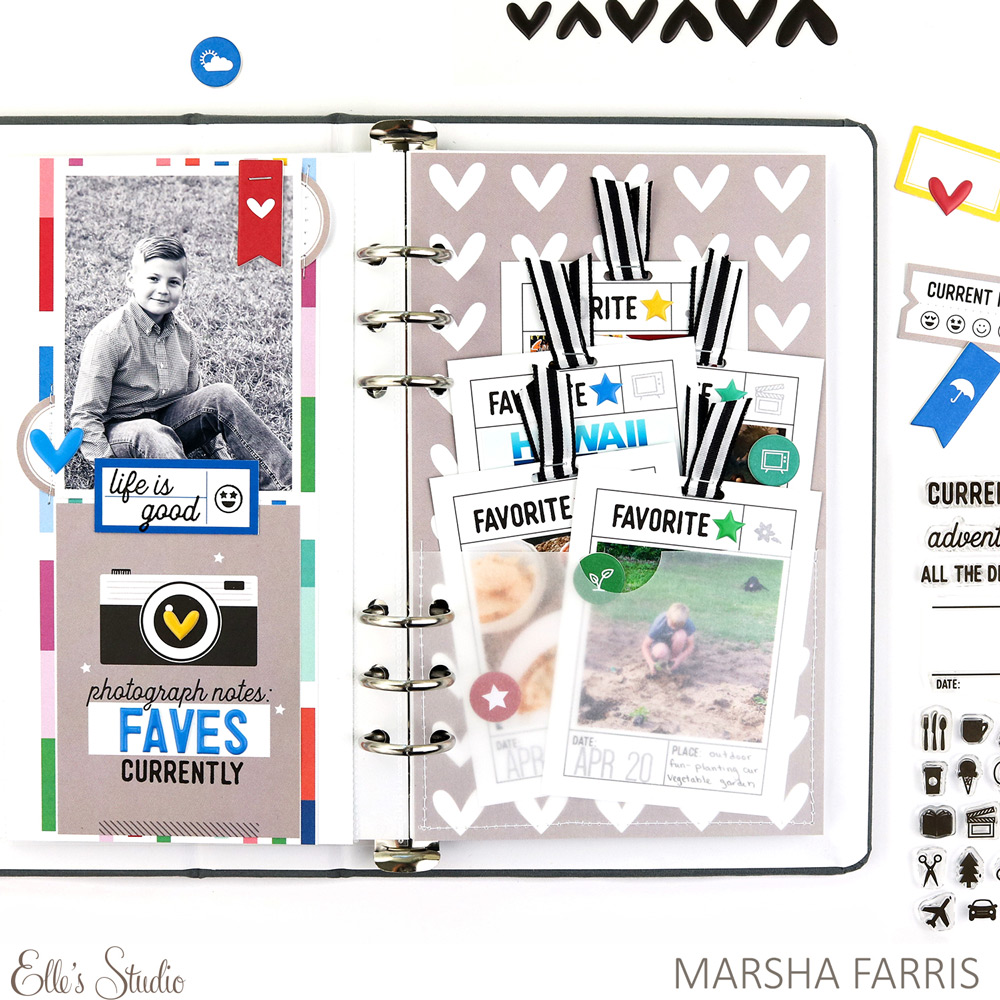
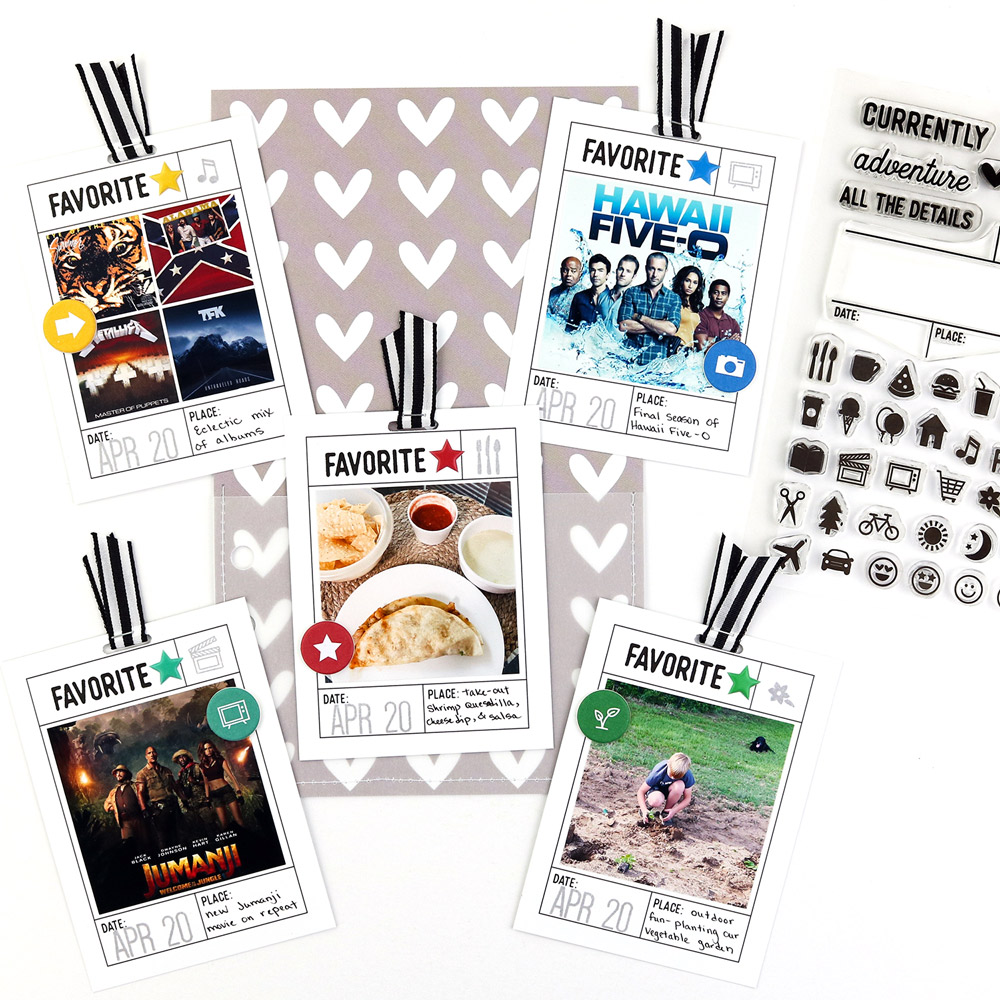
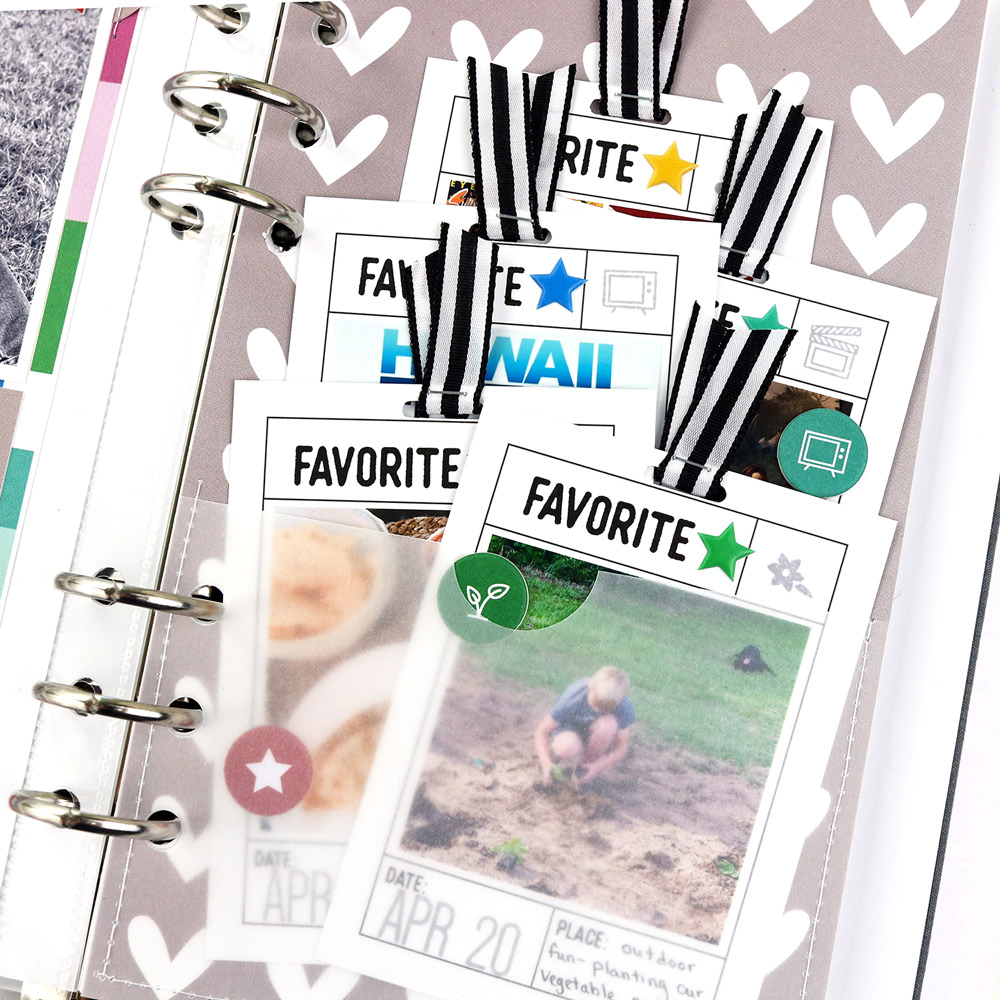
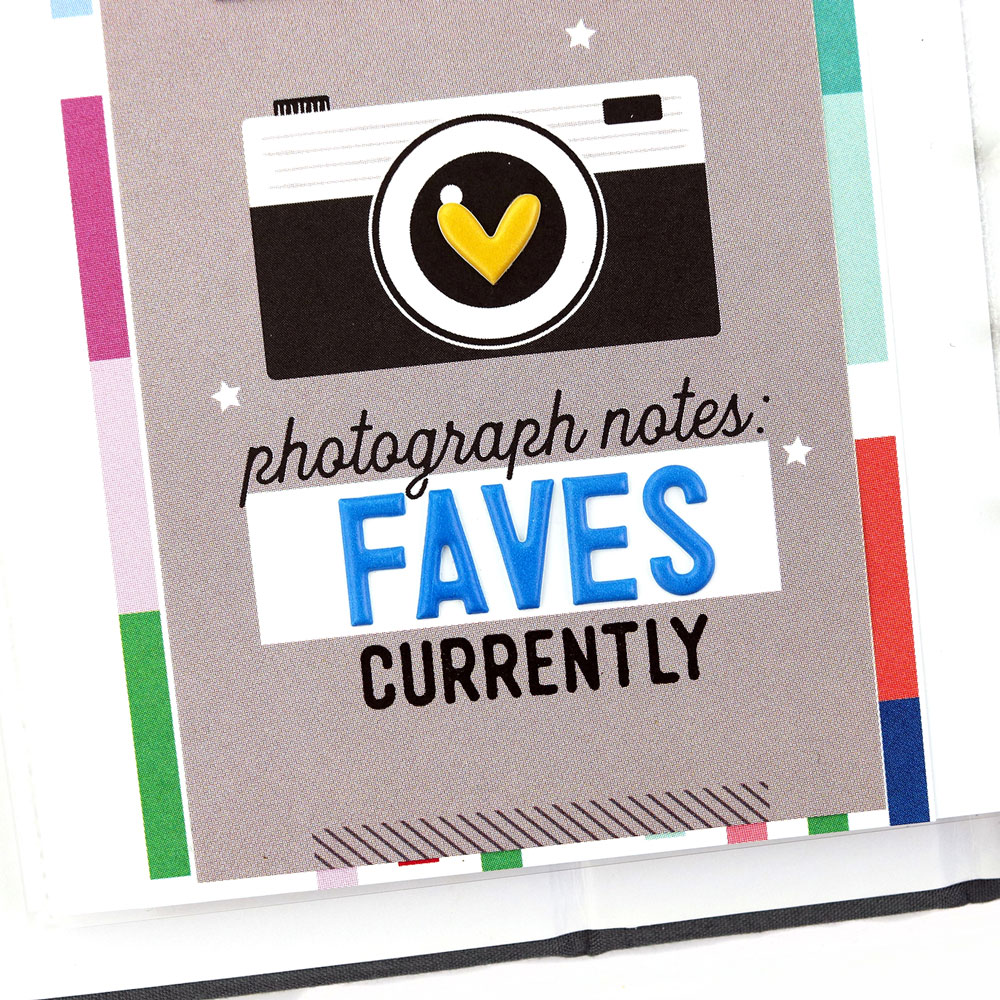
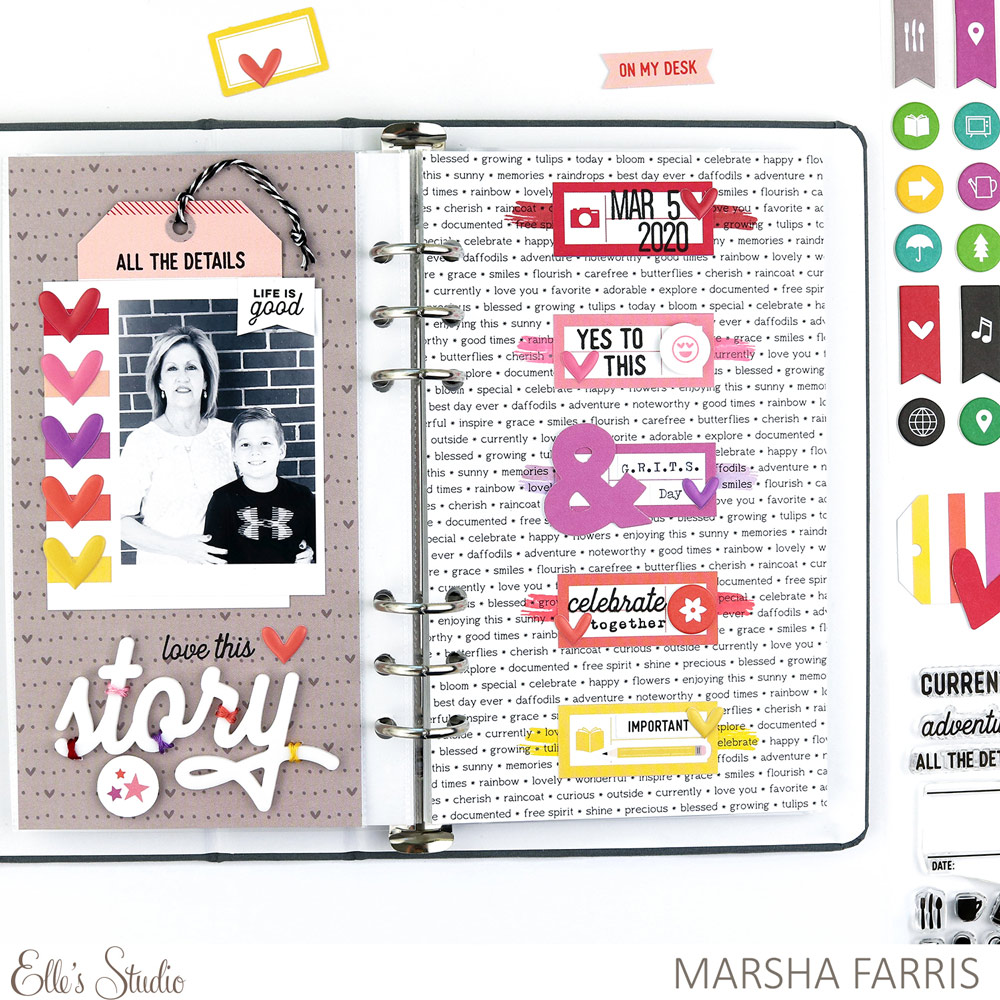
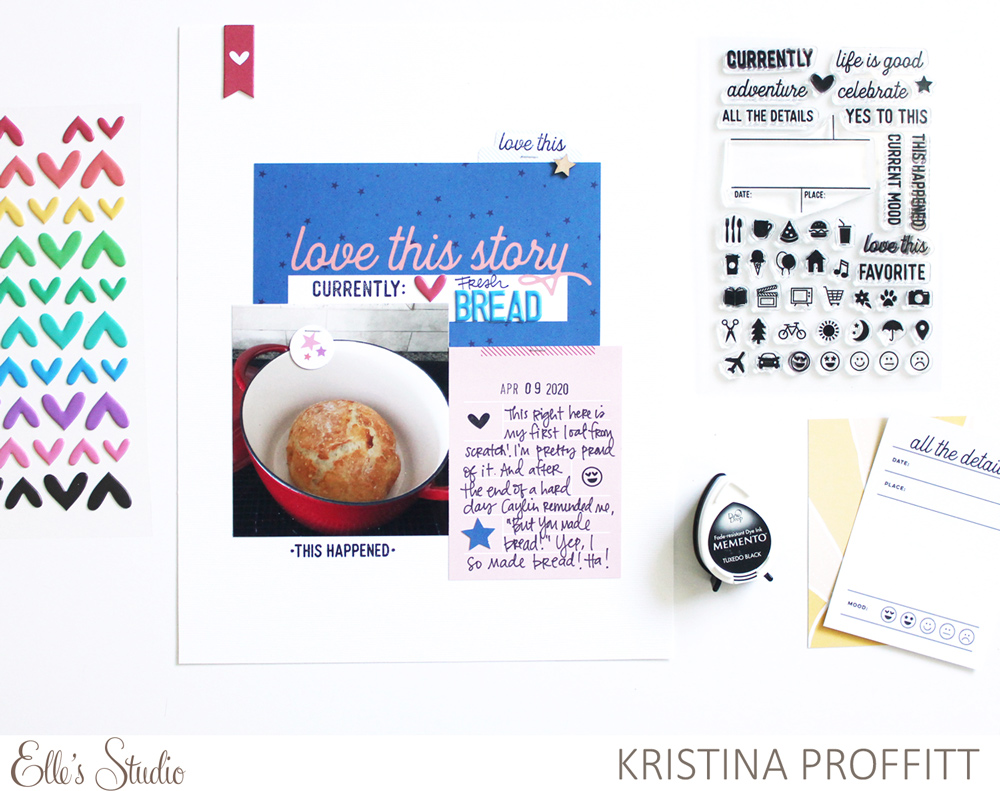
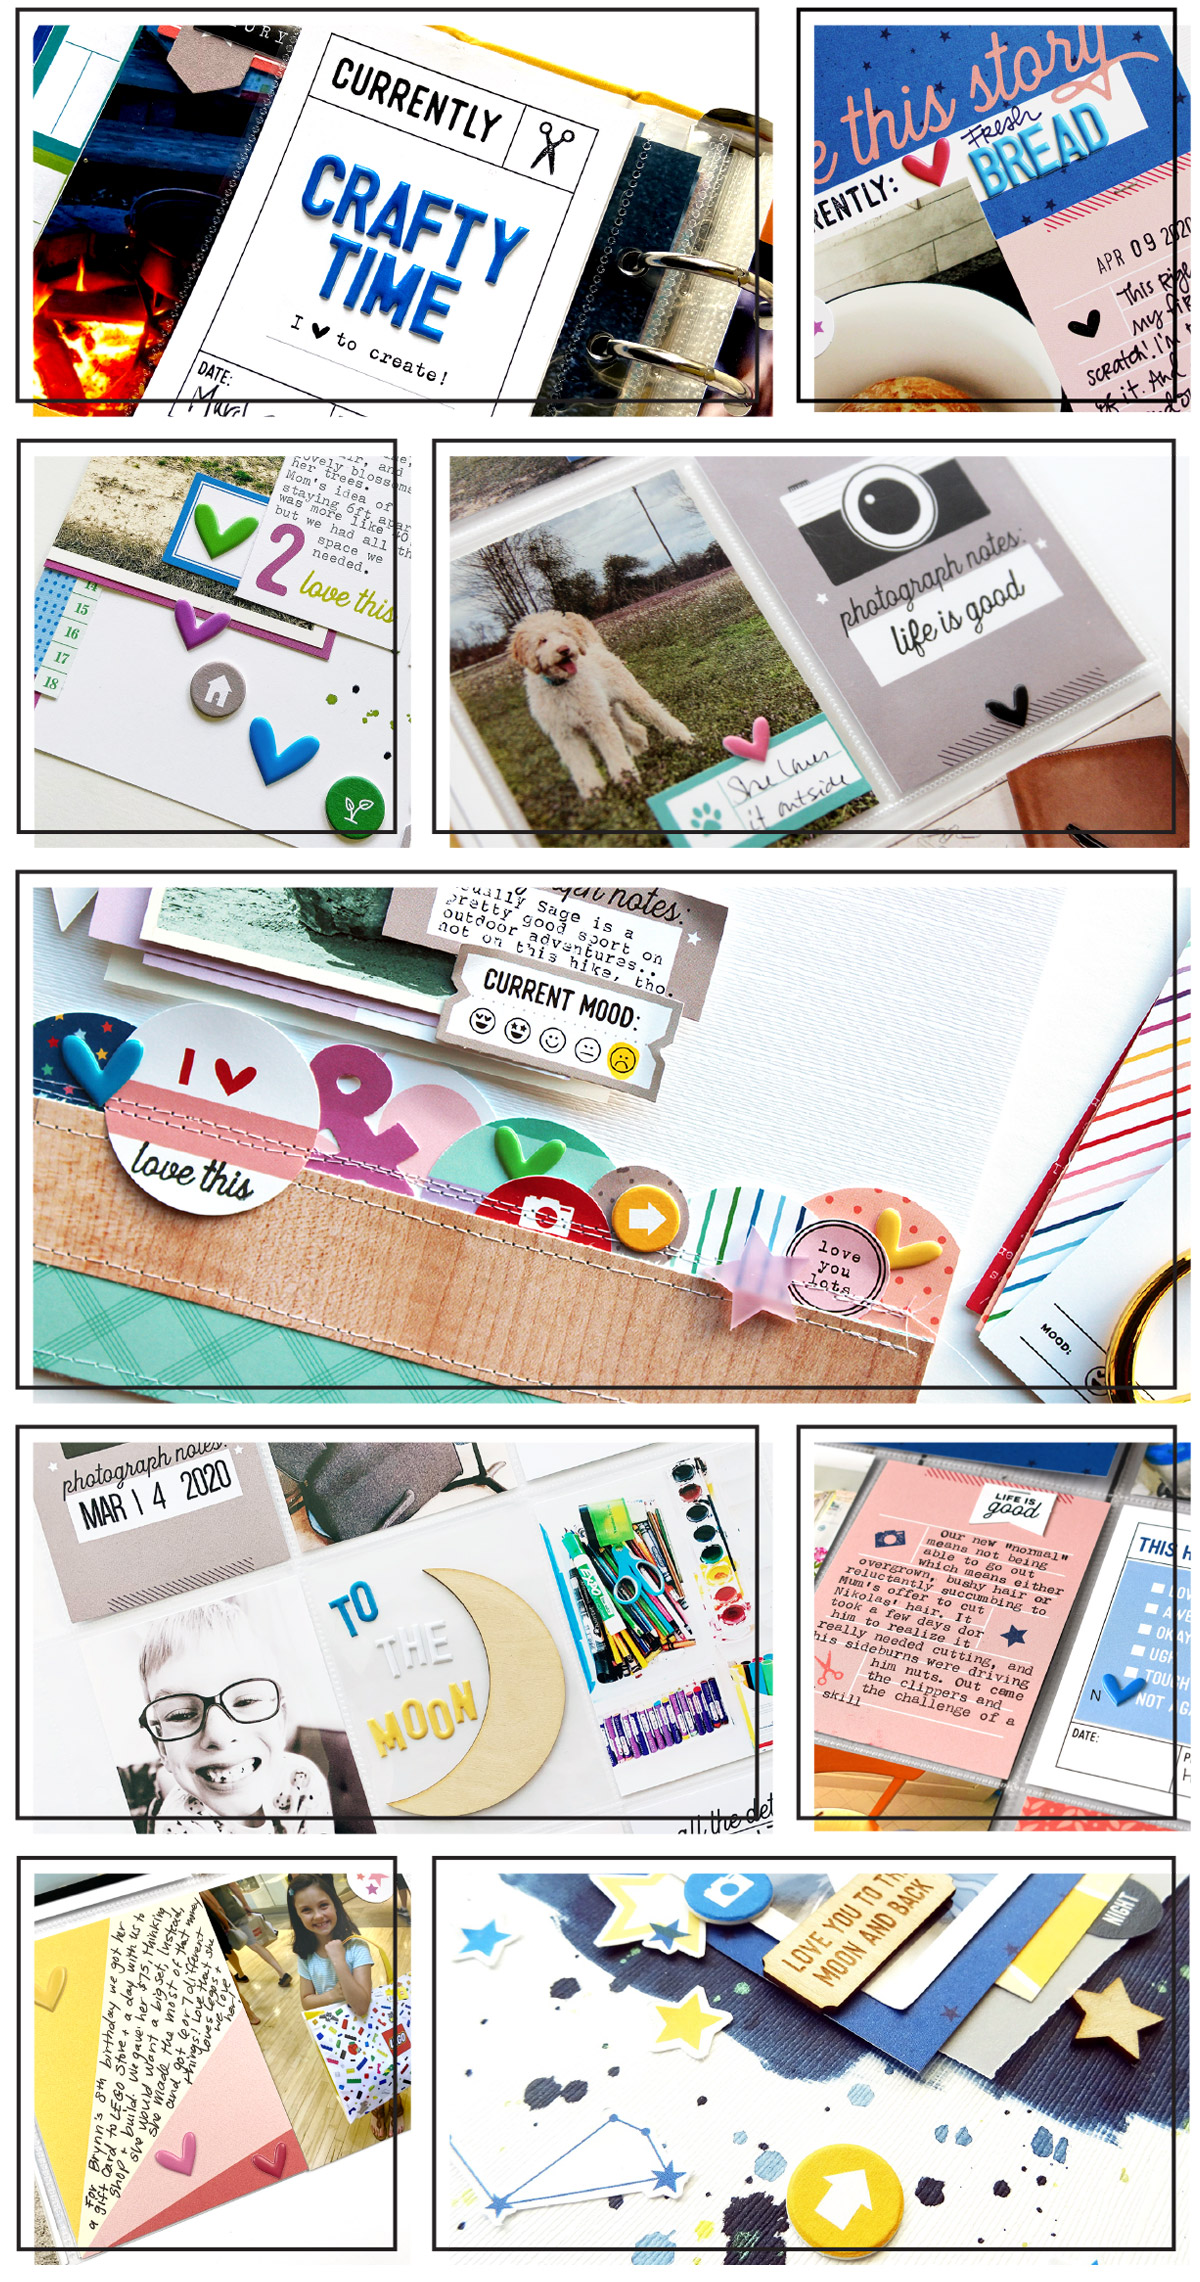
It’s quite often that we design products that work together, but maybe none so perfectly as our new Currently Icon Journaling Tags and Currently Icon Stamp! Let’s take a look at how design team member Marsha Farris used this perfect pair to create a fantastic traveler’s notebook spread to record current favorites!
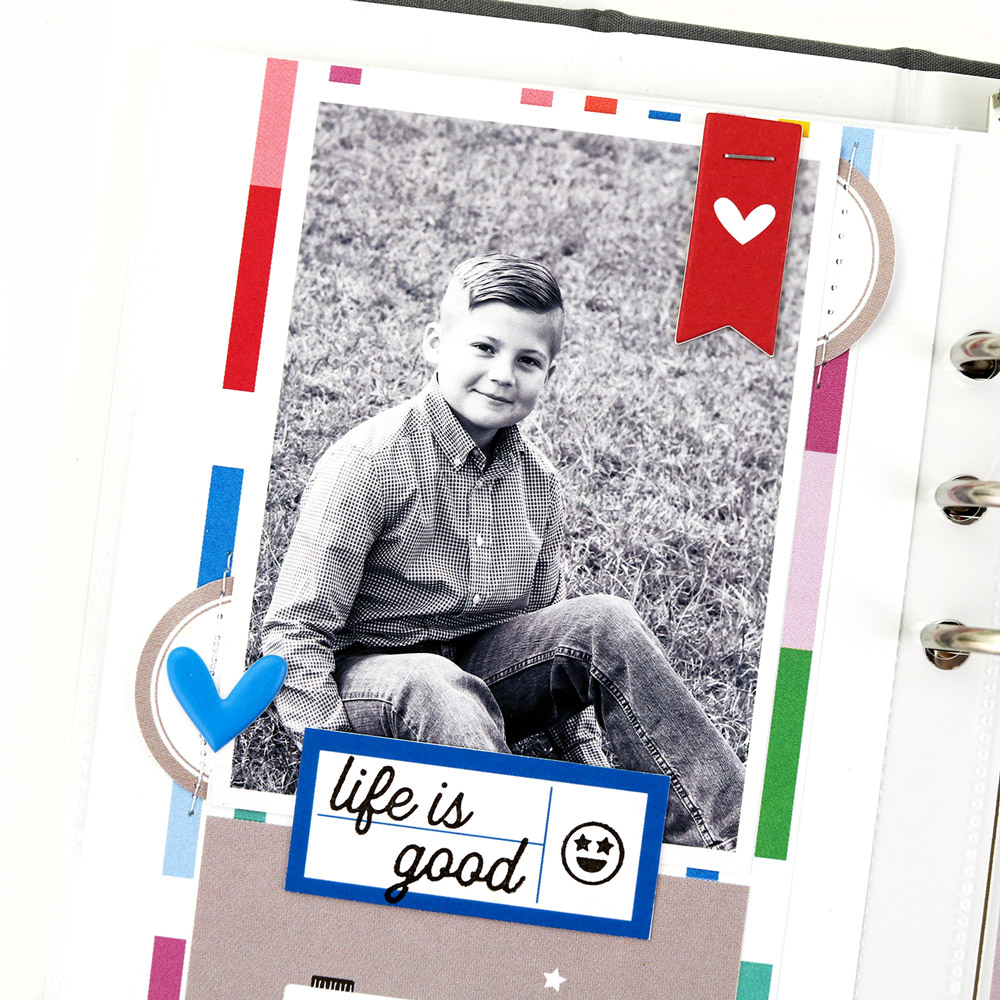
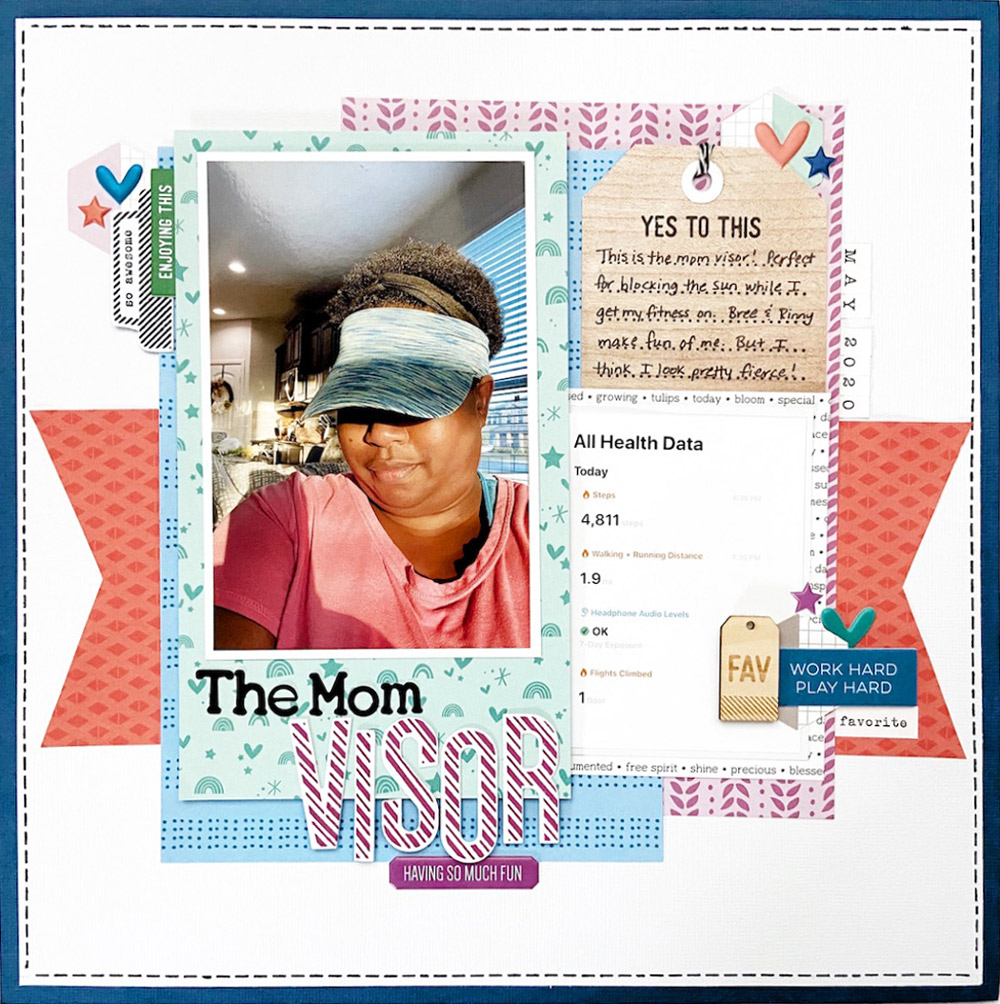
Hey, Elle’s Studio friends! It’s Marsha, and I’m excited to be sharing a project today using the bright and colorful May 2020 Kit and add-ons. For my traveler’s notebook layout, I decided to document my youngest son’s current favorites. He is growing and changing so much these days, and I wanted to capture some of the things he’s loving right now.
Using the Currently Icon Stamp and the Currently Icon Journaling Tags, I followed a simple formula. First, I stamped the word “favorite,” along with an icon from the stamp set, onto each tag. Next, I added photos to represent each favorite—some were my own photos and others were images I printed from online sources. I stamped the date using the Mini Dated Stamp and added handwritten journaling onto the other blank area on the tags. I kept the embellishing really simple using circle stickers from the Icon Chipboard Stickers and stars from the Tiny Shapes and Dots Puffy Stickers. Finally, I used a punch and ribbon from my stash to complete the tags.
I trimmed patterned paper from the Flourish Paper Stack to fit as a full page in my album. Using vellum, I created a simple pocket and attached it to the page with machine stitching. This pocket was perfect for holding my journaling tags!
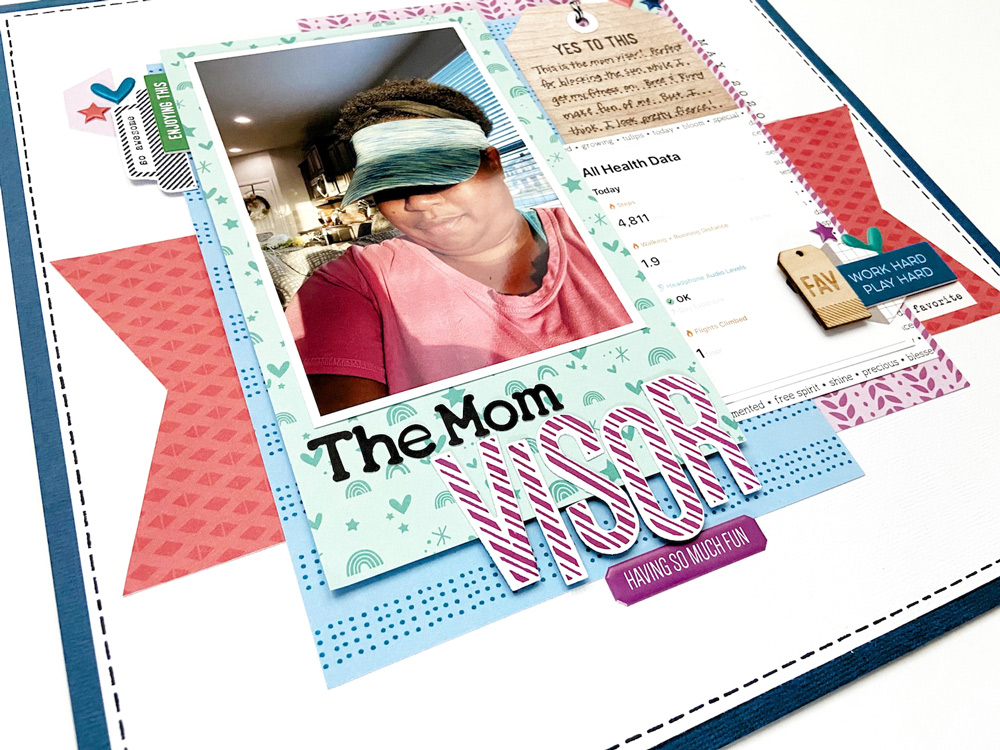
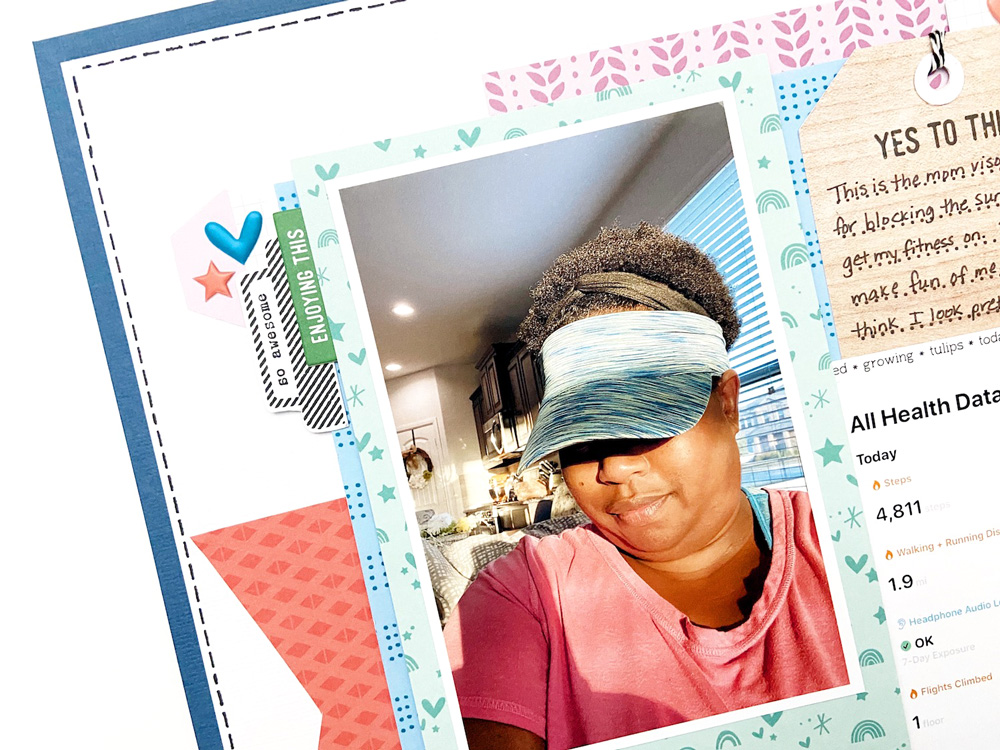
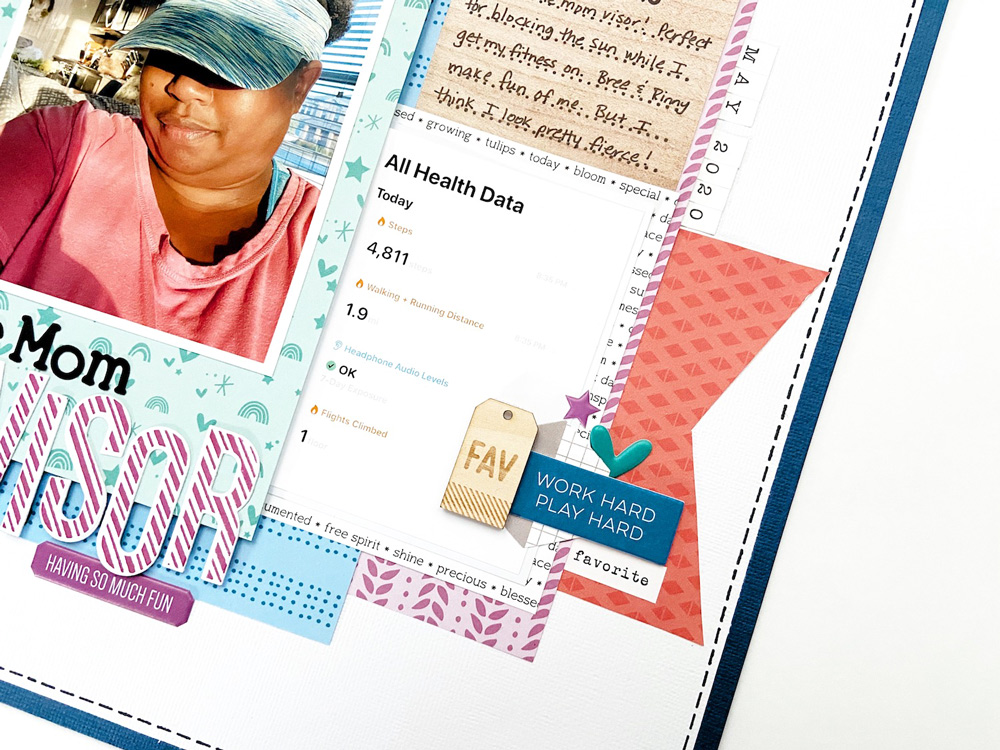
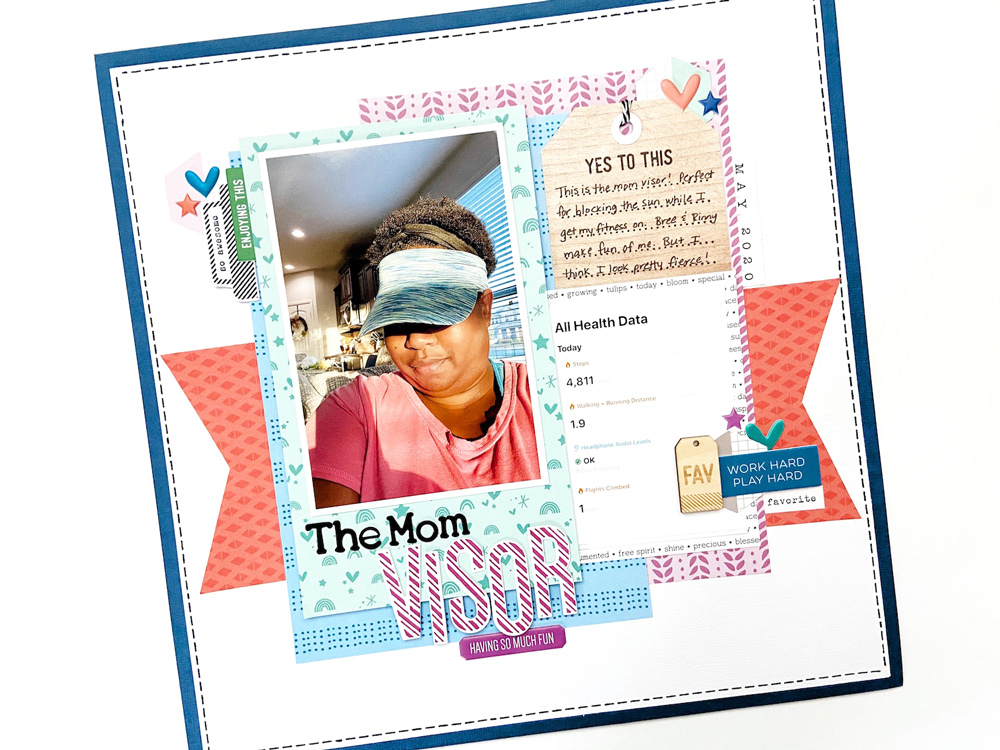
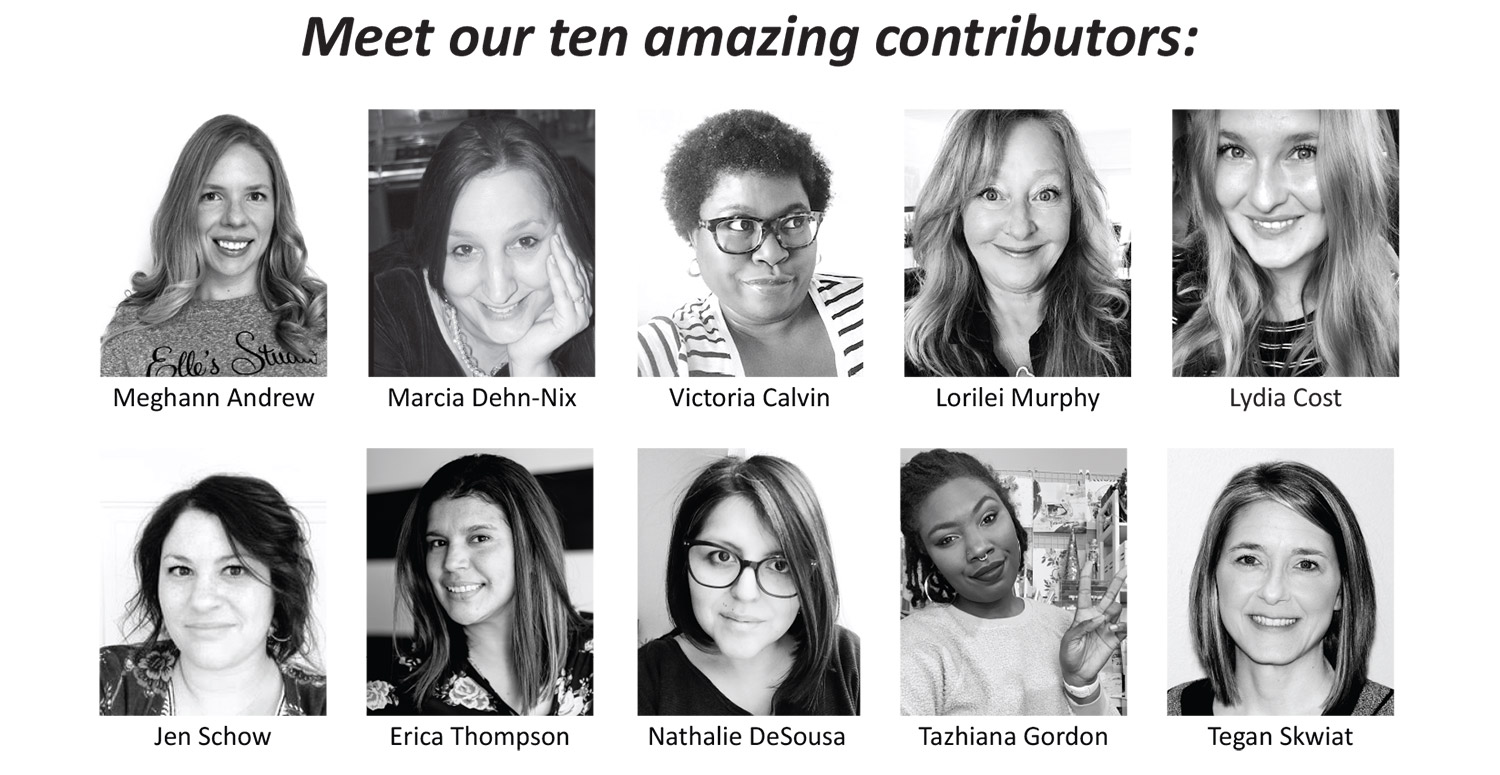
Today we are excited to kick off a new two-month long series here on the Elle’s Studio blog to introduce each of our talented From Sketch to Finish Vol. 5 contributors! Today we are kicking off these posts with our friend, Victoria Calvin! Let’s see a new project from Victoria, based on a sketch from the class, and learn a bit more about her!
Hey friends! It’s Victoria Calvin! I am so excited be a guest contributor here on the Elle’s Studio blog and the new From Sketch to Finish Vol. 5 class! If you haven’t purchased this course, what are you waiting for? It’s available with an exclusive 6″ x 8″ stamp, or on is own as a digital download. Learning to use scrapbook sketches is a great way to stretch your creative skills and to make the process of creating a scrapbook layout super easy!
The summertime is the perfect opportunity to experiement and play with scrapbook sketches! Using a scrapbook sketch takes the guesswork out of layout design so you can focus on adding your personal creative flare with embellishments, pattern paper, and photos.
Since scrapbook sketches are flexible, you can change the sketch to work with your personal design asthetic. Use the sketch as it is designed or change it up to satisfy your unique design style. My personal process begins with analyzing a sketch to determine how I want to interpret the design. Next, I build a base by creating a background, using a sketch as a guide.
Next, I identify the position of my title, journaling, photos, and embellishments. Sometimes I use the sketch design as it, other times I mix things up a bit, using the sketch as inspiration even though I may not follow the sketch exactly how it is designed. I like to add my own creative touches by changing the orientation of my photos relative to the sketch, using my favorite color palette or scrapbook techniques such as distressing or stamping.
Fun fact: When I am in a creative rut, I ALWAYS use a scrapbook sketch! Why work harder when you can work smarter? When the design work is done for me, I can focus on playing with pretty product and creating stunning layouts! There is no need to think too hard about this process. Just relax, have fun, and create!
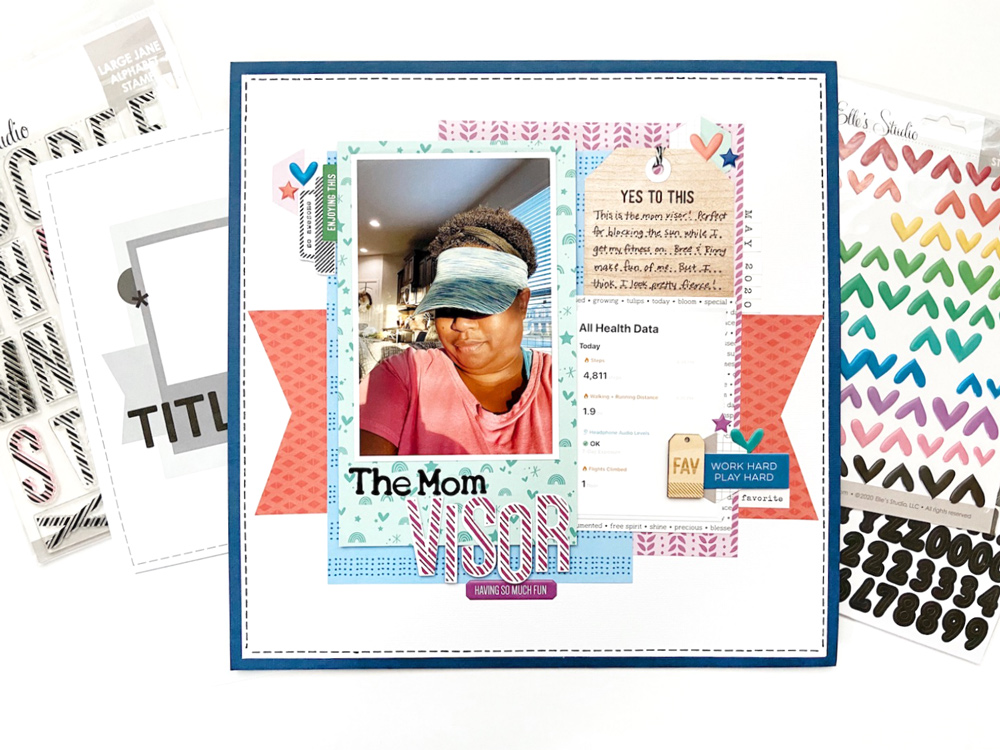
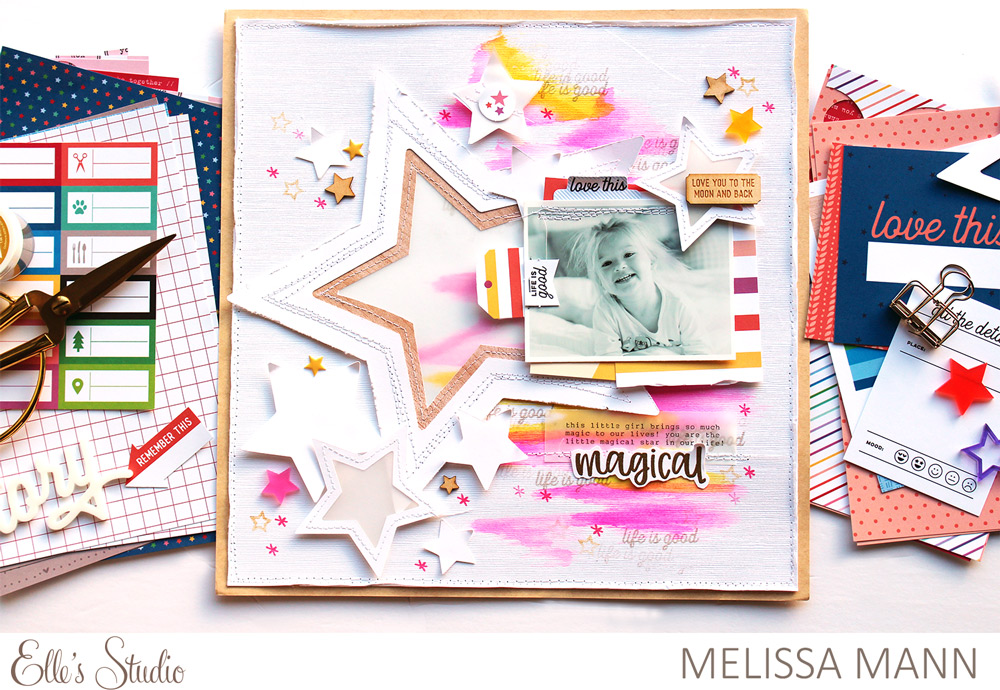
For this project, I let the sketch, sketch 11 in the From Sketch to Finish Vol. 5 class, do the design work for me, while adding my personal touches using coordinating Elle’s Studio patterns in blue, deep coral, and fuschia from the Flourish Paper Stack. I created a unique title design by using the Large Jane Alphabet Stamp and the Black Typewriter Cardstock Alphabet Stickers. Using two or three different styles of lettering for titles is a clever way to add your individual style to a layout! Puffy stickers, die cuts, a stamped tag, and wood veneer round out the three embellishments clusters featrued on the sketch. This layout came together in no time!
I love the scrapbooking community and I truly enjoy getting to know my favorite designers and fellow scrapbookers. Here’s what you need to know about me:
I currently resided in the great state of Texas! The Calvin Clan consists of my spouse Aubree, our ten year old daughter Corinne, and my mom Carolyn, who moved in with us due to health issues. We are truly a multigenerational family!
Scrapbooking has been my main creative jam since I was 13 years old. I dabbled in storytelling on and off for several years, only to fully commit myself to pretty paper and Thickers when my kiddo was born. My very first layout took me over two weeks to create. I have come a long way! I am a traditional scrapbooker by nature – I gravitate toward 12×12 inch single page spreads with mutilple photos. Creating layered designs is my absolutely favorite scrapbooking technique! In fact, my favortie projects always include layered backgrounds and embellishments with tons of texture and dimension.
If I was stranded on a deserted island, I could not live without Thickers, patterned paper, chipboard stickers, and a good journaling pen. If I don’t have these items, I might as well not scrapbook at all! All of my layouts feature all or some of these products. I am a creator of habit!
Hello, Elle’s Studio friends and fans! We are so excited to have the brand new May monthly kit and extras in the shop, and our talented design team has been hard at work making projects to inspire you to create with it! Take a look at these layouts, pockets pages, cards and traveler’s notebook spreads, and imagine the memory-keeping possibilities in our newest products!
We hope you’ve found projects to inspire you to create when you May kit and extras arrive! In the meantime, pin these projects for your future crafty sessions, and stay tuned to the blog here, where we will continue to give you ideas for documenting your memories with your new goodies!
Comments Off on May Reveal Design Team Inspiration | Share This
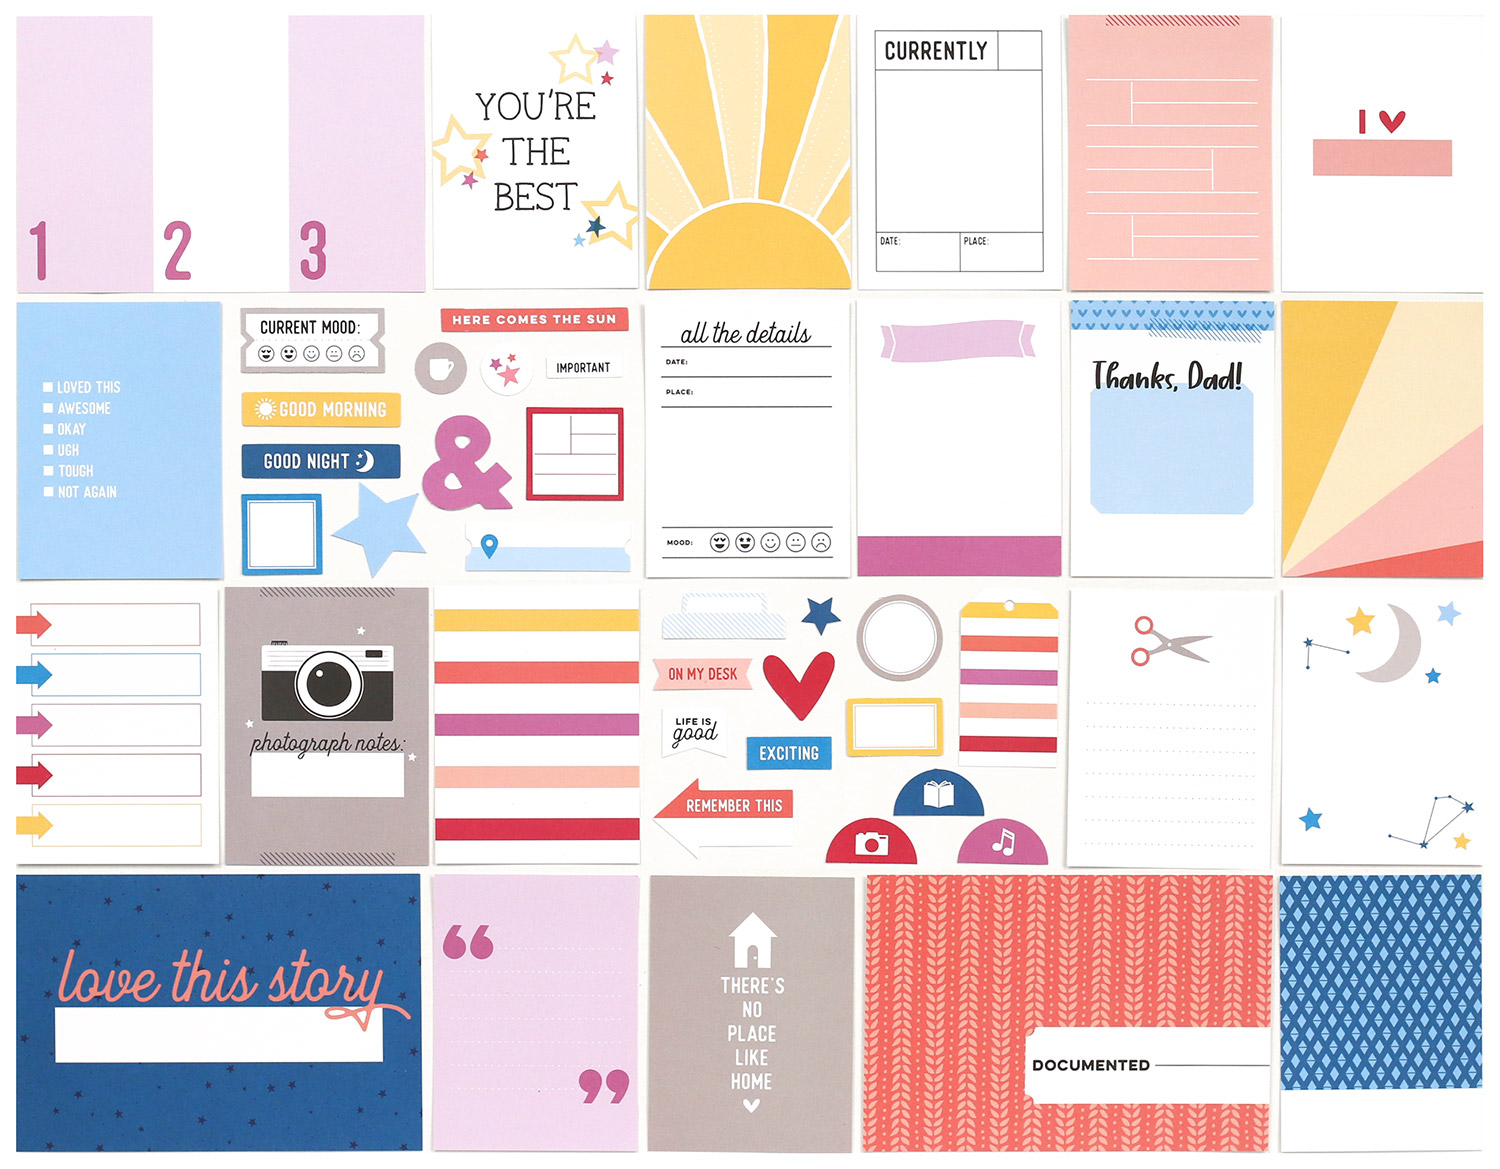
Our May reveal is here and we can’t wait for you to see all of the brand new and exclusive products that are now available in our shop today! Our May kit includes 3 – 4 x 6 inch tags, 18 – 3 x 4 inch tags, and 25 die cuts, that will work great on your scrapbooking layouts, pocket pages, traveler’s notebooks, cards, planners, and more! When designing our kits, we love to think of tags that can be used as prompts to help make it easier for you to get your story started and documented, and this kit is full of those and so much more!
Here’s the first look at all of the fun tags and die cuts included in this kit:
Our monthly kits are limited and once they sell out we will not be restocking! Look for a new kit on the 10th each month at 8:00 am Pacific! Our kits are available for single purchase or select our subscription option to subscribe and SAVE!
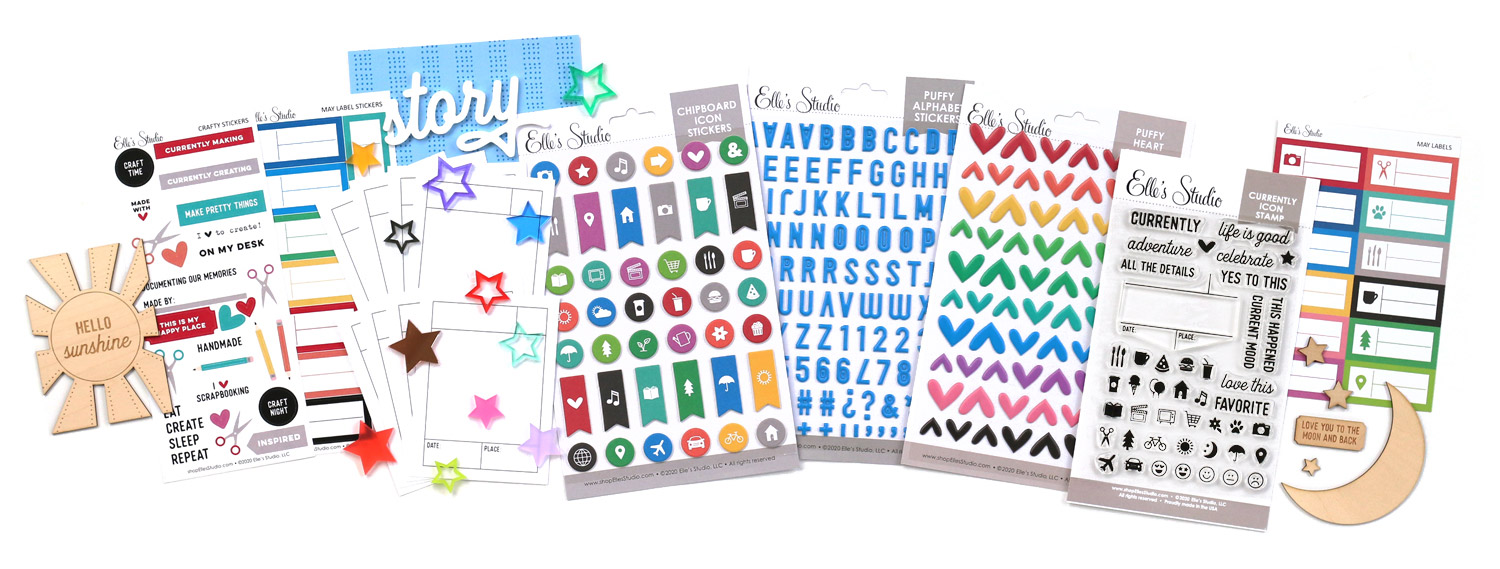
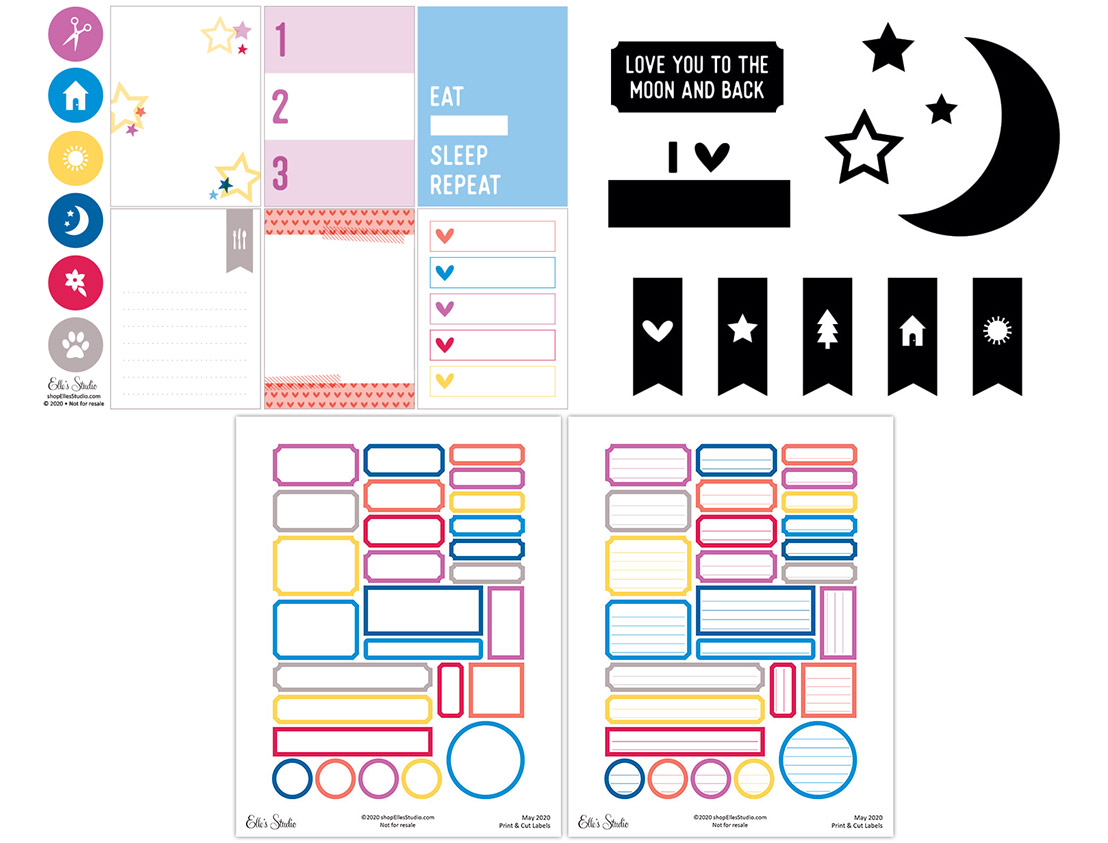
Our digital files this month include coordinating printables, May cut files, and print and cut labels that coordinate with our kit – once you download these files, you can use/print them over and over again!
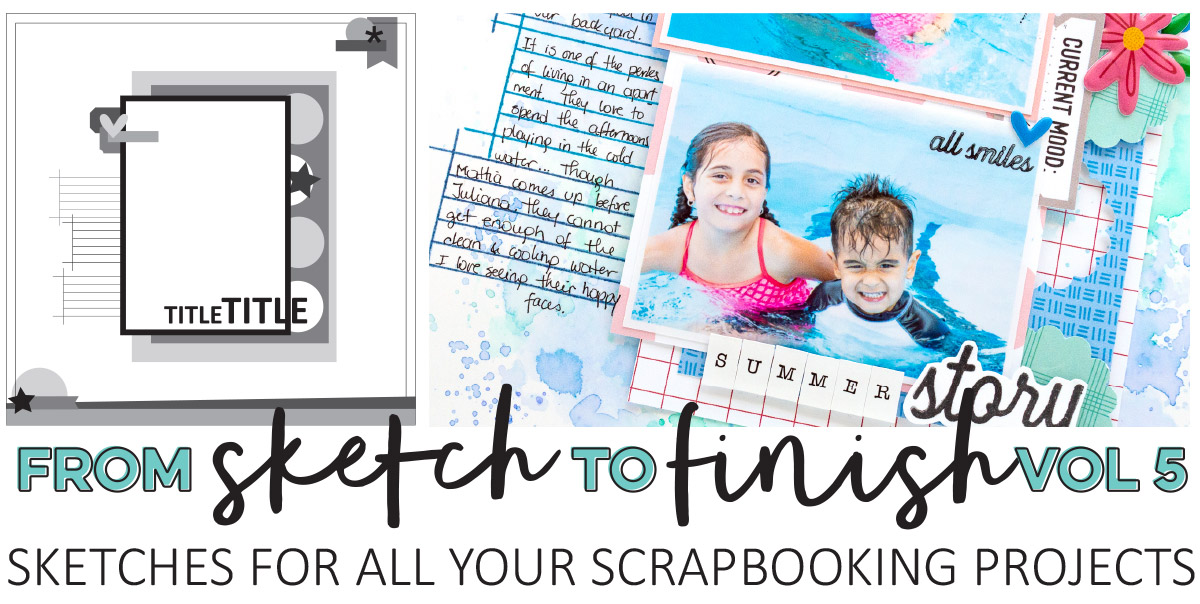
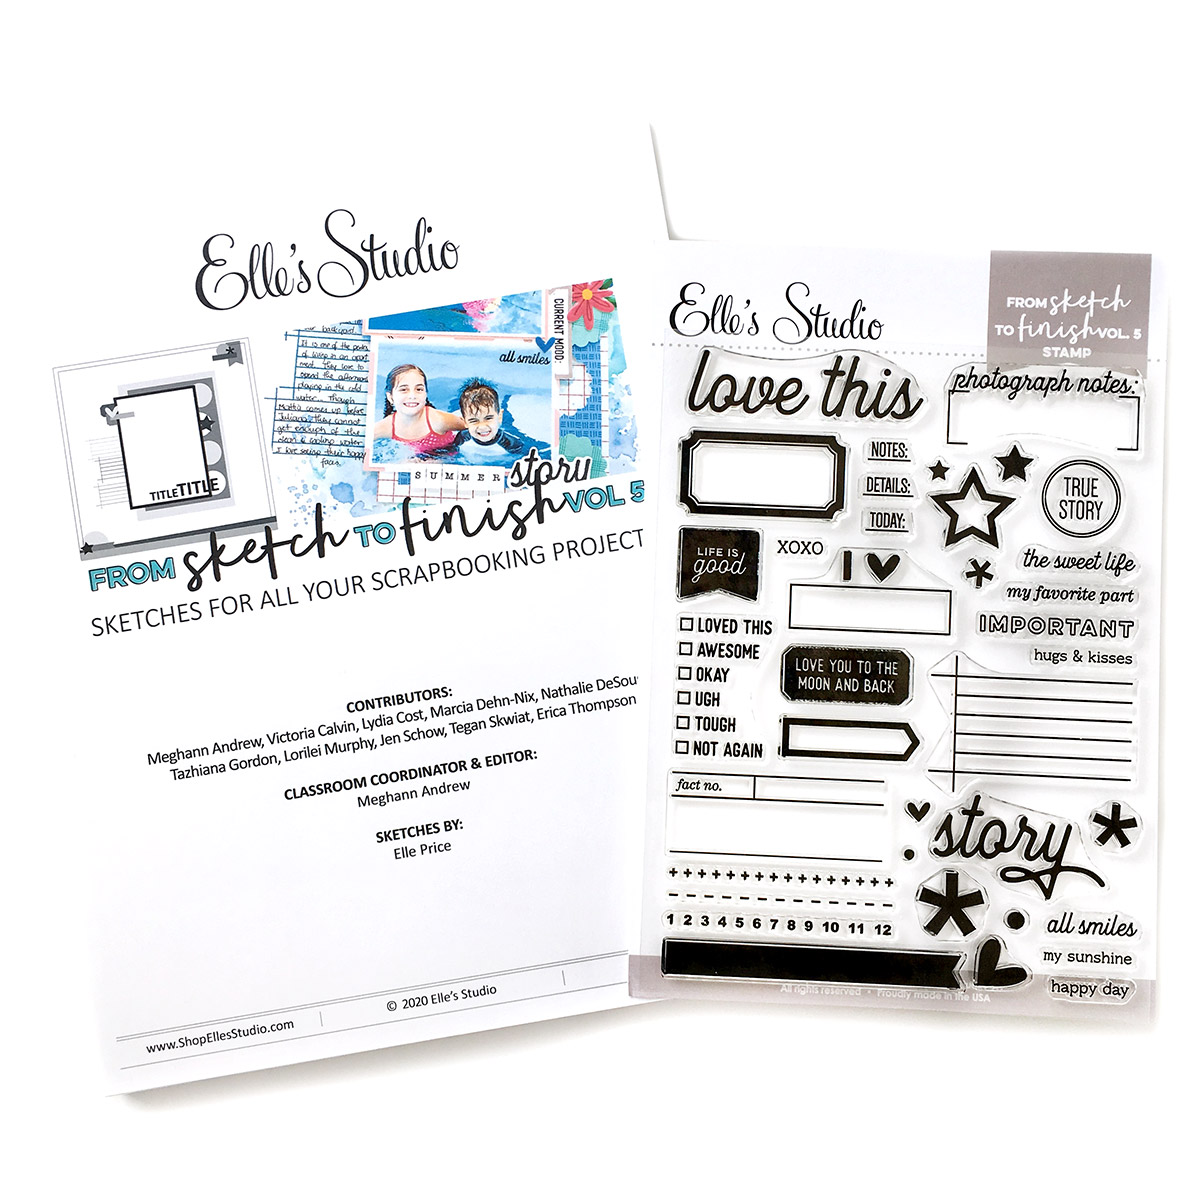
We are also SO excited to announce that From Sketch to Finish Vol. 5 is now available at a special introductory rate to celebrate! Simplify your scrapbooking process by starting with a sketch from this new, self-paced class, which will take the guesswork out of the process and will allow to you create layouts you love in no time!
Volume 5 is a 70 page PDF self-paced class that contains 50 never seen before, exclusive sketches that will keep you inspired all summer long! You’ll start out with 10 different sketches and 10 contributors each sharing two layouts they created from a sketch. You will get to read their tips and see how they interpreted each sketch to fit their unique and beautiful styles on the 20 different layouts they’ve created. Next, the class features 20 full-page sketches that will have you on your way to creating projects in no time! Then, our class ends with another 20 bonus sketches that were inspired by the final outcome of our contributors projects and you’ll be amazed at how differently they turned out! It is a great example of how sketches can inspire you to get creative! For double-page layout lovers, we’ve also included several examples on how to stretch a sketch to create a two-page layout, that we know you will love!
From Sketch To Finish Vol. 5 is available with an exclusive and BIG 6 x 8 inch stamp (while supplies last) that was designed just for this class! The possibilities are endless, and in the class, our contributors will show you how they used the stamp on their layouts! For those who aren’t into stamping, we’ve also made the class available without the stamp, too. This class comes as a downloadable PDF file. Once you have purchased the class, you will receive a link to download the class. Please make sure you save the class to your computer. If purchase the class with the stamp option, the stamp will ship asap.
Take advantage of our special introductory price by purchasing the class now – the 6 x 8 inch stamp alone is a $24 retail value! We have also put all past sketch classes on sale, too! Complete your collection and collect them all at a great price for a limited time! *Sale ends on 05/18/2020 or while supplies last.
Subscribers, you can start bundling now! Bundling is easy – just log into your account and use the “Bundle with my kit subscription” shipping option during checkout to receive FREE shipping on any extra items purchased from our shop that will ship with your kit. This option will only be available during our 24-hour bundling period.
Not a subscriber? Don’t wait any longer to sign up! Subscribe today to lock in our special kit price of $9.99 + shipping, and you’ll be able to bundle any additional products from our shop and have them ship for FREE with your kit subscription, during our 24-hour bundling period, starting on the 10th at 8:00 am Pacific!
When starting a new subscription: you’ll want to first check out with only the kit subscription in your cart. After you have subscribed to our kit, you will then be able to see your special discounts on select items in our SALE section during our 24-hour bundling period! You must be logged into your kit subscriber account to see your discounted items. Quick note: Our subscription is risk free and can be cancelled at any time by emailing us. Our monthly kit and add-ons are available without a subscription each month, too.
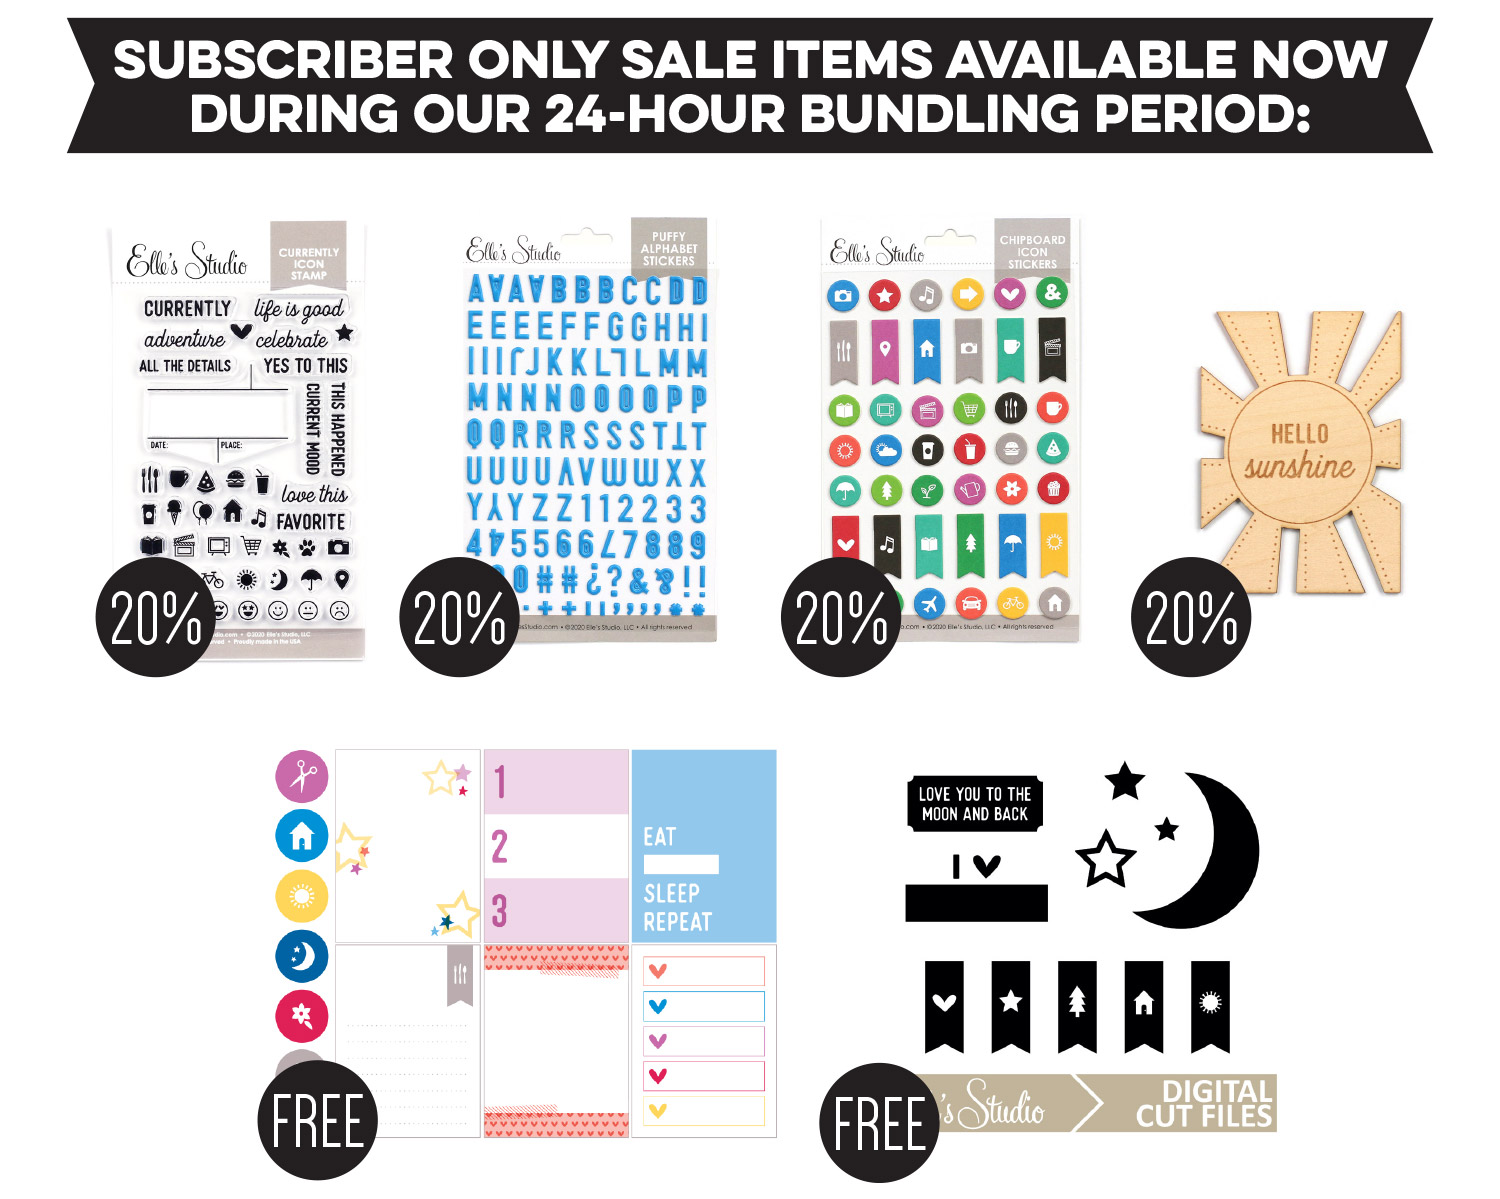
Here’s a look at the items on sale for our subscribers only this month:
Subscribers: Pick up these six items for FREE to 20% off during our 24 hour bundling period that is going on now and ends on Monday, May 11th at 8:00 am Pacific! Please make sure you are logged into your subscriber account, then click on the SALE section to see these items on sale! Once you are logged in, you’ll see your special discounted product listing that specifies Sub Discount.
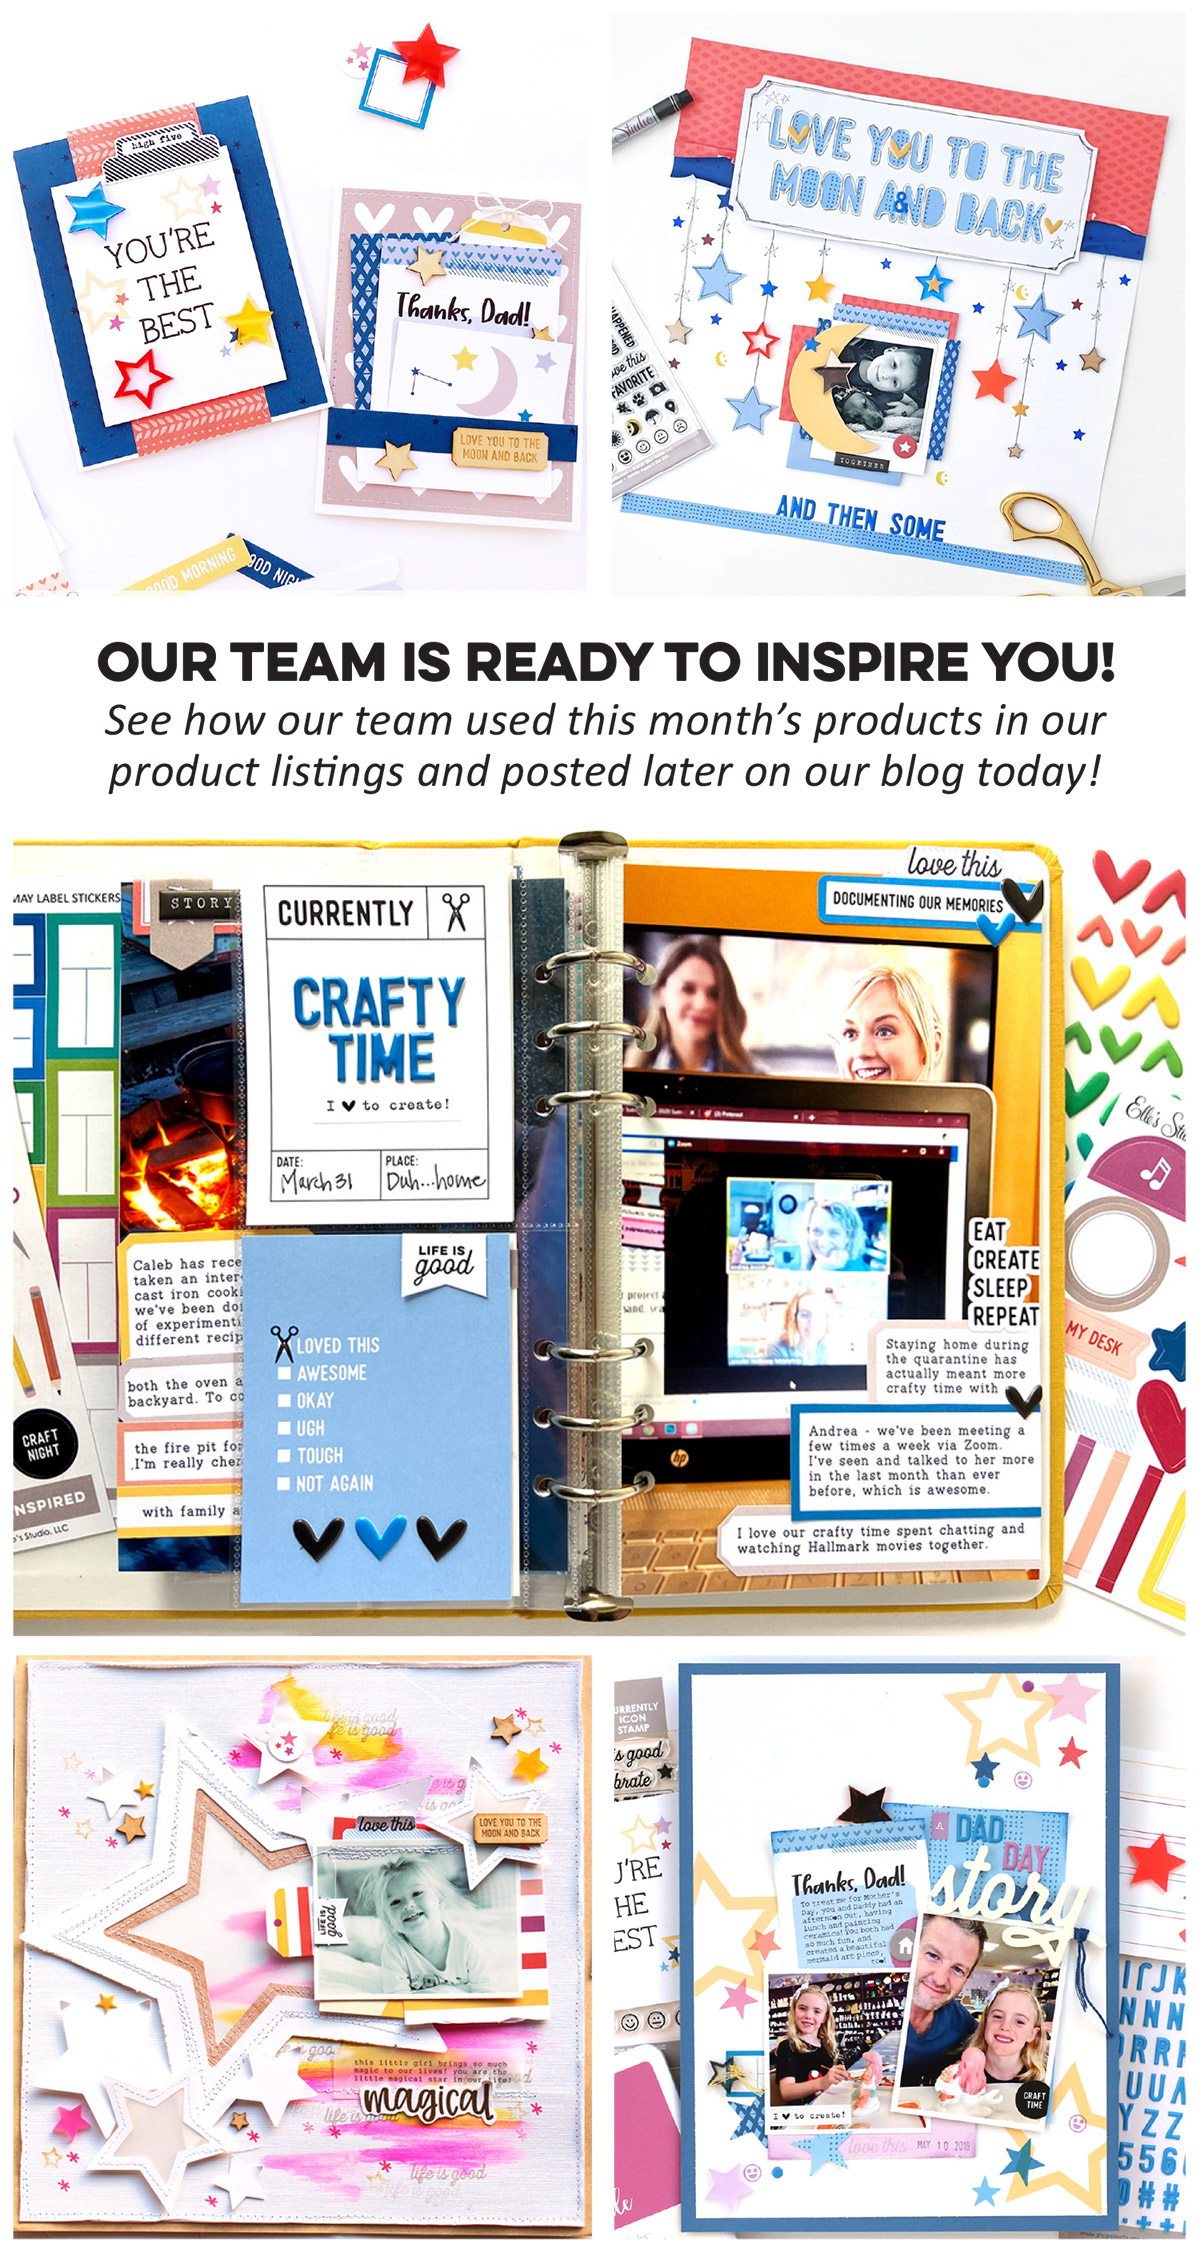
Looking for more inspiration? Our design team is ready to inspire you with brand new, fresh inspiration using the new products this month! You’ll be able to find their amazing inspiration in our product listings so you can see their projects while you shop! We will also be showcasing our team’s projects on the blog later today, and throughout the entire month!
Thank you so much for joining us today and for your continued support during this unprecedented time! We are so grateful to be a part of this amazing community and are excited to see how you use these new products! Make sure you share your projects with us in our Facebook group and make sure you use the #EllesStudio hashtag when posting on Instagram for a chance to be featured on our feed and win a gift certificate to our shop!
Comments Off on Our May kit + add-ons have arrived! | Share This
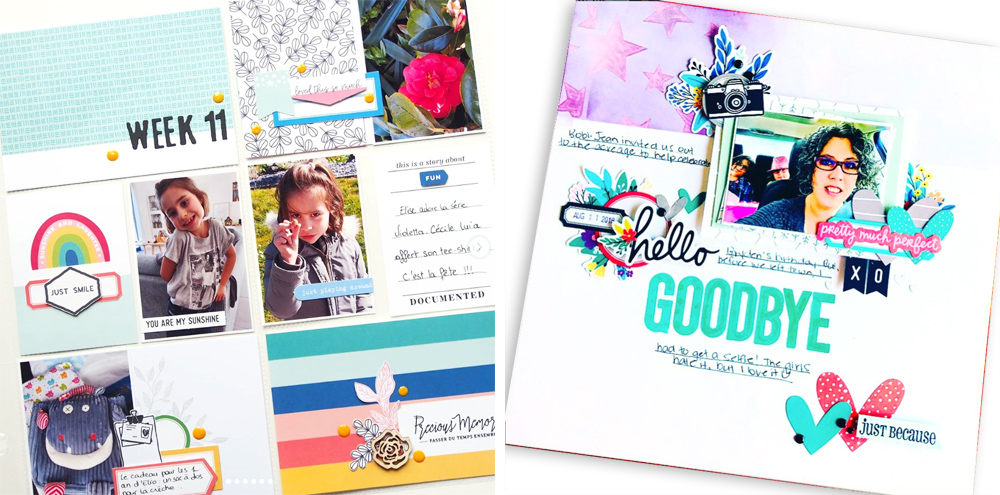
Hello friends! It looks like you have had a creative month, as our #EllesStudio hashtag is hopping on Instagram! We love seeing the projects you are creating and the memories that you’re documenting with our products! Today, we’re featuring 6 projects that used the hashtag in the month of April and caught our eye!
On the left, Nena (@nenascrap) so impressed us with her beautiful pocket page that she created using our February 2020 kit and add-ons! Those rainbows and colorful labels make for one happy page! On the right, we just think that our Teal Acetate Alphabet created the perfect title on Alison’s (@theeverydayscrapbooker) layout. We also love the addition of the You Are Loved die cuts in her embellishment! Gorgeous projects, ladies!
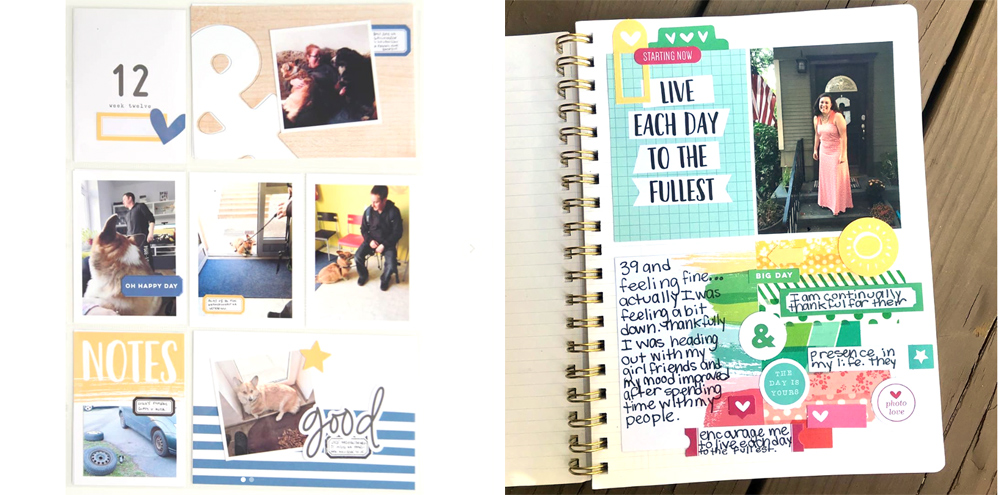
The pocket page on the left by Barbora (@barboralepikuje) includes such a pretty yellow and blue color scheme created with our retired Noteworthy collection, as well as die cuts and labels from our monthly kit and add-ons! Such a great page! On the right, Nicole (@noteswithnicole) brought all of the color to her notebook page using the Noteworthy collection and pieces from our monthly kits! Her page is a great reminder to live each day to the fullest!
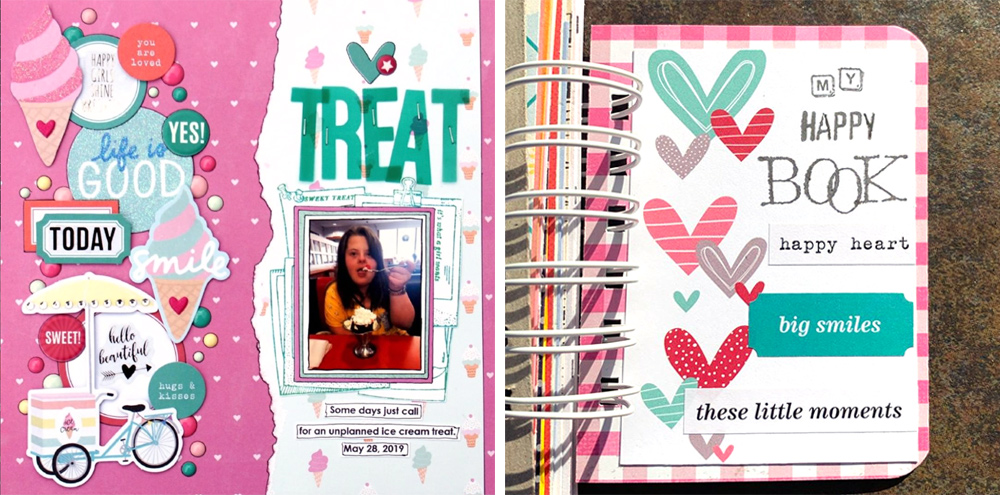
Last but not least, on the left, we have a tasty layout by Debbi (@debbi_tehrani) that uses our awesome Teal Acetate Alphabet again, as well as die cuts and labels from our monthly kits. What a gorgeous page, Debbi! On the right, this book by Diane (@diane_gen) really makes us happy, and uses our January 2020 kit (sold out) and add-ons in such a beautiful way! How lovely!
Just for sharing their projects, these six paper crafters will each win a $10 gift certificate to the shop! Thank you so much for posting your projects and using the #EllesStudio hashtag, ladies! Please email us at info@shopellesstudio.com to claim your prize!
Will YOU be featured next month? Simply use our products on your next project and post to Instagram using the hashtag #EllesStudio for a chance to be featured here on our blog, and win a gift certificate to the shop! We can’t wait to see what you make!
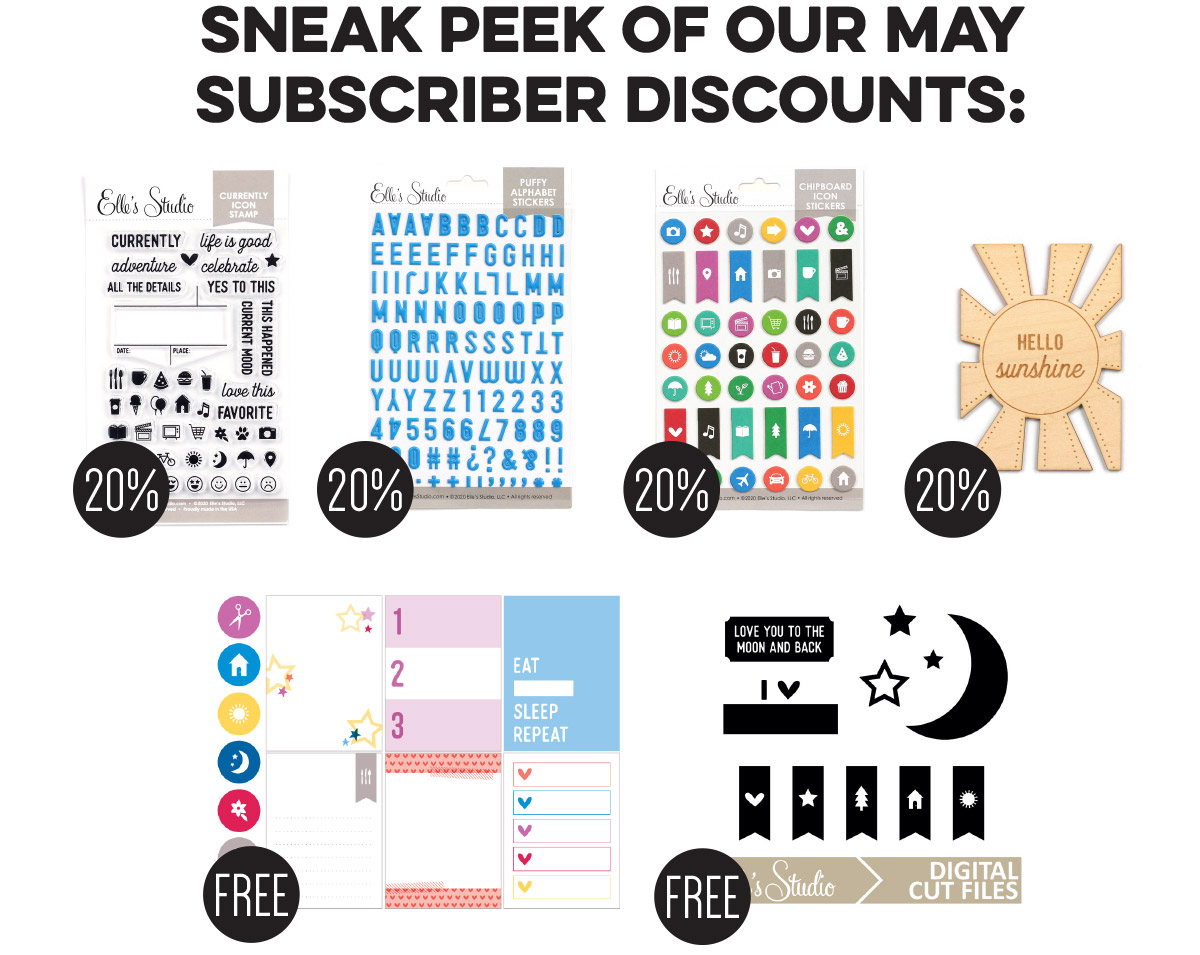
We are just two days away from our May kit and add-ons reveal and we are very excited to share these amazing sneak peeks of fun projects our team made using all the new products that will be available soon! Our reveal will be full of the perfect products to document your May stories and take you right into the month of June!
Not a subscriber? You can pre-order our May kit now and lock in our $9.99 kit price by starting a subscription today! You’ll want to choose our SUBSCRIBE & SAVE option to get signed up and start your subscription with our May kit. We will then hold your kit and you’ll be ready to bundle and save at our May 10th reveal! Details on how to bundle with your subscription order will be emailed to you once you have purchased this product.
Kit subscribers, don’t forget! Along with being able to bundle any products from our shop that will ship for FREE with your kit during our 24-hour bundling period, starting on the 10th at 8:00 am Pacific each month, our subscribers will also have access to special discounts on select items! Above is a preview of our May discounts and savings that will be available for our subscribers during our May bundling period! These discounted items can be found in our SALE section during our 24-hour bundling period, and you must be logged into your kit subscriber account to see them. If you haven’t subscribed to our kit, sign up now to take advantage of these special offers on May 10th! Quick note: Our kits and add-ons are available without a subscription each month, too.
We are also excited to announce that the next volume of our popular sketch classes will be available on May 10th and will contain 50 brand new + exclusive sketches! Our class starts out with our ten amazing class contributors inspiring us with two layouts each for the first ten sketches, for a total of 20 projects! Then, you’ll have another 40 sketches to work from and be inspired by!
Our new class will be available for a special introductory price on the 10th and you’ll also have the option of purchasing it with a 6 x 8 inch stamp that was designed just for this class! Set a reminder in your phone now so you don’t miss it! On the 10th, we will also have all past sketch classes on sale for a limited time so you’ll be able to collect them all!
We can’t wait to share all of these new + exclusive products with you and see how you use them on your upcoming projects! Make sure you set your alarm and mark your calendar for Sunday, May 10th at 8:00 am Pacific! We hope to see you there and want to say thank you so much for your continued support during this unprecedented time. We are so grateful to be a part of this amazing community!
Comments Off on May Design Team Sneak Peeks | Share This
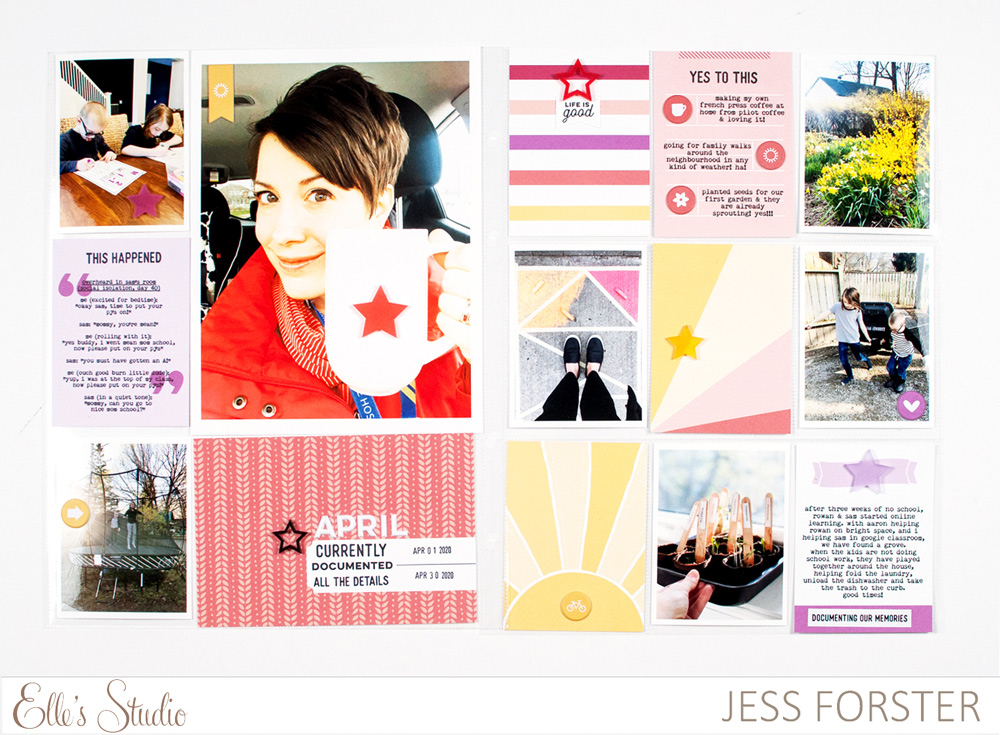
Our May Kit and add-ons are just around the corner, and we could not be more excited! The thing that makes the new kit release even sweeter is when your previous kit has been used up beforehand to record all of those amazing memories that you’re making! Today, design team member Jen McMurtrey is with us to share some great ideas on how to do that with your April Kit and add-ons! Let’s take a look!
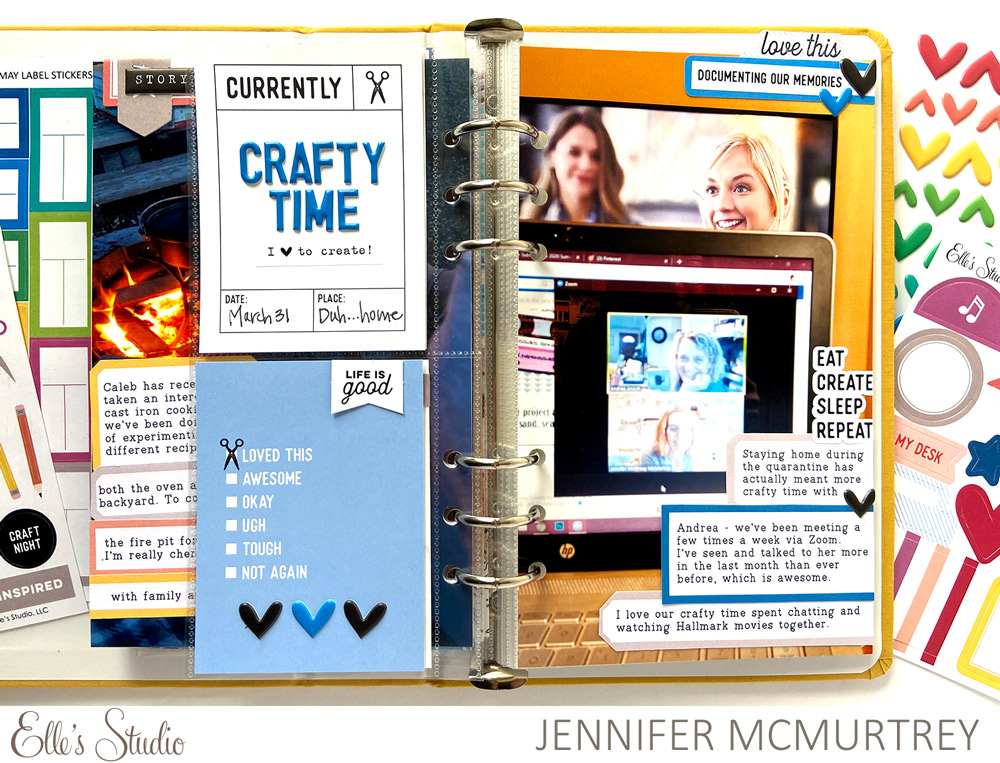
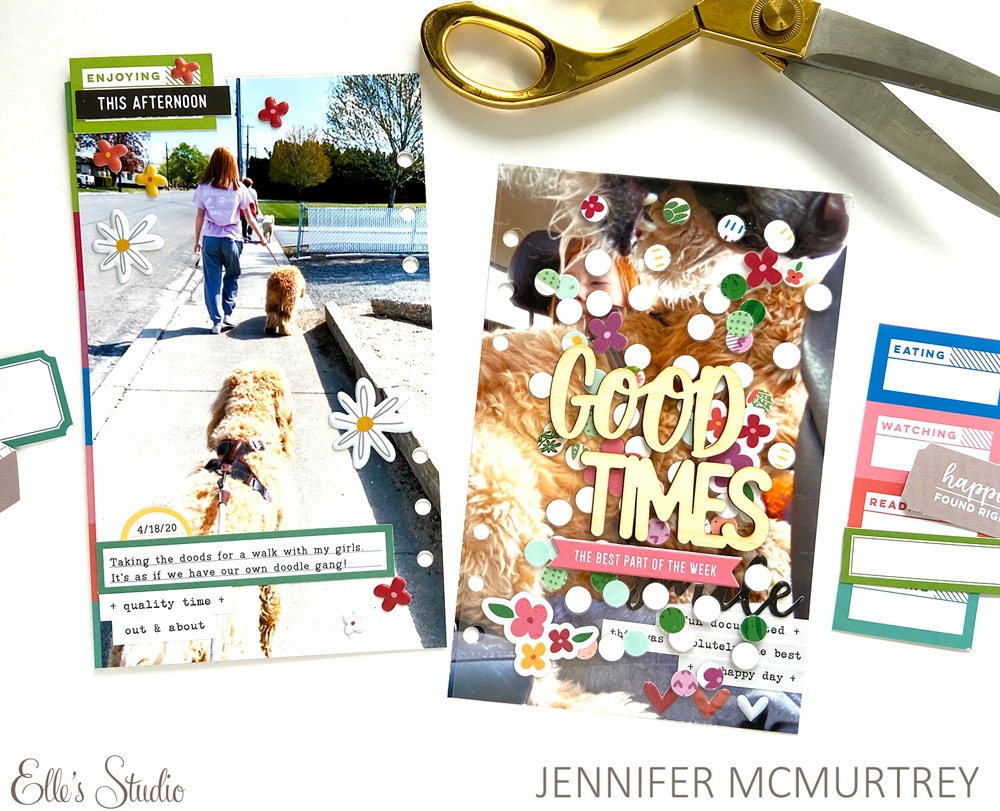
Hello friends! It’s Jen today with a fresh take on using your kit in its entirety… an issue I’m sure many of us face each month. As we’ve moved through 2020, I have been creating monthly spreads in a traveler’s notebook sized album using each of my Elle’s Studio kits. This month was no exception, but I wanted to try something new to use the journaling tags and die cuts in a unique way!
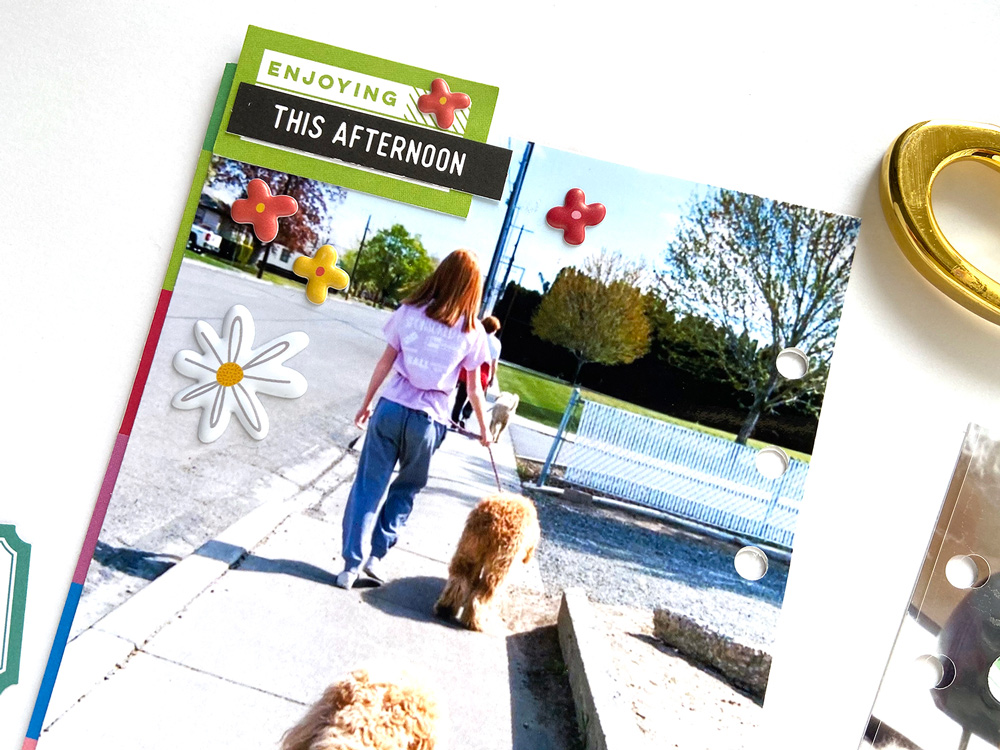
Here’s a look at my spread using two large photos as the focal point.
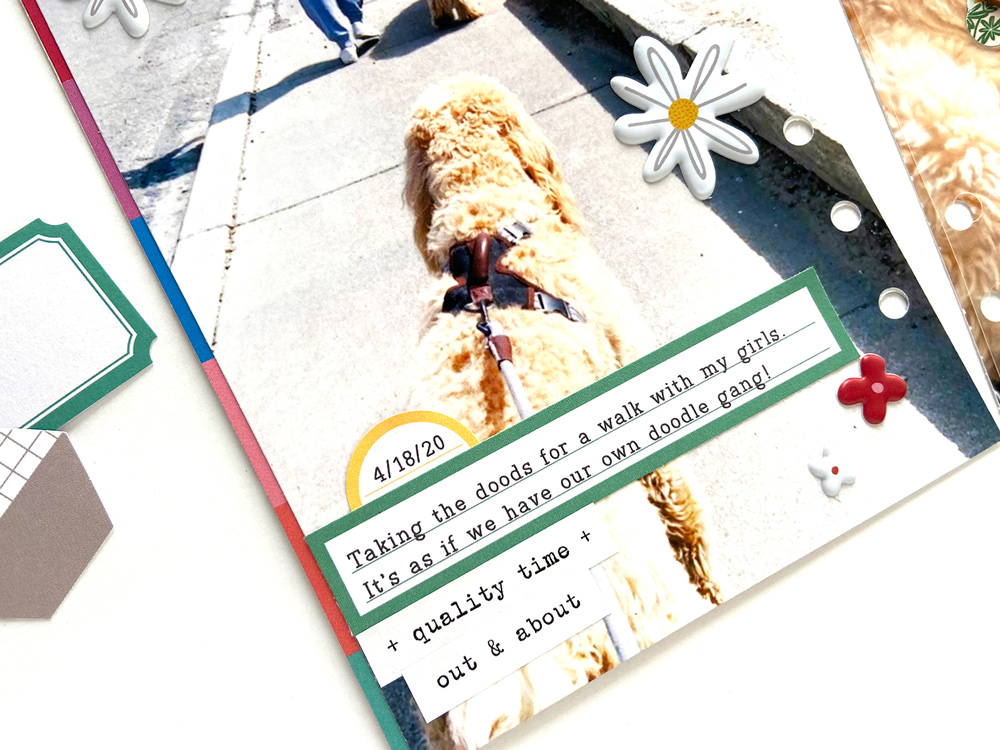
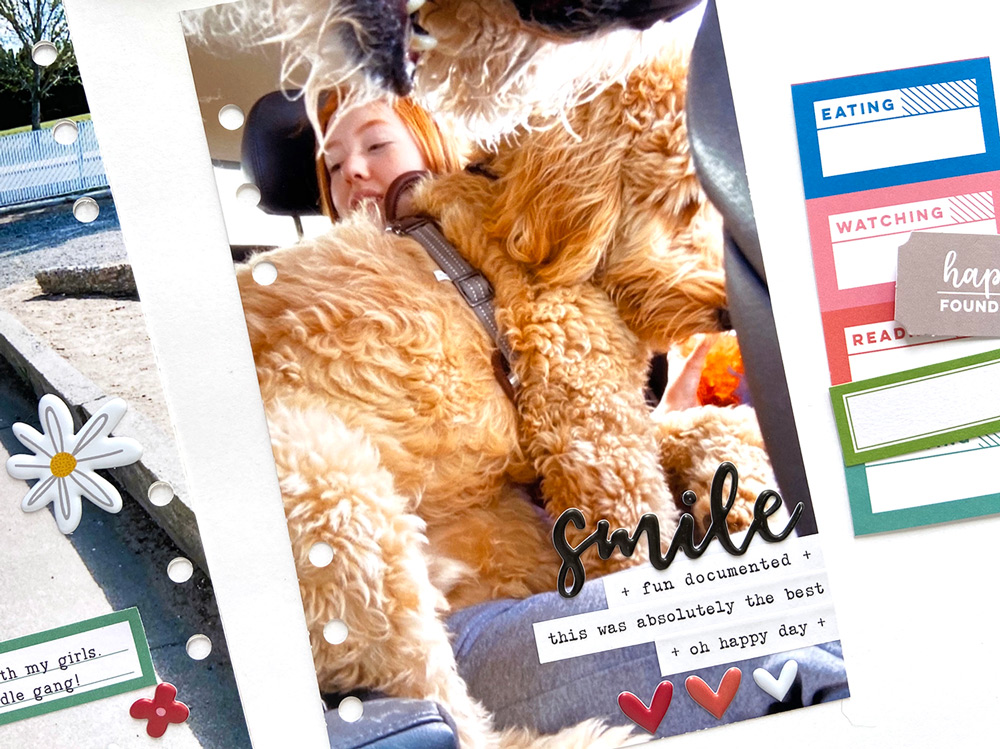
One day last month, my daughters and I took all of our golden doodles for a walk through our small town. We must have been quite the sight with the three of them – Mabel, Mildred, and Mack – in tow. Because my large photos are the focal point of this project, I simply added a few labels, tags, and puffy stickers as embellishments.
When adding the first photo to the album, I noticed that I had cut it slightly narrower than the previous page. To cover the white strip along the left of the photo, I backed it with several of the April Labels to create a multi-colored border along that edge. Problem solved!
To record the story, I used the April 2020 Print and Cut Labels and added journaling with my photo editing program before printing them.
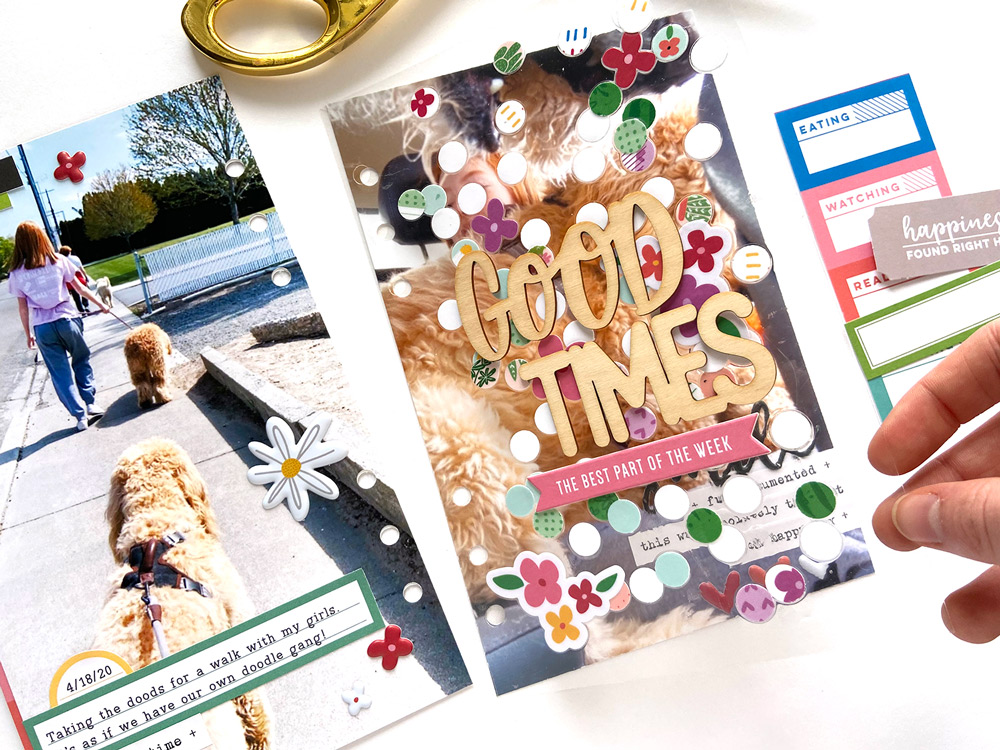
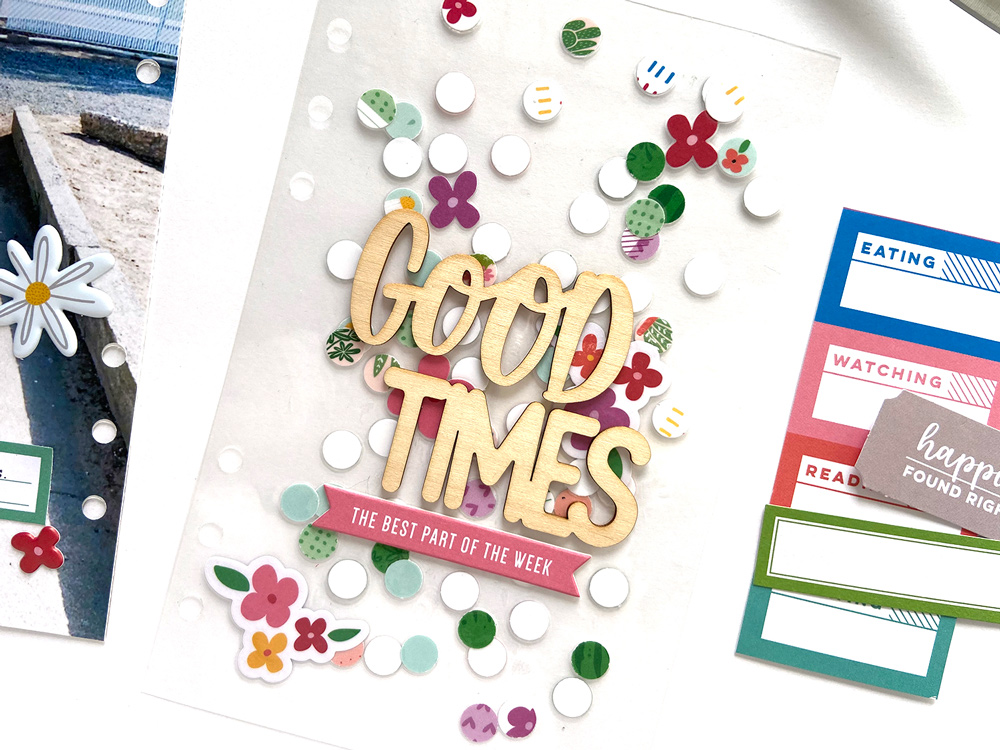
Next, to try to use the kit contents in a unique way, I grabbed a small circle punch and created confetti from the journaling tags I had yet to use. After punching out what felt like a thousand circles, I placed them inside a laminating pouch with several Beautiful Day Die Cuts and sent it all through my laminator.
After cutting the laminated page down to size, I adhered the Good Times Wood Veneer to the front and added a sentiment from the This Week Chipboard Stickers. I love how this page turned out and it makes the perfect cover for my second photo.
To finish the project, I used the Life Right Now Stickers and Lovely Puffy Stickers to embellish my second photo. I love this picture of my daughter getting squished by the dogs in the backseat of the car.
Thank you for stopping by today and I hope you’ve been inspired to use your scraps in fun, new ways.
Be sure to show us what you’ve been creating with your Elle’s Studio kits by posting your projects online using the hashtag #EllesStudio.
Show us how you’ve used up your April kit and add-ons! Share your project in our Elle’s Studio Facebook Group, or on Instagram using the hashtag #EllesStudio!
Comments Off on Using Up April with Jen McMurtrey | Share This
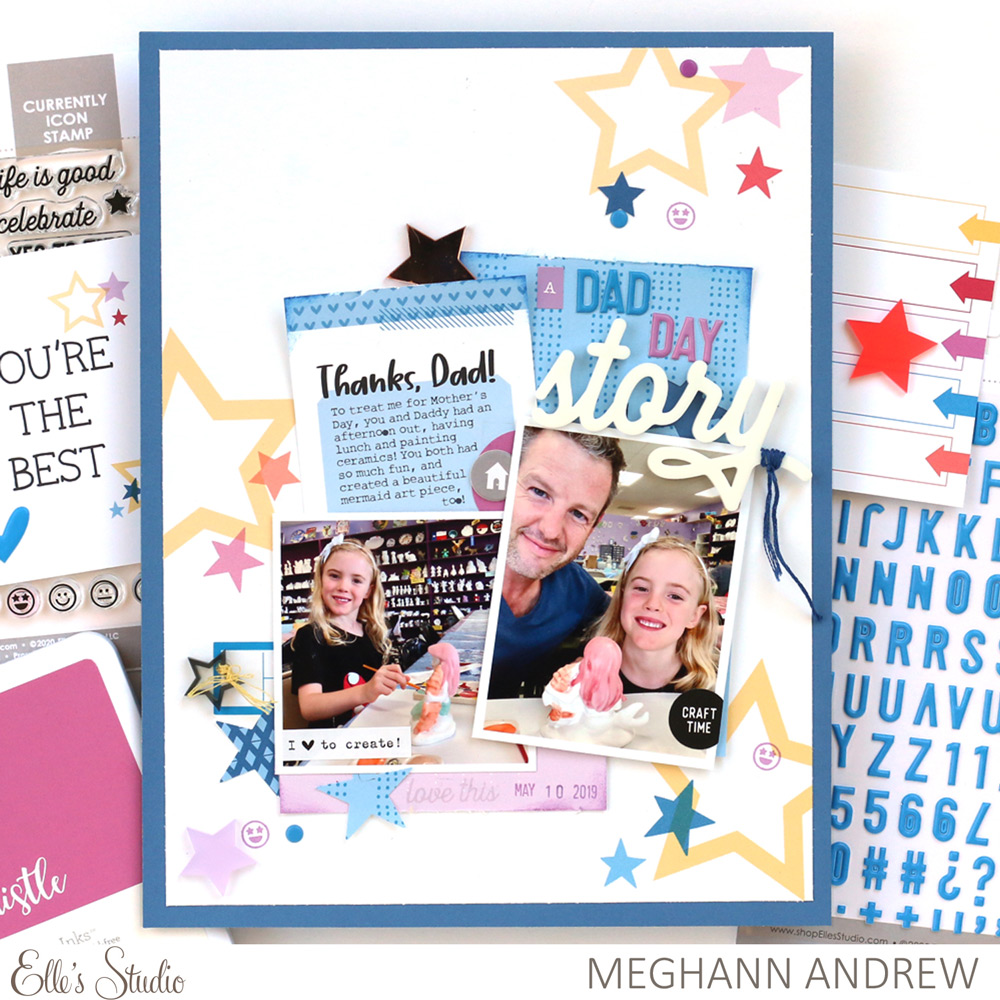
Elle’s Studio alphabet stamps are such a great investment into your crafty stash, and have so many different uses besides helping you to create titles! Today, design team member Patricia Roebuck is with us to share some really creative ways to mix and match your alphas that you may not have tried yet! Let’s take a look at what she is sharing:
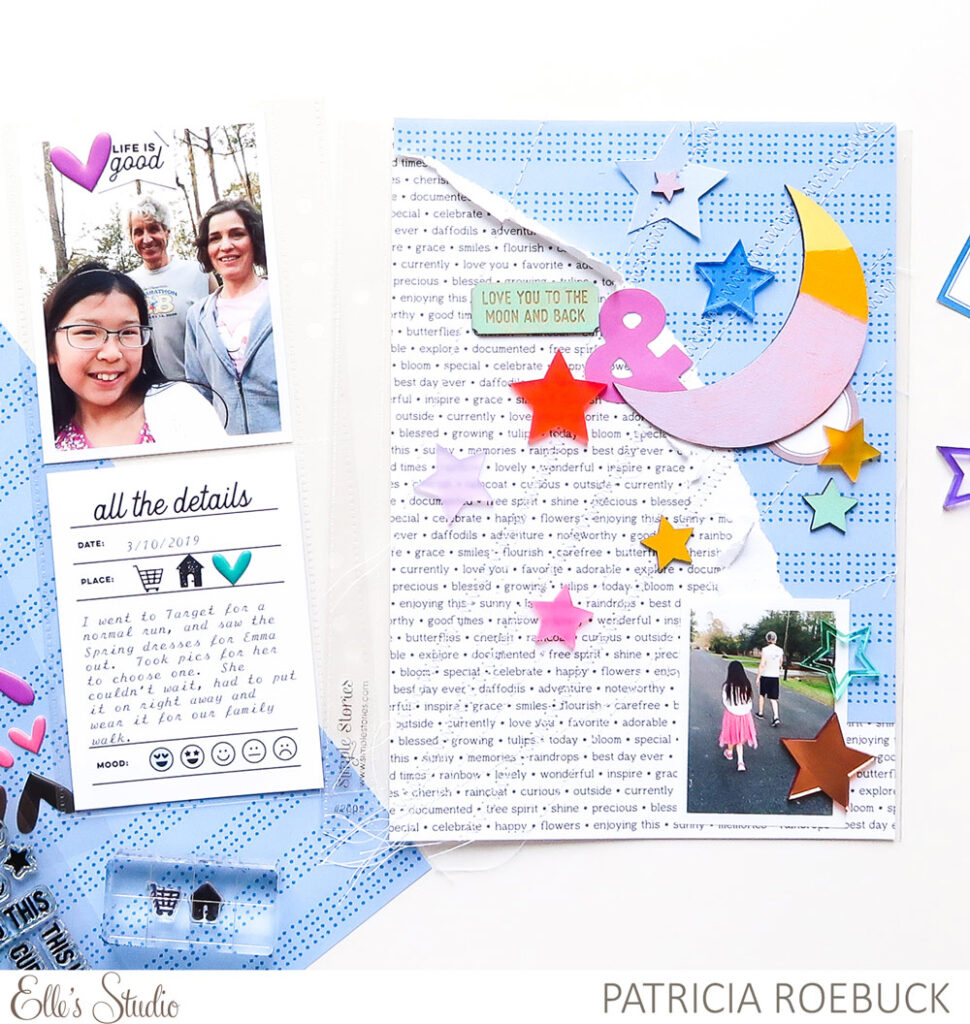
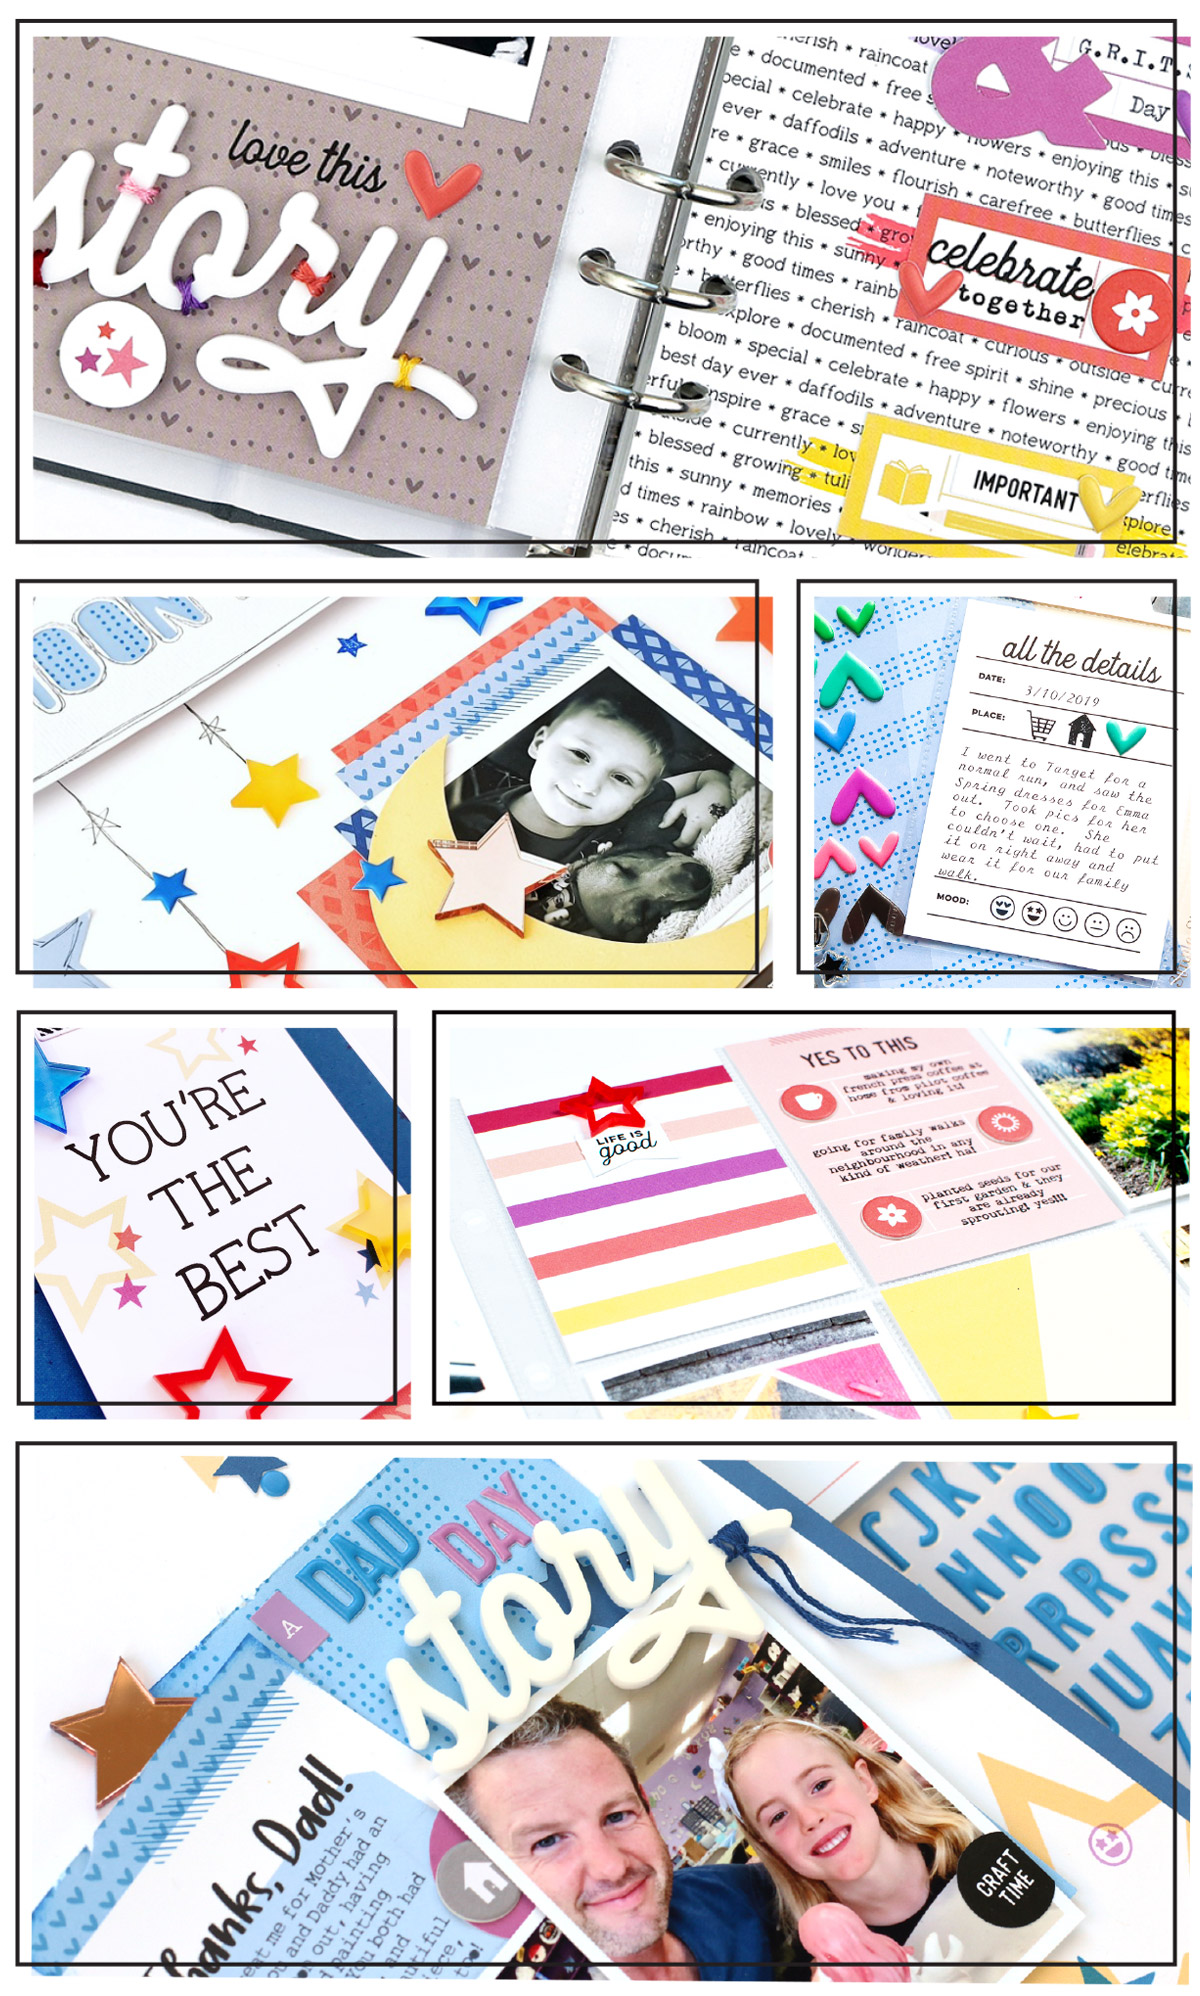
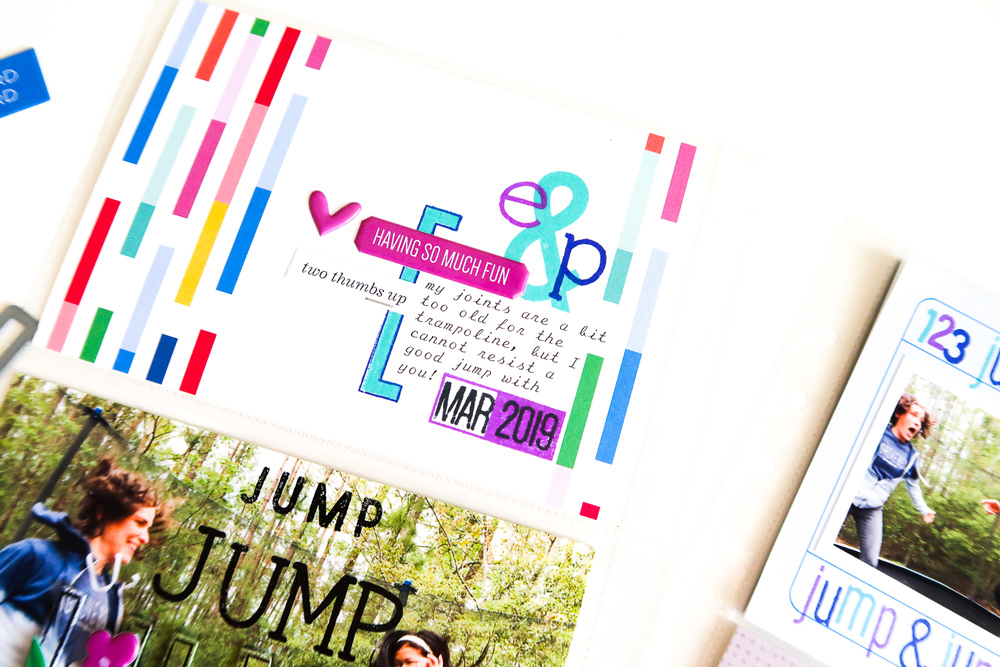
Hello, Elle Studio friends! Today I want to share ways to use several of the Elle’s Studio alphabet stamps in your pocket page. Elle’s Studio alphabet stamps stretch your products by creating titles, subtitles, add jumpstarts to journaling, color and texture, create balance, eye-catching creativity, and so much more!
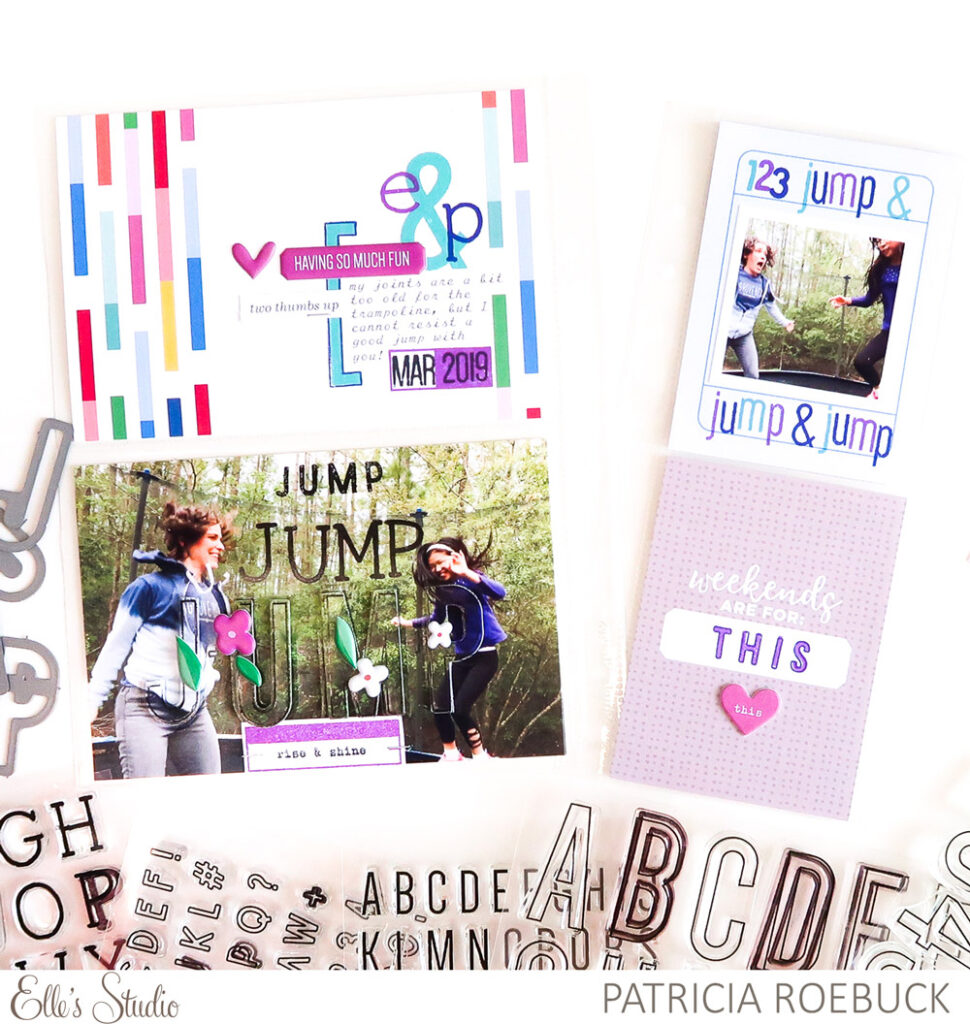
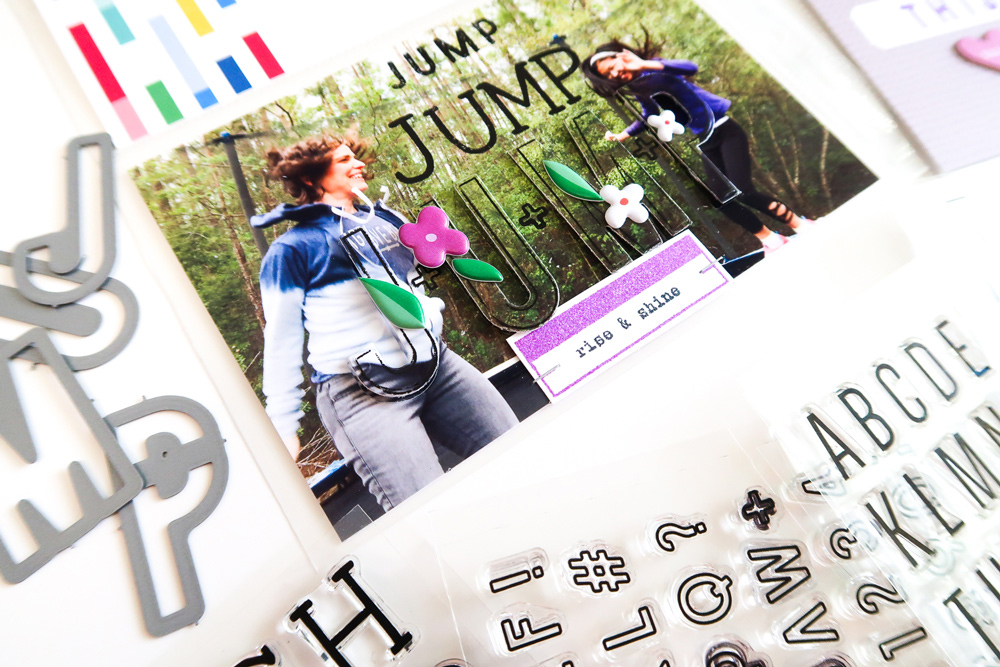
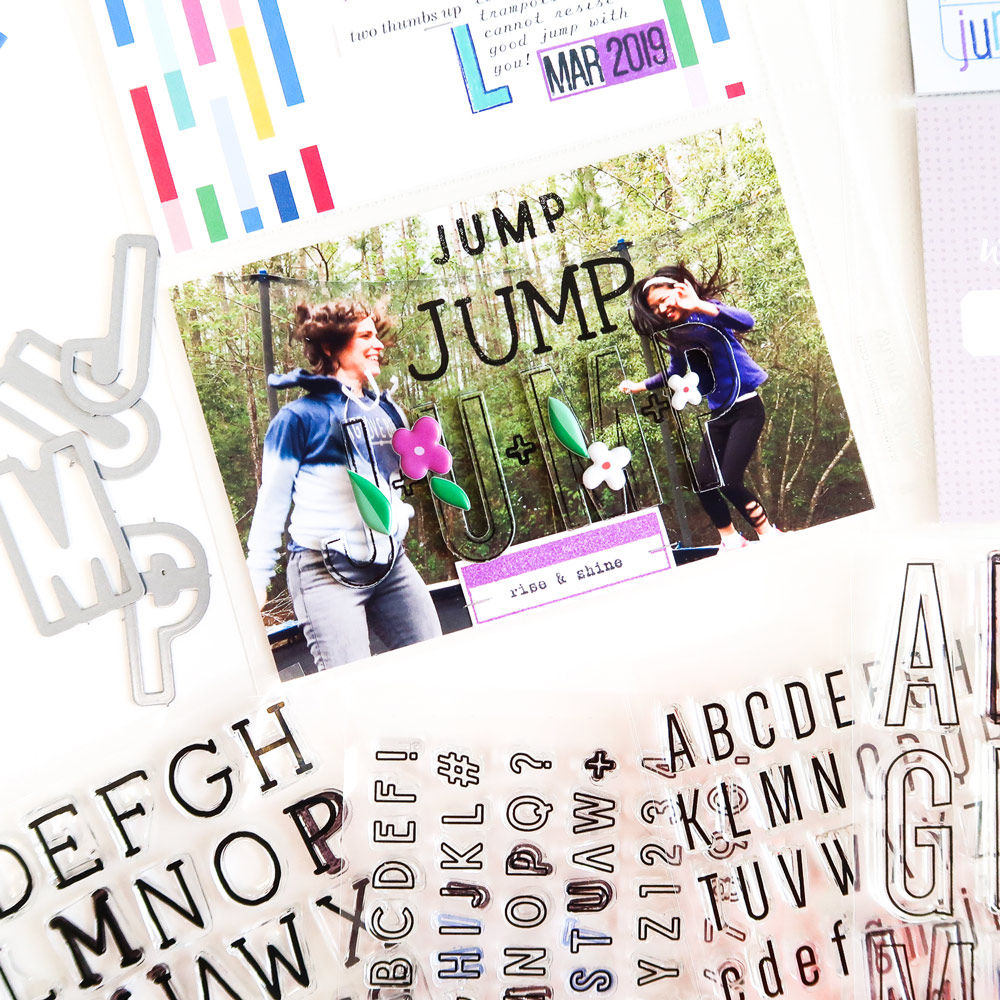
From there I stamped “jump” using the Typewriter Alphabet Stamp and the smallest font on top with the Stanley Jr. Alphabet Stamp. I adhered the two photos together, then adhered the die cut letters back over the die cut spaces using dimensional adhesive. Doing this provides a little bit of a see-through and an illusion of the word floating above the photo. Adding the puffy stickers really helps to enhance that floating illusion as well!
The Typewriter Alphabet and Large Jane Number Stamps helped to start my journaling on the April 2020 Kit colorful 4″ x 6″ tag. These stamps provided a way to layer and cluster and create contrast between the ampersand in the Large Jane Number Stamp and the skinny Typewriter Alphabet Stamp. I emphasized that contrast by using three different ink colors. I used the bracket from the Large Jane Number Stamp to frame the grouping before adding my journaling with my typewriter. Then, I added the date and stickers to frame and add to the journaling.
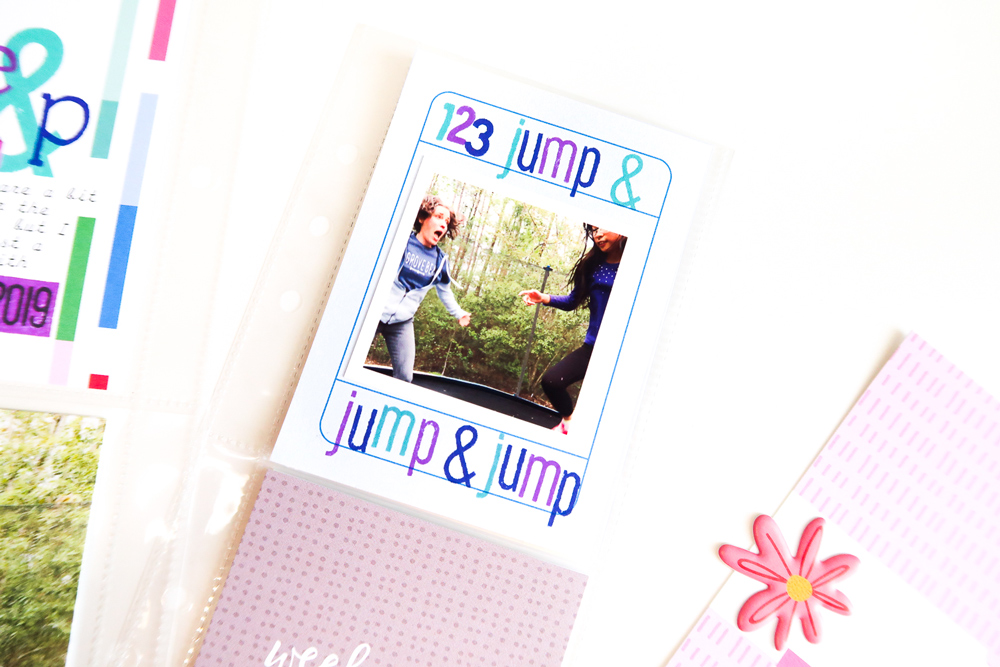
On the 3″ x 4″ tag on the top right, I used a smaller photo, then used the Jane Alphabet Stamp in the same ink colors to frame the photo.
To finish the right side and this spread, I added stamping using both the solid and outline of the Stanley Jr. Alphabet Stamp, then finished with a heart from the This Week Chipboard Stickers. To bring more color to my large 4″ x 6″ photo, I used the Springtime Tabs Stamp to stamp a label onto white cardstock, which I trimmed and stapled into place under my title.
There is no end to the possibilities with stamps—especially alphabet stamps. You can get the exact color you want, build a creative title, start your journaling, add to your kit tags, and frame photos! With the addition of the metal dies, you can really emphasize your title! Give these ideas a try on your next project and enjoy!
Comments Off on Creating with Alphabet Stamps and Patricia Roebuck | Share This
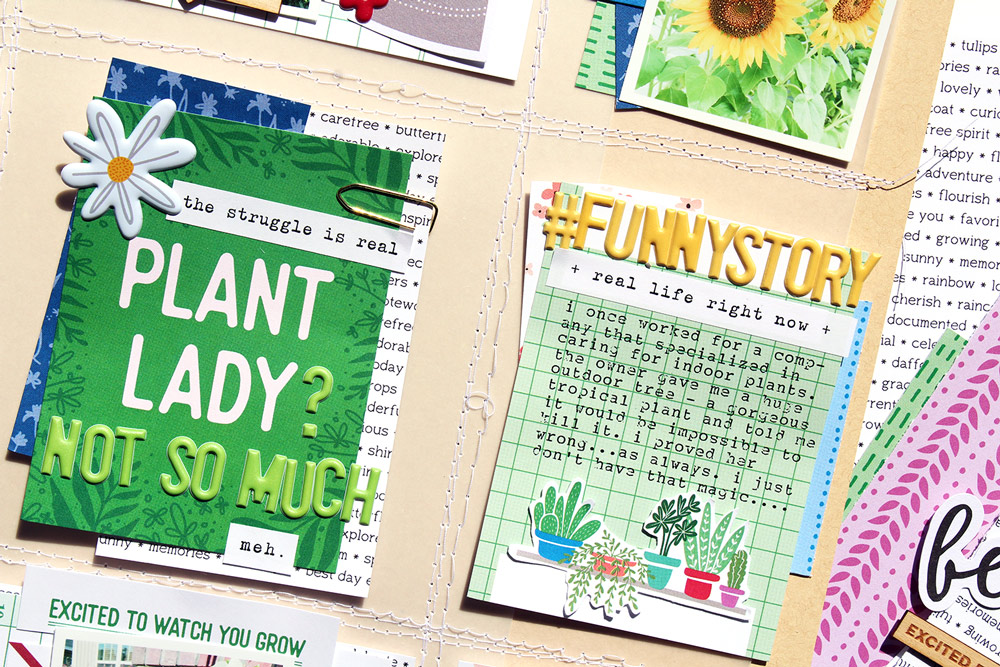
Do you have a green or a black thumb? Today, design team member Melissa Mann is showing us that no matter what your thumb color, the Plant Lady Journaling Tags can be used as the basis to create a beautiful project! Let’s take a look!
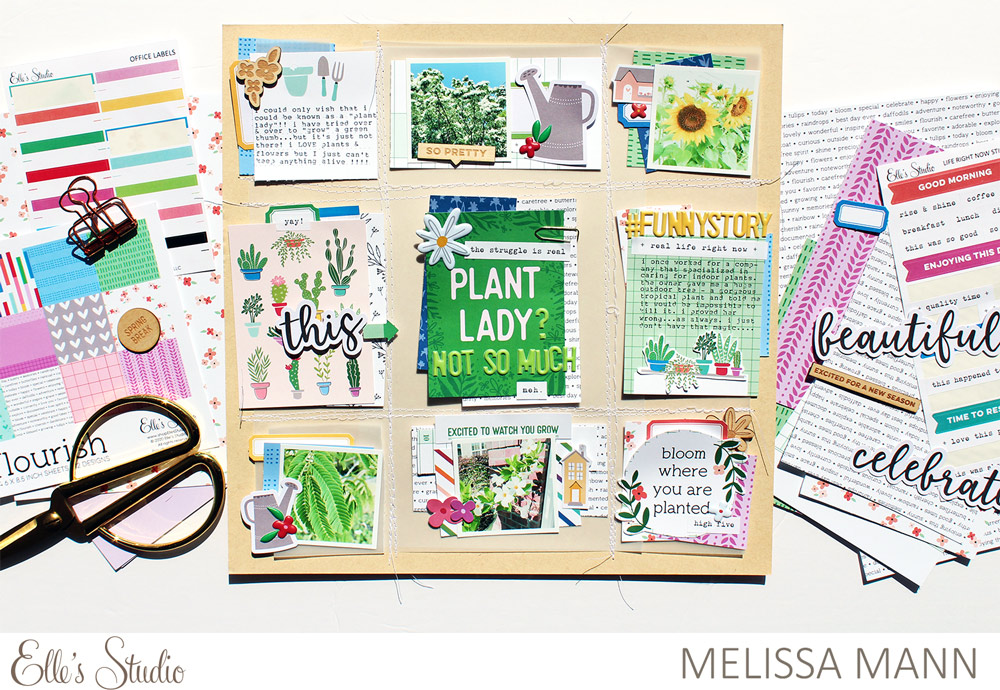
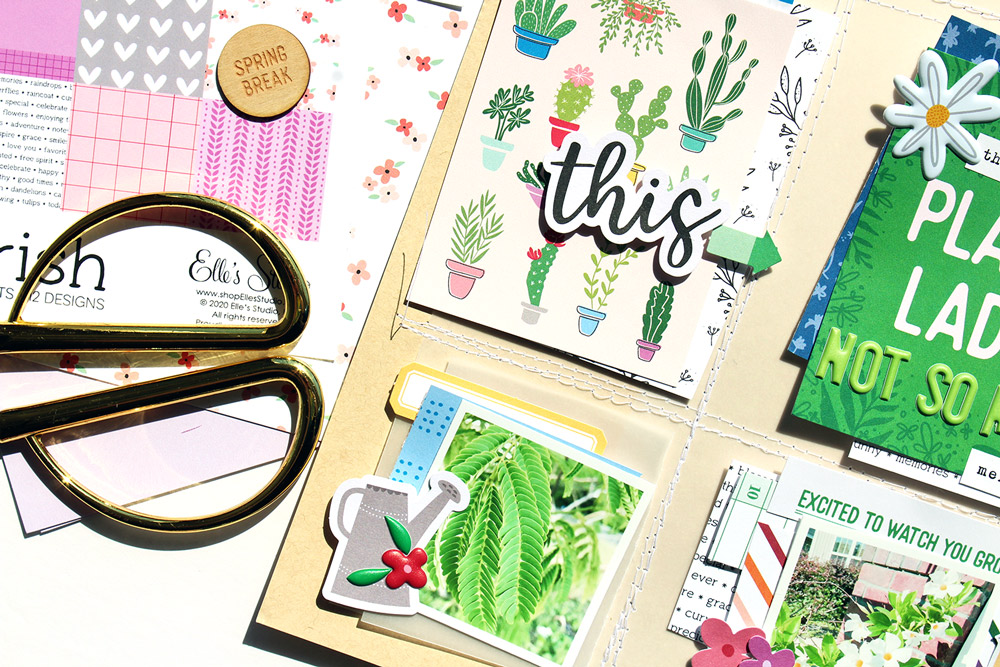
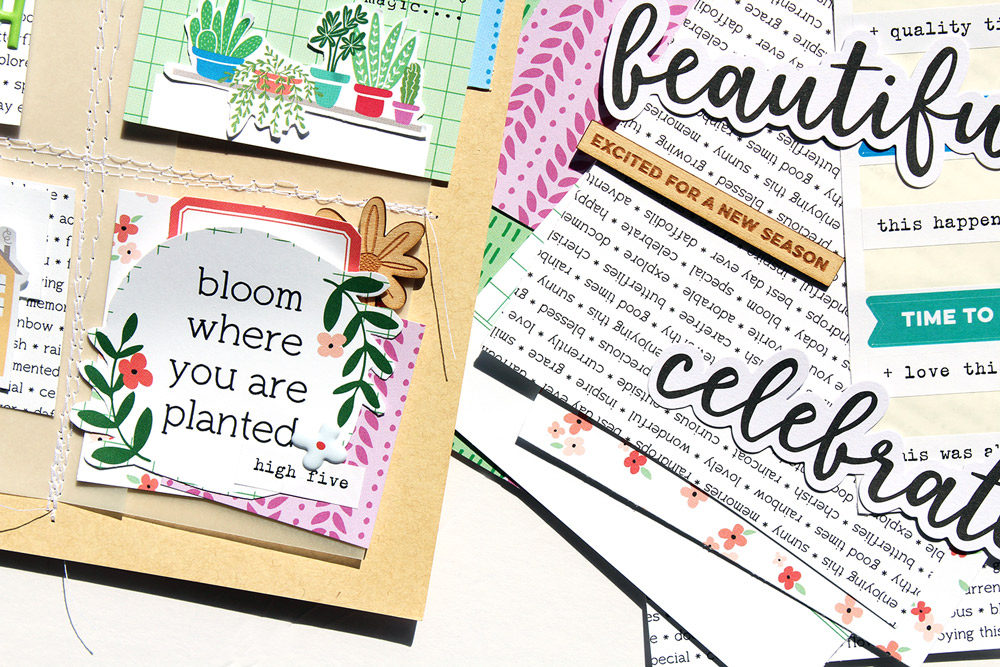
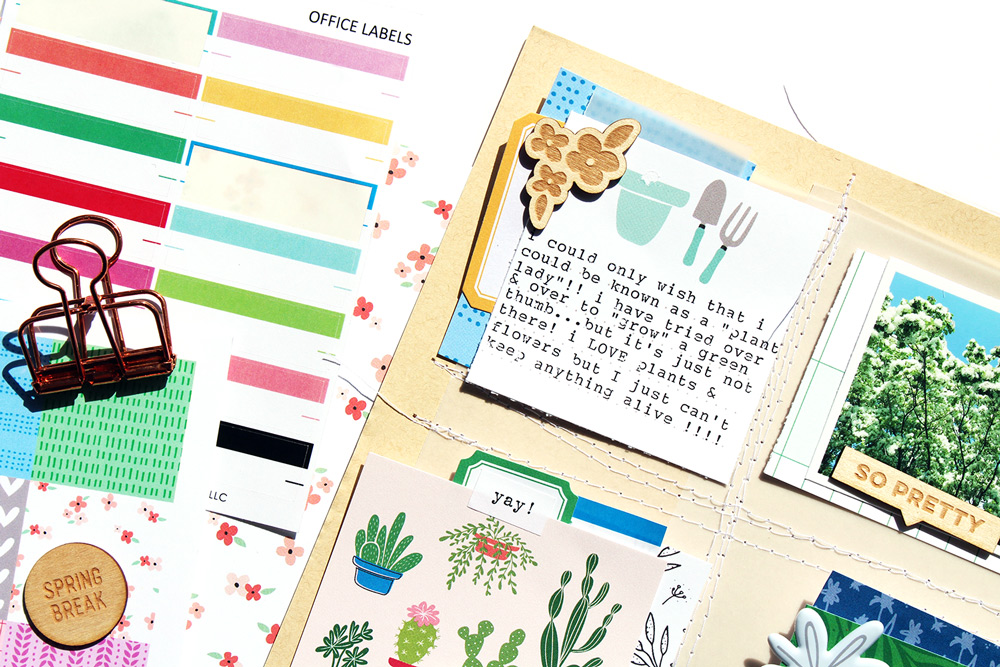
When I first started pondering what I was going to create with the GORGEOUS Plant Lady Journaling Tags, I was really stumped. I am NOT a gardener; I am NOT a plant lady. I have tried over the years and I have just proven over and over and over again that it is just not meant for me to be a gardener. I usually tell people that I even have the ability to kill artificial plants! I really wanted to use these pretty 3″ x 4″ tags and try to give them the justice they were due and I came up with the idea to scrap the fact that… am I a plant lady? Not so much!
I decided to base my layout on a grid design. Partly because I always love a good grid-based scrapbook layout; but also because it would also play into the “garden” theme. Each little “plot” had its own paper, tags and journaling. I layered the “ground”, the kraft cardstock, with vellum and loosely stitched some lines with my sewing machine to create nine squares.
I knew I wanted to use the green “Plant Lady” 3″ x 4″ journaling card as the basis for my title and Lime Green Puffy Alphabet Stickers to create the subtitle underneath it. I placed this card in the middle and then started filling up the other squares. I layered papers from the Flourish and Love Is 6 x 8.5 Inch Paper Stack, journaling tags, stickers, and die-cuts from the Beautiful Day Die Cuts. I also fussy cut some of the cute graphics on a couple of the cards to use as embellishments. They don’t always have to be used as a journaling tag!
Creating a layout like this is a great way to use up the little bits and pieces that you have left over. I used up a bunch of little scraps of paper and stickers to layer together each grid.
We would love to see how you used the Plant Lady Journaling Tags this month! They would be great to use in a pocket page to document a garden, plants that you may have around your home, or maybe like me, the fact that you’re not a gardener! Make sure to share what you create with us in our Elle’s Studio Facebook Group and on Instagram using the hashtag #EllesStudio!
Thanks for stopping by and taking a peek at my project today!
Comments Off on A Plant Lady Story with Melissa Mann | Share This
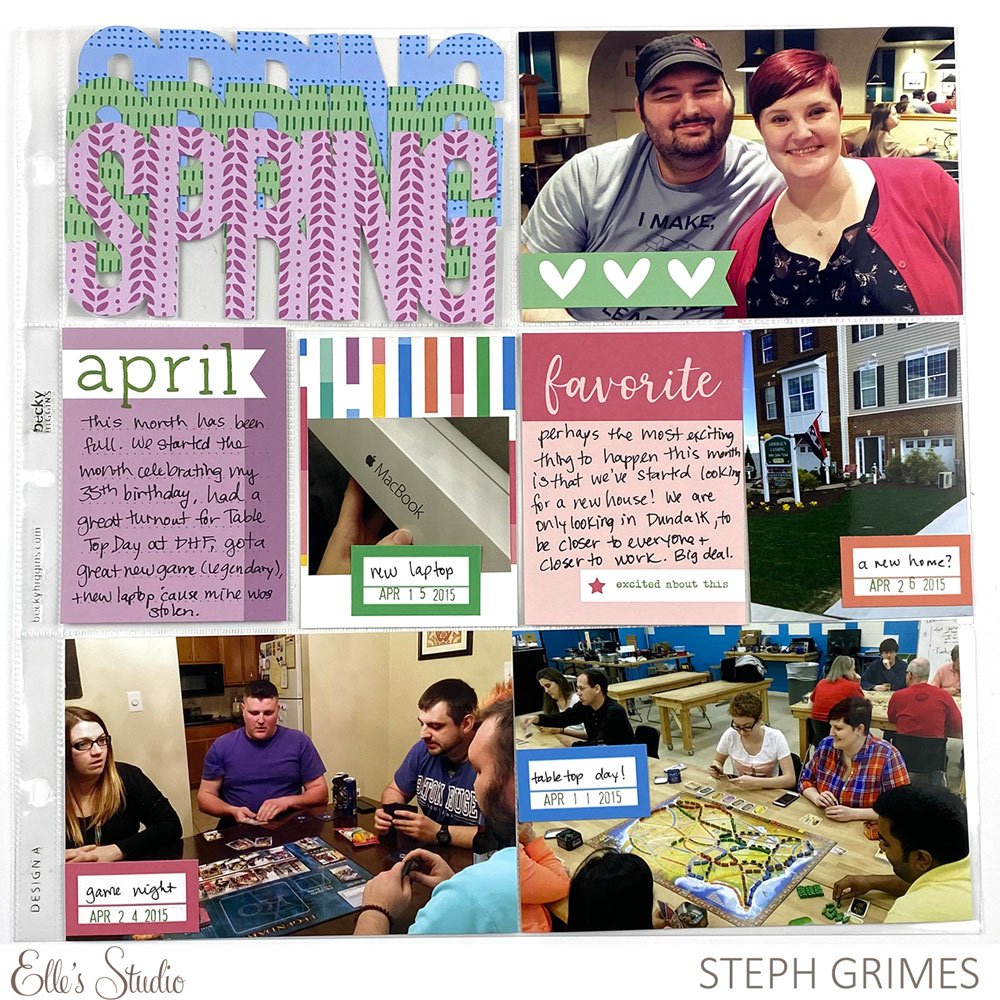
Hello everyone! It’s Stephanie Grimes with you today! I don’t know about you, but I am not “caught-up” on my memory keeping projects! I’m working on it. Sometimes, you just want to create a page quickly and kits are a fabulous way to do that. If you are able to work just from one kit, it makes the work go so much more quickly. For today’s project, I am sharing how I used the April digitals: the Favorite Printables and April 2020 Cut Files; along with a couple of stamps, to create this pocket page for my 2015 yearbook.
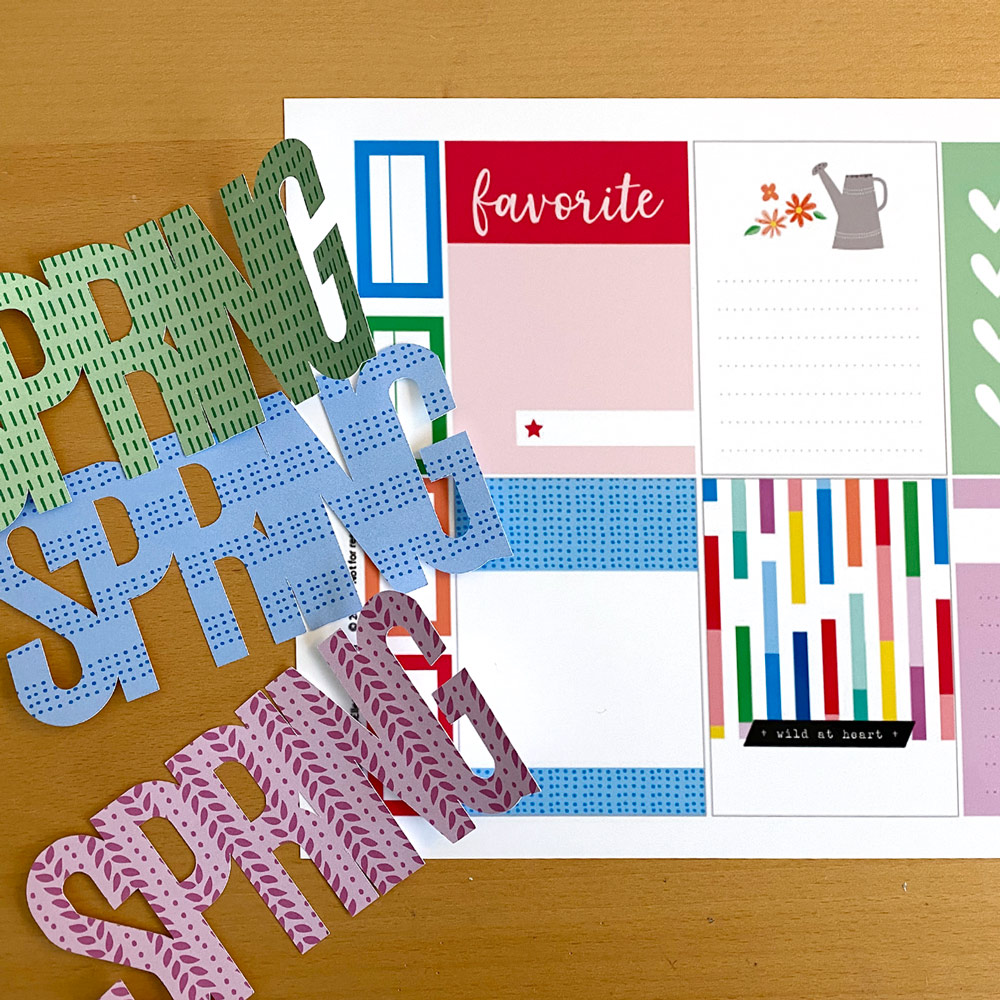
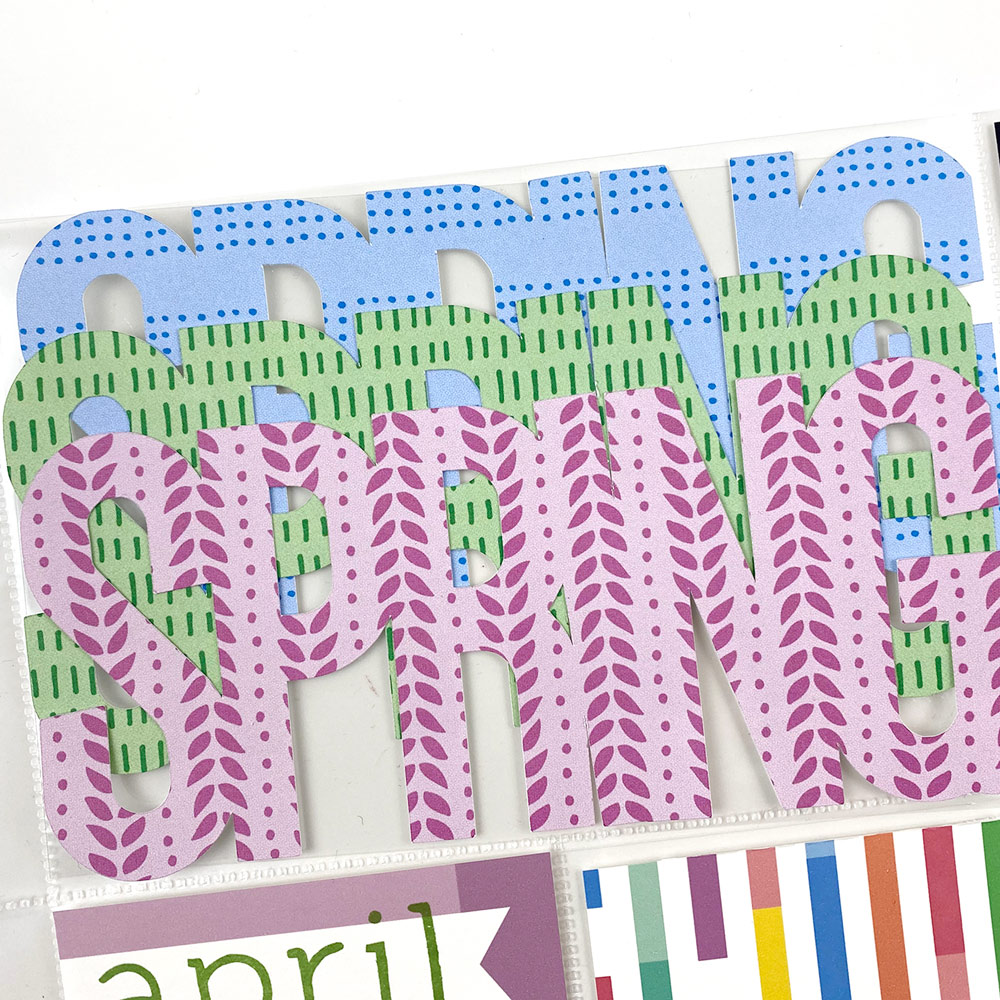
This whole page was inspired by the “Spring” word cut file. I had the idea to cut it in a variety of patterns from the Flourish 6 x 8.5 Inch Paper Stack and layer them on a transparency to preserve some the transparency of my 4″ x 6″ pocket. To cut the word, I downloaded the file and brought the .PNG into my Cricut Design Studio software, letting the Cricut make fast and easy work of cutting multiples for me. In preparation, I also printed this month’s printables on a sheet of white cardstock and cut them out.
For the title, I cut a piece of transparency to 4” x 6” to fill my pocket. Then, I layered the three “Spring” cuts and adhered them to the transparency using vellum adhesive for minimal show through on the back of the transparent card. You could also use staples for this step.
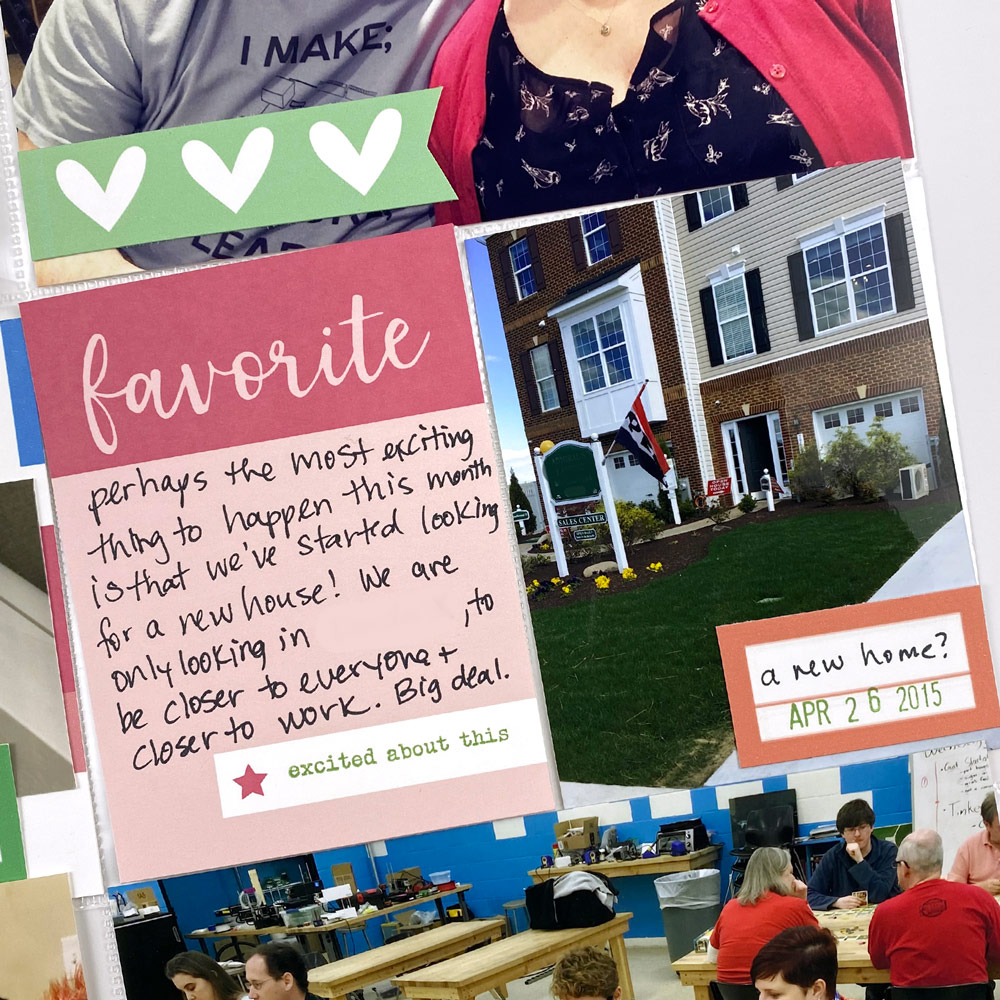
I used the title and my photos to help choose journaling tags from the April 2020 Favorite Printables. I chose three tags to use whole in my 3” x 4” pockets. For one, I used the Typewriter Alphabet Stamp to stamp the word “April” since this layout was about the month of April 2015. For the tag with the narrow multi-colored blocks on it, there was a printed sentiment that didn’t match my photos, so I just covered it with a photo I cut down to just smaller than 2” x 3” to fit on the tag. I cut down one of the journaling tags—the green one with hearts, to use a strip of hearts as a banner on the top photo of my husband and I. The remaining tags went into my stash for future use.
I used the red “favorite” journaling tag to tell the story of us looking for a new home and stamped a sentiment from the Springtime Tabs Stamp into the white space. Then, I used the labels to add the date to most of my photos and a little more information about the photo.
Because the digital files are designed to coordinate with each other and the monthly kit, it makes fast work of pulling a page together. With only a few decisions to make, once I had my printables printed and cut files cut, this page only took me 15 minutes to complete! When I am working to catch up on previous years, a page that comes together quickly and looks great because of the products is a total win to me!
Share your projects using April’s digital files on Instagram using #ellesstudio or in the Elle’s Studio Facebook Group. Happy crafting and be safe out there!
Comments Off on Making Quick Work of Catching-Up with Steph Grimes | Share This