October Design Team Inspiration: Volume Three

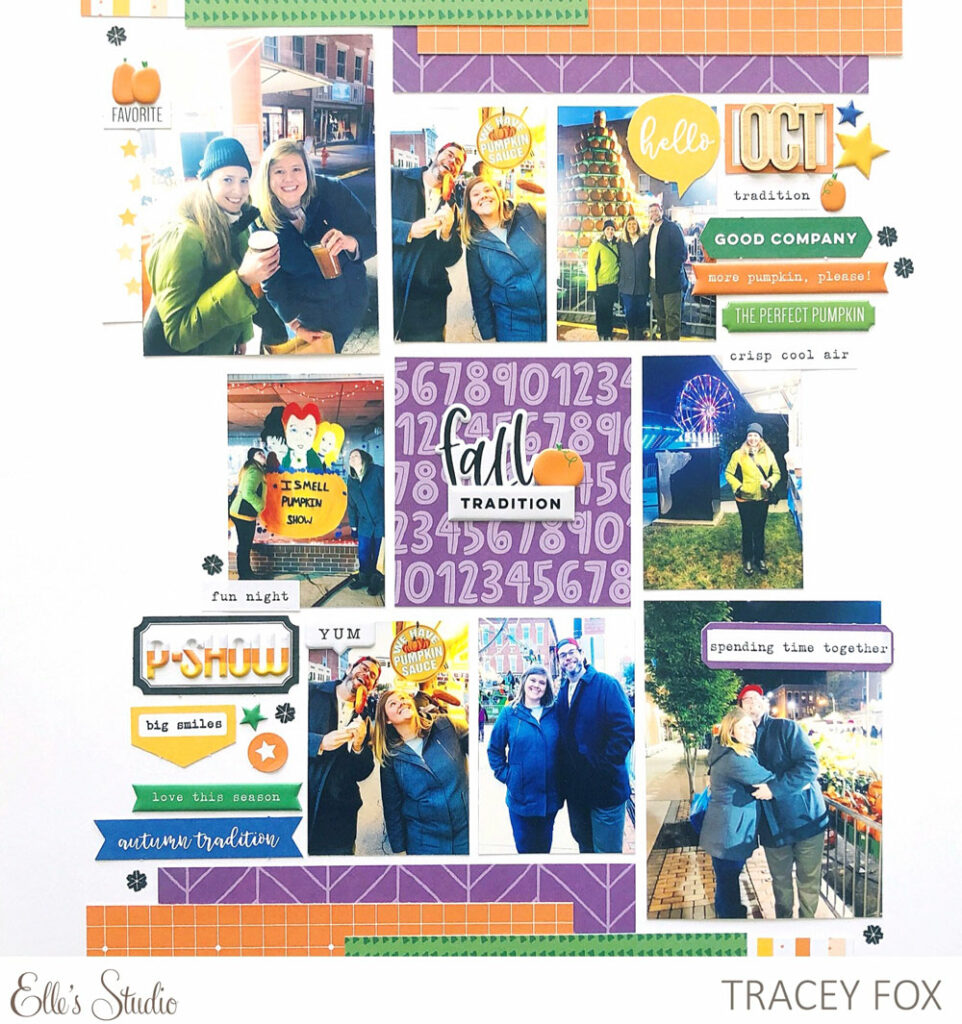
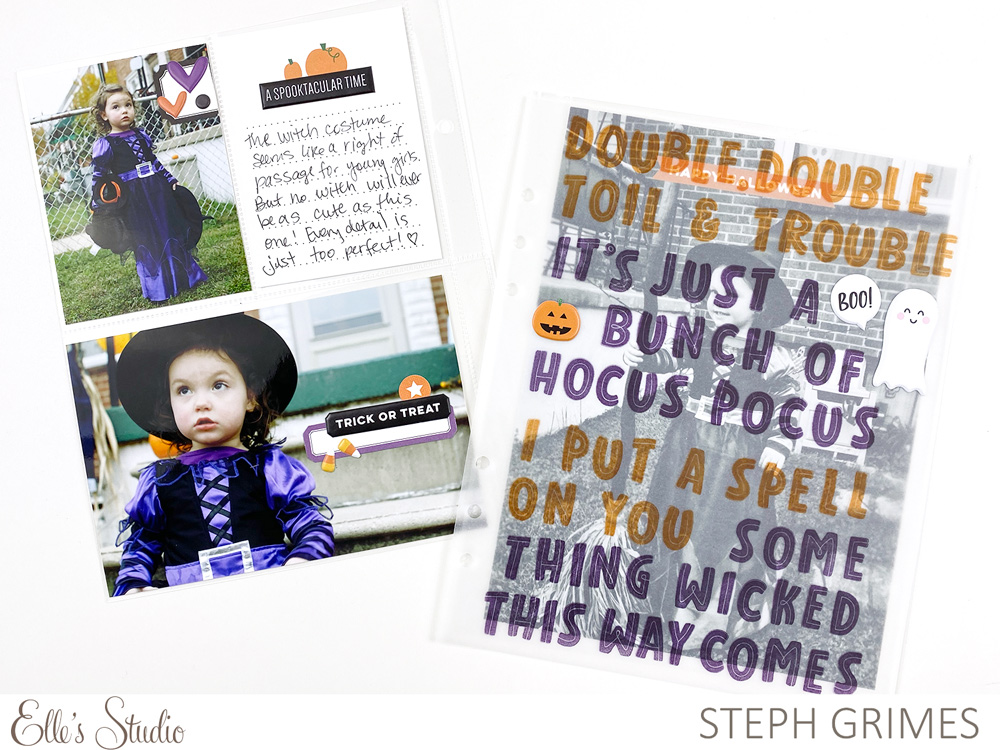
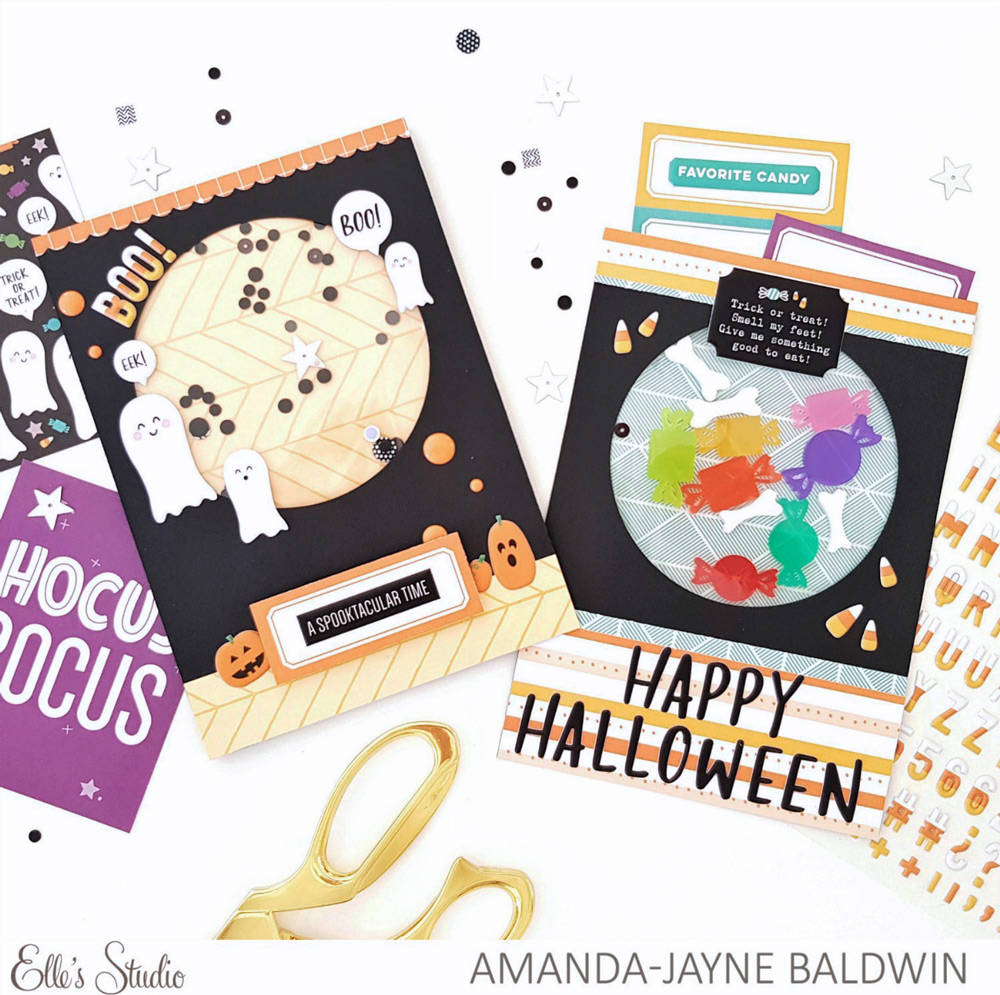
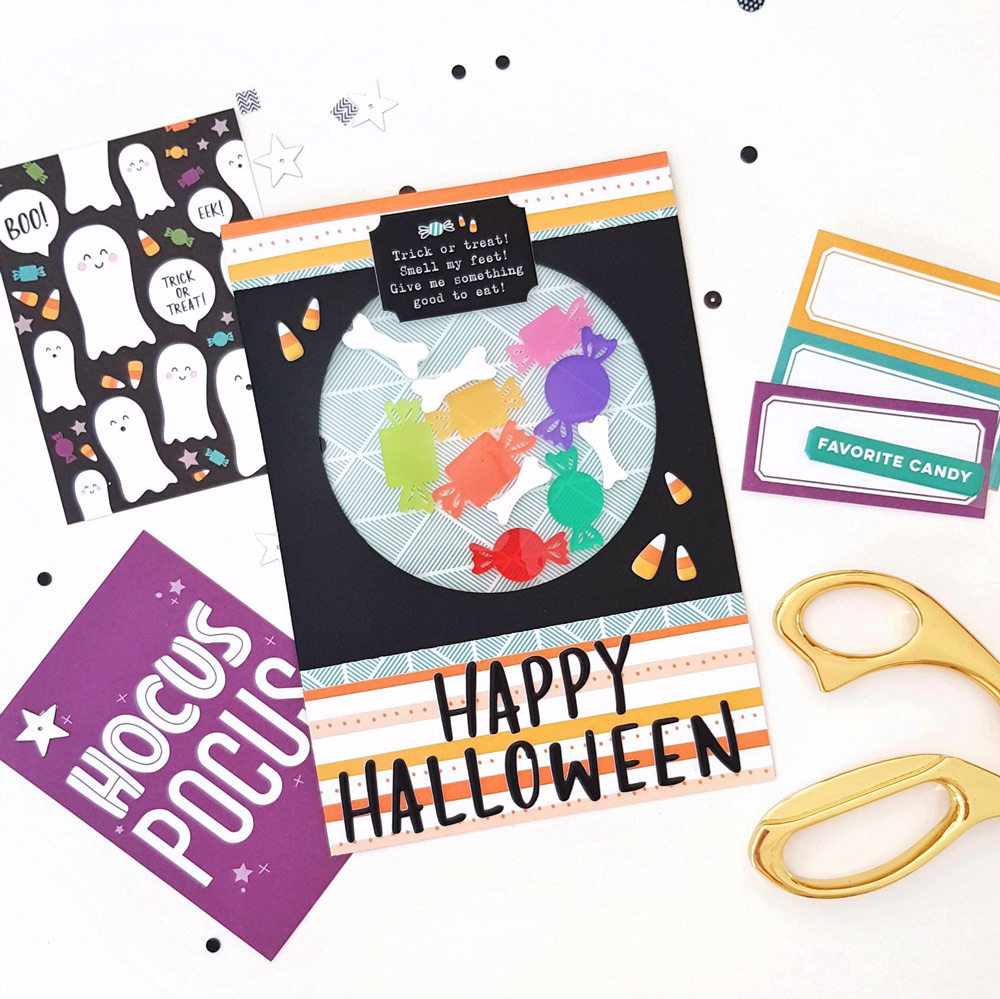
By now you should be having fun with your October 2019 kit and add-ons, but if you’re stuck in a creative rut, we have you covered! The eight projects created by our design team below will be sure to spark some inspiration, so that you can document your autumn memories in a beautiful way!

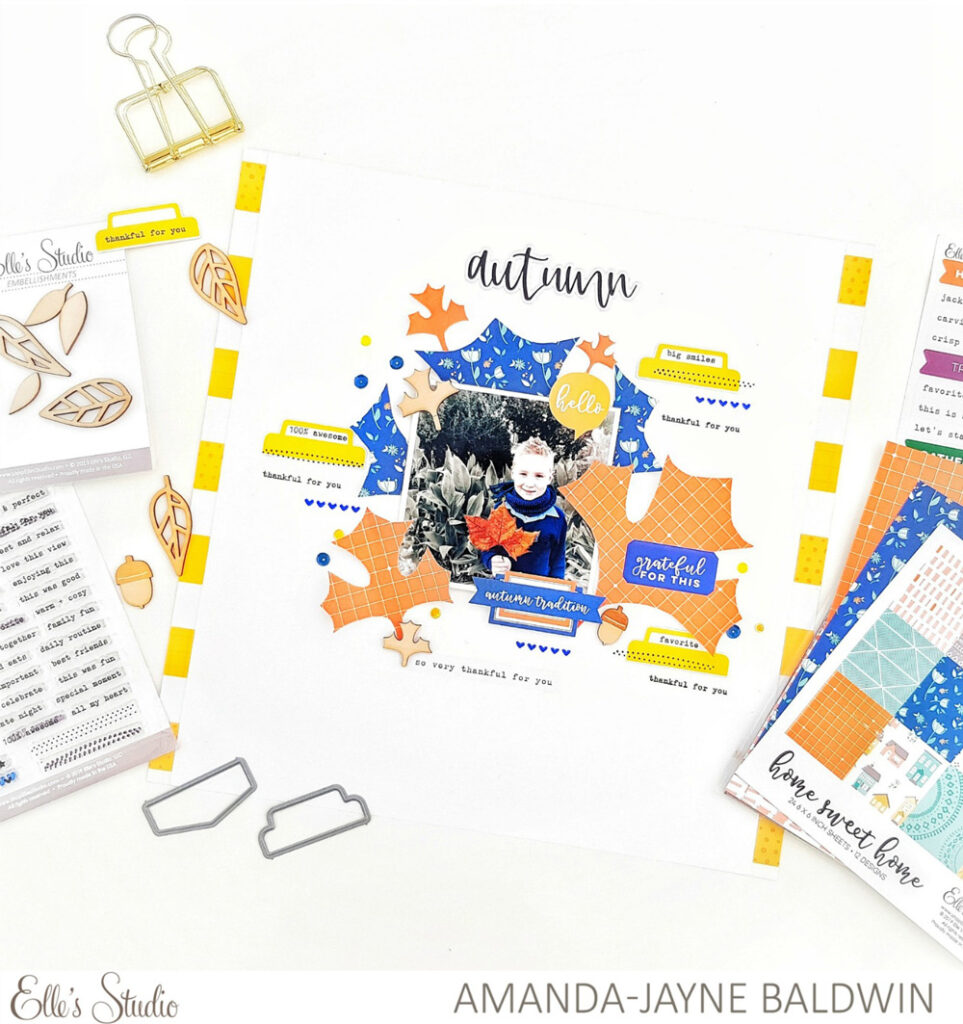
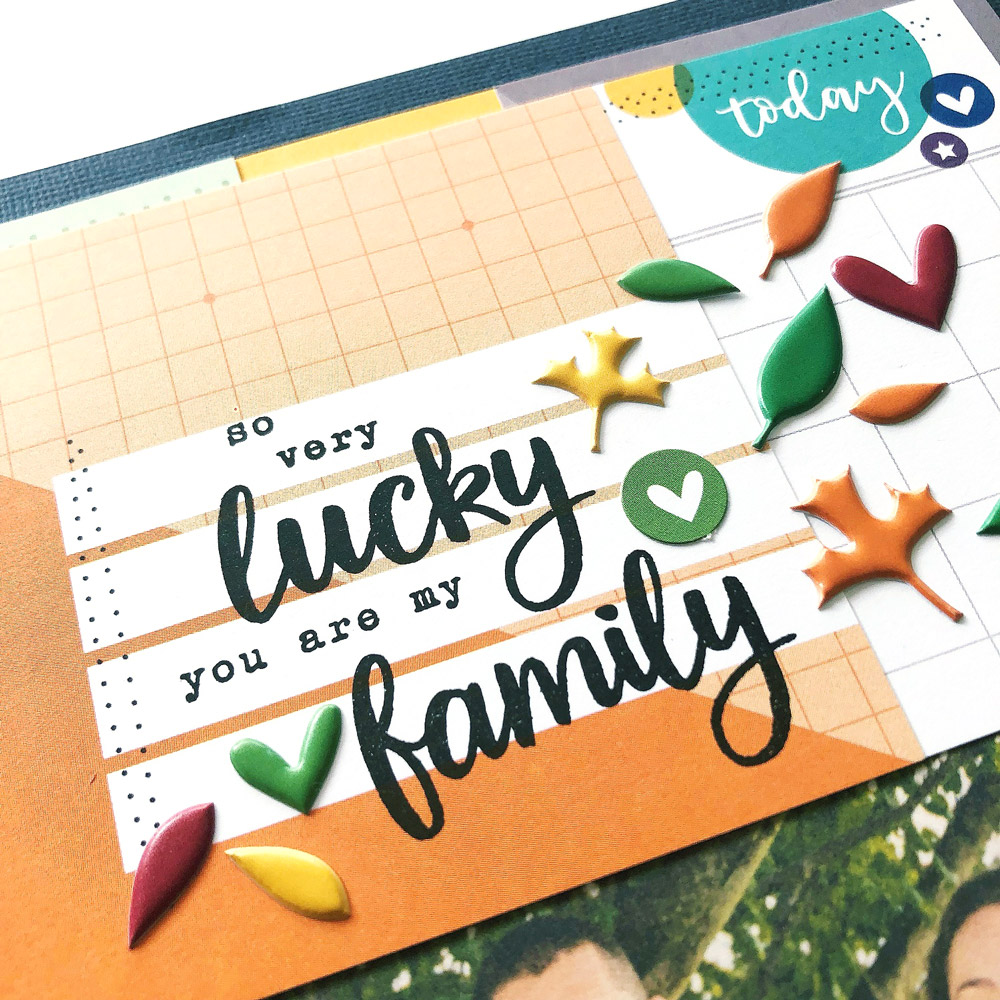
Autumn by Amanda-jayne Baldwin – supplies used | October 2019 KitOctober Cut Files, Thankful Stickers, Autumn Puffy StickersWood Veneer LeavesHome Sweet Home 6 x 6 Paper StackEveryday Tabs StampEveryday Tabs Metal Die, Noteworthy 12″ x 12″ Paper Collection

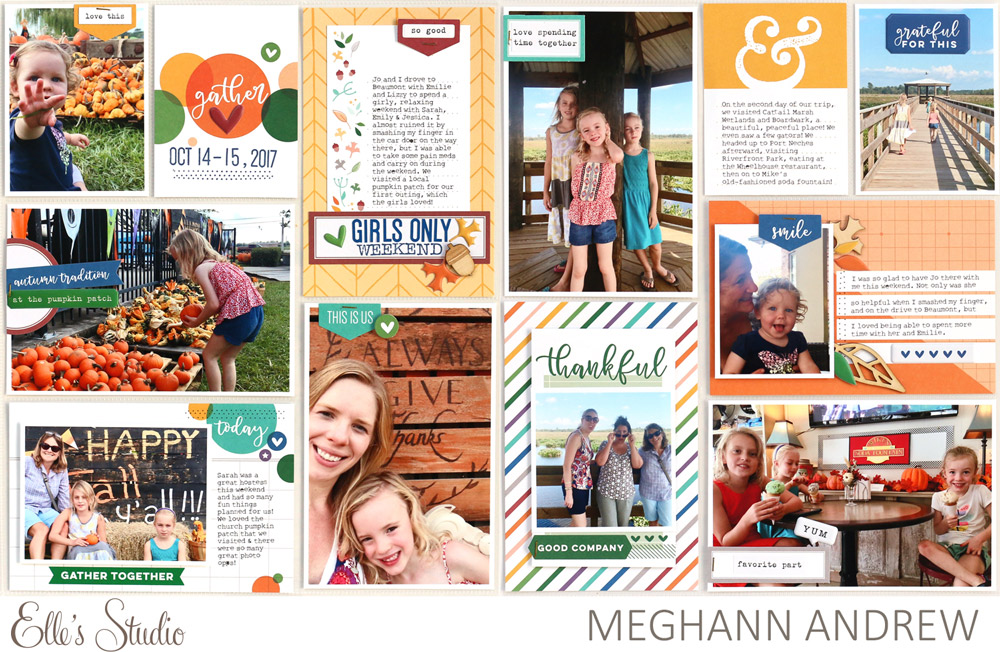
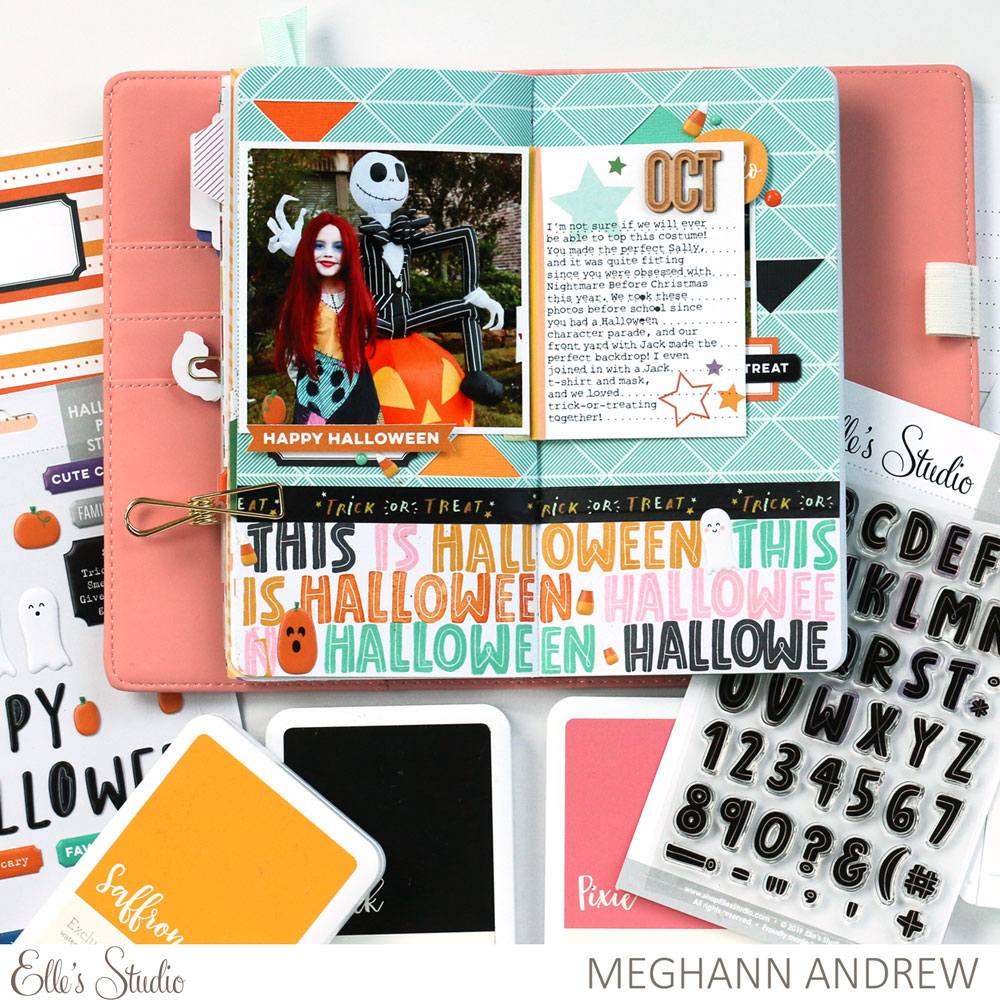
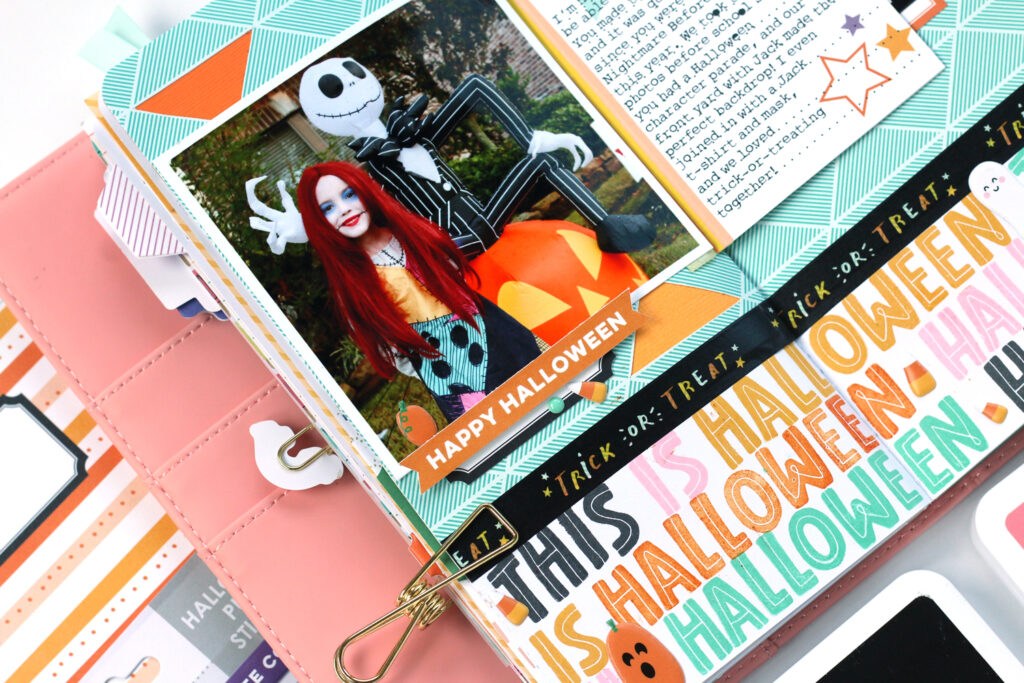
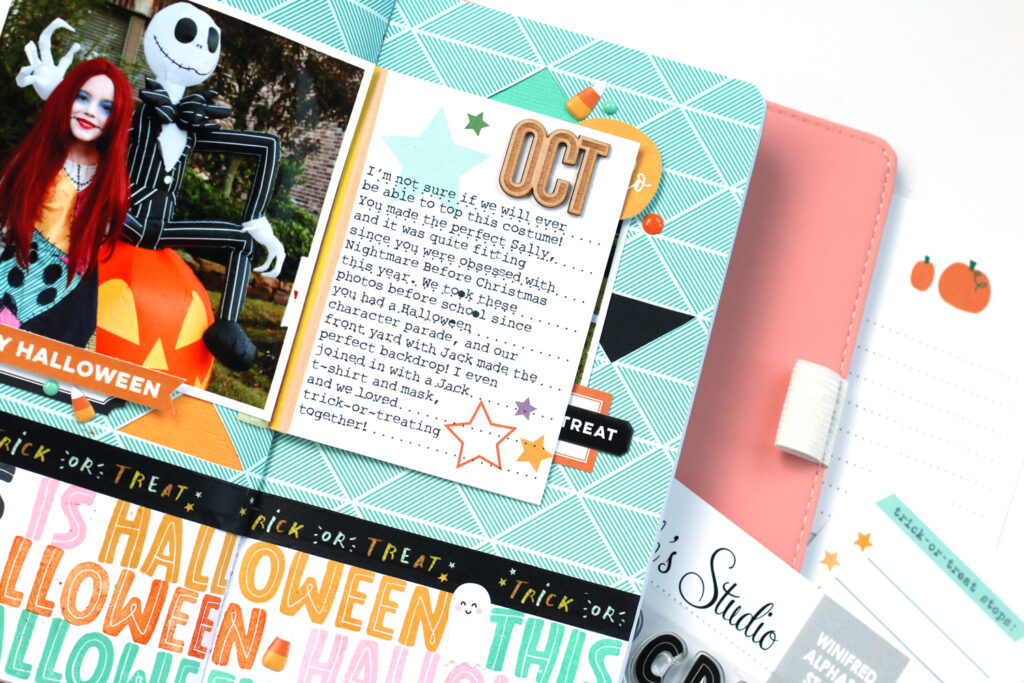
Girls Only Weekend by Meghann Andrew – supplies used | October 2019 Kit, Die Cut Labels — Jewel TonesThankful Stickers, Jane Alphabet Stickers — Navy, Autumn Puffy Stickers, Puffy Autumn Heart Stickers, Wood Veneer LeavesHome Sweet Home 6 x 6 Paper StackEveryday Tabs StampHazel Alphabet Stamp, Mini Dated Stamp

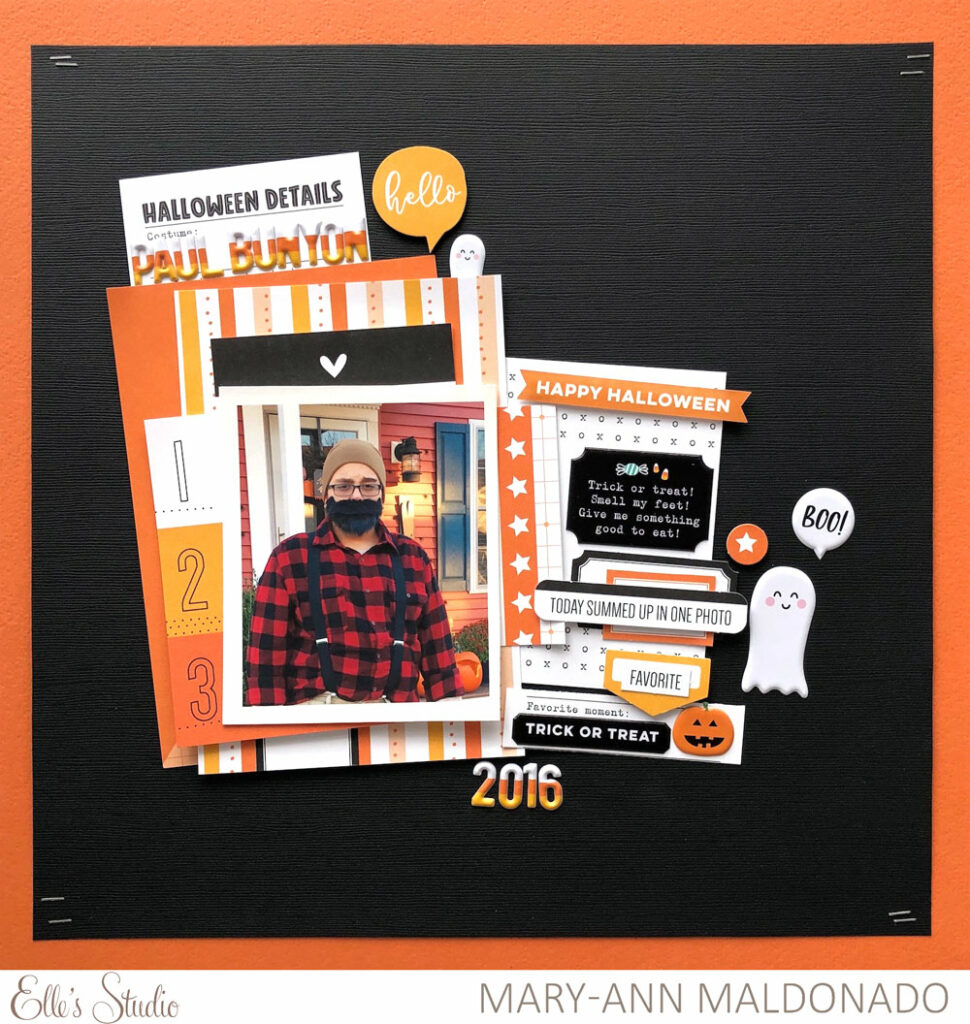
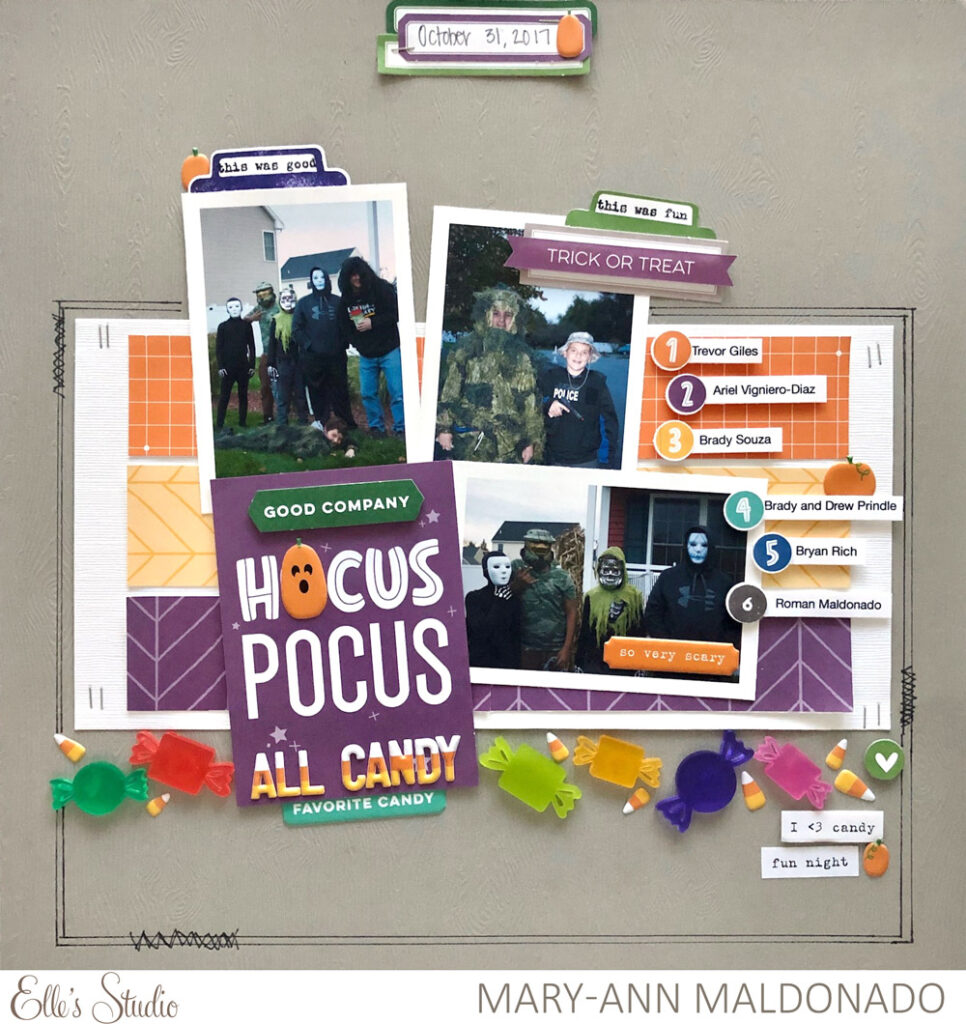
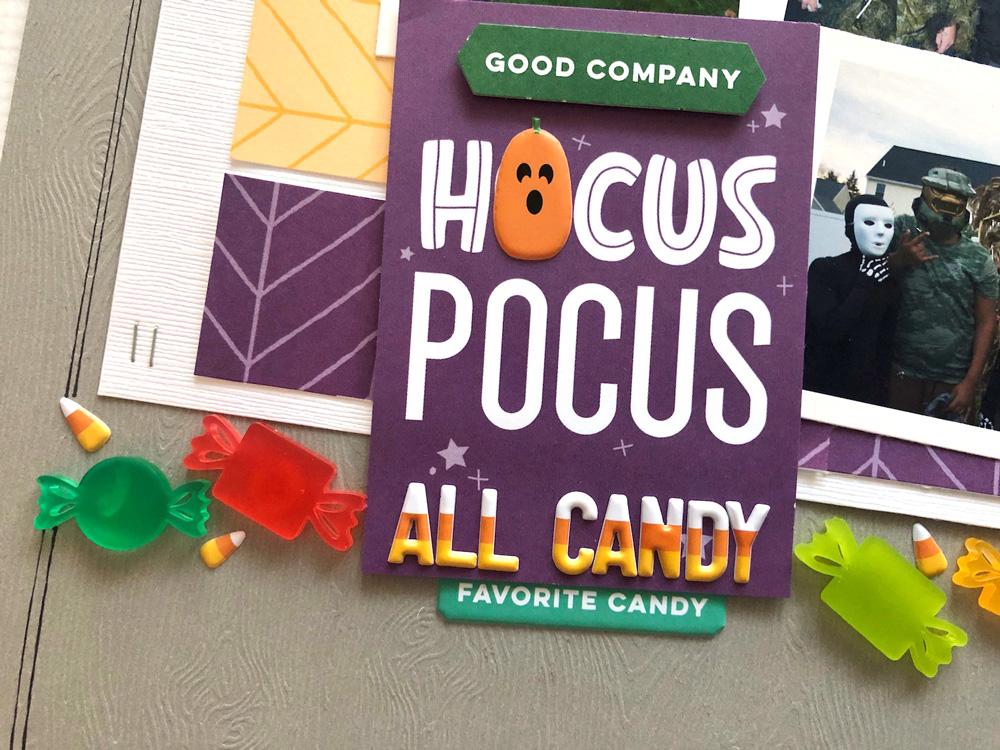
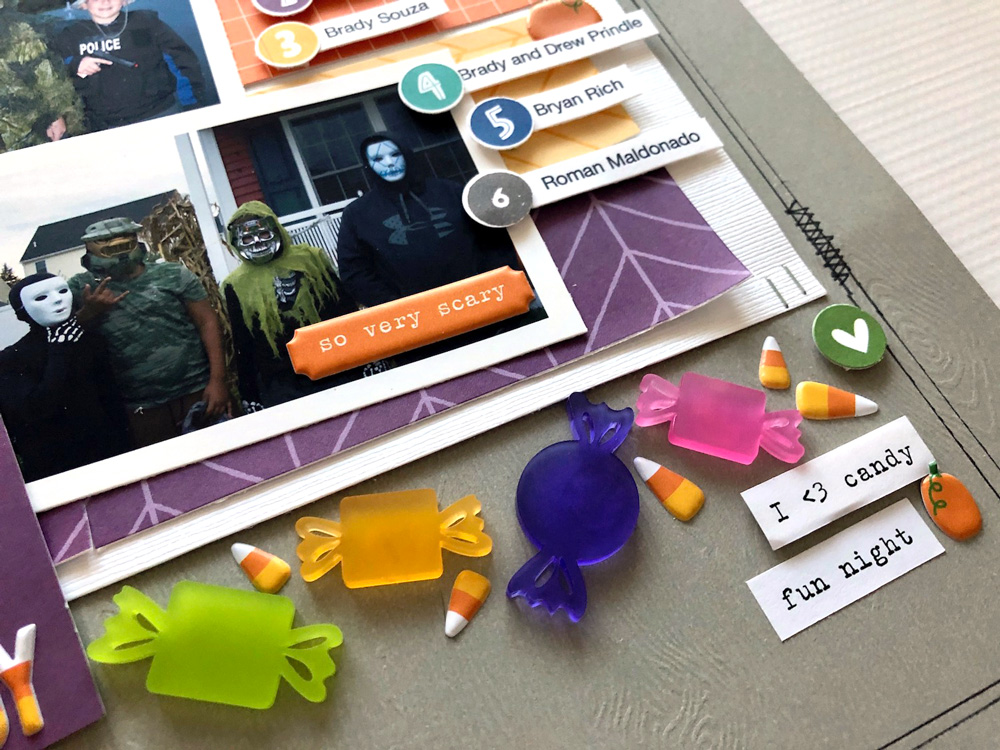
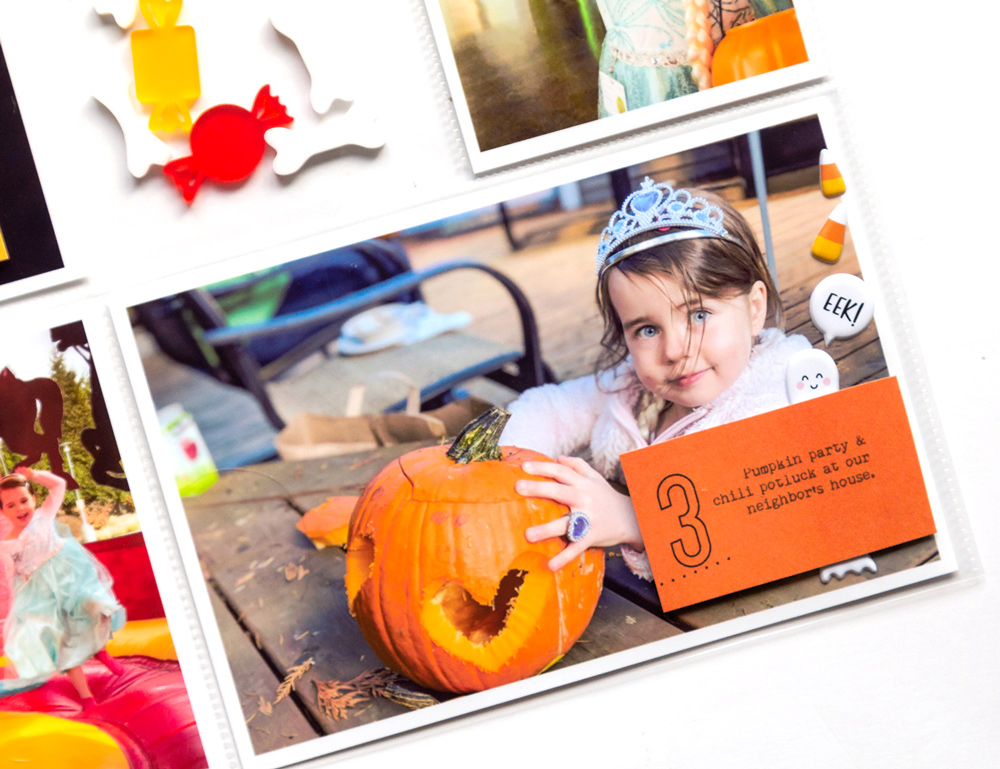
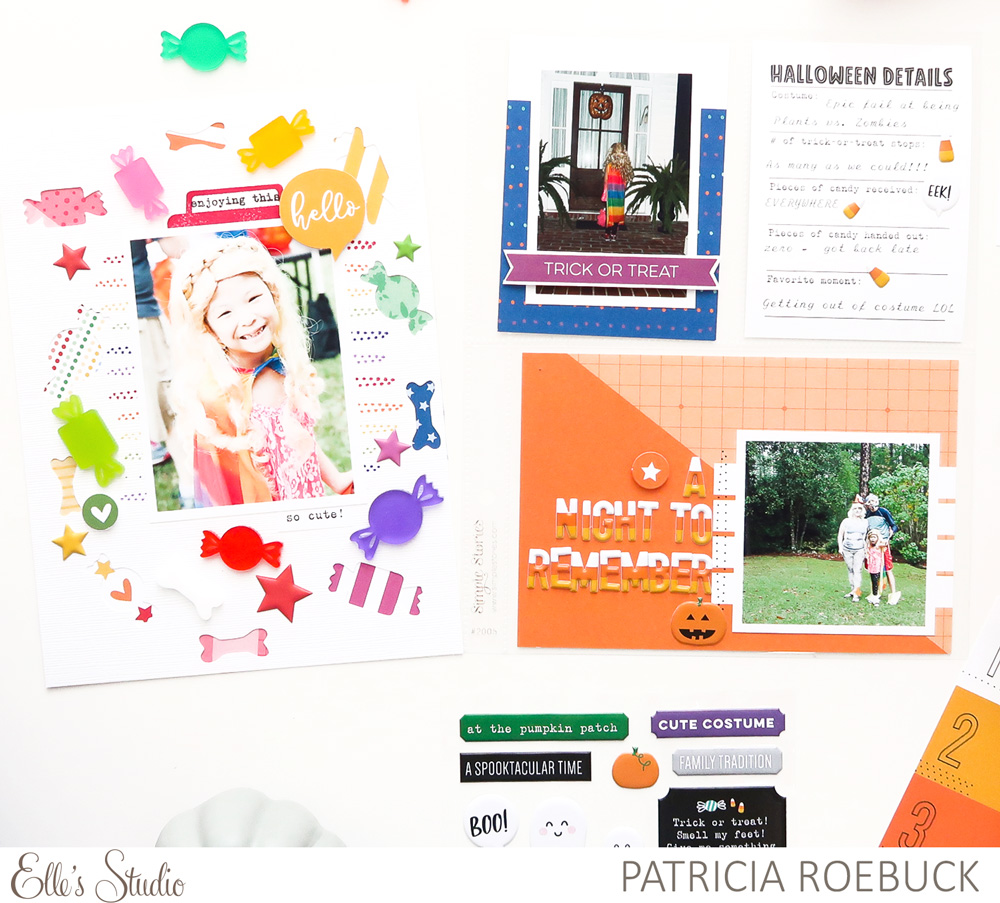
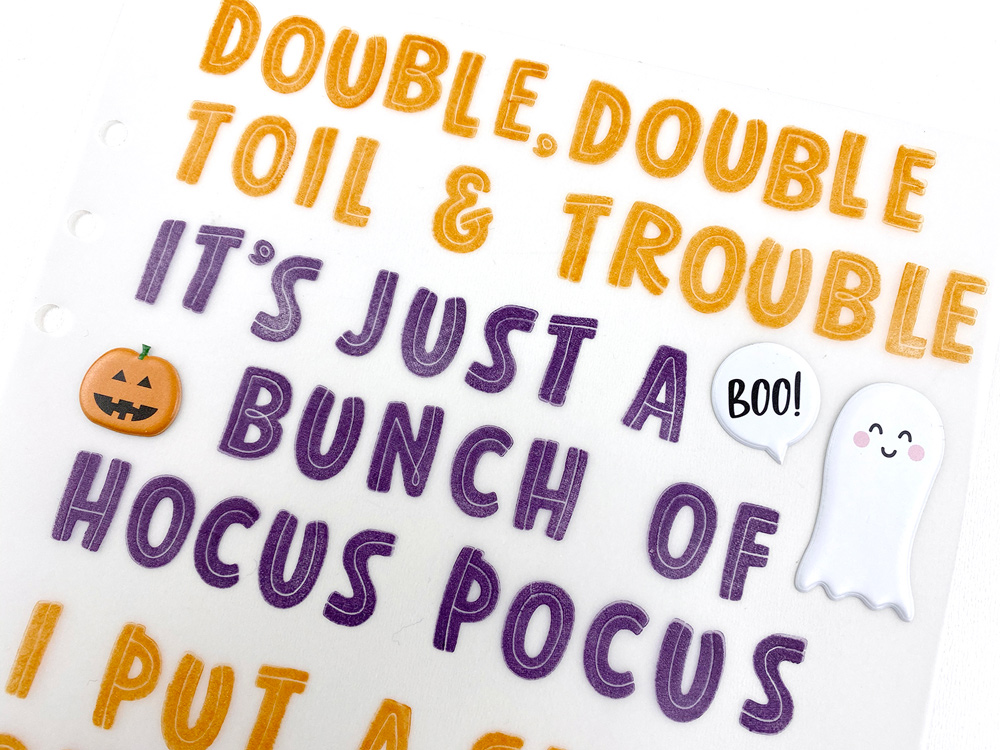
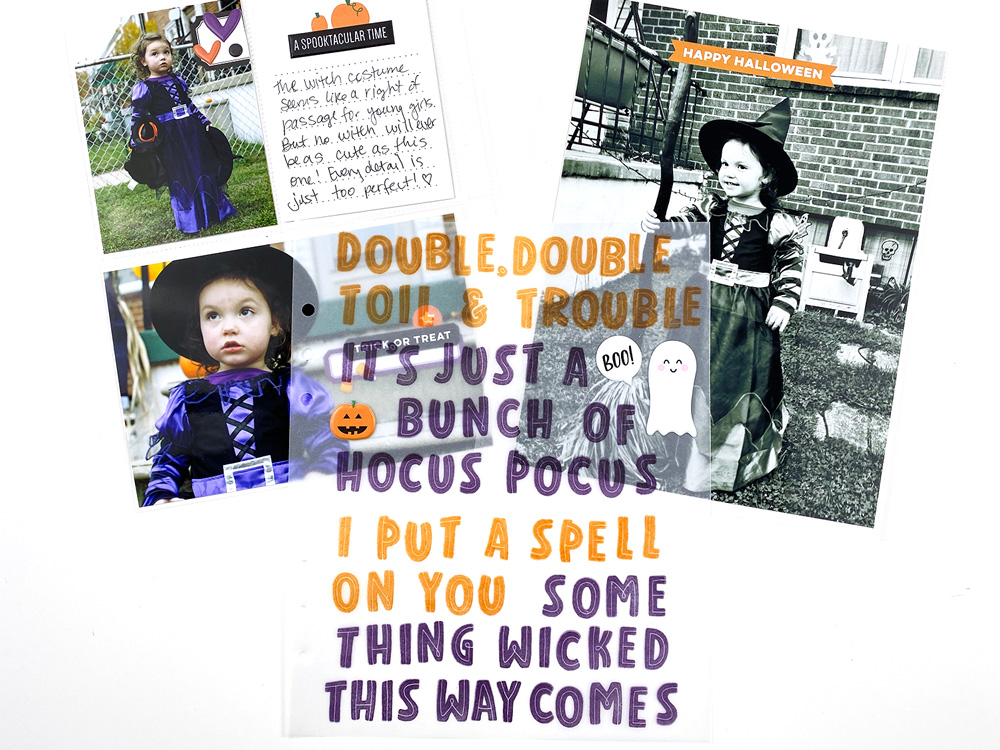
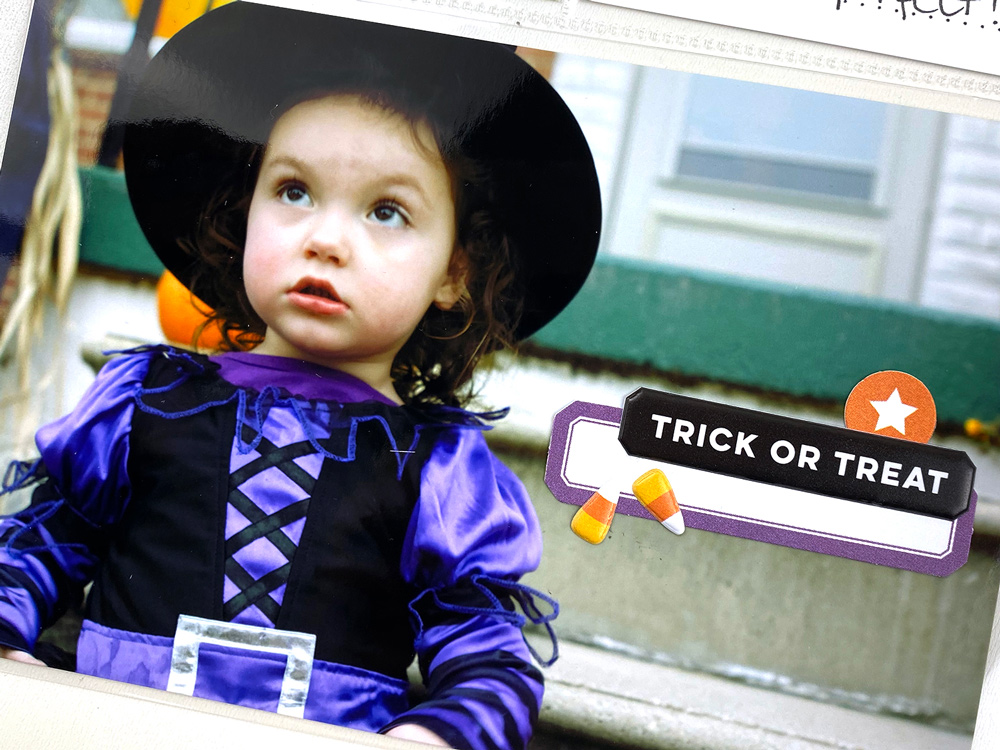
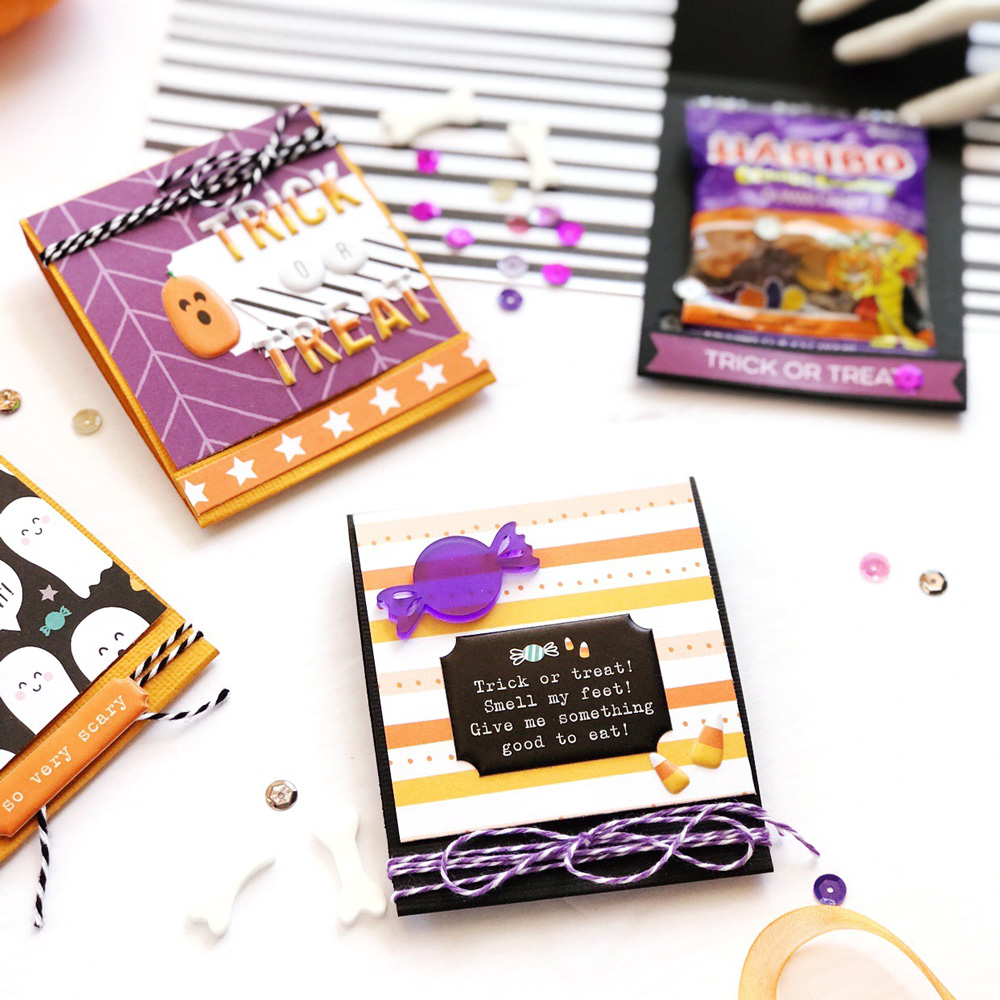
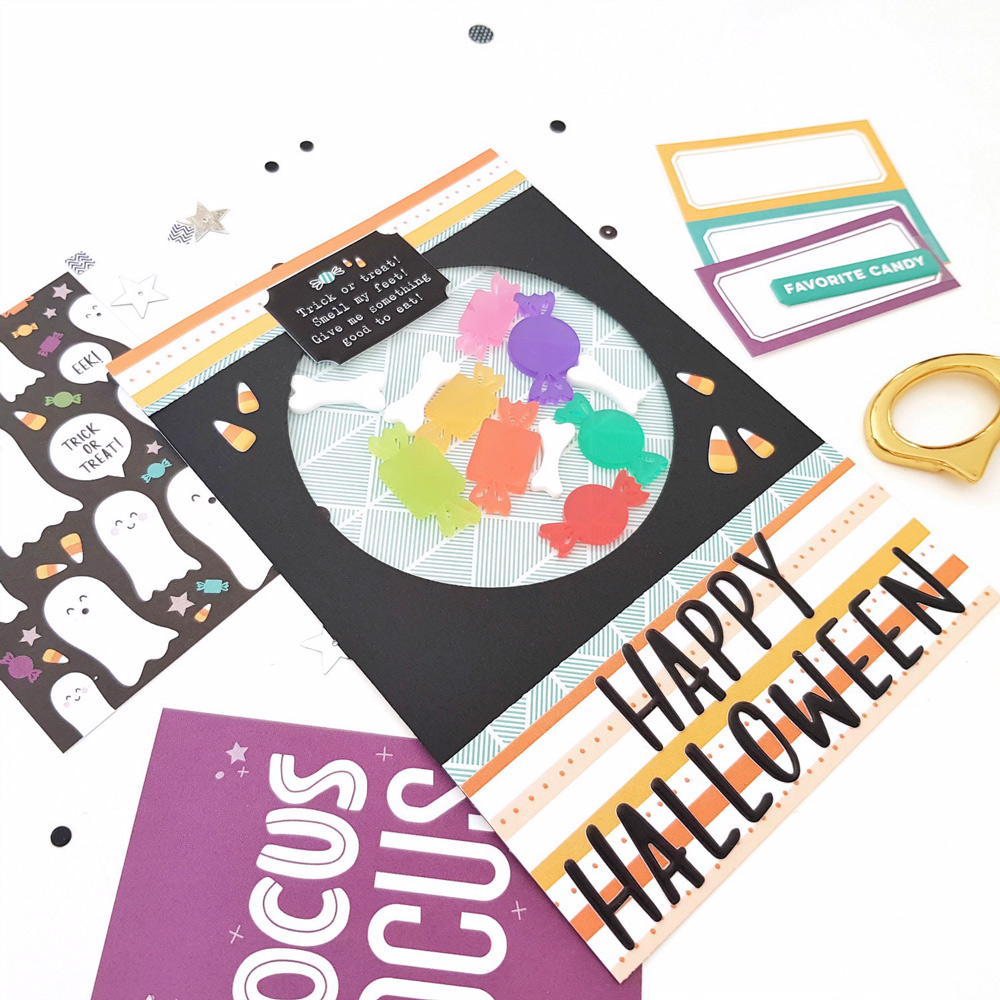
Halloween Details by Mary-Ann Maldonado – supplies used | October 2019 KitHalloween Journaling TagsHalloween Puffy StickersCandy Corn Puffy Alphabet Stickers

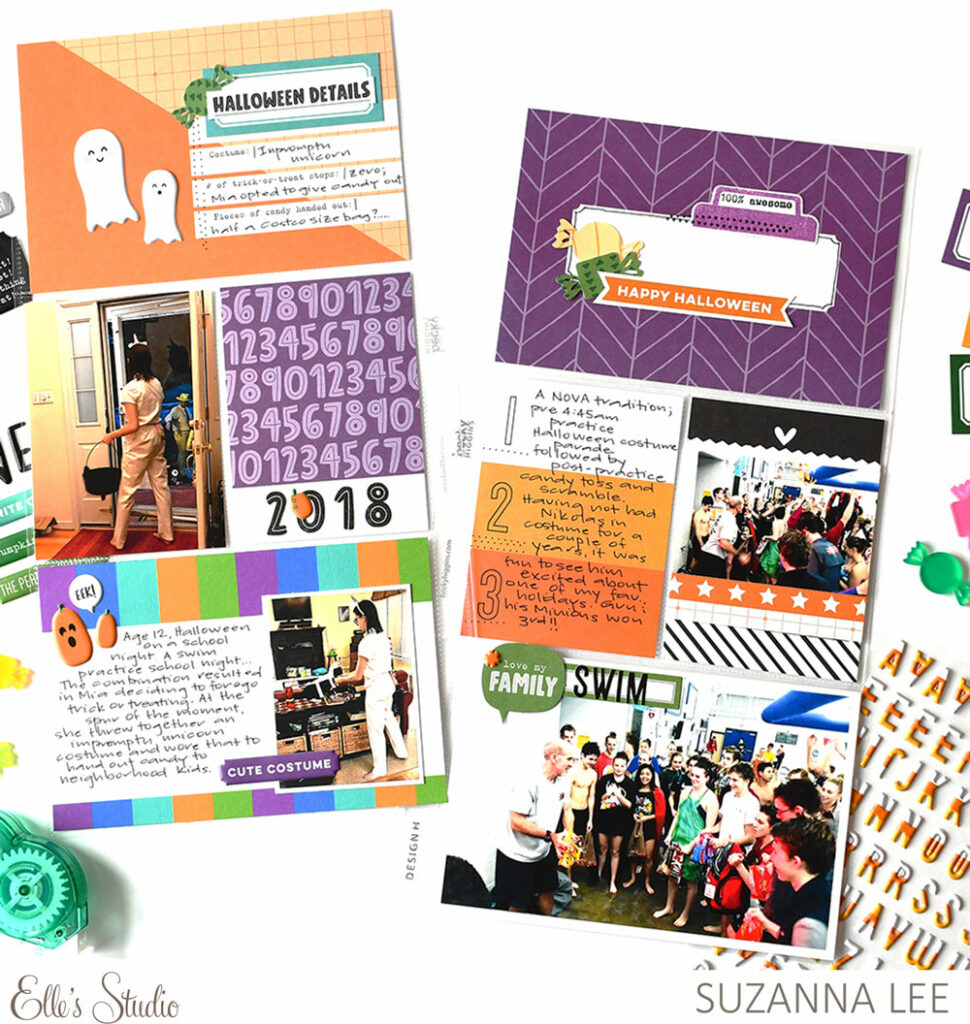
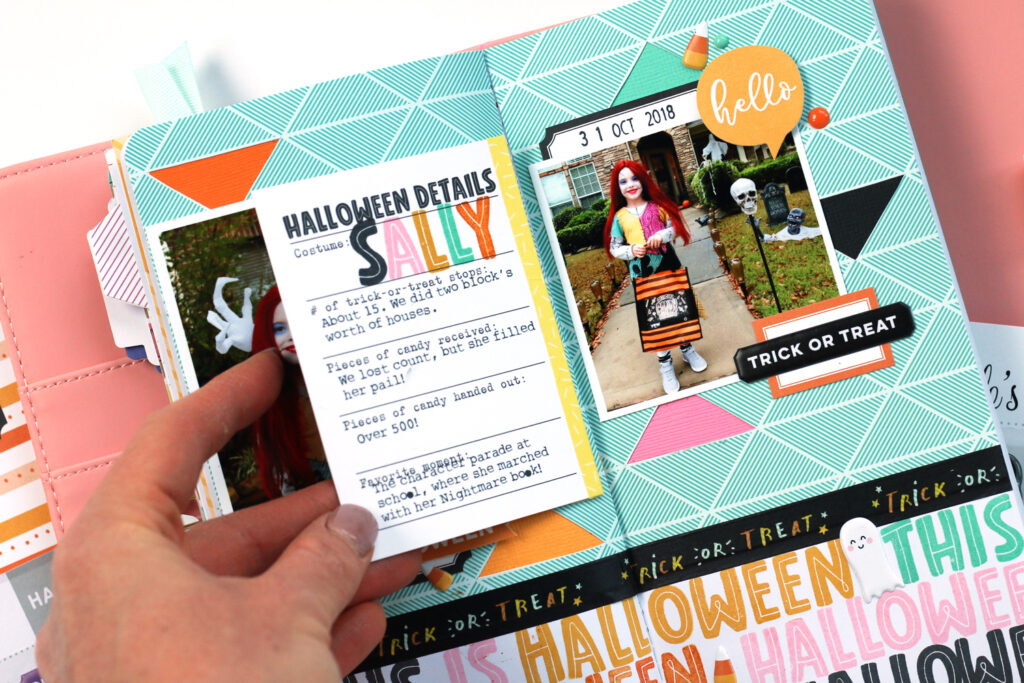
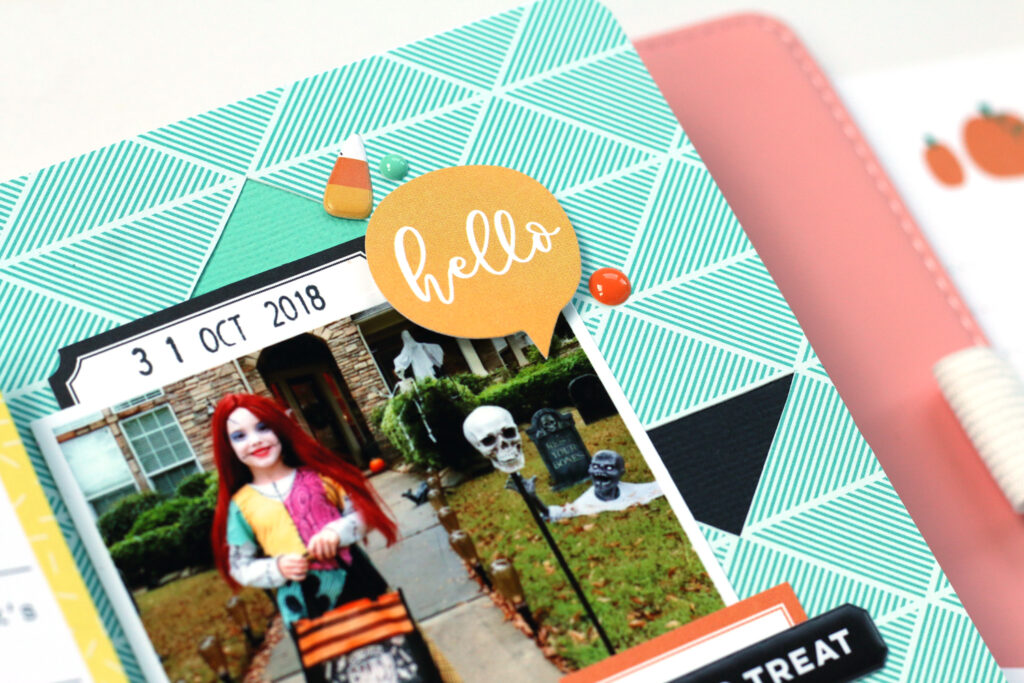
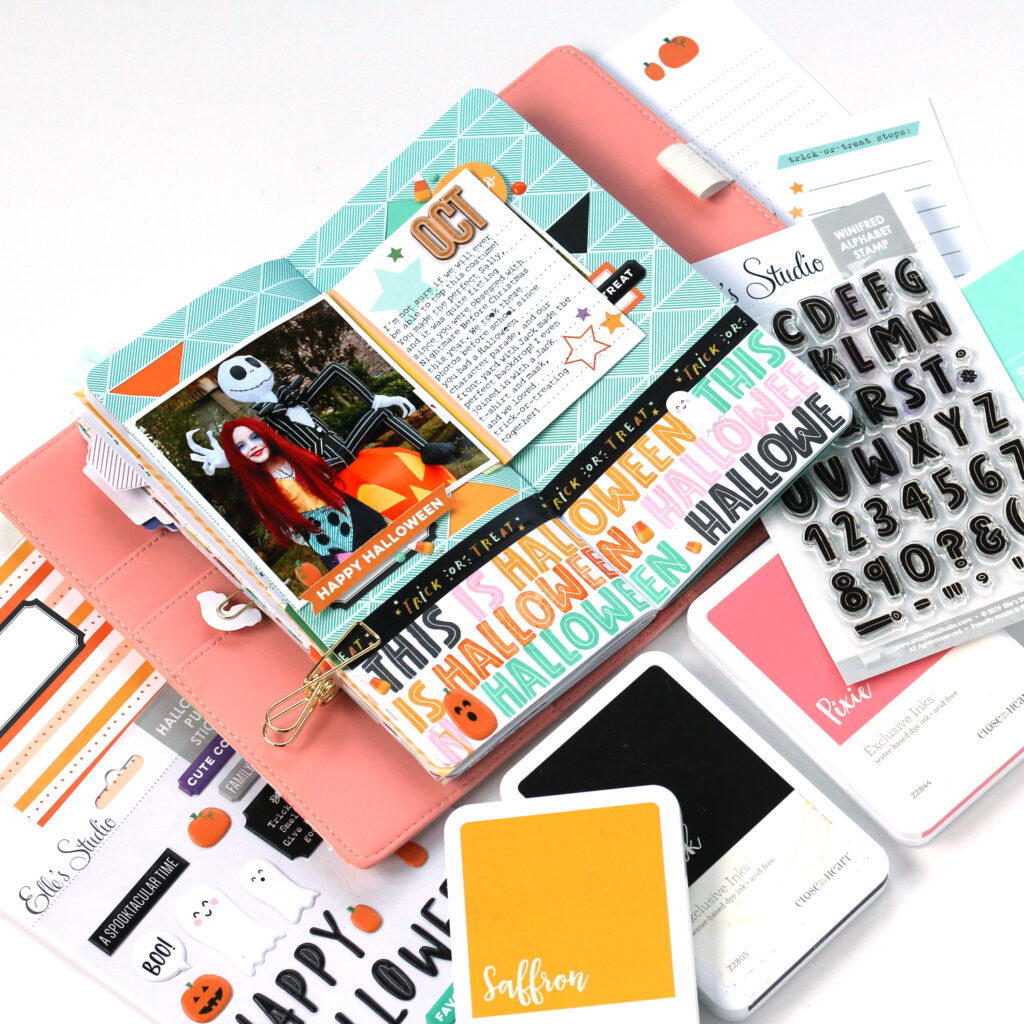
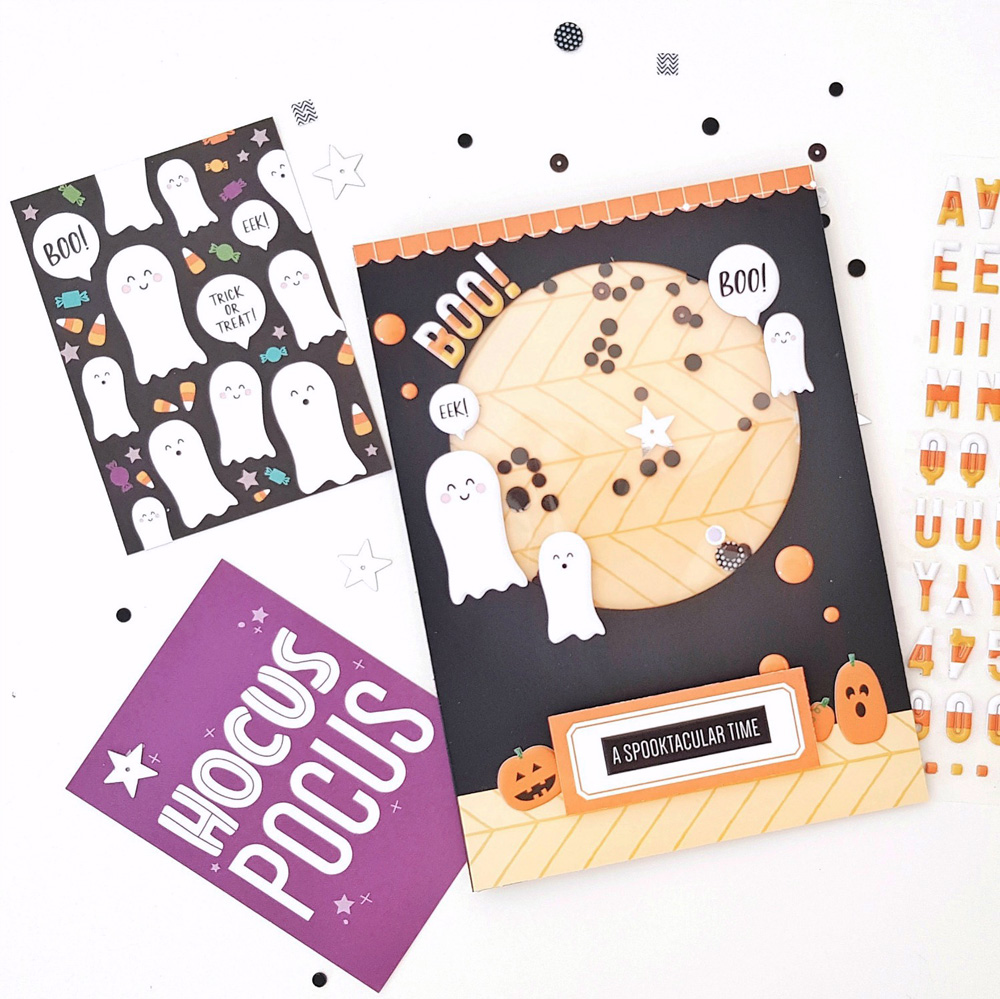
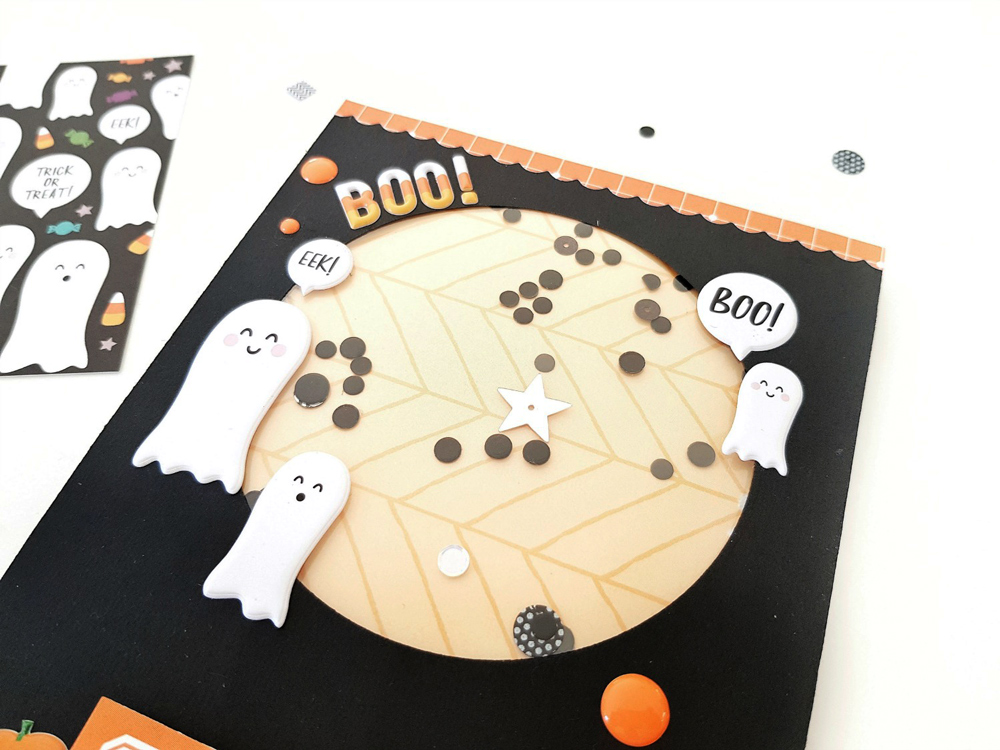
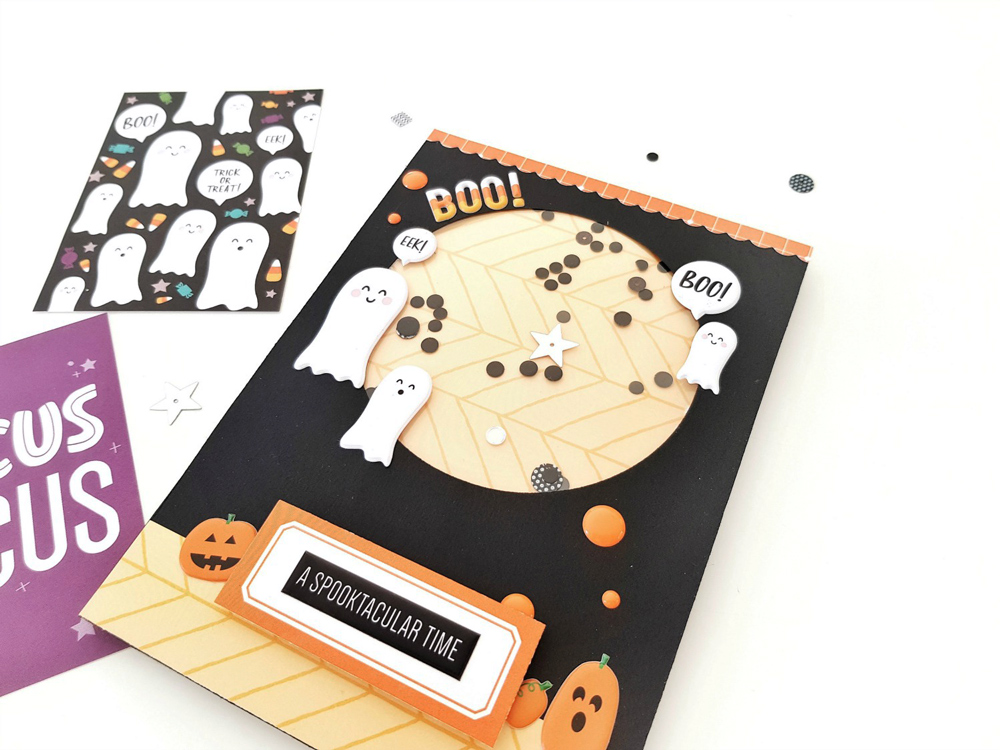
Halloween Details 2018 by Suzanna Lee – supplies used | October 2019 KitAutumn Fun Printables, October Cut Files, October Labels, Thankful StickersJane Alphabet Stickers — Black , Halloween Journaling TagsHalloween Puffy StickersEveryday Tabs Stamp, Everyday Tabs Metal Die, Winifred Alphabet Stamp

Love Bug Season by Wendy Antenucci – supplies used |October 2019 KitHalloween Journaling TagsHalloween Puffy Stickers, Autumn Puffy Stickers, Black Puffy Alphabet Stickers, Gather AcrylicEveryday Tabs Stamp

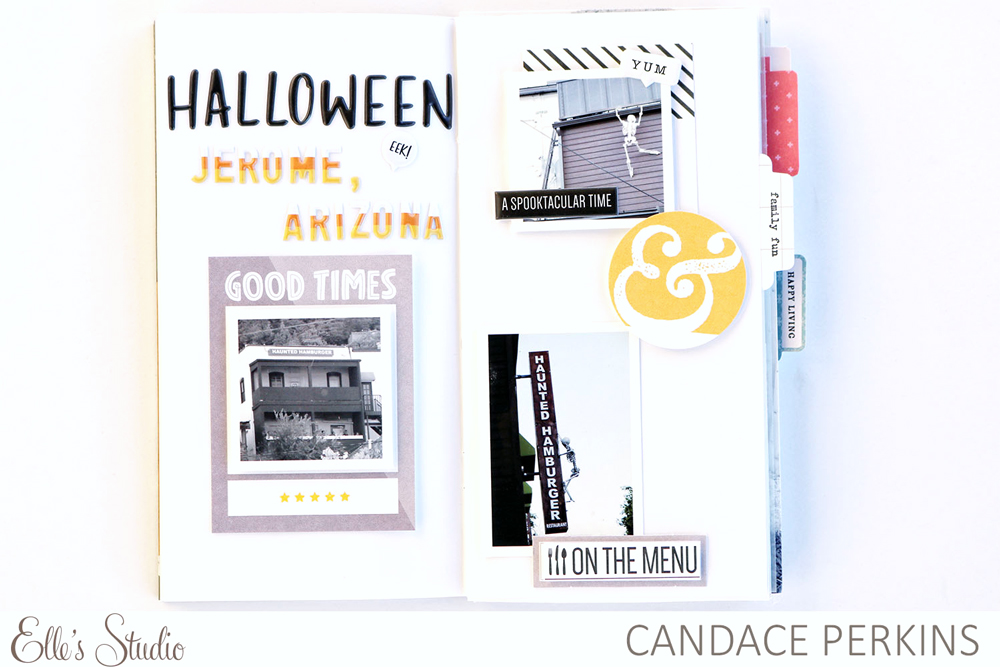
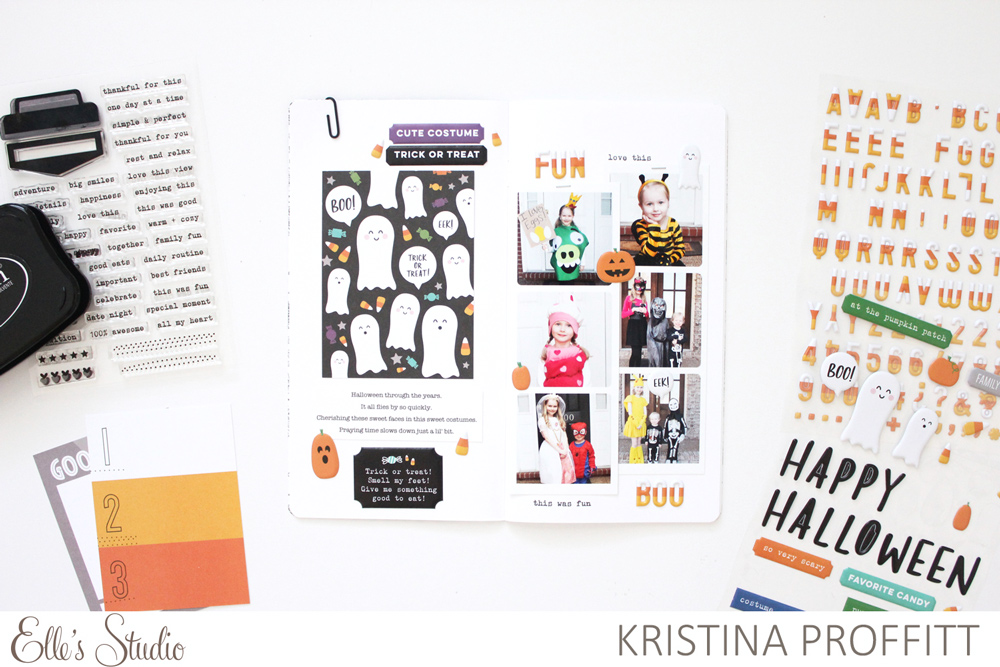
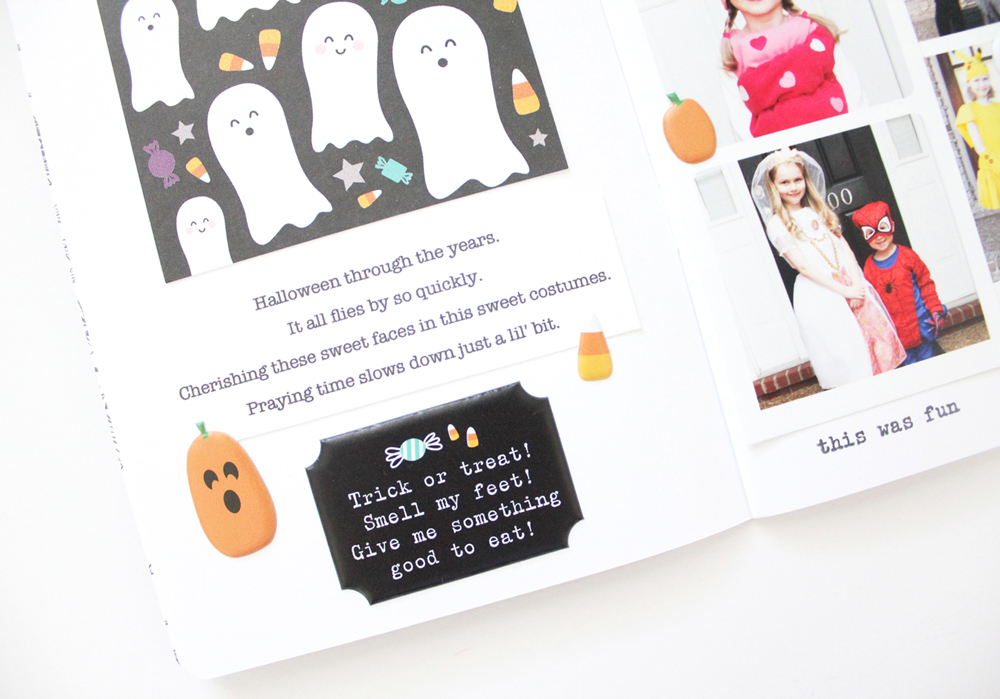
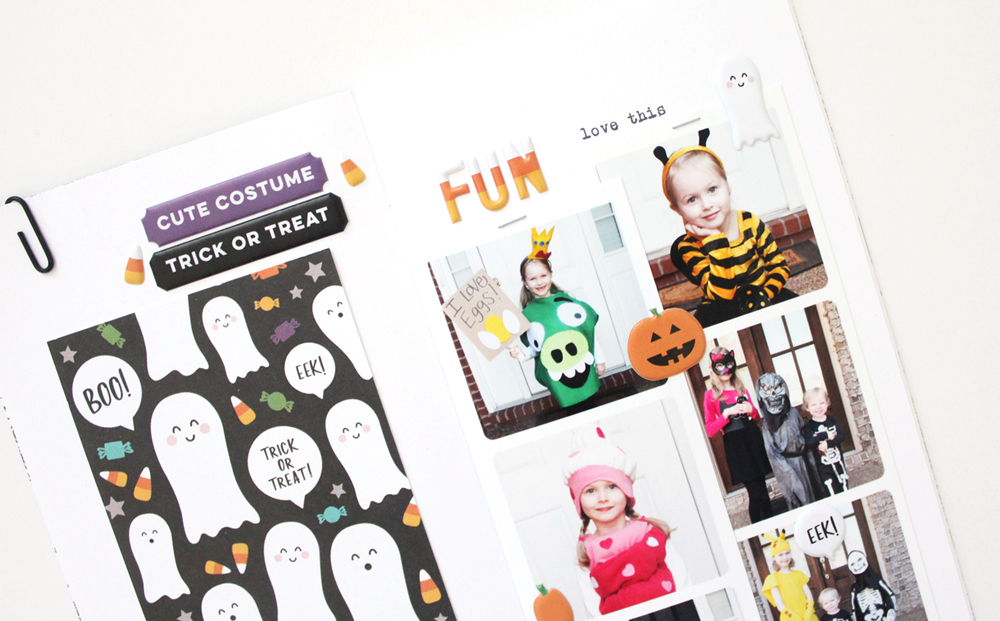
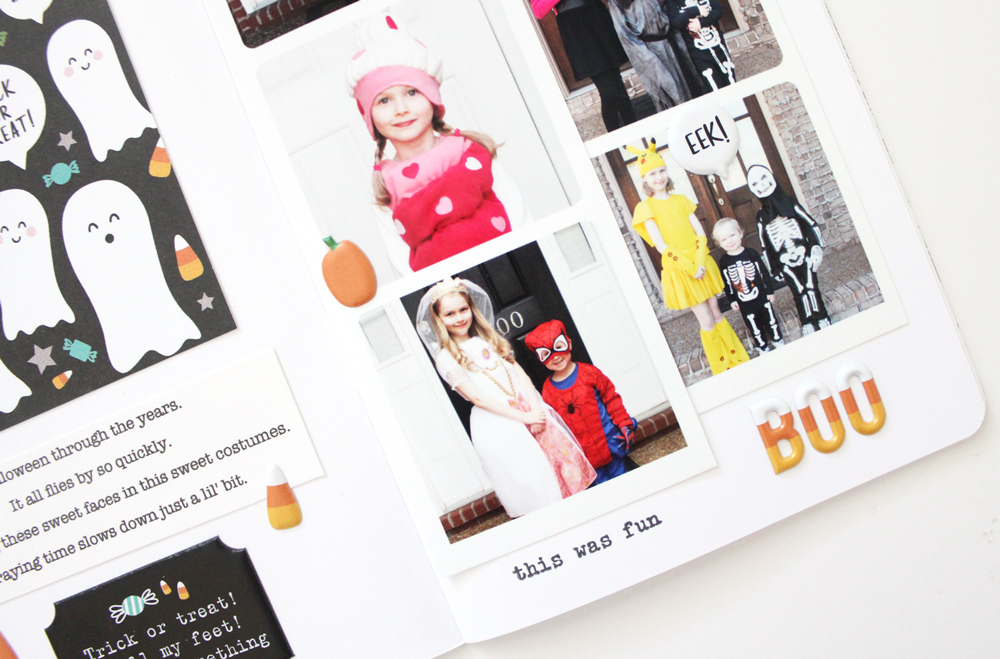
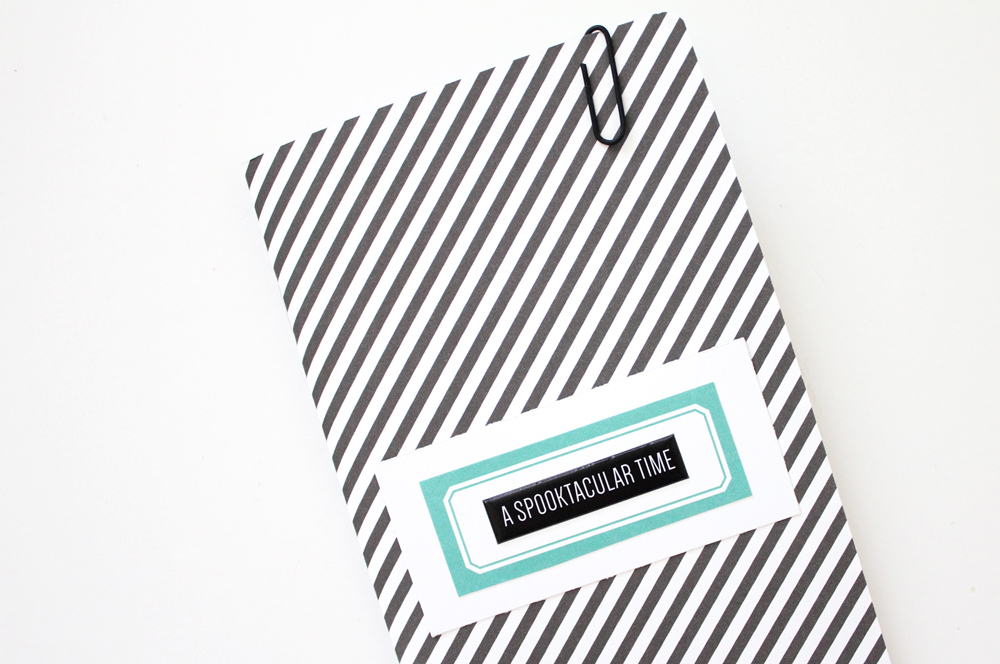
Halloween traveler’s notebook spread by Candace Perkins – supplies used | October 2019 KitHalloween Puffy Stickers, Candy Corn Puffy Alphabet Stickers, Everyday Tabs Stamp, Everyday Tabs Metal Die

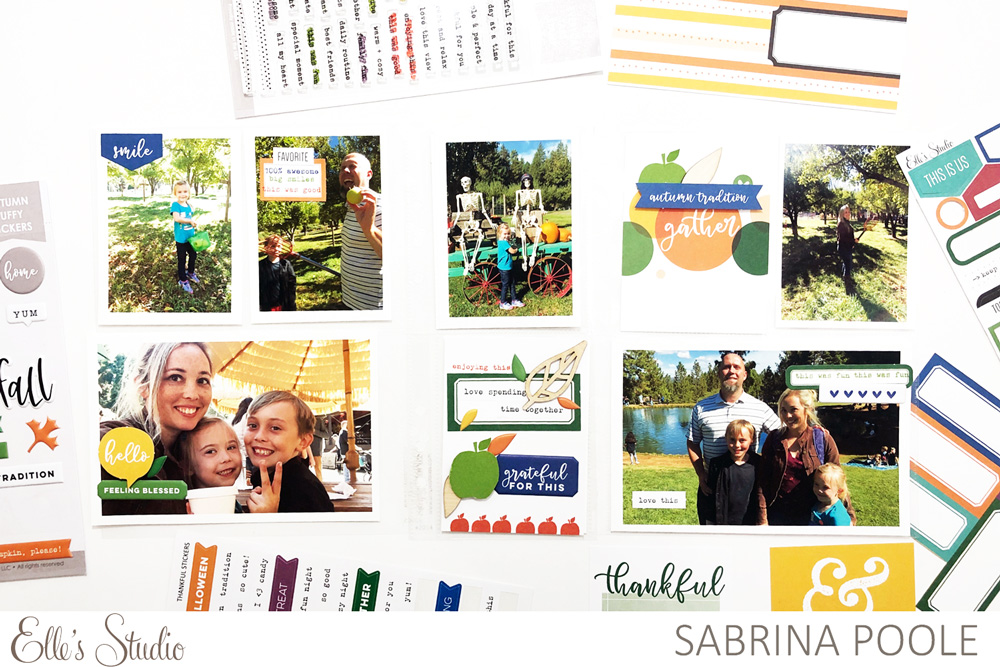
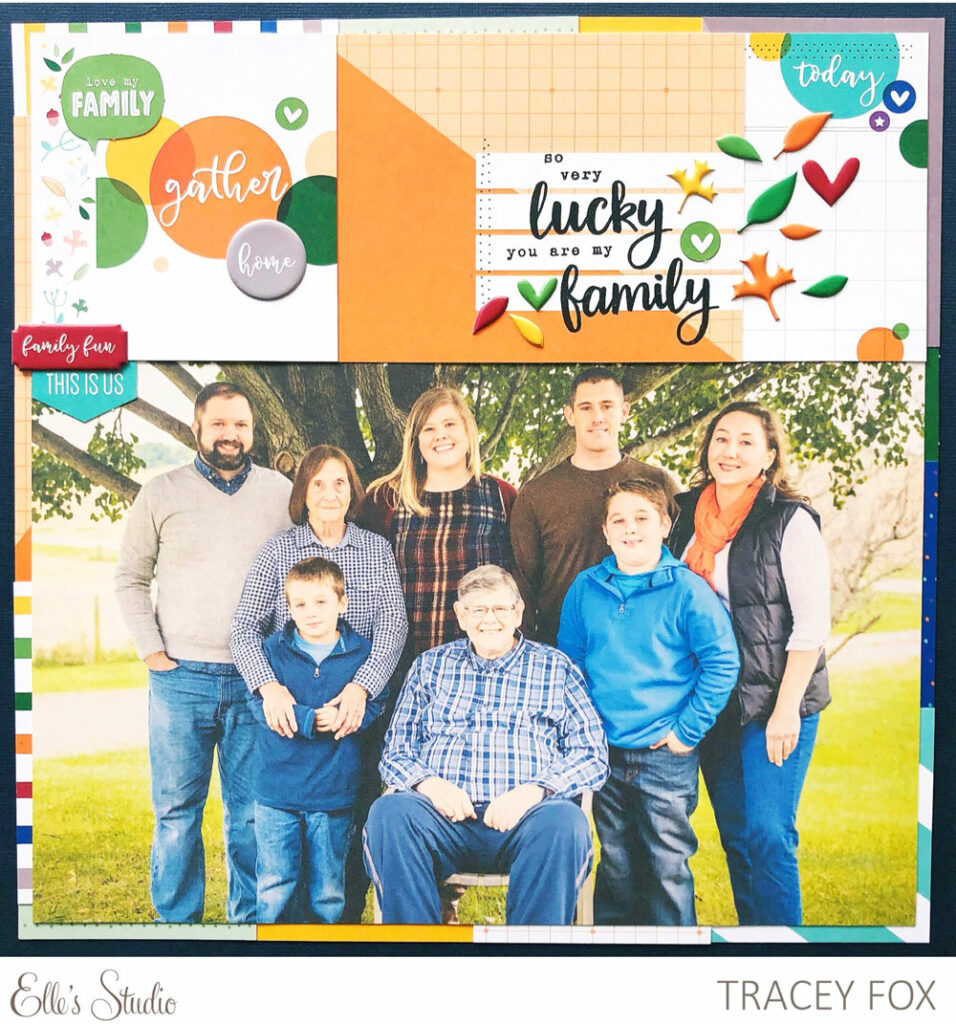
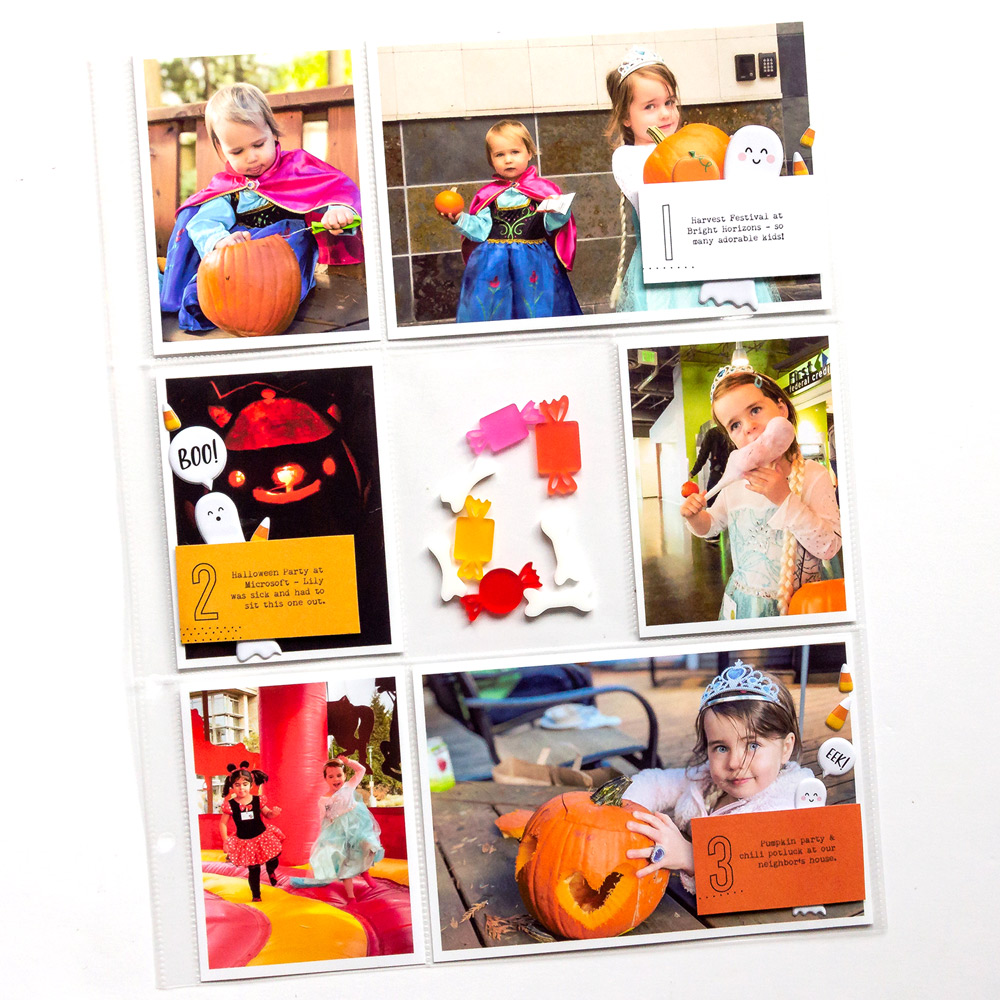
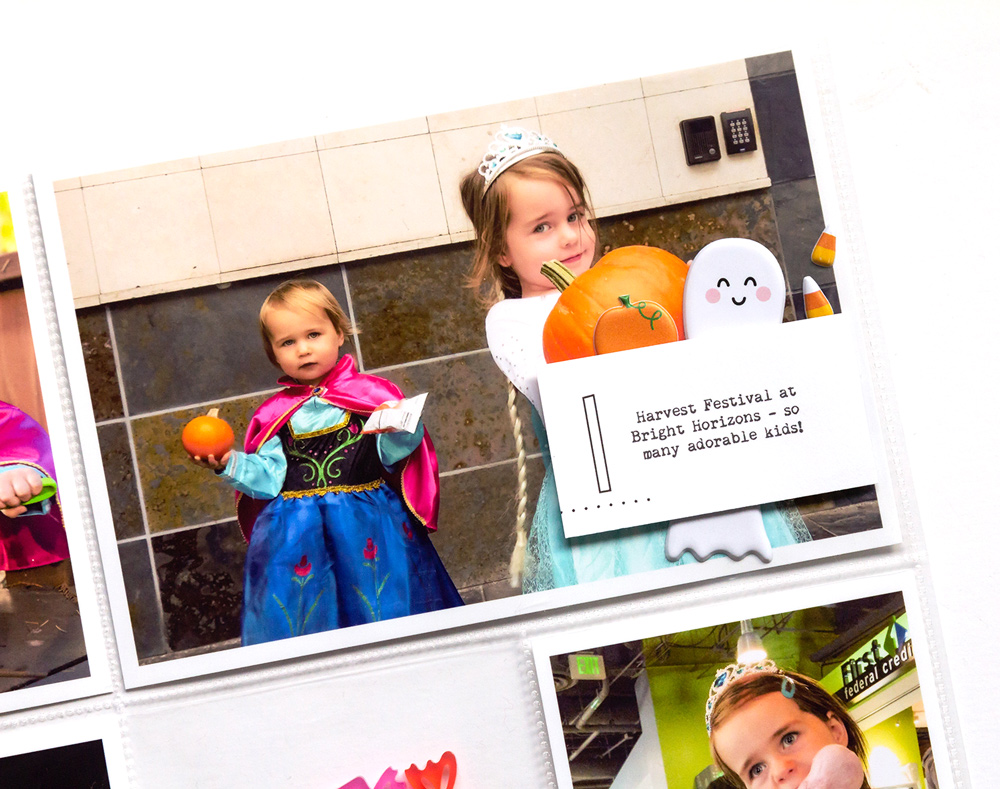
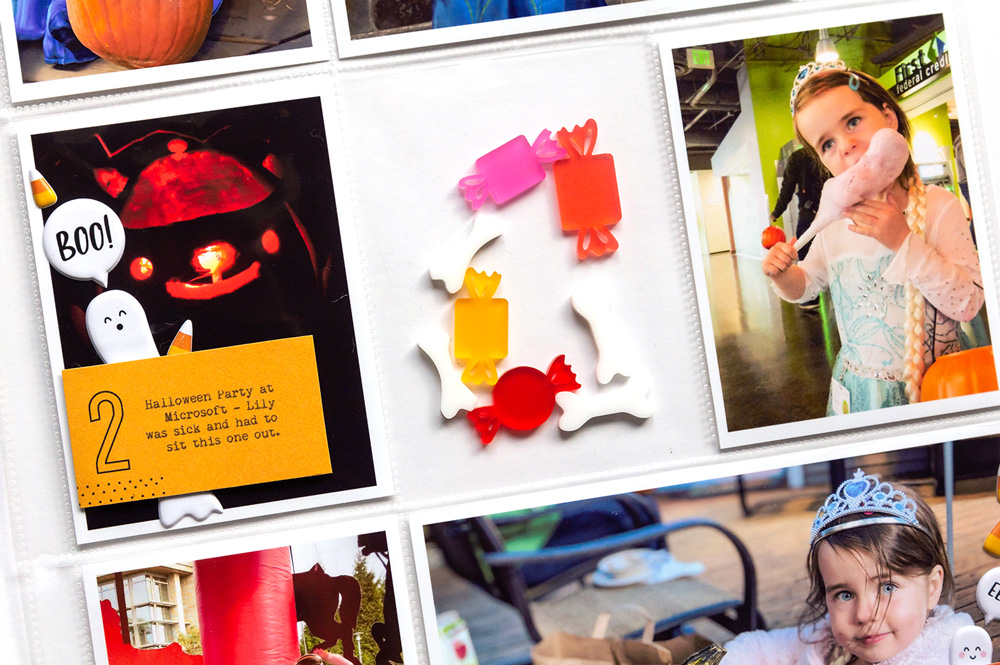
Family Fall pocket page spread by Sabrina Poole – supplies used | October 2019 KitOctober Labels, Thankful StickersAutumn Puffy StickersWood Veneer LeavesHome Sweet Home 6 x 6 Paper StackEveryday Tabs Stamp

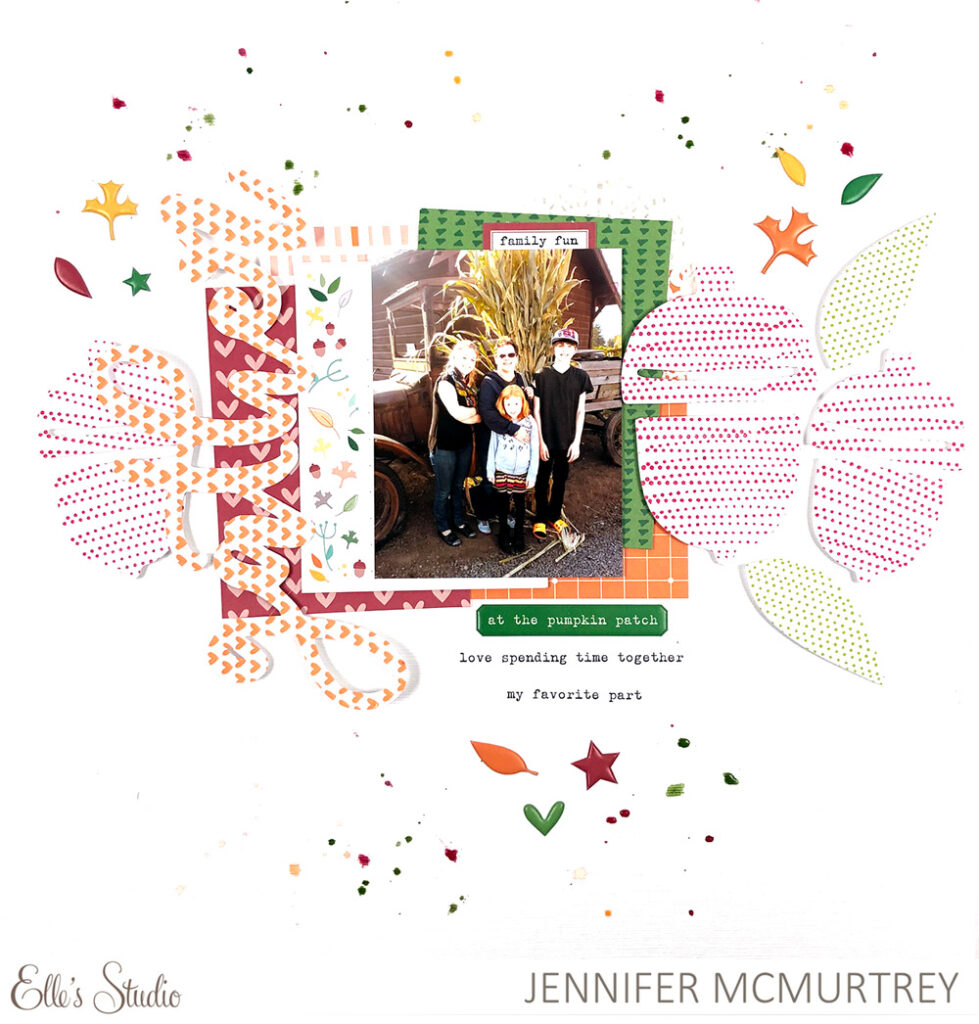
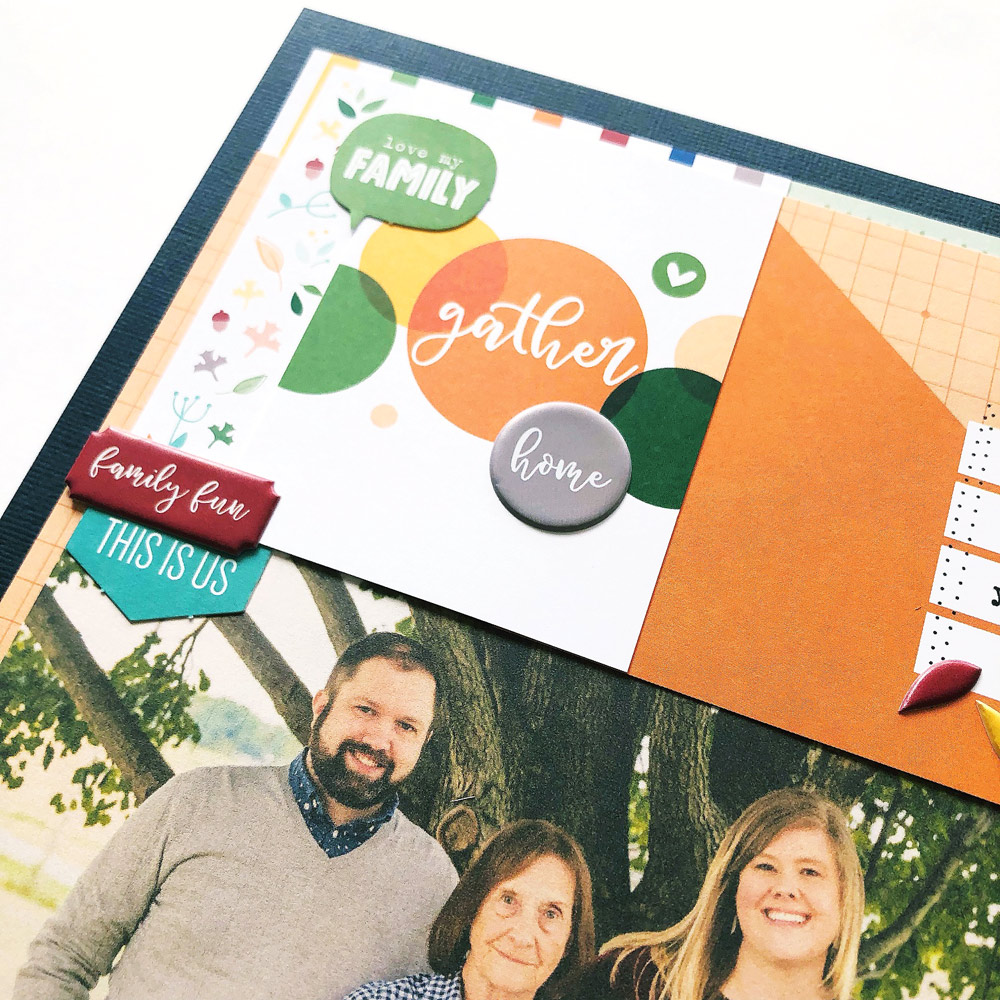
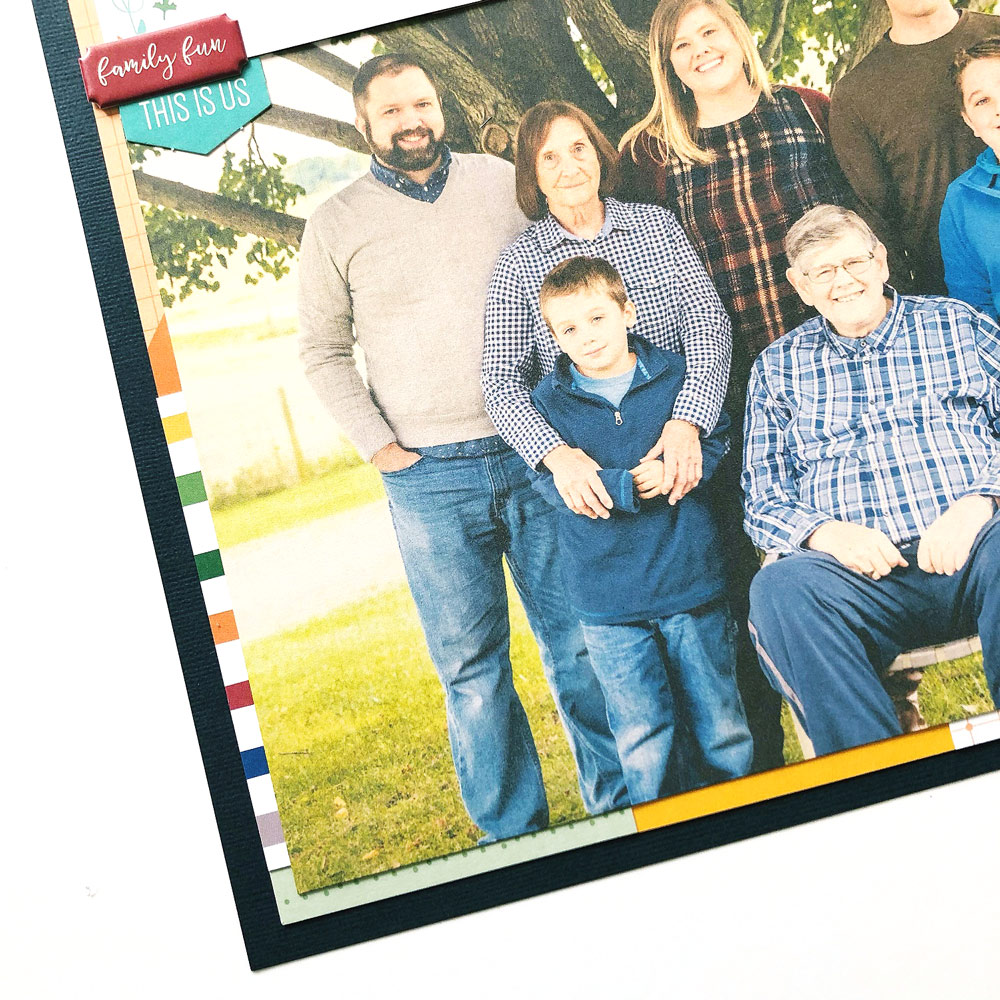
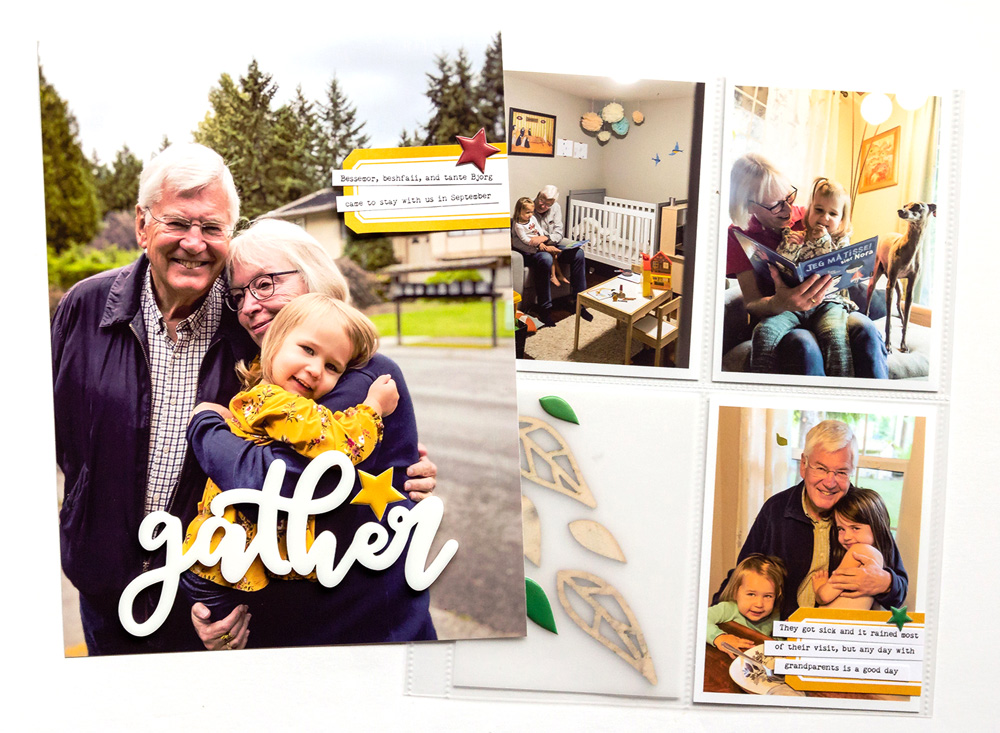
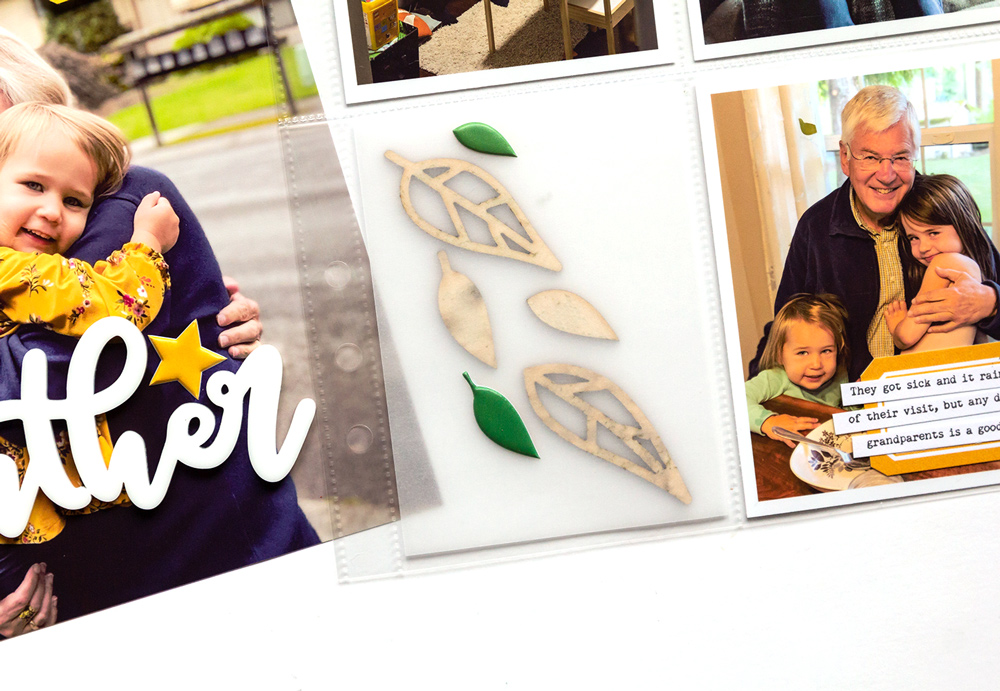
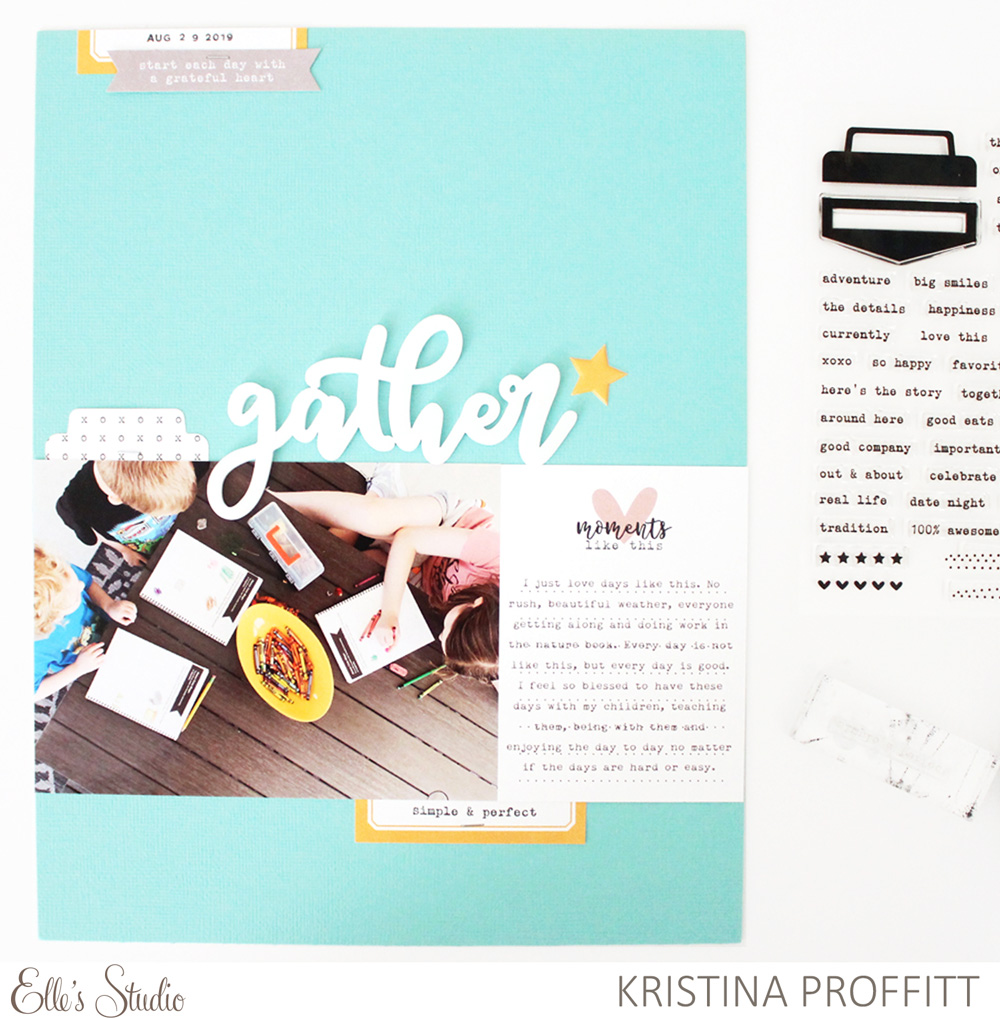
Gather by Jennifer McMurtrey – supplies used | October 2019 KitOctober Cut FilesAutumn Puffy StickersHome Sweet Home 6 x 6 Paper StackEveryday Tabs Stamp

Share what you’re creating with us using the October 2019 kit and add-ons on Instagram, using the hashtag #EllesStudio, or in our Elle’s Studio Facebook group! We want to be inspired by YOU!

Halloween Traveler’s Notebook with Meghann Andrew

Hello, friends! It’s Meghann Andrew with you today! I love documenting special moments in a traveler’s notebook and the smaller scale does not limit my creativity whatsoever! Today I’m here to share a new traveler’s notebook spread that documents fun Halloween memories in my daughter’s “favorite moments of 2018” notebook using the October 2019 Kit and add-ons and the amazing Winifred Alphabet Stamp!

Supplies | October 2019 Kit, Halloween Journaling Tags, Thankful Stickers, Halloween Puffy Stickers, Small Months of the Year Wood Veneers, Home Sweet Home 6 x 6 Paper Stack, Winifred Alphabet Stamp

What a fun color scheme for Halloween, right? It’s much more colorful than the typical black and orange combination, and completely inspired by my daughter’s Sally costume. I started out adding the teal pattern from the Home Sweet Home 6 x 6 Paper Stack to the background, which I cut five triangles from and backed with colorful cardstock. Below that paper, I added a strip of black “trick or treat” washi tape for contrast before I began stamping.

Using alternating colors of black, pink, yellow, teal and orange, I added lyrics from “This is Halloween,” the main song from Nightmare Before Christmas, using the Winifred Alphabet Stamp at the base of the spread. I was able to add three lines of text, and between the words, a few candy corn and pumpkin stickers from the Halloween Puffy Stickers. I love all of the color that it adds to the base of the layout.

To make the top more interactive, and to keep a clean and simple look to the layout, I added journaling tags, adhered back-to-back from the October 2019 Kit and Halloween Journaling Tags. Using washi tape, I made the tags flippable with my 4″ x 4″ photo, so that I could fit another, smaller photo on the right side of the spread.

To bring those colorful Winifred alphas to the top of the spread, I stamped “Sally,” on the “Halloween details” tag from the Halloween Journaling Tags, then added my journaling underneath. Simple embellishment groupings included die-cuts and labels from the October 2019 Kit and stickers from the Thankful Stickers and Halloween Puffy Stickers.

The Winifred Alphabet Stamp completely made this spread, and I love the way that it paired with the amazing October 2019 Kit and add-ons to make it one of my favorite of the year in this traveler’s notebook. In any size format, the amazing Winifred Alphabet Stamp will make your projects amazing! Thanks so much for stopping by, and I can’t wait to see how you are recording your Halloween memories in a few days!

So Very Lucky with Tracey Fox

Our Title Builder stamps are back in stock, just in time for Tracey Fox to inspire us with a beautiful layout, and a beautiful title to go along with it that she created easily using the Title Builder Vol. 3 Stamp! Let’s take a look!

Hi there! It’s Tracey Fox here with a layout featuring the gorgeous October 2019 Kit and add-ons and the Title Builder Vol. 3 Stamp. As soon as I saw the rich, autumn color palette of the October release from Elle’s Studio, I thought of this family photo shoot from last fall and how well it would go with this favorite shot. 

Supplies | October 2019 Kit, Autumn Puffy Stickers, Title Builder Vol. 3 Stamp

I started this layout by printing my photo at 7″ x 11″ and planned to fill the rest of the page with tags from the kit. The white bars on this orange 4″ x 6″ tag from the October Kit created the perfect home for me to construct a title for my layout using the versatile Title Builder Vol. 3 Stamp. I built out the phrase “so very lucky you are my family,” and in order to make the words nestle into each other the way I wanted, I ended up cutting apart the words “so very” that I could stack them on top of each other. Don’t be afraid to cut apart acrylic stamps to make them work for you! In order to ensure I got the title just how I wanted it, I used a stamp platform to place all of the stamps and stamp them at once, but it’s just as fun to stamp the words and phrases one at a time.

Once my title was stamped, I selected a few more tags from the October Kit to stretch along the top of the page above the photo. One of the great things about creating traditional layouts with Elle’s Studio kits is that you have the ability to layer the tags up however you like! On this page, I overlapped two 4″ x 6″ and two 3″ x 4″ tags so only the parts I wanted were showing along the 7″ stretch of the block I created with the tags and my enlarged photo. I then used the Autumn Puffy Stickers and a few die cuts from the October Kit to add just a bit of extra embellishment and dimension to the beautifully designed tags.  

Before adhering everything to the sheet of navy cardstock I had selected for my background, I felt like the layout needed a bit more pattern and interest, even though there wasn’t room to add very much. I decided to piece together patterned scraps from other tags in the kit to create a thin, 1/4″ border around the entire block. This is one of my favorite ways to use kit leftovers and take advantage of all of the great patterns in my kits! 

It can be so fun to enlarge a treasured photo and give it a pretty home by decorating the rest of the page with a monthly kit from Elle’s Studio! The Title Builder products enhance your ability to tell any story you want with its options to mix and match to create the perfect title to illustrate your story. Thanks for stopping by the blog today and taking a look, and be sure to head to the shop to pick up your own October Kit and Title Builder supplies today!

Show us how you’re using our Title Builder products to create your perfect project title on Instagram using the hashtag #EllesStudio and in our Elle’s Studio Facebook group!

Halloween Through the Years with Kristina Proffitt

A long-term memory project is a great way to see change through the years, especially in growing kids! Kristina Proffitt is with us today to show how she is recording Halloween past and present in a traveler’s notebook using our October 2019 Kit and add-ons, and we know you’ll just love it! We hope it sparks a new project on your crafty to-do list, too!

Has this year flown by for anyone else? It’s so crazy to think that Halloween is RIGHT around the corner in just 10 days! I love the awesome goodies in the October 2019 Kit and extras because they helped me take this little traveler’s notebook that I had just sitting on my desk for forever and put it to good use. I decided that it would be perfect to turn into a little album of Halloween through the years with my kids. It’s so fun to see all of the costumes together and I just can’t wait to continue to add to it!

Supplies | October 2019 Kit, October Labels, Halloween Journaling Tags, Halloween Puffy Stickers, Everyday Tabs Stamp, Candy Corn Puffy Alphabet Stickers

To start off this Halloween traveler’s notebook, I knew that I wanted to use the super cute little ghost journaling tag from the Halloween Journaling Tags. Y’all, this is just ADORABLE. I mean—those ghosts! I simply adhered that tag onto the first page and then added some of the super cute Halloween Puffy Stickers around it. I added a little black paperclip to the top of the page for no reason other than because I wanted to. Ha! I loved the look of it. It’s almost as if I’m “filing away” these sweet memories. 

I then printed a bit of journaling out on some white cardstock and simply adhered it to the page under the journaling tag. I found that doing so is a simple way to get some words into my notebook without having to be worried about handwriting it and messing up the page or printing on a card or the notebook itself. 

For the second page of the notebook, I wanted to add a bunch of the Halloween photos that I’ve had from years past, so I decided to use a “photobooth” template that I had and print out two strips of square photos for that page. I layered them a bit on the page, gave them a staple with my tiny attacher and then added lots of fun Halloween Puffy Stickers to the page. 

To finish off these simple, cute pages in my notebook, I decided to add “FUN” and “BOO” using the Candy Corn Puffy Alphabet Stickers. These stickers are SO much fun and I just love the bit of whimsy it gave to the pages. Y’all need to be sure you have ordered these! They are a must-have, even if you don’t like to eat ACTUAL candy corn, which I don’t. Ha! Oh, and then I stamped some super cute sentiments on the page using the Everyday Tabs Stamp. This stamp set is a MUST. It’s so versatile and cute! 

The last thing that I wanted to show you is how simply I decorated the front of my traveler’s notebook. I first cut out a rectangular piece of white cardstock almost the width of the front and then adhered it to the album cover. Then I took one of the October Labels and adhered that to the middle of the white cardstock. Lastly, I used one of the Halloween Puffy Stickers and put that in the middle of the October Label. I just love the look of it and I love the blue with the black and white. It’s perfect and it is a great title for the contents of the notebook!

So there ya go, friends, a look at the start of my little Halloween Memories traveler’s notebook. I love how easy and cute it all comes together with the help of the October Kit and extras. I can’t wait to get this year’s Halloween photos in there! Be sure that you grab some of the cute October products this month to help you get your stories told and your memories documented. I know that just like me you’ll have a “SPOOKTACULAR TIME” with it all.

Show us how you are documenting your Halloween with our latest products by posting your project on Instagram using the hashtag #EllesStudio, or in our Facebook Group!

A Candy-Colored Halloween with Mary-Ann Maldonado

Halloween is filled with colors—from costumes to candy—so why not use all of those fun colors on a layout to document the spookiest holiday of the year? To finish off Halloween Week, let’s check out a new layout created by design team member Mary-Ann Maldonado to get some inspiration using our October 2019 Kit and extras!

Hey everyone! Fall is my absolute favorite season of all. We are the busiest in October, more than we are every other month of the year besides December. We carve pumpkins, go to a local park for Screamfest, do a corn maze, pick apples, and of course trick-or-treat. I gotta tell ya, you are never to old to go around the neighborhood in a costume and collect candy! Just ask these boys!

Supplies | October 2019 Kit, Halloween Journaling Tags, Thankful StickersHalloween Puffy StickersCandy Corn Puffy Alphabet Stickers, Halloween Acrylic Treats, Home Sweet Home 6 x 6 Paper Stack, Good Times Stamp, Everyday Tabs Stamp, Everyday Tabs Metal Die

I love starting with a darker color base paper for my Halloween layouts. Today, I chose gray because my photos were taken at dusk, so they have a lot of gray tones in them.  I had several photos for this event so I narrowed them down into groups for different layouts. For this layout, I used the photos of the boys, ready to attack the neighborhood. I brightened up the center of my layout with white cardstock and layered the white with varying halloween colors and patterns found in the Home Sweet Home 6 x 6 Paper Stack.

I used a small hole punch to cut out the circular numbers on the 3″ x 4″ Halloween Journaling Tag, labeling the kids that came to our party.  I didn’t have a #6 so I took out the Good Times Stamp and created one!  

The 3″ x 4″ “Hocus Pocus” Halloween Journaling Tag ended up becoming the title of my layout.  I added the Candy Corn Puffy Alphabet Stickers to fill in some of the empty space at the bottom of the tag.  The larger pumpkin from the Halloween Puffy Stickers was just right to cover the ‘O’ in the title, and I also added the “good company” die cut from the October 2019 Kit.

Have you seen the Halloween Acrylic Treats? They are so yummy-looking and create dimension and texture to any project. I used them at the base of my photos to reiterate the candy theme. I scattered the small candy corn stickers from the Halloween Puffy Stickers around the acrylic candies.  These and the sentiments from the Thankful Stickers bring completion to my layout.  

Get crazy with colors on your Halloween projects! I did here and I think it works for this fun, Halloween page! I look forward to seeing you next month!

Halloween Party Pockets with Guest Designer Ingunn Markiewicz

We know that you’ve enjoyed Halloween project inspiration all this week, and today, our guest designer, Ingunn Markiewicz, continues the spooky fun by reminding us to document all of the Halloween festivities, not just the trick-or-treating using our October 2019 Kit and add-ons! Plus, she has a bonus project to share as a follow-up to last week’s post! Let’s take a look!

Hello, Elle’s Studio fans! For my main project this week, I wanted to document some of the pre-Halloween events from last year. I’ve already scrapbooked the trick or treating, but I had three other parties to cover! I printed the photos I wanted to use (with a 40 pixel wide white border) and arranged them in a 9″ x 12″ divided page protector. 

Supplies | October 2019 Kit, Halloween Puffy Stickers, Halloween Acrylic Treats

I ended up printing my journaling onto the candy corn-colored 3″ x 4″ tag from the October 2019 Kit and cutting it into three pieces. I attached each piece of journaling to a photo using foam adhesive, which allowed me to sneak some of the adorable puffy Halloween Puffy Stickers underneath.

I cut the ghosts in half so their “feet” (heh!) could peek out at the bottom. I made sure to use the “Boo!” sticker by the journaling that mentions my daughter being sick.

To finish the layout, I slipped some of the acrylic bones and candies (I had to give a couple of them to my daughter because they were “the most amazing things she had ever seen”) into the center pocket, which I intend to close at the top once I figure out where I have misplaced my Fuse tool. Actually, before I do that, I’ll remove one of the bones and use it on a page about our dog!

As a bonus follow-up to my last post, I thought I would show you how I filled in the back of last week’s spread

Supplies | October Labels, Autumn Puffy Stickers, Wood Veneer Leaves, Gather Acrylic

Last week, I used vellum to make a see-through pocket, which is the kind of thing that looks cool when you do it, but can create some awkwardness once it actually lives in your album. This time, I thought the Wood Veneer Leaves still looked great on the back, but the backs of the puffy stickers just looked like strange, white wiggles. My solution was to cover them with two of the green puffy leaves that I had left. I used it as an accent piece on this spread about my parents coming to visit. I also used the beautiful Gather Acrylic, two of the October Labels, and some of the puffy stars from the Autumn Puffy Stickers! I love how the yellow star nestled perfectly into the design of the acrylic word.

See you again next week! I hope you are all having a wonderful October with lots of memories you’ll want to document. 

My name is Ingunn and I was born and raised in beautiful Norway, but now live in the equally beautiful Washington with my husband, two little girls, and our Italian greyhound. I love hiking and running in the mountains and then coming back home to relive those memories through scrapbooking! This hobby is incredibly therapeutic for me. I’m on the Ali Edwards Creative Team and love to focus on big photos, journaling with an overload of feels, and simple design. I mostly share my stuff over on my Instagram account!

Wow! Two beautiful projects in one post! We can’t wait to see what Ingunn has to share with us next week! Until then, be sure to follow her on Instagram for more pocket page inspiration in the meantime!

October Design Team Inspiration: Volume Two

We know you’ve been loving the inspiration found here on the blog this week using our newest products found in the October 2019 Kit and extras! Today we have another round of autumnal and Halloween projects to share with you, just in time for you to start printing photos before your October box arrives! Let’s take a look!

Happy Halloween by Daniela – supplies used | October 2019 Kit, Halloween Journaling TagsHalloween Puffy Stickers, Candy Corn Puffy Alphabet StickersHalloween Acrylic Treats, Home Sweet Home 6 x 6 Paper Stack

October pocket page spread by Nathalie Leonelli – supplies used | October 2019 Kit, October LabelsAutumn Puffy StickersWinifred Alphabet Stamp, Large Jane Alphabet Stamp – Outline

Noah by Ashley Laura | October 2019 KitAutumn Puffy StickersWood Veneer Leaves

Happy Halloween 2015 pocket page spread by Steph Grimes – supplies used | October 2019 Kit, Halloween Journaling Tags, October LabelsHalloween Puffy Stickers, Candy Corn Puffy Alphabet Stickers, Halloween Acrylic TreatsHome Sweet Home 6 x 6 Paper Stack, Jane Alphabet Stamp

You Make Me Happy by Melissa Mann – supplies used | October 2019 KitOctober Print and Cut LabelsThankful StickersAutumn Puffy Stickers, Halloween Puffy Stickers, Halloween Puffy StickersHome Sweet Home 6 x 6 Paper StackWinifred Alphabet StampEveryday Tabs Stamp

A Night to Remember pocket page spread by Patricia Roebuck – supplies used | October 2019 KitOctober Cut Files, Halloween Journaling Tags, Thankful Stickers, Candy Corn Puffy Alphabet Stickers, Puffy Star Stickers, Halloween Acrylic TreatsEveryday Tabs StampEveryday Tabs Metal Die

Fall Tradition by Tracey Fox – supplies used | October 2019 KitThankful Stickers, Candy Corn Puffy Alphabet Stickers, Autumn Puffy Stickers, Halloween Puffy Stickers, Winifred Alphabet Stamp, Everyday Tabs Stamp, Home Sweet Home 6 x 6 Paper Stack

Sycamore Shoals by Kristina Proffitt – supplies used | October 2019 KitOctober LabelsAutumn Puffy Stickers, Gather Acrylic, Everyday Tabs Stamp, Everyday Tabs Metal Die

Are you inspired by one of these design team projects to create this month? Share your project with us on Instagram using the hashtag #EllesStudio, or in our Elle’s Studio Facebook group!

Creating a Statement Title with Pocket Page Layouts

Let’s talk Halloween pockets today to continue Halloween week! Halloween memories bring a LOT of photos—blame it on cute costumes and trick-or-treating moments—and pockets are the perfect way to document them quickly and easily! Today Steph Grimes is with us to share how you can take those pockets to the next level by creating a BIG statement title on an overlay, and we could not love it more! Let’s take a look!

Happy Halloween, friends! It’s Steph here to share with you a Halloween pocket page I created. I felt really inspired by the Winifred Alphabet Stamp released this month and wanted to create a large statement title using those stamps, but I was working in a 6” x 8” pocket page, so I found a fun, interactive way to make it work!  

Supplies | October 2019 Kit, Halloween Journaling Tags, Halloween Puffy Stickers, Thankful Stickers, Puffy Autumn Heart Stickers, Winifred Alphabet Stamp

First, I knew that I wanted to use these adorable photos of my niece in her witch costume from a few years back because I had never actually scrapped these photos. I printed a full-sized 6” x 8” photo in black and white and printed the others in color: a cropped 4” x 6” and a 3” x 4” to fill the pockets on the opposite page.

Creating and stamping out a statement title takes a little planning, so you want to be sure not to skip this step! Here are my tips for planning out your title BEFORE you get started:

  • Decide on the method for creating your title. In this case, I knew I wanted to use the Winifred Alphabet Stamp to add a full page title on a 6” x 8” piece of vellum that would be inserted directly into the rings of my album as an overlay on the full page photo.
  • Select your title. For my title, I knew I wanted to use something witch-related to go along with my photos. The first thought that popped into my head was the phrase “Double Double Toil and Trouble,” from Macbeth, which was totally perfect for my little witch photos, but wouldn’t be long enough using the Winifred Alphabet to fill the whole page. One option would have been to repeat the same phrase over and over to fill the page, but instead, I decided to find some other witchy phrases to add. After a quick Google search, I had three more kid-friendly witch-inspired phrases to use in my title. 
  • Lay it out. For this step, it’s important to get at least a rough idea of the spacing for your title. I did this by removing the individual stamps from the acetate sheet and laying them out on my vellum to get a sense for how to space out my word as I was stamping. I find that this is never a perfect approach, so just be prepared to be okay with some imperfection. If you want something a little closer to perfection, I suggest typing your title and printing it out. You will have a lot more control that way. For me? I prefer the imperfect, sometimes messy style of stamped words.
  • Create your title! I chose an orange and a purple ink to stamp each phrase, alternating between the two colors. My original plan was for each of my four phrases to take up and fill an even amount of lines, however, I ended up with the spacing a little off. But I was able to make it work! For the last two phrases, one was short, and the other a little longer, so I just started the second one on the same line as the end of the first. I thought it would bother me that they weren’t color-blocked better, but I actually really like how it turned out.   

To fill in some of the awkward spaces around my phrases on my title page, I added in a few character stickers from the adorable Halloween Puffy Stickers—a ghost, “Boo” speech bubble, and jack-o-lantern. 
I wrote out my journaling on a 3” x 4” journaling tag from the Halloween Journaling Tags, which were an extra in this month’s release. To round out that tag, I added the “a spooktacular time” phrase sticker from the Halloween Puffy Stickers to cover just the bottom of the pumpkins on the card.

I completed the layout by adding a few more embellishments from the die-cuts included in the monthly kit, the “Happy Halloween” sticker from the Thankful Stickers, and candy corn and “Trick or Treat” stickers from the Halloween Puffy Stickers. Have I mentioned that between my three projects for this month’s kit I have already used every single one of the Halloween Puffy Stickers? I loved them THAT much!

Overall, I’m really tickled with how this pocket page spread turned out! I really love the statement title and it made me fall in love with the Winifred Alphabet Stamp. I hope this provided some guidance on creating your own statement titles. I can’t wait to see what you’re making using this month’s kit, specifically for Halloween projects! Be sure to share on Instagram using the hashtag #Ellesstudio, or in our Elle’s Studio Facebook Group, so we can all see your awesome creations! 

Easy Halloween Treat Wraps with Nathalie Leonelli

Our Halloween week fun continues with treats, and a clever, easy way that Nathalie Leonelli is showing us how to package them for a large group! Use this idea for your family Halloween get-together, colleagues, or classroom party using our October kit and add-ons! Let’s take a look!

I love all the fun Halloween elements in the October release and they inspired me to create small treat packets to give to some of my favorite co-workers. Hello, this is Nathalie, and I will explain here how you can easily make these yourself, whether to hand out, for a party, or to mail to your favorite niece or nephew!

Supplies | October 2019 Kit, Halloween Journaling Tags, Candy Corn Puffy Alphabet Stickers, Halloween Puffy Stickers, Typewriter Keys Puffy Alphabet Stickers, Thankful Stickers, Halloween Acrylic Treats

You will also need: cardstock, twine, a stapler and candy!

For each little treat packet, cut a piece of cardstock to 3″ x 7.5″ and score it at 3.25″, 3.5″ and 7″ as seen below:

Next, fold the bottom flap inward and staple it with your candy bag into the fold:

All you have to do now is decorate the front and the bottom flap to hide the staple. I used a selection of tags, from the Halloween Journaling Tags pack and the October 2019 Kit, which I cut to 2 7/8″ square because I wanted a small border. I embellished them with my favorite Halloween Puffy Stickers, acrylic candy from the Halloween Acrylic Treats and Candy Corn Puffy Alphabet Stickers.

A little matching twine finishes the look. To close them, you simply slide the front part under the bottom flap and you’re done. I love how they are each unique and fun!

Of course, you could also use patterned paper, but they are really perfect for tags and I can see myself making them again for other occasions! 

Our Halloween themed week continues here on the blog so make sure to stop by again tomorrow! I wish you all a Happy Halloween!

Halloween Week: Frightfully Fun Cards with Amanda Baldwin

We are so excited to kick off Halloween week here on the Elle’s Studio blog! All this week, we’re bringing you inspiration for projects to help you celebrate and document your Halloween celebrations! Today, we’re starting with greeting cards—they’re so fun to create and can make someone’s day! Amanda-jayne Baldwin is with us to share two shaker cards using our October kit and add-ons that we know you’ll SCREAM for! Let’s take a look!

Hi, friends! It’s Amanda here, and today I am sharing two spook-tacular Halloween greeting cards using the fabulous October Kit & new releases!

Supplies | Halloween Journaling Tags, October Labels, Candy Corn Puffy Alphabet Stickers, Halloween Puffy Stickers, Halloween Acrylic Treats, Home Sweet Home 6 x 6 Paper Stack

Say BOO!!! Aren’t they just the cutest?! Halloween is all about the element of surprise, and having fun! And nothing screams childhood fun like a pocket (err, shaker pocket) full of candy! 

This card will have your recipients guessing if it’s a trick or a treat, as it is such a fabulous card, but you can’t eat the candy, ha! Plus, it has the perfect sentiment for Halloween! 

Shaker pocket cards are really easy to create and give your cards that extra wow factor! Okay, enough of the chatter! Hocus Pocus, it’s time to focus! For these cards, I used two sheets of black cardstock. I cut each piece to the following specifications: 10″ x 7″ to create the cards, plus a 5″ x 7″ sheet to create the shaker window. 

I scored & folded the 10″ x 7″ sheets of card at the 5″ mark to create the card bases. For the card fronts, I used a circle cutting tool to cut a large circle window at the top of the 5″ x 7″ sheets of cardstock.

For this particular card, I placed the Halloween Acrylic Treats into a cellophane bag, and then sealed it off. I used hot glue to back this bag of sweet treats to the circle window, and then positioned the teal Home Sweet Home Paper Stack patterned paper behind it all. I love the added interest of the pattern paper behind the window. It is so much more interesting and fun than the plain black cardstock! 

While I had this patterned paper handy, I also added a trim of it to both the top & bottom of my card front. I overlapped this patterned paper with another trim, this time cut from the striped 6″ x 4″ Halloween Journaling Tag. I added lots of the Halloween Puffy Stickers to embellish, and adhered it all to one of the 5″ x 7″ card fronts.

For the spooky boo card, I used the same technique to create my shaker window, but replaced the Halloween Acrylic Treats with some black and silver star sequins from my stash. I also used patterned papers from the Home Sweet Home Paper Stack to back my circle window, and trim the top & bottom of the card front. 

I embellished with the ghosts and pumpkins from the Halloween Puffy Stickers, and then added the “Boo!” sentiment using the Candy Corn Puffy Alphabet Stickers. Those alphas are the best! 

For finishing touches, I foam mounted one of the October Labels and added the “a spooktacular time” Halloween Puffy Sticker sentiment, as well a scattering of orange enamel dots from my stash.

And there you have it: trick-or-treat greeting cards that scream fun! I hope I have put a spell on you to get creating some frightfully fun cards!

Happy Halloween!

Are you inspired by Amanda’s spook-tacular shakers? Show us the Halloween cards that you create using our October 2019 Kit and add-ons on Instagram using the hashtag #EllesStudio, or in our Facebook Group!