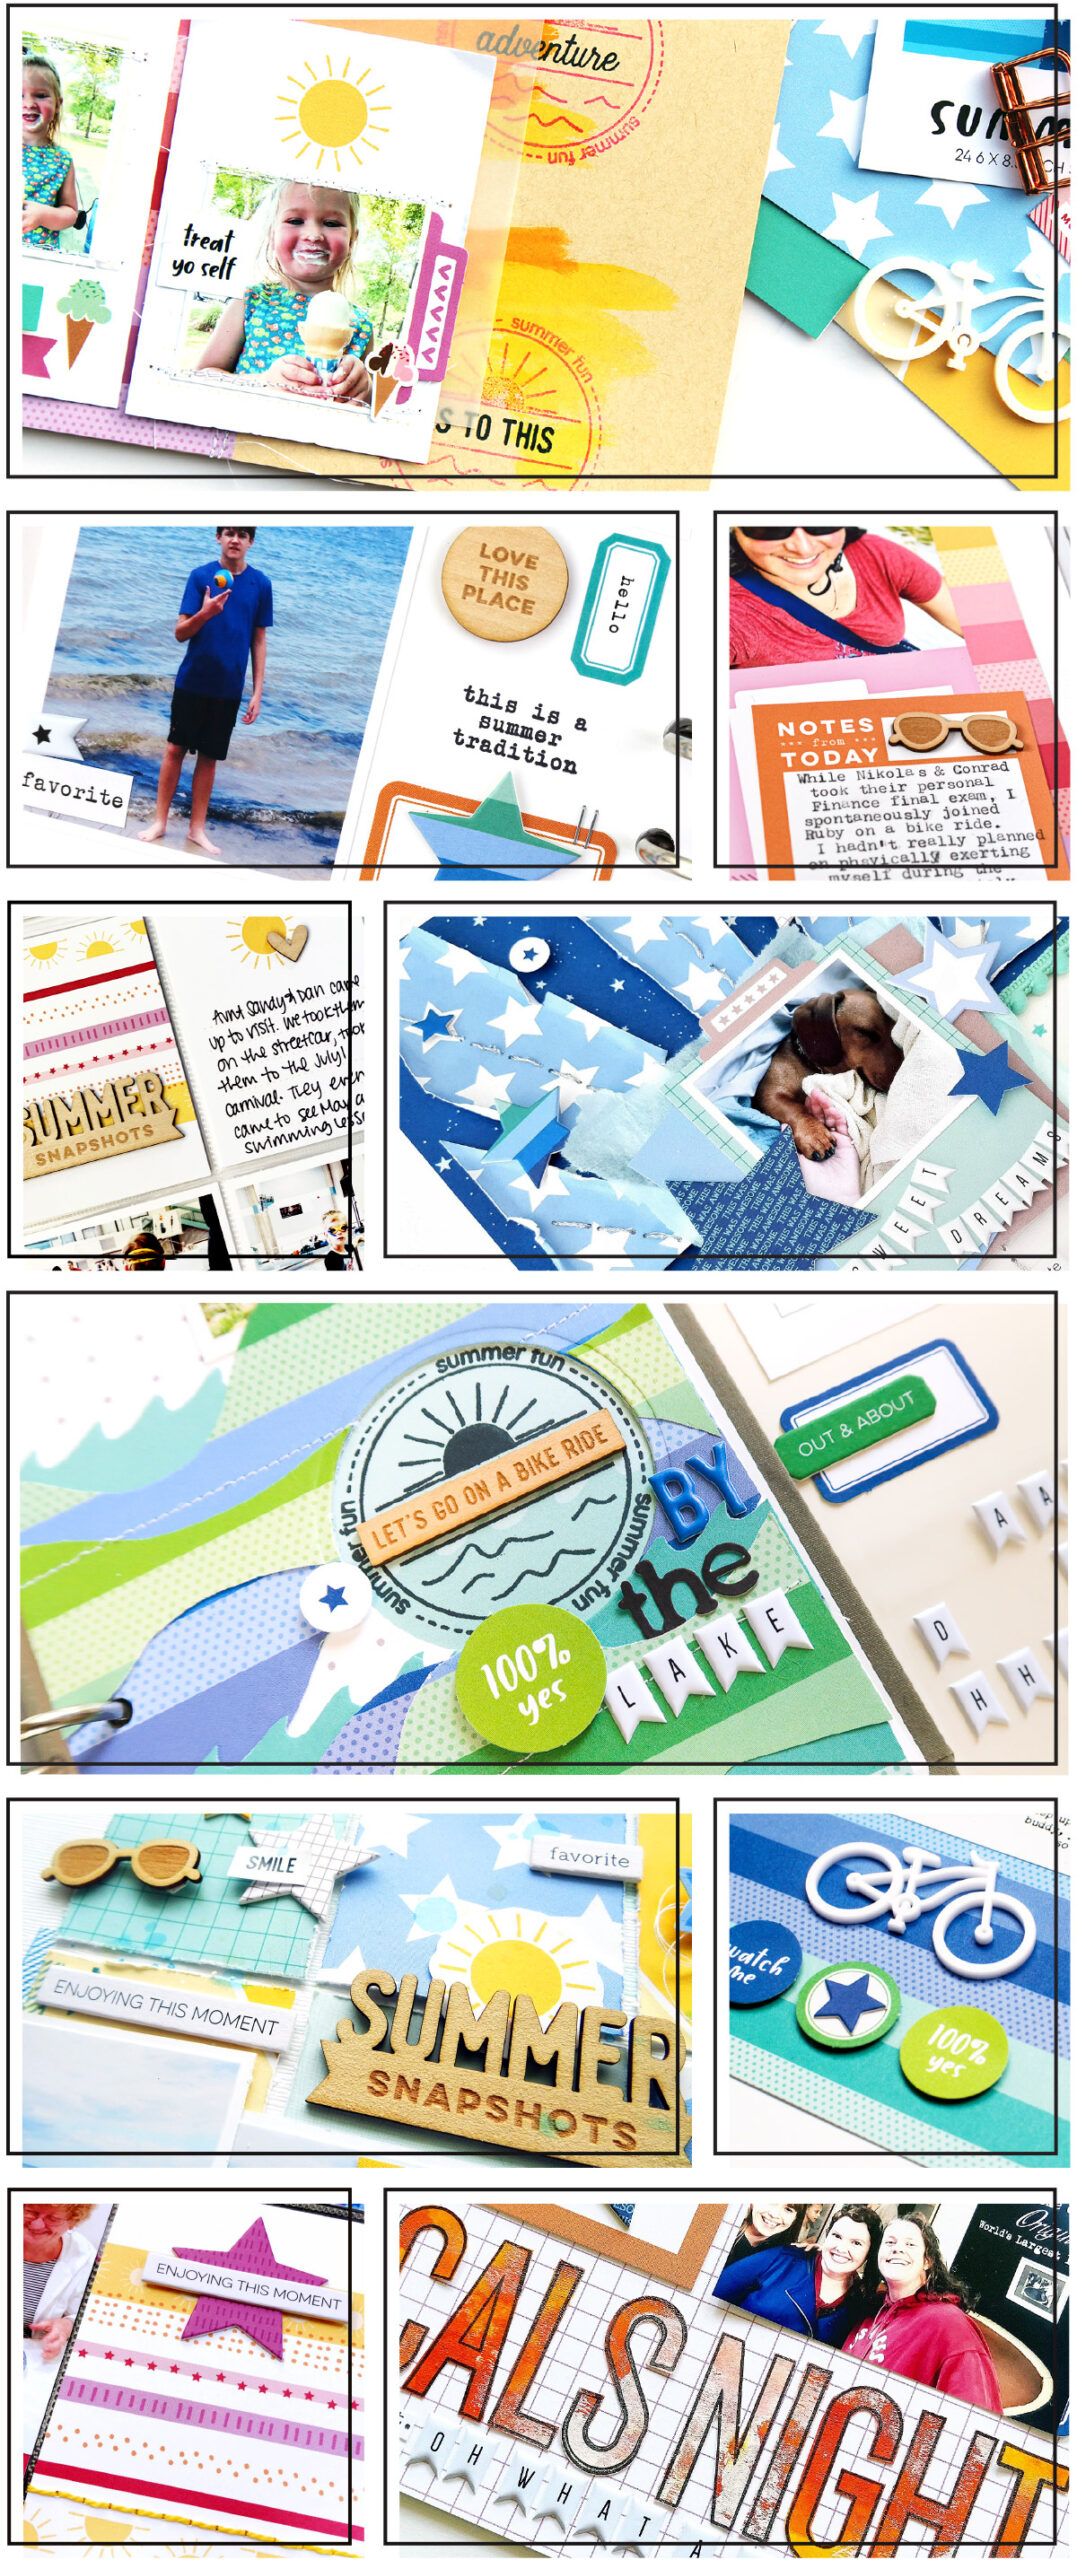
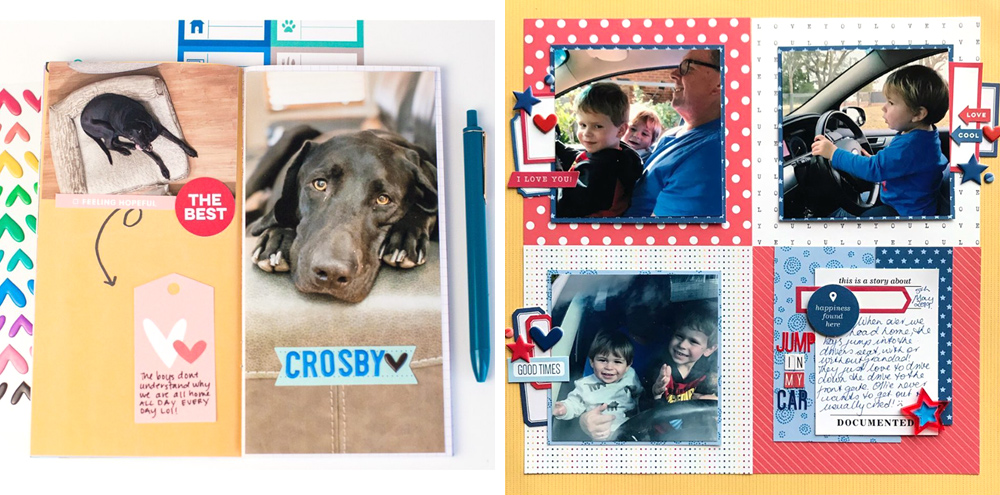
Our paper stacks can be used for so many things, from crafting mini albums to backing a scrapbook layout—but have you tried to use our 6 x 8.5 inch paper stacks in pockets? Design team member Nathalie Leonelli is here to share how she used our newest paper stack, Summer Fun, to create one gorgeous pocket page spread. Let’s take a look!
Hello! It’s Nathalie here, and today I would like to share with you how I used the fabulous new Summer Fun 6 x 8.5 Inch Paper Stack to create pocket pages. I love Elle’s paper stacks because they always match the current kits perfectly and they allow me to add more color in my spreads—not to mention how much I love them for card making!. The Summer Fun Paper Stack is no exception with its vibrant summer colors and fun, modern patterns.
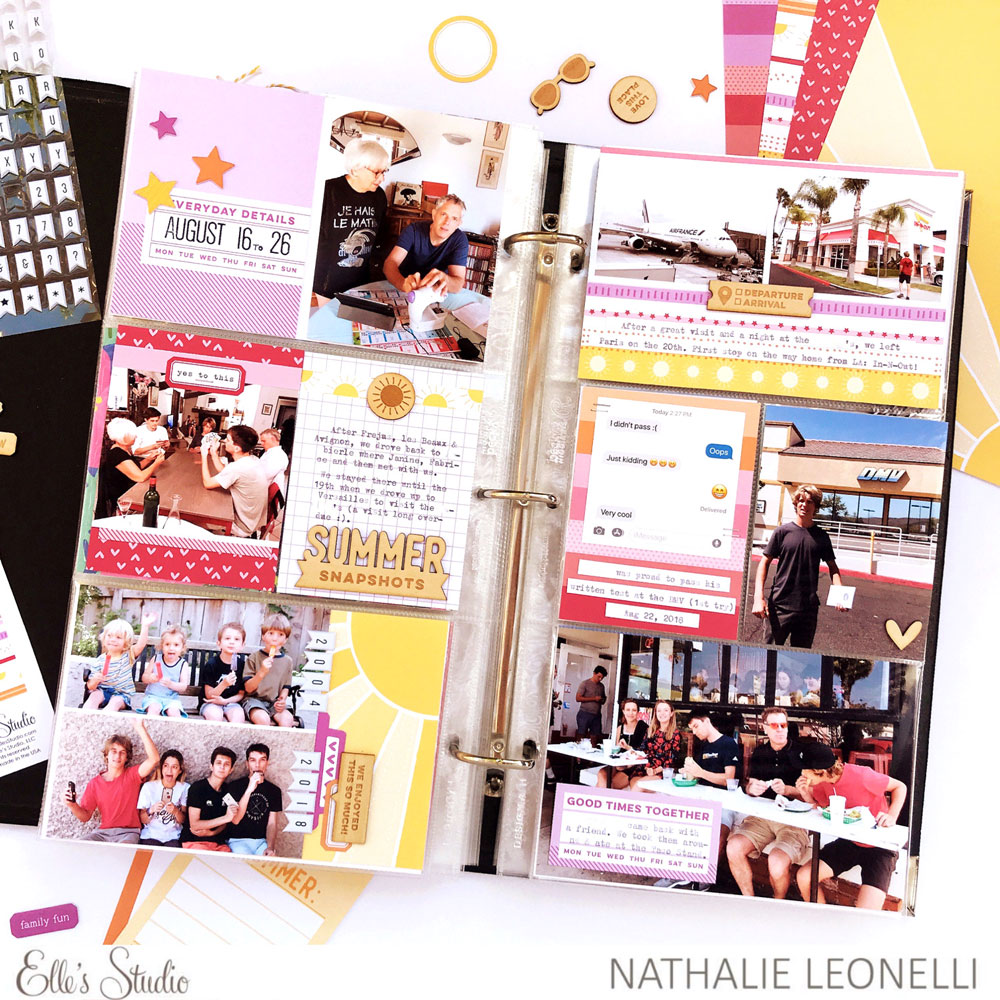
Here is the spread I created in my 6″ x 12″ album:
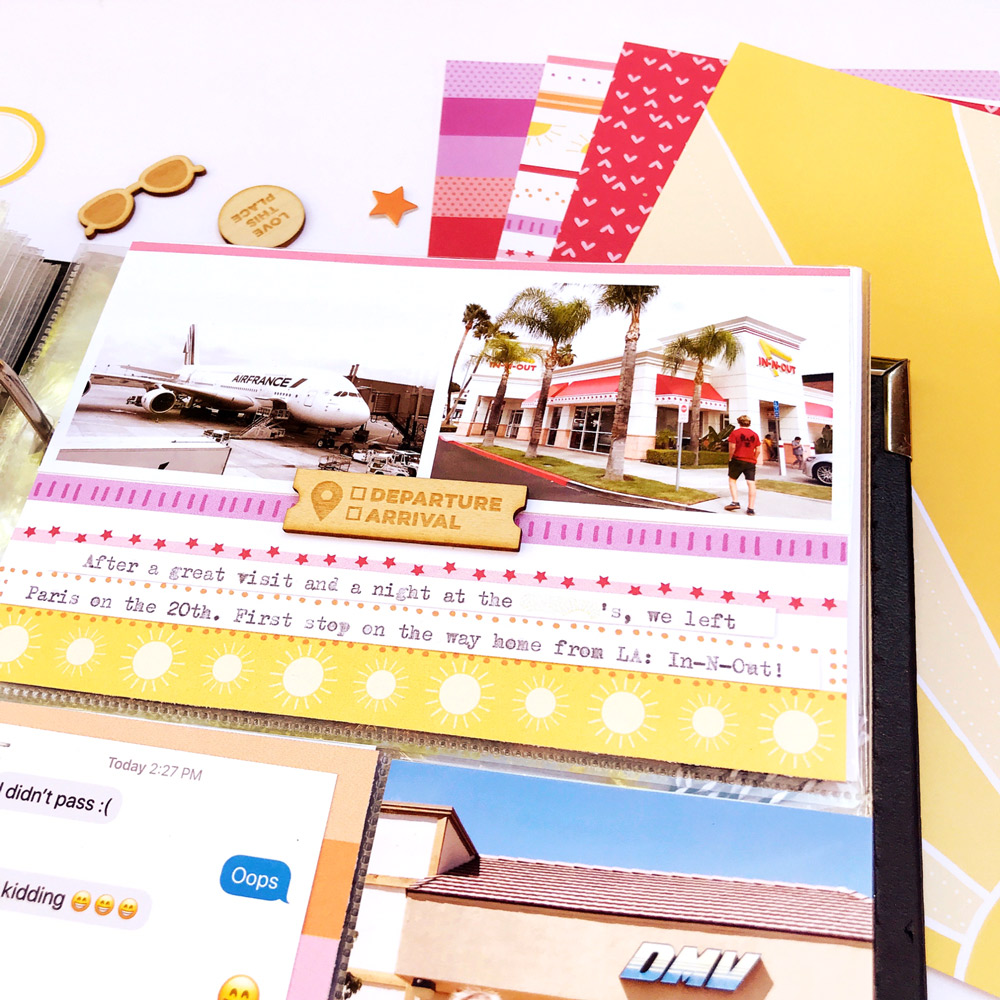
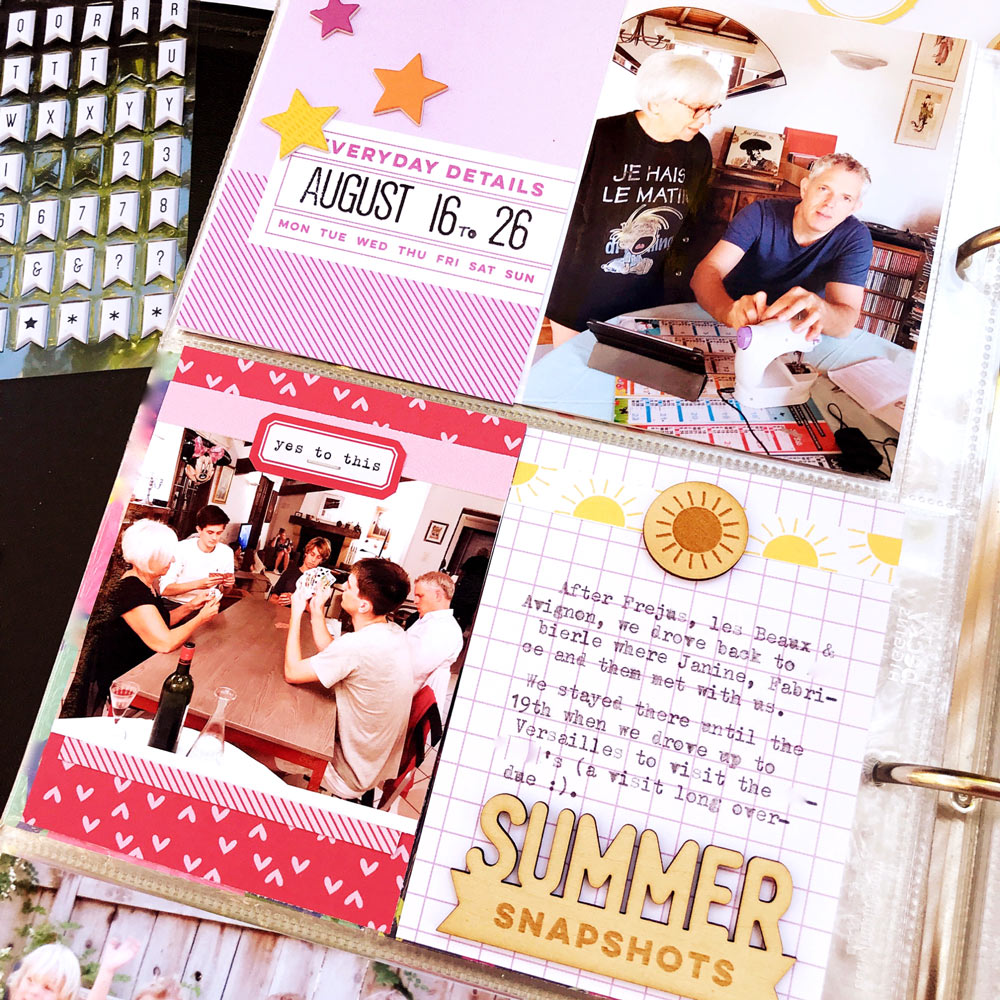
The easiest thing to do in pockets with your paper stack is to complement your kit by cutting some of the papers into 3″ x 4″ or 4″ x 6″ tags. You can really stretch your kit that way. I used a couple of horizontal patterns for the pockets on my right page.
All I did to them was add journaling and embellish minimally with the new Vacation Wood Veneers.
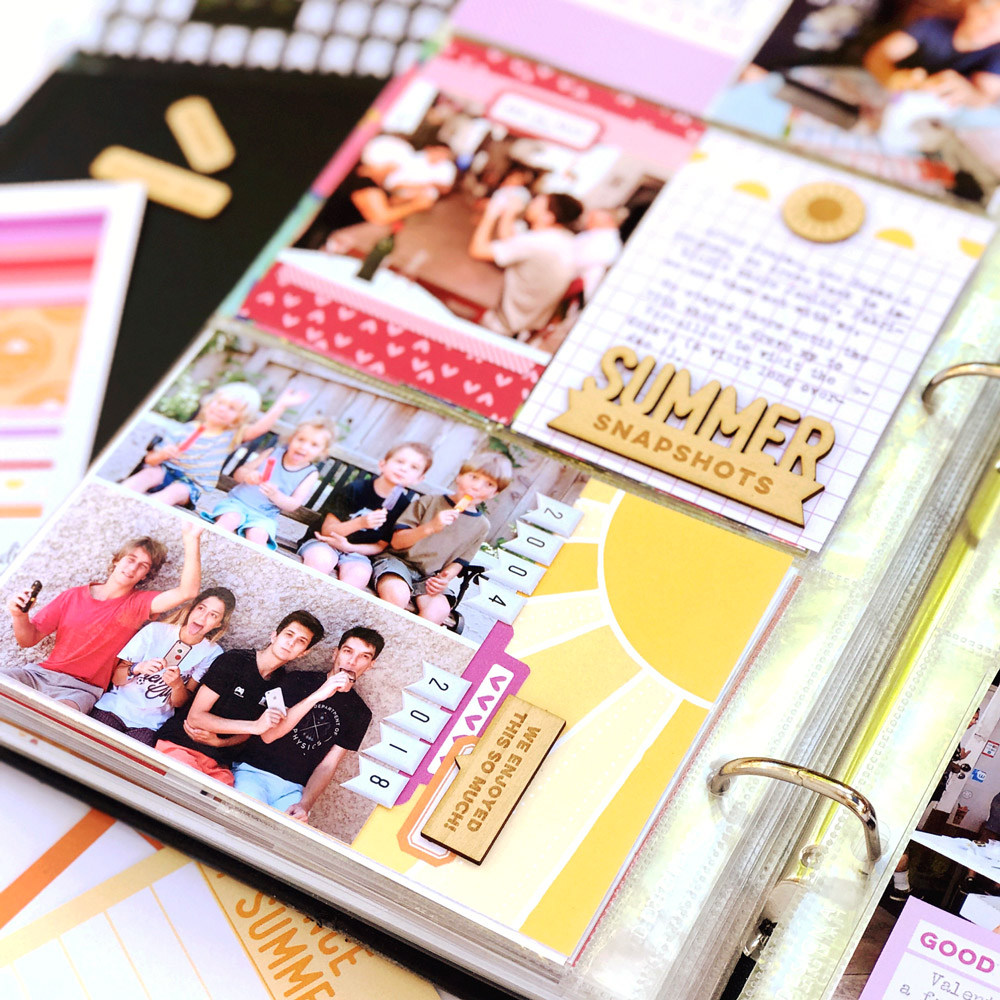
I also like to look through all the papers in the paper stack to find interesting parts within the patterns. This portion of the sunburst paper caught my eye and after adding a sticker, a die-cut and a wood veneer on top of it, it became my favorite area of the spread!
Another way I will typically use my paper stacks in pocket pages is by creating more elaborate tags using several papers on the same tag; layering them with photos, stickers or embellishments. The Summer Wood Veneers are perfect for that!
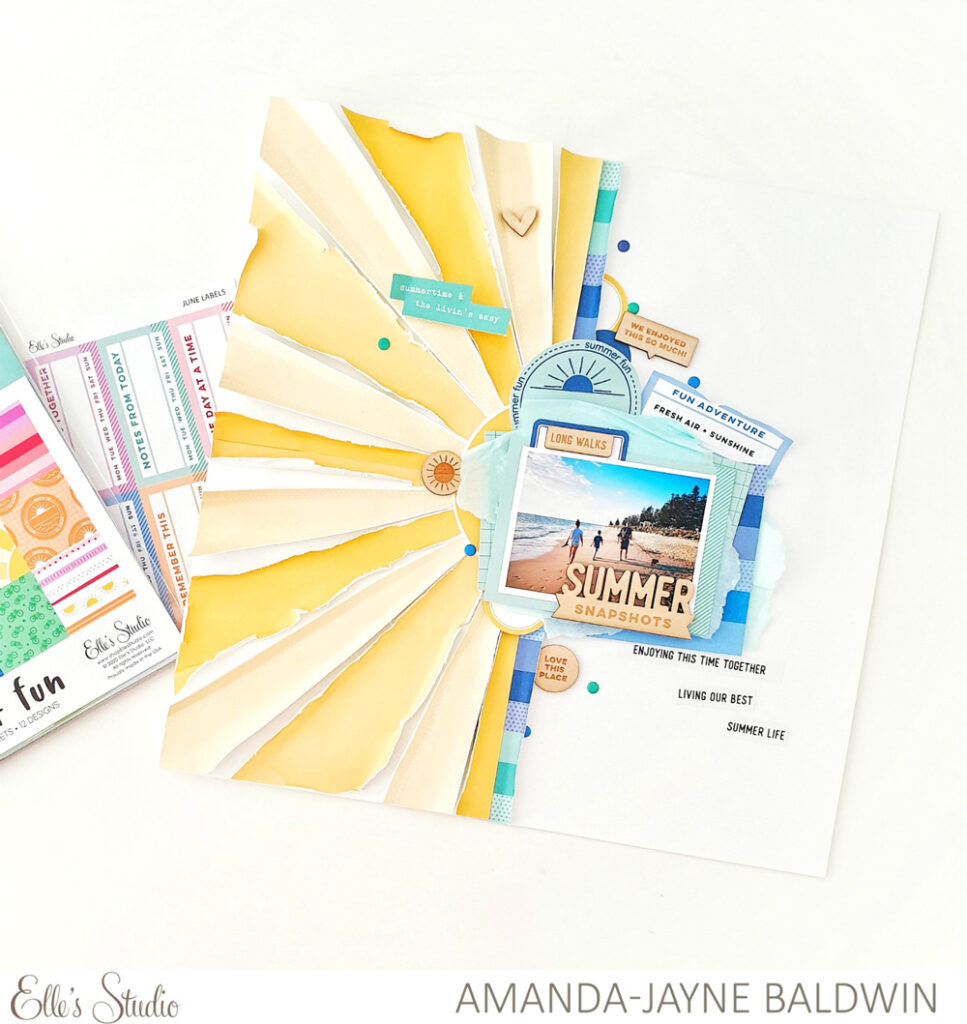
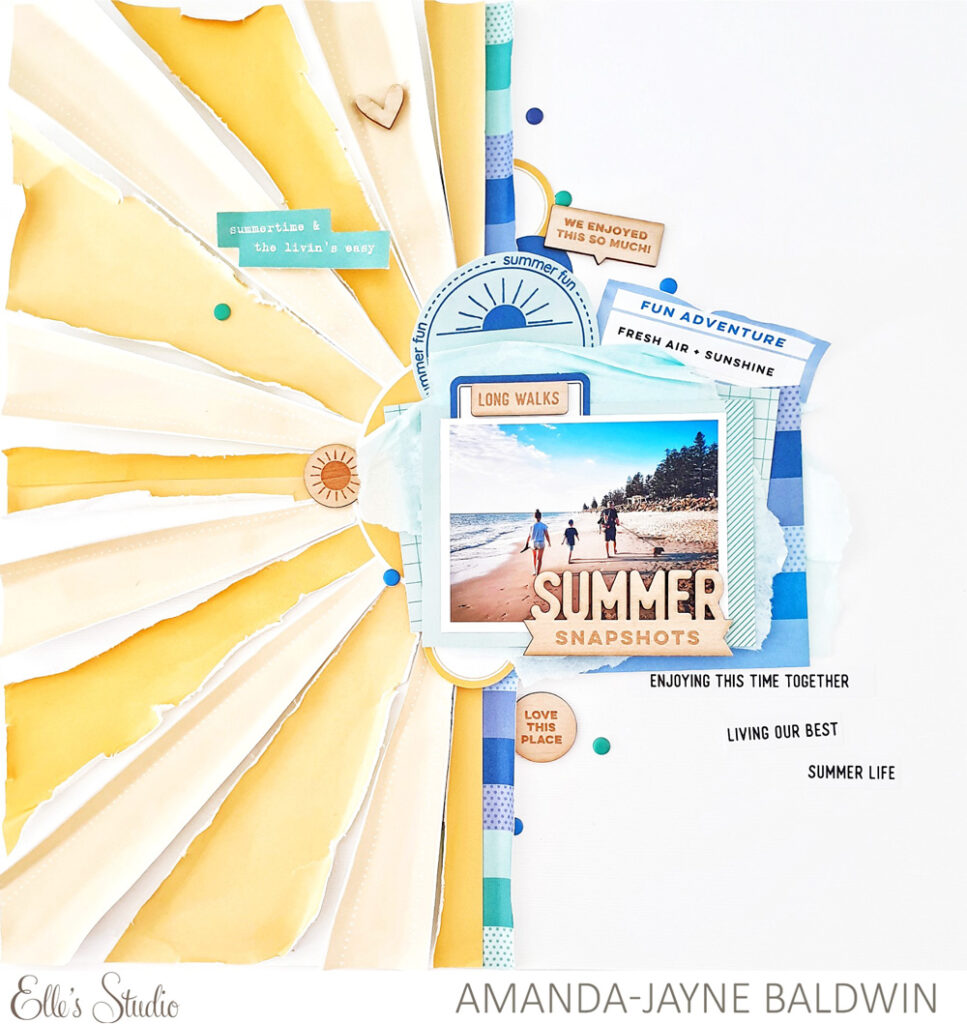
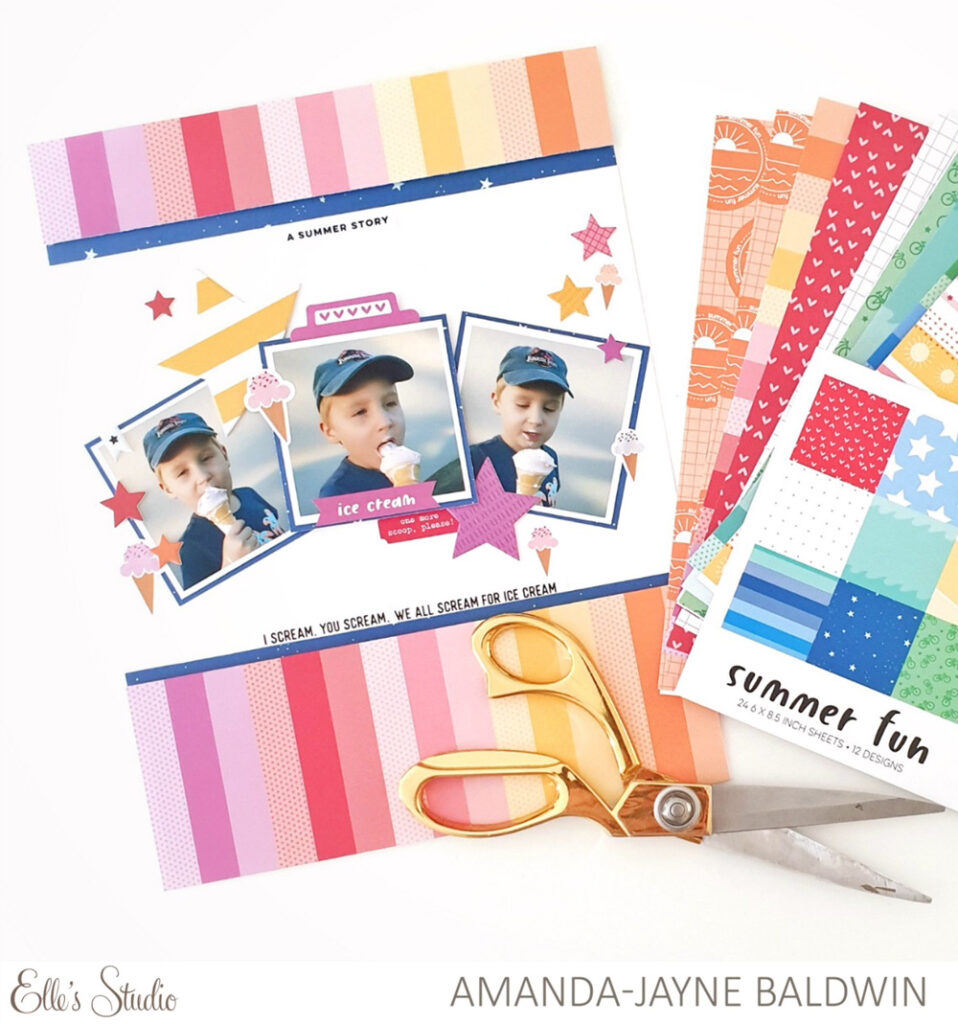
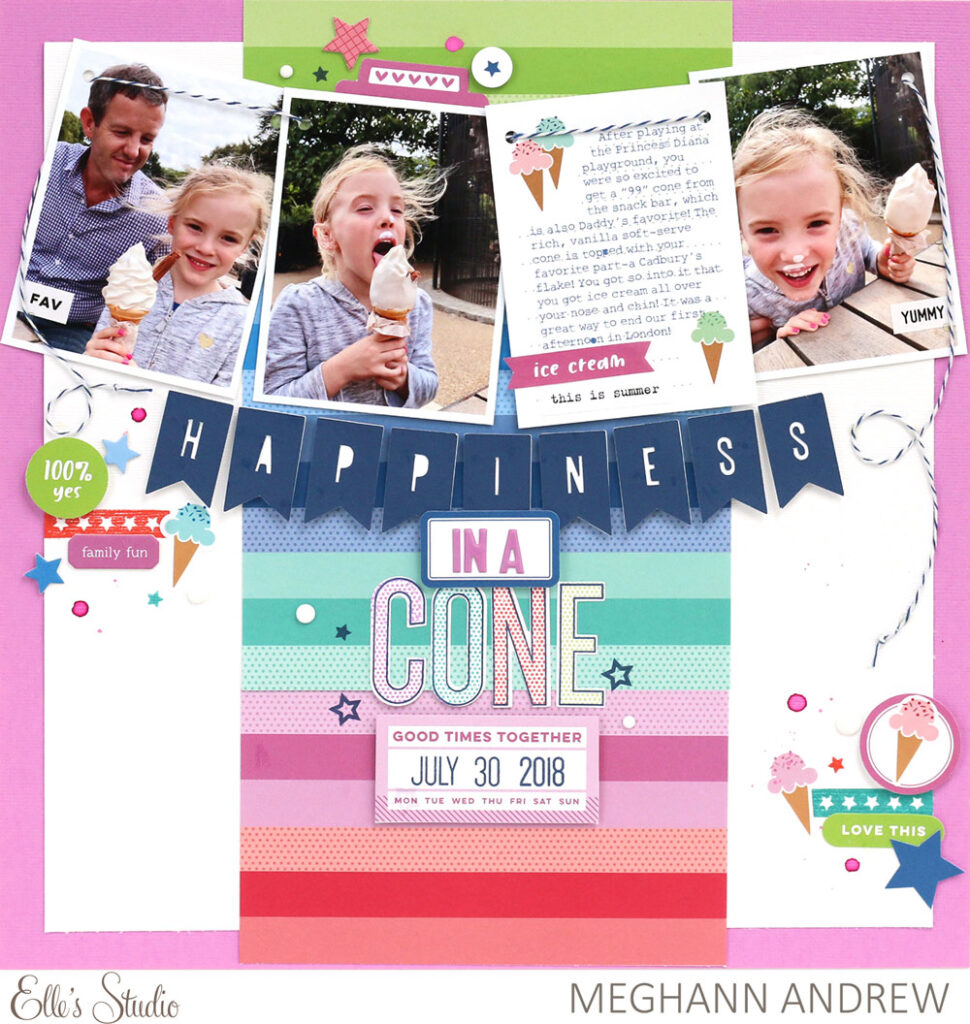
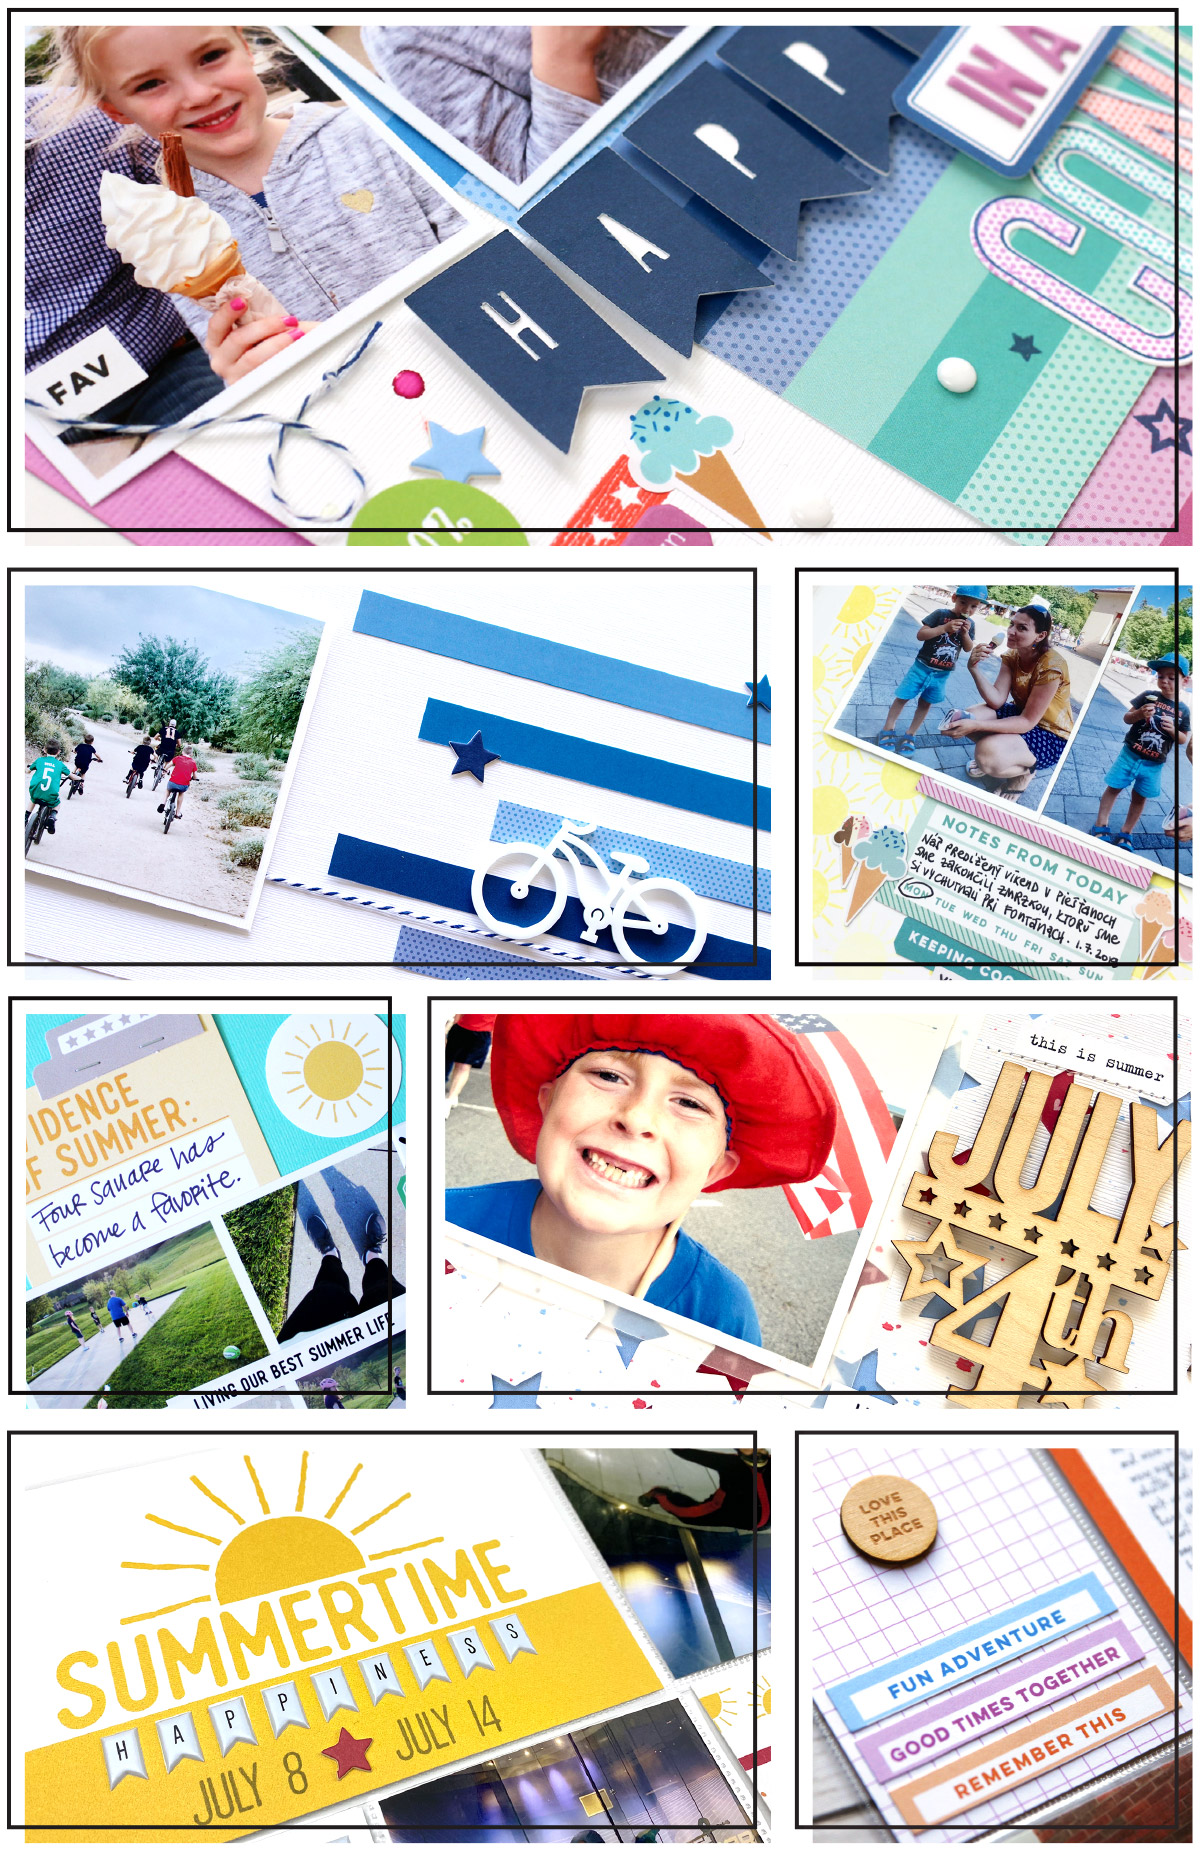
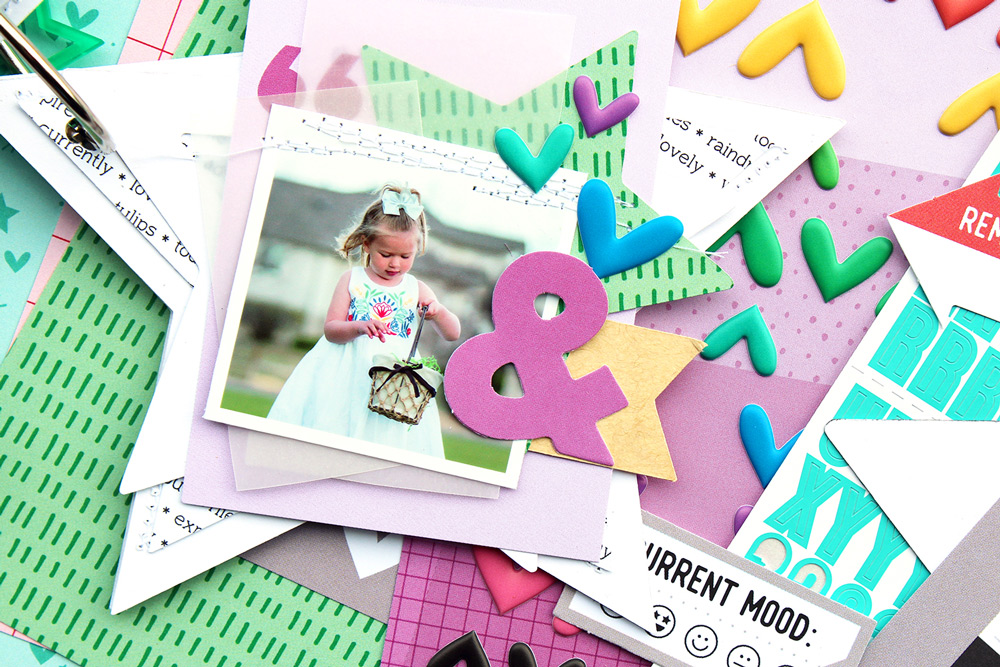
We could not be more excited that our newest products, the June 2020 kit and extras, have hit the shop! This fun release brings vibrant colors and a feeling of warm, sunny days to your creative space, and design team member Amanda-jayne Baldwin has taken full advantage of that with the layout she’s sharing with us today! Let’s take a look!
Hi, Elle’s Studio friends! It’s Amanda here, and boy was I excited when I opened up the exclusive June 2020 kit and add-ons—so many gorgeous products included in one box!
Summer is my favorite season and I just couldn’t resist adding a little sunshine into my layout!
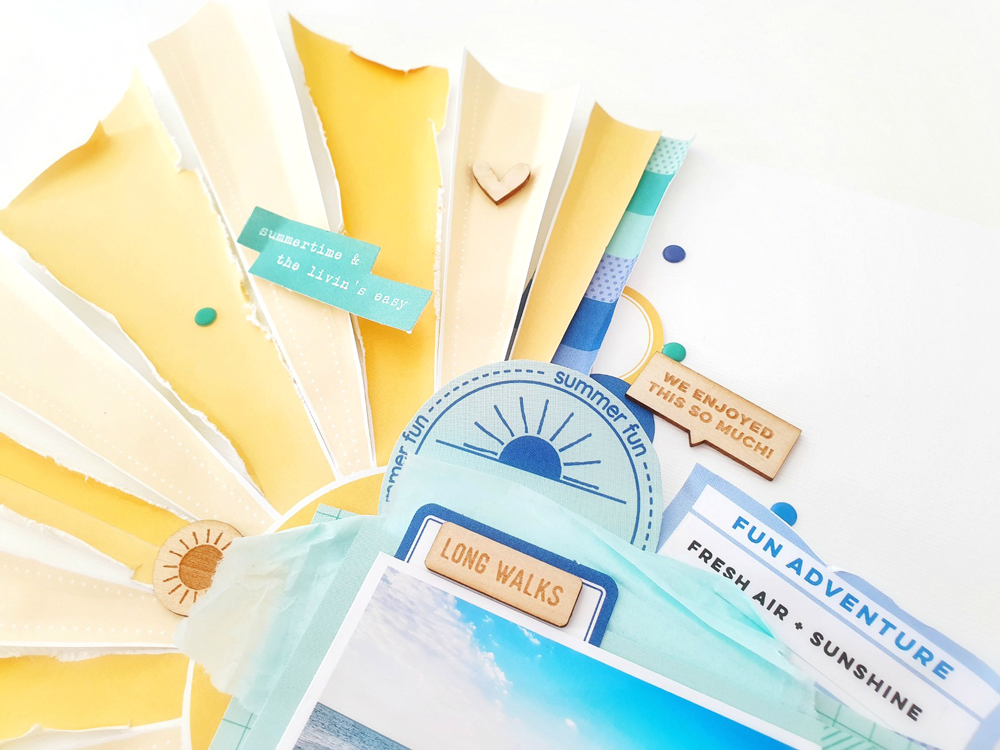
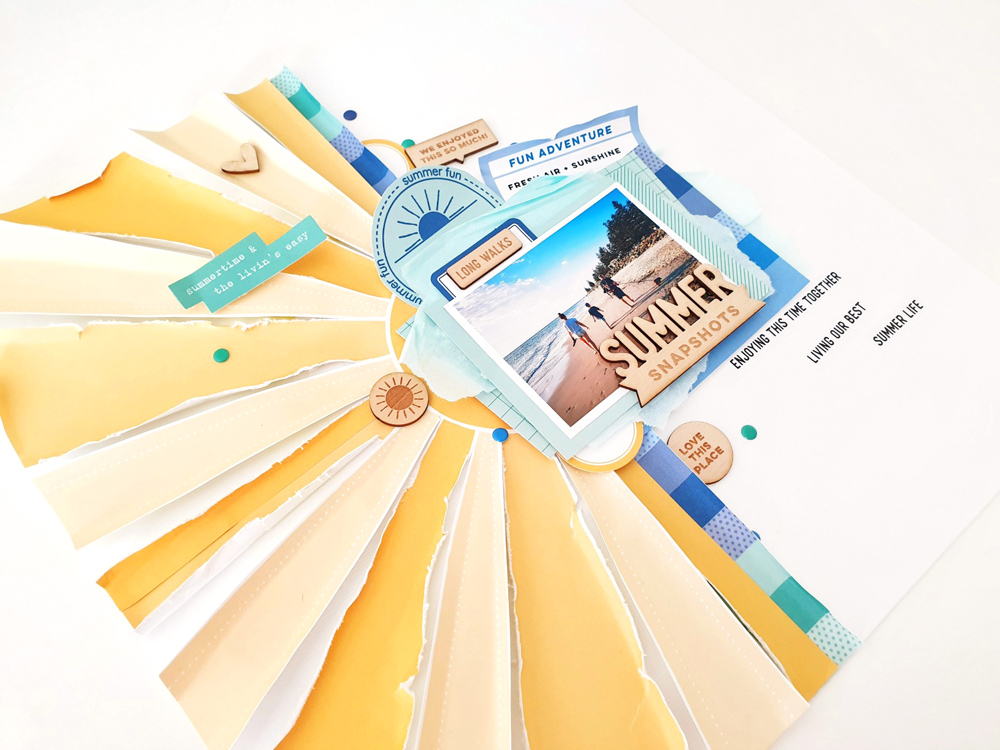
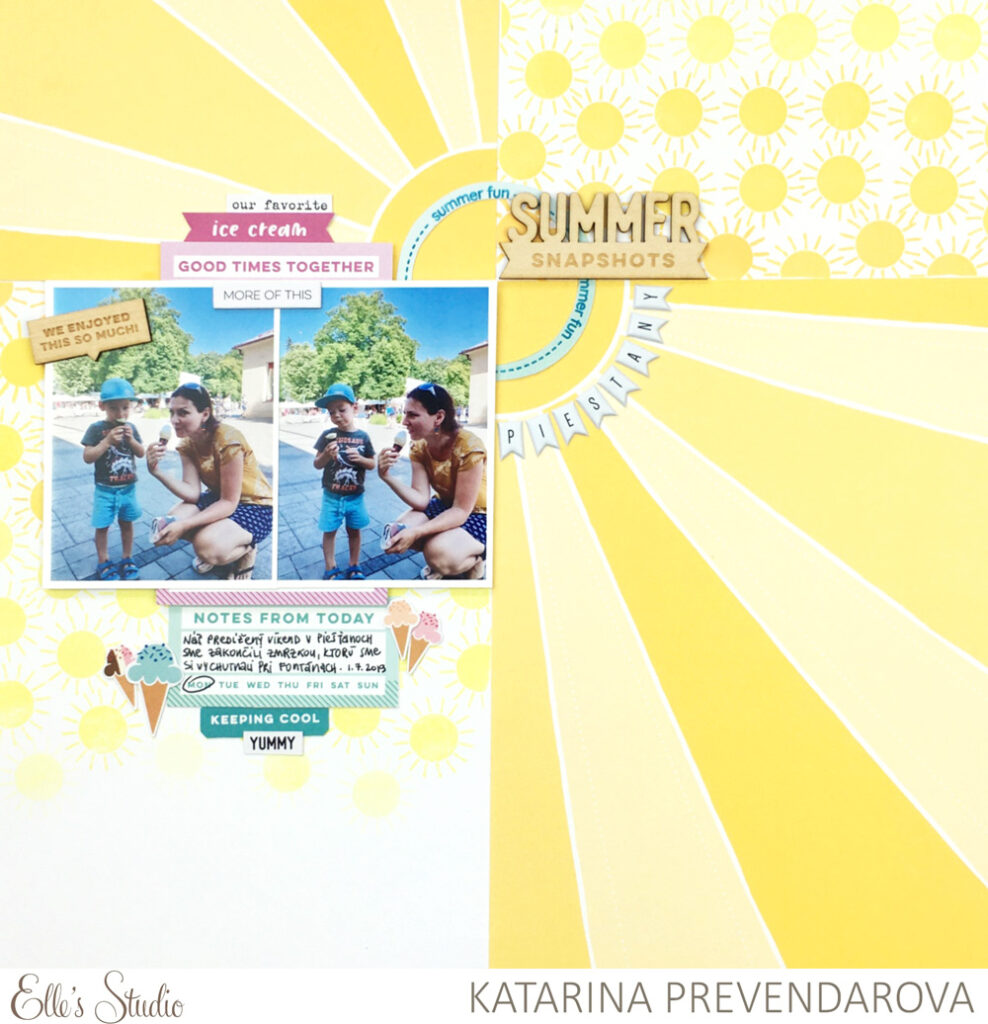
For the love of summer, sunshine & sunbursts! The June Kit is outta this world! Let’s take a closer look at this striking sunburst page:
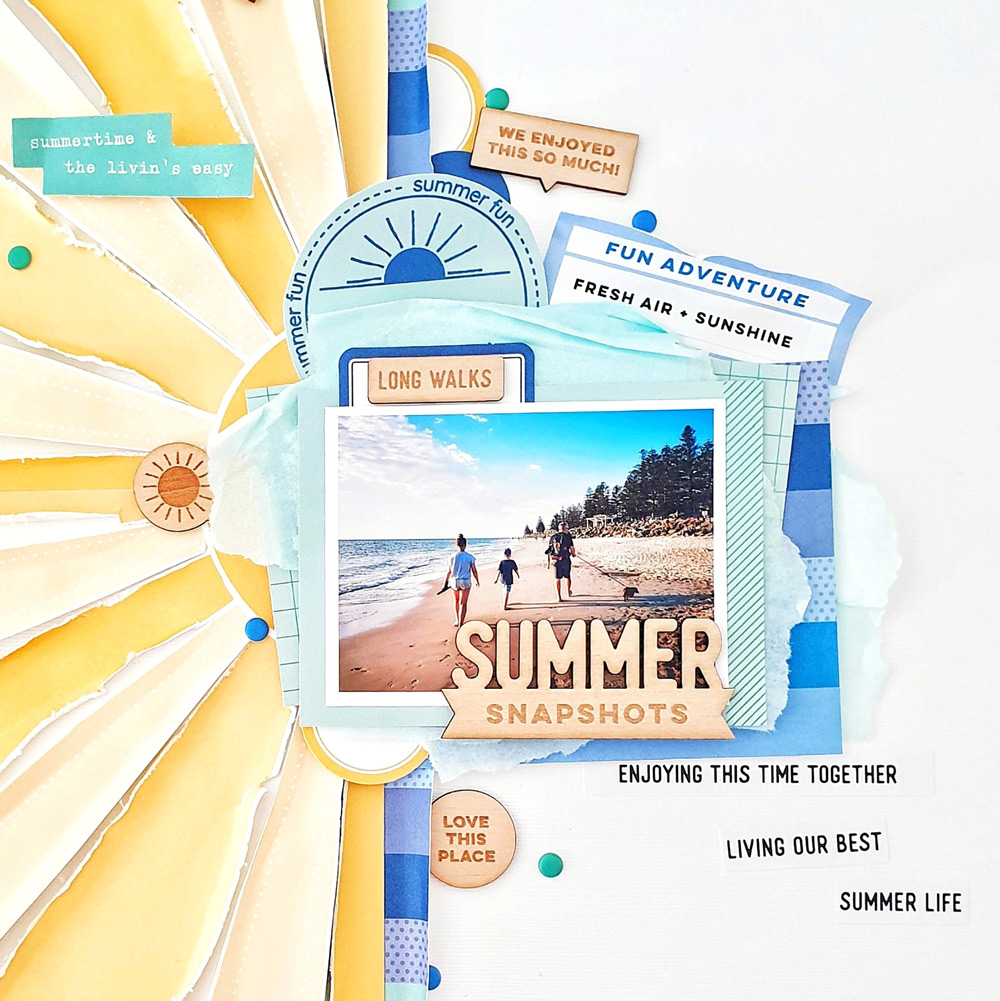
Inspired by the theme and colors of my family photograph, I knew I wanted to create a page that evoked all the summer vibes. As soon as I saw the yellow sun patterned paper in the Summer Fun Paper Stack, I knew I would have to use it! However, unlike my usual butting of two papers together to create the illusion of a full 12″ paper, I had to get a little creative to make this design work.
To form the sun, I trimmed the first sun paper to 6 inches long, and then rotated the second sun paper, trimming it to 6 inches wide. Now, when combined, these two pieces became one large radial 6″ x 12″ sun—awesome! To add extra dimension and texture to this sun, I cut along all the sun rays, distressed all the edges and foam mounted all the pale yellow segments. For added impact, I also added a half-inch trim of the blue striped pattern paper, also from the Summer Fun Paper Stack, beneath this sun. To keep my design uniform, I lightly distressed the edge of this paper too. So effective!
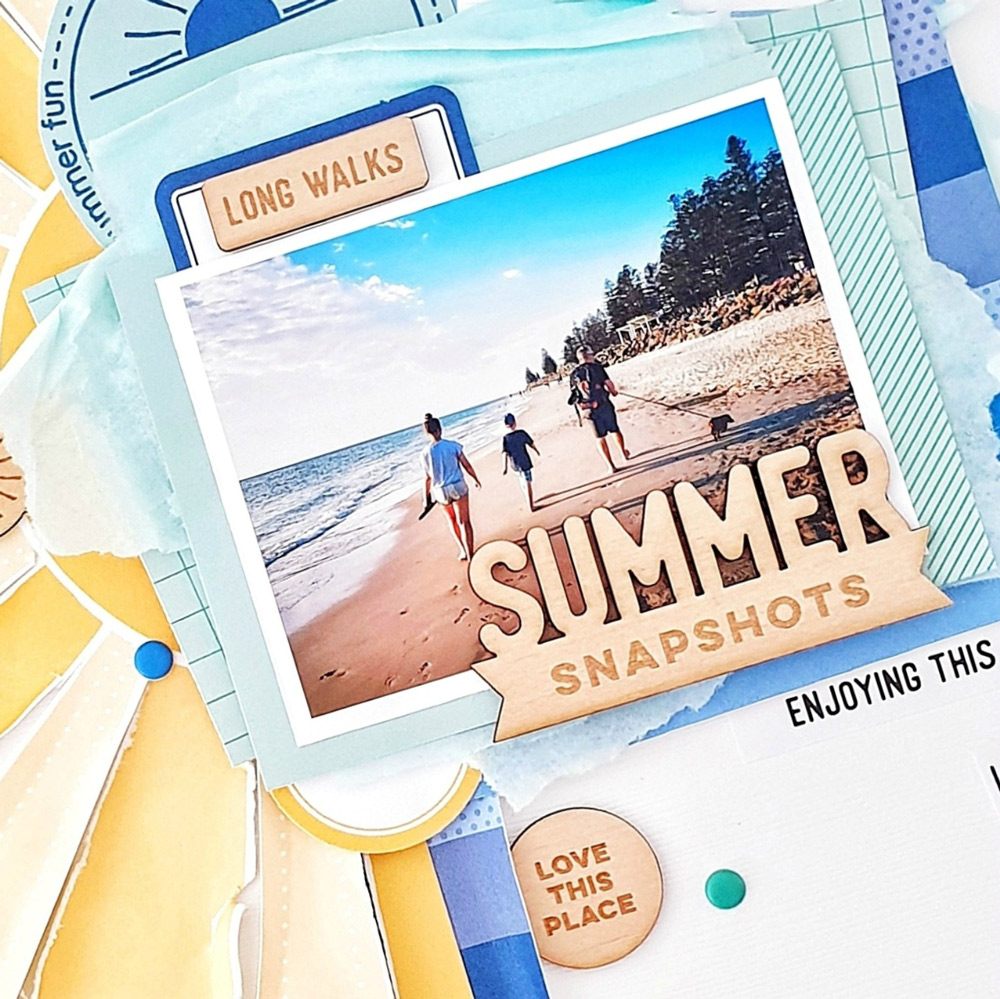
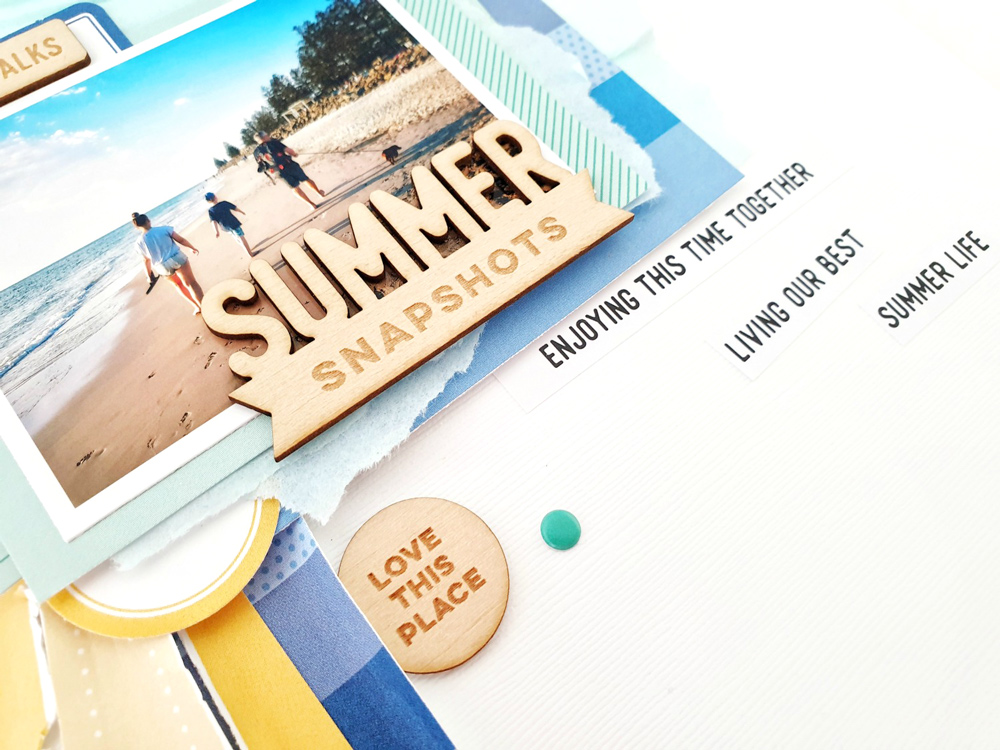
I layered my photograph onto a couple of the 3″ x 4″ tags from the June Kit, some pale blue tissue paper from my stash, and some of that gorgeous blue striped paper again. Into these layers, I tucked in a few embellishments—die cuts from the kit, June Labels and even that “summer fun” circle, fussy cut from a tag in the kit. I wanted to it as a feature embellishment as it combined the sun design with the blue colors and also aided to anchor my photo cluster onto that circular sun.
I cleverly positioned this photo cluster over the center of the sun for two key reasons: 1. so that your eye would be drawn directly into the photo, and 2. to cover the paper joints and enhance the illusion of 12 inch papers.
Drawing on the natural sand color in my photograph, and a need to balance out all that vibrant color, I mixed the Summer and Vacation Wood Veneers and added them to my design. The “summer snapshots” veneer fitted beautifully across my photo and formed the perfect title!
To further enhance the sun design, I used a mix of circular embellishments throughout my page, and even scattered some Tiny Shapes & Dots Puffy Stickers, too. Those little pops of teal created a point of difference between the dominant blue & yellow, and added that extra interest!
For a finishing touch, I added a cascade of the Summer Stickers at the base of my photo.
What a simple, yet striking page to document my family’s summer story! I hope I have inspired you to start documenting your summer stories with our fabulous June 2020 kit and add-ons! Thanks so much for visiting!
Share your summer-sunshine projects with us when your kit arrives by posting on Instagram using the hashtag #EllesStudio, or join our Elle’s Studio Facebook Group to be connected to fellow ES fans and creatives!
Comments Off on Creating with Sunshine and Amanda-jayne Baldwin | Share This
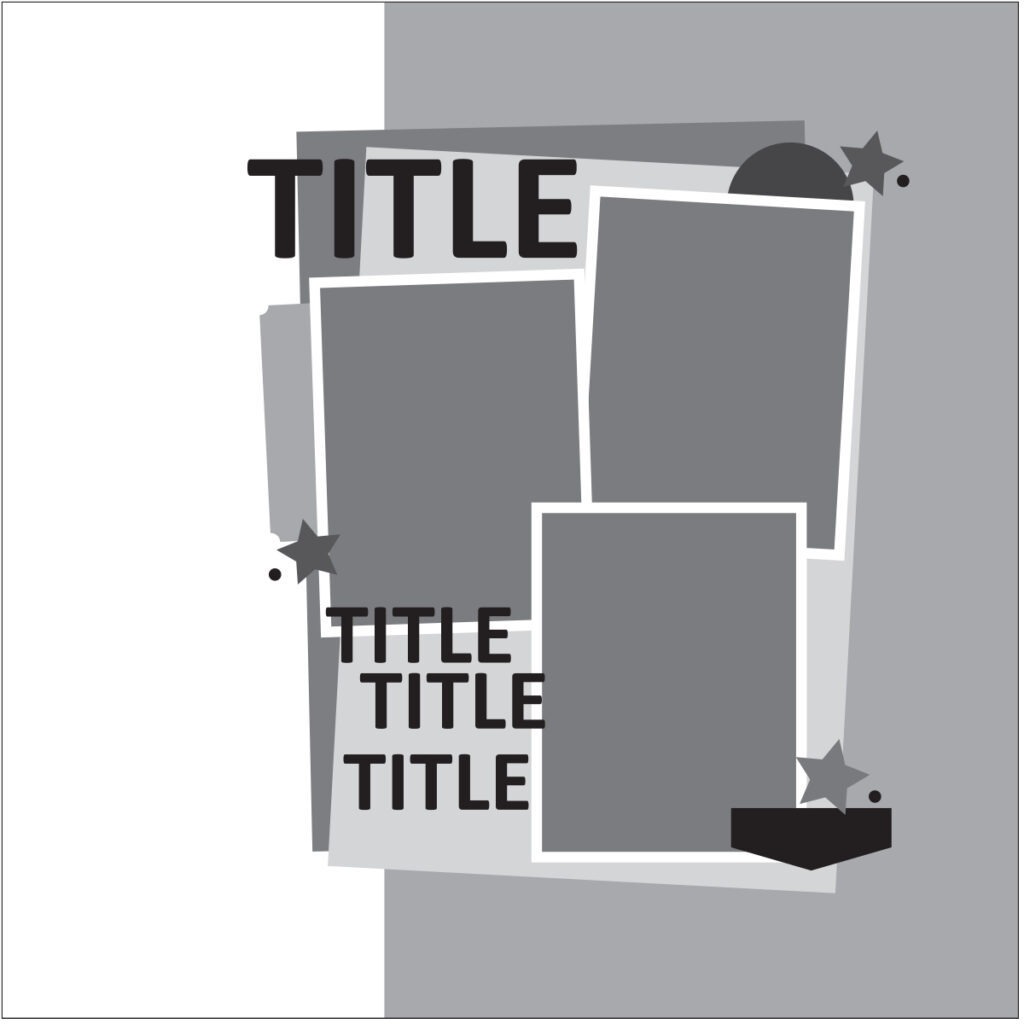
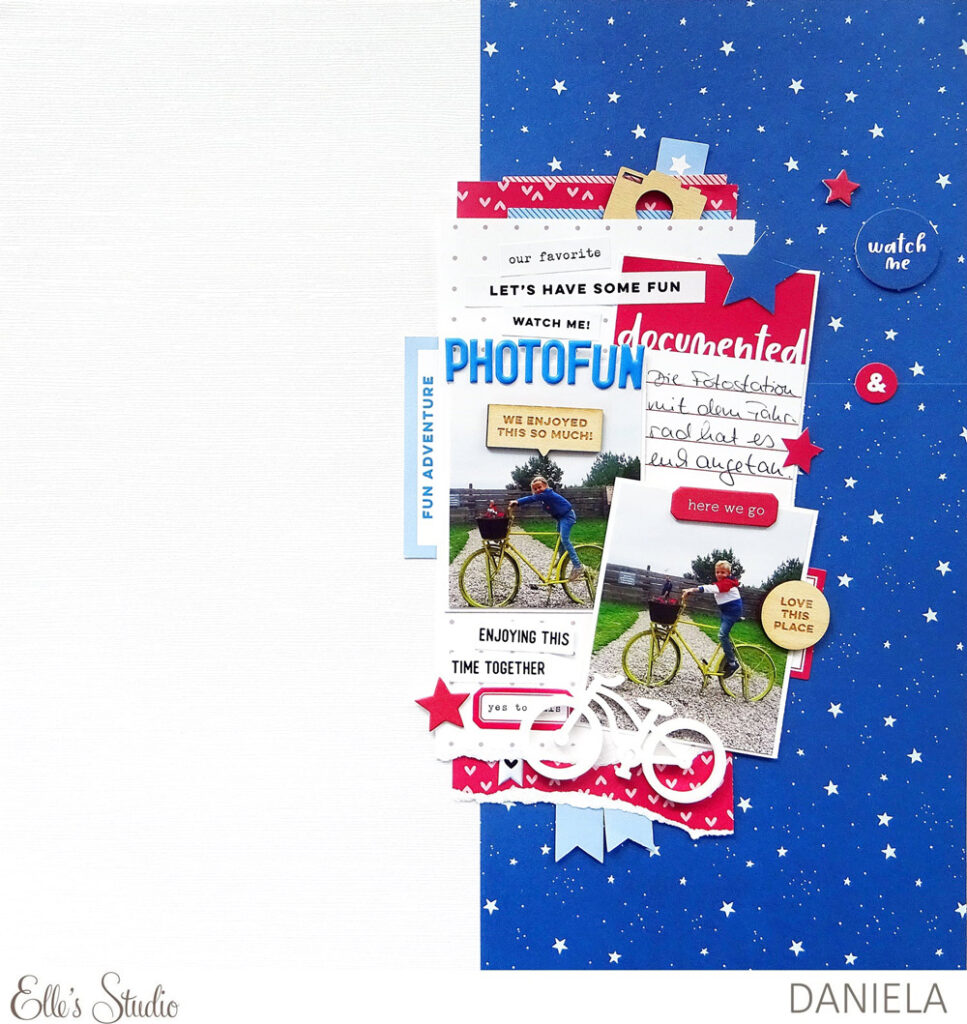
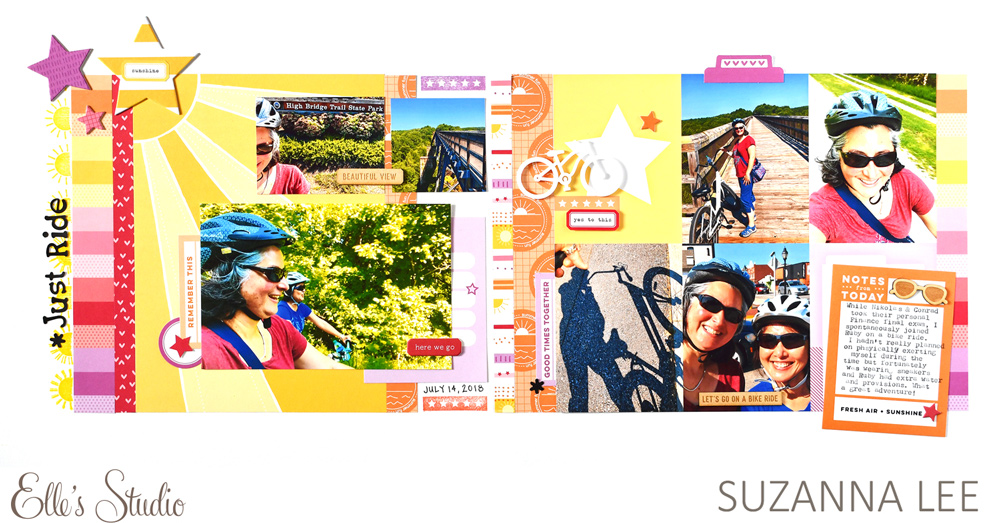
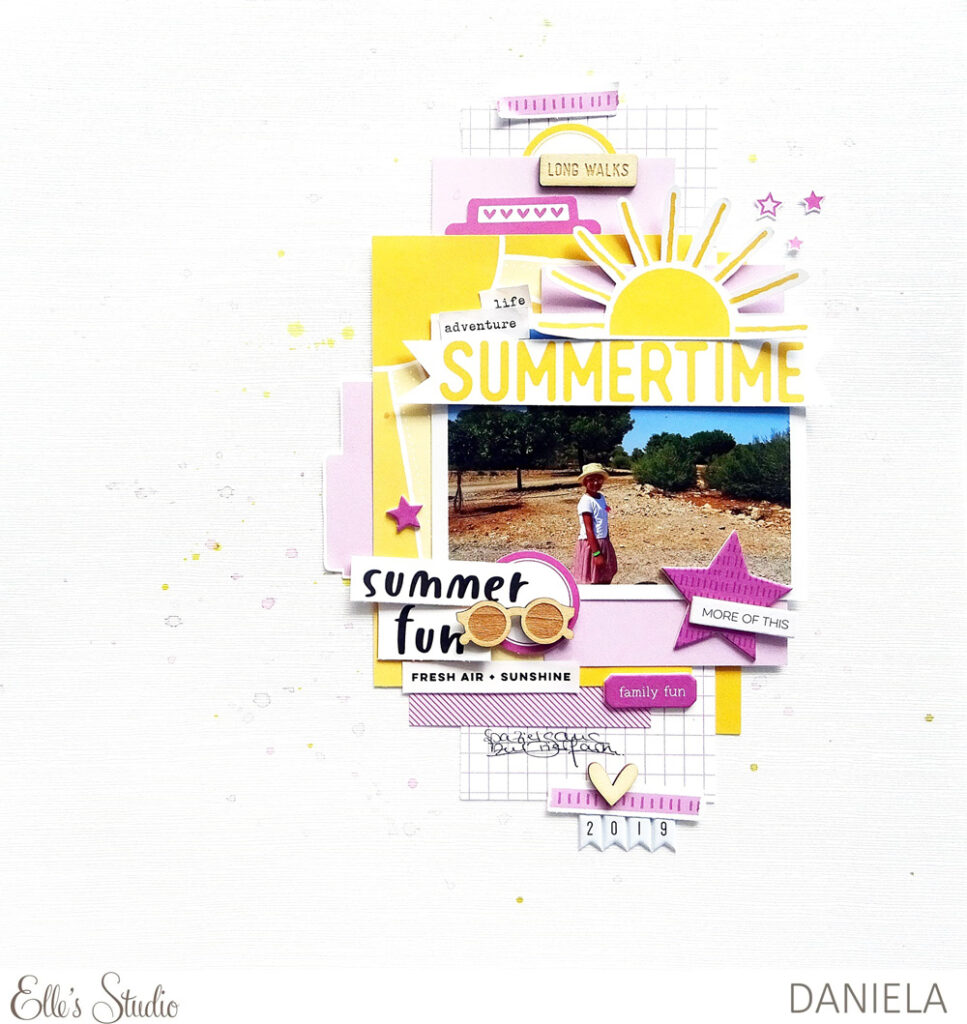
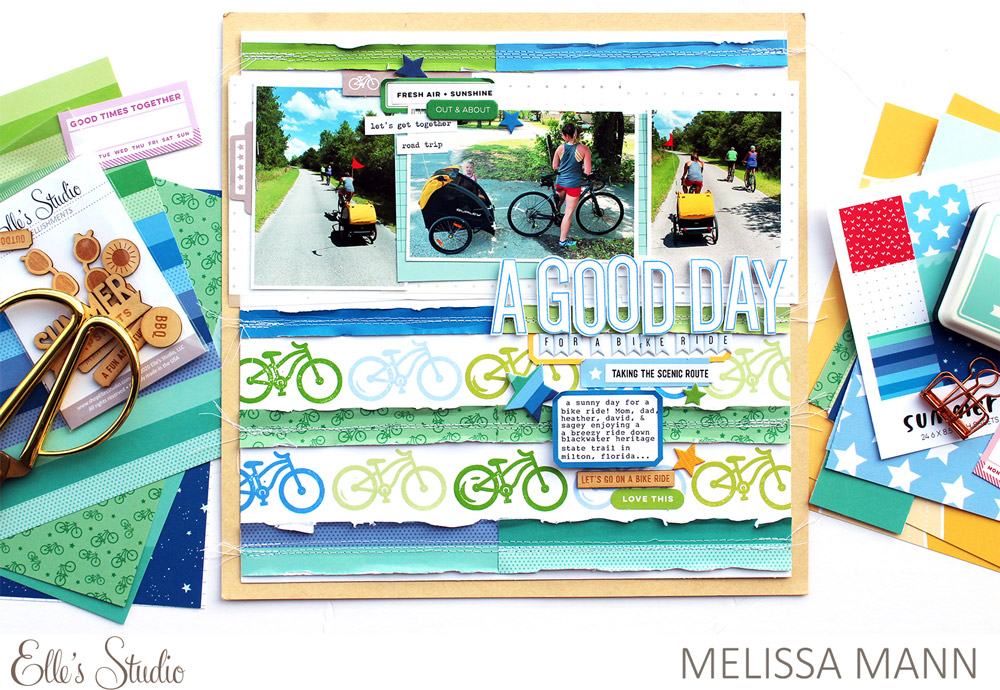
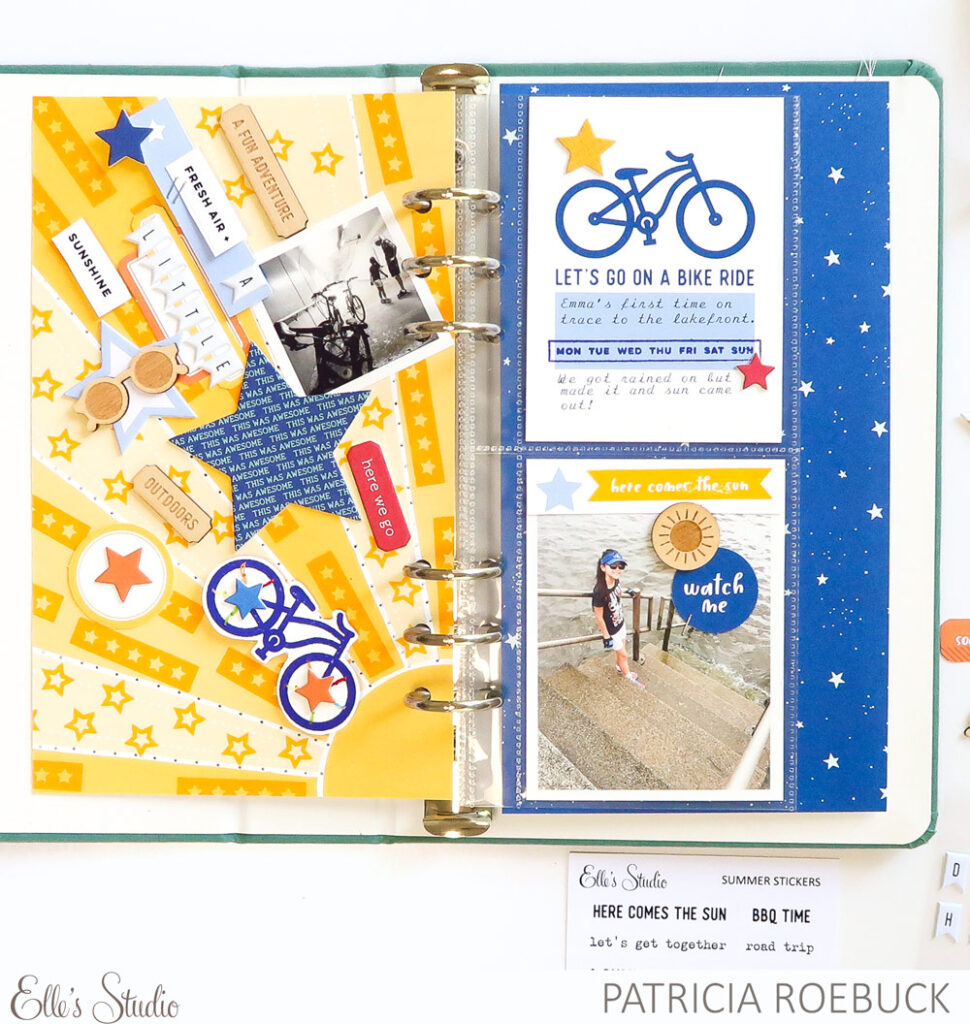
Hi, friends! It’s Daniela here with a new sketch-based layout! I love using sketches because they give you an idea of what the layout could look like in the end. You can just follow the basic composition of the sketch and creating becomes so eas1. Let’s take a look at this week’s sketch:
I loved the large paper column on the right-hand side. You can use three pictures on your page, but you can also replace one of the pictures with a journaling tag, like I did. Here is my full layout:
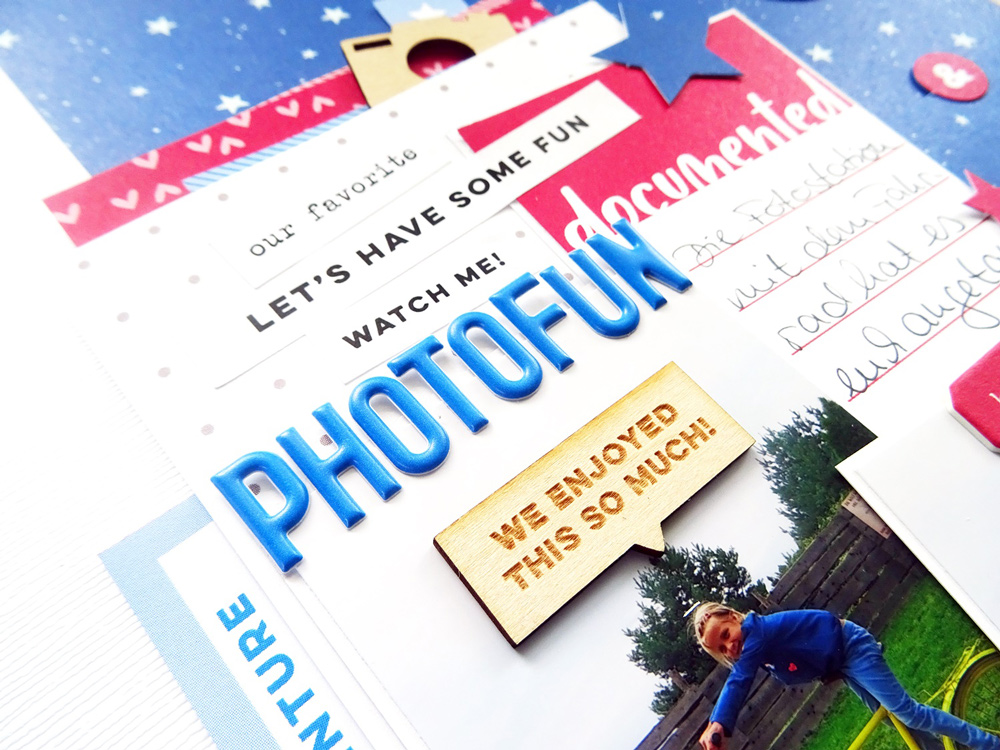
My layout follows a simple color scheme: blue, red and white. I picked these colors because they match my son’s sweater he is wearing in the picture. I decided to use the star patterned paper from the new Summer Fun Paper Stack as a base, then I added paper layers under my photo, just like in the sketch. After finishing the paper cluster, I used different embellishments to add some nice details. The Cerulean Blue Puffy Alphabet Stickers and one of the Vacation Wood Veneers were placed on top of one of the pictures, so all the different elements and embellishments are linked in some way.
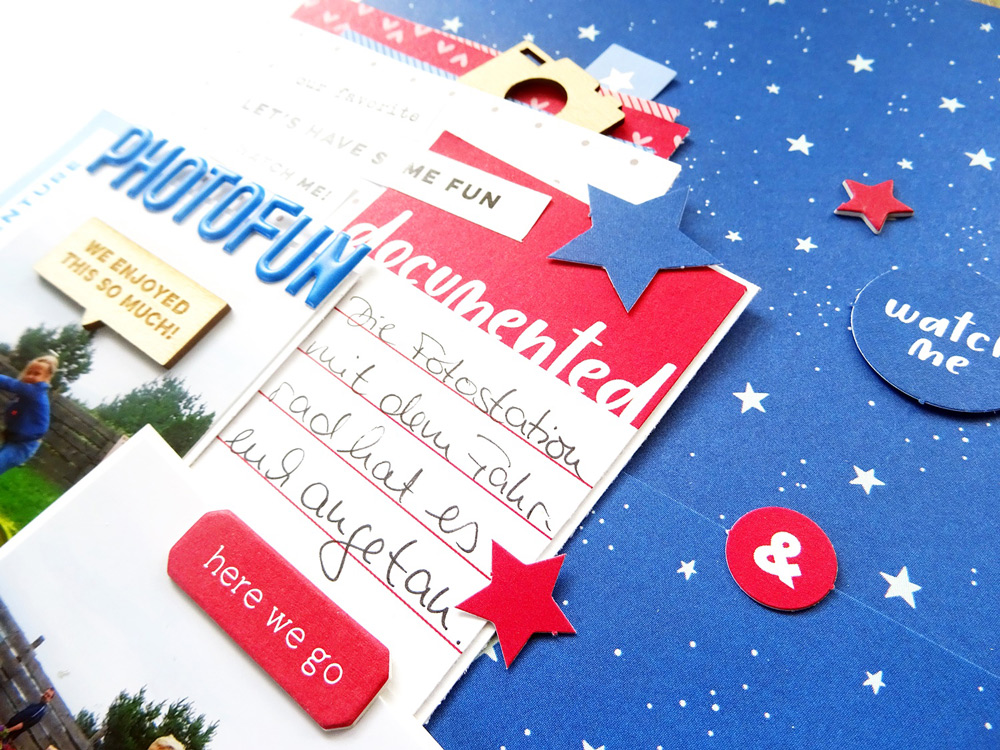
I love the Chipboard Star Stickers, and they add a lot of dimension to the page. I chose the red and blue stars and placed them on the blue patterned paper background.
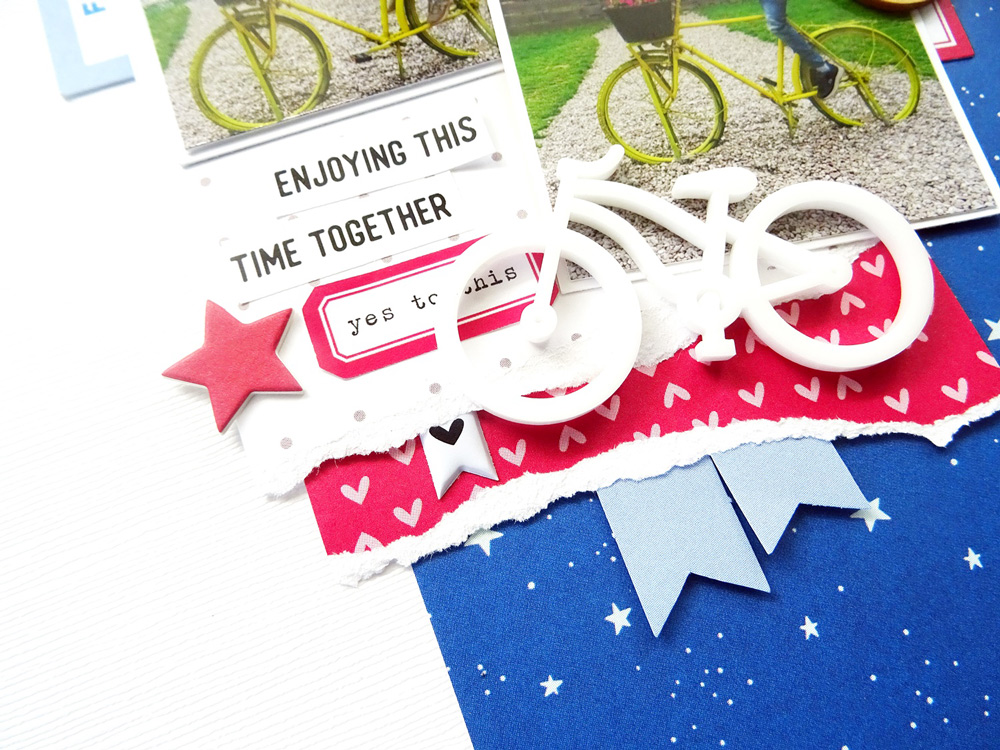
The sketch shows two titles, so I added some of the phrase stickers from the Summer Stickers under the picture. One of the Acrylic Bicycles created a perfect addition to the page, and the ripped paper edge and the fussy cut banners added even more interesting details.
I hope you like my take on the sketch! Thanks so much for stopping by today and don’t forget to share what you create with this sketch as your starting point using the hashtag #EllesStudio on Instagram, or in our Elle’s Studio Facebook Group!
Have fun using your kit!
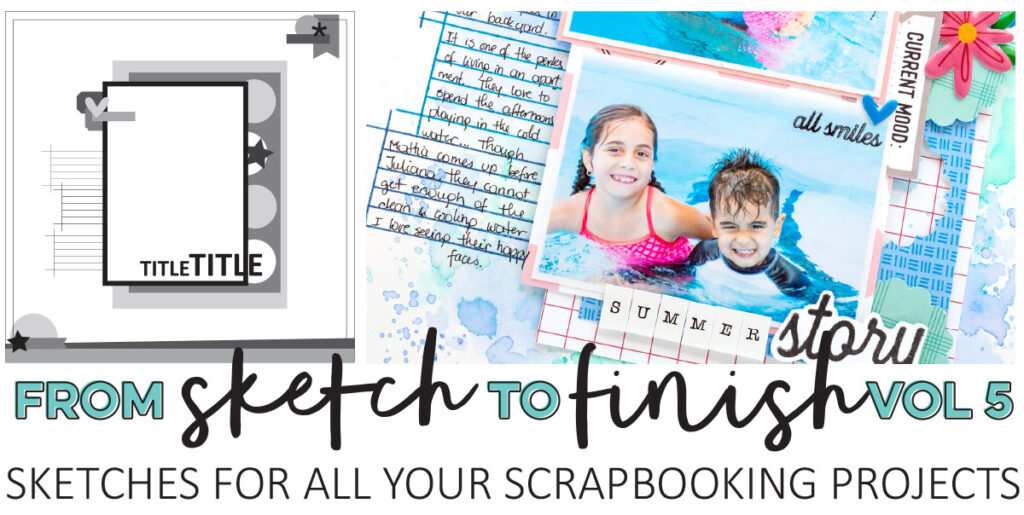
Love working from a sketch? Find our latest class, From Sketch to Finish Vol. 5 (available with or without the exclusive class stamp!) in the classes section of our shop, and get instant access to 50 full-page sketches and 20 amazing layouts from 10 talented contributors! We know that this class will keep you creating all summer long!
Comments Off on Sketch Day with Daniela | Share This
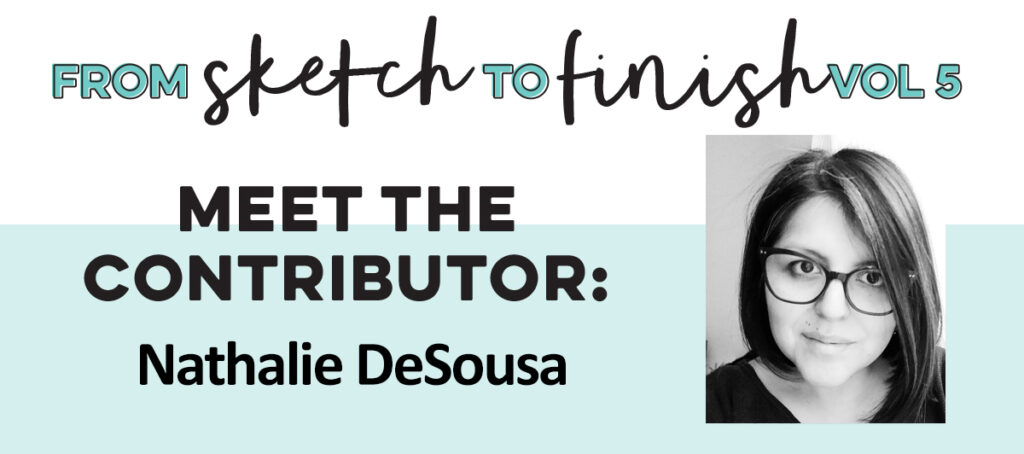
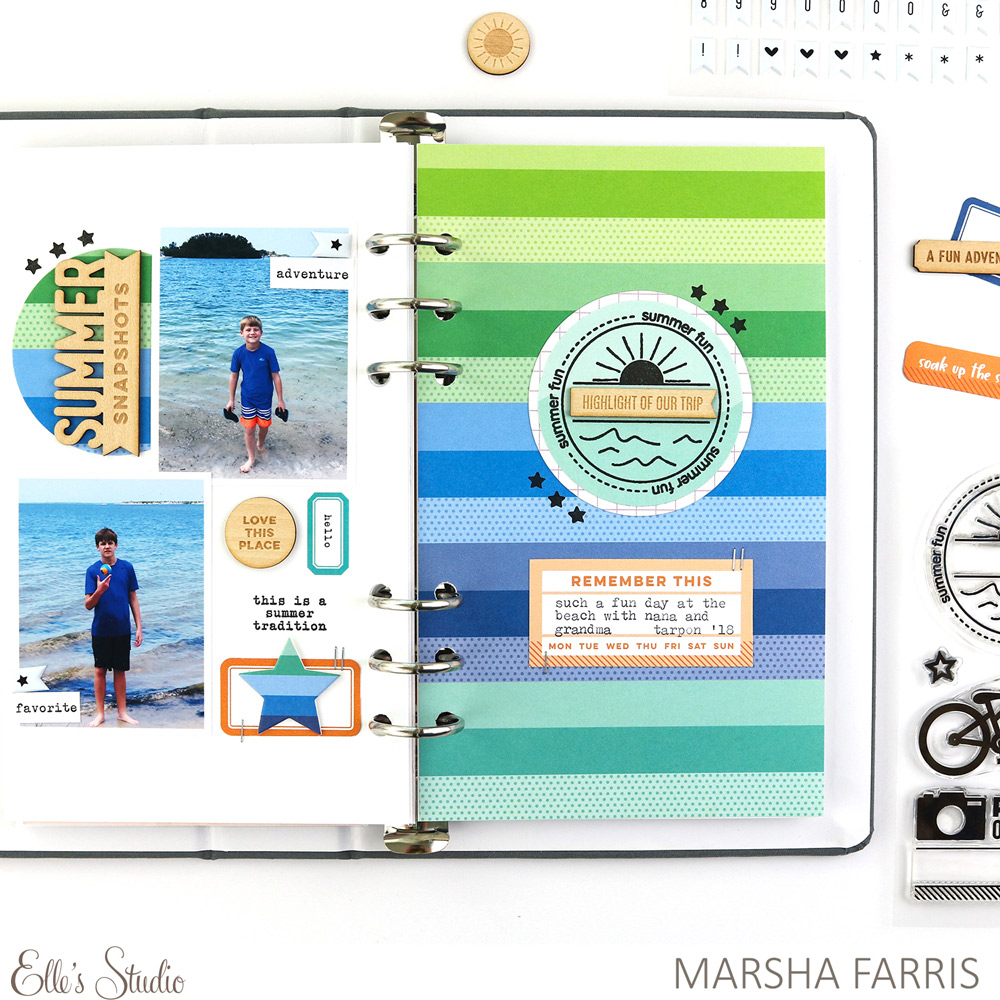
We are so happy to welcome From Sketch to Finish Vol. 5 class contributor Nathalie DeSousa to the blog today! Nathalie’s work is just stunning—filled with mixed media, texture, beautiful colors and gorgeous photos. Her projects created for the sketch class are no exception, so be sure to download the class today to be inspired! Today, Nathalie has worked with one of our bonus sketches from the class to create a new traveler’s notebook spread. Let’s see what she created for us today!
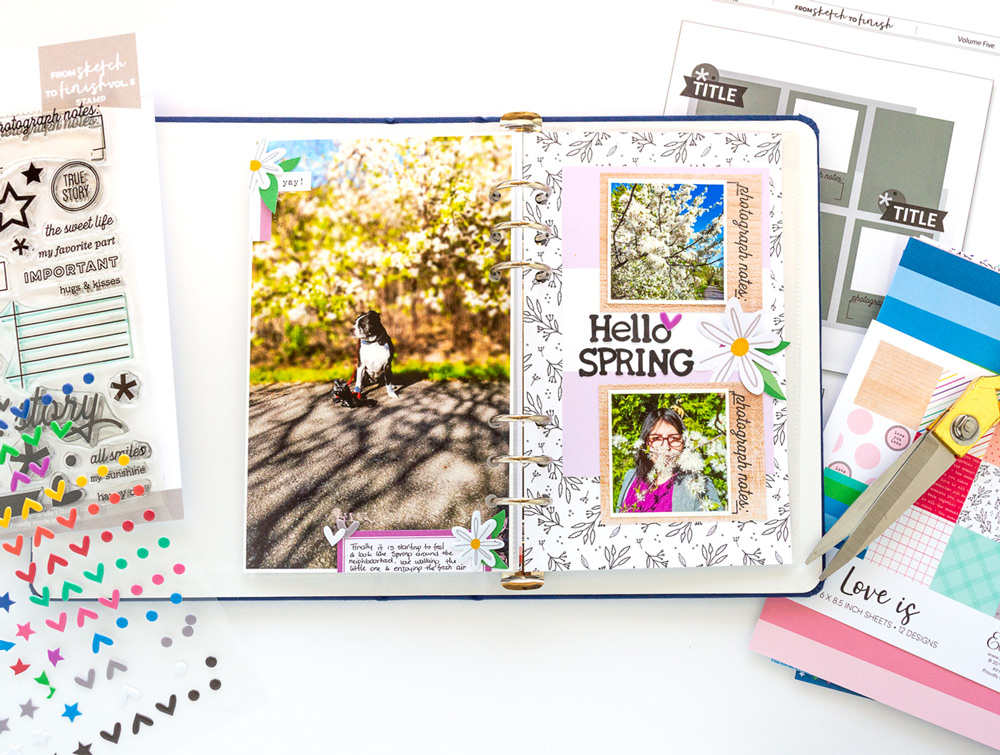
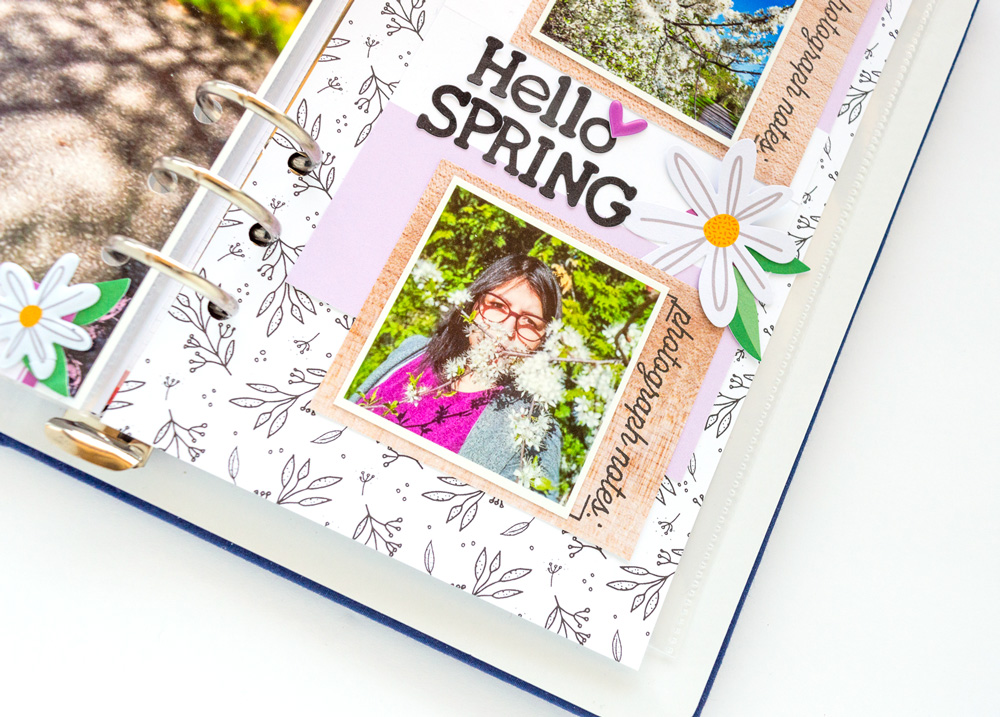
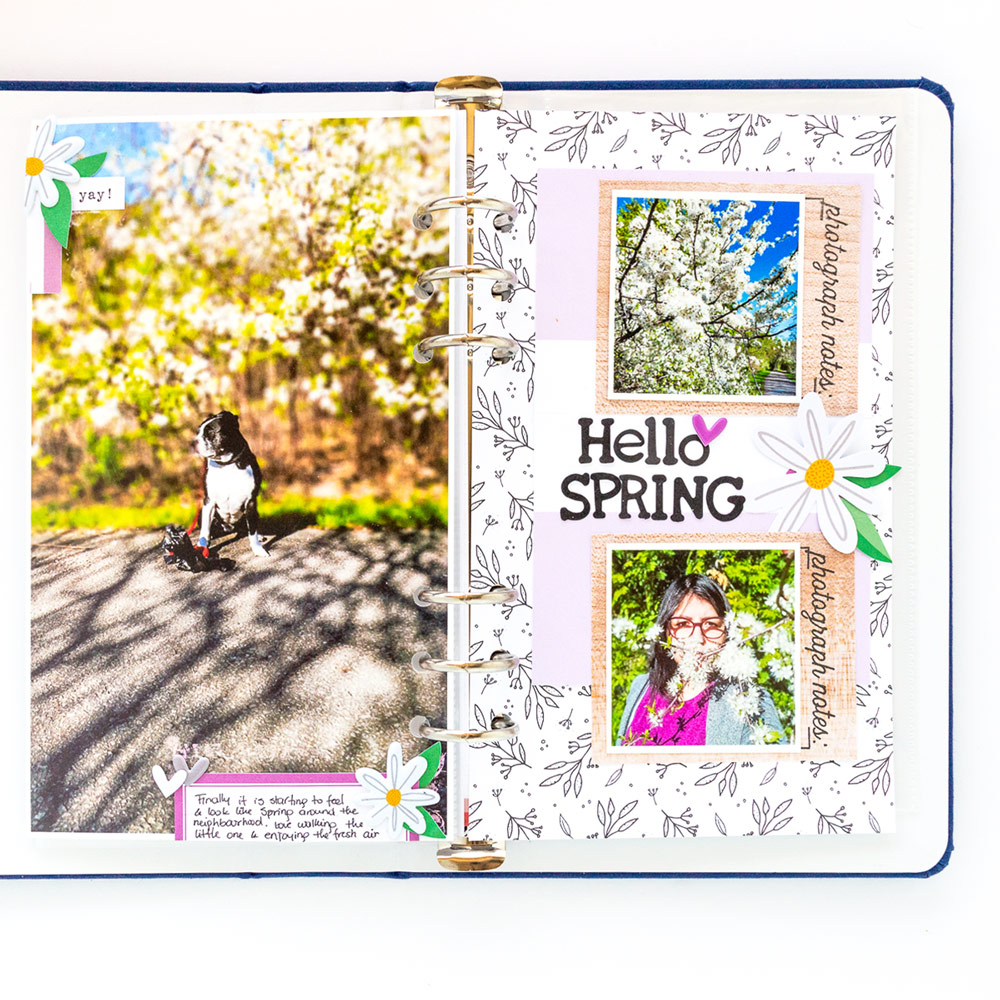
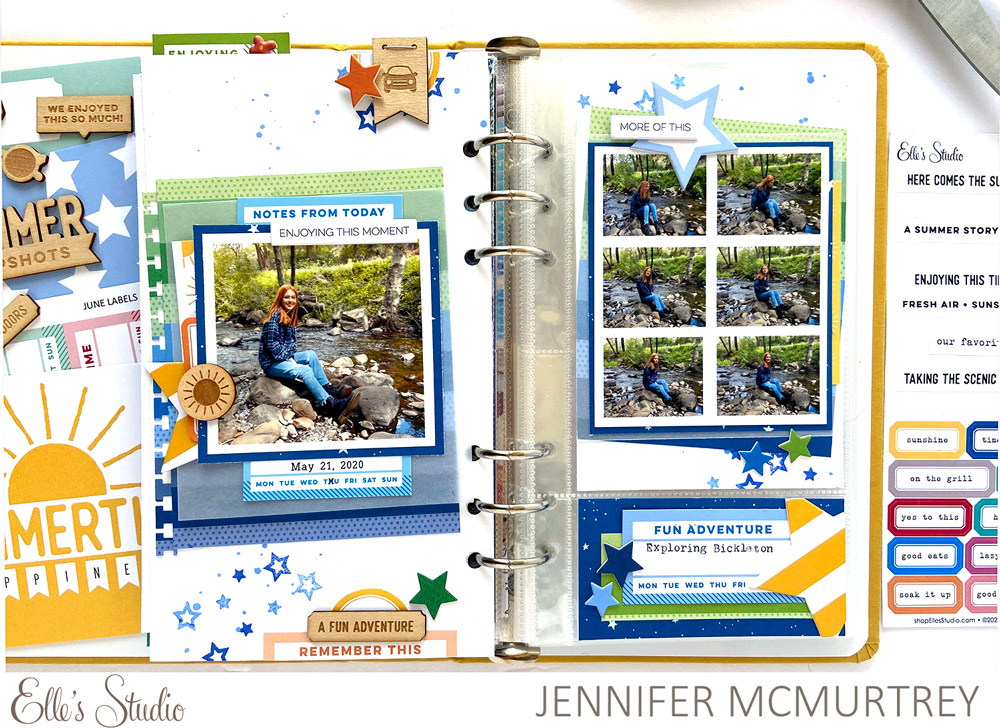
Hi there! It’s Nathalie with you today! I am so excited and grateful to be here on the blog and also a contributor to the From Start To Finish Vol 5 class. Sketches are a great kickstart for documenting, regardless of the format you are using. They are a blueprint for your layout. I was so inspired by sketch 15 and its grid formation that I used it on one of my daily documenting entries in my ringed traveler’s notebook.
First, I rotated the sketch 90 degrees counter-clockwise to create my layout, as this will provide a center line for the page that can easily be replicated on a TN spread.
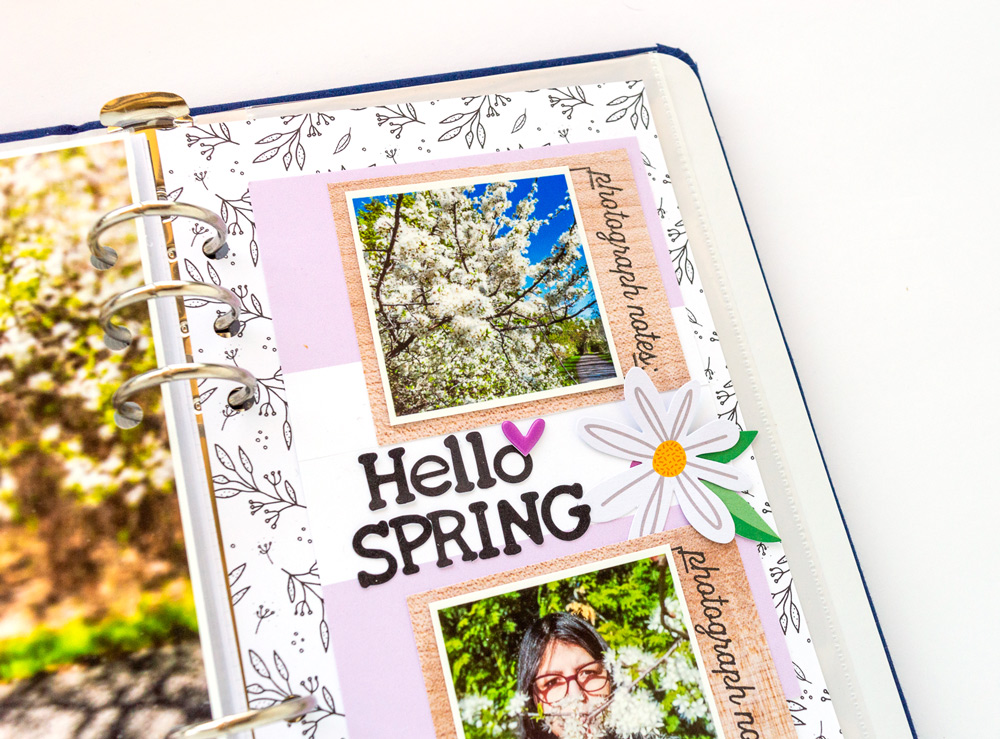
I love the multiple photo positions on the sketch, as I am documenting a bright, sunny day here in Toronto, Canada, and I took advantage of the lovely day to take lots of pictures. So, I chose to create the picture frames as in the sketch from the woodgrain paper found in the Love Is Paper Stack and used the awesome From Sketch to Finish Vol. 5 Stamp to add the “photograph notes” along the sides.
The original sketch shows paper layers behind the pictures, but I chose to make a small alteration by using one of the 4″ x 6″ tags from the May 2020 Kit as the layer behind the picture frames. Instead of adding a third “picture frame” as per the sketch, I decided to use the space between the picture frames to add my title, using the Black Typewriter Cardstock Alphabet Stickers and the large floral cluster from the Beautiful Day Die Cuts.
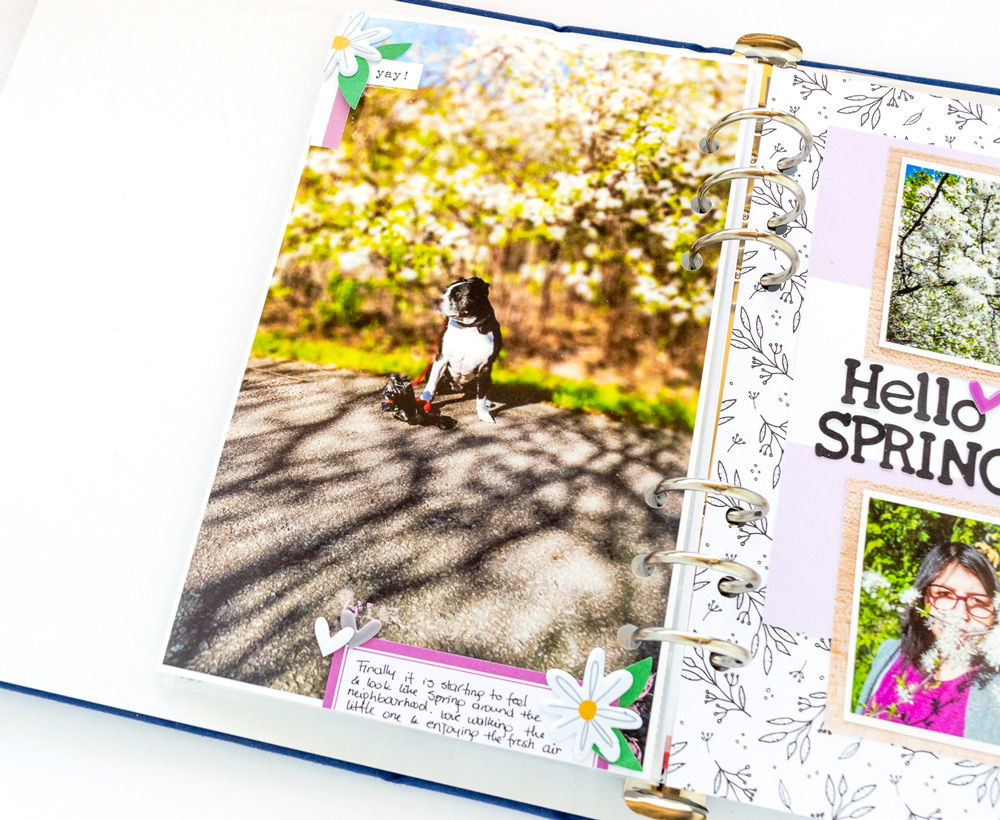
For the other half of the spread, I decided to use a full-sized photo. I made sure to choose an image where the subject, aka our baby, Poochie, was in the center of the page. This will assure that your main focus is left on the subject.
I added two more clusters of repeating embellishments to the large photo, but deviating a bit from the original sketch with their location. Sometimes, you have to move a bit of the elements of the sketch around to make them work for your pages. Remember sketches are a starting point—the rest is up to you!
I hope this shows you how easily you can transform a sketch to a smaller format! Imagine how you could use all of the From Sketch to Finish Vol. 5 sketches in your mini albums or traveler’s notebook to document your summer! I cannot wait to see what you create from the sketches and inspiration found in the class!
Let’s learn a bit more about Nathalie:
Residing in: Toronto, Canada
Living with: Stay-at-home wife to Roger, Mom to my two teens: Joshua and Gabrielle and our 10 yr old baby Boston Terrier: Poochie, and blessed to have my mami with me always.
Scrapbooking since: 2016
Favorite type of memory-keeping: Traveler’s notebooks for everyday documenting, and 12″ x 12″ layouts for memory keeping (love letters to my family)
Favorite technique: Mixed media and hand stitching
Favorite layout or project ever created: This is a hard one for me, too many to chose from!
Crafty essential that you could not live without: I think the one thing I could not live without is black fineliner. I need to write stories, even when there is a picture to accompany, the story will always come first!
Find more inspiring projects from Nathalie at the links below!
Thanks so much for inspiring us today, Nathalie! Find Nathalie’s summery, exclusive layout designs in our From Sketch to Finish Vol. 5 class today, and be sure to grab it with the exclusive class stamp at a special price while supplies last!
Comments Off on MEET FROM SKETCH TO FINISH VOL. 5 CONTRIBUTOR NATHALIE DESOUSA! | Share This
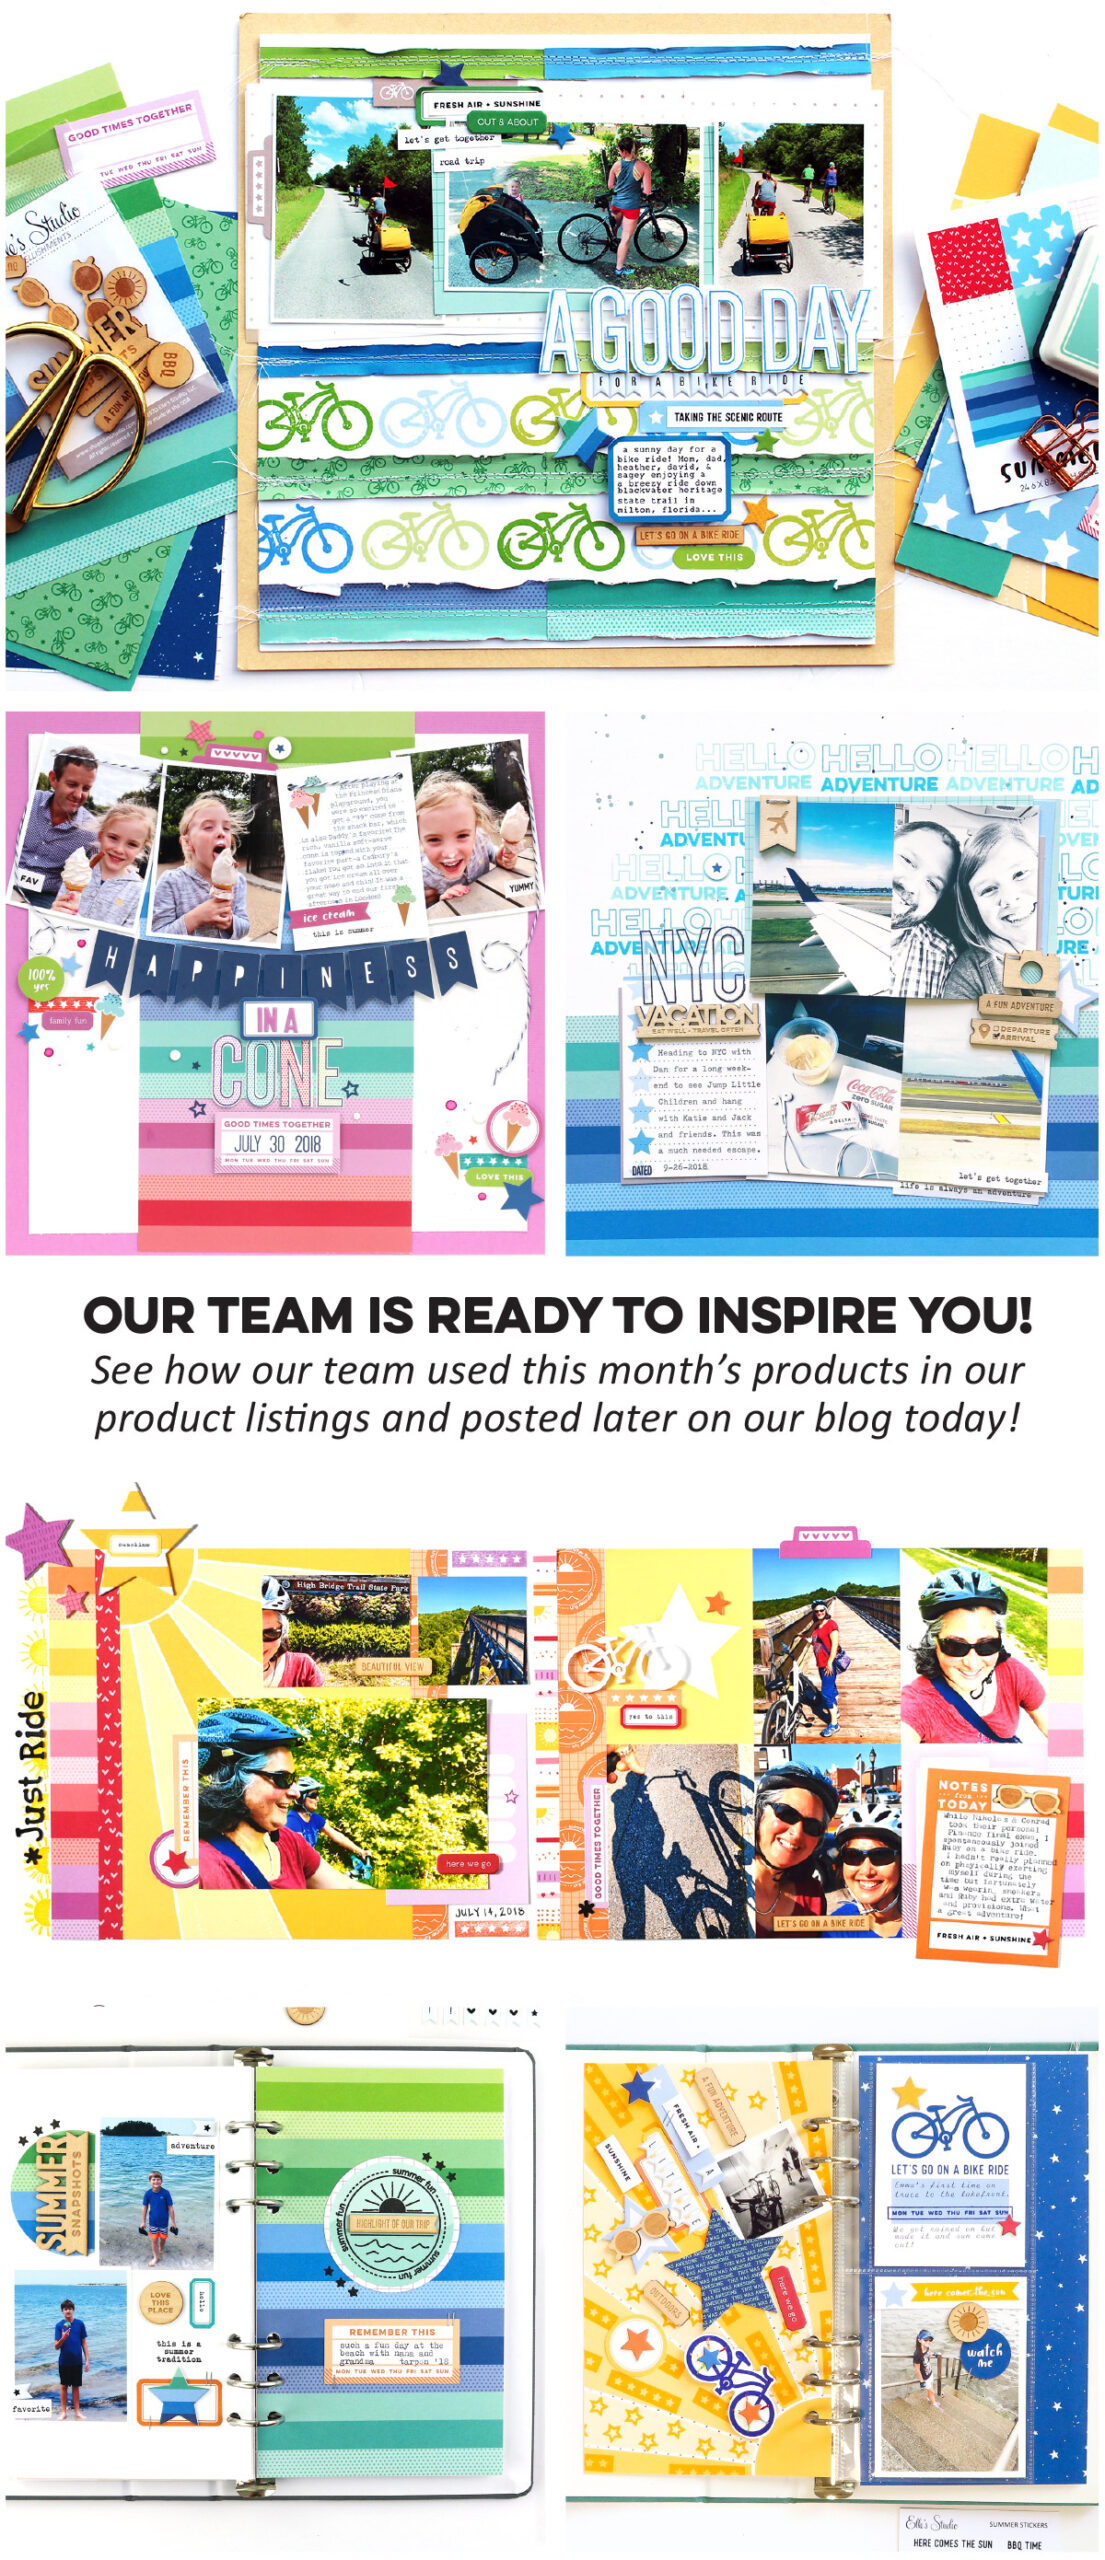
Our June 2020 kit and add-ons are live in the shop, and our design team has had some fun playing with our newest products! Take a look at the 16 new layouts, pocket pages, traveler’s notebook spreads and cards that they created to inspire us to create!
Be sure to watch the blog here all week for more project inspiration featuring our new June products, and be sure to add the projects you love in this post to your Pinterest board for future crafty sessions!
Comments Off on June Reveal Design Team Inspiration | Share This
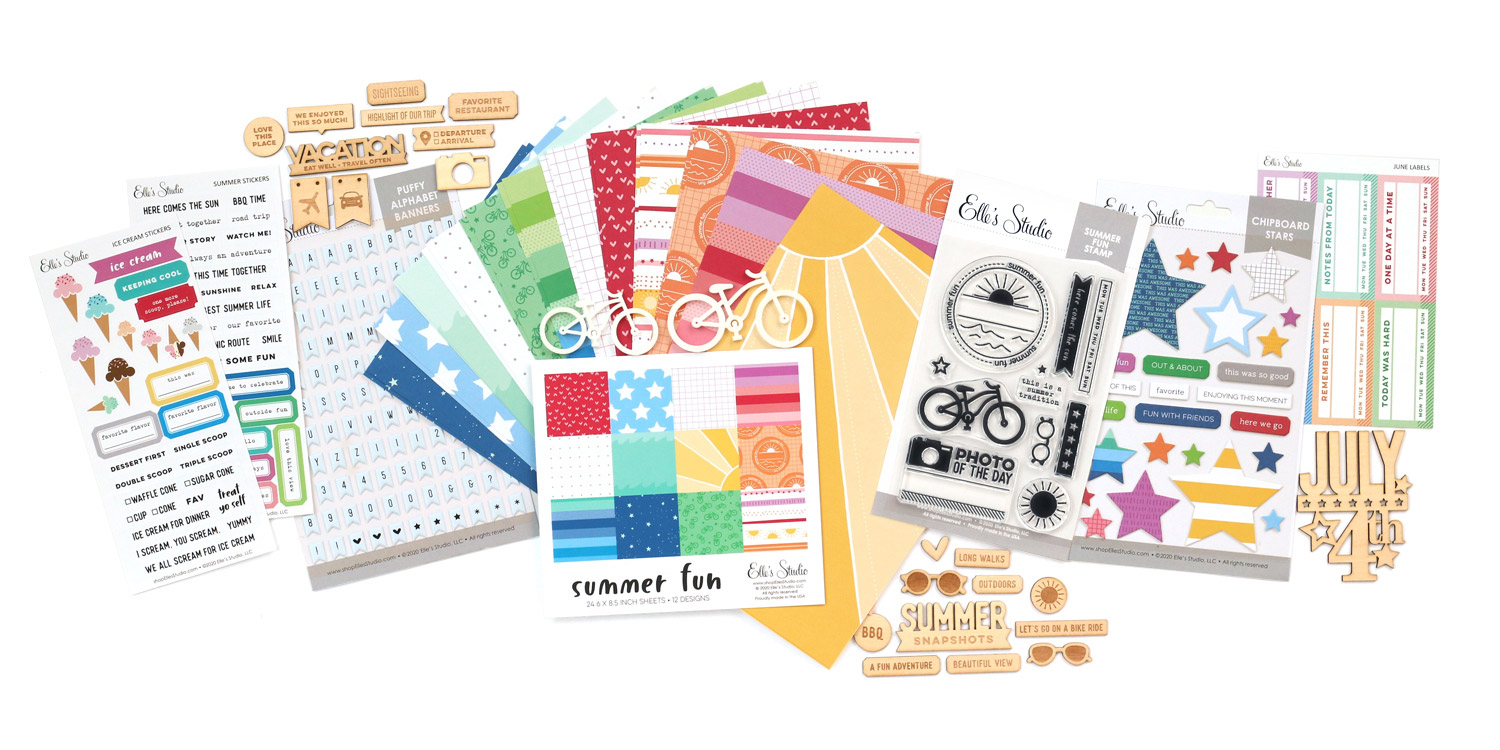
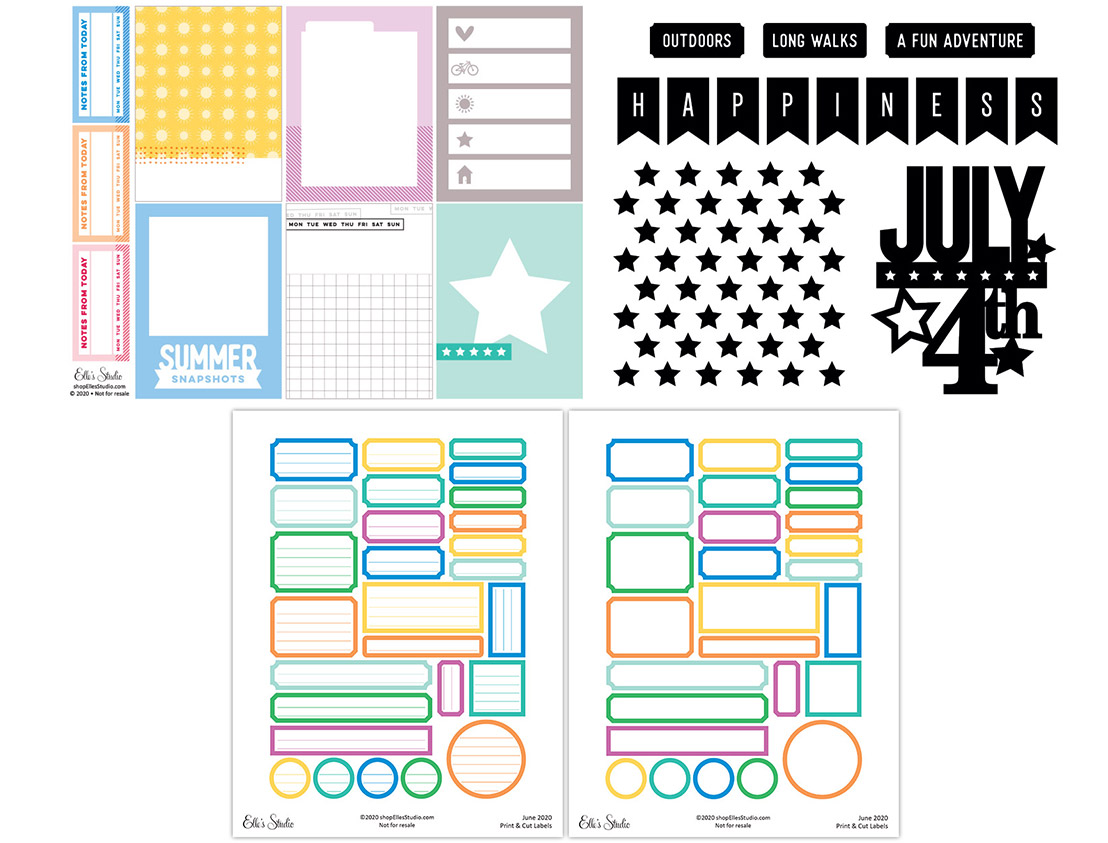
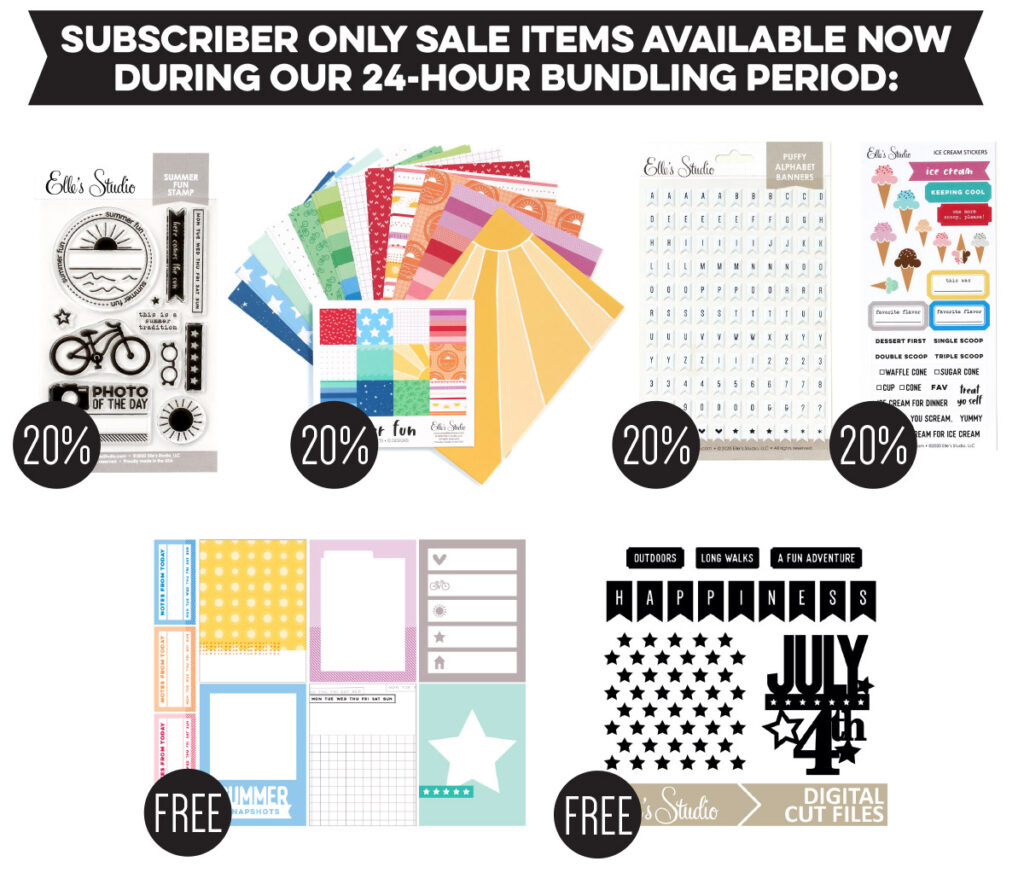
Our June reveal is here and we are so excited to share all of the brand new and exclusive products that are now available in our shop today! Our June kit includes 3 – 4 x 6 inch tags, 18 – 3 x 4 inch tags, and 25 die cuts, that will work great on your scrapbooking layouts, pocket pages, traveler’s notebooks, cards, planners, and more! When designing our kits, we love to think of tags that can be used as prompts to help make it easier for you to get your story started and documented, and this kit is full of those and so much more!
Here’s the first look at all of the fun tags and die cuts included in this kit:
Our monthly kits are limited and once they sell out we will not be restocking! Look for a new kit on the 10th each month at 8:00 am Pacific! Our kits are available for single purchase or select our subscription option to subscribe and SAVE!
Our digital files this month include coordinating printables, June cut files, and print and cut labels that coordinate with our kit – once you download these files, you can use/print them over and over again!
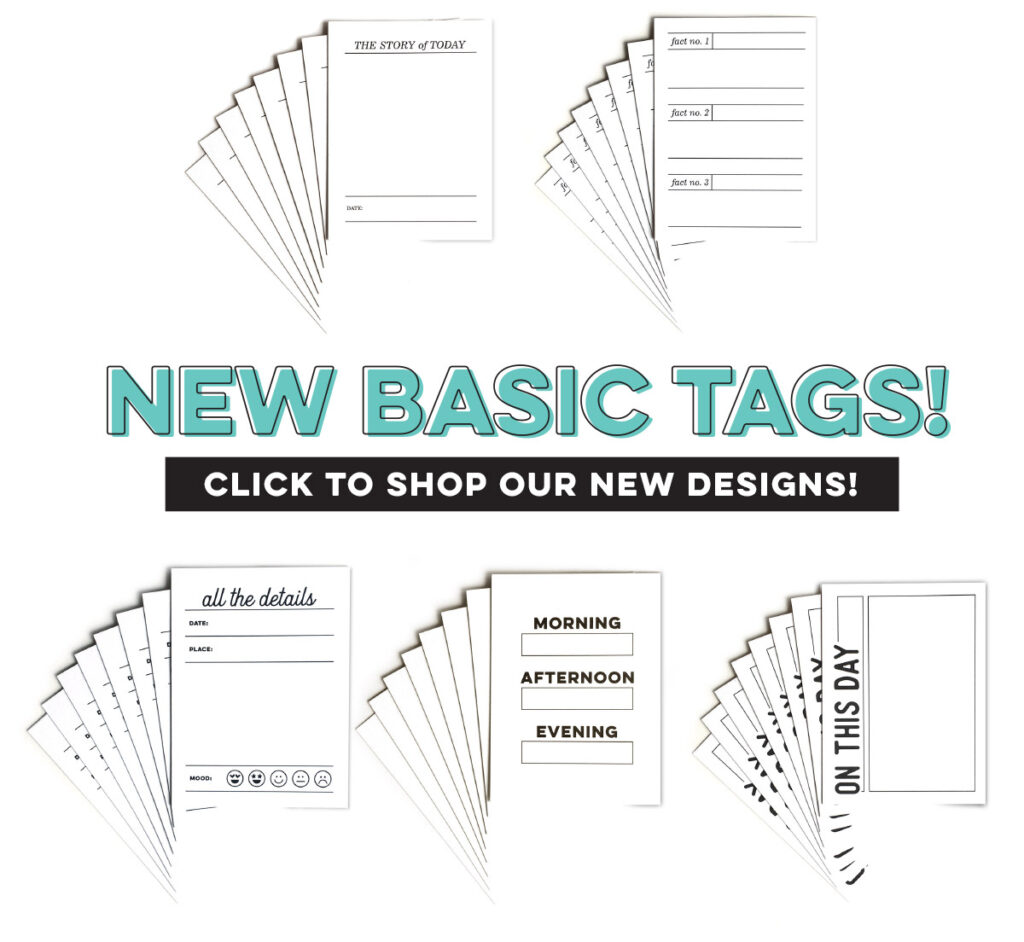
We also added some new basic journaling tags to our shop! We love having these basic tags around to use in our pocket pages!
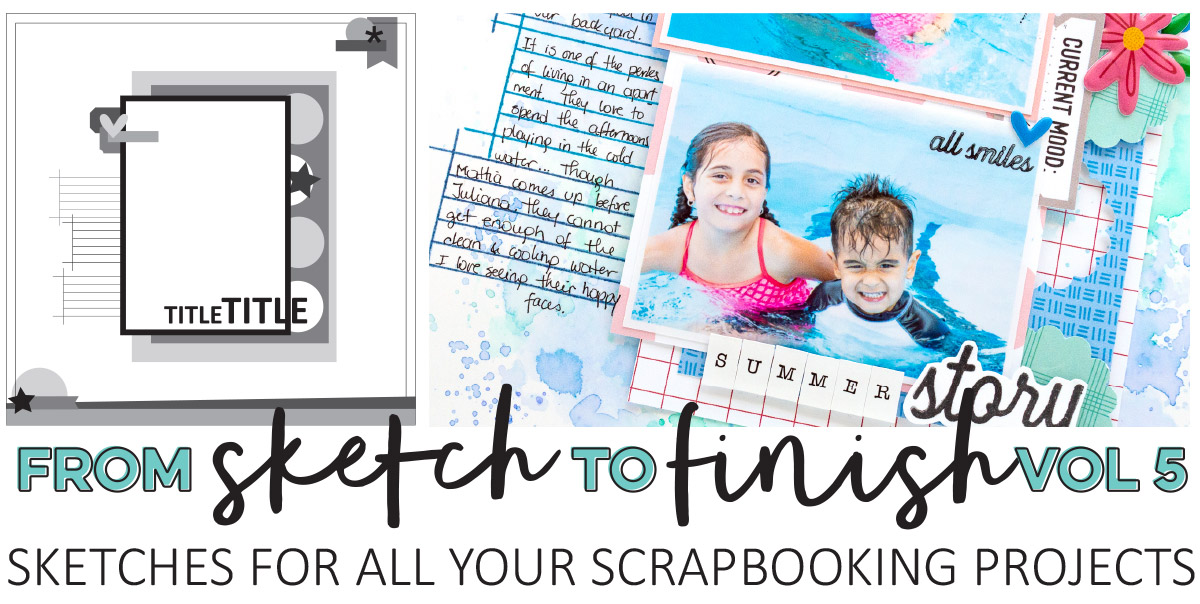
If you are looking for inspiration to stay inspired all summer long, don’t miss our newest sketch class! Our new, self-paced class, will take the guesswork out of the process and will allow to you create layouts you love in no time!
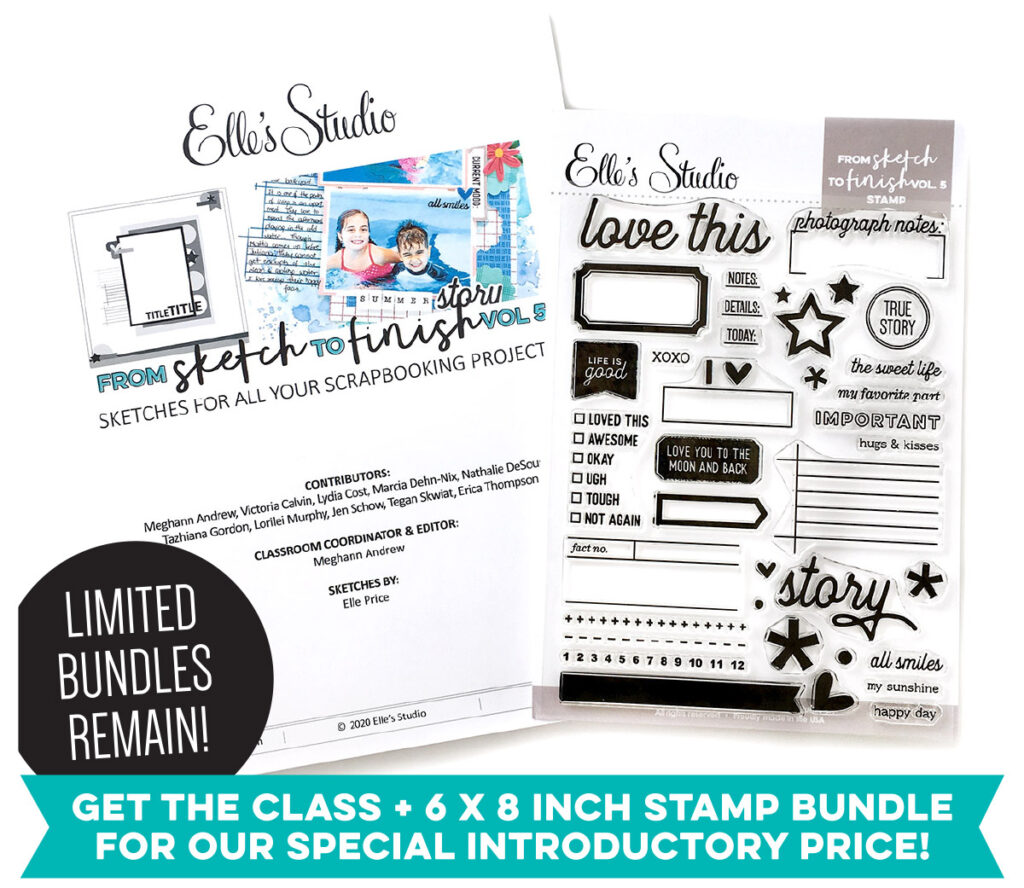
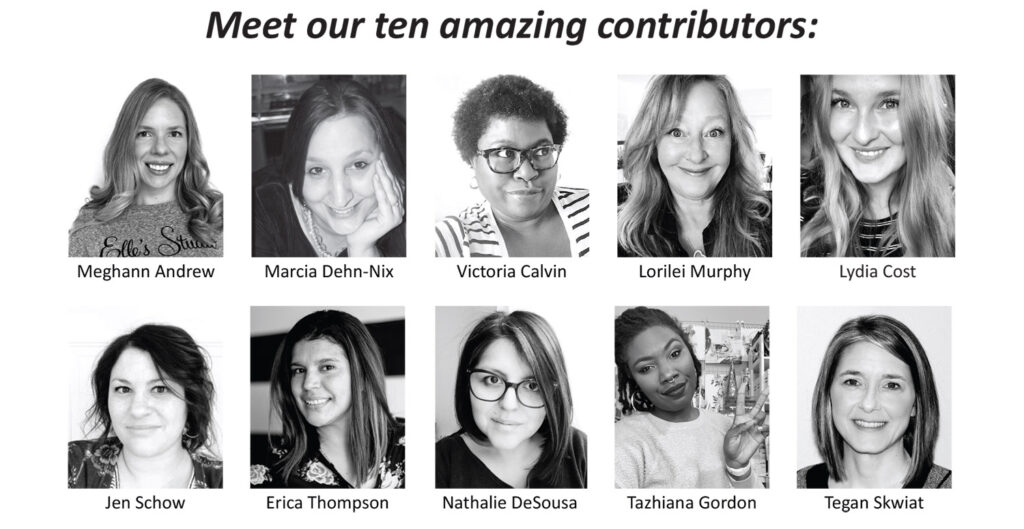
From Sketch to Finish Vol. 5 is a 70 page PDF self-paced class that contains 50 never seen before, exclusive sketches that will keep you inspired all summer long! You’ll start out with 10 different sketches and 10 contributors each sharing two layouts they created from a sketch. You will get to read their tips and see how they interpreted each sketch to fit their unique and beautiful styles on the 20 different layouts they’ve created. Next, the class features 20 full-page sketches that will have you on your way to creating projects in no time! Then, our class ends with another 20 bonus sketches that were inspired by the final outcome of our contributors projects and you’ll be amazed at how differently they turned out! It is a great example of how sketches can inspire you to get creative! For double-page layout lovers, we’ve also included several examples on how to stretch a sketch to create a two-page layout, that we know you will love!
From Sketch To Finish Vol. 5 is available with an exclusive and BIG 6 x 8 inch stamp (limited amount of bundles remain) that was designed just for this class and is available at a special introductory price! The possibilities are endless, and in the class, our contributors will show you how they used the stamp on their layouts! For those who aren’t into stamping, we’ve also made the class available without the stamp, too. This class comes as a downloadable PDF file. Once you have purchased the class, you will receive a link to download the class. Please make sure you save the class to your computer. Click here to pick up the bundle while supplies last!
Subscribers, you can start bundling now! Bundling is easy – just log into your account and use the “Bundle with my kit subscription” shipping option during checkout to receive FREE shipping on any extra items purchased from our shop that will ship with your kit. This option will only be available during our 24-hour bundling period.
Not a subscriber? Don’t wait any longer to sign up! Subscribe today to lock in our special kit price of $9.99 + shipping, and you’ll be able to bundle any additional products from our shop and have them ship for FREE with your kit subscription, during our 24-hour bundling period, starting on the 10th at 8:00 am Pacific!
When starting a new subscription: you’ll want to first check out with only the kit subscription in your cart. After you have subscribed to our kit, you will then be able to see your special discounts on select items in our SALE section during our 24-hour bundling period! You must be logged into your kit subscriber account to see your discounted items. Quick note: Our subscription is risk free and can be cancelled at any time by emailing us. Our monthly kit and add-ons are available without a subscription each month, too.
Here’s a look at the items on sale for our subscribers only this month:
Subscribers: Pick up these six items for FREE to 20% off during our 24 hour bundling period that is going on now and ends on Thursday, June 11th at 8:00 am Pacific! Please make sure you are logged into your subscriber account, then click on the SALE section to see these items on sale! Once you are logged in, you’ll see your special discounted product listing that specifies Sub Discount.
Looking for more inspiration? Our design team is ready to inspire you with brand new, fresh inspiration using the new products this month! You’ll be able to find their amazing inspiration in our product listings so you can see their projects while you shop! We will also be showcasing our team’s projects on the blog later today, and throughout the entire month!
Thank you so much for joining us today! We are so grateful to be a part of this amazing community and are excited to see how you use these new products! Make sure you share your projects with us in our Facebook group and make sure you use the #EllesStudio hashtag when posting on Instagram for a chance to be featured on our feed and win a gift certificate to our shop!
Comments Off on Our June kit + add-ons have arrived! | Share This
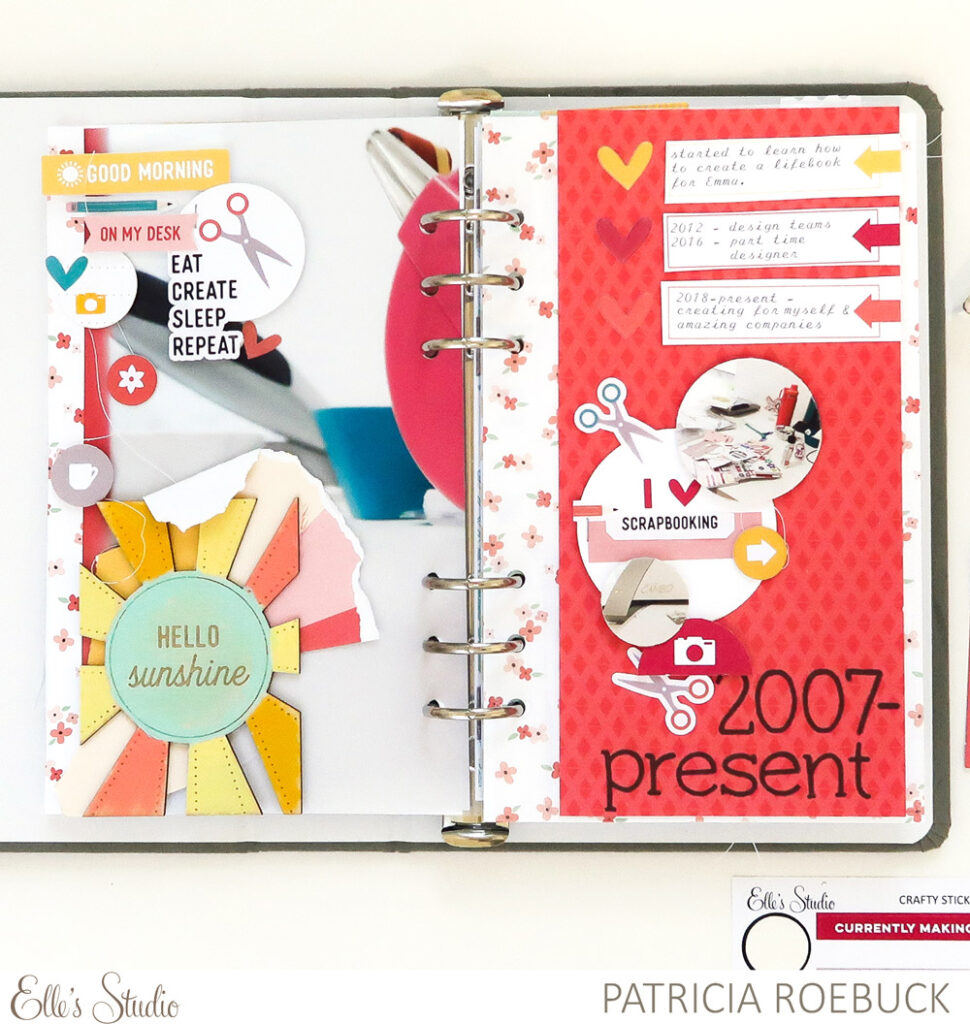
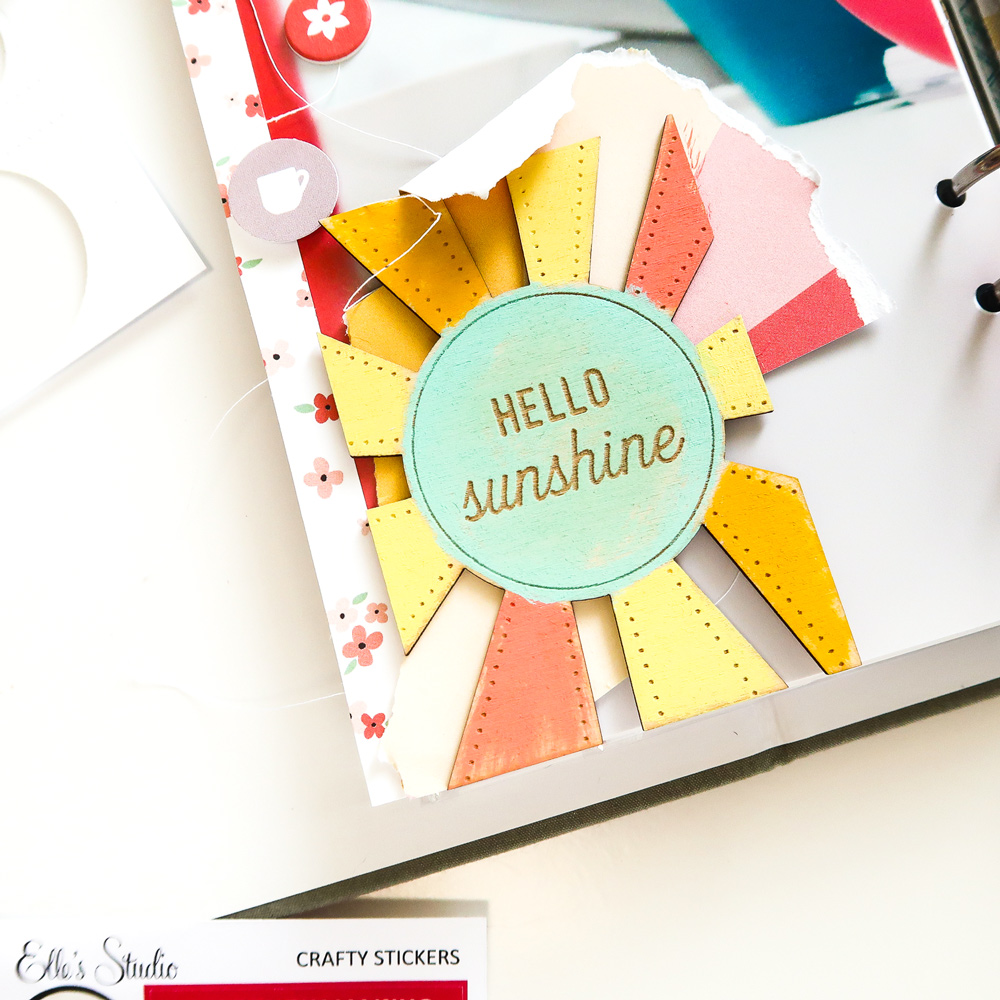
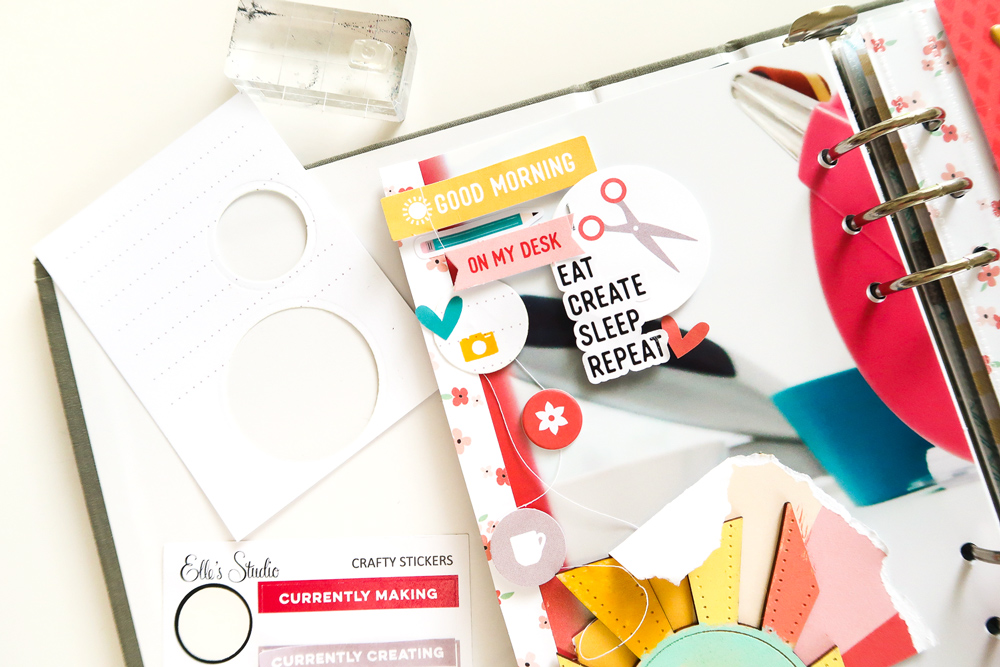
Hello, Elle Studio friends! Recently, the May 2020 kit and extras got me inspired to create a project about my love of scrapbooking! In this post, I’ll be sharing four different ways to make the most of your leftover monthly kit tags. I’ll also show you how the Hello Sunshine Wood Veneer piece that I painted didn’t work for a previous project, but seemed to fall right into place for this one. Let’s get started!
I just loved that Hello Sunshine Wood Veneer, and decided to paint it, but it didn’t work with the project I intended to use it on. I had backed it with a May 2020 Kit tag, giving it a vintage distressed look. It fit my eclectic style as well as my love of scrapbooking. With that piece in mind, I printed a large photo to adhere that piece to first.
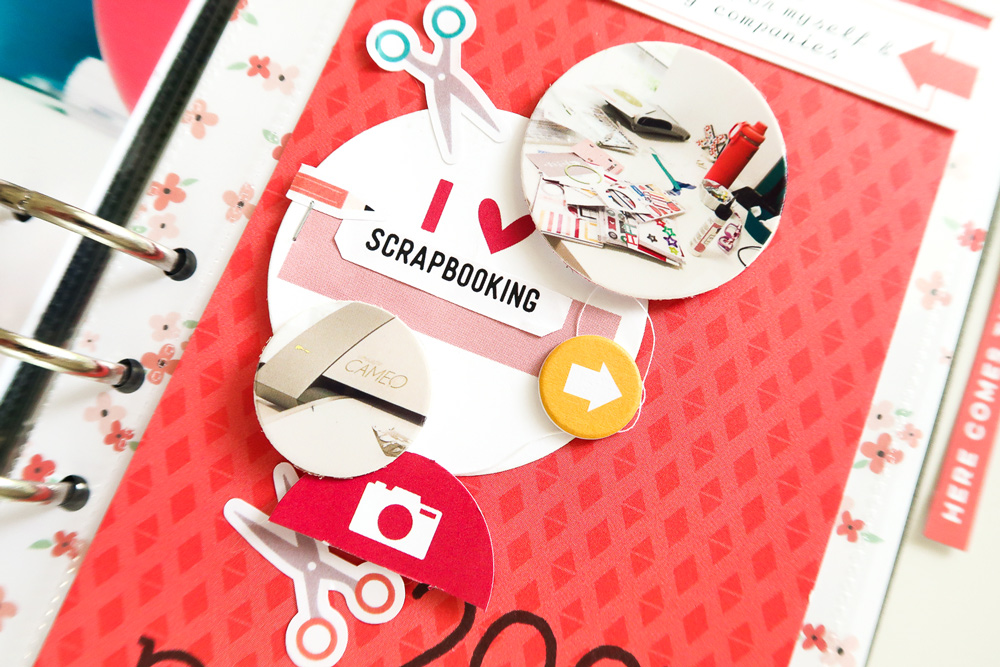
The next thing I did was create circles from two May Kit tags using circle dies. From the first tag, these circles gave me customizable ways to add them as a die cut with the scissor image, and a smaller image with the stamped camera. For the second tag, I created a larger circle with the I {HEART} image to go on the right. To finish this left side, I created a cluster on my large photo using the tags cut in circles along with Crafty Stickers, May Kit die cuts, and Icon Chipboard Stickers.
To continue the circle design from the left side, I used the same circle dies to die cut circles from two more photos. I used the coral Flourish 6 x 8.5 Paper Stack pattern as my background, then added the circle cut tag in the center, clustered my circle photos, more Crafty Stickers, May Kit die cuts, and Icon Chipboard Stickers. Using foam adhesive gave me more of the layered look I wanted. I love how the scissors tuck under the circles!
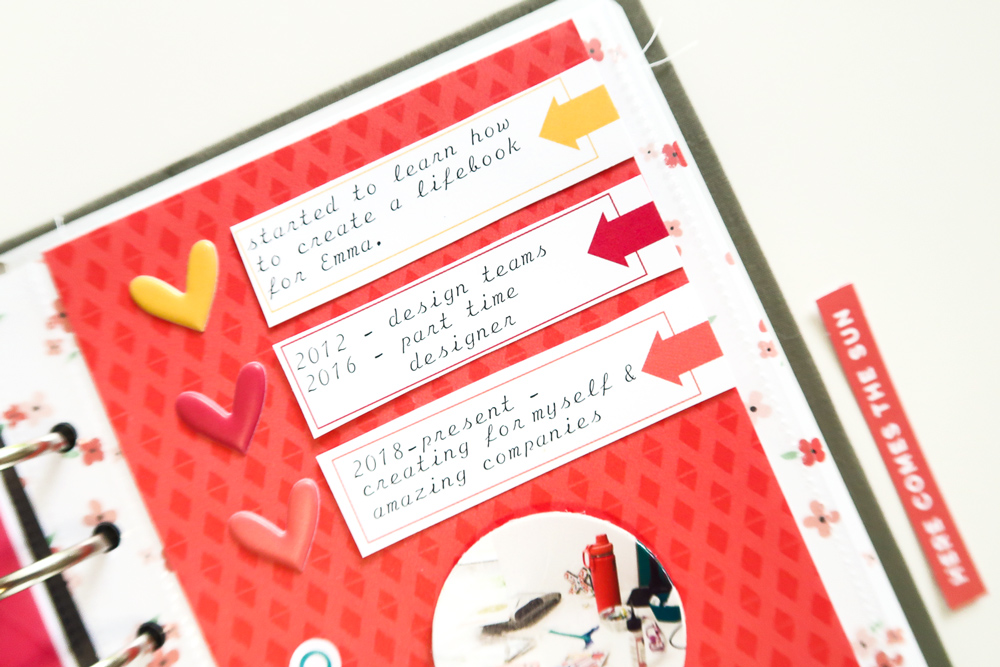
The next May Kit tag I used had journaling lines and arrows. I added my typed journaling to the tag, trimmed each rectangle out and adhered, then added Puffy Heart Stickers to repeat those colors from the arrows to the left side of the tag.
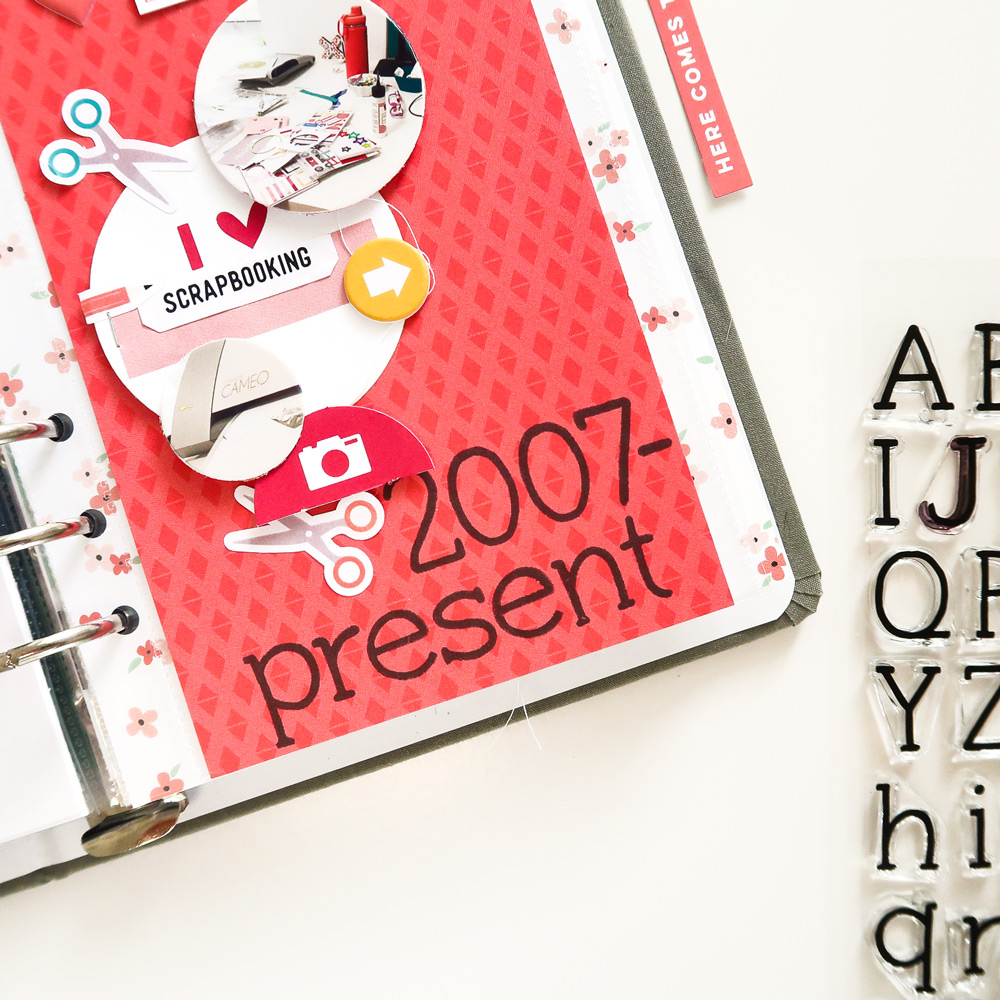
I wanted to document how long I had been scrapbooking. The Typewriter Alphabet Stamp gave me the look I wanted by stamping the dates at the bottom of the page in black ink.
In all I used four May 2020 Kit tags: two cut as circles, one cut in strips for journaling, and one torn and adhered behind the Hello Sunshine Wood Veneer, giving me so many different looks! Now, pull out your unused May 2020 Kit tags and large embellishments that didn’t get used on another project and see what inspiration hits you for your next project!
Comments Off on Monthly Kit Tags Four Ways with Patricia Roebuck! | Share This
We are just two days away from our June kit and add-ons reveal and we are so excited to be able to share these fun sneak peeks of amazing projects our team made using all the new products that will be available soon! Our June reveal will be full of exclusive products that we’ve designed and will have you ready to document your June stories and take you right into July!
Not a subscriber? Don’t wait any longer! You can pre-order our June kit now and lock in our $9.99 kit price by starting a subscription today! You’ll want to choose our SUBSCRIBE & SAVE option to get signed up and start your subscription with our June kit. We will then hold your kit and you’ll be ready to bundle and save at our June 10th reveal! Details on how to bundle with your subscription order will be emailed to you once you have purchased this product.
Kit subscribers, don’t forget! Along with being able to bundle any products from our shop that will ship for FREE with your kit during our 24-hour bundling period, starting on the 10th at 8:00 am Pacific each month, our subscribers will also have access to special discounts on select items! Above is a preview of our June discounts and savings that will be available for our subscribers during our June bundling period! These discounted items can be found in our SALE section during our 24-hour bundling period, and you must be logged into your kit subscriber account to see them. If you haven’t subscribed to our kit, sign up now to take advantage of these special offers on June 10th! Quick note: Our kits and add-ons are available without a subscription each month, too.
Make sure you set your alarm and mark your calendar for this Wednesday, June 10th at 8 am Pacific! We hope to see you there!
Comments Off on June Design Team Sneak Peeks | Share This
Wow! What an amazing month it has been for the #EllesStudio hashtag on Instagram! We’ve seen so many new faces using our products, and we can’t wait to share some of them with you today! Let’s take a look!
Just for sharing their projects, these six paper crafters will each win a $10 gift certificate to the shop! Thank you so much for posting your projects and using the #EllesStudio hashtag, ladies! Please email us at info@shopellesstudio.com to claim your prize!
Will YOU be featured next month? Simply use our products on your next project and post to Instagram using the hashtag #EllesStudio for a chance to be featured here on our blog, and win a gift certificate to the shop! We can’t wait to see what you make!
Comments Off on May #EllesStudio Spottings on Instagram! | Share This
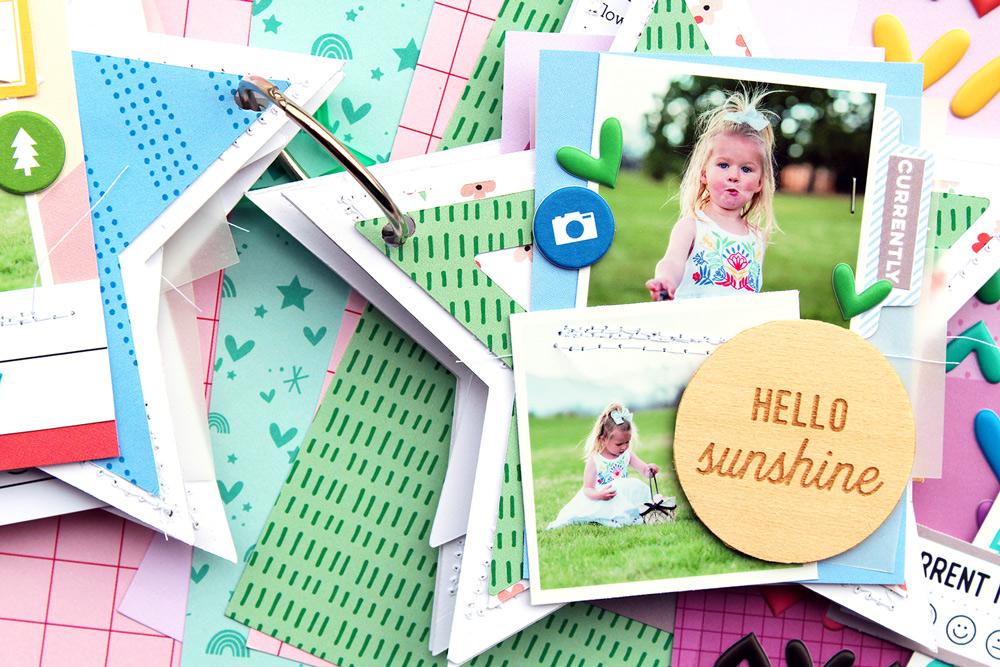
Today we are excited to show you another creative possibility using our monthly digitals—a gorgeous mini album created by design team member Melissa Mann! Let’s take a look at how she made an Easter album so special by bringing a shaped design to its pages!
Hello! This is Melissa with you today and my project is all about the digital products that were offered this month! I don’t know about you, but Elle’s digital product releases each month are always a huge hit for me! And this month was no exception with the star cut files. I used these a bunch this month on various projects and really put them to good use for this new mini book.
My brother shared some really beautiful photos he took of my niece at Easter and I knew when I saw them that I was going to want to put some of my favorites into a small mini album.
When I saw the star included in the May 2020 Cut Files, I immediately wanted to make a star shaped mini book. It’s always a fun touch to have a shaped album! I took one of the stars and modified the size of it in Silhouette Studio software and cut one star out. I used this as my stencil to cut four chipboard stars. I then used that same size star and cut out eight more stars from white cardstock paper and adhered these to each side of the chipboard stars to create my album. I also stitched down the stars using my sewing machine as some added reinforcement to hold the pages together. Because I didn’t want the backside of the stitching to show, I cut out four more stars with patterned paper from the Flourish 6 x 8.5 Paper Stack. I cut these just a tad smaller than the white background stars and glued them down.
I always, always construct my mini albums the same way. I construct my base pages first, then place my photos down which are usually layered with some more papers and vellum. In this book, I had some smaller stars that I also layered up underneath. I used a 3″ x 4″ journaling tag from the May 2020 Kit, and layered the stars, vellum, and photo on top. I stitched it down and left the threads long to create some texture in the album.
Once my pages were put together, I then add all the fun embellishments: stickers, acrylic pieces, other die cut pieces, stamps, veneer, and chipboard. Remember to always make your products work for YOU. I loved the Hello Sunshine Wood Veneer but it just wasn’t working in my album, so I decided to cut the “rays” off the middle circular piece and then used that circular piece on one of my pages.
Do you use the digital products that are offered each month? Remember that the GREAT thing about the digital products is that they can be used over and over again! They are a great investment if you know you are going to make a suite of cards using the same element or a mini book that will use the same shape over and over again!
We love to see how you are using the digital products! Make sure to share them with us on Instagram using the hashtag #EllesStudio and in our Elle’s Studio Facebook Group!
Comments Off on A Special Shaped Mini Album with Melissa Mann | Share This