Documenting Togetherness with March Guest Nicole Martel

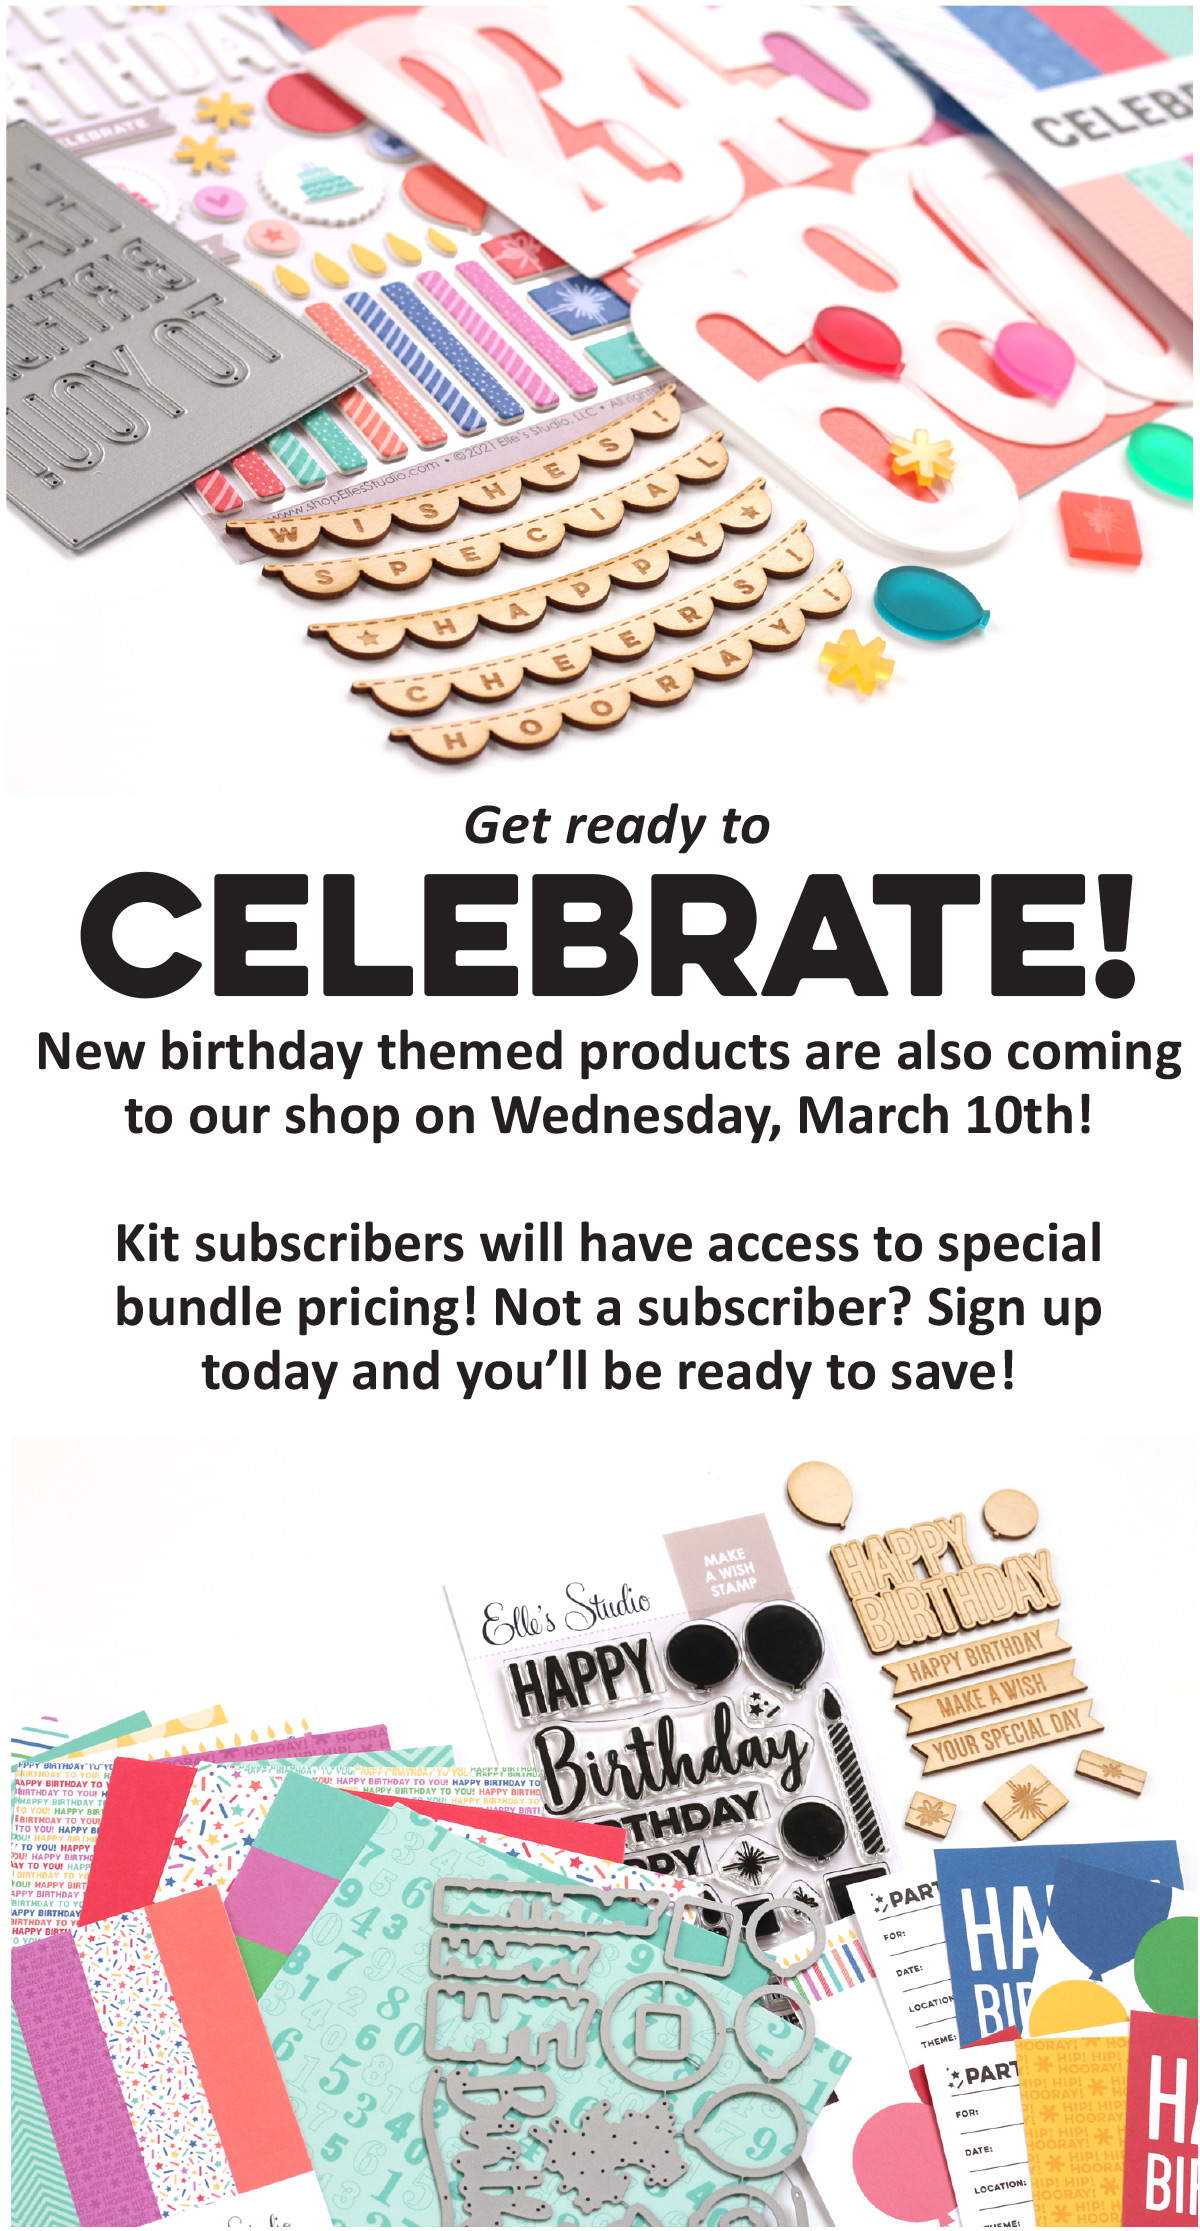
The reveal of the new March kit and add-ons means that it is a new creative month for us here at Elle’s Studio, so we’re excited to welcome a new guest to the blog! Nicole Martel is a prolific paper crafter who creates beautiful layouts, traveler’s notebook pages and more that often feature mixed-media, bold colors and lots of layers! We’re excited to see what Nicole has created with our new March goodies, so let’s welcome her to the blog today!

Good morning! It’s Nicole here and I’m so excited to be guest designing for Elle’s Studio this month! Before I begin, let me just say one thing: Happy Birthday, Elle’s Studio! 

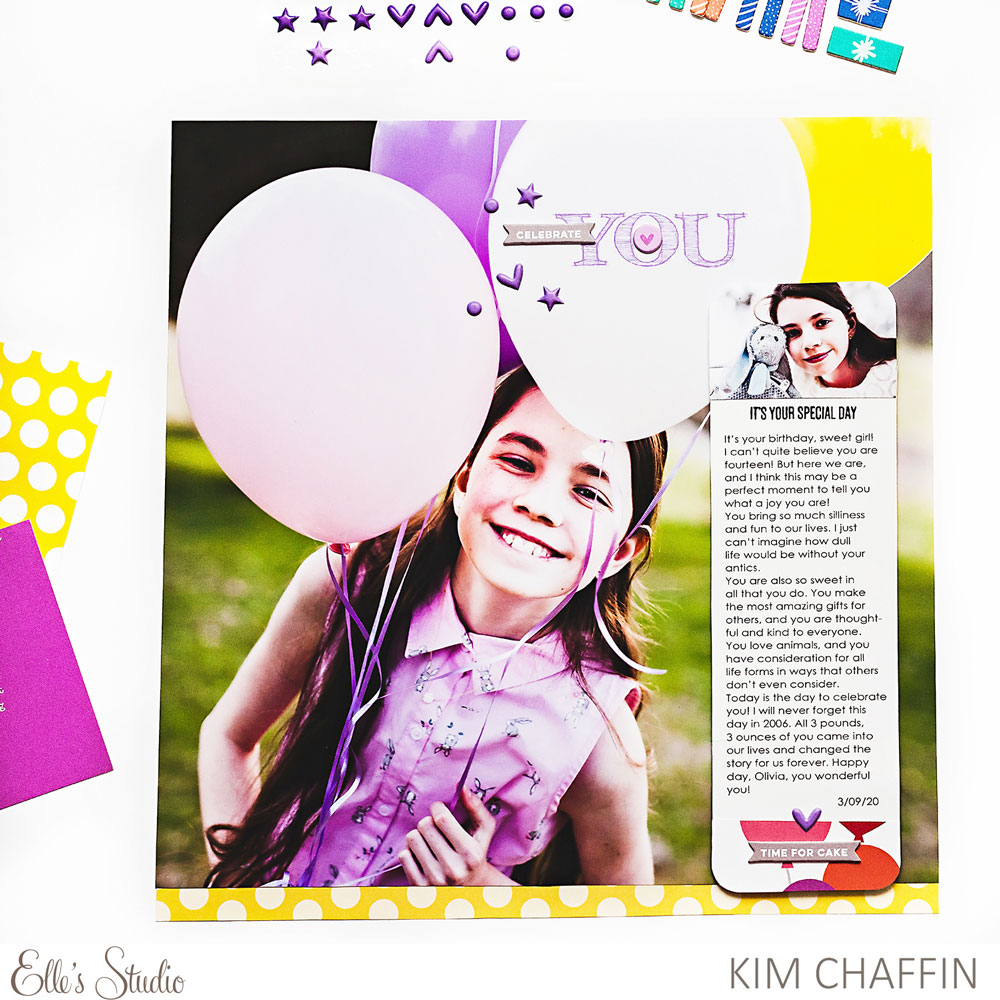
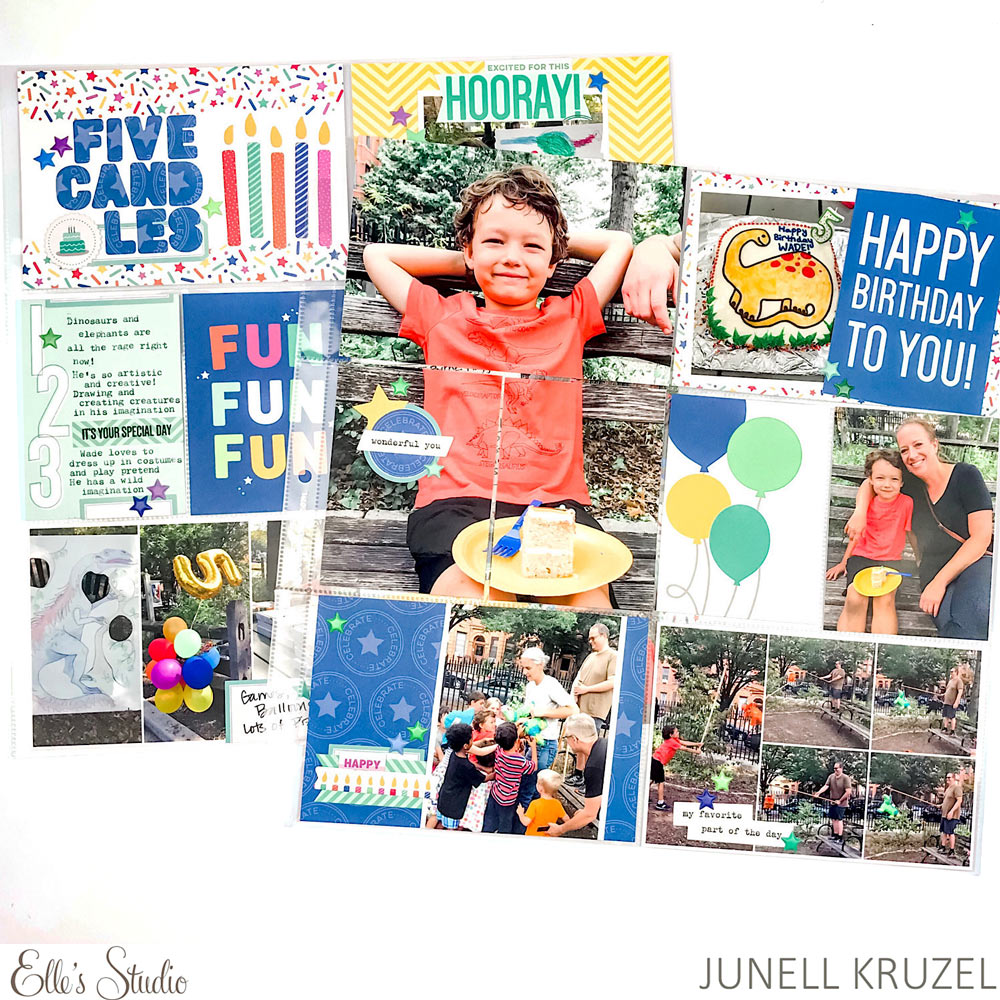
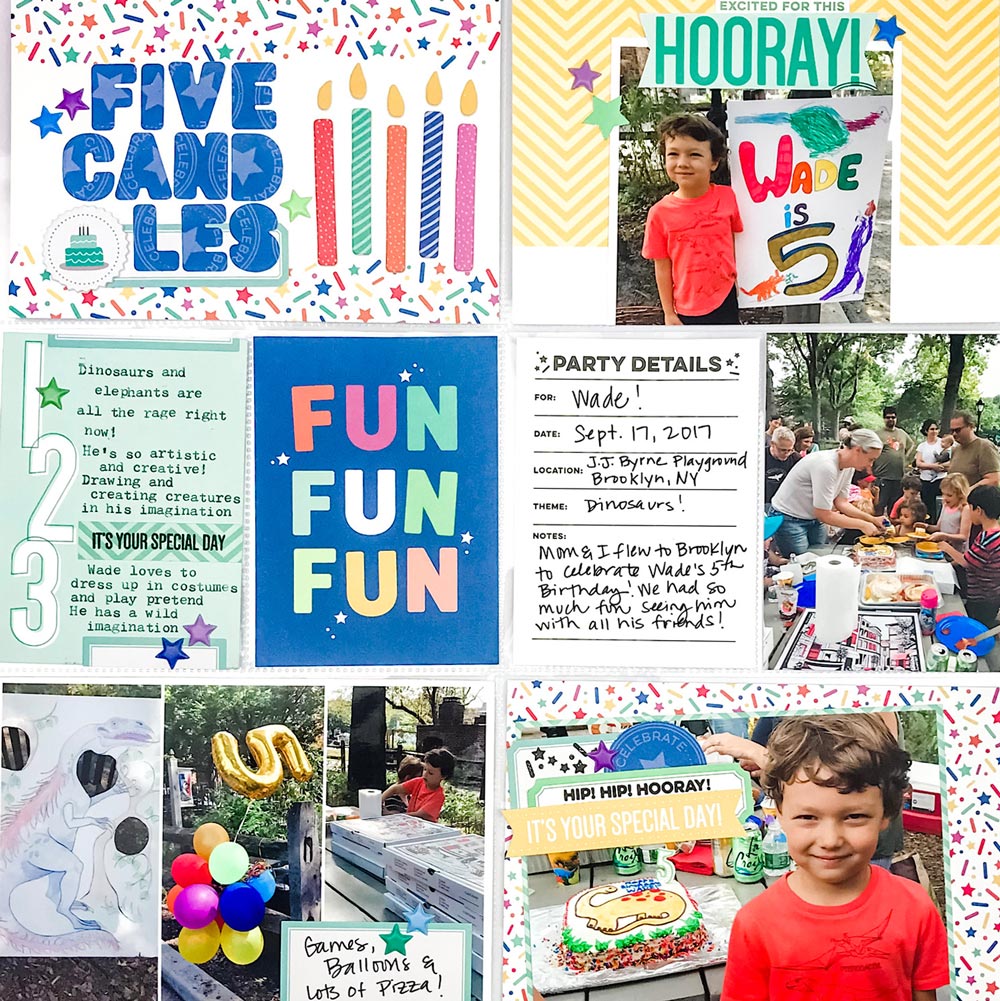
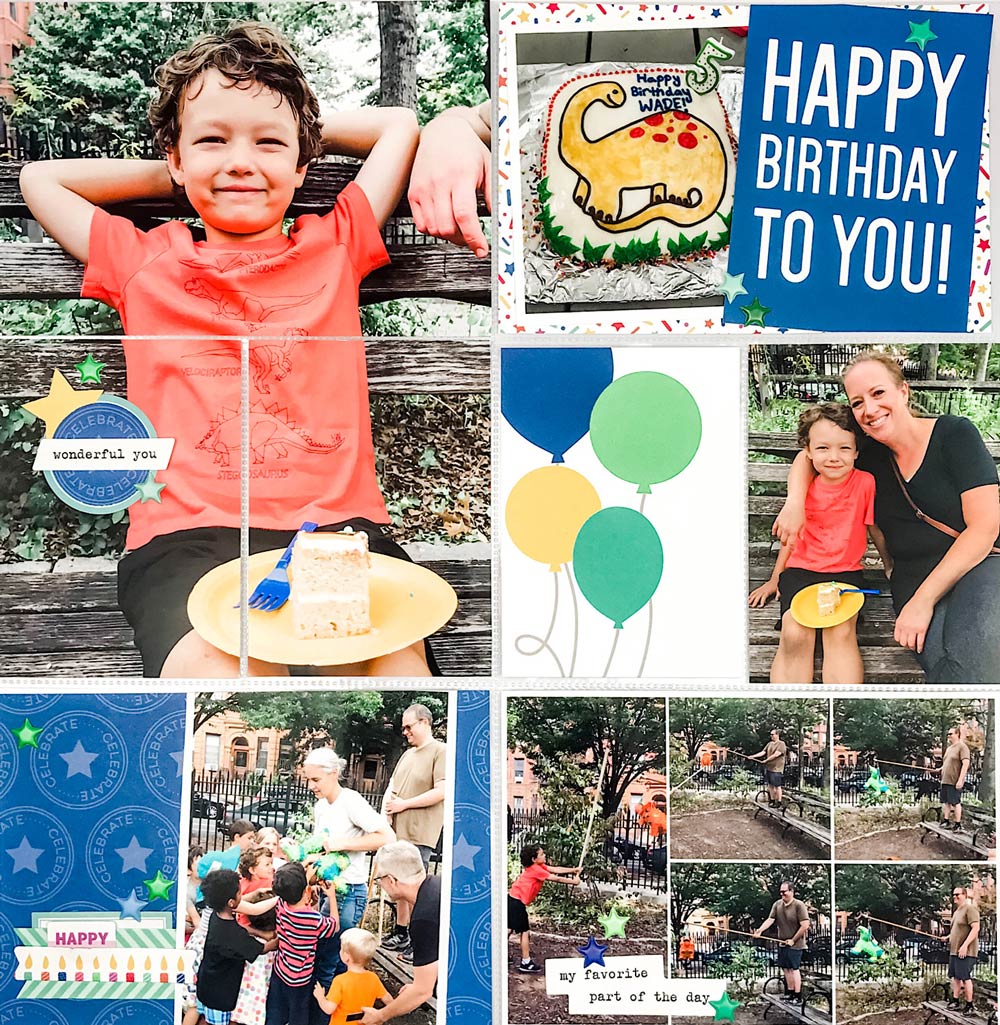
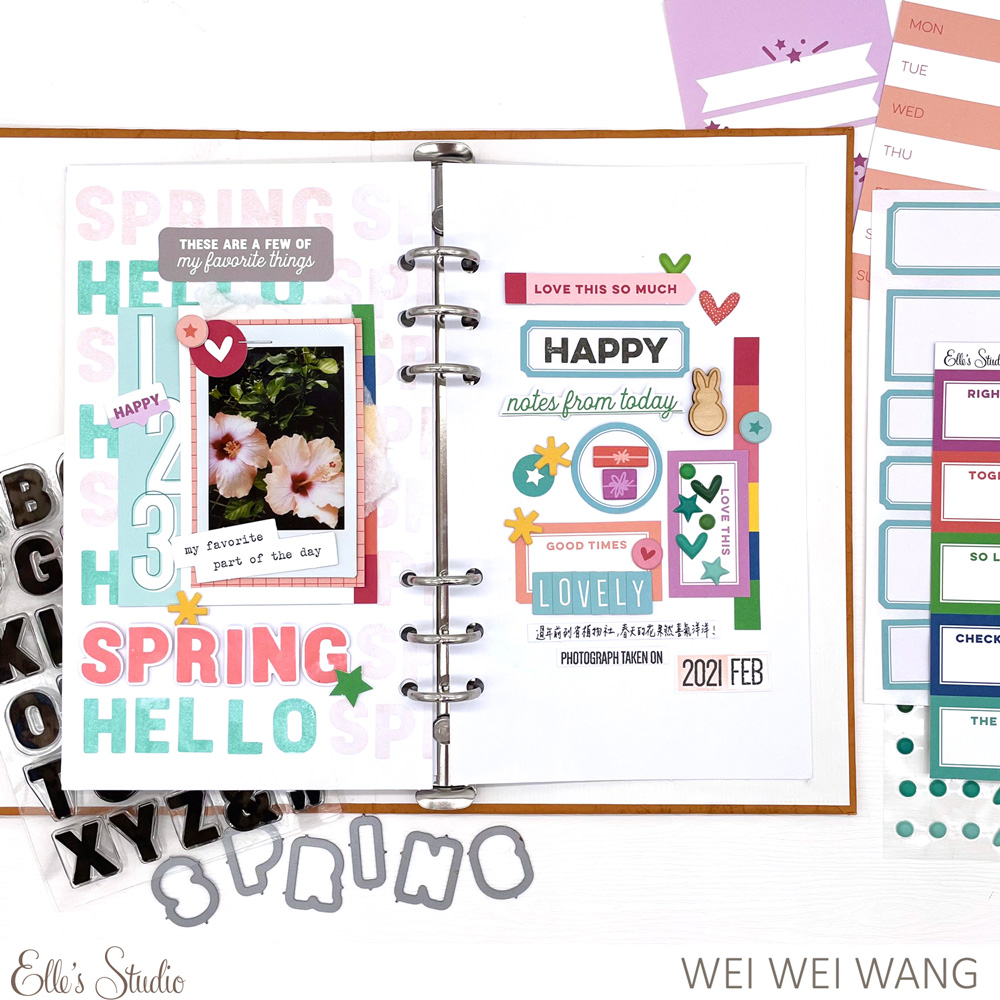
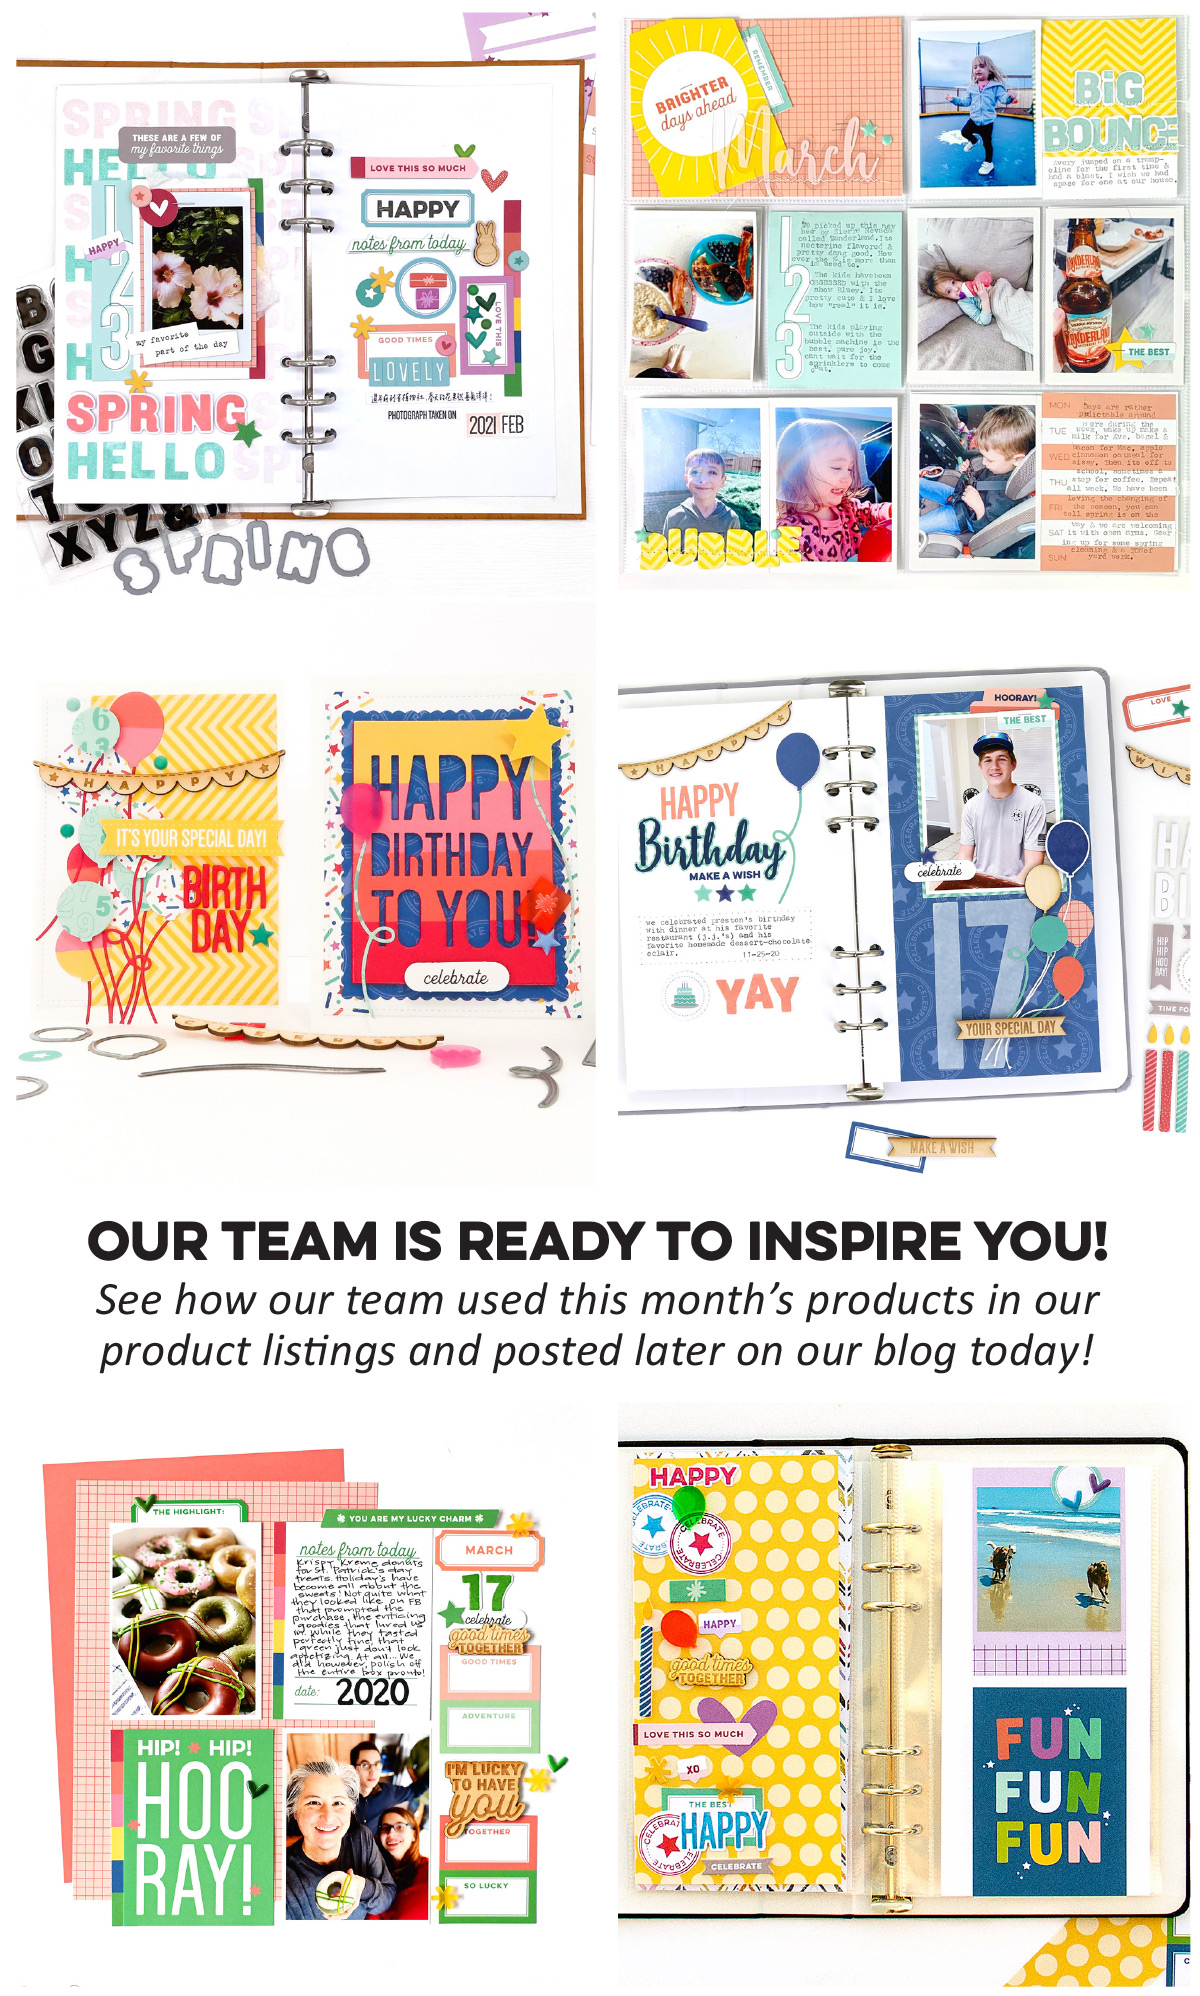
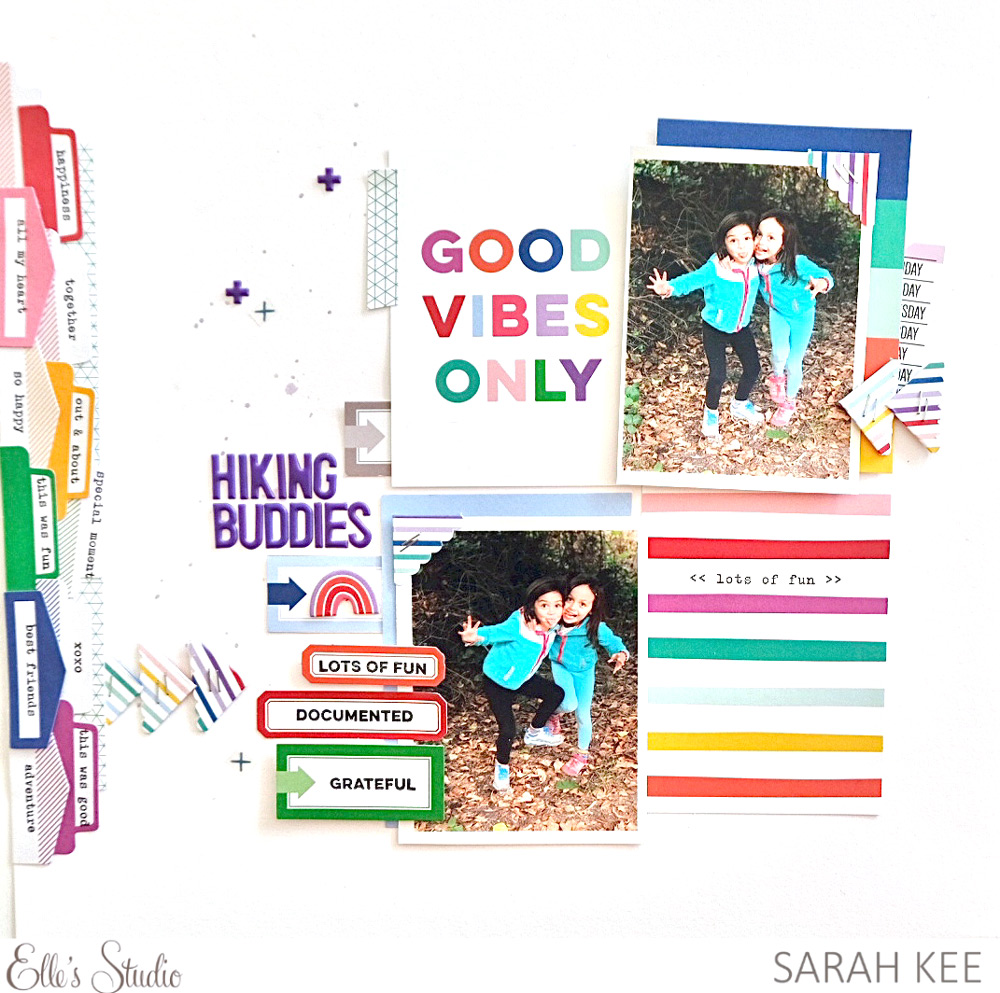
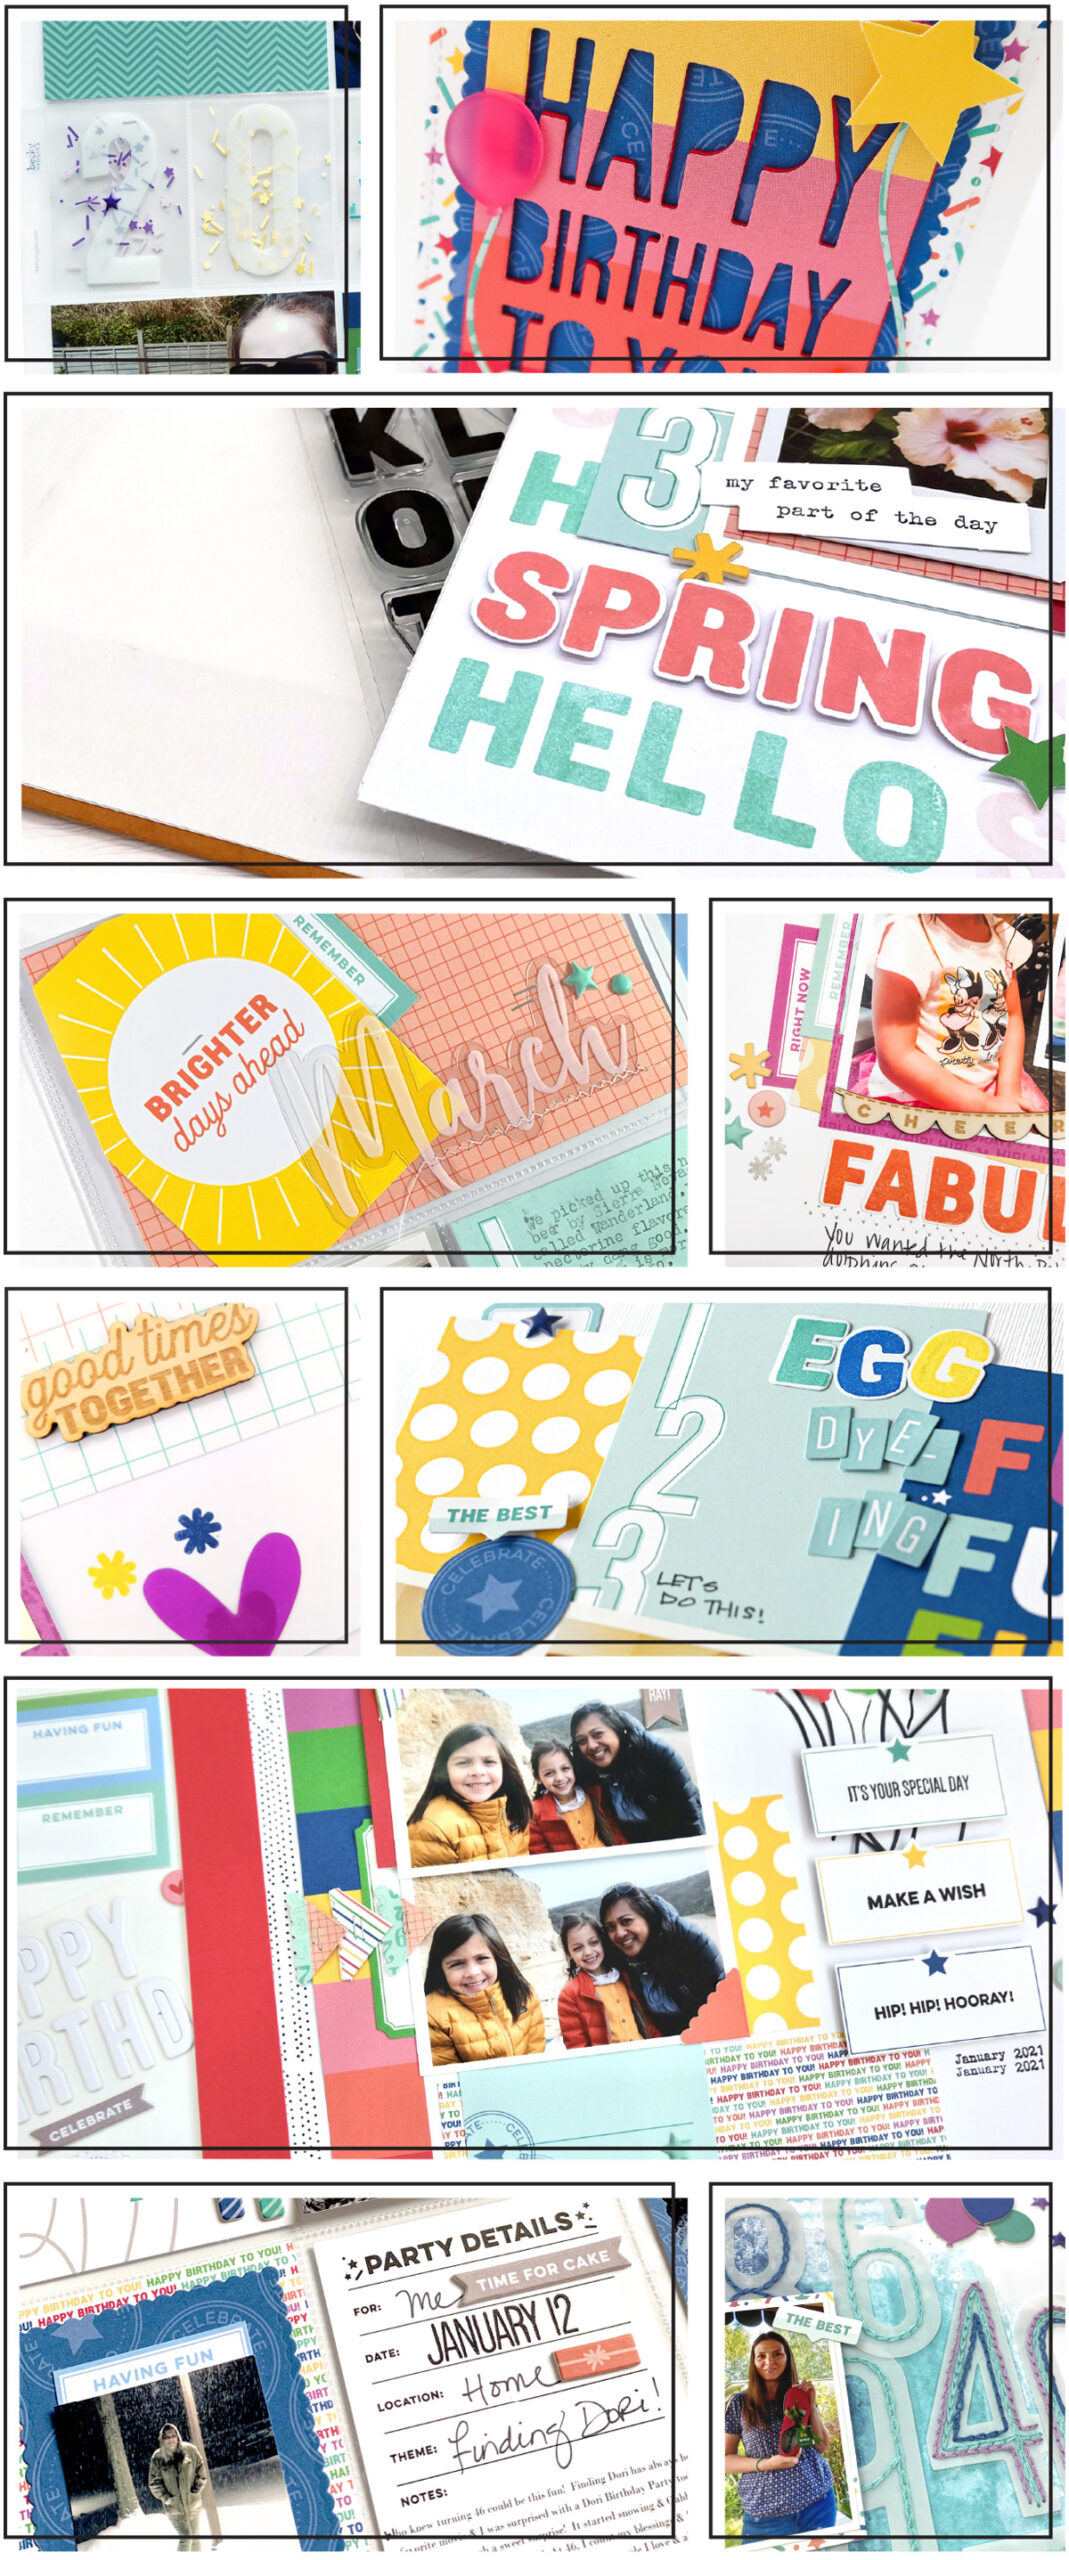
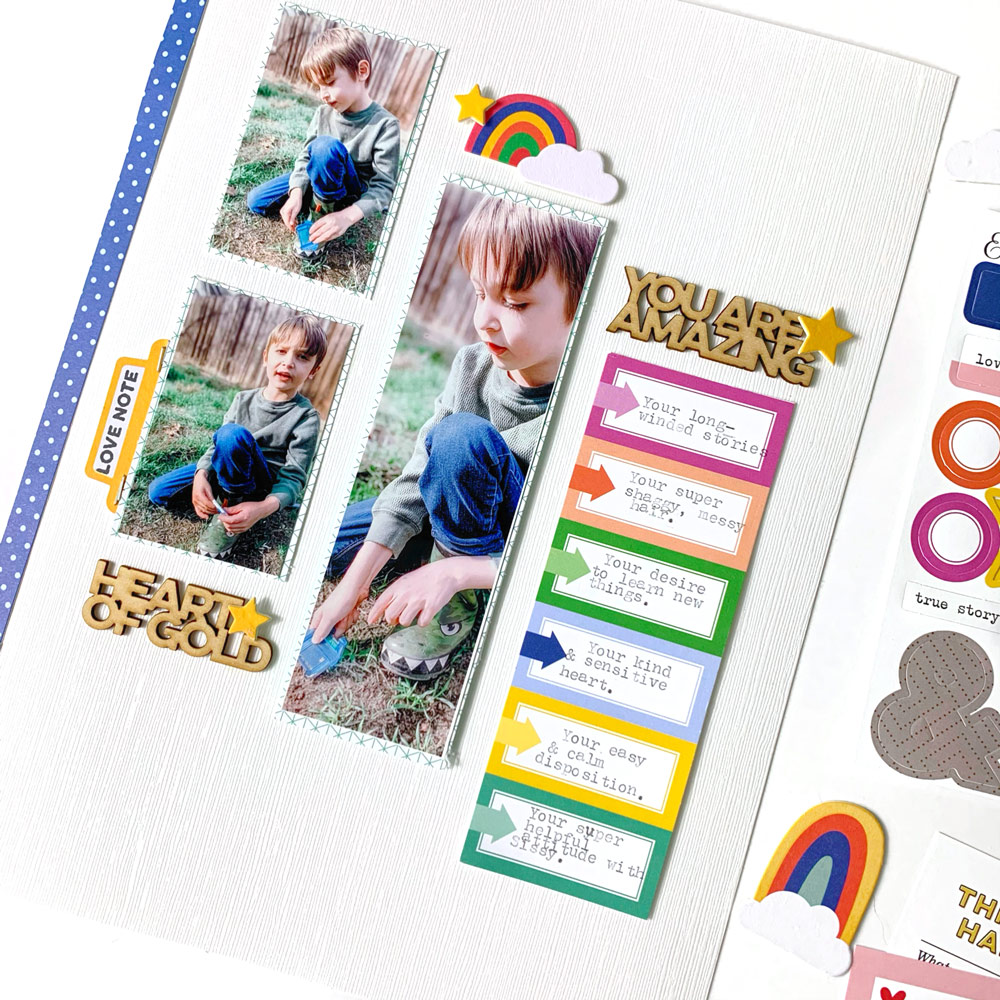
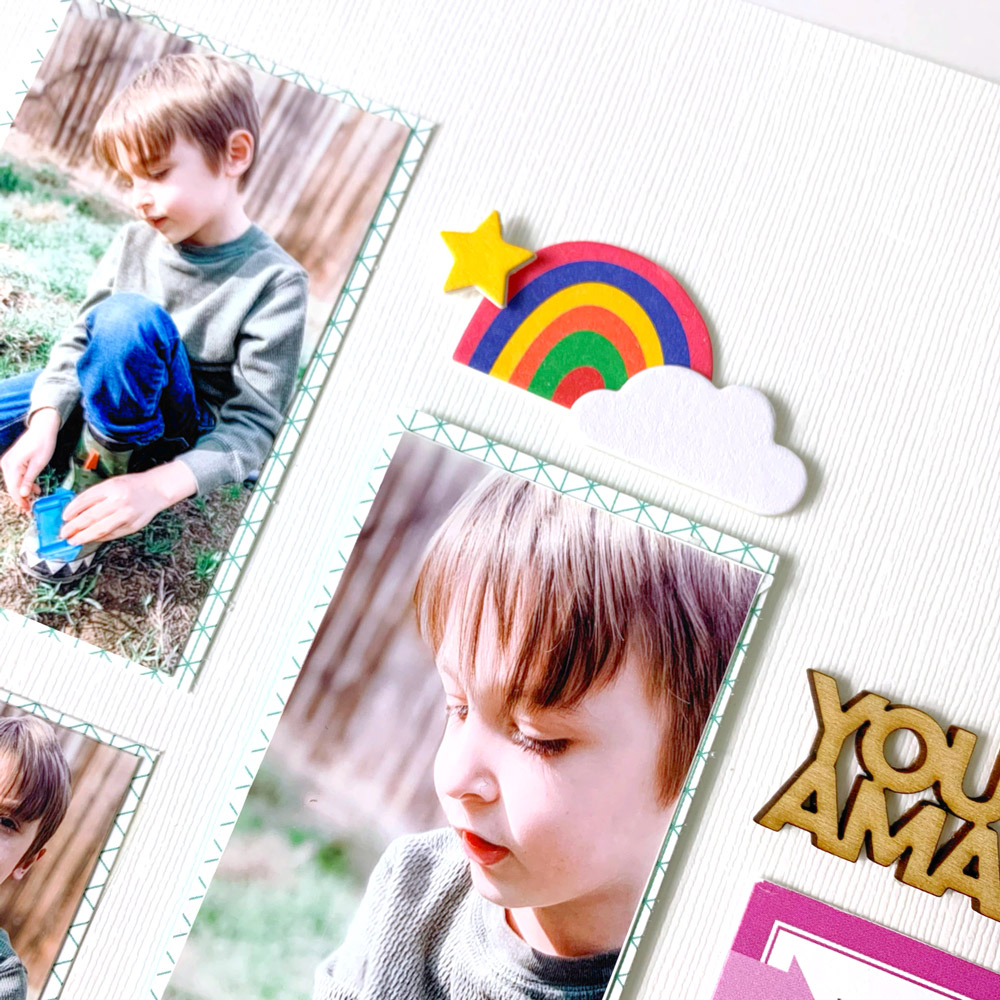
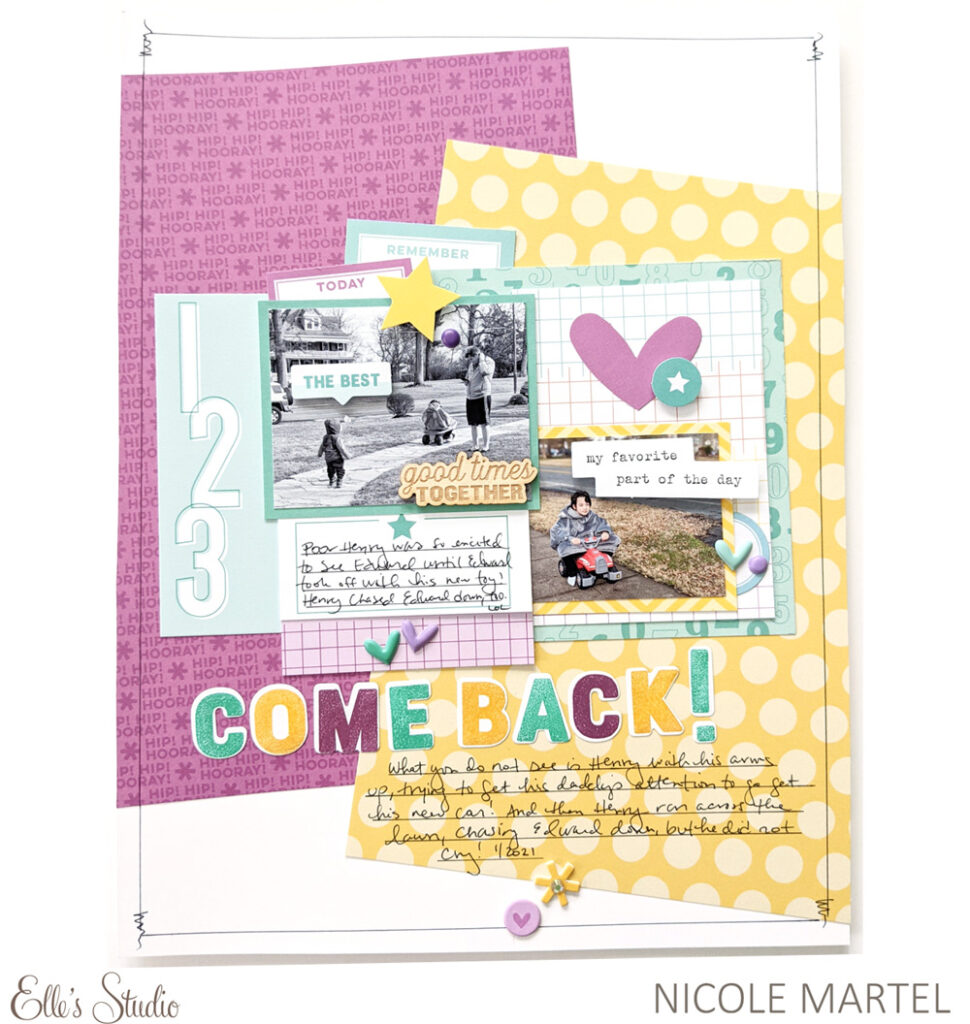
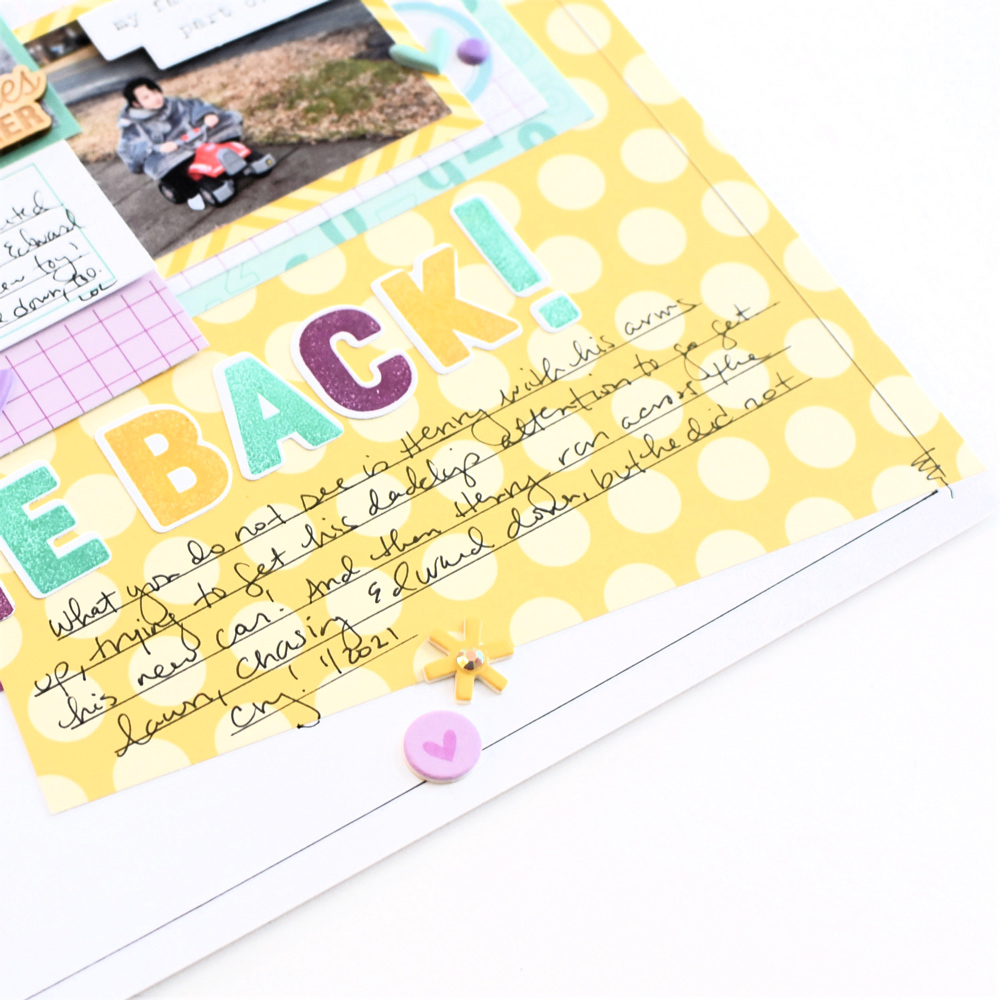
For me, this month is about celebrating those special moments with your friends and family! I must admit, I don’t see my family much these days, but we do sneak over there every once in awhile. In fact, we made a quick visit to my sister’s in January so that we could spend a little time with Henry. He is getting big so fast and I am so sad because we haven’t seen much of him this past year! I created a layout to record this visit using the March kit and add-ons:
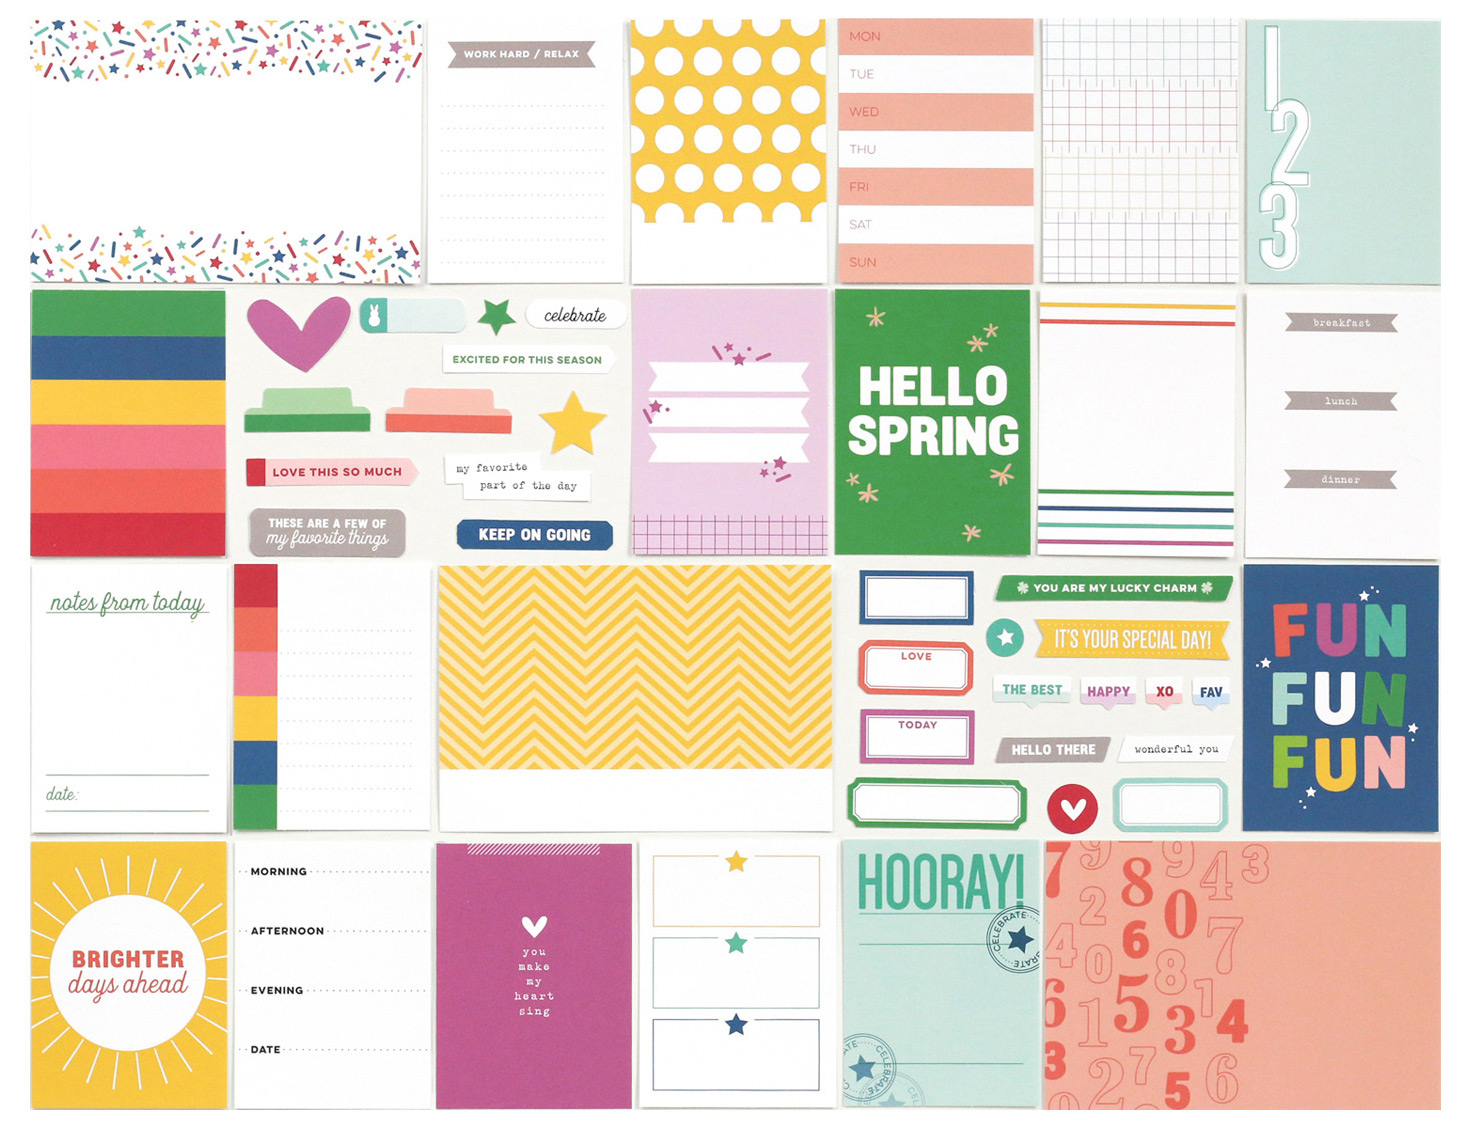
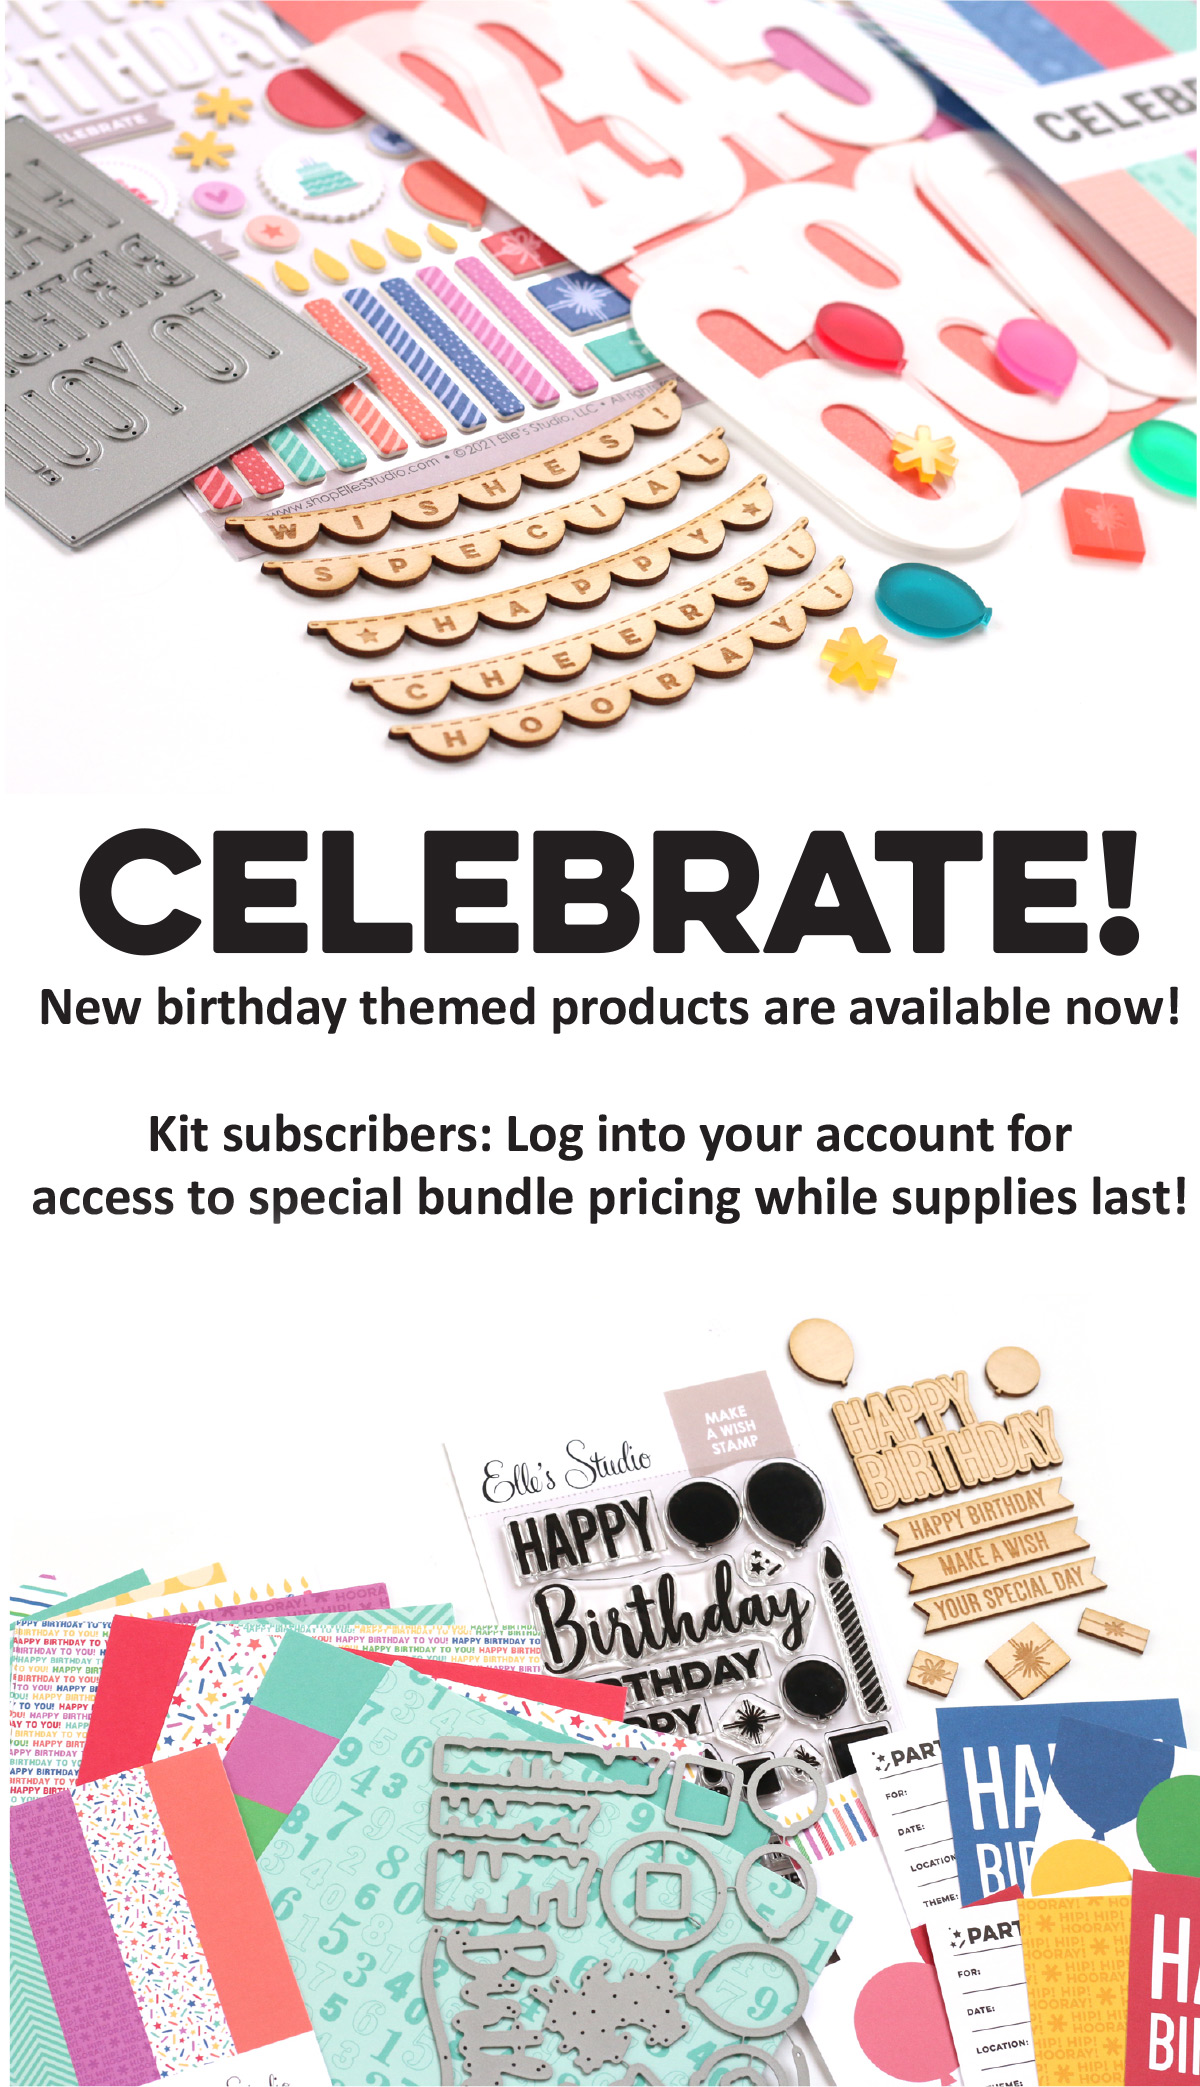
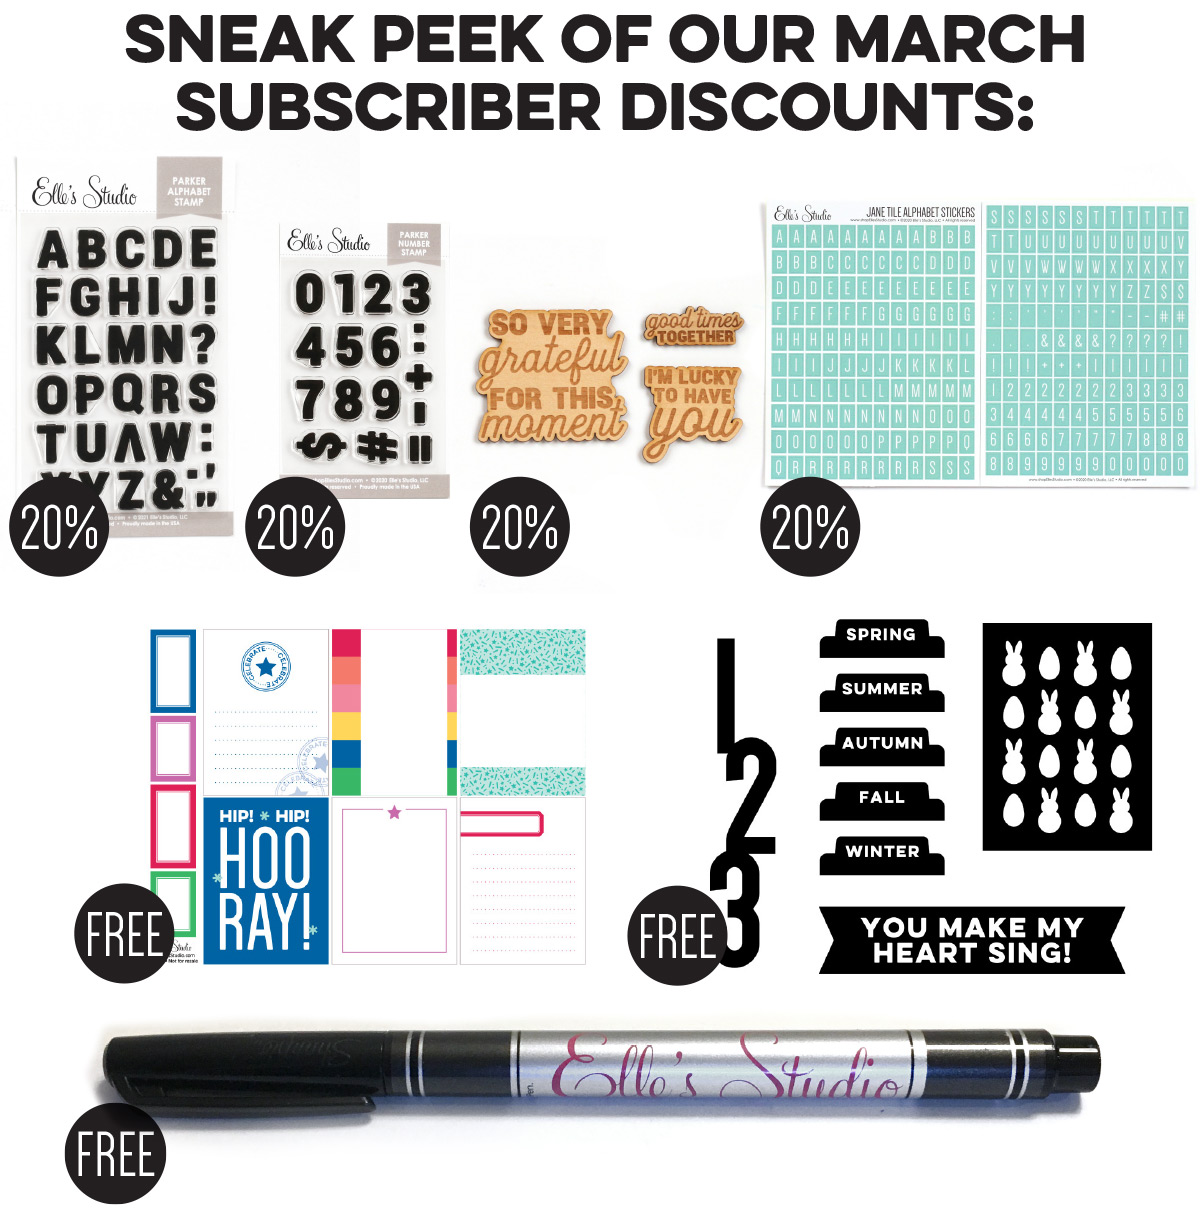
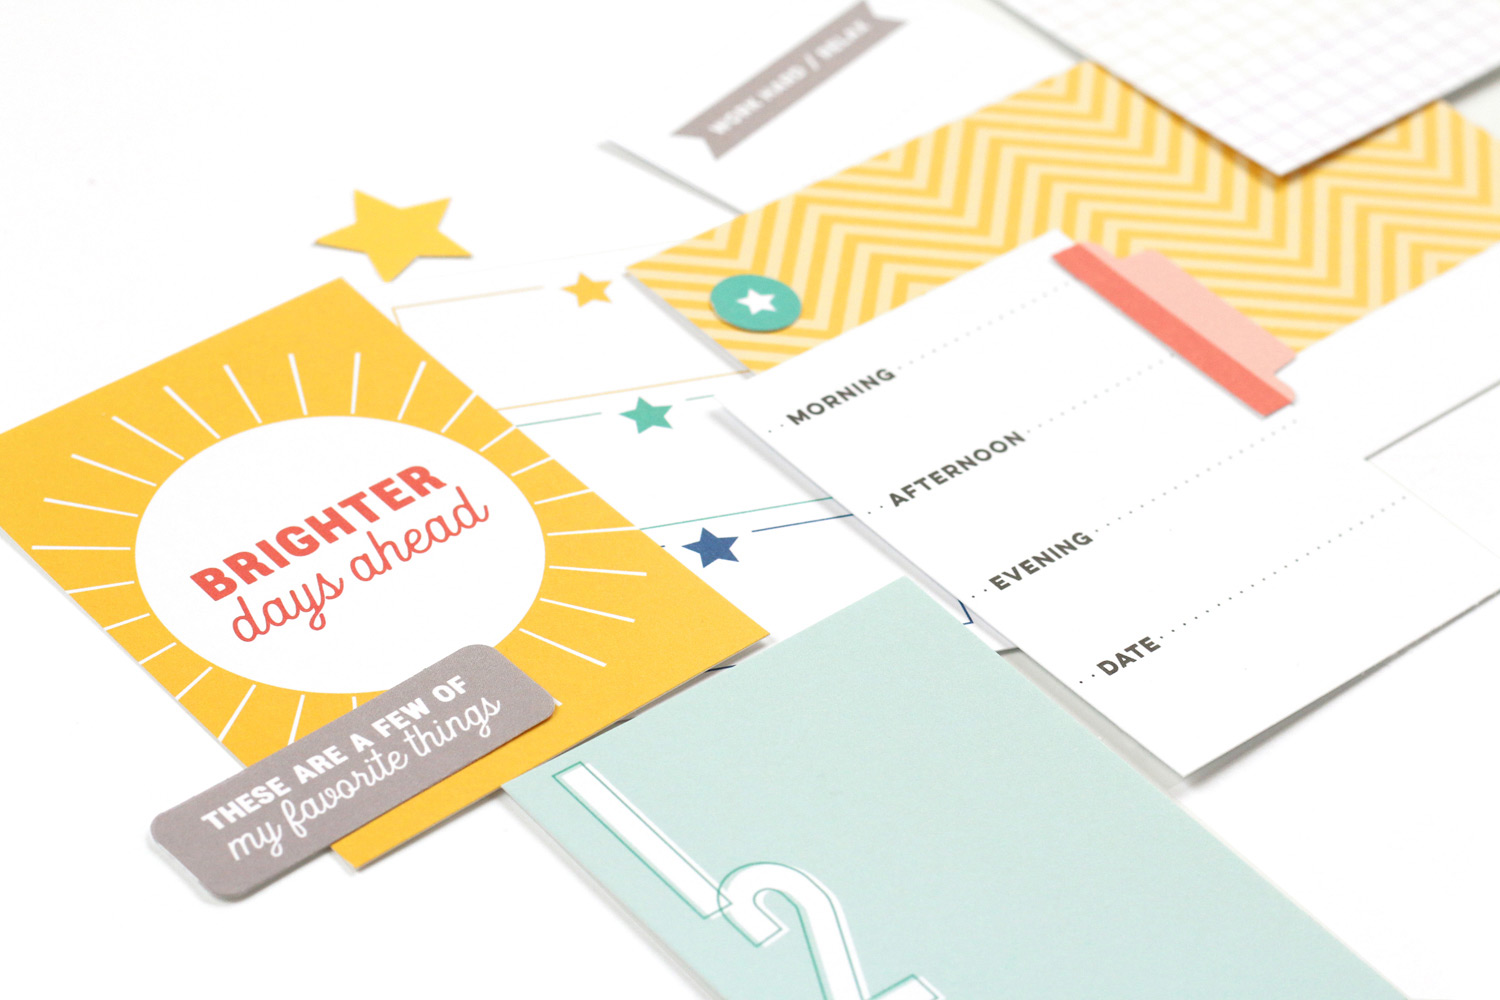
Supplies | March 2021 KitMarch 2021 Labels, Light Teal Cardstock Label Stickers, Happy Birthday Chipboard Stickers, Tiny Shapes and Dots Puffy Stickers – Cool Tones, Grateful Wood Veneers, Celebrate 6 x 8.5 inch Paper Stack, Parker Alphabet StampParker Alphabet Metal Die

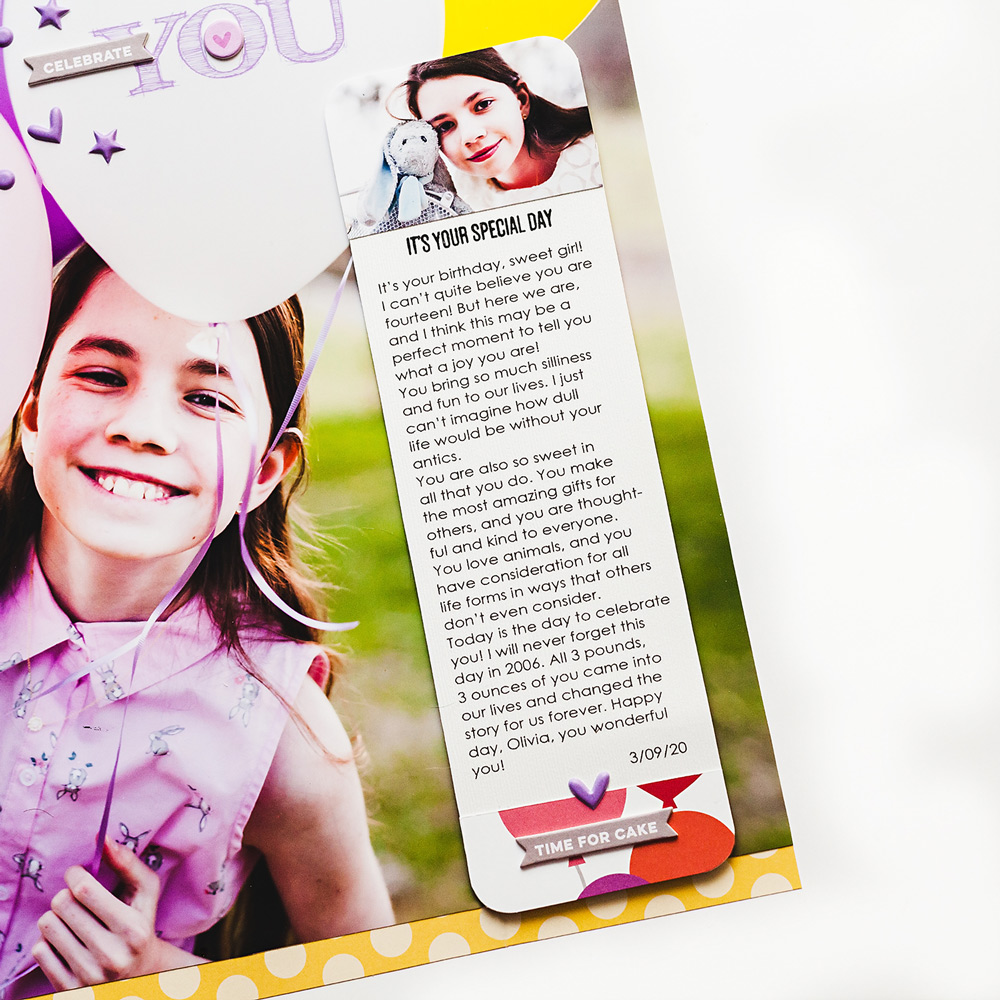
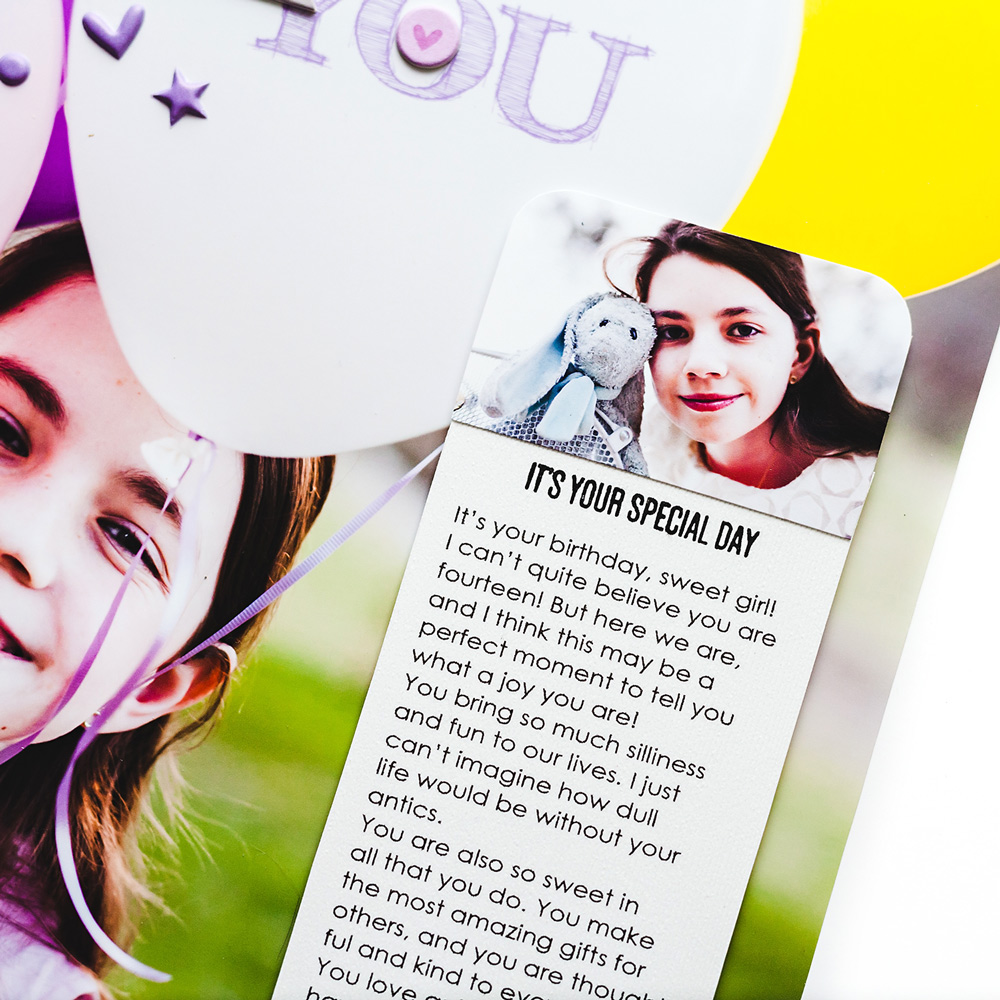
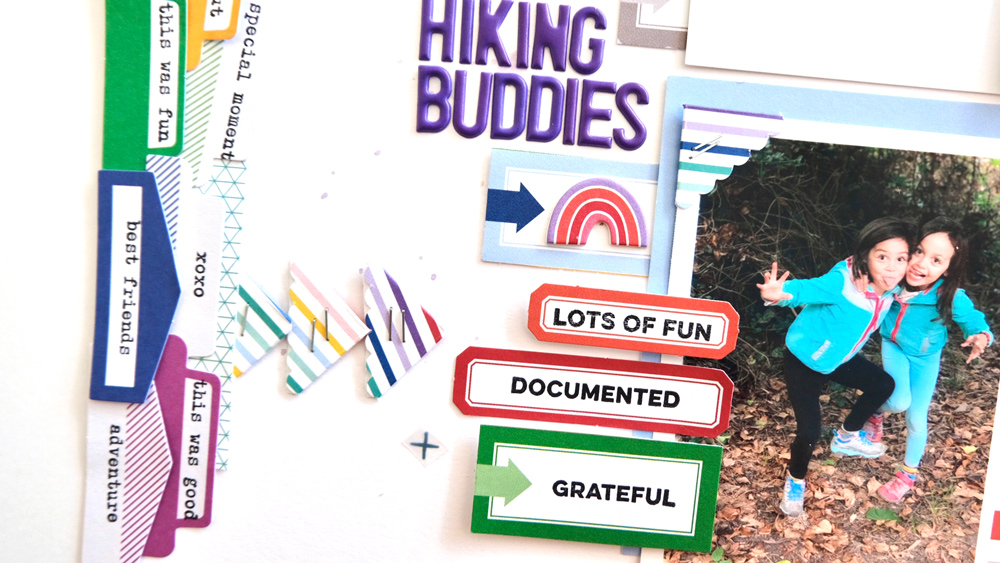
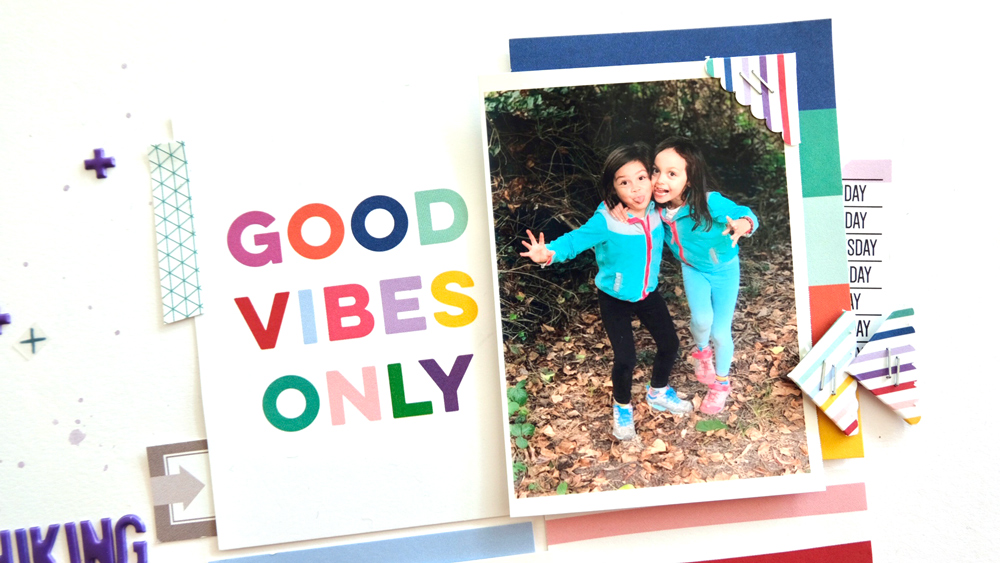
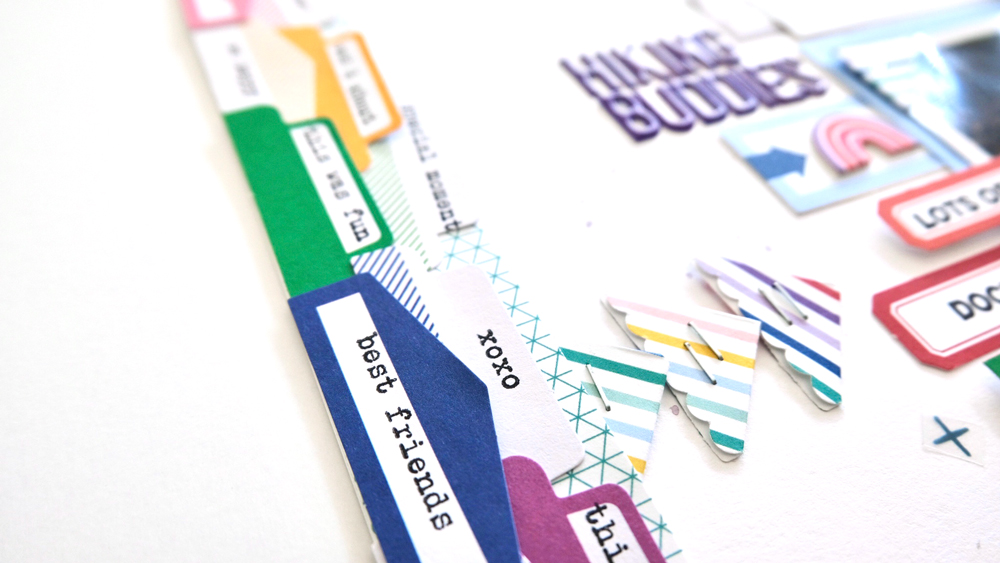
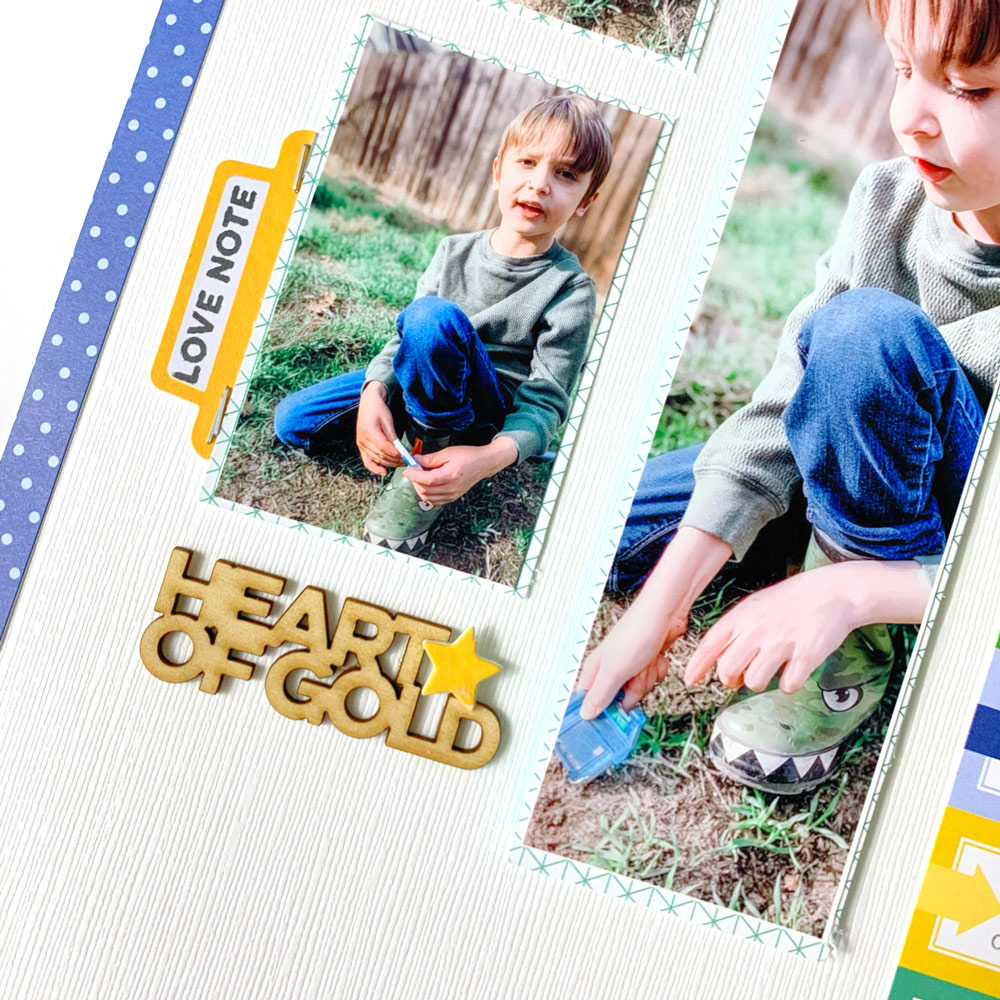
To begin, I placed two sheets of the Celebrate Paper Stack patterned paper onto white cardstock and cut the excess patterned paper from the edges using scissors. This is such a simple way to create an interesting design on the background. Then, I placed a few journaling tags from the March 2021 Kit across the middle of the layout. I love journaling tags because they make the best frames and mats for my photos. And of course, they are perfect for journaling!

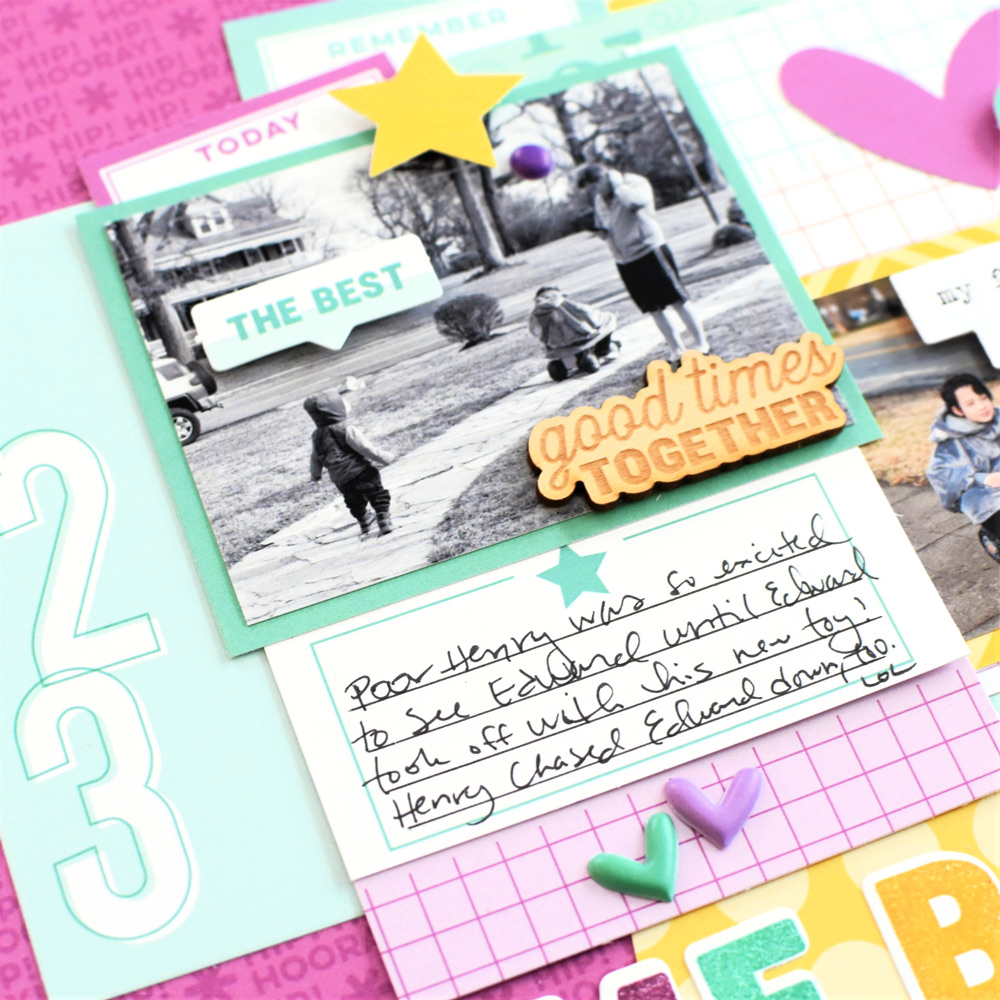
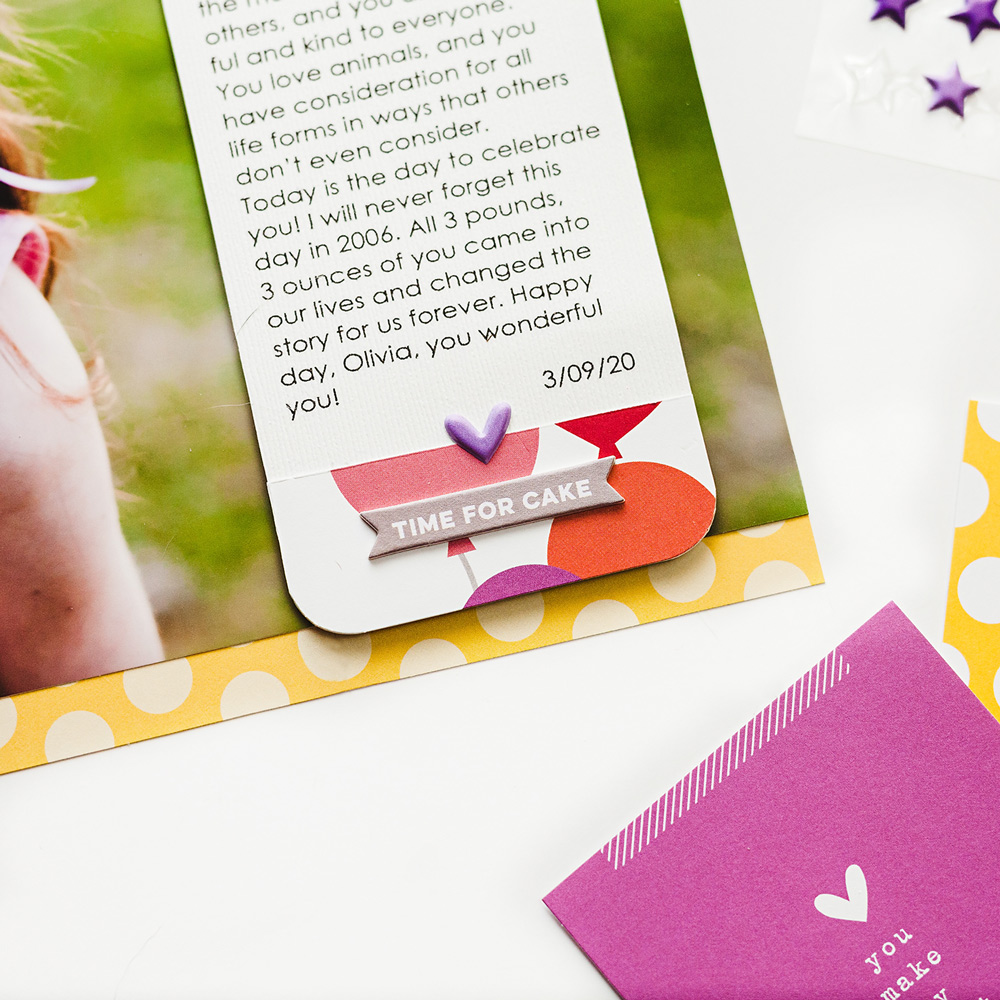
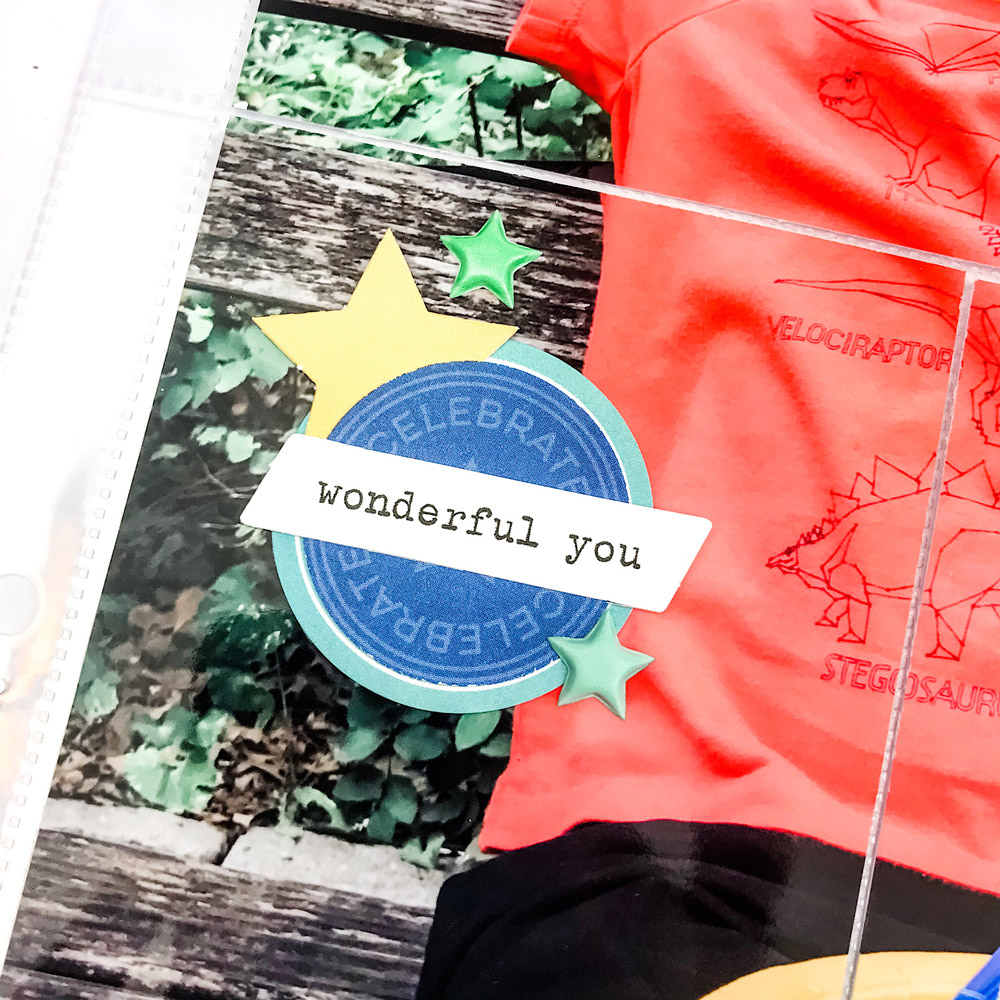
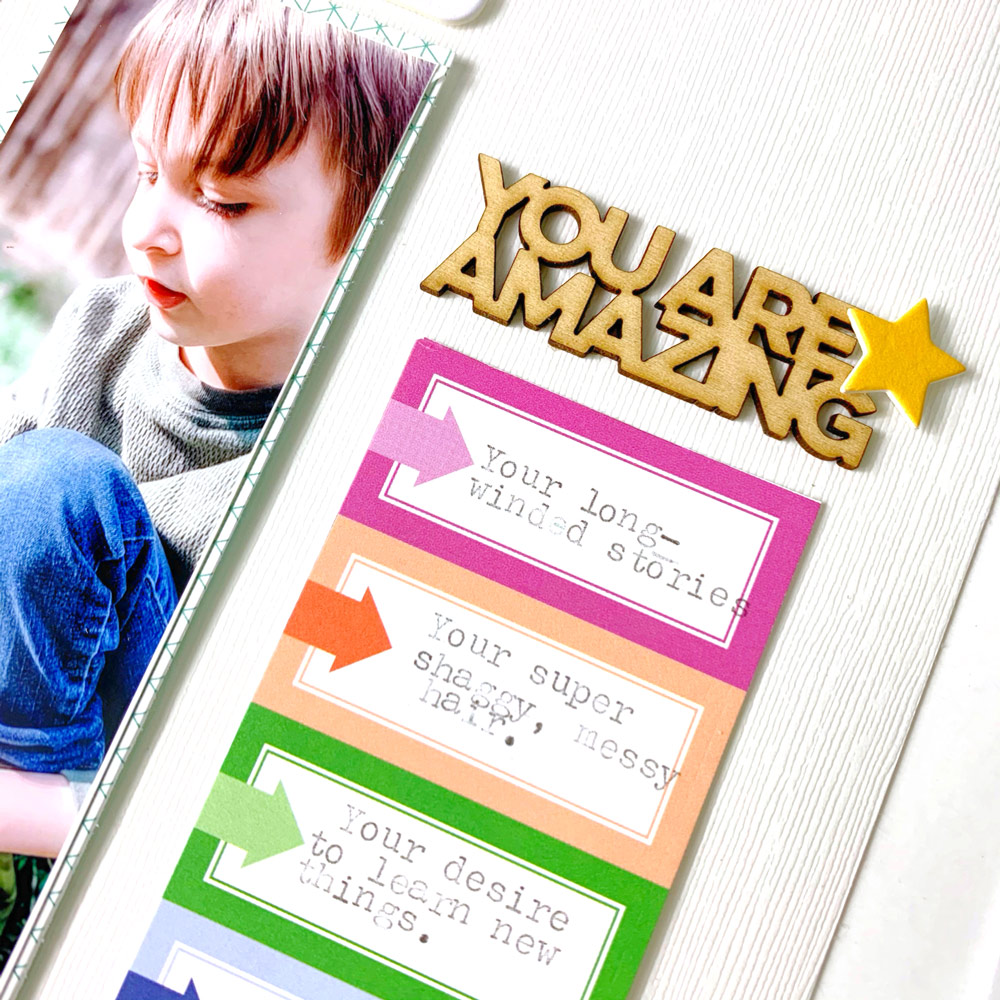
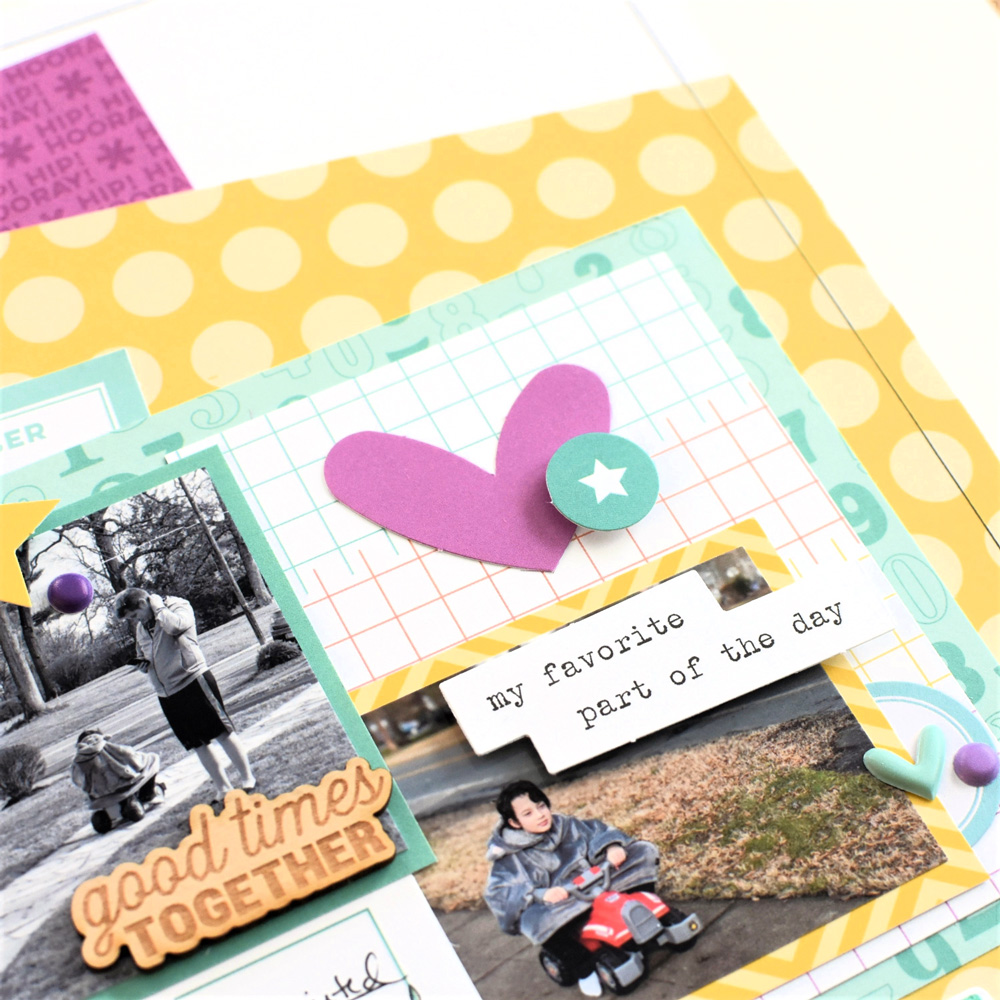
I used the “good times together” wood veneer from the Grateful Wood Veneers to create a sub-title within the matted photo. Then, I tucked a Light Teal Cardstock Label Sticker beside the second matted photo and added some puffy stickers from the Tiny Shapes and Dots Puffy Stickers. They are soooo pretty! I added the heart die and star above the photo to fill in the white space and used foam squares to pop up the “my favorite part of the day” die cut from the March Kit.

I was super excited to receive the new Parker Alphabet Stamp and Metal Die! To complete the layout, I added the title, stamped with all of the colors of my layout, at the bottom along with some journaling and a hand-drawn 1/4″ border around the layout. To finish, I placed a few of the Happy Birthday Chipboard Stickers at the bottom with a gem.

Find a process video of this layout coming together on my YouTube channel! Thank you for having me this month! I can’t wait to share my next project with you! 

Hello! My name is Nicole Martel and I live in Crownsville, Maryland with my 10-year old son, a husband, and Toby (my cat). During the day, I work as an Assistant Branch Manager for a credit union. At night, you can find me binge watching my favorite series on Netflix, scrapbooking, playing with my son, or reading a good thriller. I’ve been scrapbooking for over 20 years and I honestly love this hobby. It brings me great joy to create scrapbooking layouts, cards, mini albums, and even wood crafts. I do a little of everything. I’m so excited to be guest designing for Elle’s Studio! 

Find more of Nicole’s creations at these links until she comes back to share her second post with us!

Instagram | Facebook | YouTube

Five on Friday with Kim Chaffin

Hello, scrapbooking friends! It’s Kim, and I’m happy to be back here for one of my favorite blog posts, Five on Friday! I love this approach, because it fits my style well. Today, I’d like to talk with you about using a photo enlargement as the perfect canvas for your Elle’s Studio kit and add-ons. Let’s dig in! 

Supplies | Happy Birthday Chipboard Stickers, Tiny Shapes and Dots Puffy Stickers – Cool Tones, Celebrate 6 x 8.5 inch Paper Stack, Make a Wish Stamp

When choosing which photograph to enlarge, I look for one that has some space to incorporate my Elle’s Studio kit pieces, embellishments, and my journaling. I chose a picture from my daughter’s birthday, noticing that the balloons and the space to her side would be perfect for layering journaling and embellishments. I work in 12″ x 12″, but full-sized photos can work in any size. If your printer won’t print the size you’d like, many printing services will print larger sizes. 

The first priority for me is to find space for my journaling, and that often takes the form of a journaling block. I created this one by sandwiching my journaling strip between a second birthday photograph and a trimmed down balloon tag from the Happy Birthday Journaling Tags that coordinated well with my photos. I simply adhered the three segments together, rounded the corners, and adhered them in place on my photo with pop dots for a bit of dimension. 

I used a festive word stamp from the Make a Wish Stamp as a subtitle to top my journaling.

The bottom of the journaling block was completed with stickers from the Happy Birthday Chipboard Stickers and the Tiny Shapes and Dots Puffy Stickers layered over the cropped balloon pocket tag. 

The final crucial element to my page is my title. I really enjoy layering Elle’s Studio embellishments over words that I’ve added to the photograph digitally to give my title a fun impact. In this case, I added stickers from the Happy Birthday Chipboard Stickers and the Tiny Shapes and Dots Puffy Stickers to pull together a fun, celebratory title. 

Using only five items is a great way to stretch your scrapbooking dollars and get more layouts from your supplies. A supersized photograph creates the perfect workspace to make a layout with a lot of “wow!” What will you create with Five on Friday?

Share what you create, using only five products with us! Post your “5 on Friday”-inspired project to our Elle’s Studio Facebook Group, or on Instagram using the hashtag #EllesStudio!

Birthday Moments in Pockets with Junell Kruzel

Hello, friends! It’s Junell here today to share my March project with you, and it’s a fun, festive one! The March 2021 kit and extras were perfect for documenting my nephew’s 5th birthday party! I had a ton of pictures so I created a two-page pocket style spread to include as much as I possibly could.

Supplies | March 2021 Kit, Happy Birthday Journaling Tags, Light Teal Cardstock Label Stickers, Happy Birthday Chipboard Stickers, Tiny Shapes and Dots Puffy Stickers – Cool Tones, Celebrate 6 x 8.5 inch Paper StackMake a Wish Stamp, Happy Birthday Metal Die, Parker Alphabet Metal Die

I included journaling tags from the March Kit and also used a card from the Happy Birthday Journaling Tags. I typed up some fun tid-bits about my nephew’s interests and personality at this age on the “1, 2, 3” tag from the March Kit and then hand wrote the party details on the “party details” tag from the Happy Birthday Journaling Tags. I also had a ton of pictures I wanted to include, so I used the PicFrame app to create a collage in one of the 4″ x 6″ spots. I did the same with a spot on the right side, too.

When making pocket pages, I usually always place my title card on the top left spot. I used a 4″ x 6″ tag from the March 2021 Kit and the Parker Alphabet Metal Die to create my title tag along with five of the candles from the Happy Birthday Chipboard Stickers. These candles are so fun and festive!

There was one picture that I absolutely loved from the hundreds I took that I wanted to be the focal point of my entire spread. I printed that picture at 6″ x 8″. Because I was using pocket pages, I had to be very strategic about where I placed the picture. I oriented it towards the top of the page, because if I had put it at the bottom of the page, I would have to make a cut right down the center of his face, and I didn’t want to do that. When placed at the top, there is nothing distracting from his cute face!

I created an embellishment cluster right in the empty space of the large photo using the die cuts from the March Kit. I also used a 1.25″ circle punch to punch out one of the “celebrate” circles from the blue paper in the Celebrate Paper Stack and backed it with a circular label from the Light Teal Cardstock Label Stickers. No cluster is complete without a sprinkling of puffy stars! I used several colors from the Tiny Shapes and Dots Puffy Stickers in the cool tones.

I like to create little, mini layouts on the 4″ x 6″ spots. I placed this picture at an angle to give it a more festive, whimsical look and embellished it with more die cuts from the March Kit. I included a stamp from the Make a Wish Stamp to finish it off.

We all have those birthday pictures just sitting there waiting to be documented and the March Kit and extras are so perfect for getting those layouts completed. I can’t wait to see what you create!

Be sure to Pin your favorite projects found here on the blog to help you create with before your March kit and add-ons arrive, and join our Elle’s Studio Facebook Group for more inspiration and ideas from our team and fellow Elle’s Studio fans!

March Design Team Inspiration: Volume One

We hope you’re ready to celebrate this month, because our March kit and add-ons have arrived! Our design team has been in “party mode,” busy working on beautiful projects to inspire you to create when your new products arrive! Check out these wonderful layouts, pocket pages, notebooks and so much more!

Five and Fabulous by Junell Kruzel – supplies used | March 2021 Kit, March 2021 Labels, Happy Birthday Chipboard Stickers, Tiny Shapes and Dots Puffy Stickers – Cool Tones, Hooray Wood Veneer Banners, Celebrate 6 x 8.5 inch Paper Stack, Make a Wish Stamp, Parker Alphabet Stamp, Parker Alphabet Metal Die

Happy Birthday Odie mini album by Nicole Kerr – supplies used | Jane Tile Alphabet Cardstock Stickers – Light Teal, Happy Birthday Chipboard Stickers, Happy Birthday Wood Veneers, Acrylic Balloons and Presents, Celebrate 6 x 8.5 inch Paper Stack, Make a Wish Stamp, Make a Wish Metal Die

Happy Birthday by Jennifer McMurtrey – supplies used | March 2021 Kit, Happy Birthday Wood Veneers, Acrylic Balloons and Presents, Celebrate 6 x 8.5 inch Paper Stack, Make a Wish Stamp, Parker Number Stamp, Everyday Tabs Stamp, Make a Wish Metal Die, Parker Number Metal Die

March in Pockets by Aimee Mertell – supplies used | March 2021 Kit, March 2021 Labels, Tiny Shapes and Dots Puffy Stickers – Cool Tones, Acetate Months, Celebrate 6 x 8.5 inch Paper Stack, Parker Alphabet Stamp, Parker Alphabet Metal Die

March 17th by Suzanna Lee – supplies used | March 2021 Kit, March 2021 Print and Cut Labels, March 2021 Labels, Black Typewriter Cardstock Alphabet Stickers, Tiny Shapes and Dots Puffy Stickers – Cool Tones, Dark Pink Puffy Alphabet Stickers, Grateful Wood Veneers, Acrylic Balloons and Presents, Celebrate 6 x 8.5 inch Paper Stack, Parker Number Stamp, Parker Number Metal Die

Birthday cards by Patricia Roebuck – supplies used | March 2021 Kit, Tiny Shapes and Dots Puffy Stickers – Cool Tones, Hooray Wood Veneer Banners, Happy Birthday Metal Die, Make a Wish Metal Die, Layered Card Metal Die

46 by Michelle Flynn – supplies used | March 2021 Kit, March 2021 Labels, Happy Birthday Journaling Tags, Happy Birthday Chipboard Stickers, Tiny Shapes and Dots Puffy Stickers – Cool Tones, Large Acetate Numbers, Celebrate 6 x 8.5 inch Paper Stack, Make a Wish Stamp, Hugs and Kisses Stamp, Make a Wish Metal Die, Pocket, Frame and Flip Up – Extra Frames Metal Dies, Mini Dated Stamp

Happy Birthday by Jody Compton – supplies used | March 2021 Kit, Happy Birthday Wood Veneers, Hooray Wood Veneer Banners, Acrylic Balloons and Presents, Celebrate 6 x 8.5 inch Paper Stack, Make a Wish Stamp, Stanley Jr. Alphabet Stamp, Make a Wish Metal Die

Happy Birthday pocket page spread by Nathalie Leonelli – supplies used | March 2021 Kit, March 2021 Labels, Happy Birthday Journaling Tags, Large Acetate Numbers, Acrylic Balloons and Presents, Celebrate 6 x 8.5 inch Paper Stack, Make a Wish Stamp, Happiness and Cheer Stamp, Make a Wish Metal Die

Happy Birthday traveler’s notebook spread by Marsha Farris – supplies used | March 2021 Kit, Happy Birthday Chipboard Stickers, Large Acetate Numbers, Tiny Shapes and Dots Puffy Stickers – Cool Tones, Happy Birthday Wood Veneers, Hooray Wood Veneer Banners, Celebrate 6 x 8.5 inch Paper Stack, Make a Wish Stamp, Parker Alphabet Stamp, Make a Wish Metal Die, Parker Alphabet Metal Die

Hooray by Sarah Kee – supplies used | March 2021 Kit, Happy Birthday Chipboard Stickers, Tiny Shapes and Dots Puffy Stickers – Cool Tones, Celebrate 6 x 8.5 inch Paper Stack, Make a Wish Stamp, Daily Tabs Stamp, Make a Wish Metal Die

2020 pocket page by Meg Gundlach – supplies used | March 2021 Kit, Jane Tile Alphabet Cardstock Stickers – Light Teal, Large Acetate Numbers, Tiny Shapes and Dots Puffy Stickers – Cool Tones, Celebrate 6 x 8.5 inch Paper Stack, Parker Alphabet Stamp, Parker Number Stamp, Make a Wish Metal Die

Happy Birthday by Melissa Mann – supplies used | March 2021 Kit, March 2021 Print and Cut Labels, March 2021 Labels, Happy Birthday Chipboard Stickers, Tiny Shapes and Dots Puffy Stickers – Cool Tones, Celebrate 6 x 8.5 inch Paper Stack

Happy traveler’s notebook spread by Jennie McGarvey – supplies used | March 2021 Kit, March 2021 Labels, Happy Birthday Chipboard Stickers, Tiny Shapes and Dots Puffy Stickers – Cool Tones, Grateful Wood Veneers, Celebrate 6 x 8.5 inch Paper Stack, Make a Wish Stamp, Make a Wish Metal Die

Hello Spring by Jackie Ashton – supplies used | March 2021 Kit, Jane Tile Alphabet Cardstock Stickers — WhiteTiny Shapes and Dots Puffy Stickers – Cool Tones, Celebrate 6 x 8.5 inch Paper Stack, Daily Tabs Stamp, Mini Dated Extras Stamp, Everyday Tabs Metal Die, Pocket, Frame and Flip Up – Extra Frames Metal Dies

Greeting cards by Shannon Dombkowski – supplies used | Happy Birthday Chipboard Stickers, Tiny Shapes and Dots Puffy Stickers – Cool Tones, Happy Birthday Wood Veneers, Celebrate 6 x 8.5 inch Paper Stack, Make a Wish Stamp, Parker Alphabet Stamp, Make a Wish Metal Die, Parker Alphabet Metal Die, Layered Card Metal Die

You Make My Heart Sing by Kim Chaffin – supplies used | March 2021 Kit, March 2021 Cut Files, Tiny Shapes and Dots Puffy Stickers – Cool Tones, Happy Easter Wood Veneers, Celebrate 6 x 8.5 inch Paper Stack

Spring traveler’s notebook spread by Wei Wei Wang – supplies used | March 2021 Kit, March 2021 Labels, Jane Tile Alphabet Cardstock Stickers – Light Teal, Light Teal Cardstock Label Stickers, Happy Birthday Chipboard Stickers, Tiny Shapes and Dots Puffy Stickers – Cool Tones, Happy Easter Wood Veneers, Celebrate 6 x 8.5 inch Paper Stack , Make a Wish Stamp, Parker Alphabet Stamp, Make a Wish Metal Die, Parker Alphabet Metal Die, Make a Wish Stamp, Parker Alphabet Stamp, Parker Alphabet Metal Die, Mini Dated Stamp

Happy Birthday to Us by Katarina Prevendarova – supplies used | March 2021 Kit, Jane Tile Alphabet Cardstock Stickers – Light Teal, Happy Birthday Chipboard Stickers, Large Acetate Numbers, Tiny Shapes and Dots Puffy Stickers – Cool Tones, Large Acetate Numbers, Grateful Wood Veneers, Celebrate 6 x 8.5 inch Paper Stack, Make a Wish Metal Die

Happy Easter 2020 by Amanda-jayne Baldwin – supplies used | March 2021 Kit, March 2021 Labels, Jane Tile Alphabet Cardstock Stickers – Light Teal, Light Teal Cardstock Label Stickers, Tiny Shapes and Dots Puffy Stickers – Cool Tones, Happy Easter Wood Veneers, Celebrate 6 x 8.5 inch Paper Stack

Let Me Eat Cake by Meghann Andrew – supplies used | March 2021 Kit, Happy Birthday Chipboard Stickers, Dark Red Puffy Alphabet Stickers, Tiny Shapes and Dots Puffy Stickers – Cool Tones, Hooray Wood Veneer Banners, Celebrate 6 x 8.5 inch Paper Stack, Parker Alphabet Stamp, Parker Alphabet Metal Die, Make a Wish Stamp, Make a Wish Metal Die, Mini Dated Stamp

There are so many more projects in store for you this month using our fun, new March kit and add-ons, so be sure to check back here on the blog, follow us on Instagram, and join our Elle’s Studio Facebook Group!

Our March kit + add-ons have arrived!

Our March reveal is here and we are so excited to share all of the brand new and exclusive products that are now available in our shop today! Our March kit includes 3 – 4 x 6 inch tags, 18 – 3 x 4 inch tags, and 27 die cuts, that will work great on your scrapbooking layouts, pocket pages, traveler’s notebooks, cards, planners, and more! When designing our kits, we love to think of tags that can be used as prompts to help make it easier for you to get your story started and documented, and this kit is full of those and so much more!

Here’s the first look at all of the fun tags and die cuts included in this kit:

Our monthly kits are limited and once they sell out we will not be restocking! Look for a new kit on the 10th each month at 8:00 am Pacific! Our kits are available for single purchase or select our subscription option to subscribe and SAVE!

Here’s a look at all of the new and exclusive add-ons we have available this month! All of our coordinating add-ons can be purchased separately, so you have a chance to pick the products that work for your stash and what you’re documenting now, and if you need more than one, you can purchase multiples, too! The new items added to the shop for March are: stamps (Parker Alphabet and Parker Number), coordinating metal dies (Parker Alphabet die and Parker Number die), Tiny Shapes and Dots puffy stickers, wood veneers (Happy Easter and Grateful), Tiny Acrylic Eggs and Bunnies, Light Teal cardstock labels and Jane Tile alphabet, and March labels.

Our digital files this month include coordinating printables, March cut files, print and cut labels, and birthday cut files that coordinate with our kit – once you download these files, you can use/print them over and over again!

We are also excited to announce that we have added new birthday themed products to the shop today! There are 10 new and exclusive products including a paper pack, stamp + coordinating die, stickers, tags, wood veneers, and more! Click here to shop these items now! Kit subscribers: log into your subscriber account for access to special bundle pricing while supplies last – there are three different bundles to choose from!

Subscribers, you can start bundling now! Bundling is easy – just log into your account and use the “Bundle with my kit subscription” shipping option during checkout to receive FREE shipping on any extra items purchased from our shop that will ship with your kit. This option will only be available during our 24-hour bundling period.

Not a subscriber? Don’t wait any longer to sign up! Subscribe today to lock in our special kit price of $9.99 + shipping, and you’ll be able to bundle any additional products from our shop and have them ship for FREE with your kit subscription, during our 24-hour bundling period, starting on the 10th at 8:00 am Pacific!

When starting a new subscription: you’ll want to first check out with only the kit subscription in your cart. After you have subscribed to our kit, you will then be able to see your special discounts on select items in our SALE section during our 24-hour bundling period! You must be logged into your kit subscriber account to see your discounted items. Quick note: Our subscription is risk free and can be cancelled at any time by emailing us. Our monthly kit and add-ons are available without a subscription each month, too.

Here’s a look at the items on sale for our subscribers only this month:

Subscribers: Pick up these six items for FREE to 20% off during our 24 hour bundling period that is going on now and ends on Thursday, March 11th at 8:00 am Pacific! Please make sure you are logged into your subscriber account, then click on the SALE section to see these items on sale! Once you are logged in, you’ll see your special discounted product listing that specifies Sub Discount.

This month we also have a couple of EXTRA SPECIAL SURPRISES: We are excited to be celebrating 14 years in business this month and we are so thankful for all of your support and friendship over the years! We love and appreciate you all so much! All of our current and new kit subscribers will be receiving and Elle’s Studio pen that will automatically shipped with your March kit subscription! Subscribers also have access to SAVE on our new birthday themed products with our Birthday Bundle options! Log in now to see your savings! Not a subscriber? Sign up today so you don’t miss these savings!

Looking for more inspiration? Our design team is ready to inspire you with brand new, fresh inspiration using the new products this month! You’ll be able to find their amazing inspiration in our product listings so you can see their projects while you shop! We will also be showcasing our team’s projects on the blog later today, and throughout the entire month!

Thank you so much for joining us today! We are so grateful to be a part of this amazing community and are excited to see how you use these new products! Make sure you share your projects with us in our Facebook group and make sure you use the #EllesStudio hashtag when posting on Instagram for a chance to be featured on our feed and win a gift certificate to our shop!

Loving Your Kit Leftovers with Sarah Lee

Hi Elle’s friends! It’s Sarah here, and today it’s all about using those scraps! Scraps—what’s that you say?! Well, consider it the “leftovers” from kits. We all have them, and sometimes it’s hard to throw out all the pretty things. I know I find it be difficult! 

Using a bunch of the scraps, aka—the things I had leftover, from the February kit and add-ons, I created a fun layout. 

Supplies | February 2021 KitFebruary Labels, Bright Die Cut TabsHappy Little Moments Chipboard StickersPurple Puffy Alphabet Stickers, XOXO 6 x 8.5 Inch Paper Stack, Good Times Tab Stamp, Everyday Tabs Stamp

Honestly, from just looking at it, you wouldn’t know I was using all of my “leftovers,” but these were the last bunch of various pieces left for me to create with. I had a couple of February Kit die cuts and February Labels, so I stamped right onto them using the Good Times Tab Stamp to help embellish my layout.

I had four remaining 3″ x 4″ tags left from the February Kit, so I used them as my main background for this 12″ x 12″ layout. I layered my photos on top of two of these 3″ x 4″ tags.

My favorite part about creating this layout was using up all of my leftover Bright Die Cut Tabs. I layered them on the side of my layout, and then I stamped a bunch of various words and phrases from the Everyday Tabs Stamp. It was such an easy way to embellish a project, and I love how it turned out.

Last but not least, I had scrap pieces from the colorful XOXO Paper Stack, so I punched out some photo corners and added some of those to my layout.

That’s all I have for today. What’d you think? We’d love to see how you use those February kit and add-on scraps. Join us in using all of your leftovers, and please share your projects with all of us at our Elle’s Studio Facebook Group or on Instagram using the hashtag #EllesStudio. We’d love to see how you use those Elle’s products!

And as always, thanks for letting me share my work with all of you! 

March Design Team Sneak Peeks

We are just two days away from our March kit and add-ons reveal and we are so excited to be able to share these fun sneak peeks of amazing projects our team made using all the new products that will be available soon! Our March reveal will be full of exclusive products that we’ve designed and will have you ready to document your March stories and take you right into the month of April!

Not a subscriber? Don’t wait any longer! You can pre-order our March kit now and lock in our $9.99 kit price by starting a subscription today! You’ll want to choose our SUBSCRIBE & SAVE option to get signed up and start your subscription with our March kit. We will then hold your kit and you’ll be ready to bundle and save at our March 10th reveal! Details on how to bundle with your subscription order will be emailed to you once you have purchased this product.

Kit subscribers, don’t forget! Along with being able to bundle any products from our shop that will ship for FREE with your kit during our 24-hour bundling period, starting on the 10th at 8:00 am Pacific each month, our subscribers will also have access to special discounts on select items! Above is a preview of our March discounts and savings that will be available for our subscribers during our March bundling period! These discounted items can be found in our SALE section during our 24-hour bundling period, and you must be logged into your kit subscriber account to see them. If you haven’t subscribed to our kit, sign up now to take advantage of these special offers on March 10th! Quick note: Our kits and add-ons are available without a subscription each month, too.

This month we also have a couple of EXTRA SPECIAL SURPRISES: We are excited to be celebrating 14 years in business this month and we are so thankful for all of your support and friendship over the years! We love and appreciate you all so much! All of our current and new kit subscribers will be receiving and Elle’s Studio pen with their March kit subscription, and subscribers will also be able to save on our new birthday themed products with our Birthday Bundle option:

We are so excited to share all of these new products with you and to see how you use them on your projects! Make sure you set your alarm and mark your calendar for Wednesday, March 10th at 8:00 am Pacific! We hope to see you there!

February #EllesStudio Spottings on Instagram

Hello, friends! We’re so excited to share six projects that we discovered this month by searching the #EllesStudio hashtag on Instagram. Take a look at what we found:

Both of these fun projects just make us happy with their sunny elements! On the left, Deanna (@enjoy.the.season) layered bits and pieces from our Summer Fun Paper Stack, one of our past monthly kits and Puffy Alphabet Banners to record a summer moment! On the right, Christina (@christinandjays) used our Grateful Stamp to add a title to her awesome traveler’s notebook spread. Both beautiful projects!

We love finding our products in pocket pages! On the left, Amanda (@amanda_kuhn3) used pieces from our February kit and add-ons to record her week in a colorful way! On the right, Heather (@heatherscraftylife) used the same products to do the same, and we just love the result!

We love the final two layouts! Our newest alphabet puffy stickers in purple made an appearance on the page on the left, created by Doreen (@memorykeeper_doreen). On the right, a very love-filled layout by Victoria (@sahmiam) was created using our January 2021 kit and add-ons! So beautiful!

Just for sharing their projects, these six paper crafters will each win a $10 gift certificate to the shop! Thank you so much for posting your projects and using the #EllesStudio hashtag, ladies! Please email us at info@shopellesstudio.com to claim your prize!

Use our products on your next project and post to Instagram using the hashtag #EllesStudio for a chance to be featured here on our blog, and win a gift certificate to the shop! We can’t wait to see what you create this month!

Less is More with Aimee Mertell

Hello Elle’s Studio friends! It’s Aimee here to walk you through creating a simple, yet meaningful layout using your February kit and add-ons. Let’s take a look at what I did. 

Supplies | February LabelsBright Die Cut Tabs, Happy Little Moments Chipboard StickersXOXO 6 x 8.5 Inch Paper Stack, Heart of Gold Wood VeneersGood Times Tab Stamp

I knew I wanted to create a sort of, “reasons why” style layout using these photos I snapped of my son mid-story— he tells the best stories! I grabbed the February Labels as I thought they would be a great jumping off point and a fun place to list my reasons. I went ahead and filled in the boxes with a bunch of reasons why my boy is amazing and instead of trimming them down into individual labels I opted to leave them together, which actually inspired my layout design and photo sizing. 

I printed out my photos the same dimensions as the label strip and laid them in a stair pattern. I then selected some of my favorite Heart of Gold Wood Veneer pieces to help direct my story and the overall theme of my layout.

I chose the phrases, “heart of gold” and “you are amazing” and also added in a “love note” stamped sentiment on a tab from the Bright Die Cut Tabs. Being intentional about the phrases or embellishments you use on your spread can do wonders for making your entire layout feel meaningful without needing any extra fluff. Don’t get me wrong, sometimes it’s fun to fluff, but that doesn’t mean it’s always necessary! 

Next up, I added a bit of whimsy with some gold stars and a rainbow cluster from the Happy Little Moments Chipboard Stickers—sweet and simple. 

Even projects with minimal embellishments can be just as striking or impactful as one with ALL THE THINGS—especially if you’re choice with your products. This is one of those situations where less was definitely more, and I hope it inspires you to try a simpler and more intentional approach to your next page. Until next time, happy creating! 

Delightful Dies with Jen McMurtrey

Hello friends! It’s Jen here today with a project inspired by the many fabulous Elle’s Studio metal dies that are currently available. I love that the stamps and dies provide me with the ability to create unique projects, and I find myself going back to them time and again!

Here’s a look at the layout I created using several of my favorites.

Supplies | February 2021 Kit, XOXO 6 x 8.5 Inch Paper Stack, Fa La La 6 x 8.5 Inch Paper Stack, My Heart Stamp, Large Jane Alphabet Stamp – Candy Cane, Large Jane Alphabet Stamp – Outline, Large Jane Alphabet Metal Die, My Heart Metal Die, Banners Metal Die, Pocket, Frame, and Flip Up Metal Die

Lately, I’ve been on a rainbow kick and have been creating lots of fun projects. Today’s layout began with my creating the rainbow background using inks and the smushing method. To prevent the colors from bleeding into one another, I made sure each was dry before moving onto the next.

While the background was drying, I began stamping several hearts in coordinating colors using the My Heart Stamp and cut them out using the coordinating My Heart Metal Die.

Using an app on my phone, I created the strip of photos that is the focal point of the layout. Since the background and embellishments are so colorful, I opted for black and white photos and patterned papers from the XOXO Paper Stack.

To frame my favorite of the four pictures, I used the Pocket, Frame, and Flip Up Metal Die with woodgrain patterned paper from the Fa La La Paper Stack.

The hearts were next, and I created clusters by stapling them together with a tiny attacher and adhering them with foam squares. The hearts were placed atop their coordinating colors on the background to give the layout symmetry (and I like how it looks!) 

Now to my favorite element . . . the title. There are not enough words to describe just how much I love the Large Jane Alphabet Stamps and Dies. There is no limit to what you can create with them. For this layout, I used the candy cane Large Jane Alphabet Stamp with the Large Jane Outline. The stripes were stamped in the same colors as the hearts and background, and I followed that with a black outline around each letter prior to cutting them out using the Large Jane Alphabet Metal Die. These stamps and dies are so awesome!

Last, I used the Banners Metal Die to cut three banners that are attached at the top right of the project.

To finish the layout, I added journaling strips below the title with Luna and Mildred’s names and the date.

Thank you so much for stopping by today. I hope you’ve been inspired to break out those stamps and dies and create!

What are you creating with your favorite Elle’s Studio dies? Share with us in our Elle’s Studio Facebook Group or on Instagram using the hashtag #EllesStudio!