Five Days of Love Event: Cards with Meghann Andrew

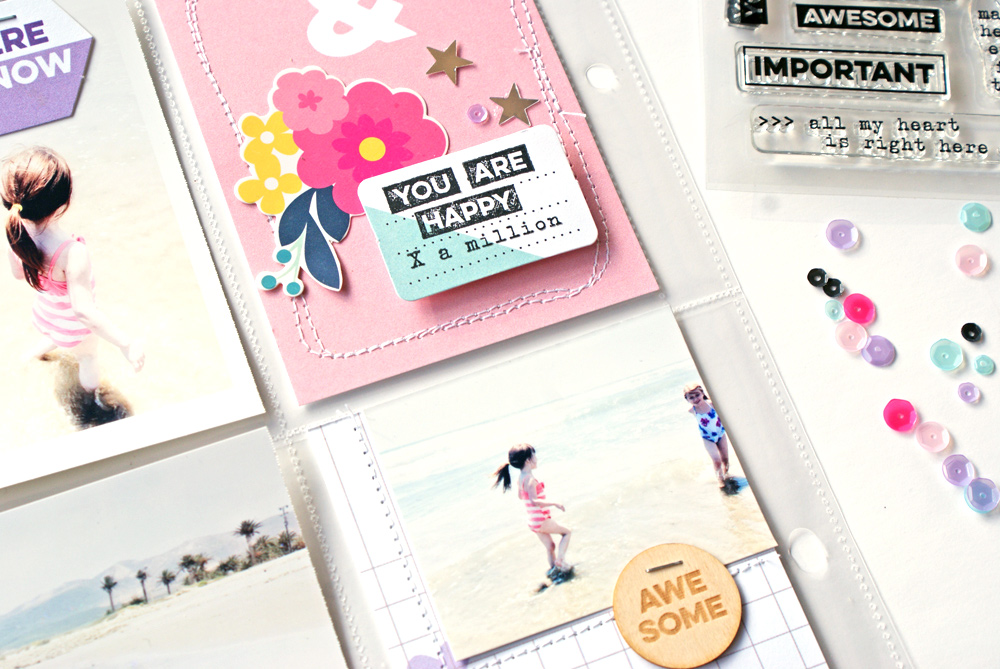
Hi there! We are so excited to kick off a new month here at Elle’s Studio and get ready for Valentine’s Day with a special event:

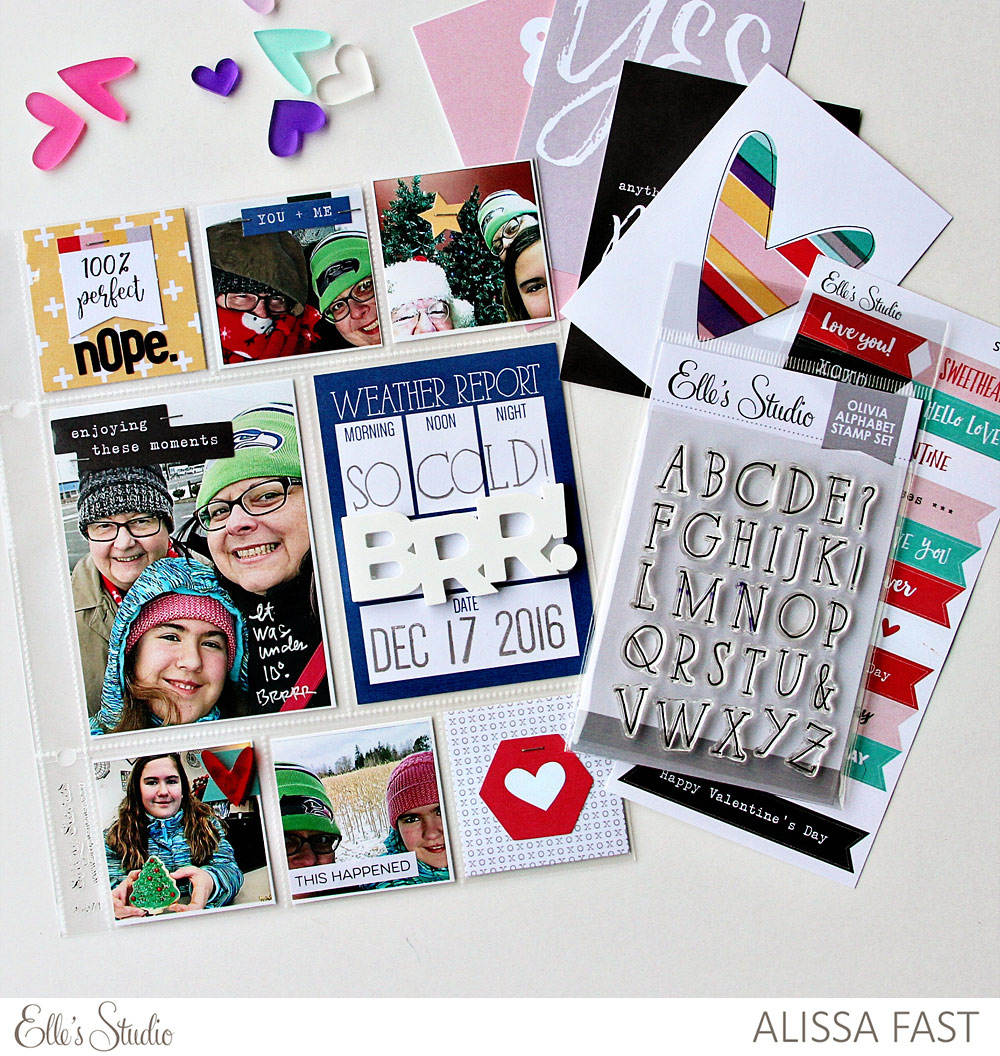
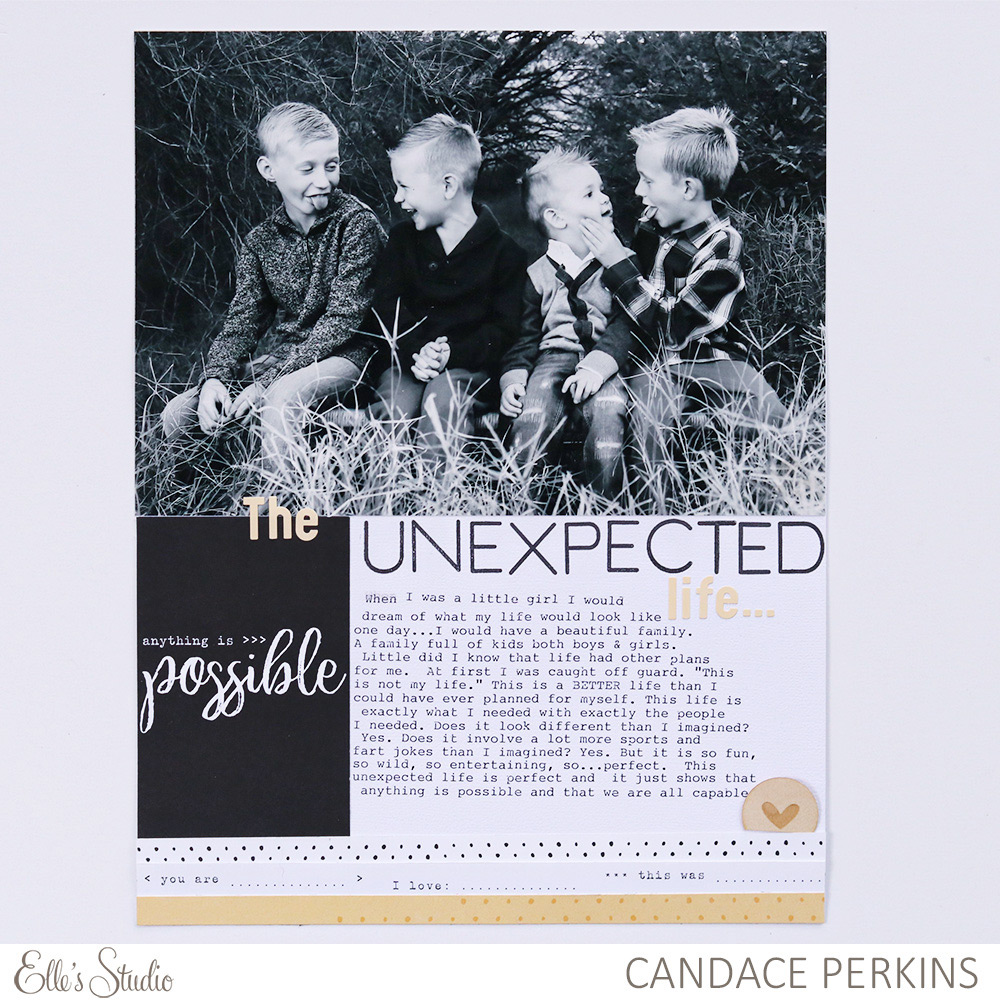
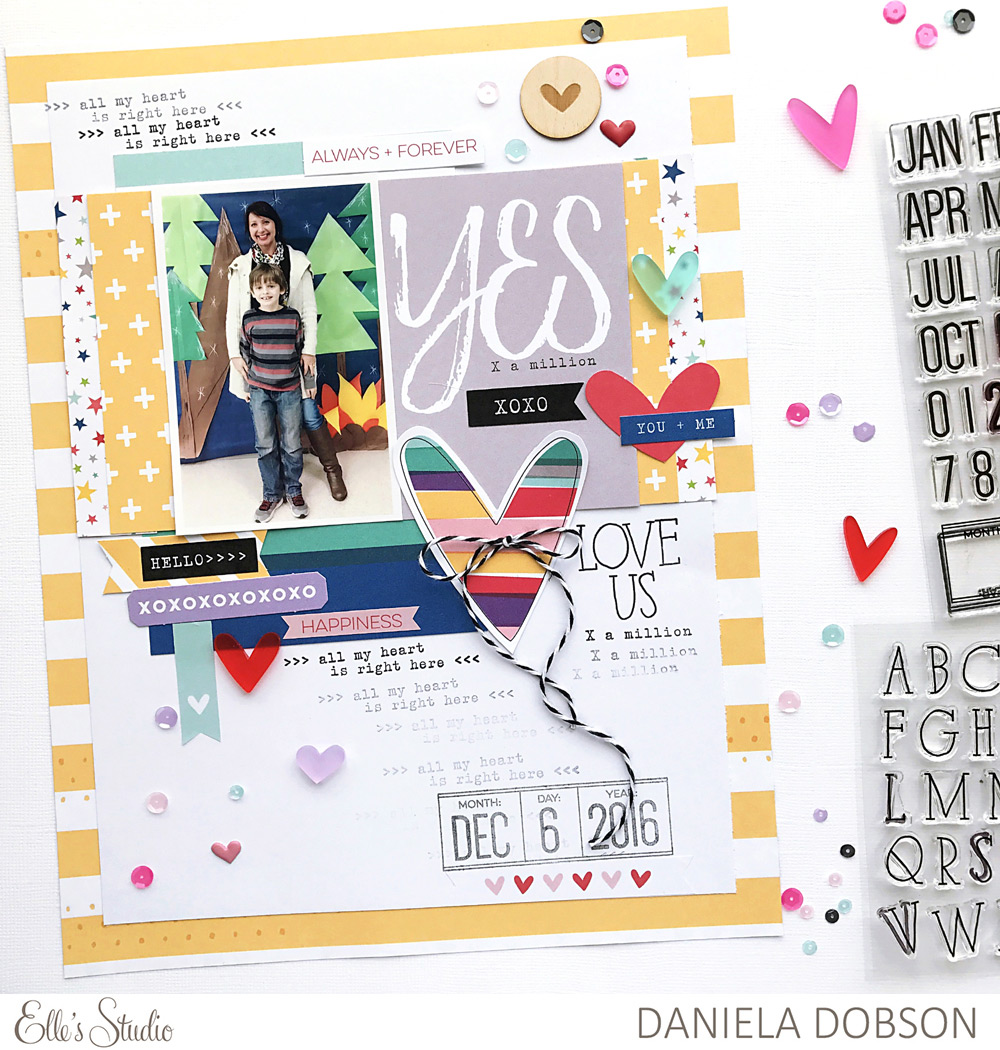
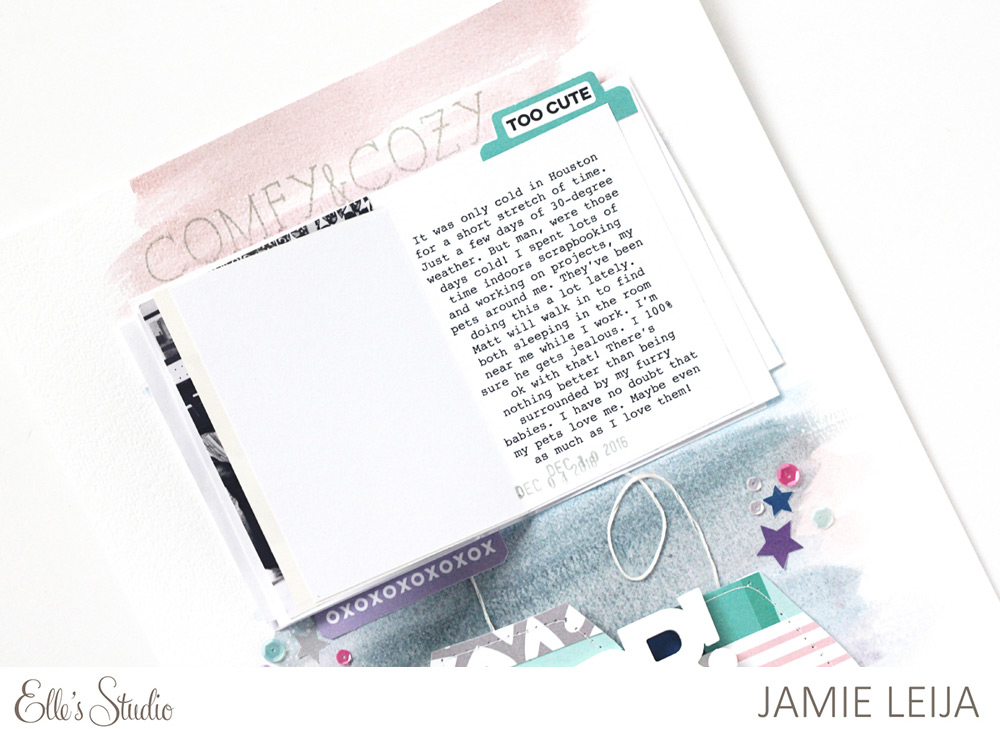
Today through Friday, we will be sharing love-themed projects: cards, pocket page layouts, traditional layouts and a mini album, all documenting and celebrating love, because that’s all we need, right?

I’m Meghann Andrew, and I’m kicking off the event with a couple of simple cards, perfect to give to someone you love on Valentine’s Day!

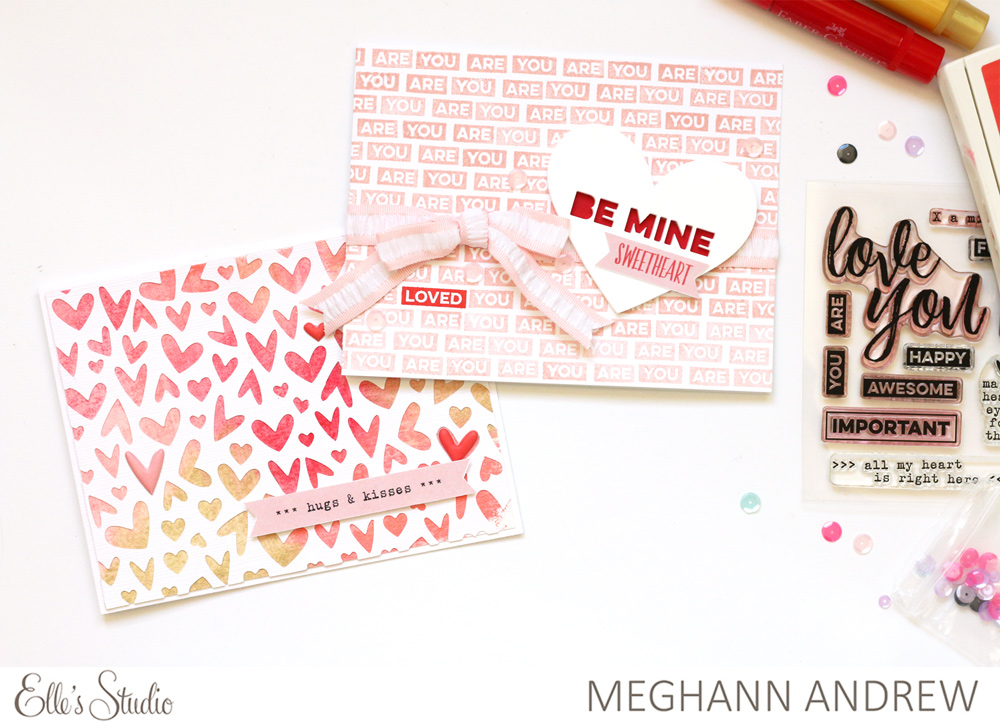
Supplies for “Hugs & Kisses” card | January 2017 Digital Cut File, Valentine Banner Stickers, Heart Puffy Stickers

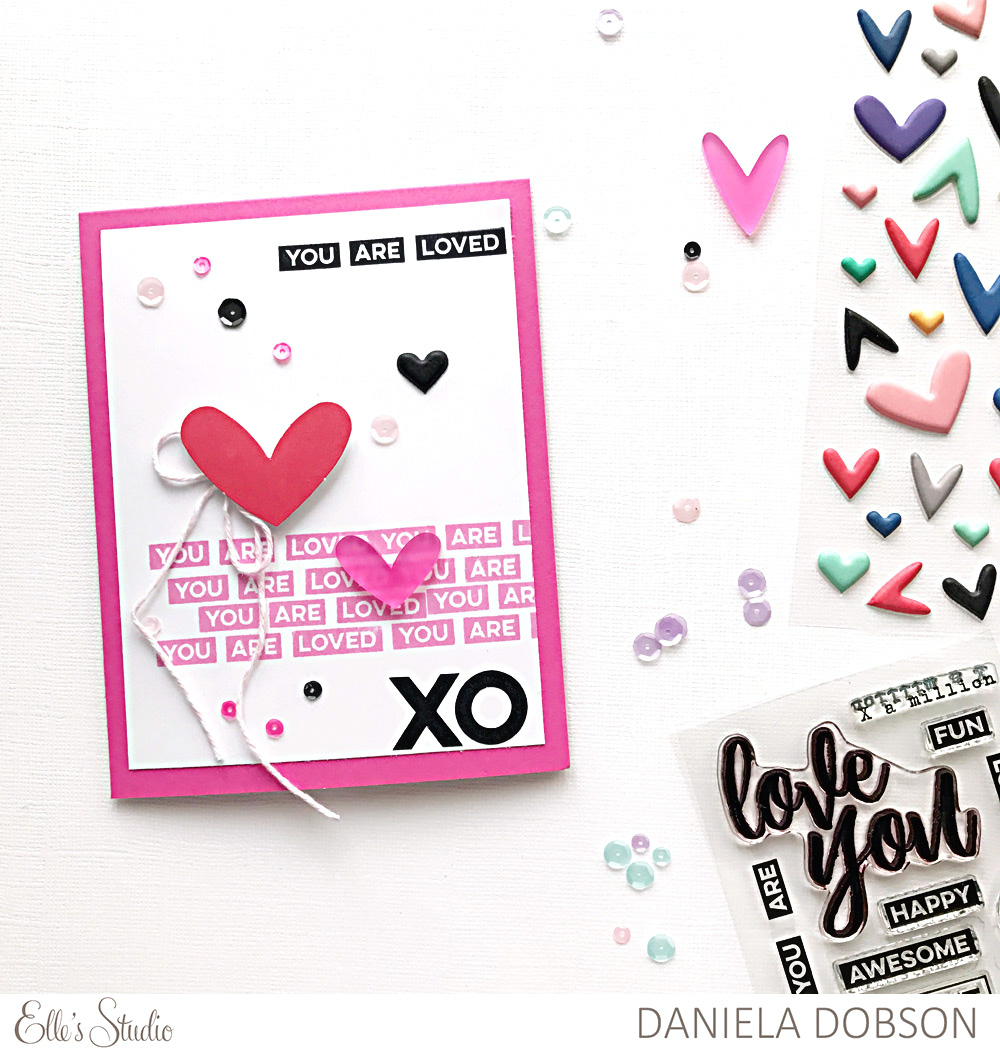
Supplies  for “Be Mine” card | All My Heart Stamp, Be Mine Acrylic Heart, Valentine Banner Stickers, Love Mix Sequins


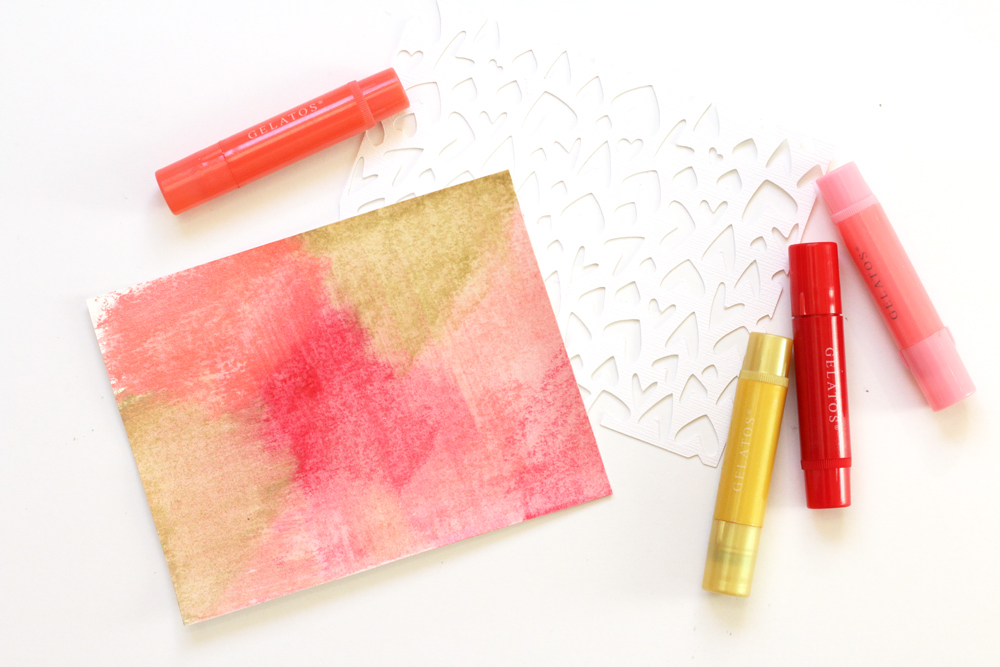
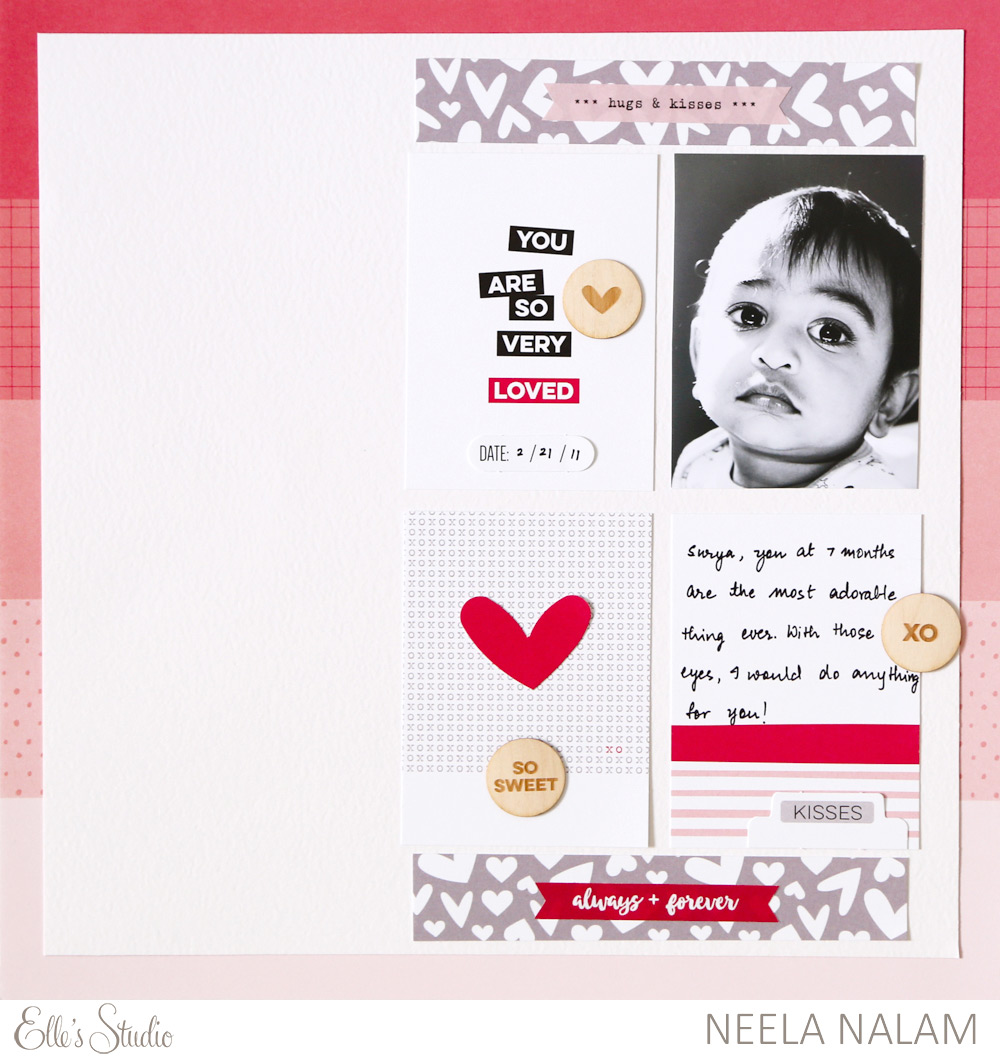
To start off my first card, I pulled out my gelato crayons and a bit of water to create a red, salmon, pink and metallic gold background. While my colored background dried, I sized the heart background from the January 2017 Digital Cut File to just under 4-1/2″ x 5-1/2″, so that there would be a small border around the background on my card front.


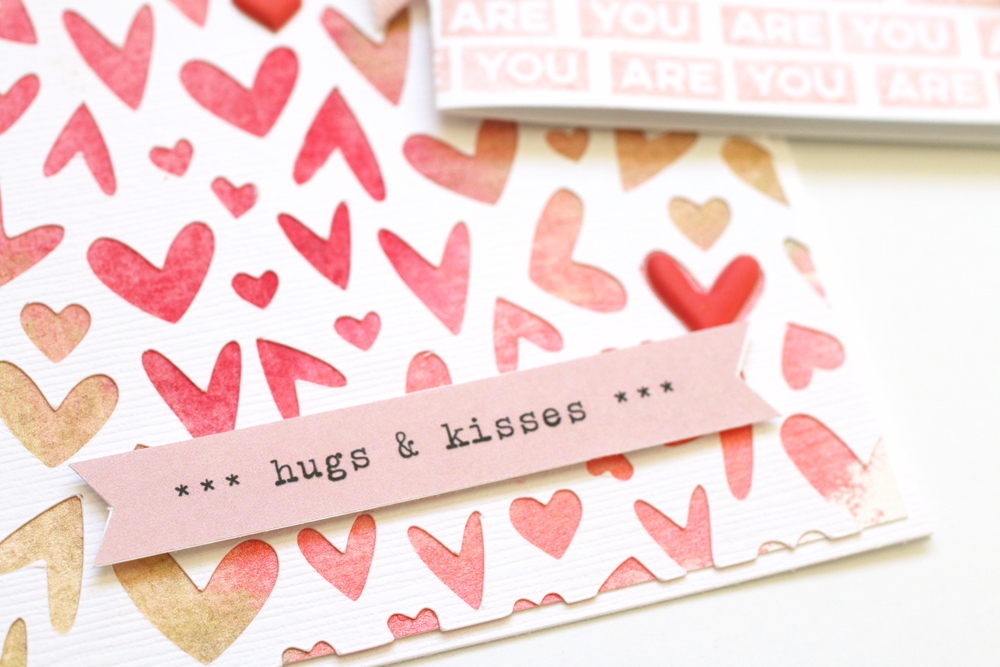
Once the gelatos were dry, I adhered the watercolor paper to the hearts die-cut background, then adhered that to the folded card. I backed the “hugs and kisses” Valentine Banner Stickers with a piece of cardstock, and adhered it to the card with dimensional adhesive. Lastly, I added three Puffy Heart Stickers, just to add a different texture to the card front.


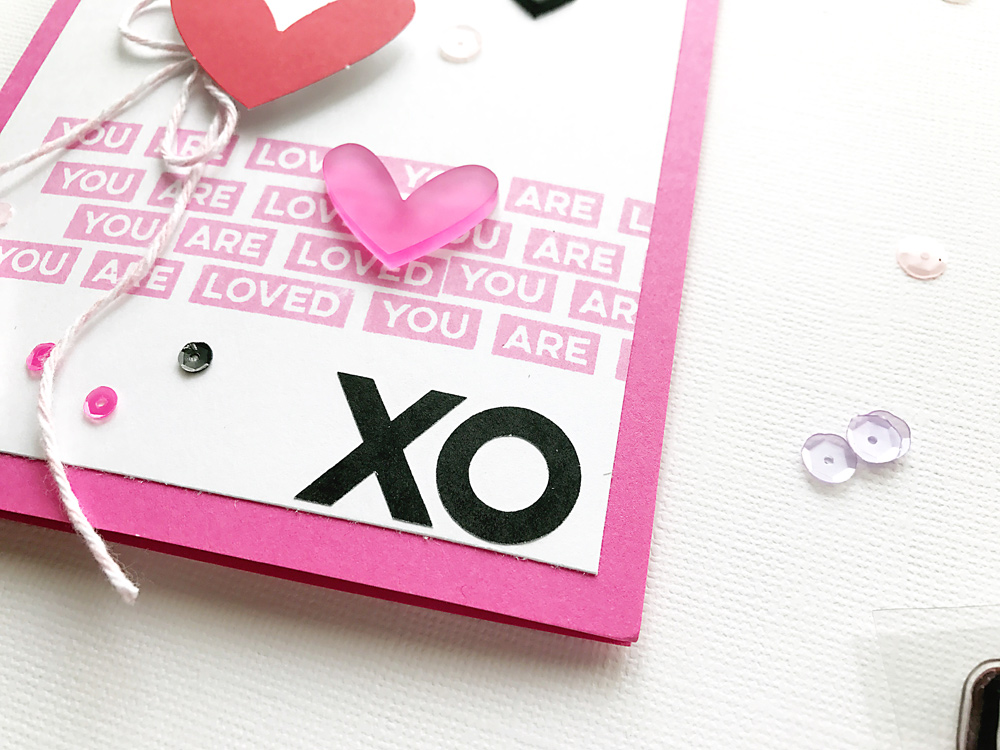
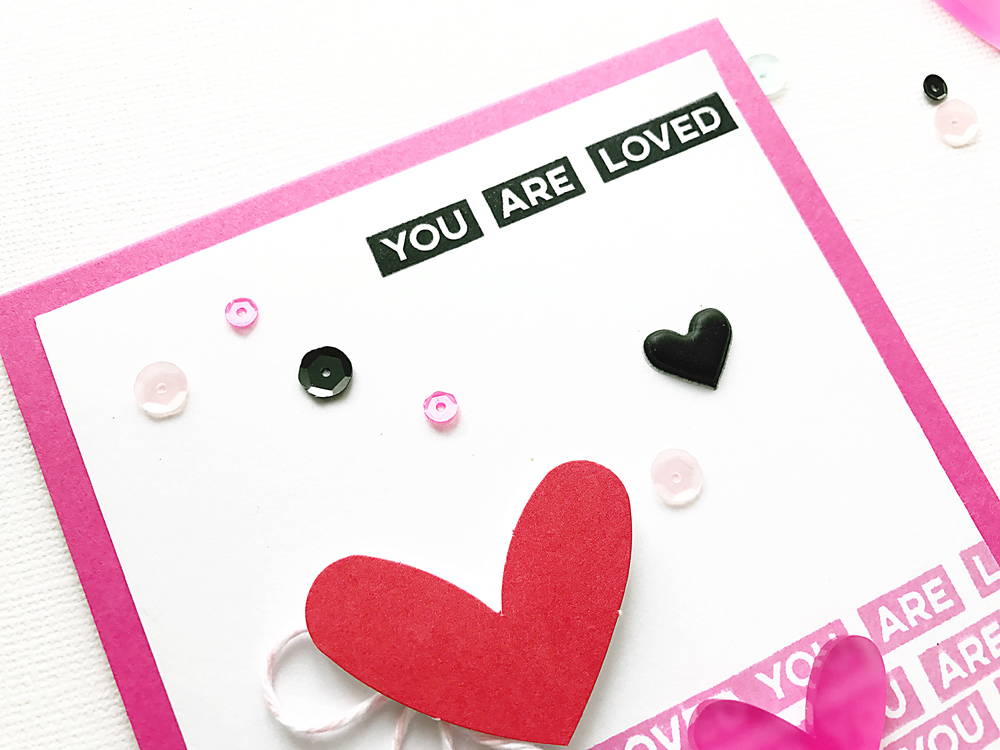
The second card took a few more minutes to create, as I stamped “you” and “are” in pink repeatedly on the background from the All My Heart Stamp. Then, I added “loved” in red to complete the background.


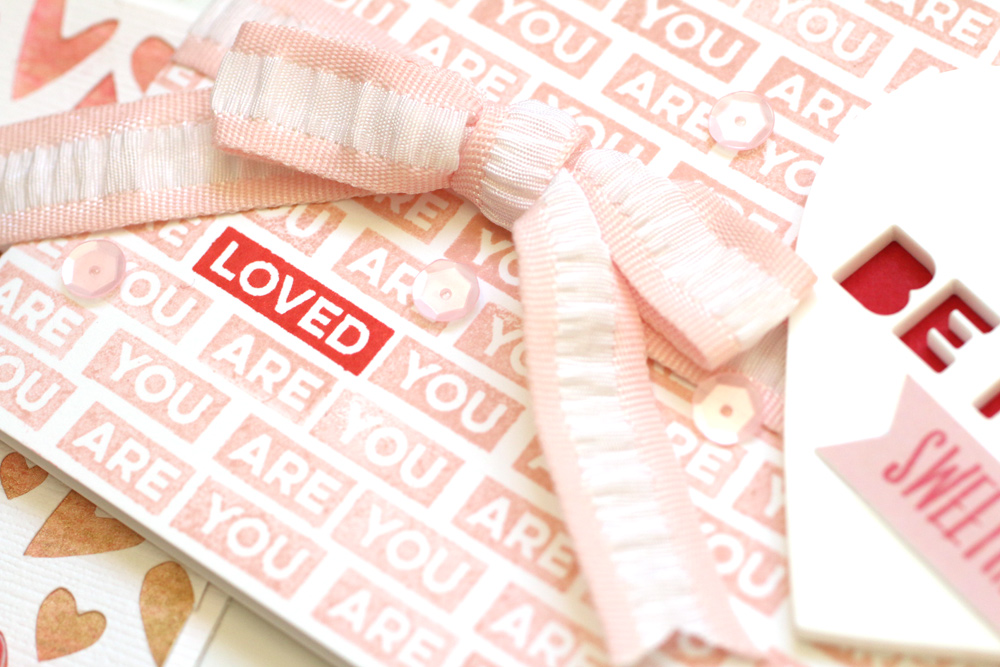
After I tied a pretty bow around my card front (by cutting a slit in the fold of the card), I backed the Be Mine Acrylic Heart with red cardstock and adhered it on top of the ribbon. The “sweetheart” Valentine Banner Sticker and a few pink sequins finished off the card nicely.

Thanks for joining me today here on the blog! Stay tuned for more projects this week, all celebrating the month of love!

Documenting Laughs with Kay Rogers

Sometimes a sappy, formal love story is required in our scrapbooks, but more often, we have everyday love stories to tell. Stories of laughs and goofy smiles instead of bouquets of flowers or wedding dresses. Today, Kay Rogers is here with us to share a layout documenting one of her everyday love photos.
 
I love this goofy picture of my husband and I, and I used wood veneer, the January 2017 Exclusive Kit, and the Sunny Days collection to create this fun, happy page to document it.
 

Supplies | January 2017 Exclusive Kit, XO Stickers, True Love Wood Veneer, Love Ya Wood Veneer Circles, Sunny Days 12″ x 12″ Paper Collection


I created a simple grid design to keep the focus on my photo, but I turned the grid at a diagonal, to make the page fun and playful. To keep the focus on my grid, I kept all of my smaller tags, stickers from the XO Stickers and Love Ya Wood Veneer Circles layered on top of the 3″ x 4″ tags and my photo.


Keeping my handwritten journaling short and sweet, I used a small tag from the January 2017 Exclusive Kit. There really weren’t any more words needed.
 
Thanks for stopping by today!

Breaking the Rules with Alissa Fast

Today we’re sharing a fun page from Alissa Fast in which she challenges us to break all of the “rules” of pocket page layouts, and add our embellishment to the outside of the pocket! Let’s take a look at what she’s created.
 
Good Morning, all! Alissa here today with a 6″ x 8″ pocket page layout using the January 2017 Exclusive Kit + extras. I love pocket pages and Elle’s products are perfect for all the little pockets. This time around I did something a little different. I added a lot of the elements to the outside of the pockets. Who said you have to put everything inside the page protector?


Supplies | January 2017 Exclusive KitPuffy Heart StickersLove You Journaling TagsValentine Banner StickersLove Ya Wood Veneer Circles
 
Adhering and stapling the element to the outside of the page helps to avoid the dreaded page pucker. How awesome are the Puffy Heart Stickers? They are totally my favorite product this year thus far.


I even ignored the pocket sizes and put a 4″ x 6″ tag in a 4″ x 4″ pocket and the left side of the tag in a 2″ x 4″ pocket. All the stickers from the Valentine Banner Stickers and stapled die cuts from the January Kit are on the outside of the pages, too.


Here’s a close up of the cute die cut labels from the January Kit layered over each other and stapled to the outside of the page.
 
Now, what will I do with the back side since I’ve stapled all the pockets closed? No problem, I’ll adhere elements, photos and journal cards on the outside of the entire page. Fun stuff, right?
 
Breaking the rules is what I do.
 
Now it’s your turn. Get those pocket pages out and add fun stuff to the outside of the pockets and see what greatness you end up with. Be sure to tag your projects using the hashtag #ellesstudio I know you will love it!
 
Have a great day!

Design Team Inspiration

We are back with another round of beautiful inspiration from our Design Team! Our Design Team has put together a ton of fun projects using our new items for January and we can’t wait to share them with you! Let’s take a look:

Royal layout by Allie Stewartsupplies used: January 2017 kit, Love Ya Wood Veneer Circles, Little Moments 12 x 12 paper collection, Little Moments Bits and Pieces, and Frosted Acrylic Hearts.

Brr Layout by Andrea Graysupplies used: January 2017 kit, Olivia Alphabet stamp, XO stickers, Brr Acrylic, Dated Stamp, and Little Moments Bits and Pieces.

True Love Layout by Jen Schowsupplies used: January 2017 kitOlivia Alphabet stamp, Love Ya wood veneer circles, Valentine Banner Stickers, True Love Wood Veneer, and January 2017 cut file.

True Love Layout by Maggie Masseysupplies used: January 2017 kit, and January 2017 cut file.

Bundled Up Layout by Meghann Andrewsupplies used: January 2017 kitOlivia Alphabet stampAll My Heart stamp, XO stickers, Sunny Days 12 x 12 paper, and ‘Tis the Season 12 x 12 paper.

Love by Melissa Mannsupplies used: January 2017 kit, Love Ya Wood Veneer Circles, Little Moments 12 x 12 paper collection, Frosted Acrylic Hearts, and XO stickers.

Loved Layout by Neela Nalam – supplies used: January 2017 kitLove Ya Wood Veneer CirclesValentine Banner Stickers, and Little Moments 12 x 12 paper collection.

Jazz Dancer Layout by Tessa Buyssupplies used:  January 2017 kit, Frosted Acrylic Hearts, Olivia Alphabet stamp, and Sequins – Love Mix.

Such fun and incredible projects! We love them and hope you found our teams projects as inspiring as we did! Stay tuned for even more inspiration coming from our team next month!

And, don’t forget – we would love to see how you use our products, too! If you are posting on Instagram, make sure you use the #EllesStudio hashtag for a chance to be featured on our feed! And, if you blog, link us up in the comments below!

A Sunny Pocket Page Layout with Michelle Wedertz

If you had any question to the versatility of the exclusive monthly kits that we offer, Michelle Wedertz is here today to prove it to you! She saw the colors in the January 2017 Exclusive Kit and immediately thought of beach photos that she had on hand, creating a gorgeous pocket page spread.

Hello! I fell head over heels for the beautiful colors featured in the January 2017 Exclusive Kit. The mix of lavender, pink, turquoise, and black was just what I needed to chase away the winter blues! And even though I think the cards and tags would be perfect to document all the love in my life, I decided I wanted to work with some extra beach photos that have been waiting to document since last spring.

Supplies | January Exclusive Kit, Love Ya Wood Veneer CirclesAll My Heart Stamp, Sequins – Love Mix, and XO Stickers.

Almost all of my memory keeping is done using a mix of both pocket and traditional pages. This allows me a lot of creative freedom, yet functions as a practical way to keep up with the volume of photos that I take. Instead of choosing just a few photos, I pick one or two to highlight in a traditional layout and then pop the rest of the pictures in pockets. For this particular spread, I had already made the traditional layout and I found that the kit was a great compliment to it.

Along with the kit and a few pieces from my stash, I also used a some of the fun extras available this month, like the All My Heart Stamp, Love Ya Wood Veneer Circles and XO Stickers. My favorite add-on this month, however, is the pretty bag of Love Mix Sequins – what a great mix of colors! I like using sequins because they add that finishing touch as well as bring in a new texture to the page.

Wishing you all a great day!

Documenting a Big Story with Melissa Mann

Sometimes on our projects, we have a large story to tell, more than will fit on a typical 3″ x 4″ journaling tag. Melissa Mann had a lot of journaling to fit onto one page, so she used several tags to document her story, as well as ground her photos. We love how she mixed and matched our collections with the January 2017 Exclusive Kit to create such a fun, colorful page! 


Good morning and thanks for joining us on the Elle’s Studio blog! My layout today is focused on journaling. That being said, I have to say right off the bat that this layout is heavily influenced by a layout done by one of my all time favorite scrapbookers, our very own Jill Sprott! She is one of the most skilled journalers on scrapbooking layouts and I often turn to her projects to get some inspiration!
 

Supplies | January 2017 Exclusive Kit, XO Stickers, Love Ya Wood Veneer Circles,  Malia Lowercase Alphabet Stamp, Joyful 12″ x 12″ Paper CollectionLittle Moments 12″ x 12″ Paper CollectionLetter and Number Stickers- Black
 
Of course, the 3″ x 4″ Elle’s Studio journaling cards are the perfect choice for adding your words to your projects. I created a loose grid of six 3″ x 4″ cards, all from the January 2017 Exclusive Kit, adding pictures to three of them and journaling to the other three.


I used my sewing machine pretty heavily on this layout to secure all of my cards. A layout is never complete to me unless it has some sort of stitching!  I distressed the edges of the outer cardstock and stitched that down as well. I made good use out of several different stamp sets, including the new Malia Lowercase Alphabet Stamp (so good!) for my title.
 
I hope this layout helps you to include some journaling on your next project! Thanks so much for stopping by!

A Repeated Sentiment with Daniela Dobson

Stamps are such a great product to create with. You can use them over and over again in different ways to really test your creativity, as well as get your money’s worth! Today Daniela Dobson is with us to share a gorgeous card that she created using a repeated sentiment in a creative way. Let’s take a look.

Welcome to the Elle’s Studio blog post today. It’s Daniela here highlighting the exclusive All My Heart Stamp along with January 2017 Exclusive Kit and extras with a card perfect for Valentine’s Day.

January 2017 Exclusive KitAll My Heart StampSequins – Love MixAcrylic Frosted HeartsPuffy Heart StickersXO Stickers

I used a stamp positioner to line up the three stamps that say, “you are loved.” Moving the white cardstock only, I was able to create a repeated design of the sentiment on the lower part of the card in pink ink.


To embellish the card I added stickers from the XO Stickers, Love Mix sequins, acrylic heart from the Acrylic Frosted Hearts, puffy heart from the Puffy Heart Stickers, and a die cut heart from the January 2017 Exclusive Kit. I used dimensional adhesive for the die cut heart, and I tucked a twine bow under it. In addition, I stamped the sentiment again, in black ink, at the top of the card.


Stamps are so versatile and I love using them. They are easily incorporated into any type of project, and the All My Heart Stamp is perfect for cards to show someone how much you care.
Thanks for stopping by and don’t forget to share your projects using Elle’s Studio stamps using the hashtag #EllesStudio on social media!

Double-Page Magic with Guest Designer Jennie McGarvey

Jennie McGarvey is back today with her final post as our January guest designer, and we’ve so enjoyed all of her projects! Today is no different, as she shares her double-page solution for adding multiple photos to tell a story of a magical day.

It can be really hard to create a stylish page that really is fun to create with a lot of photos. But sometimes, you need quite a few to really tell the story. What I often do is combine a one page layout with a photo or two alongside a pocket page. That pocket page allows me to simply add a few more photos or words. The pages go together well, but I only feel the need to embellish lightly on the pocket page. Elle’s Studio tags are so sweet they pair well with any photos!


Supplies | January 2017 Exclusive Kit, Love Mix Sequins, Valentine Banner StickersLittle Moments Bits and Pieces, ‘Tis the Season 12″ x 12″ Paper CollectionMalia Alphabet StampMalia Lowercase Alphabet Stamp

The Malia Alphabet Stamp and Malia Lowercase Alphabet Stamp are as amazing as they appear. I was so excited by them, that I really wanted to create something special. So this time, I actually stamped my title work. The stamps are already whimsical and have a staggered look naturally. I decided to enhance that a bit and decided to not have the stamps line up on the baseline. I feel like the staggered stamps really give this the fun and playful look I wanted to have on my layout.


Supplies | January 2017 Exclusive KitLove Mix Sequins, Acrylic Frosted Hearts, XO StickersLittle Moments Journaling TagsLittle Moments Bits and Pieces, ‘Tis the Season Bits & Pieces

A double page layout with a pocket page as one of the pages really opens all kinds of doors for storytelling and memory keeping. I can absolutely see myself doing this over and over again, especially with fun embellishments like these from Elle’s Studio!


ellesstudio-jenniemcgarvey-planner-6blogMy name is Jennie McGarvey and I feel like I’ve been papercrafting forever! I guess, I have been in one way or another since I was 12.

I’m mom to 3 boys and an avid scrapbooker + planner who loves color, stamping and clean lines. Be sure to follow my YouTube channel for planner inspiration!

Design Team Inspiration

Are you ready to see more inspiration from our team this month? Our Design Team has put together a ton of fun projects using our new items for January and we can’t wait to share them with you! Let’s take a look:

Brrr Pocket Pages by Alissa Fastsupplies used: January 2017 kit, Olivia Alphabet stamp, XO stickers, Brr Acrylic, Dated Stamp, and Letter and Number Stickers – Black.

Year In Review pocket pages by Candace Perkinssupplies used January 2017 kit, Love Ya Wood Veneer Circles, Little Moments 12 x 12 paper collection, Jonah Alphabet Stamp, and Letter and Number Stickers – Yellow.

Love Us layout by Daniela Dobsonsupplies used: January 2017 kit, All My Heart stamp, Frosted Acrylic Hearts, Olivia Alphabet stamp, XO stickers, Love Ya Wood Veneer Circles, Dated Stamp, Sequins – Love Mix, Valentine Banner Stickers, Sunny Days 6 x 6 paper, and Little Moments 12 x 12 paper collection.

Comfy Cozy layout by Jamie Leija – supplies used: January 2017 kit, Sequins – Love MixOlivia Alphabet stamp, XO stickers, and Brr Acrylic.

2017 Cover Pocket Page by Jennifer Chapinsupplies used: January 2017 kit, Olivia Alphabet stamp, XO stickers, and 2017 Large White Acrylic.

Monthly Goal Tracker Pocket Pages by Laura Hager –  supplies used: Dated Stamp, and Little Moments 12 x 12 paper collection.

Hello Pocket Pages by Michelle Wedertzsupplies used: January 2017 kit, Sequins – Love Mix, and XO stickers.

October Pocket Pages by Nancy Damianosupplies used: January 2017 kit, All My Heart Stamp, Always Acrylic Heart, Frosted Acrylic Hearts, Sequins – Love Mix, and XO stickers.

Aren’t they all AMAZING!?! We hope you found our teams projects as inspiring as we did! Stay tuned for even more inspiration coming from our team later next week, and from our guest designer!

And, don’t forget – we would love to see how you use our products, too! If you are posting on Instagram, make sure you use the #EllesStudio hashtag for a chance to be featured on our feed! And, if you blog, link us up in the comments below!

Save

Save

Creating a Tone-on-Tone Background with Allie Stewart

Using a background cut file on a layout can sometimes be a bit tricky, as we typically like to keep the emphasis on our photos and stories, but today, Allie Stewart is showing us just how easy it is to create a beautiful page using the January Digital Cut File, that still keeps all of the focus on her gorgeous photo.

Hi there! Today I have a layout to share using the January 2017 Exclusive Kit and exclusive items, as well as the January Digital Cut File! I was specifically inspired by the hearts background in the cut file, and the heart shaped Always Acrylic Heart. I wanted this page to be all about hearts!

Supplies | January 2017 Exclusive Kit, January 2017 Digital Cut File, Always Acrylic Heart, XO stickers, Valentine Banner Stickers, Love Mix Sequins, Little Moments 6″ x 6″ Paper Stack

To create this layout, I started with the background. I used Silhouette Studio to trace the cut file, and turn a portion of it into a square. I cut it out from white cardstock, and also backed it with white cardstock. White on white is one of my favorite looks, and it’s a great way to use a background cut file, while still keeping the emphasis on your photo. I wanted to use the color scheme in the January Exclusive Kit, so I pulled out my Little Moments 6″ x 6″ Paper Stack and looked for layers to coordinate. I arranged my layers with a doily and my photo, and then glued them down.

Next, I backed the Always Acrylic Heart with purple, and added it to my page. I often frame my photos by adding words and phrases above and below my photo, and this layout was no exception. I pulled in elements from the January Kit, Little Moments collection, the XO stickers, and the Valentine Banner Stickers to add around my photo. I finished the layout by adding purple and red splatters, as well as some of the new and exclusive Love Mix Sequins!

I love how inspiring this month’s new products are! The fun color scheme and hearts throughout the kit made creating this layout extra fun. Thank you for joining me today!