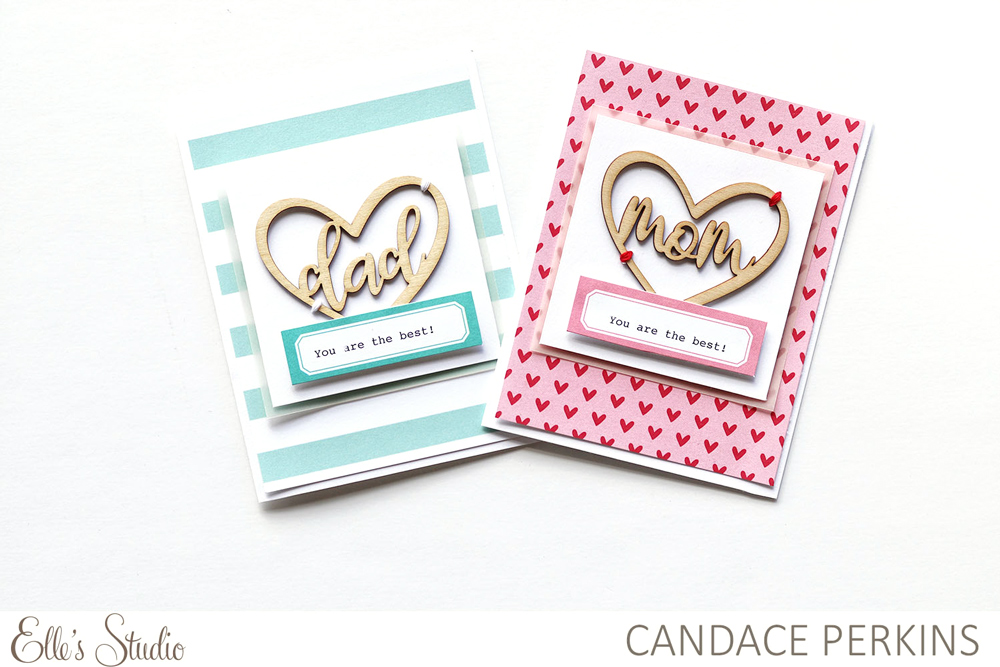
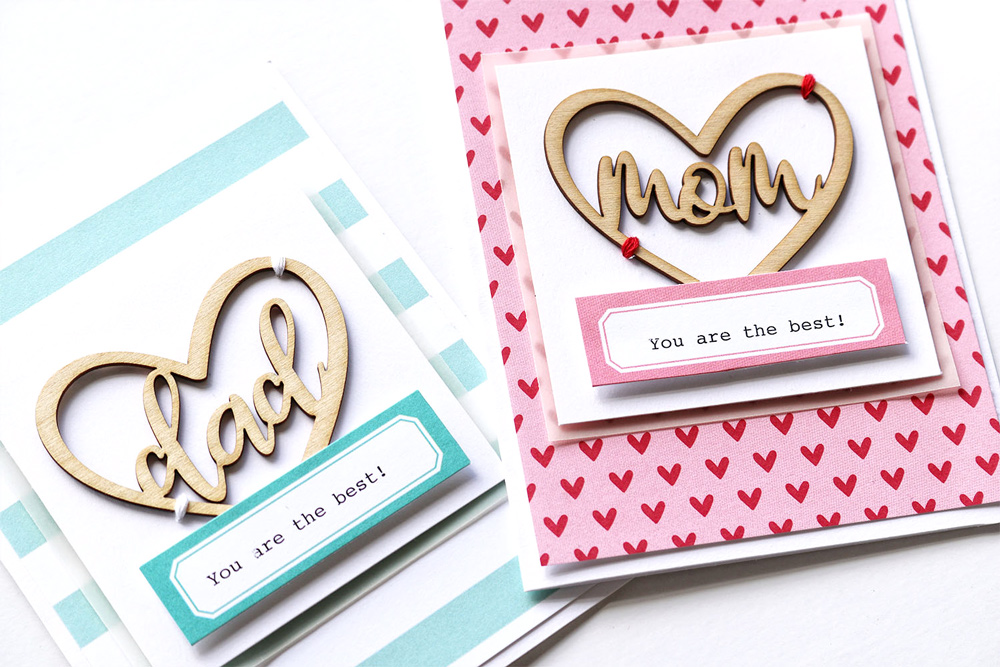
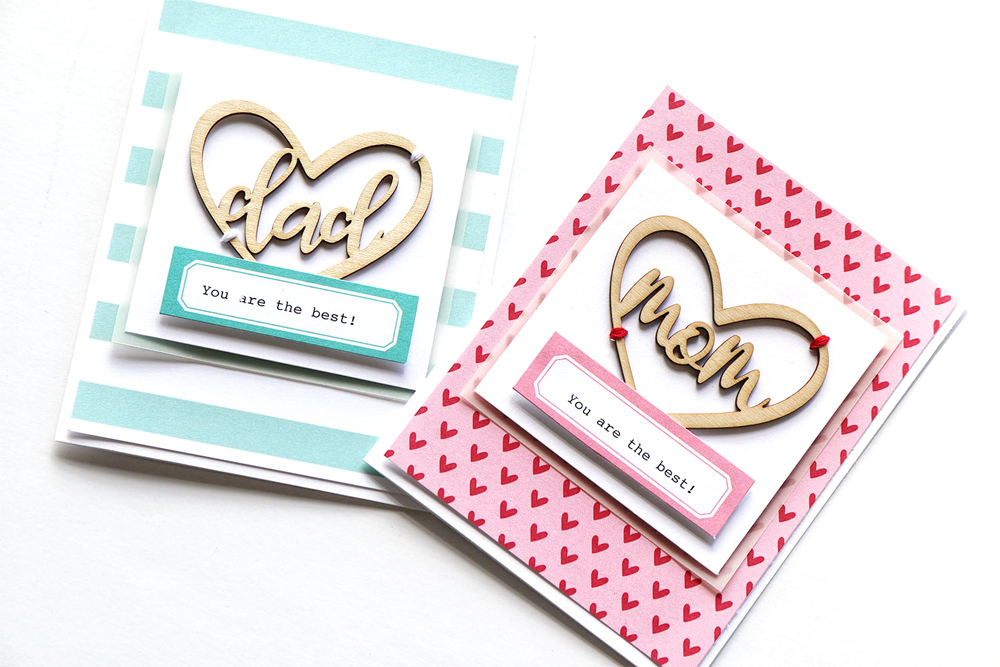
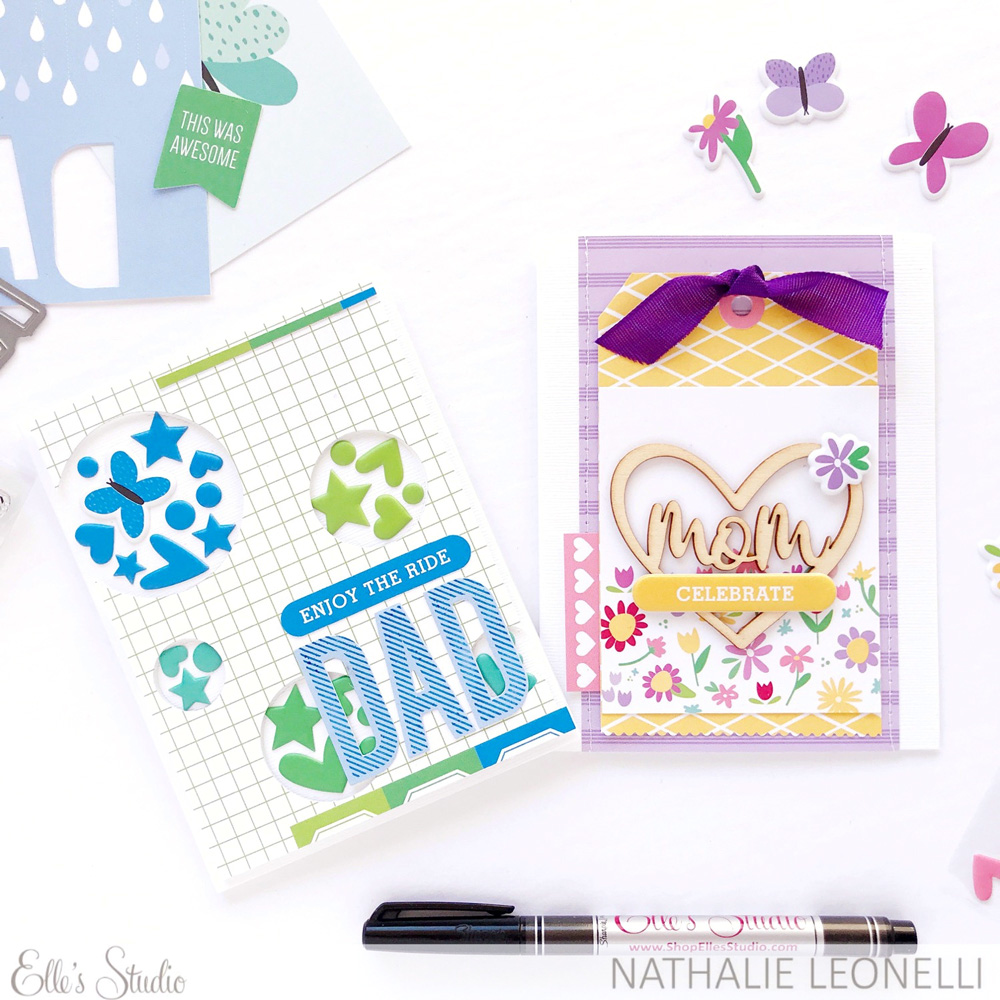
Hello friends! Welcome back to the Elle’s Studio blog. Spring is in full bloom and some very special holidays are on the way, and Elle’s Studio has all the embellishments and goodies to help you celebrate these special days! Using the fun Mom and Dad Wood Veneer along with the Springtime 6 x 6 Paper Stack, I created a matching set of cards for Mother’s and Father’s Day.
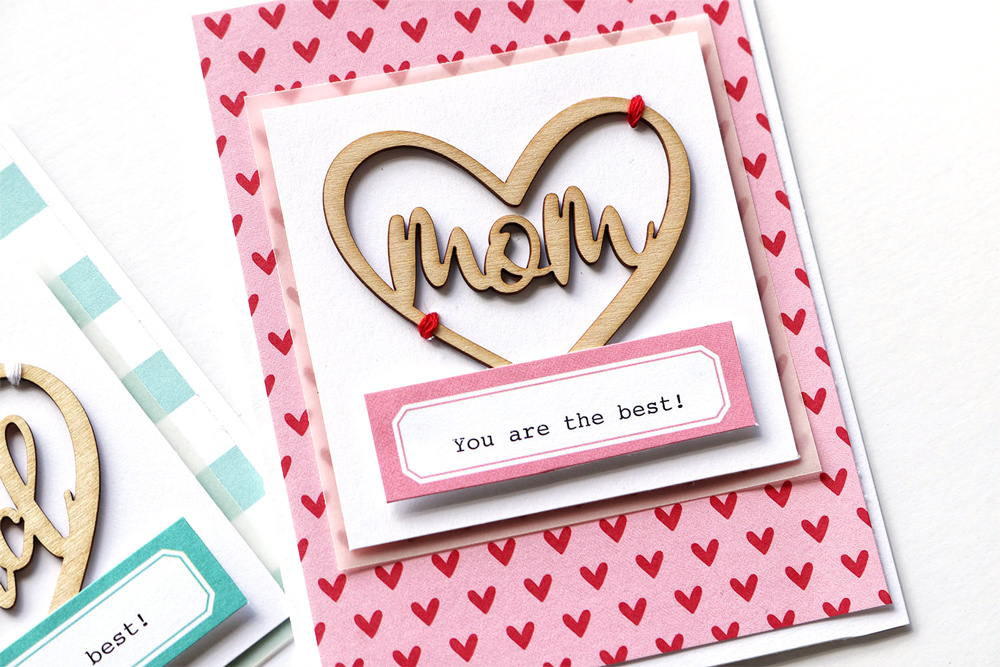
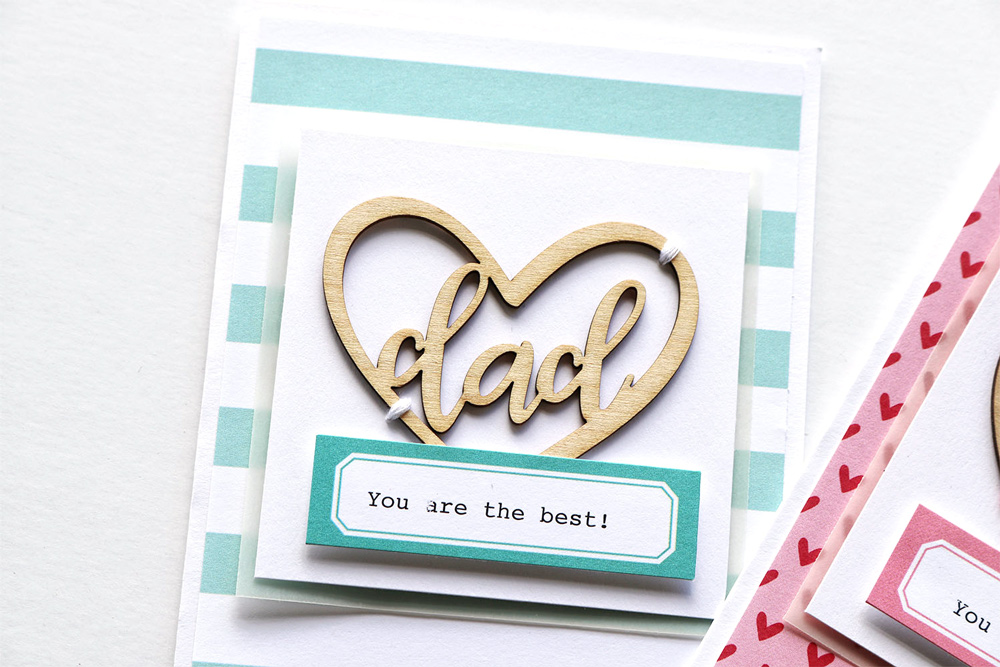
I started the simple 4-1/4″ x 5-1/2″ matching cards with a white cardstock base. Next, I cut two pieces of paper from the Springtime 6 x 6 Paper Stack, just slightly smaller than the cardstock base to create a small white border around all the edges of the card. For the centerpiece and focal point of the card, I layered the wood veneer on top of a white cardstock and vellum mat.
To adhere the wood veneer to the cardstock and add a bit of interest and texture I sewed the wood down with white and red embroidery floss. I love this little detail and the personal touch this adds to the cards! It’s such a sweet addition!
To finish the cards, I ran a few matching April Labels though my typewriter and added the “you are the best” sentiment. I love these two simple and clean matching cards and I am excited to see them together on the fireplace mantle at my parents house. I know my parents will love their personal cards and appreciate the time it took to create the cards just for them.
Thanks for stopping by the blog today for a bit of inspiration. This month, try creating a personal card or project for someone special in your life. Just think about the joy that your heartfelt creation will bring!
Have a beautiful day!
Show us how you are using the Mom and Dad Wood Veneer on your own creations in our Elle’s Studio Facebook group or on Instagram using the hashtag #EllesStudio!
Comments Off on Mother’s and Father’s Day Cards with Candace Perkins | Share This
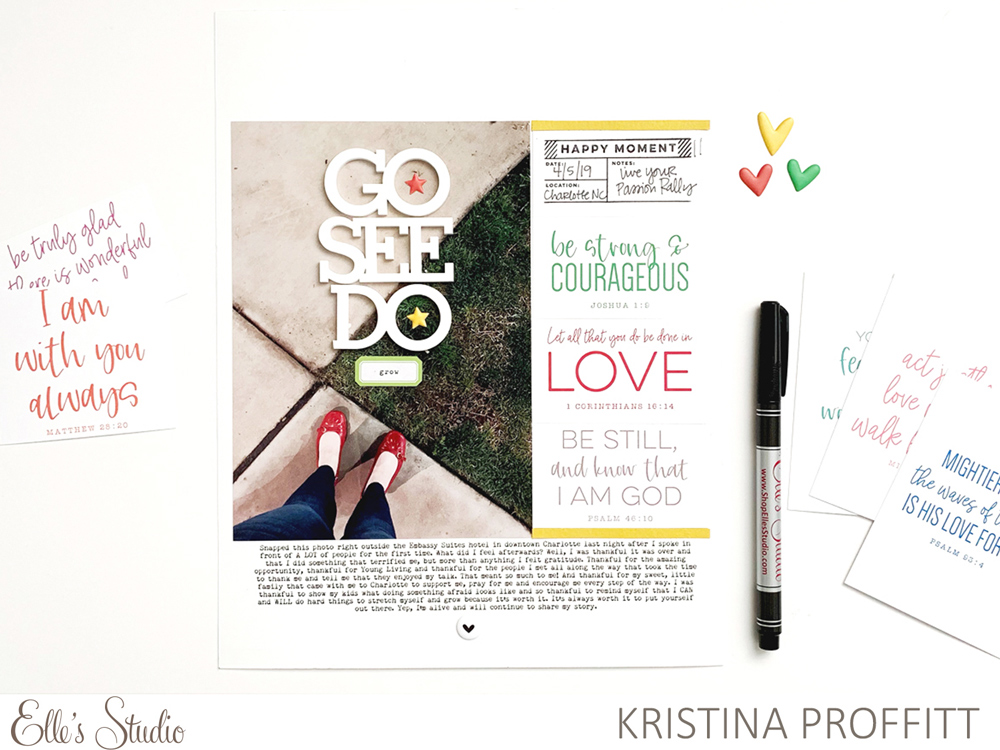
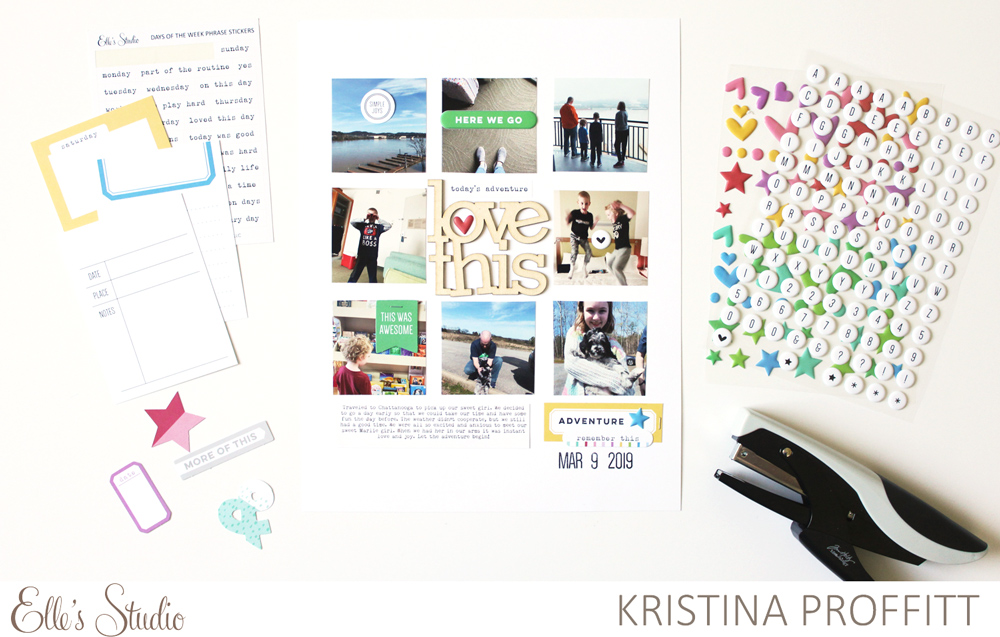
Included in April release are the new Spring Bible Scripture Tags, which include colorful and uplifting scripture sentiments to add to any project that you create. Today, design team member Kristina Proffitt is sharing how she used them on a new layout to document an everyday moment. Let’s see what she made.
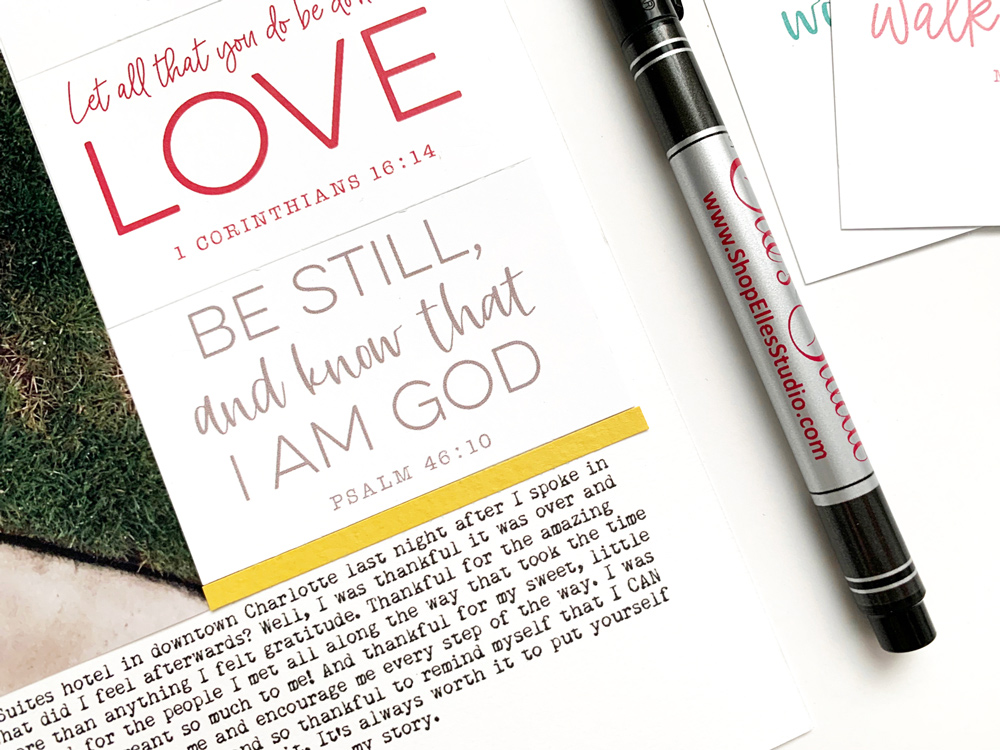
I love these beautiful Spring Bible Scripture Tags that Elle’s Studio released this month! I was so excited because I love to incorporate my faith into my projects from time to time and these are simply beautiful and so easy to use, no matter what kind of project you’re working on. Just because they are 3″ x 4″ tags, that doesn’t mean you HAVE to stick them in a pocket page, friends! One of the reasons why I love Elle’s products is their versatility (not to mention how awesome everything is) and these tags were no exception.
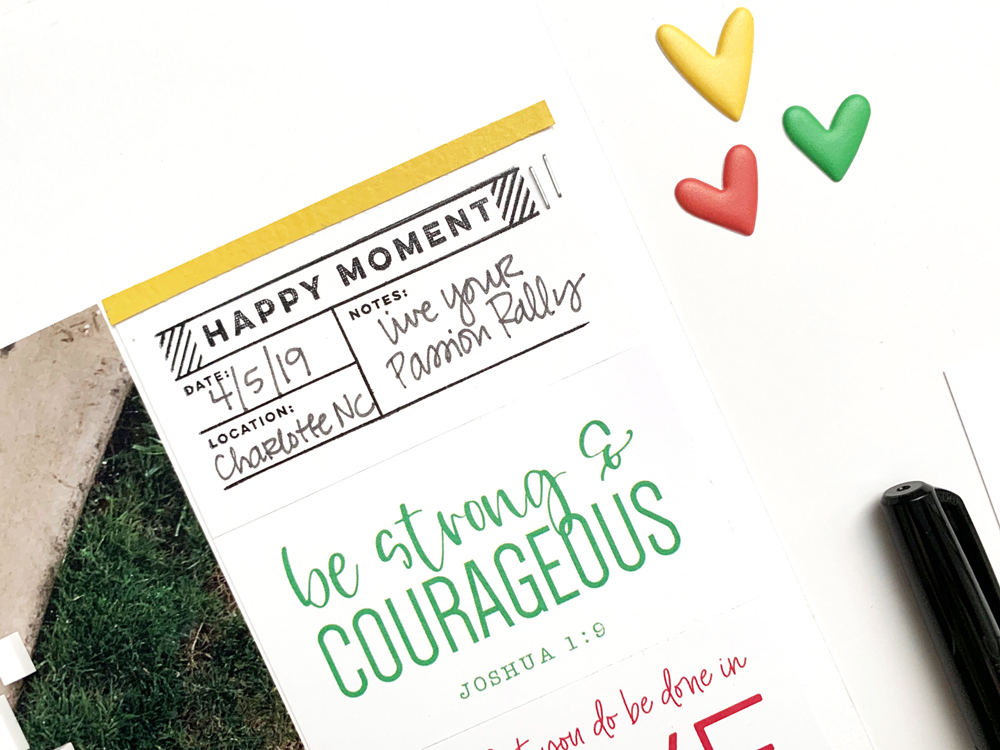
I simply trimmed each 3″ x 4″ tag and placed them on the side of my enlarged photo on my layout to add some visual interest and a sweet, important reminder to myself.
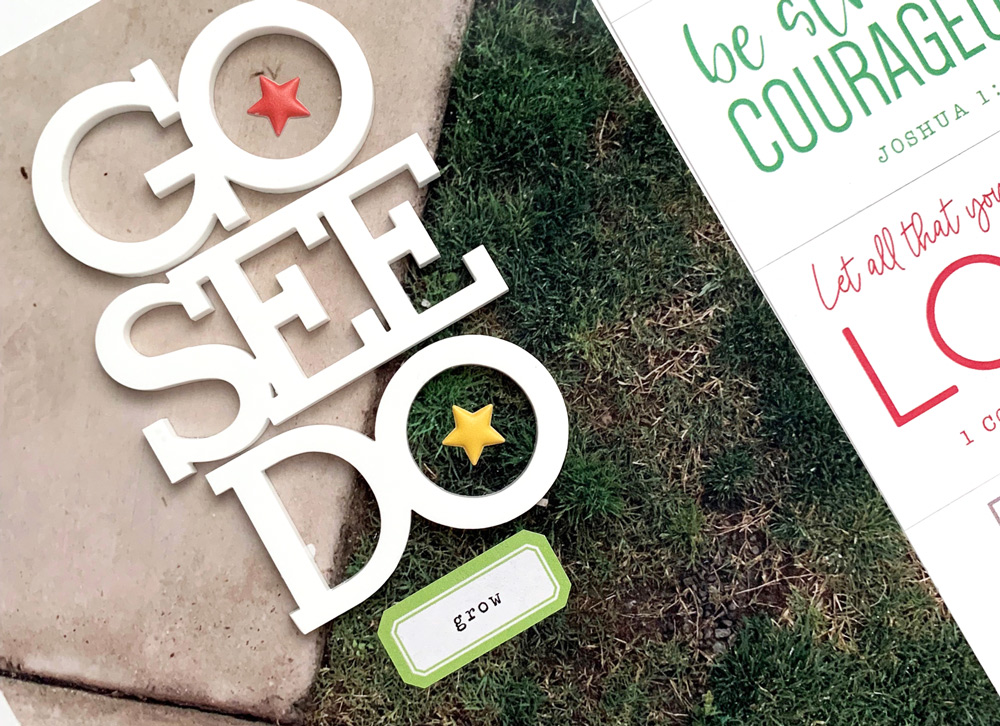
I loved adding other April goodies like the Wander Stamp,Go See Do Acrylic and the Shapes and Dots Puffy Stickers to the layout as well. It all tied together so perfectly (another reason I love Elle’s products—they all coordinate so well together!) and made this layout come together simply and beautifully. I am so thankful to have documented my thoughts on this day.
There are so many different things that you can do with 3″ x 4″ tags—trim them down, punch shapes out of them, stamp on them, add photos to them—the ideas are endless.
Remember, when it comes to these Spring Bible Scripture Tags, you don’t have to slip them into pocket pages to use them, friends. Think of other ways that you can incorporate the products that you buy and no matter how you’re documenting, be sure to pick up some of these tags! They are so beautiful and full of good reminders for us as we document our every day.
Comments Off on Scripture Reminders for Everyday with Kristina Proffitt | Share This
When your photos are a bit drab, why not add color to your project using our monthly kit and add-ons? That’s what design team member Nathalie Leonelli did on the pocket page spread she’s sharing today, and we know you’ll love all of the little touches she added!
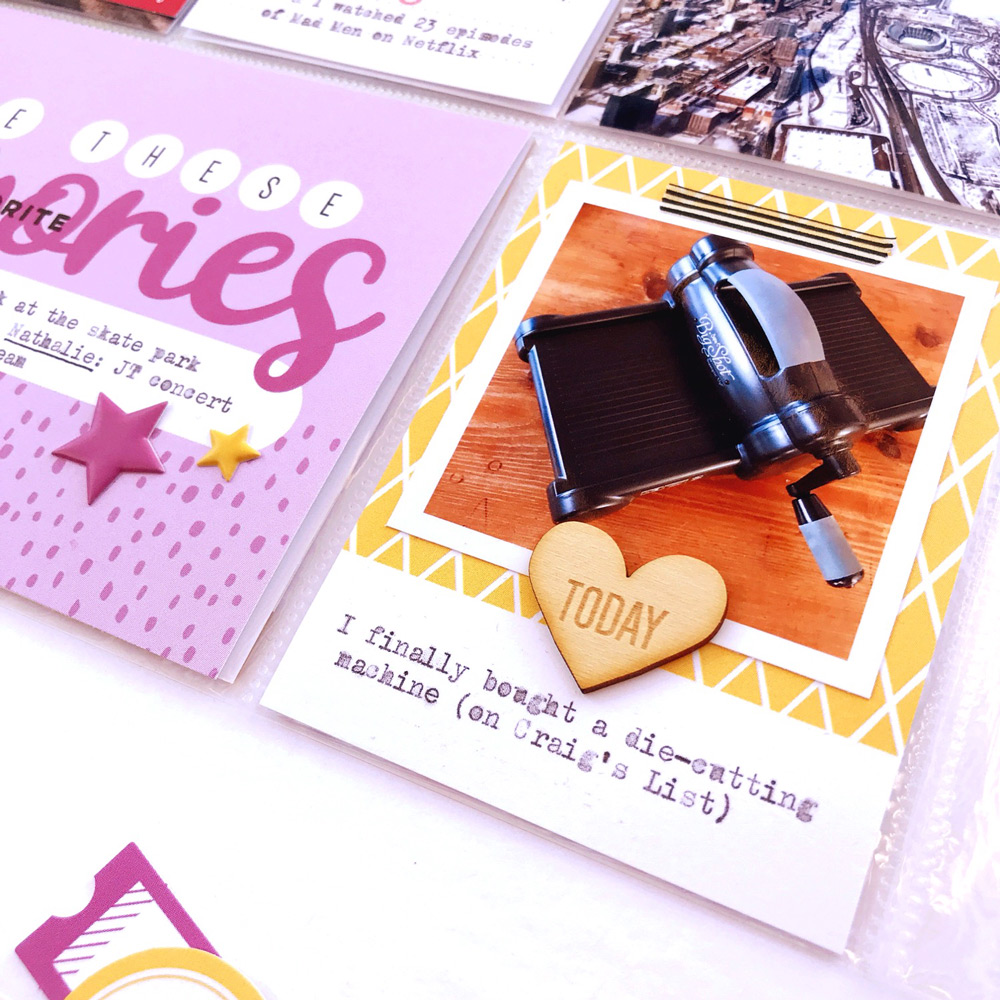
Hi! It’s Nathalie, and I am happy to be here to share my latest 9″ x 12″ pocket pages with you. I went with a really bright and colorful palette for this spread in order to balance out the dark and tinted photos from a concert I went to (JT!) My color combination was inspired by one of the tags from the new April 2019 Kit. Can you guess which one?
I pulled all the elements from the April Kit and add-ons that matched the striped tag: die cuts, tags, labels and puffy stickers. I loved the yellow touches so much I even cut a 4″ x 6″ tag in half to use it in two different spots.
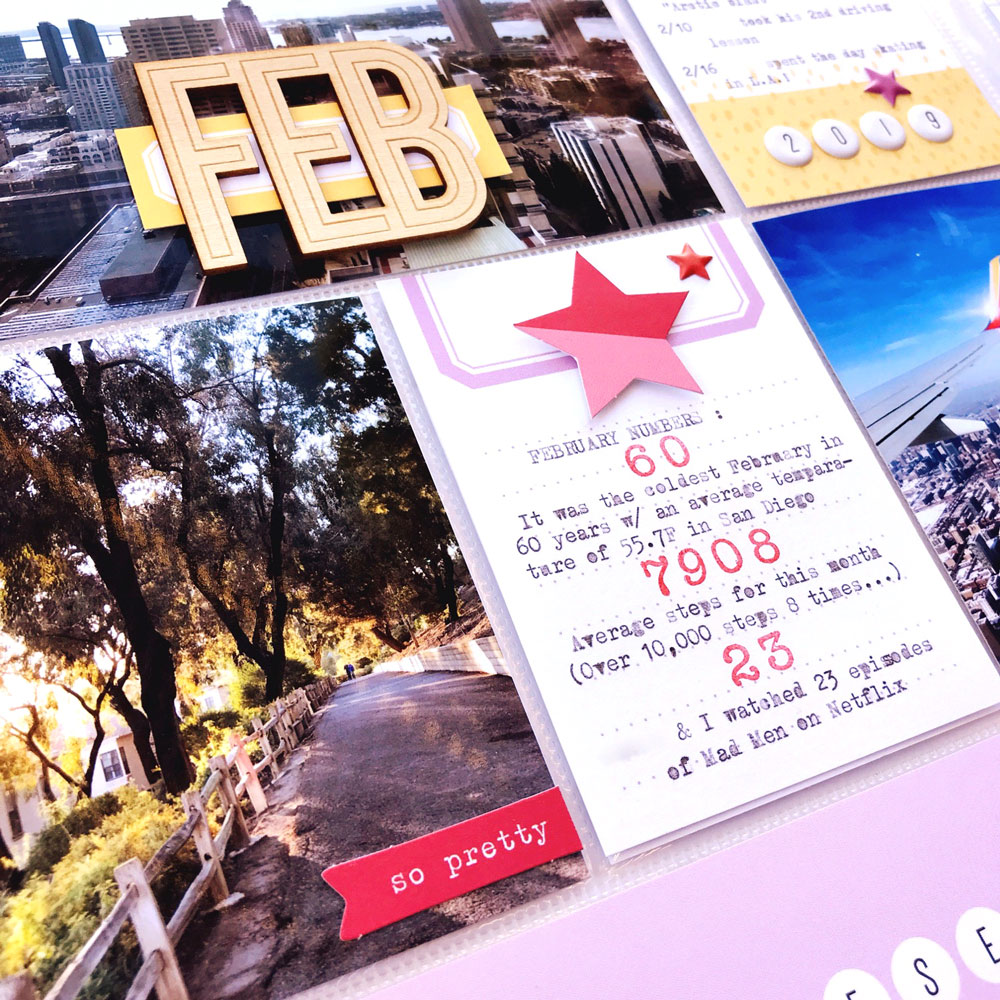
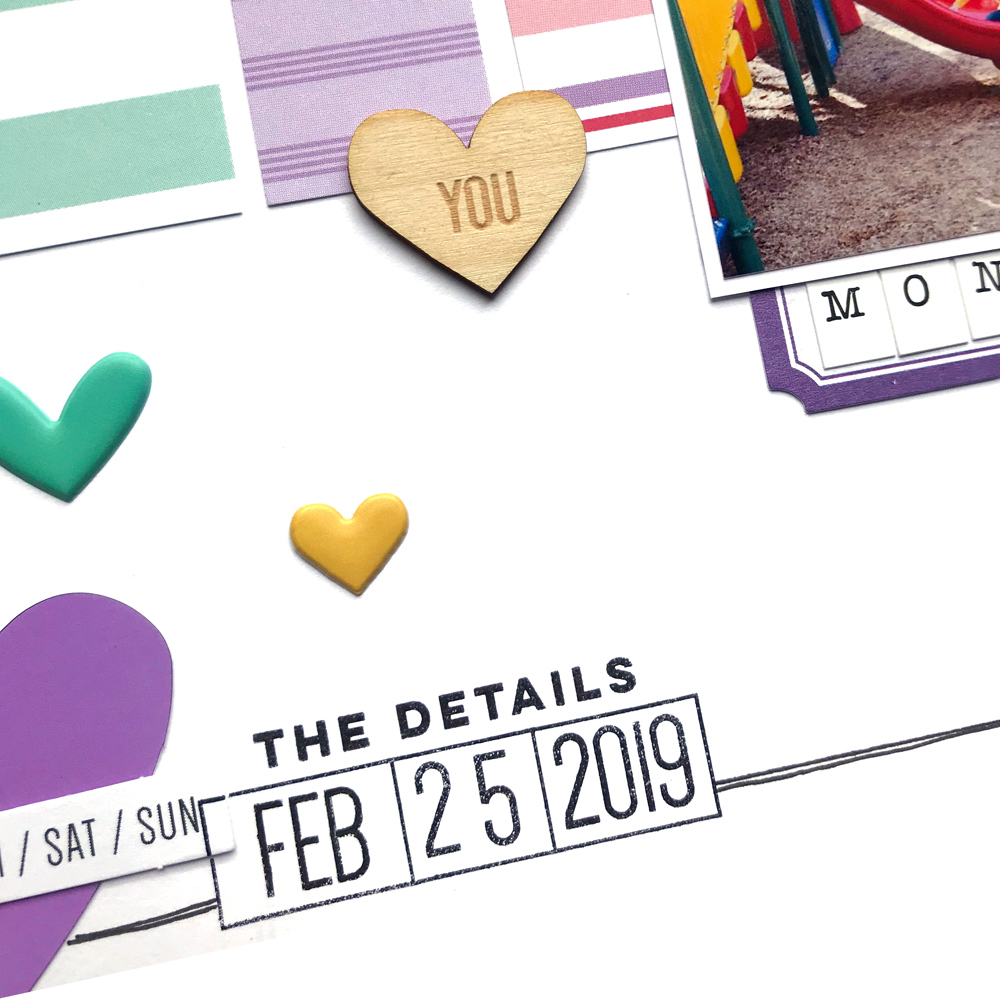
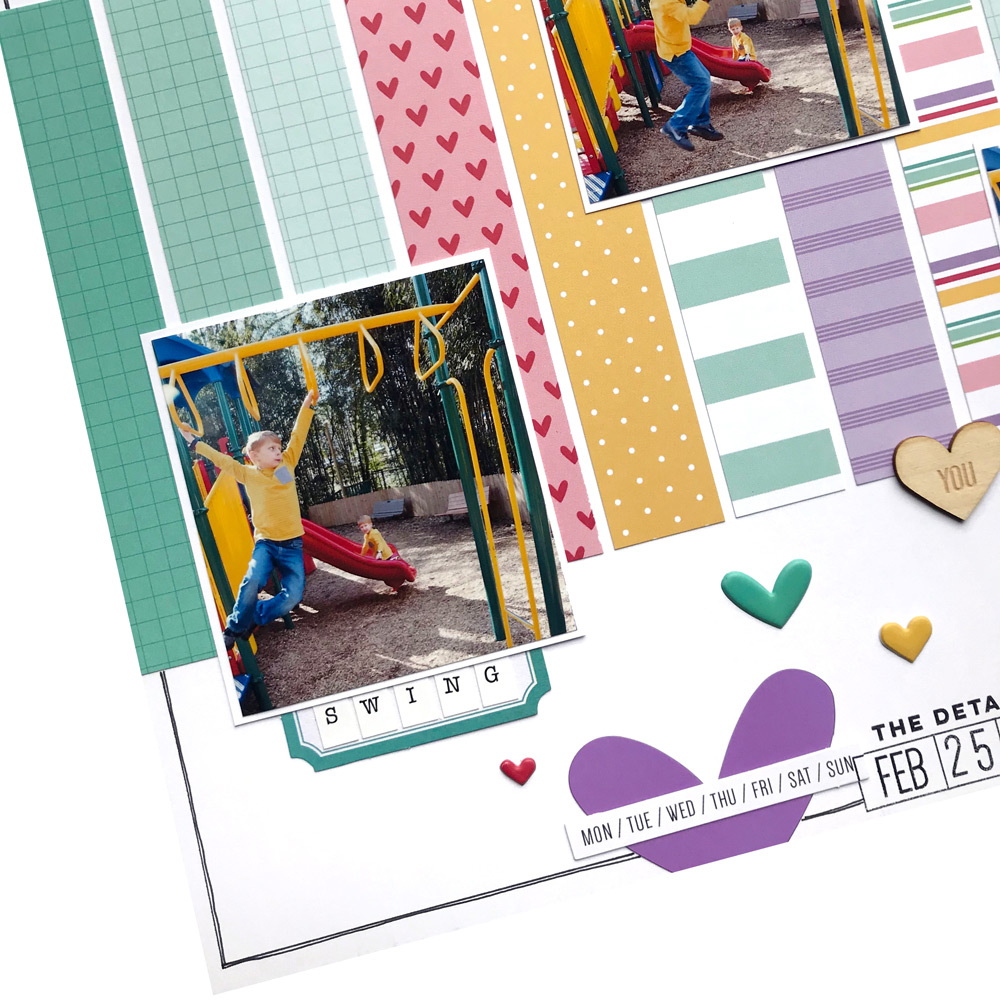
I decided early on that I would use the Large Months of the Year Wood Veneers on each monthly spread in 2019. After placing the February one on top of an April Label for a pop of color, I created a visual triangle with a veneer heart and, one of my new favorites, the Love This Wood Veneer, which both come together in the same pack! A mix of puffy stickers add extra dimension and texture to the spread. I positioned them so that they would help the eyes travel across the pockets.
I also continued recording details using numbers (as I did last month). It is a fun journaling trick especially for random tidbits. I used a tag from the new Pastel Labeled Journaling Tags, embellished it and stamped the numbers in red with the perfectly sized Hazel Alphabet Stamp.
It’s not often that I have really dark photos, but when I do, I love to stamp directly on them in white ink (using Brilliance ink in Moonlight White) so I jumped on the chance with the new Wander Stamp here. I am so happy with the result!
You will find that you can create lots of different color combinations with the April kit and extras so they can match all sorts of photos. If you are having trouble, just pick a multi-colored tag from the kit and find all the elements that match it (like I did) or find a design team project that you like and pull those same colors! Thanks for stopping by!
Comments Off on Documenting in Color with Nathalie Leonelli | Share This
We are so excited to welcome our April guest designer, Rachel O’Neal to the Elle’s Studio blog today! Rachel always creates bold, FUN and colorful layouts, and inspires us with her use of digital cut files! Let’s see what she created to share with us today using the April kit and add-ons!
Hello friends! My name is Rachel and I am so excited to be able to share my creations with you this month. I’ve had the Elle’s Studio April kit and many of the other shop goodies on my table for a few weeks now and I’ve enjoyed playing with everything! So let’s jump right in and I’ll tell you all about my first project!
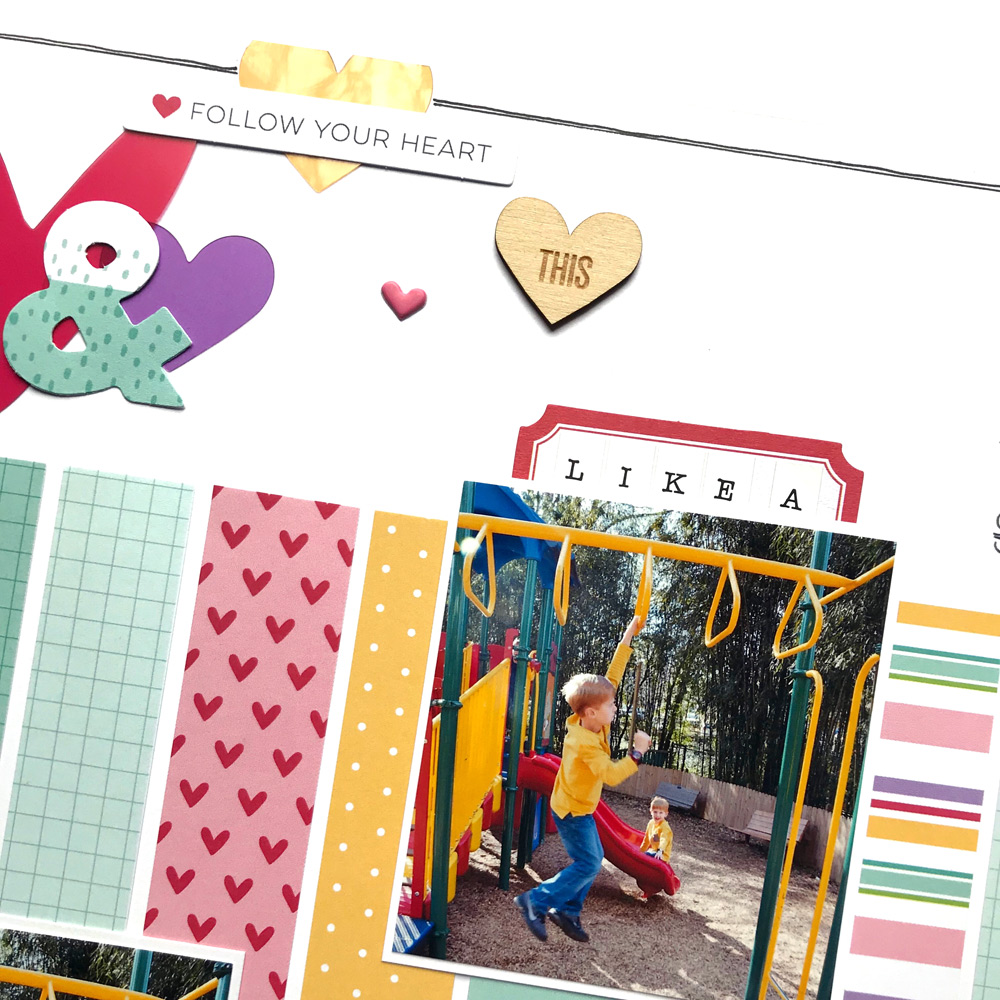
I was immediately inspired by the Springtime 6 x 6 Paper Stack. It’s filled with 12 beautiful designs that coordinate perfectly with this month’s kit. I took six of the designs and cut several 1 inch strips from them. I used eleven of the strips and placed them across the middle of a piece of white 12 x 12 inch cardstock. Tip: When I’m doing something like this that requires even spacing, I always lay them out on the paper first and play around with them before adhering them down to the paper.
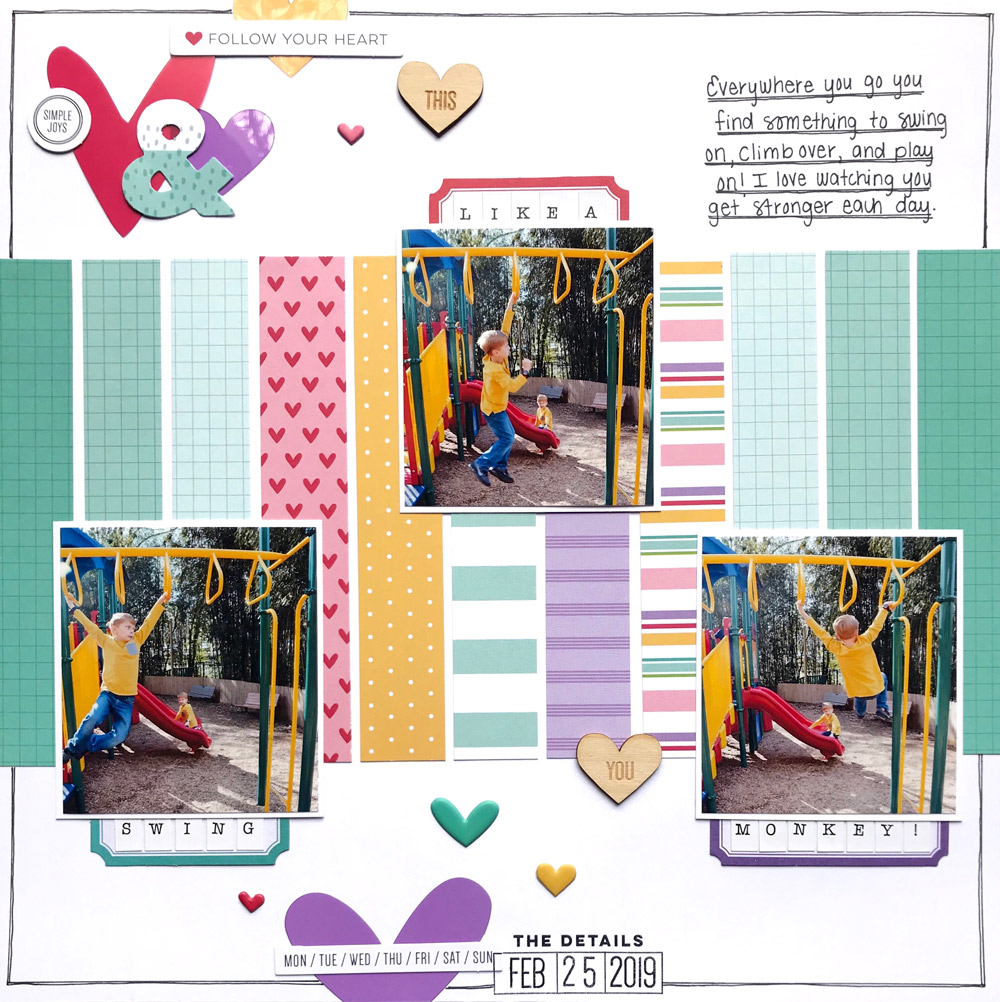
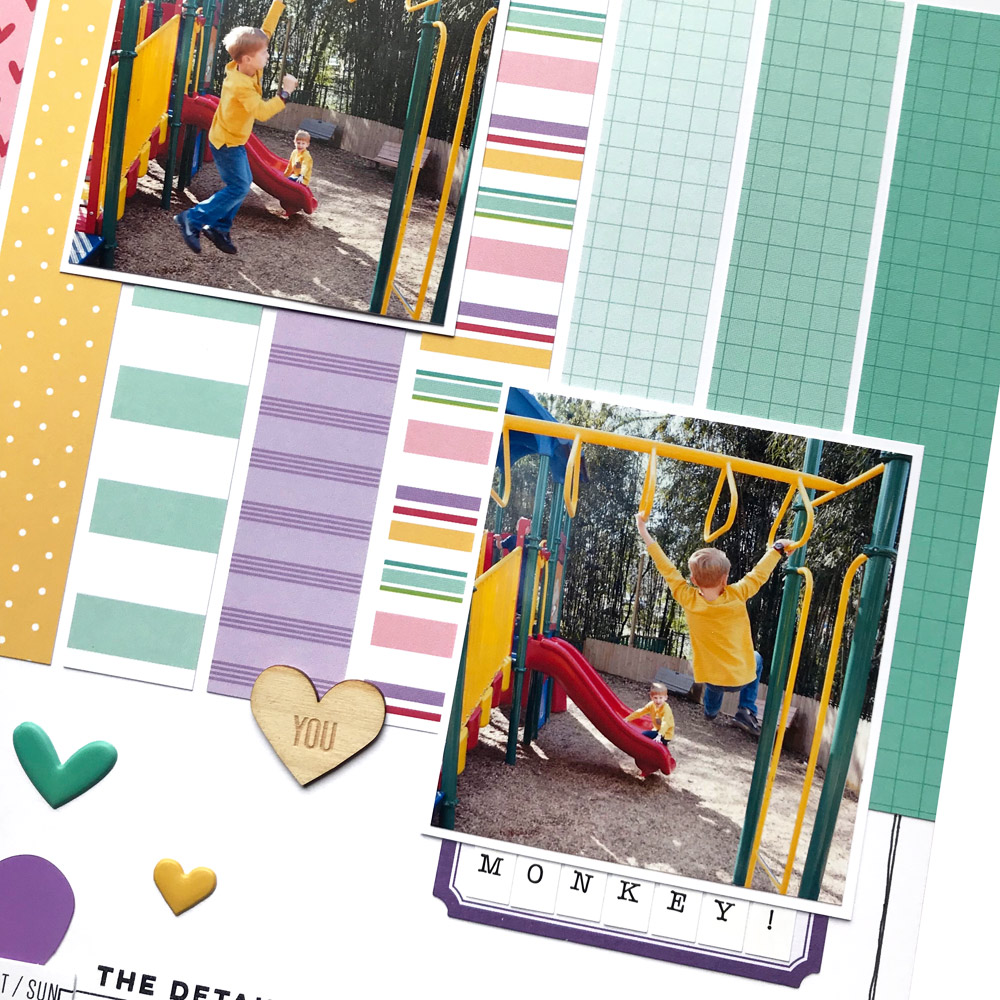
Next I chose my three photos, matted them with white cardstock, and added them to my layout in a zig-zag pattern. Above or below each photo, I slipped in a label and used the white Hazel Alphabet Stickers to create my title.
Now it was time to embellish and in my opinion the more the merrier, right!? I used a variety of hearts: acetate, puffy stickers, and wood veneer. I also used several die cut pieces from the April 2019 Kit. I love the ampersand, the days of the week, “simple joys” and the “follow your heart” phrases. All of those fit so well with this layout and describe how I feel about my boy.
In almost all of my layouts I love to journal. That could be with journal strips I’ve typed on my type writer or in my own hand, writing right on the layout itself. For me, scrapbooking is more than pretty paper and photos. I want to get our story down! For this layout I journaled in the top corner. Tip: You can use a ruler to help draw straight lines for journaling. I typical draw my lines with a ruler and then I go back and free hand a second line next to the ruler line. Don’t forget the date–that’s important too! I used the Wander and Mini Dated Stamp sets to add mine.
The last step in my layout was drawing a border around the edge of my layout. I used the same process as I do when journaling–draw my first line with a ruler and then free hand my second line.
Thank you so much for stopping by today to check out my layout. I hope I’ve inspired you to create something new with your Elle’s Studio stash!
Hi friends! My name is Rachel O’Neal. I’m a wife and mom to the cutest two little boys on the planet. I spend my days homeschooling them and enjoy every minute of it. When we aren’t in school, I love being outdoors – camping, hiking, and taking pictures of our adventures. I’ve been scrapbooking for over 15 years! I love to scrap with cut files, stamps, and bright colors.
Be sure to follow Rachel’s Instagram account for loads of colorful layout inspiration until she shares a new project with us right here next week!
We are so excited about the reveal of our April kit and extras today! Our design team is, too, and they have been working hard at providing you with tons of inspiration to fill up this space this month! Let’s kick April off with a project from each of our design team members to inspire you to create with your April goodies when they arrive!
Thanks so much for stopping by! We hope you are as excited as we are about the possibilities of our new April products! Tune in each day this week for more design team inspiration using the new April Kit and add-ons!
Comments Off on April Reveal Design Team Inspiration | Share This
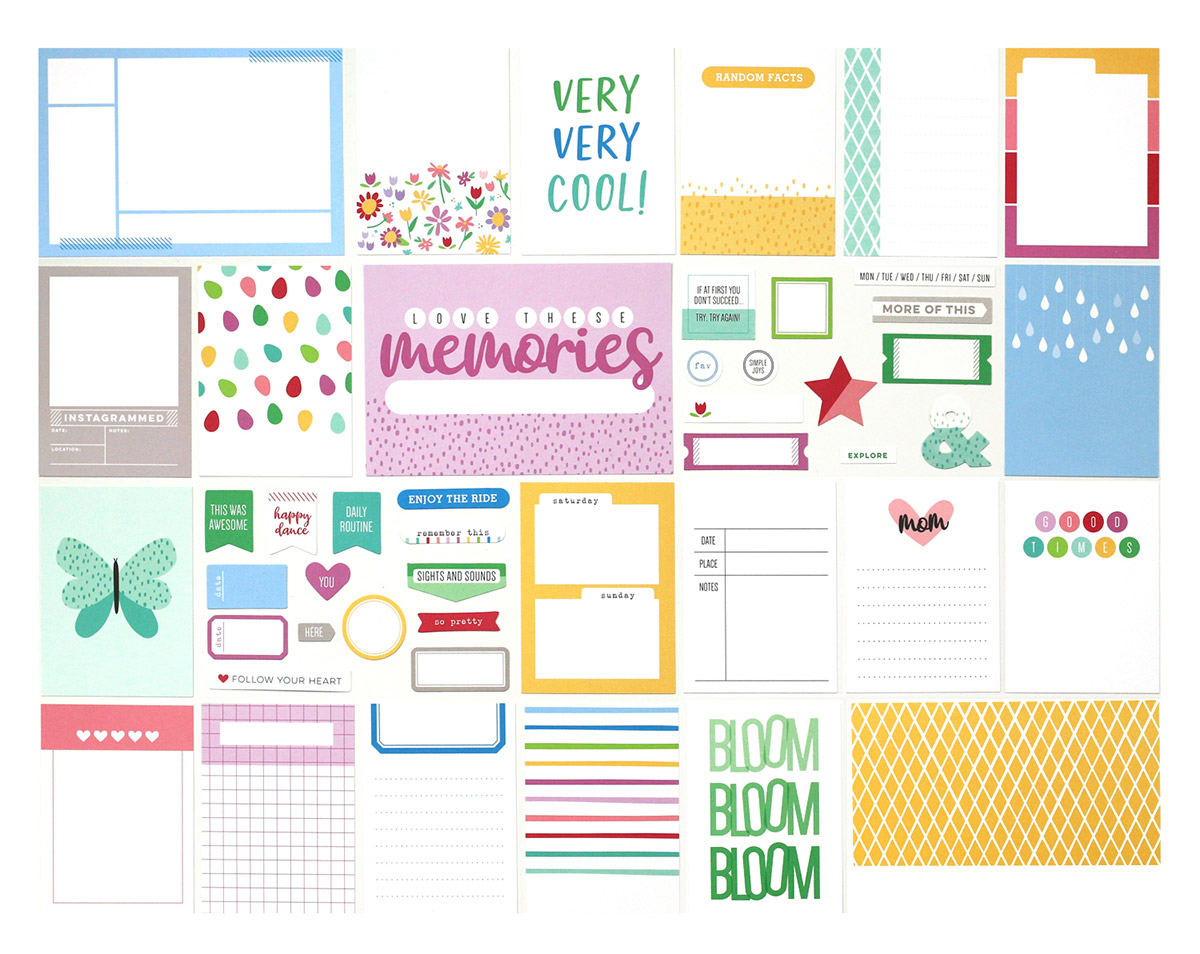
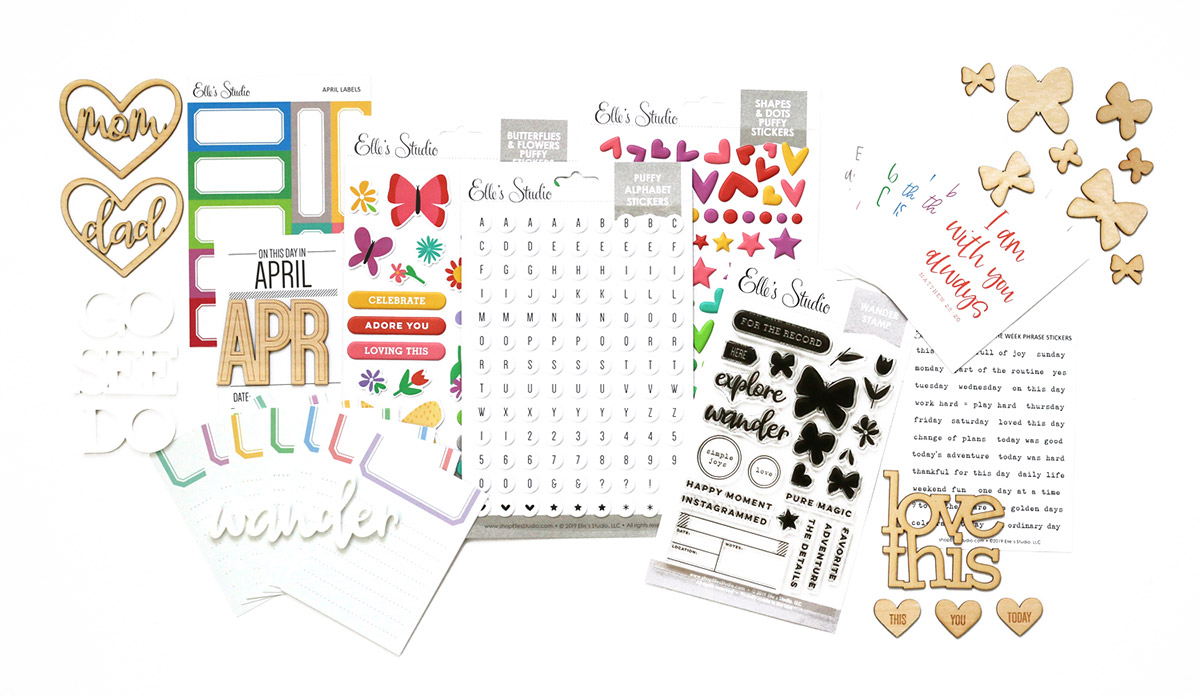
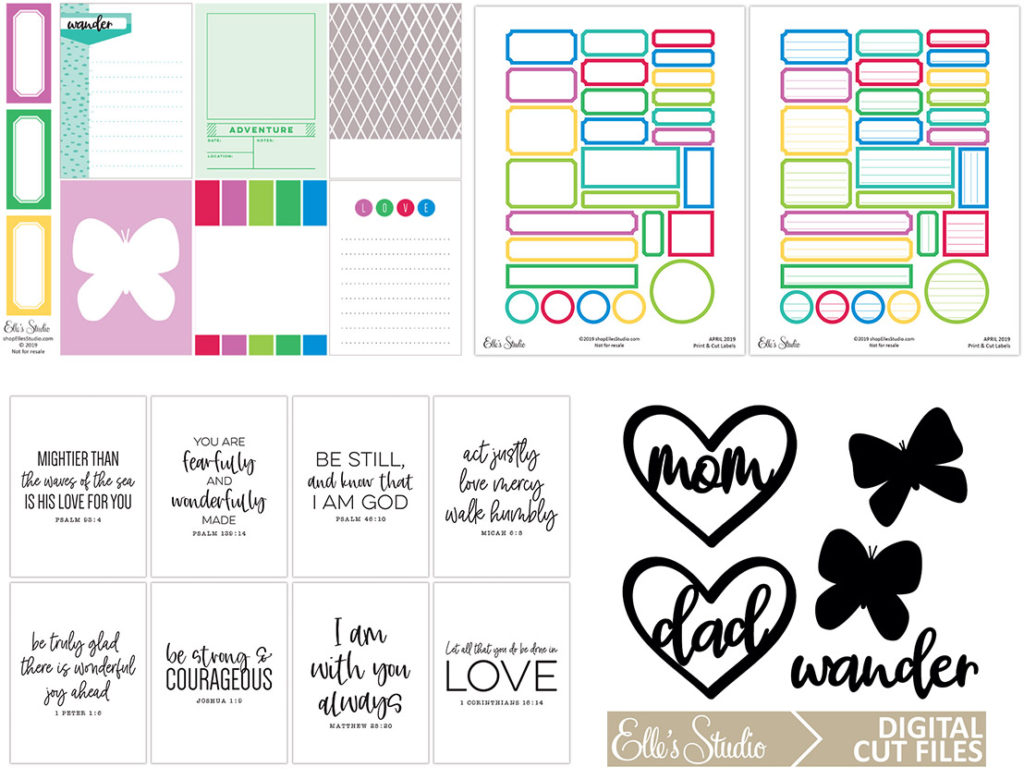
Our April reveal is here and we can’t wait for you to see all of the brand new and exclusive products that are now available in our shop today! Our April kit includes 3 – 4 x 6 inch tags, 18 – 3 x 4 inch tags, and 26 die cuts, that will work great on your scrapbooking layouts, pocket pages, traveler’s notebooks, cards, planners, and more! When designing our kits, we love to think of tags that can be used as prompts to help make it easier for you to get your story started and documented, and this kit is full of those and so much more!
Here’s the first look at all of the fun tags and die cuts included in this kit:
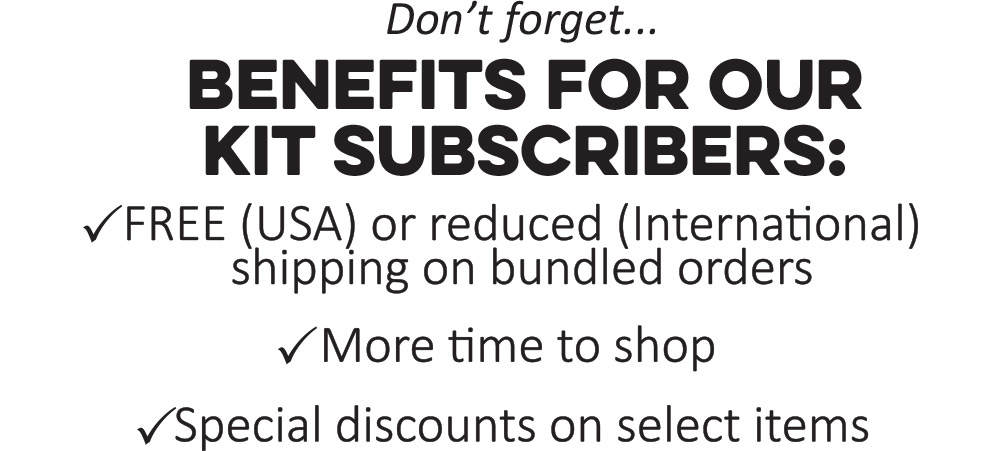
Our monthly kits are limited and once they sell out we will not be restocking! Look for a new kit each month on the 10th at 8:00 am PST, and as a special bonus to celebrate launch day, kits will be on sale for $9.99 for today only, regular price after that will be $11.99. Or, you can lock in our $9.99 price and receive FREE (USA) or reduced (International) shipping each month, on products added to your order with a subscription! If you haven’t started a subscription yet, you’ll want to read below for details!
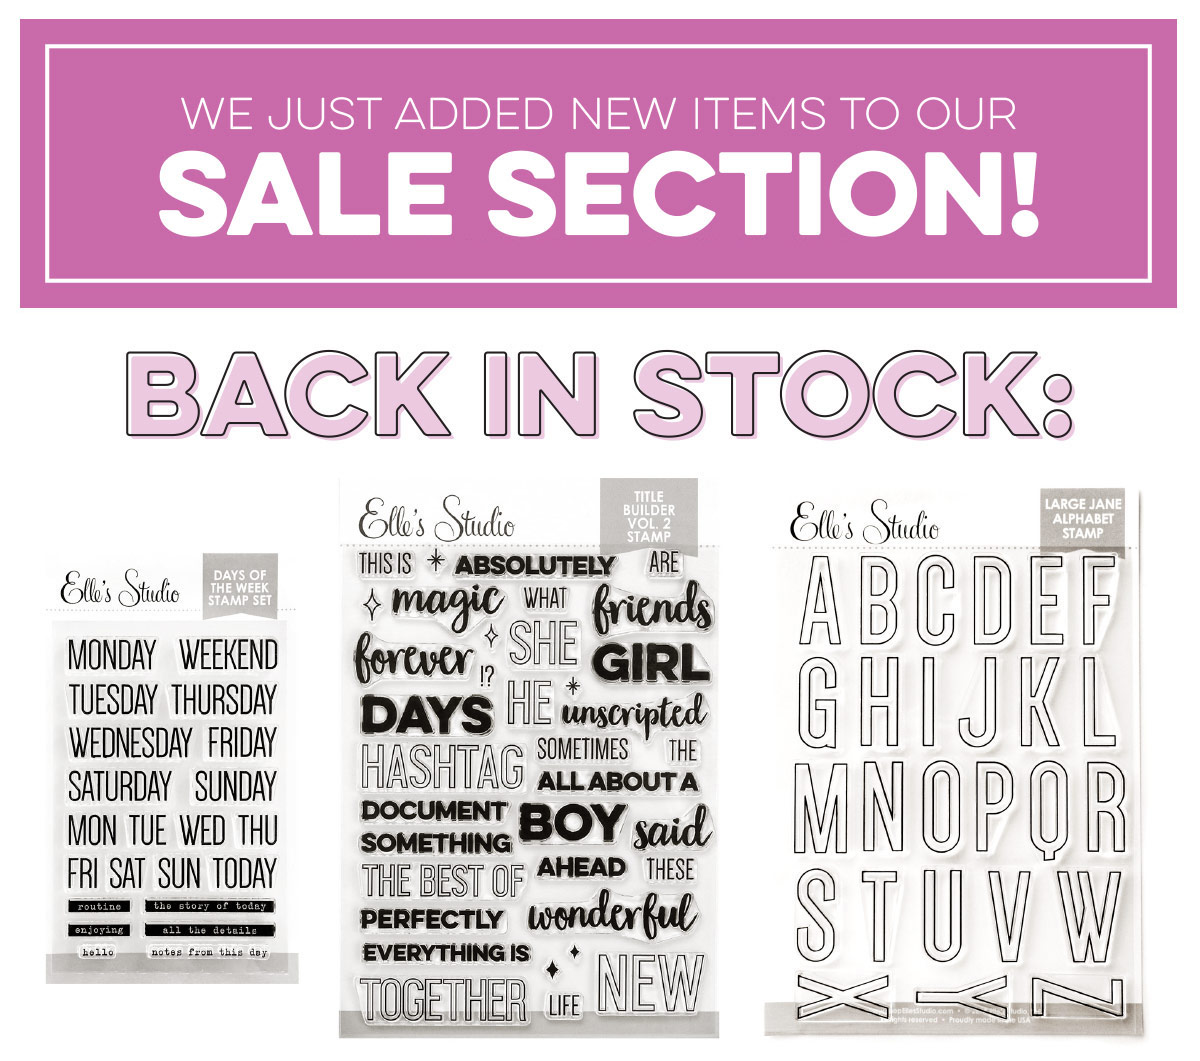
Make sure you stop by our SALE section to shop all the new items we just added! Most of the products in our sale section will not be restocked once they have sold out. We also were able to restock some of our stamps this month! Our Days of the Week, Title Builder Vol. 2, and Large Jane Outlined Alphabet stamps are back in stock!
Subscribers, you can start bundling now! Not a subscriber? Don’t wait any longer to sign up – Today is the perfect day to sign up and save on shipping! With a subscription, you will be guaranteed a kit each month, lock in our launch day special price of $9.99 + shipping, and receive FREE (USA) or reduced (International) shipping on anything added to your box each month during our 24 hour bundling period (starting on the 10th at 8:00 am PST and ending on the 11th at 8:00 am PST). Along with more time to shop, our subscribers will also have access to special discounts on select items during the 24 hour bundling period! These discounted items can be found in our SALE section during bundling, and you must be logged into your kit subscriber account to see them. Our subscriptions are risk free and can be cancelled at any time, too! Quick note: Our kits and add-ons are available without a subscription each month, too.
Please note: When starting a new subscription on the 10th, please allow up to 2 hours (during daytime hours from 8:00 am PST to 4:00 pm PST) for us to switch your account to a subscriber account. You will receive an email with directions on how to access the discounted items and bundle products with your kit subscription.
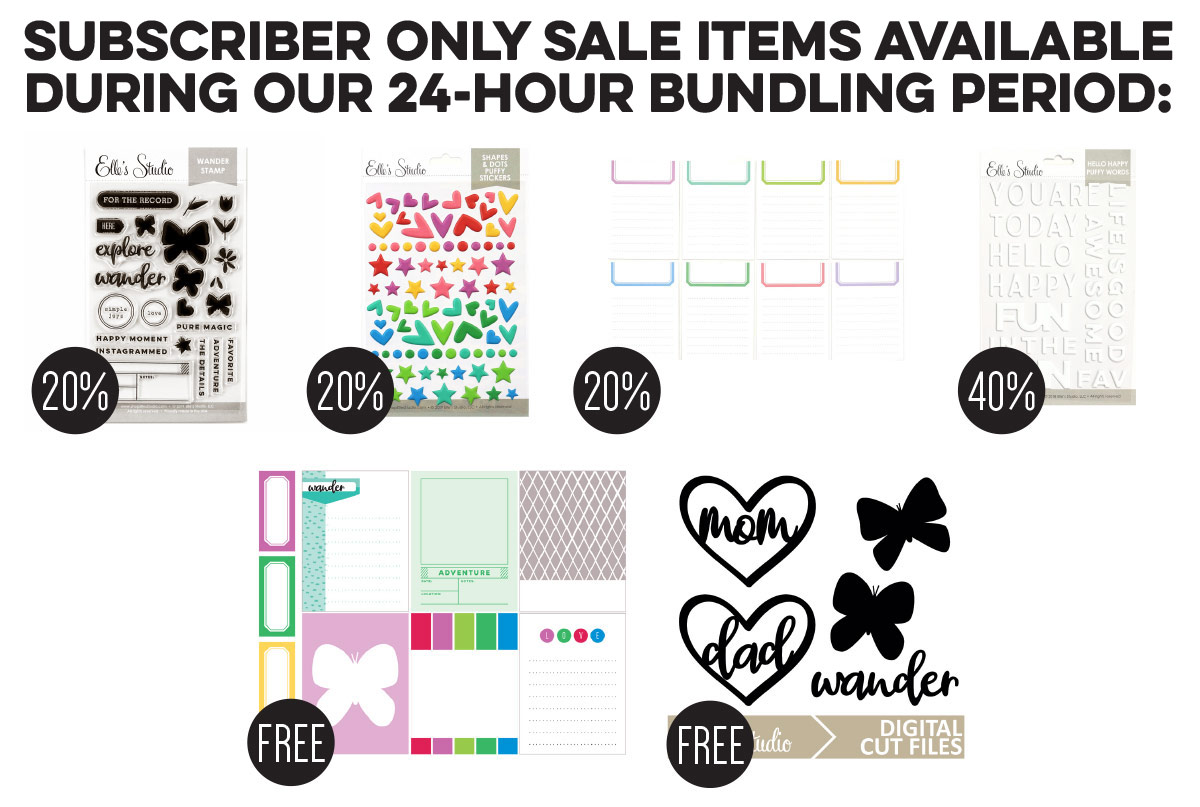
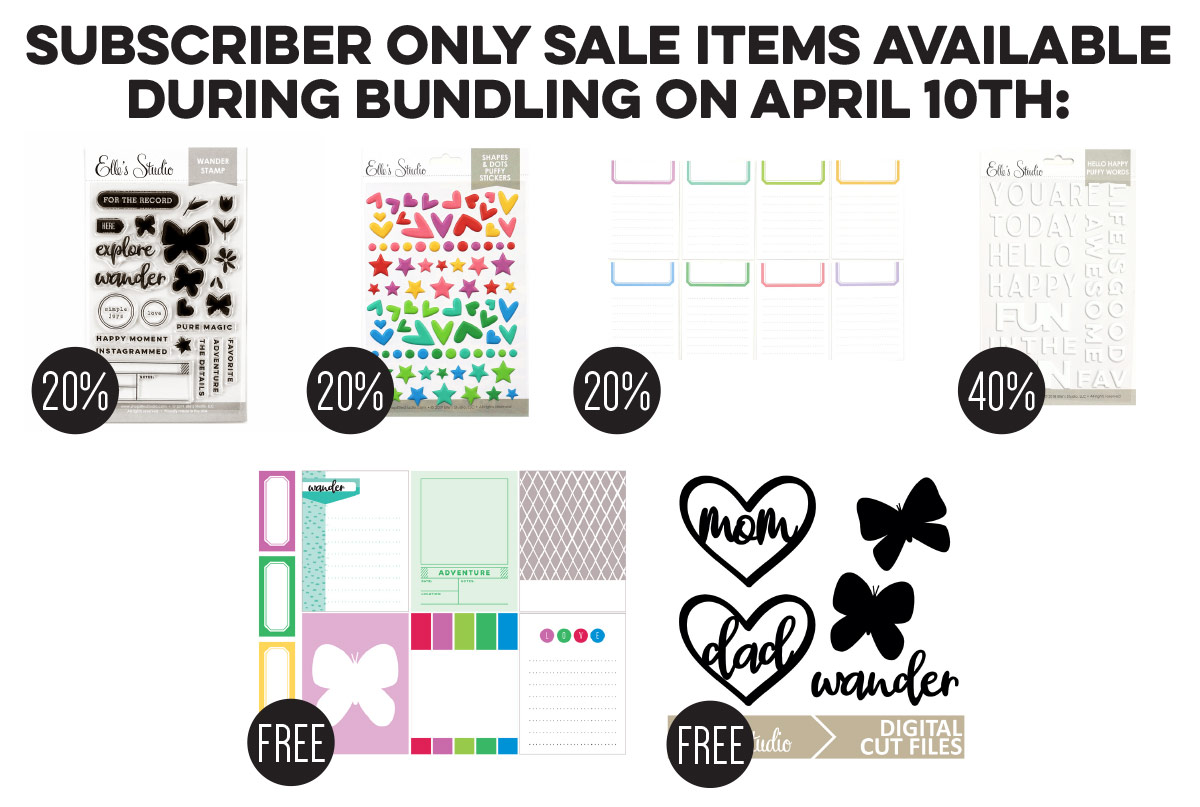
Here’s a look at the items on sale for our subscribers only this month:
Subscribers: Pick up these six items for FREE – 40% off during our 24 hour bundling period that is going on now and ends on Thursday, April 11th at 8:00 am PST! Please make sure you are logged into your subscriber account, then click on the SALE section to see these items on sale! Once you are logged in, you’ll see your special discounted product listing that specifies Sub Discount.
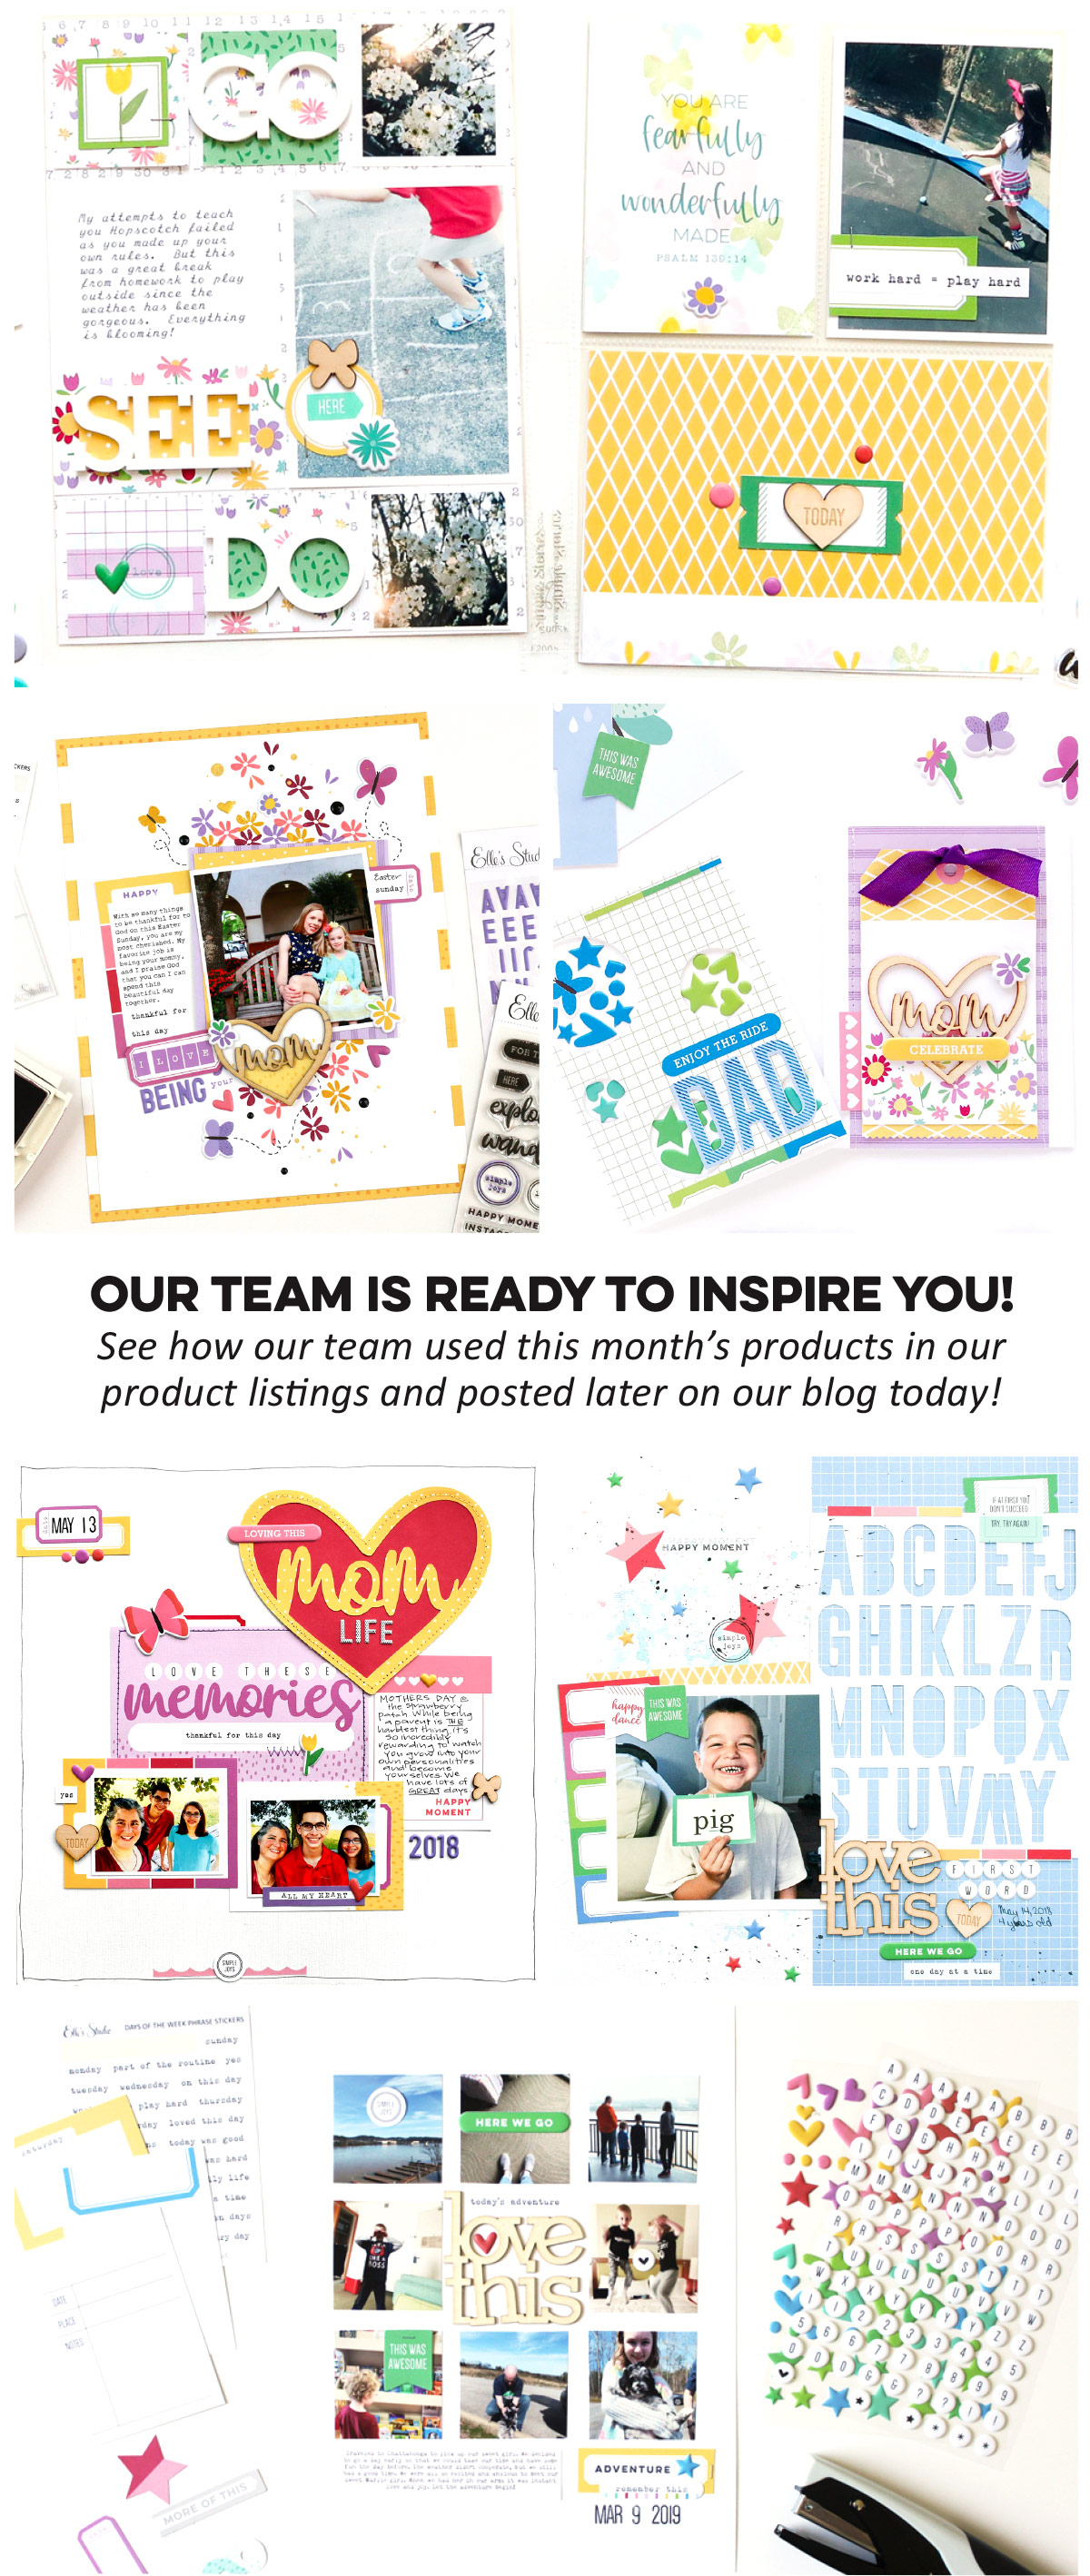
Looking for more inspiration? Our design team is ready to inspire you with brand new, fresh inspiration using the new products this month! You’ll be able to find our their amazing inspiration in our product listings so you can see their projects while you shop! You’ll want to click on the magnifying glass for a large view of the projects our team has created with all these new items. We will also be showcasing our team’s projects on the blog later today, and throughout the entire month!
Thank you so much for joining us today and for all of your support! We are excited to see how you use these new products! You can share your projects with us in our Facebook group and make sure you use the #EllesStudio hashtag when posting on Instagram for a chance to be featured on our feed and win a gift certificate to our shop!
Comments Off on Our April kit + add-ons have arrived! | Share This
Our April kit reveal is only a day away, so why not try to use up what’s left from your March kit? Patricia Roebuck is with us today to share the creative ways that she is using all of those leftover bits and pieces, including one that you might typically throw away! Let’s take a look.
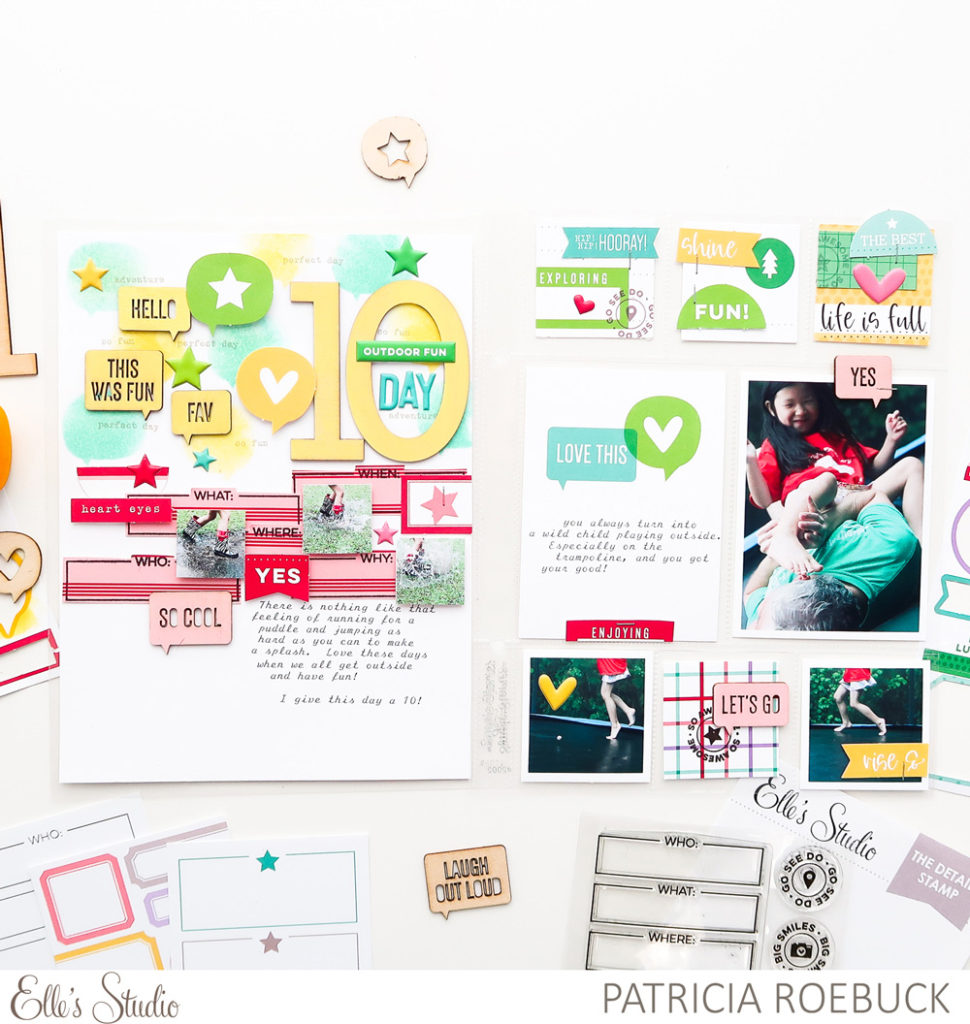
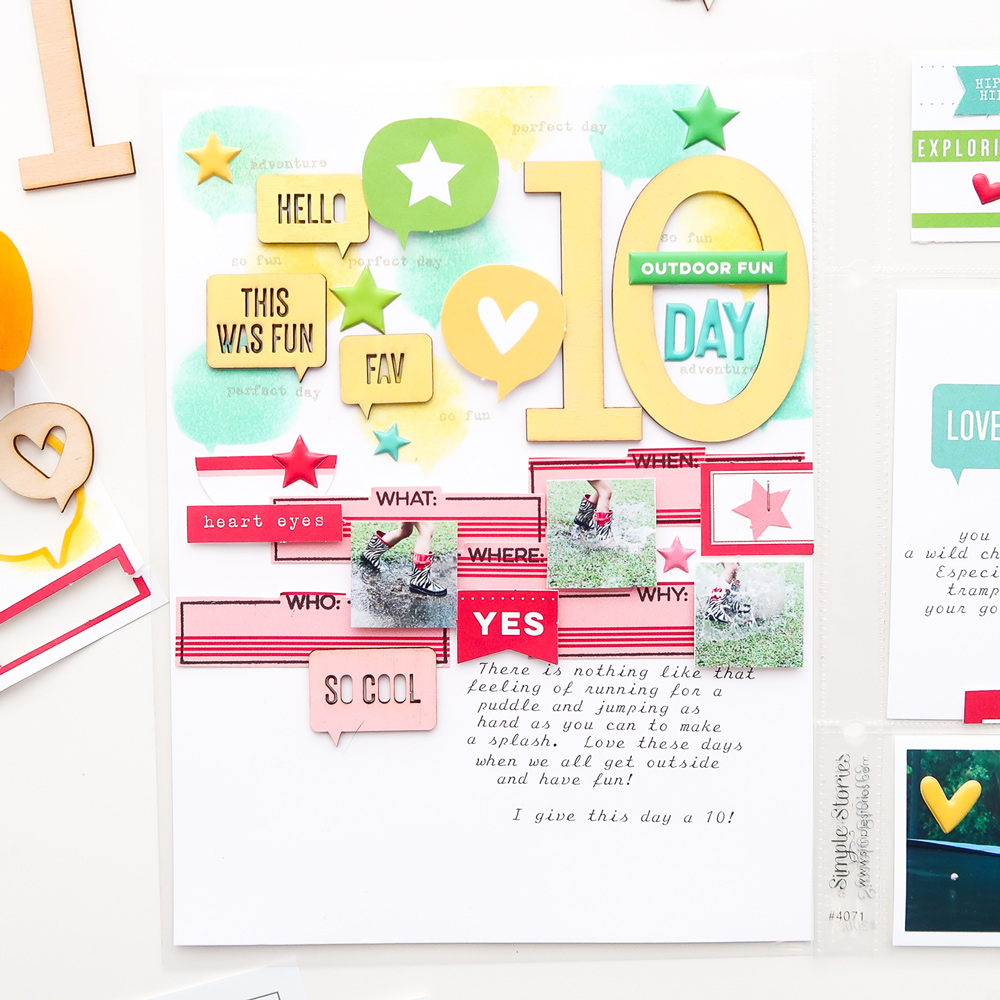
Hi Elle’s Studio fans and friends! This is Patricia Roebuck here to share with you ways to use your leftovers and scraps from your March Kit and Extras. All those lovely leftovers can really spark fun ideas you wouldn’t normally try. Today we’ll create layers using these for a 6″ x 8″ pocket page and layout.
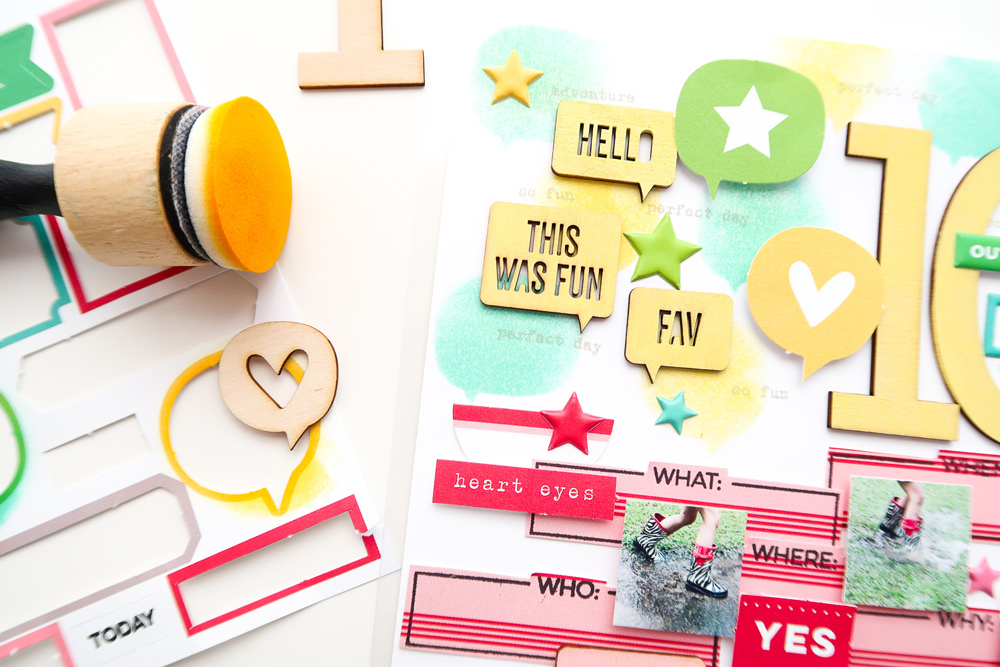
As I looked through what I had left, I was inspired by the leftover die cut sheets from the March Kit. I noticed that the speech bubble dies would work well with The Details Stamp and the Wood Veneer Speech Bubbles. I used the speech bubbles on the leftover die cut sheet as a stencil on the top half of my 6″ x 8″ layout, sponging and blending similar ink colors to the speech bubble die cuts.
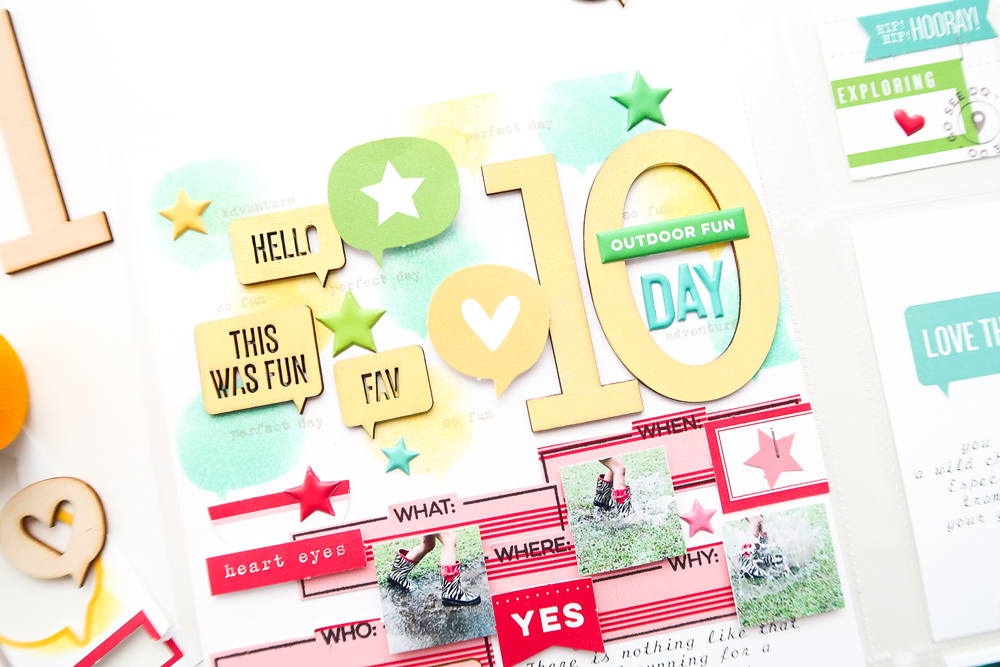
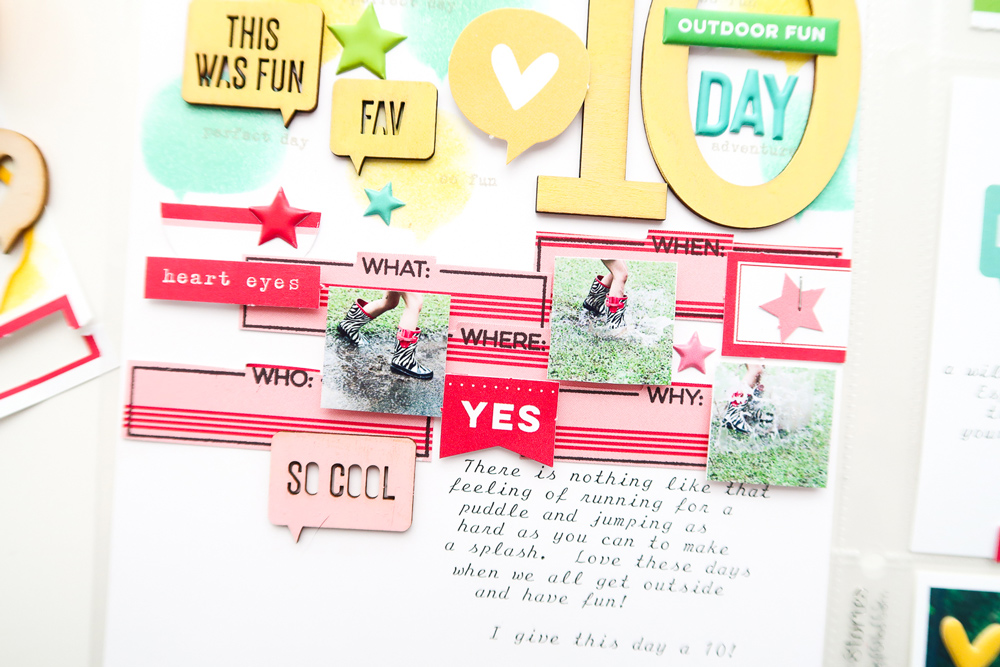
Continuing with those colors, I built up more layers by painting the Wood Veneer Speech Bubbles and Large Wood Veneer Numbers with yellow paint. Another great way to use those Large Wood Veneer Numbers is to rate your day as I’m doing here with the ’10.’ To add more layers, I used The Details Stamp to stamp three of the small sentiments in grey ink partially over the stenciled speech bubbles.
I love red with the colors I started with, so I stamped the larger image from The Details Stamp onto the 3″ x 4″ red and pink striped March tag, then trimmed each section out to stagger the pieces horizontally across my page, going with the lines of that tag. The horizontal flow of elements, the colors, and those lines are creating a nice ‘sporty’ and ‘springy’ look. I printed my photos very small, about 1”, to adhere using dimensional adhesive over my stamped and cut up tag, then placed die cuts in red from the March Kit to fill in spots. Since the striped tag has pink in it, I pulled in pink die cuts and embellishments as well. To help tie those colors in and to balance with my pocket page on the right, I painted another Wood Veneer Speech Bubble in pink. To finish this layout, I added the Spring Puffy Stickers to the top and added ‘day’ with the Teal Puffy Alphabet Stickers by the 10.
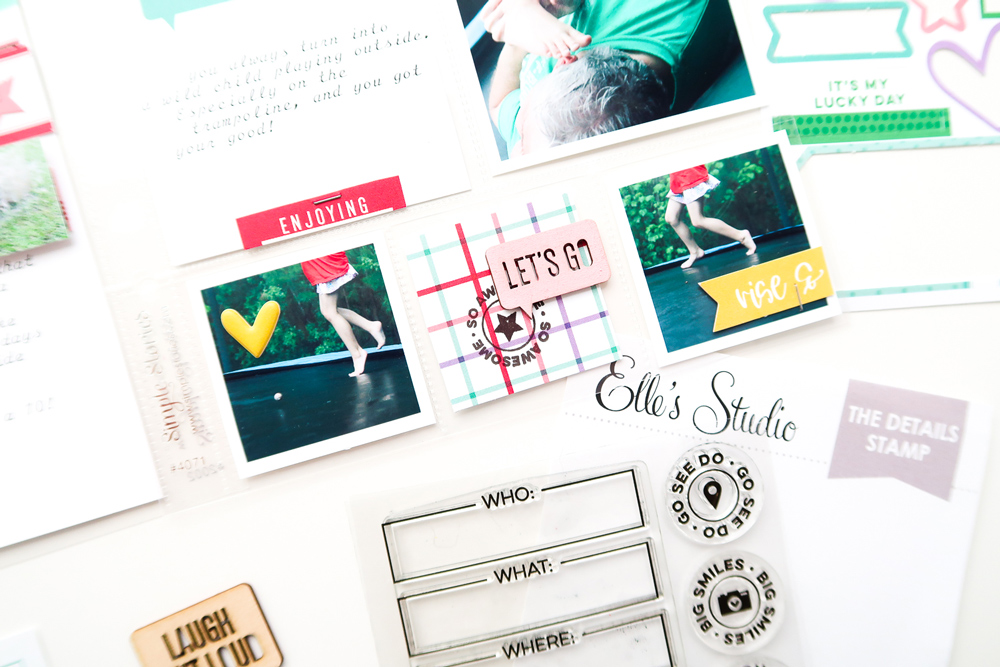
For my pocket page on the right, those small 2″ x 2″ pockets are so much fun to fill with embellishments, but they are also a great way to use your leftovers and scraps to create layers! I first used a 1 3/4” square punch to punch out some of the images from the March Kit tags. Then, I added either die cuts or leftover scraps of the Springtime 6 x 6 Paper Stack and more Spring Puffy Stickers to them. I also added one of the circle stamps from The Details Stamp to tie in with the tag I punched that had one of the images already on it.
I did not match the flow of colors from the layout to the pocket page, they could each stand on their own, but did concentrate on more of the green, yellow, and teal colors at the top of the pocket page, then used the leftover March Kit tags, Springtime 6 x 6 Paper Stack papers, pink painted Wood Veneer Speech Bubbles, and Spring Puffy Stickers to help balance the rest of the pockets to coordinate with my 6″ x 8″ layout on the left.
Pull out your leftover die cut sheets and pick images to use as a layer on your next project using either ink and a sponge as I did or even a pen to trace them. Then use your punches to selectively punch the tags from the March Kit to add layers for your pocket pages, using up all the lovely leftovers! Have fun!
Show us how you used your March Kit and extras by sharing your project on Instagram using the hashtag #EllesStudio, or in our Elle’s Studio Facebook Group!
Comments Off on Using Up Your March Kit with Patricia Roebuck | Share This
Our April reveal is right around the corner and we are so excited to be able to share these amazing sneak peeks of projects our design team made using all the new products that will be available soon! Our April reveal is going to be full of exclusive products that we’ve designed to coordinate with our April kit and this month our kit + add-ons will have you ready to document all your special memories and stories!
Get ready to pick up our April kit for our launch day special pricing of only $9.99 on Wednesday, April 10th, at 8:00 am PST. After the 10th, our kits go back to their regular price of $11.99. Or, you can lock in the $9.99 price anytime by starting a subscription! And subscribers, don’t forget! You’ll be able to bundle anything from our shop (including the new add-ons) with your monthly kit for FREE (USA subscribers) or reduced (International) shipping!
Not a kit subscriber? Now is the perfect time to sign up! We have a handful of spots left were you can start with our March kit now! Or, wait until April 10th to sign up and start with our April kit! With our risk free monthly kit subscription, you will be guaranteed a kit each month, lock in our launch day special price of $9.99 + shipping, and receive FREE (USA) or reduced (International) shipping on anything added to your box each month during our 24 hour bundling period (starting on the 10th at 8:00 am PST and ending on the 11th at 8:00 am PST).
Along with more time to shop, our subscribers will also have access to special discounts on NEW and previously released items during the 24 hour bundling period! Above is a preview of our April discounts and savings that will be available for our subscribers starting on April 10th! These discounted items can be found in our SALE section during bundling, and you must be logged into your kit subscriber account to see them. Quick note: Our kits and add-ons are available without a subscription each month, too.
Make sure you set your alarm and mark your calendar for this Wednesday, April 10th at 8:00 am PST! If you haven’t signed up for our newsletter, make sure you do to receive a reminder of when everything is available for sale! We hope to see you there!
Comments Off on Design Team Sneak Peeks | Share This
Just for sharing their projects, these six paper crafters will win a $10 gift certificate to the shop! Thank you so much for posting your projects and using the #EllesStudio hashtag, ladies! Please email us at info@shopellesstudio.com to claim your prize!
We want to see what YOU are creating with our products! Use the hashtag #EllesStudio on Instagram and you could be featured here next month!
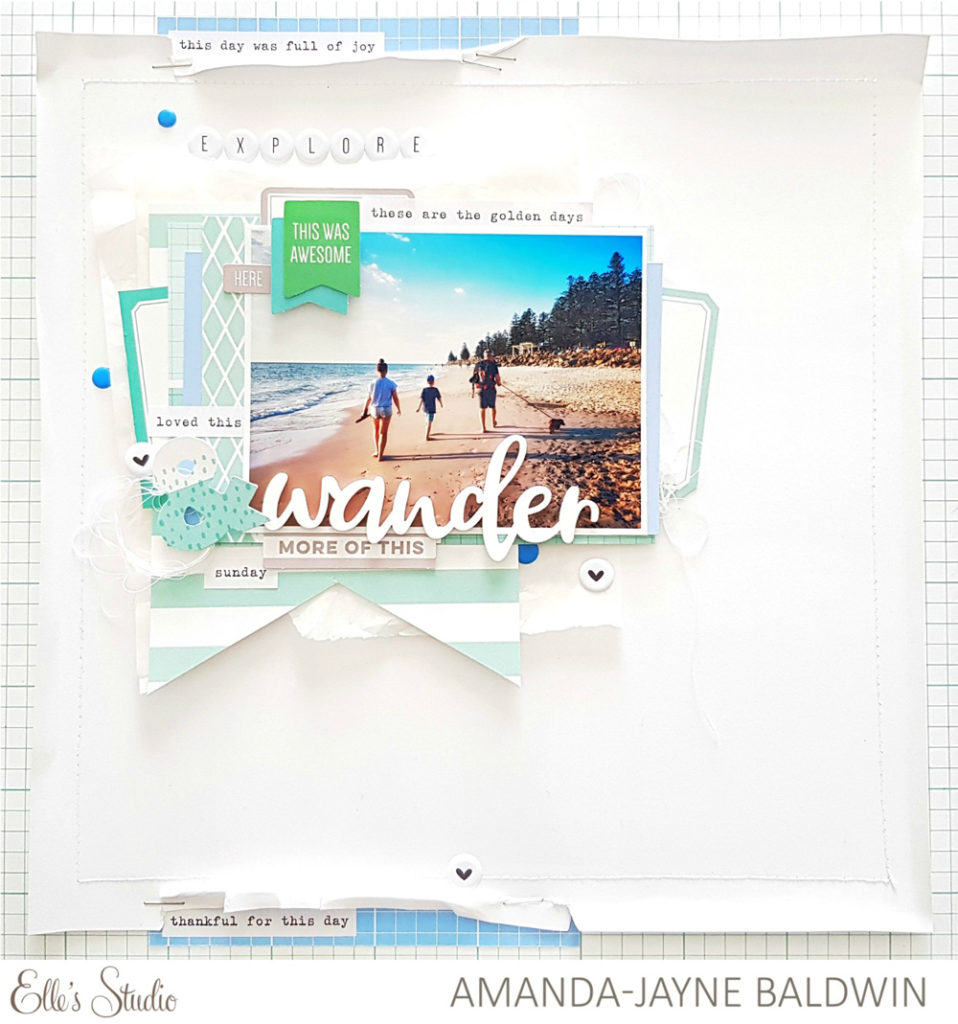
Our monthly digital printables and cut files are made to coordinate perfectly with each exclusive kit, but today Sabrina Poole is showing us how to start with these versatile downloads when you create! Let’s take a look at all of the different ways she used these files!
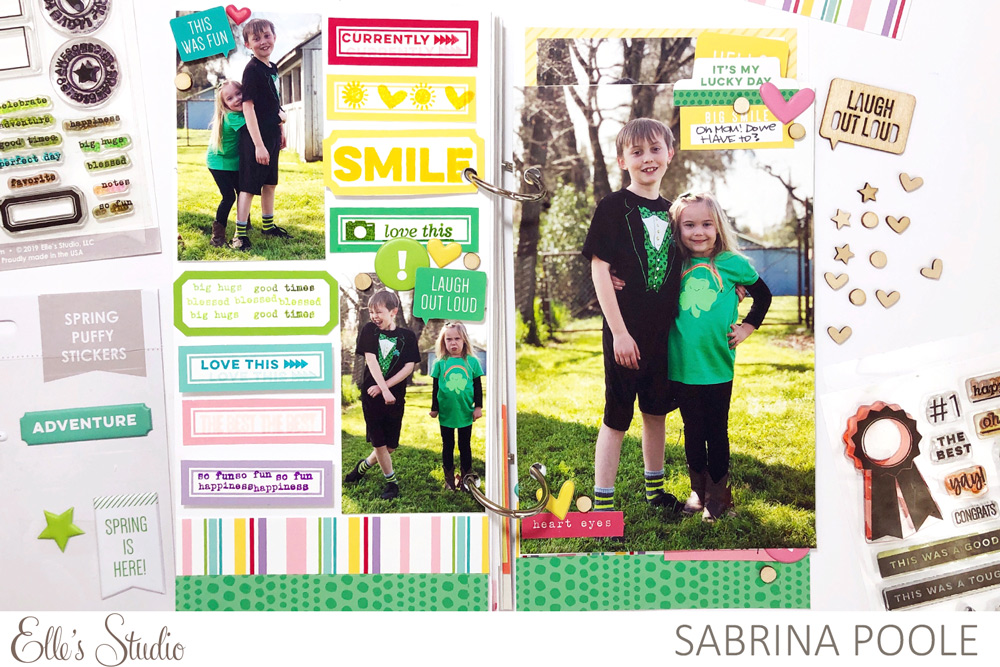
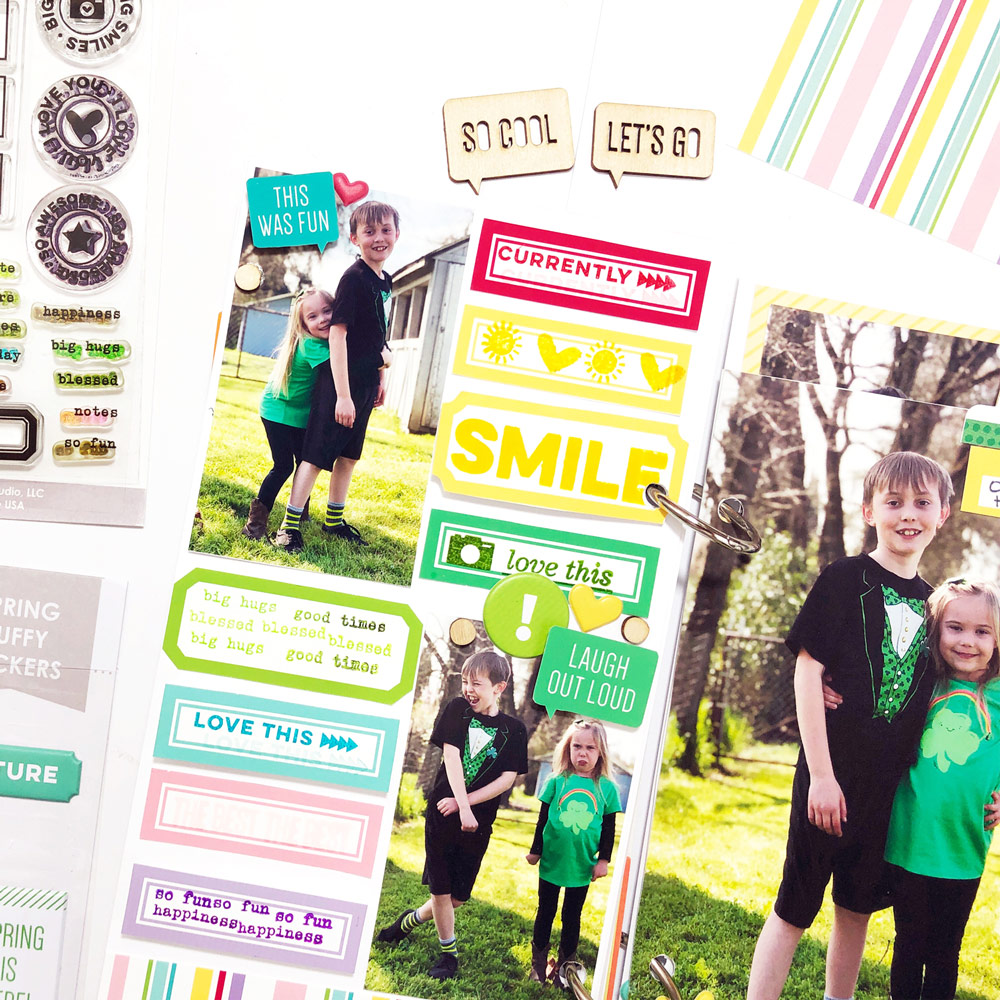
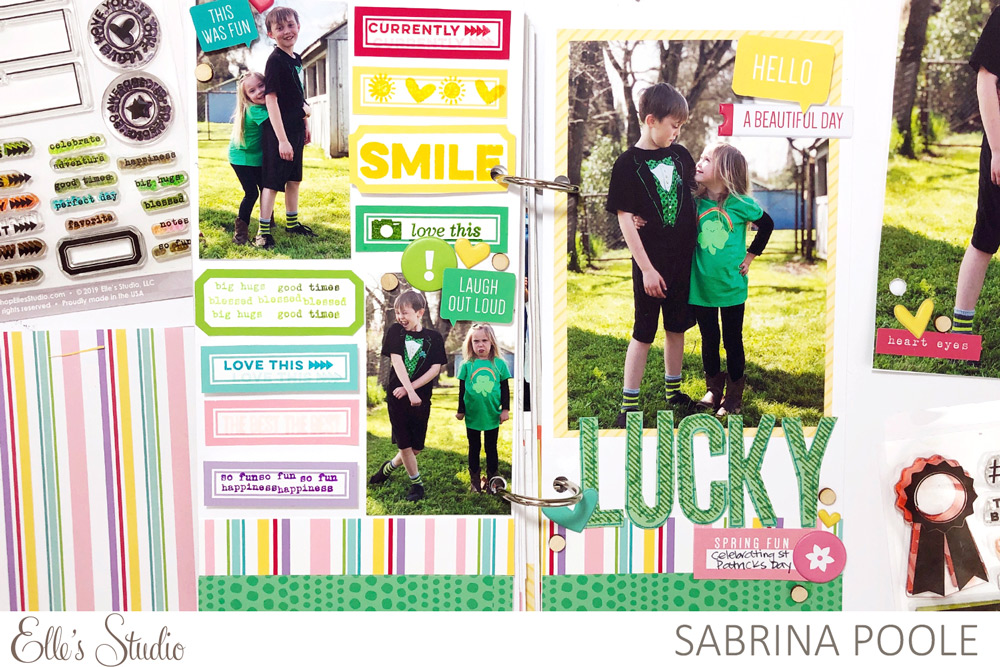
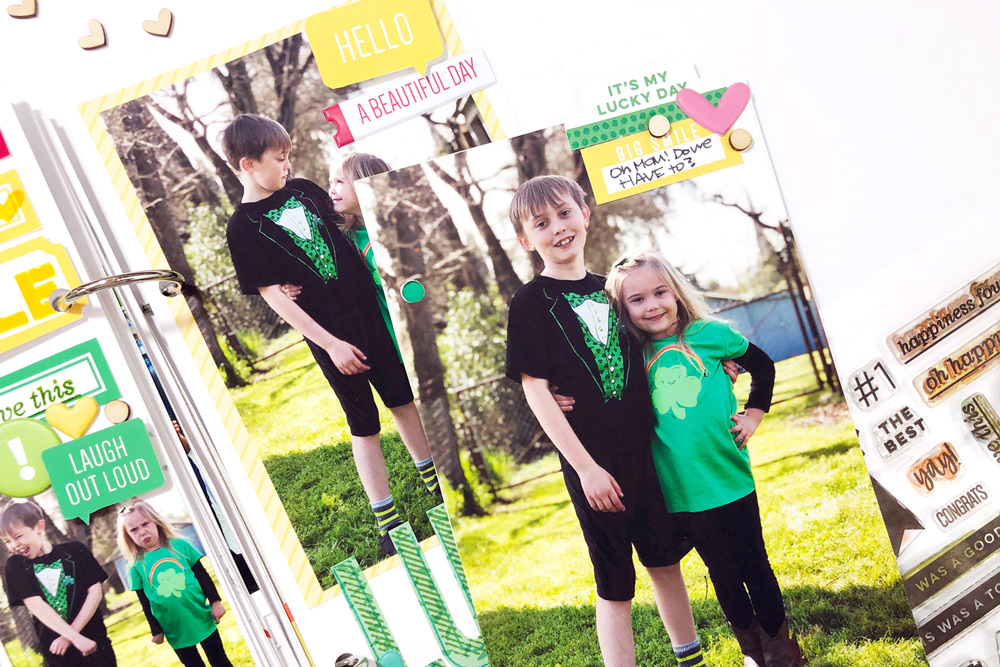
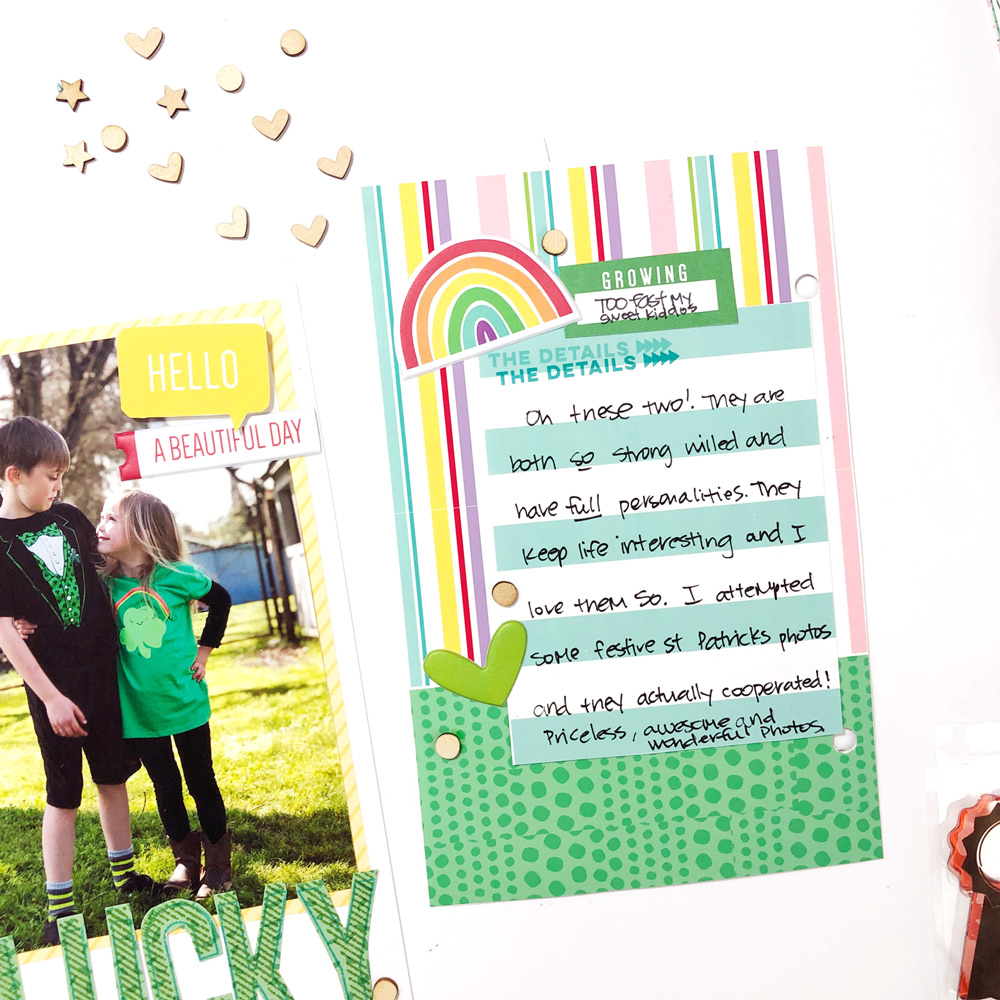
Hi everyone. It’s Sabrina with you, and today I will be sharing a fun colorful spring filled travelers notebook spread that I put together of my kids on St. Patrick’s Day. I started this project with the So Awesome Printables included with the March add-ons. I am excited to share with you how I used my Elle’s Studio digitals in a different way!
I started this project in Photoshop Elements with a travelers notebook canvas sized at 8.5″ x 8.5″ and I wanted some borders at the bottom of my spread. I took the green and striped journaling cards from the So Awesome Printables and I placed them at the bottom of the canvas, duplicating the cards several times so that way they would go across the page. Doing this allowed me to create the borders I wanted.
On the left side of the spread, I pulled in all the colors of the rainbow using the March Print and Cut Labels and I placed them so that I could add the smaller photos of my kids, sized at 2.75″ x 3.25″. Putting together this spread digitally allowed me to make sure that the labels and also the photos would all fit on the traveler’s notebook spread!
I then took the speech bubbles from the March 2019 Digital Cut File and I used the eyedropper tool to pull colors from the striped card. I used those three colors to make three different speech bubbles for my project. Once I had them re-colored, I dragged them to my spread and placed them where I wanted them. I did have to shrink the speech bubble down 70% so that it would fit on the photo and would not be too big. With the help of the March printables, labels, and cut file, I was able to create my spread digitally. It made for a great foundation and starting point for my spread!
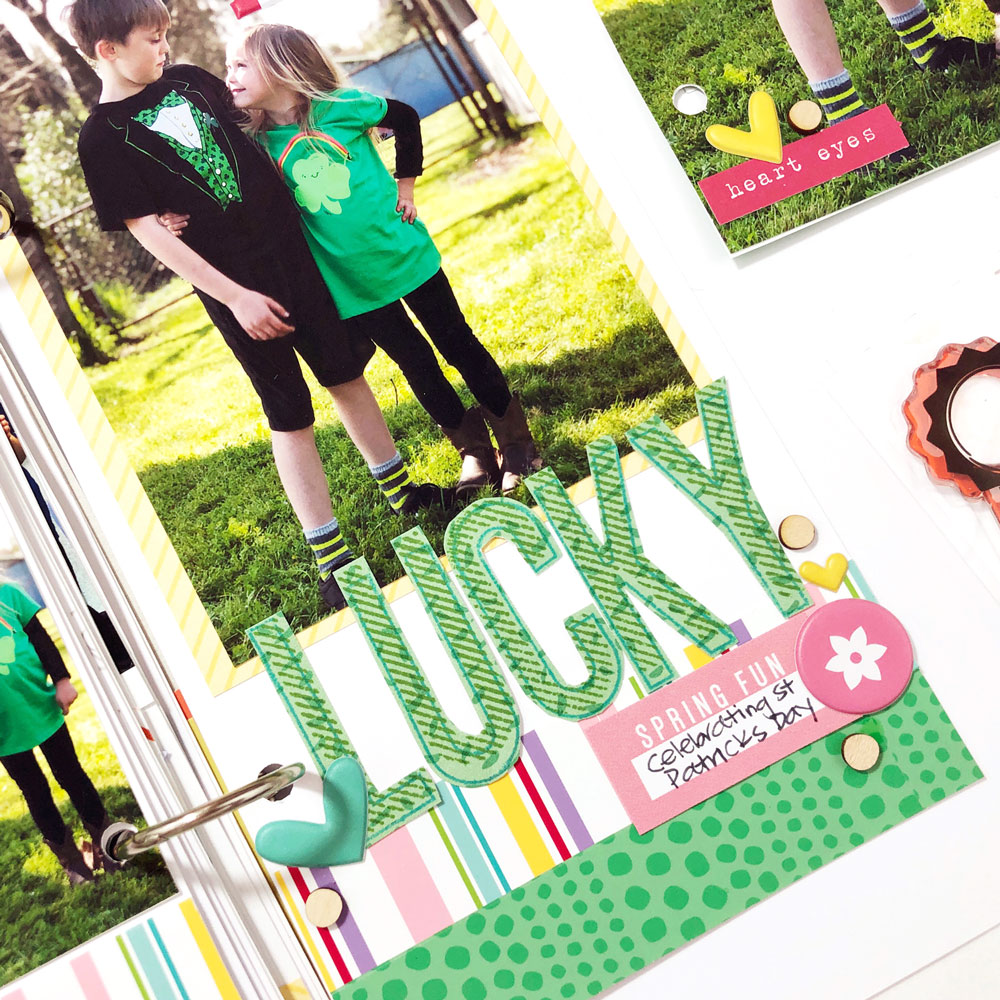
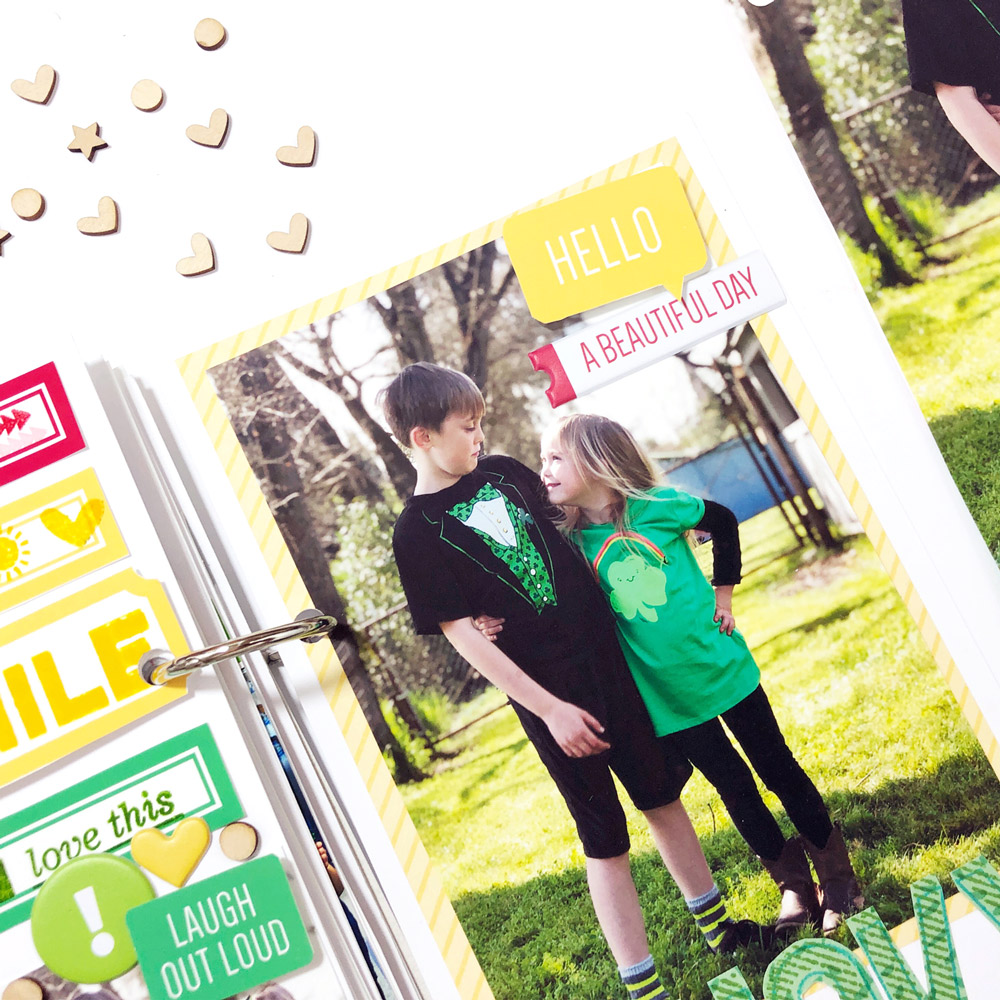
I printed out all of these pieces, fussy cut them and then got started on my physical spread. I began by gluing down my green border and striped border that I made using the digital printables and then I adhered my photos. I then decided that I wanted to stamp on all the labels using the The Details Stamp and Oh Happy Day Stamp to add to the overall theme of rainbows. I had a lot of fun stamping different sentiments on each of the labels like ‘smile’, ‘big hugs’ and little icons. I also stamped out “lucky on the right hand side with the Large Jane Striped and Outline Stamps on a green piece from the Springtime 6 x 6 Paper Stack.
I also added in some Wood Veneer Confetti for extra dimension and texture to my page. Some diecuts and puffy stickers added in another layer of dimension and visual interest. Adding in all these different components helped me to create a fun eye-catching, colorful spread that really captured the adorable photos of my kids.
I had one large photo that was my favorite photo of all the photos so I decided to make a fun insert with it. I sized the photo at 4.25″ x 6.5″ to include in the middle of the spread. On the back I adhered the same printables—the green dotted card and striped card—to make a journaling spot. I duplicated the striped card and also the green card so it would cover the entire back of the photo. I also used ‘the details’ journaling tag from the So Awesome Printables and I put all of these pieces together on the back and it made it made an unique journaling place.
I had so much fun figuring out a new way to use the March 2019 Digital Cut File, So Awesome Printables, and March Print and Cut Labels. I hope this helps you to think outside the box when it comes to using the monthly digital printables and cut files. They can be used in lots of ways other than just labels and cards! Have a good week!
Comments Off on Documenting with Digitals with Sabrina Poole | Share This