 Welcome to Celebrate December at Elle’s Studio! The month of December will be packed with holiday inspiration, projects, layouts, and gift ideas from many talented designers. So make sure to visit Elle’s Studio everyday for prizes, giveaways, and inspiration!
Today we have Valerie Bishop and Meghann Andrew sharing instructions on making Christmas tags!
Valerie Bishop has three lovely tags to share today. She says “I love making tags – it helps me to use up my scraps and I love to layer little bits and pieces on top of each other! I like to use these on gifts to special people in my life. Most of the products I used are from the Good Cheer Collection with a few cut files from November and bits and pieces from the Christmas Ephemera kit. All of the bases are just basic red shipping tags.

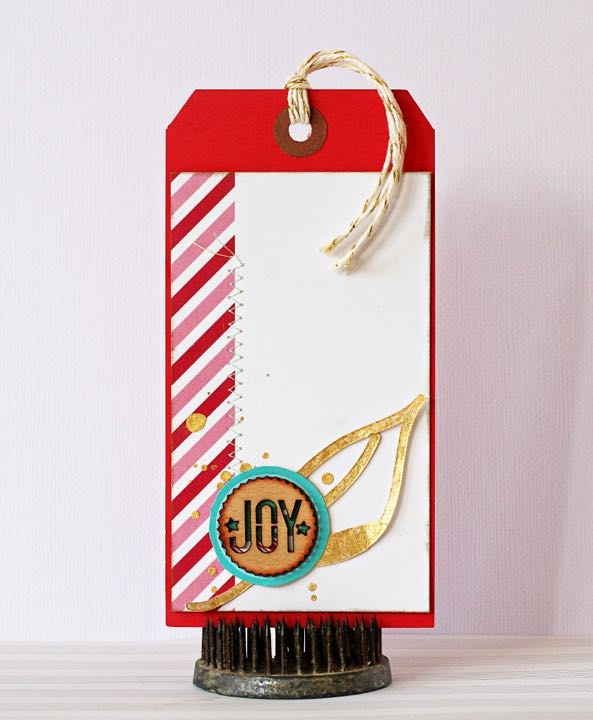
Valerie shares, “I kept this tag simple. I used a tag and wood veneer piece from the Christmas Ephemera kit and layered it on top of a leaf from a cut file from the October cut file collection.
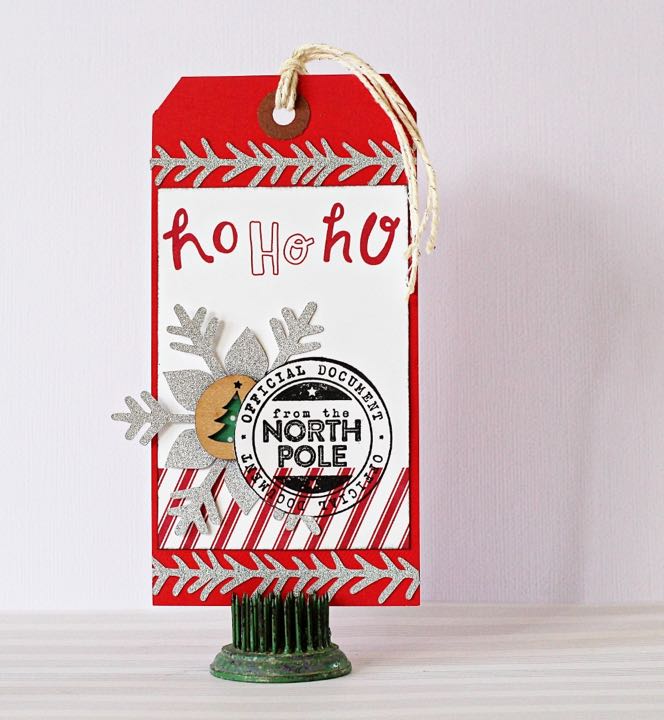
For this tag, I used a tag from the Good Cheer Journaling Tags as the base. I used the Good Cheer – North Pole stamp and then I cut around the edge with a craft knife to layer a snowflake (from the November Digital cut files) and a wood veneer piece also from Good Cheer under it.
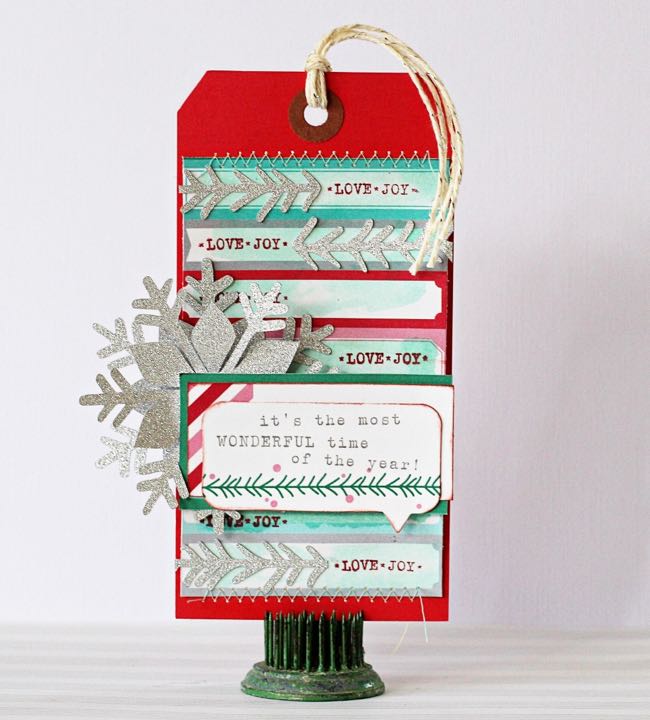
For the base of this tag, I used a Good Cheer – Blank Label. I swiped watercolor paint across each label, then stamped the “love joy” words from the Warmest Wishes exclusive stamp set onto each box. I used one of the Good Cheer – Bits and Pieces as the title and layered a couple of snowflakes (November cut file) with some scraps from previous projects.”
Meghann Andrews has three beautiful tags to share with us, She shares, “I love creating layouts, but every once in a while, I need to create something on a smaller scale. I usually choose to create tags, and with Christmas around the corner you can never have a shortage of cute tags to dress up an otherwise plain gift.”
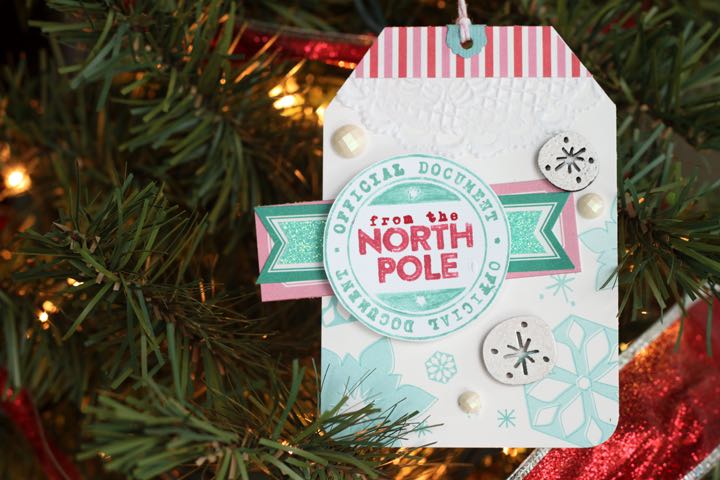
The addition of teal and pink to traditional red and green colors in your Christmas décor and gift-wrap adds a whimsical touch. Here’s how this tag came together:
- Start with the teal snowflake card from the Good Cheer journaling tags and cut the top corners off, 15mm from the sides and 20mm from the top. Adhere the edge of a white doily to the top of the card and trim. Adhere the manufacturers strip from the Merry Christmas patterned paper to the top over the doily and trim. Punch a hole at the center.
- Cut out the pink and the teal labels from the Good Cheer blank labels. Adhere the teal to the pink, slightly askew. Cut a piece of teal glitter tape to fit the inside of the teal label. Adhere both to the left center of the card.
- Color in the North Pole stamp with water based stamping markers in pink, red and teal. Stamp onto smooth cardstock and cut out. Using dimensional adhesive, adhere to the center of the blank labels.
- Cover the snowflakes from the Good Cheer wood veneers with a watermark inkpad and cover with white embossing powder. Emboss with a heat gun. Adhere to the tag. Add three white enamel dots to the card.
If you’re like me, you like more neutral, natural Christmas décor and gift-wrap. This card would be a lovely accent on a kraft wrapped box or bag. To create this beautiful, woodsy tag:
- Cut a bracketed tag shape using a thin die or digital die-cutting machine from the Star of Wonder paper. Using the Good Cheer Merry Christmas stamp, stamp ‘merrry & happy’ all over the woodgrain using a medium brown stamp pad.
- Cut the ‘joy’ pinked circle from the November digital cut file from textured white cardstock. Using a circle template that fits the inside of the pinked circle, poke a hole with a paper piercer at every 1/16”. In your digital die-cut software, delete the word ‘joy’ and the stars from the pinked circle and cut again from brown glitter paper. Adhere the white die-cut to the brown die-cut using dimensional adhesive, but leaving the bottom un-adhered.
- Cut the antlers from the November digital cut file out of the Ever After paper. Adhere with the black side up to the back of the ‘joy’ die-cut.
- Die-cut the evergreen branch from the Good Cheer digital cut file out of green cardstock 4 times. Cut apart, arrange in a wreath on the back of the ‘joy’ die-cut circle and adhere.
- Cut out the ‘create wonder’ cutout from the Good Cheer cutouts. Adhere to the base of the tag.
- Wrap a piece of bakers twine twice around the bottom third of the tag. Tie in a knot. Put a jingle bell on each leg and then tie in another knot to secure. Adhere the ‘joy’ die-cut to the center of the tag. Slide the baker’s twine in between the white and the brown layer on the die-cut. Adhere the bottom of the layers of your die-cut with dimensional adhesive.
- Put a piece of natural ribbon through the hole at the top and secure with a mini-staple. Adhere gold metal dots around the green wreath.
 If you’re a Christmas color purist, you don’t tend to stray from red and green. Here’s how I created this traditional tag:
- Cut a tag from white cardstock using a wafer-thin die or die-cutting machine. Trim 1” off the bottom and cut with a border punch. Using a gold pen, draw gold stitches 1/8” from the edges.
- Adhere a 2” piece of Merry Christmas patterned paper to the bottom of the white tag and round the bottom corners.
- Stamp the snowflakes from the Warmest Wishes stamp onto the white cardstock with a watermark stamp pad. Top with white embossing powder and emboss with a heat gun.
- Using the Good Cheer digital cut file, cut the hand drawn circle from the North Pole patterned paper. Adhere to the white card.
- Cut the Good Cheer digital cut file evergreen branch out twice from gold glitter paper. Cut apart and adhere pieces to the center of the hand drawn circle.
- Using a backstitch, hand stitch around the ‘joy’ die-cut from the Good Cheer Bit & Pieces pack. Using dimensional adhesive, adhere to the center of the hand drawn circle.
- Tie a piece of ribbon at the intersection of the white cardstock and red patterned paper. Adhere red enamel dots to the gold evergreen branches.

Have you entered for our big GRAND PRIZE?

Entering is easy – just upload a project you created to our Member Gallery and tag the Elle’s Studio item used. Make sure you also mention in your project description that it is a “Celebrate December” entry!
And that’s it— we are keeping it super simple so everyone has a chance to enter! Start uploading NOW, and you can enter as many times as you want (must be a different project per entry). The three GRAND PRIZE winners will be drawn on December 31, 2014. All entries will have a chance to be featured on our blog.
You can also enter to win prizes on our blog posts all month long – just look for a giveaways on our Celebrate December posts and leave a comment to be entered to win!
Comments