Pointing to the Good Times with Sarah Kee

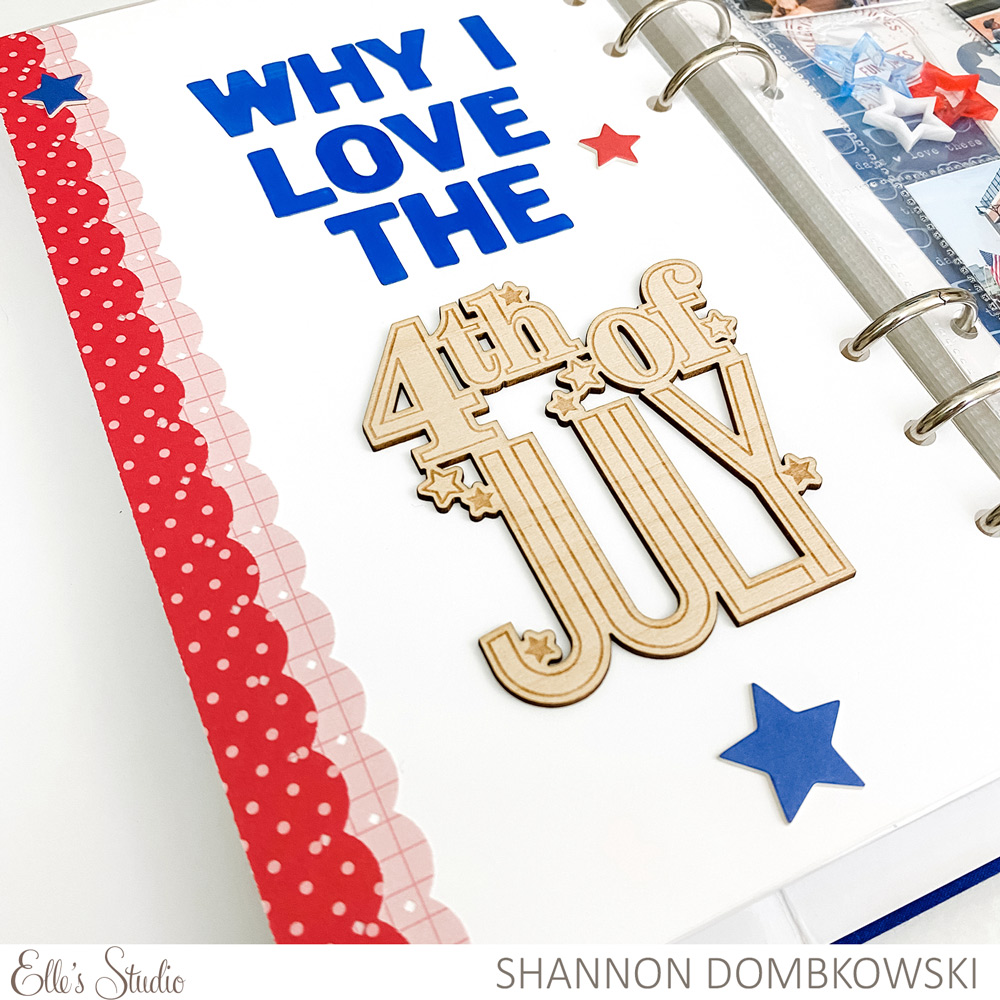
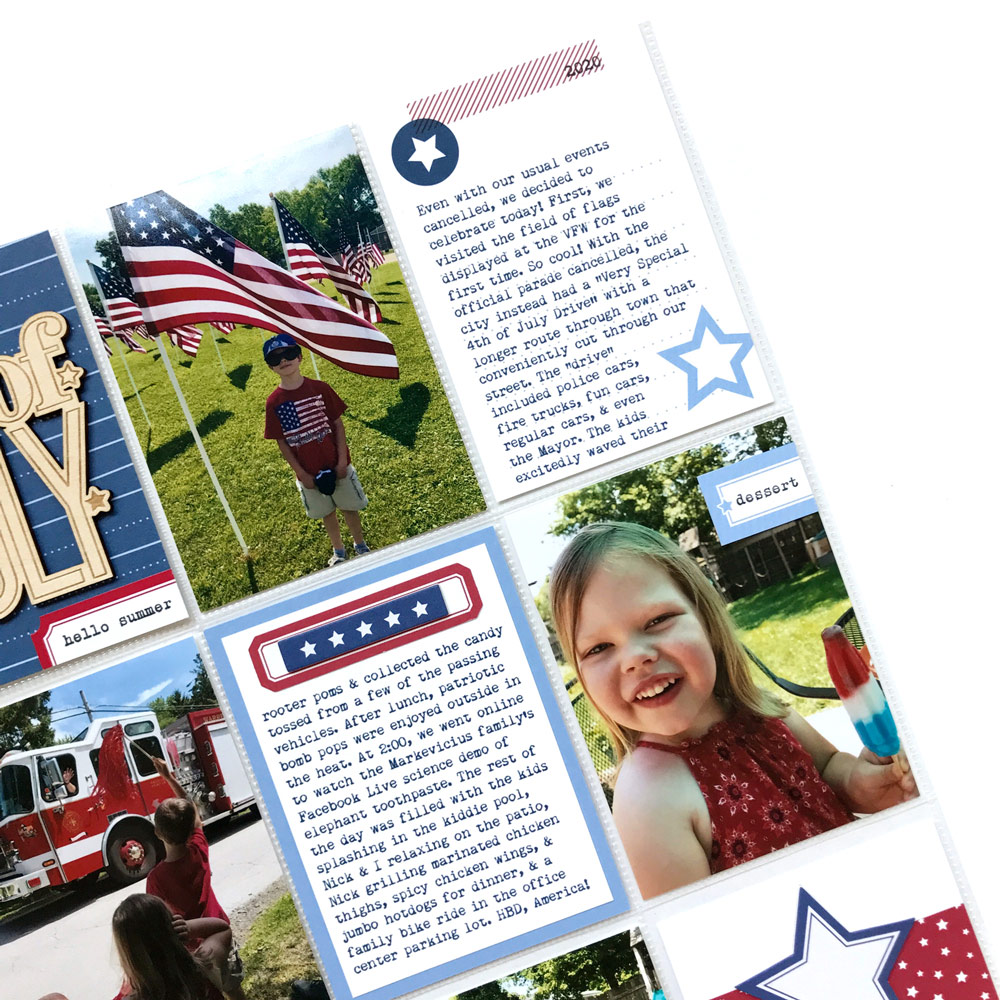
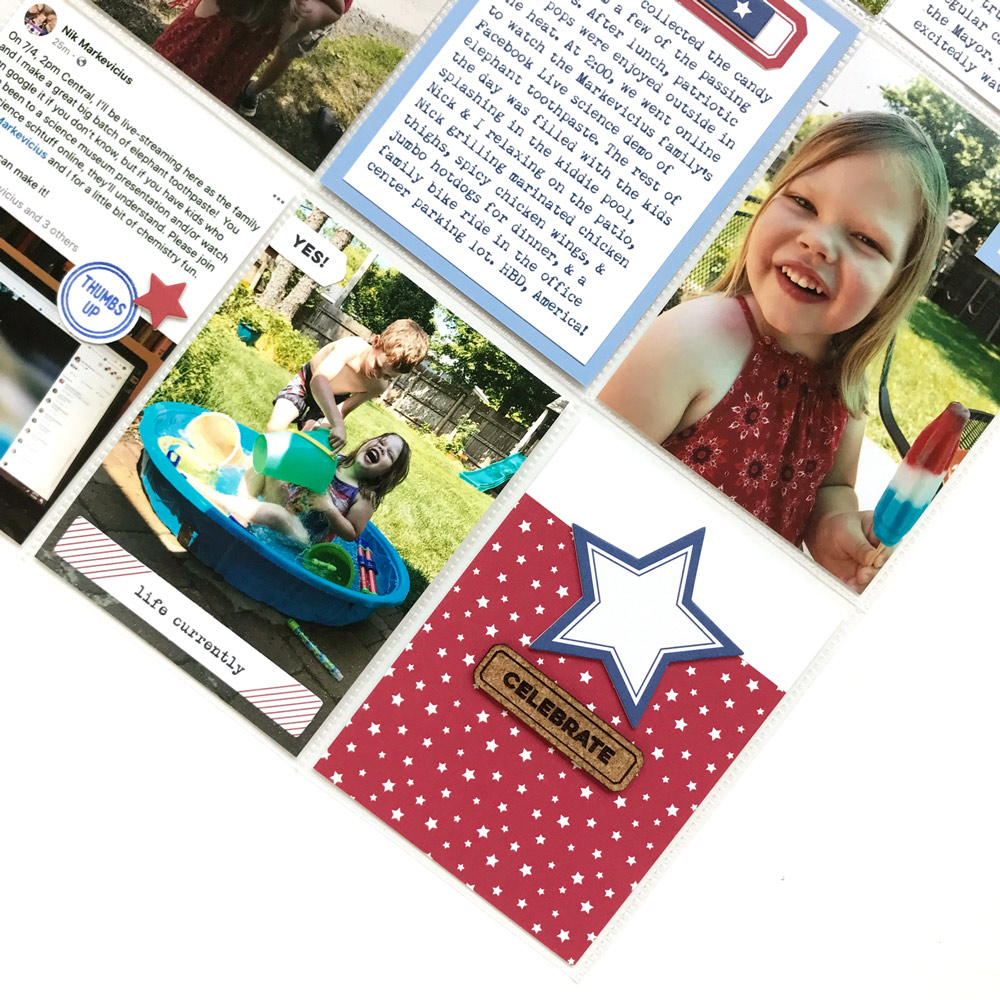
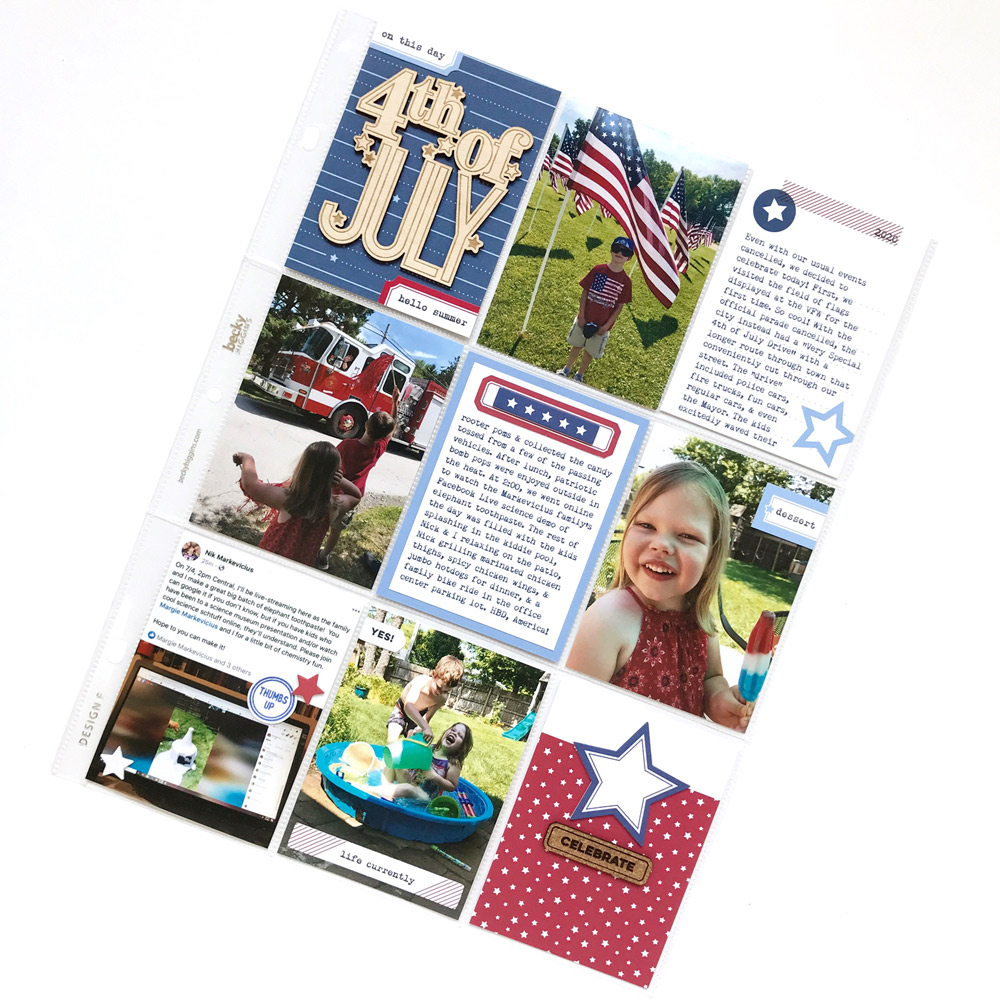
Hi, Elle’s friends. It’s me Sarah on the blog, and I’m honestly baffled at how it’s already July! It’s full-on summer where I’m at, and I could’ve sworn it was just a cold, wintery day about a month ago! Anyway, hope you all had a fun and relaxing 4th yesterday!

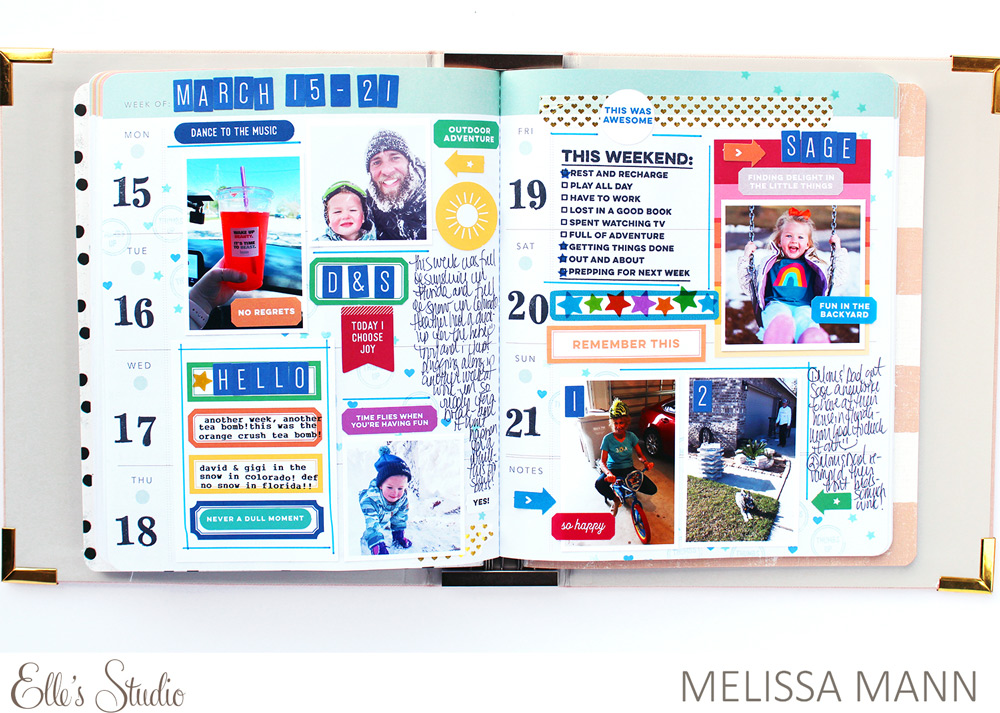
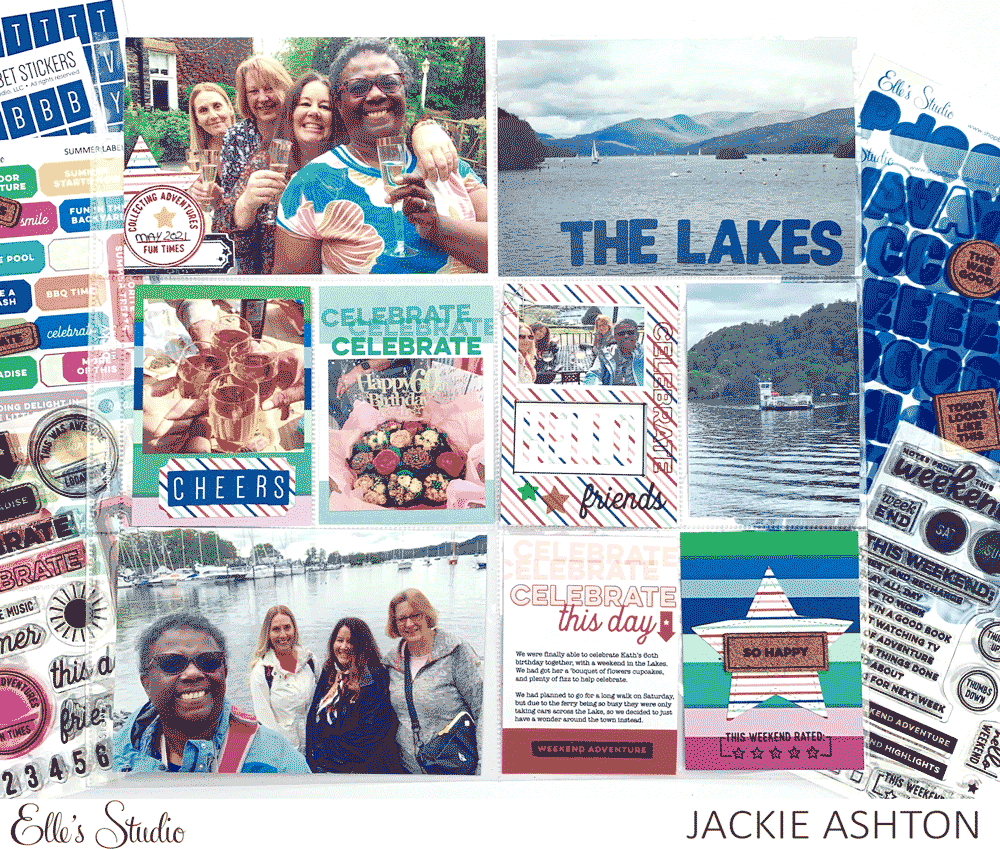
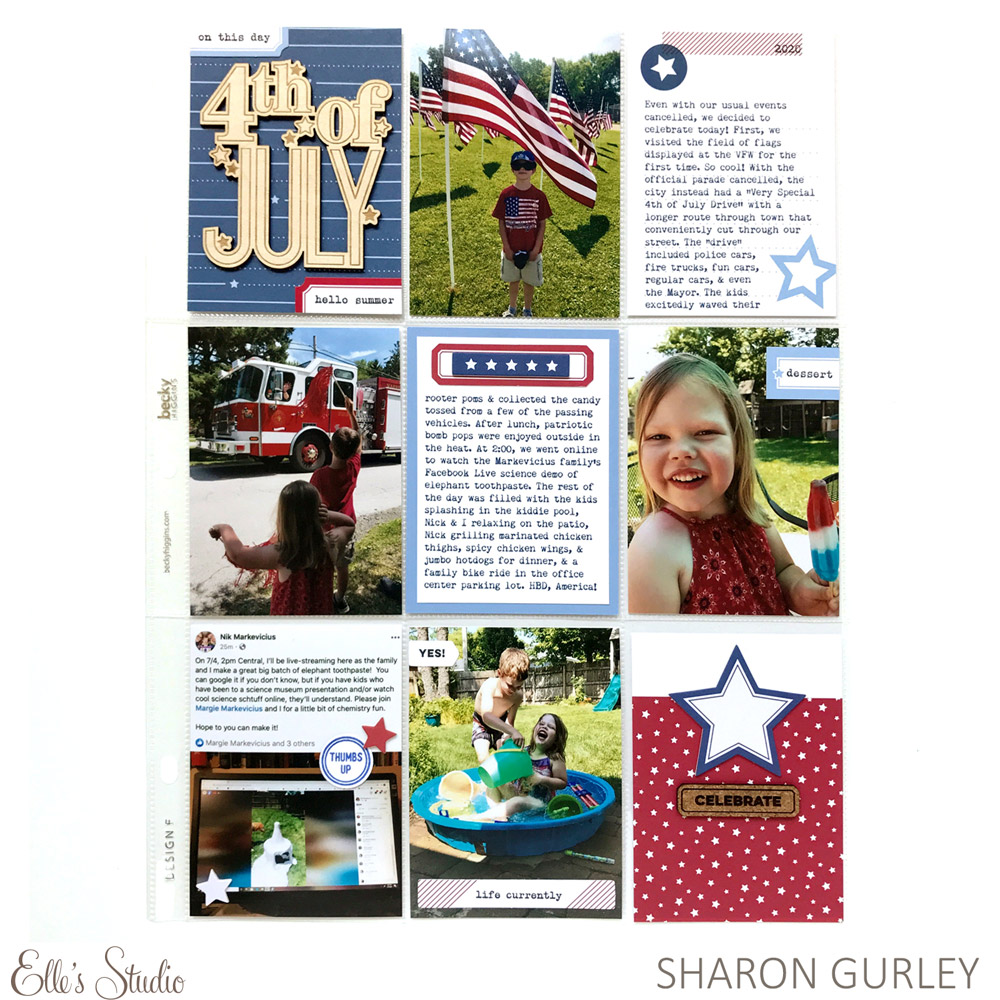
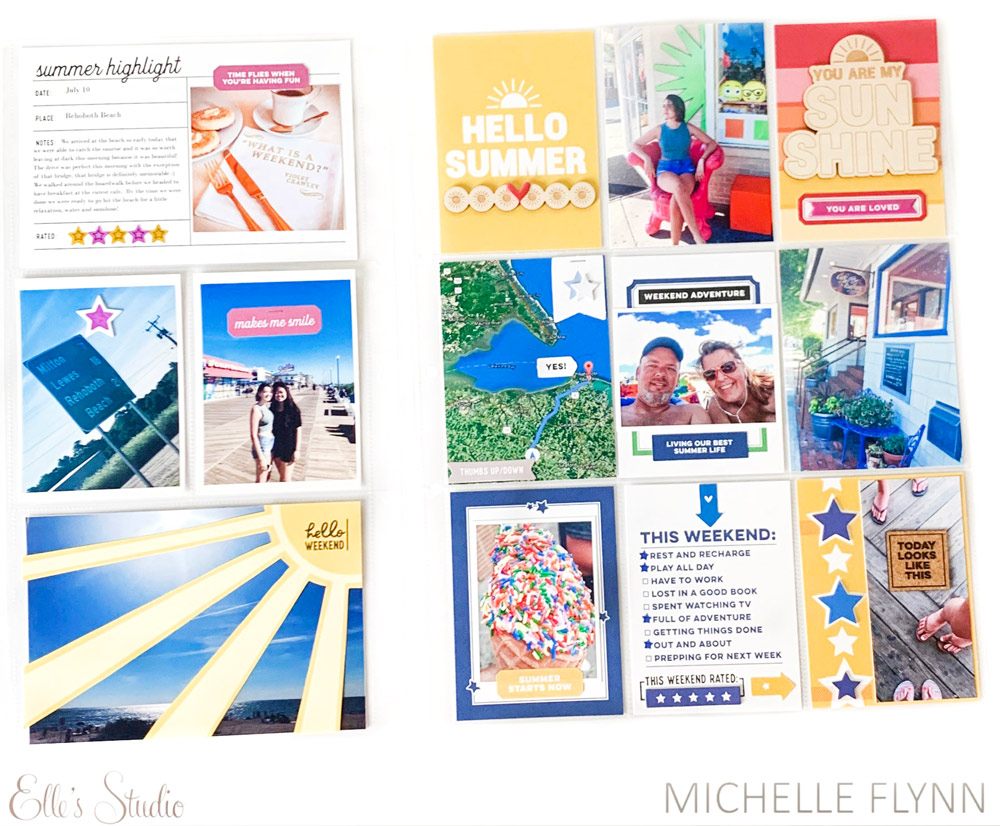
Today, I’m happy to share one of my latest layouts with all of you. I focused on using the Good Times Paper Stack mixed with pieces from the June 2021 kit and add-ons. Here’s what I came up with:

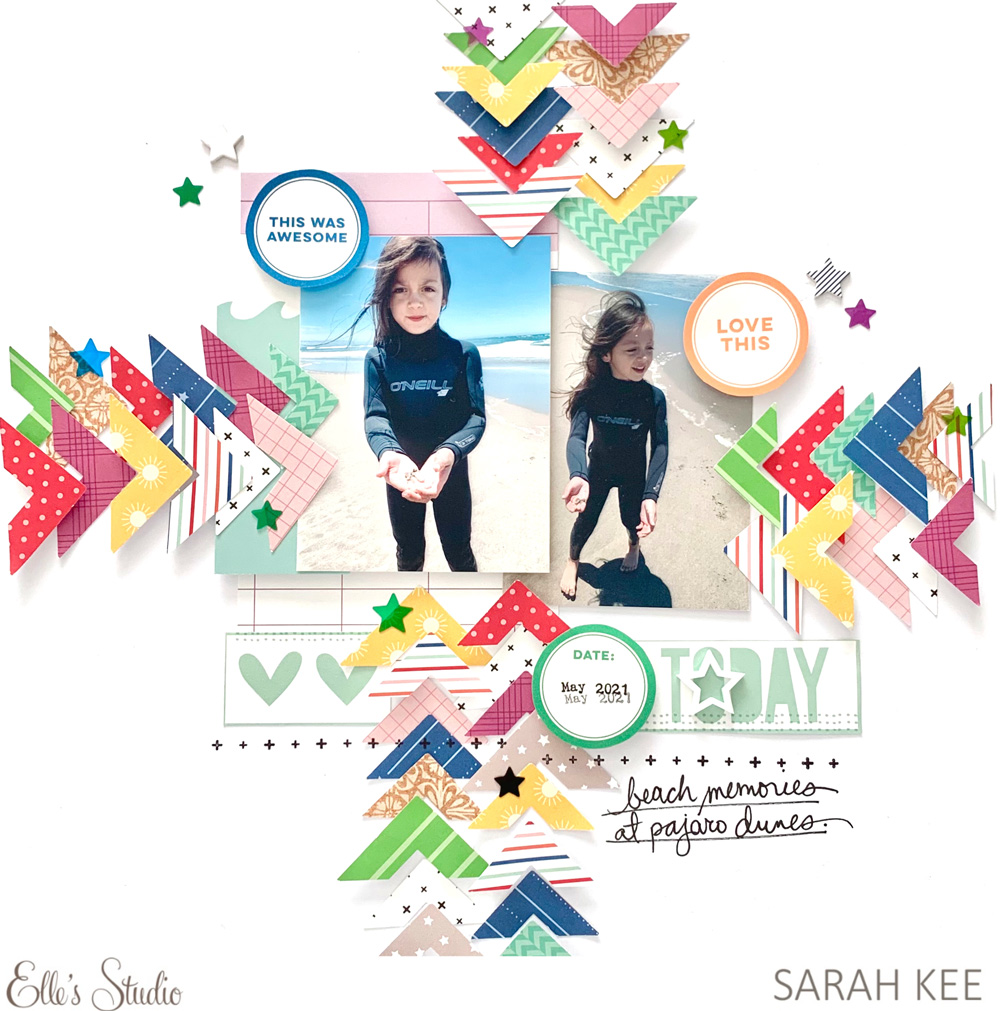
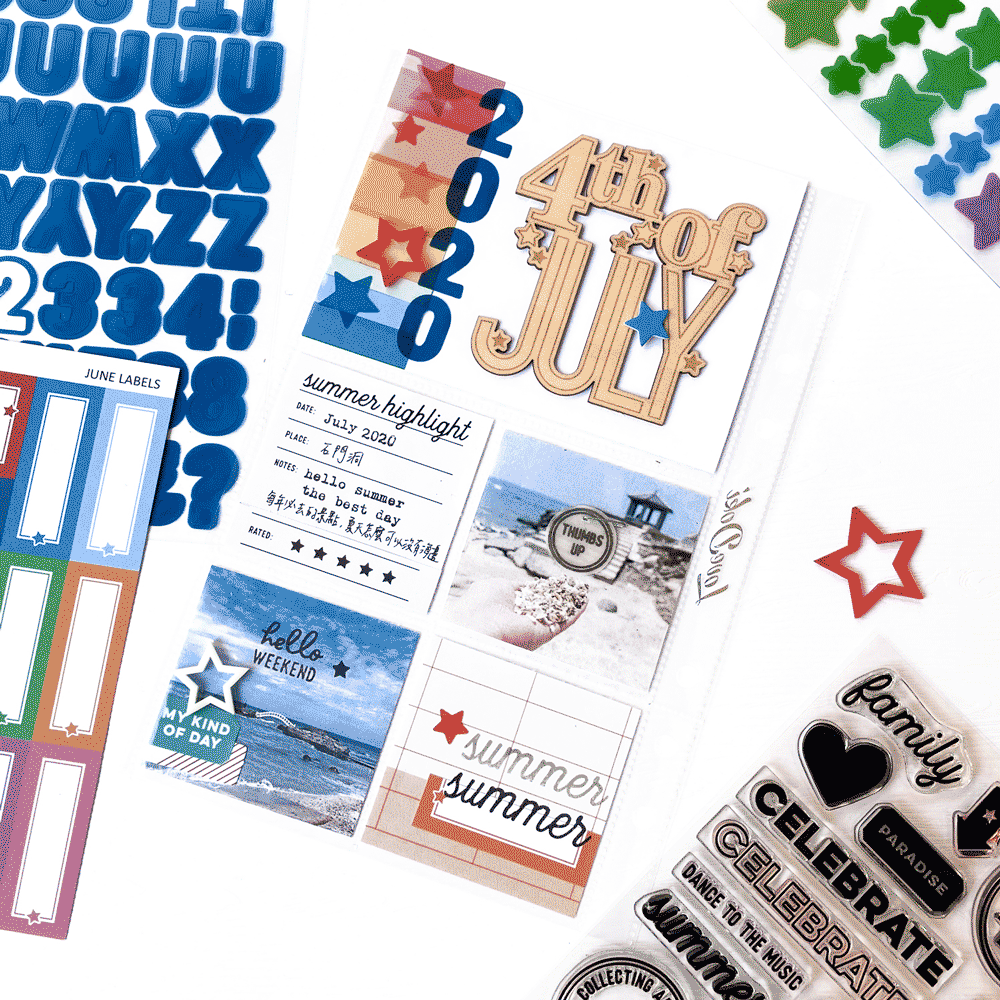
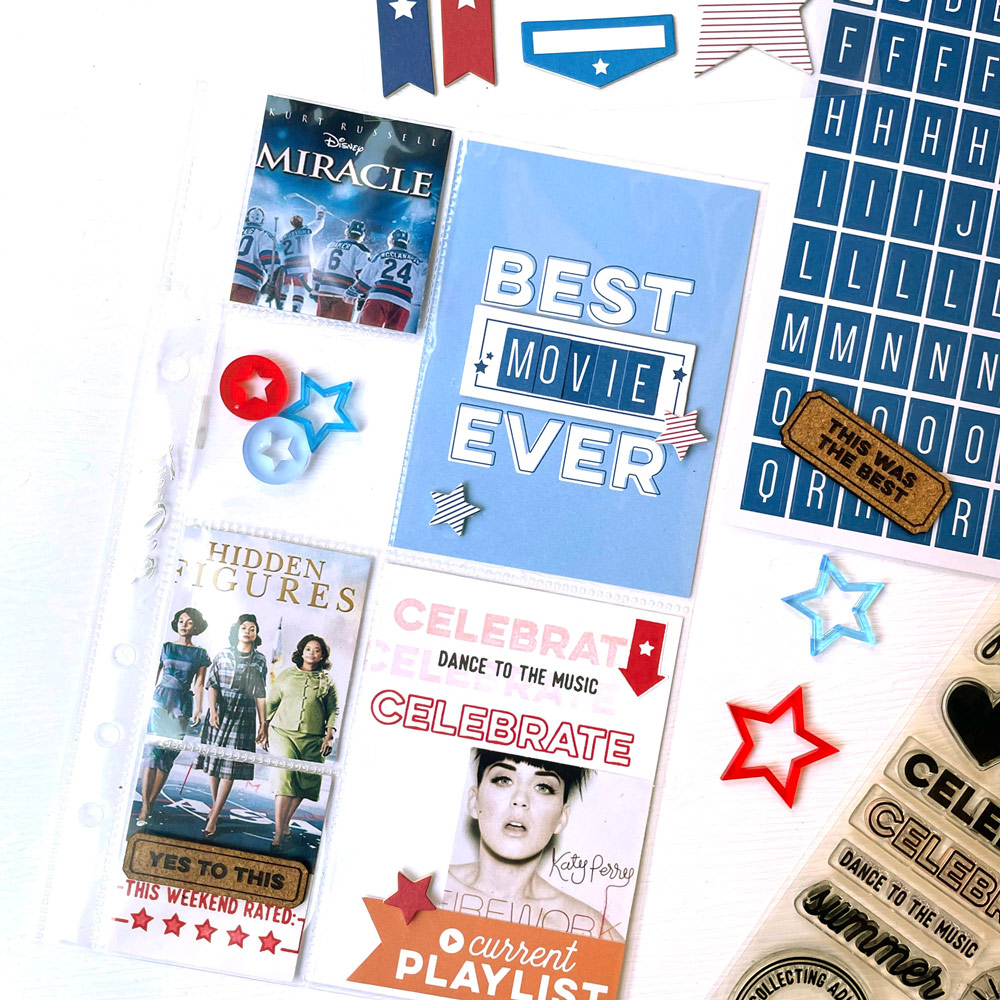
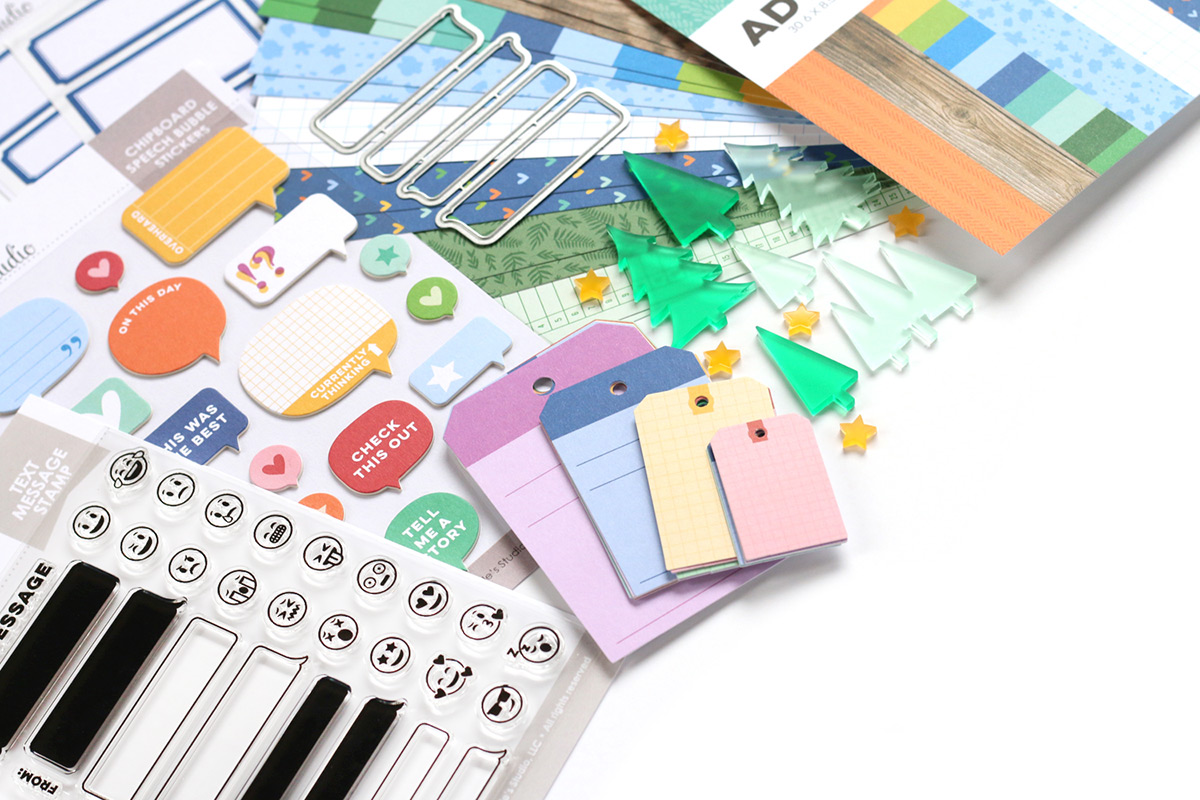
Supplies | June 2021 Kit, June 2021 Print and Cut Labels, Stars and Stripes Chipboard Stickers, Acetate Star Stickers, Patriotic Acrylic Stars, Good Times Paper Stack, Fun with Borders Stamp, Daily Tabs Stamp

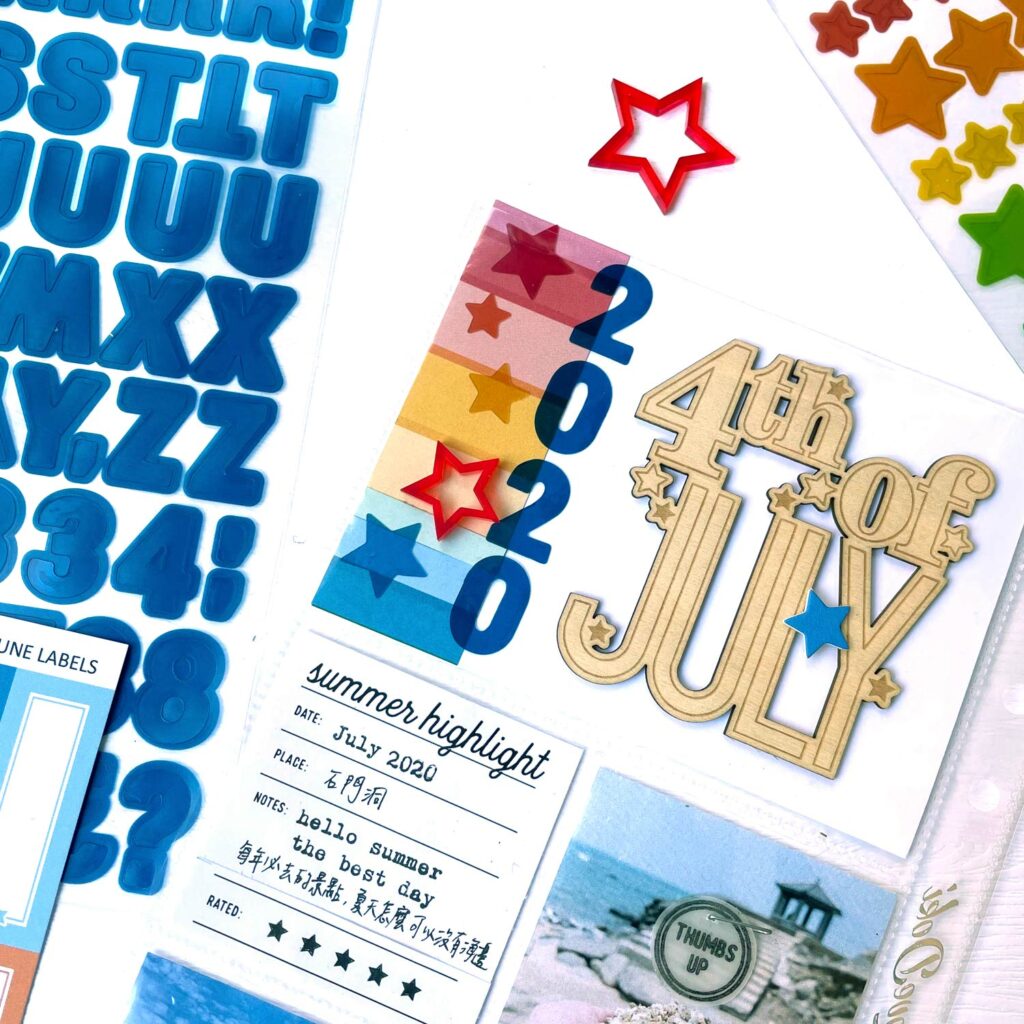
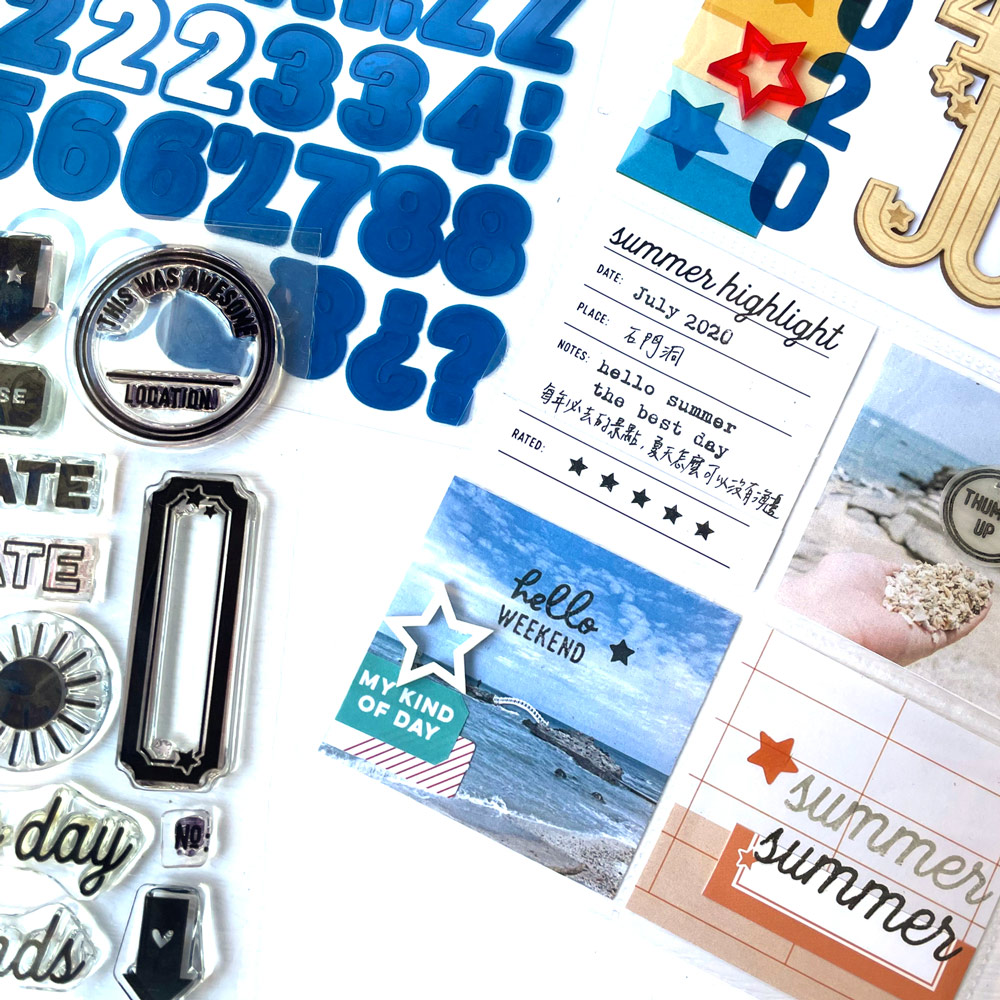
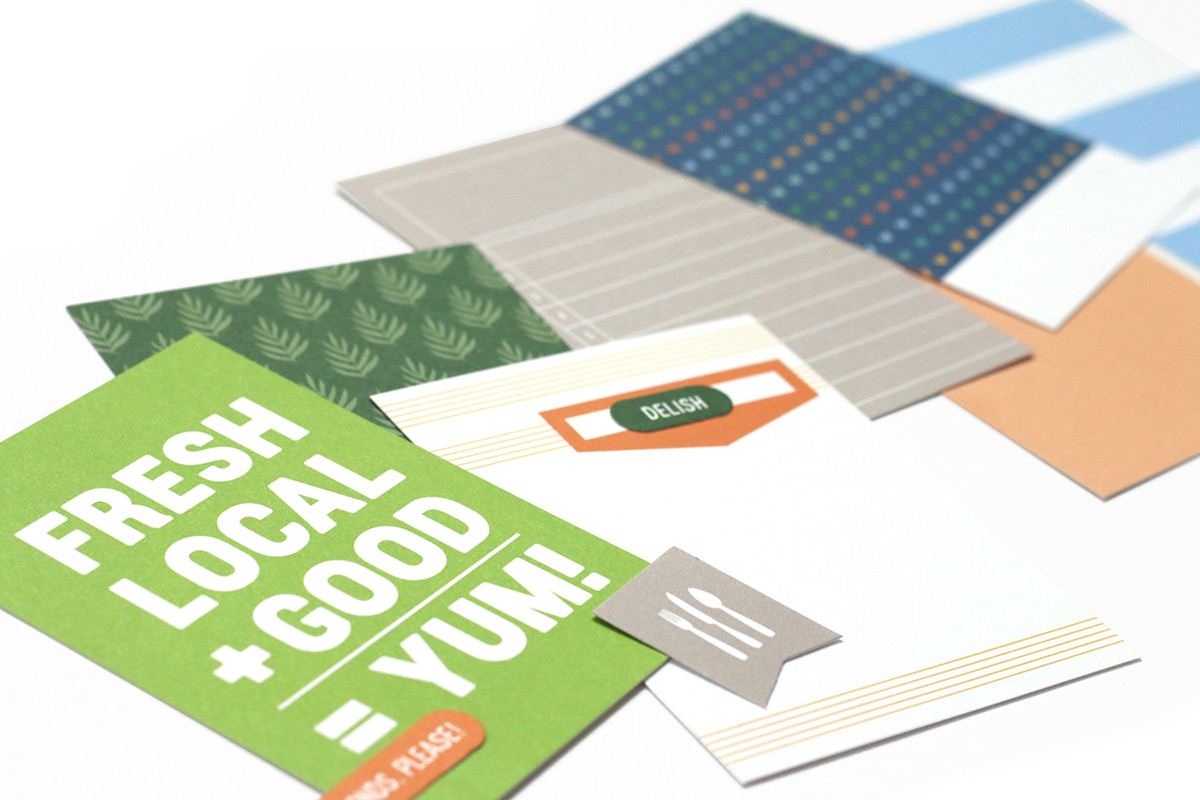
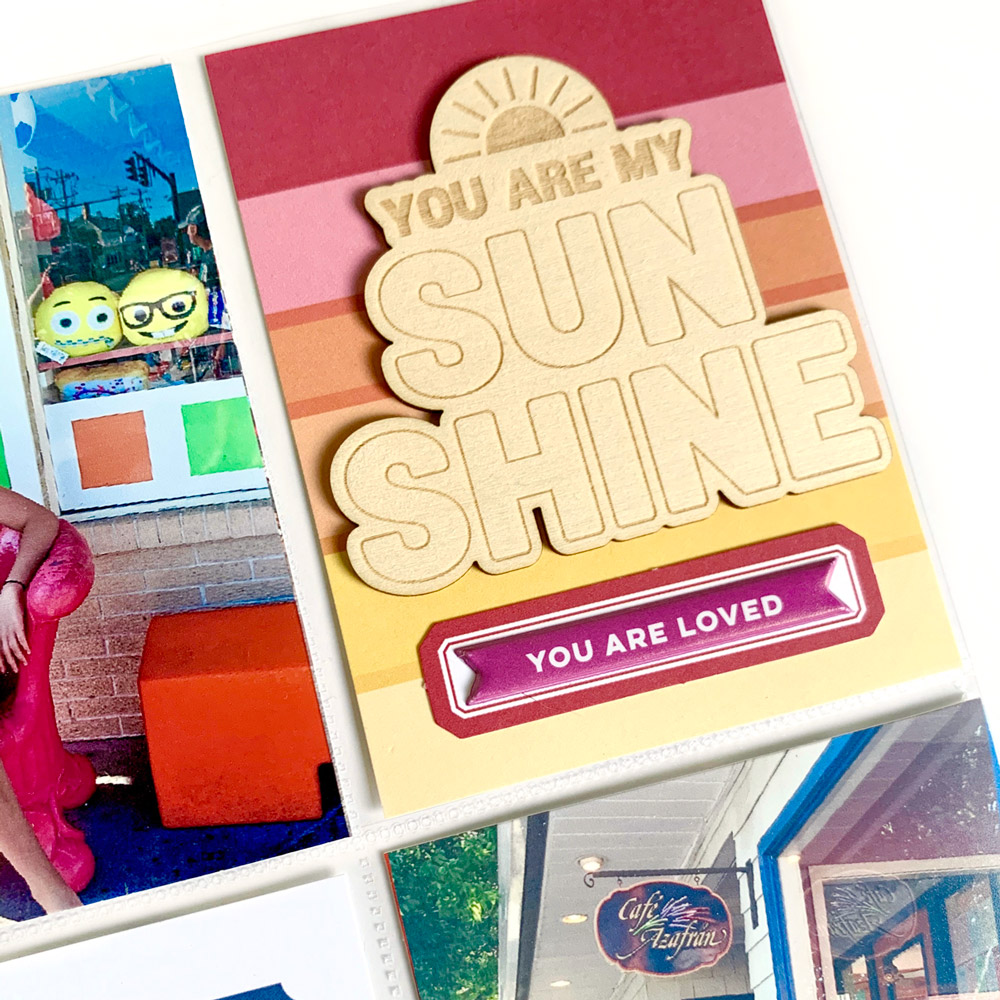
I really wanted to showcase and highlight all of the beautiful colors and patterns in this paper stack, so I punched out a ton of photo corners using all of the various sheets!

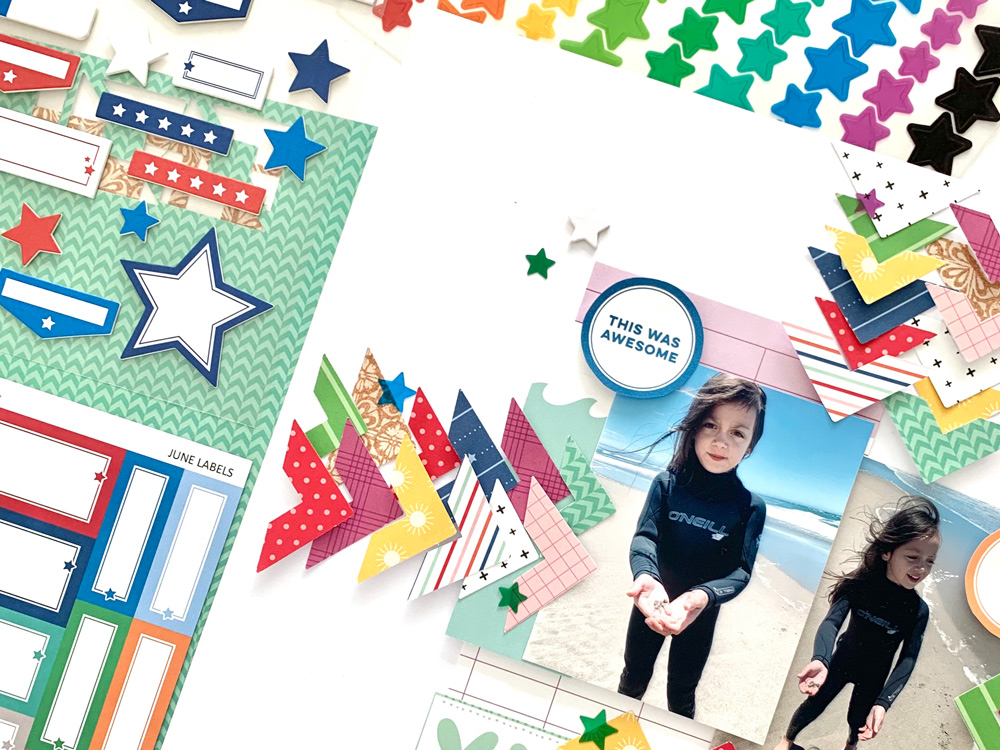
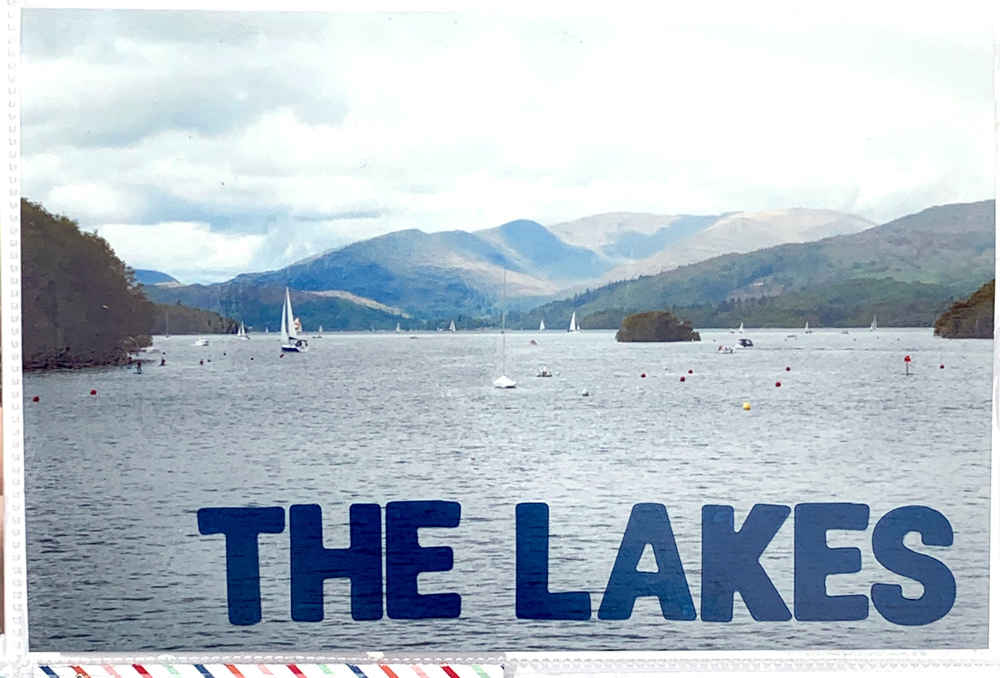
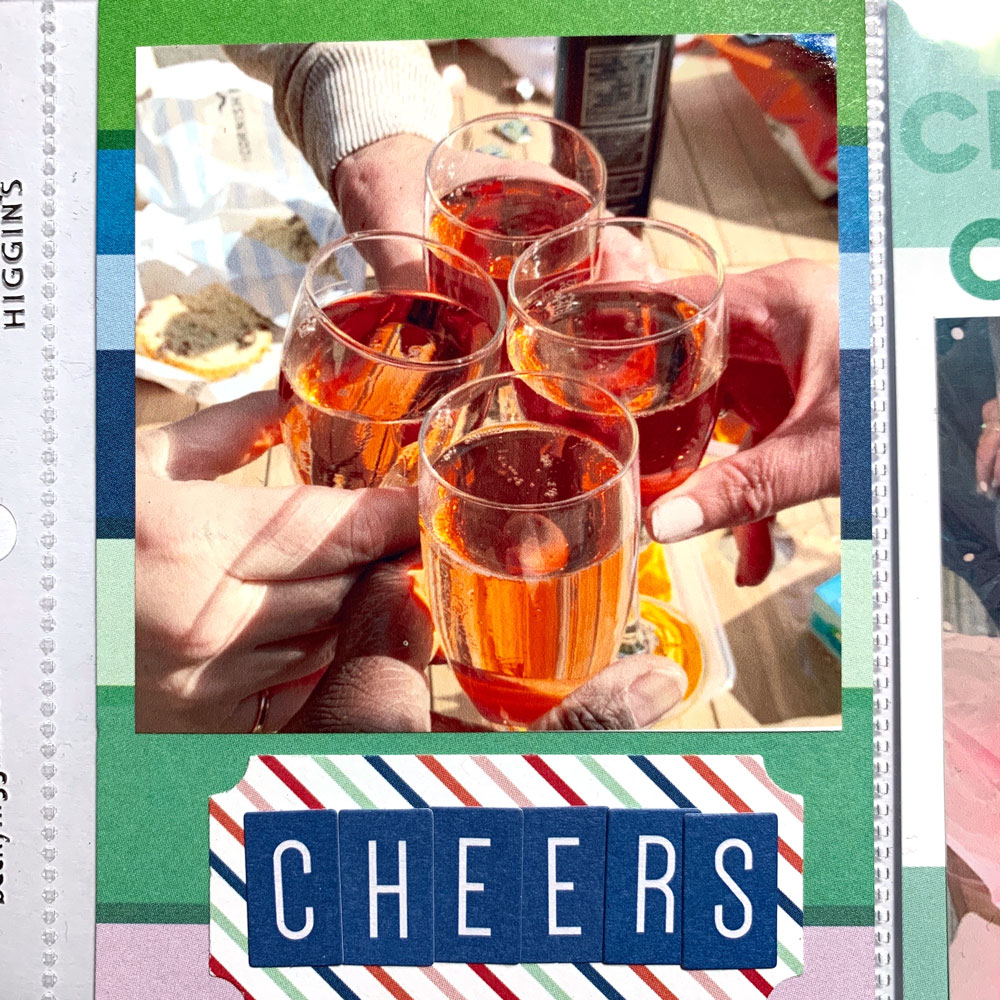
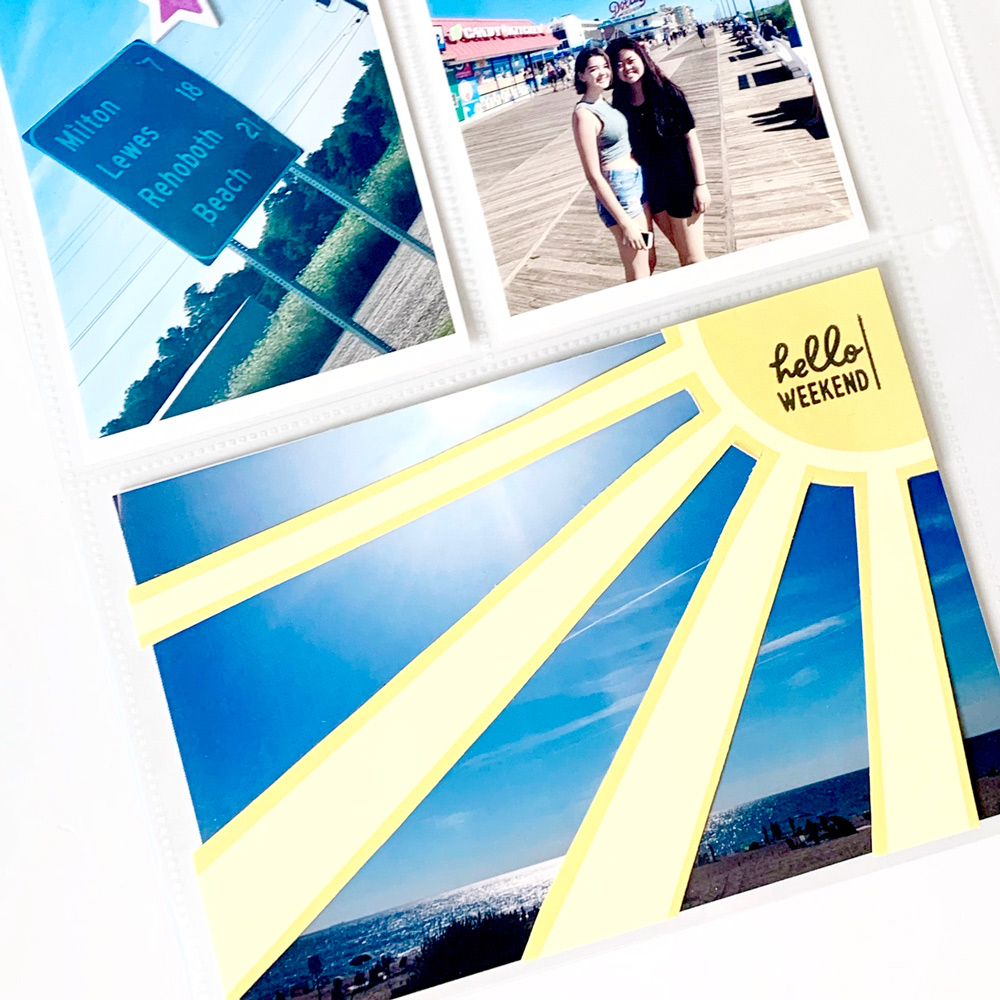
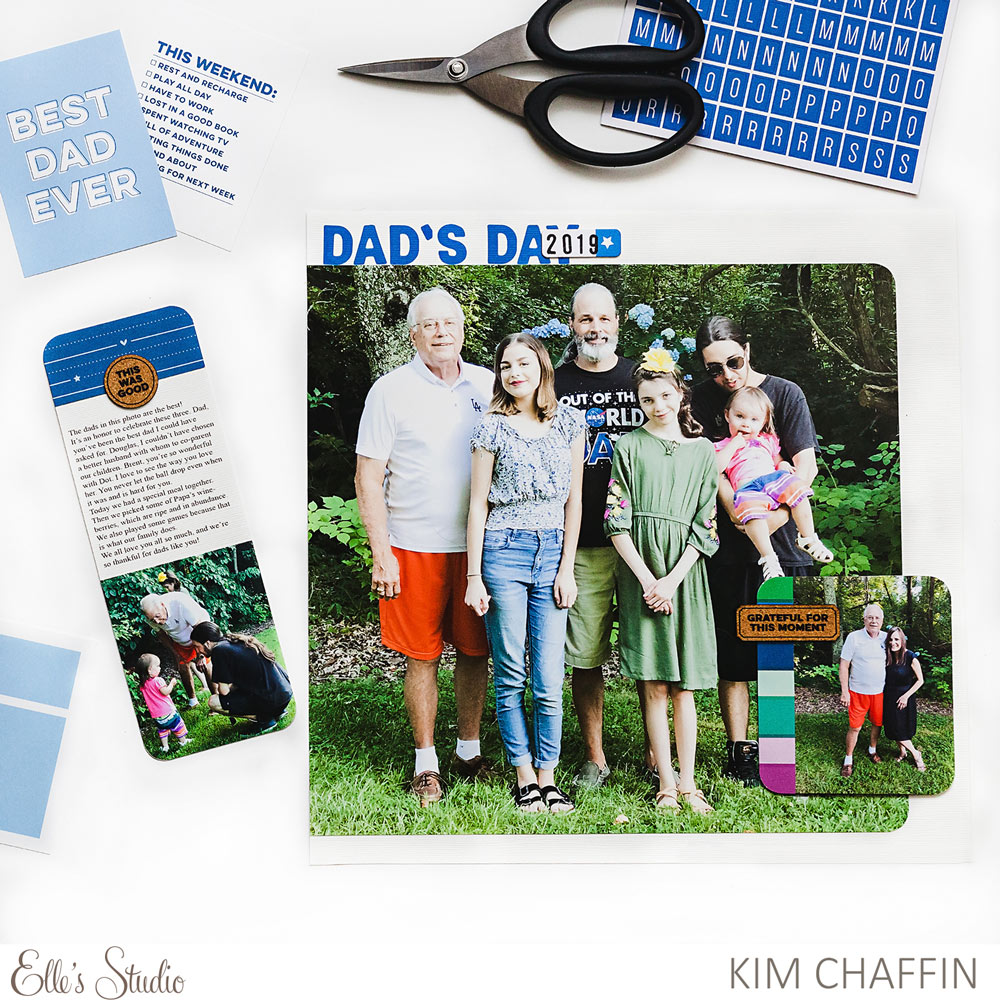
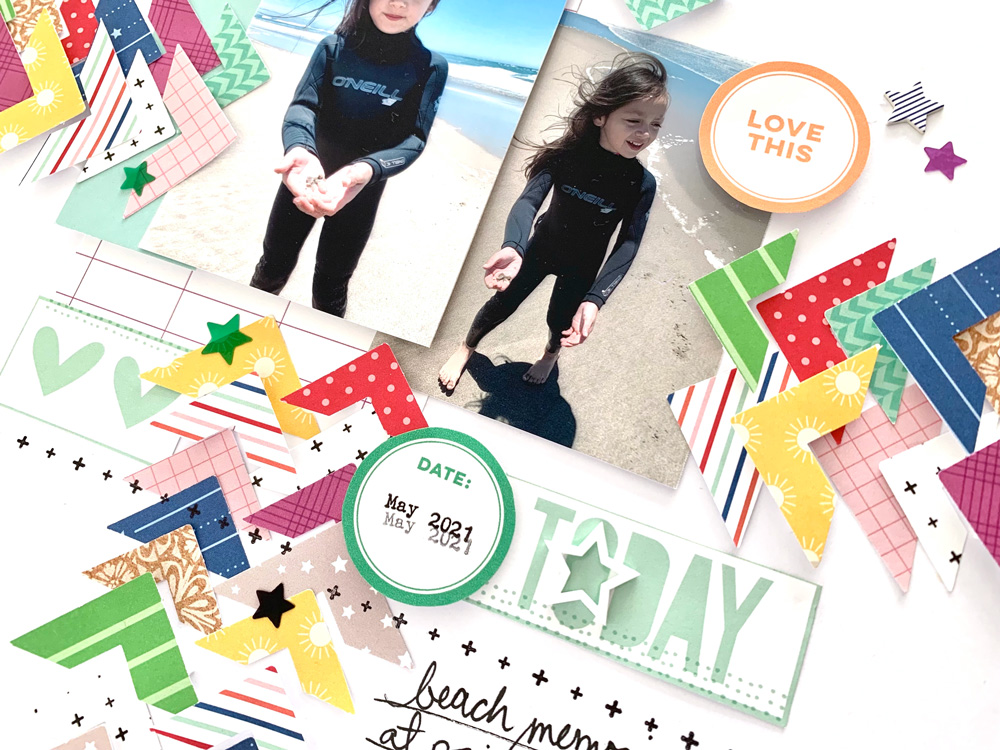
I wanted to scrapbook a couple photos from a recent trip to the beach, so I started by layering a couple of the 3 x 4 inch tags from the June Kit at the center of my layout. After adding my photos, I then lined up and layered the photo corners. I turned them into “arrows” instead. 

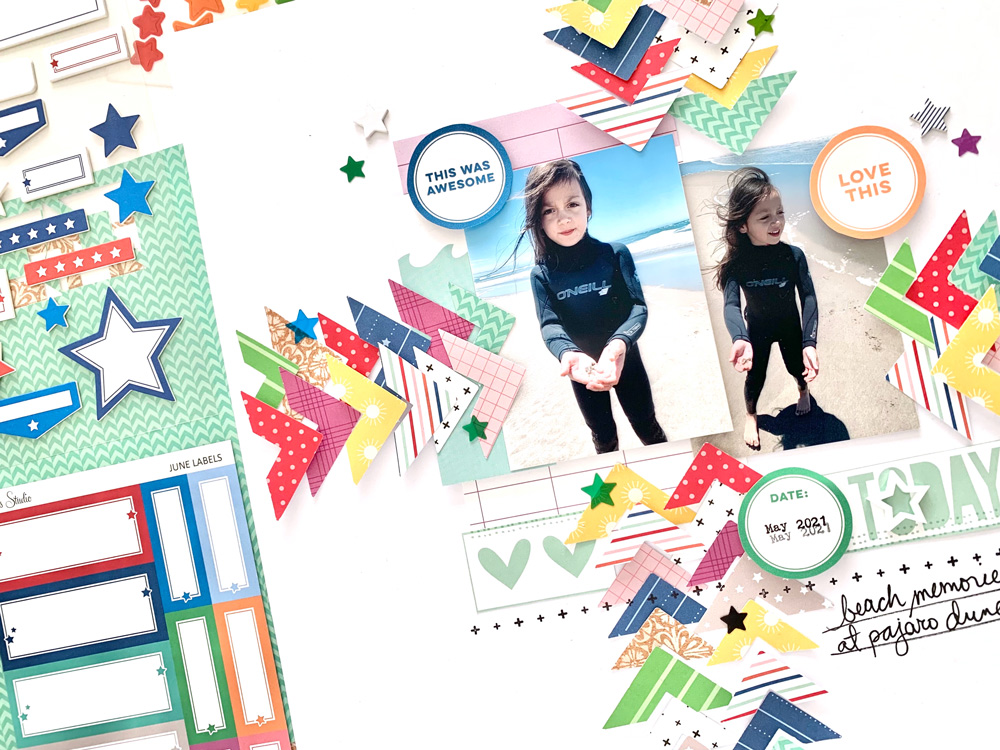
I created 6 rows of “arrows” to help guide the eye to the center focal point. Did I do it?! Are you focused on my photos?!

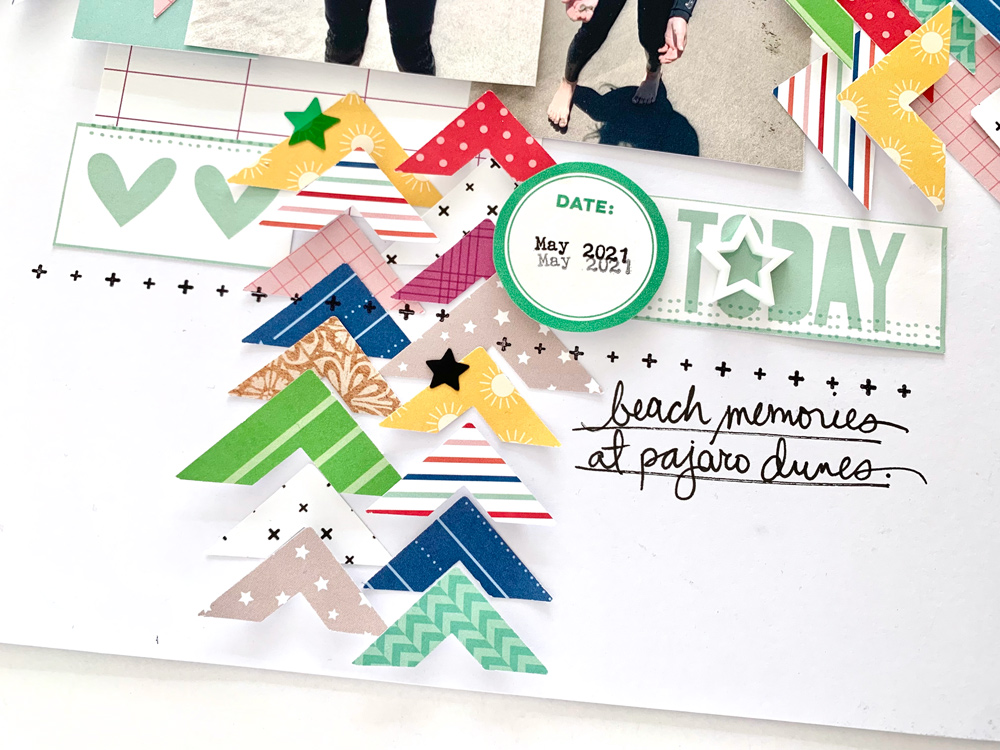
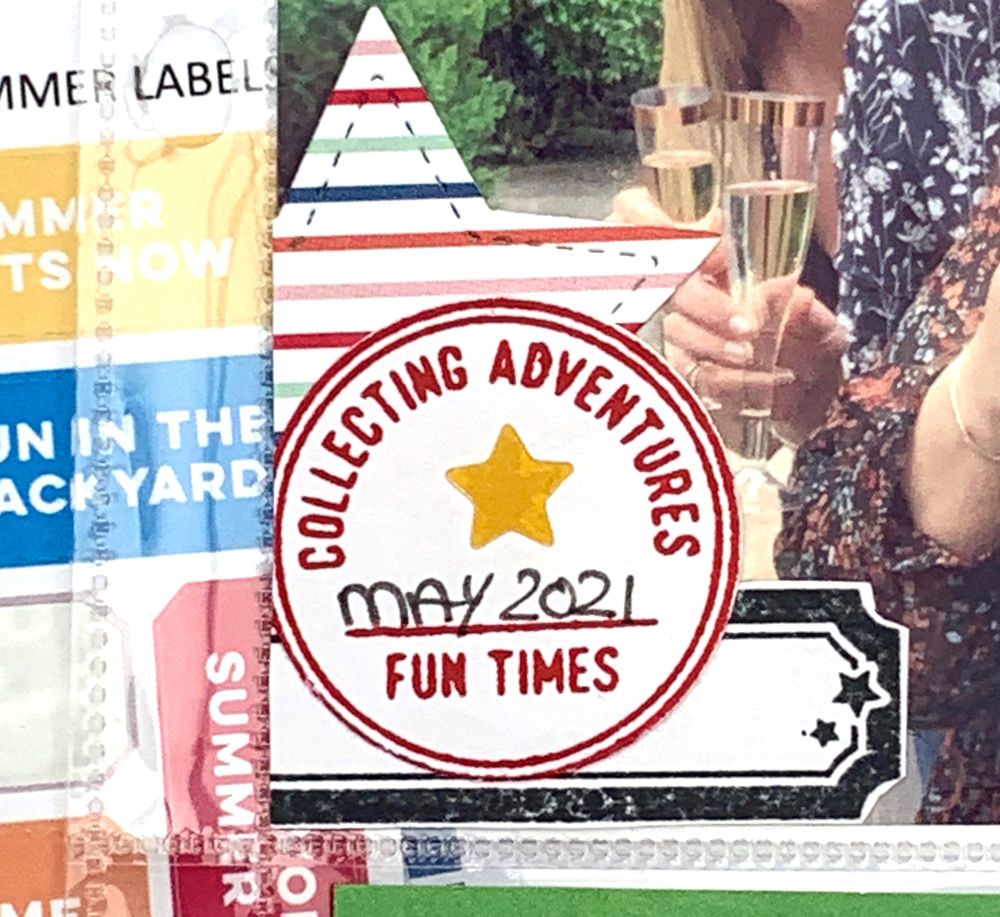
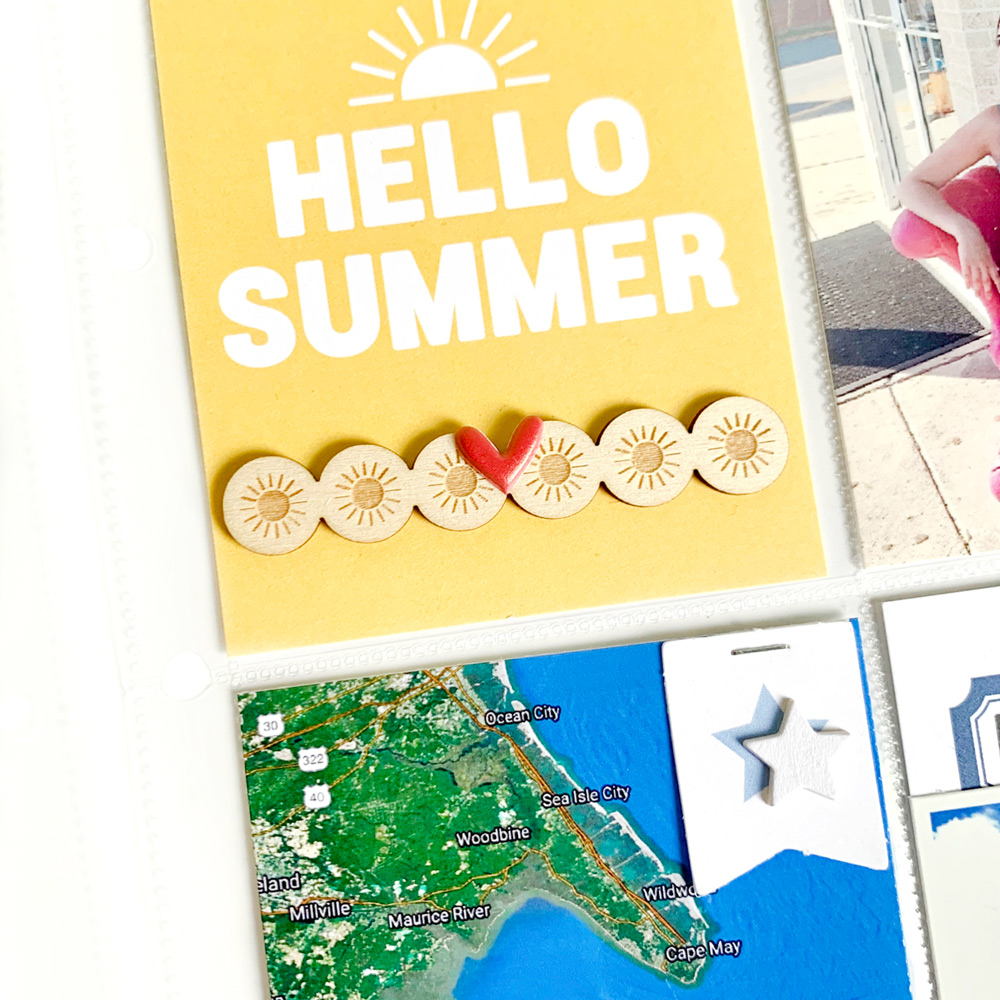
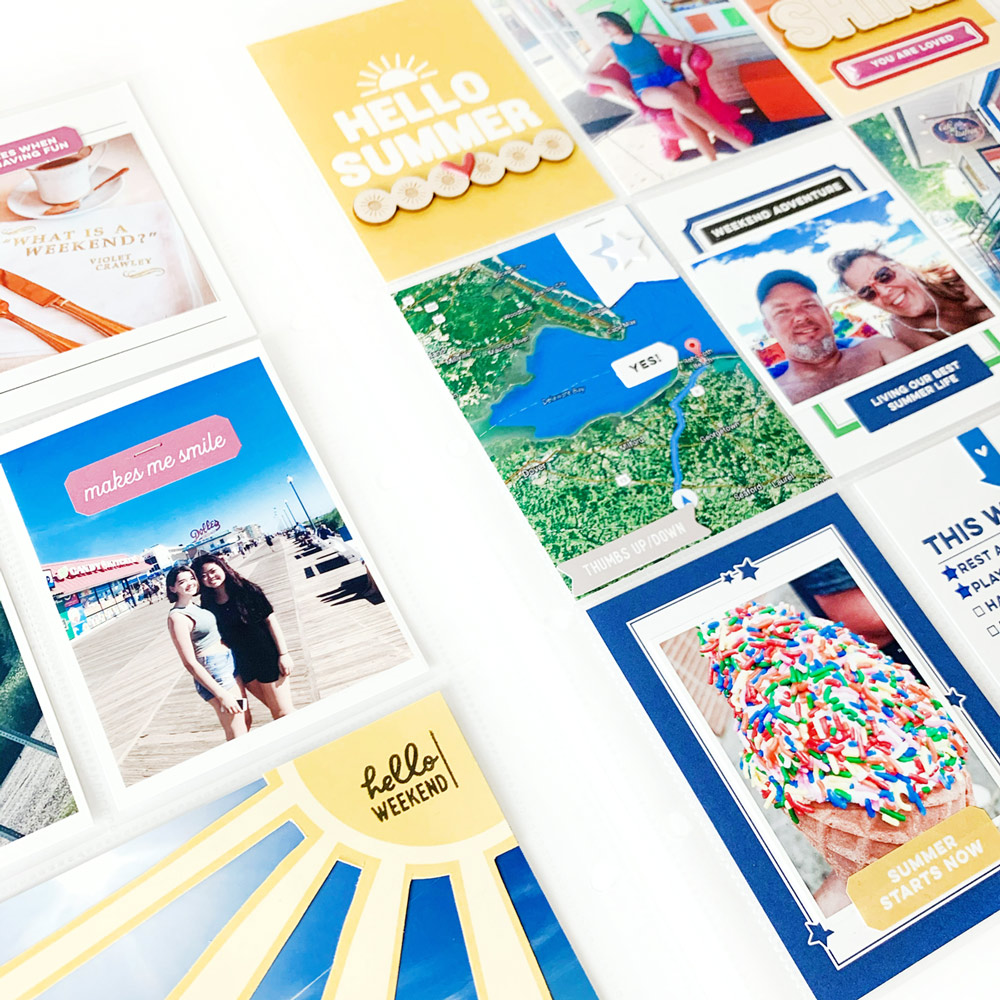
I embellished around my photos with various June 2021 Print and Cut Labels. I cut out a couple of the circles and attached them to my layout with foam adhesive. I also wanted to document when it happened, so I stamped the date into one of the circle die cuts using the Daily Tabs Stamp

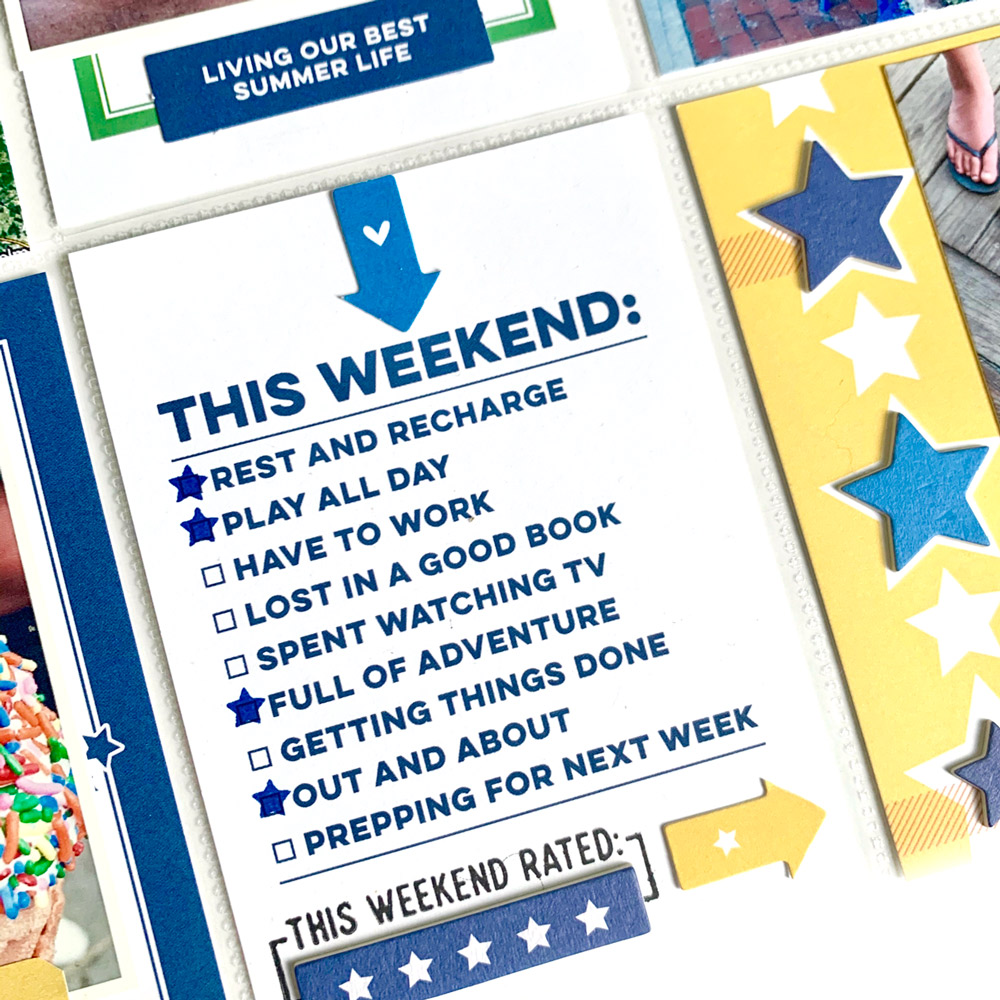
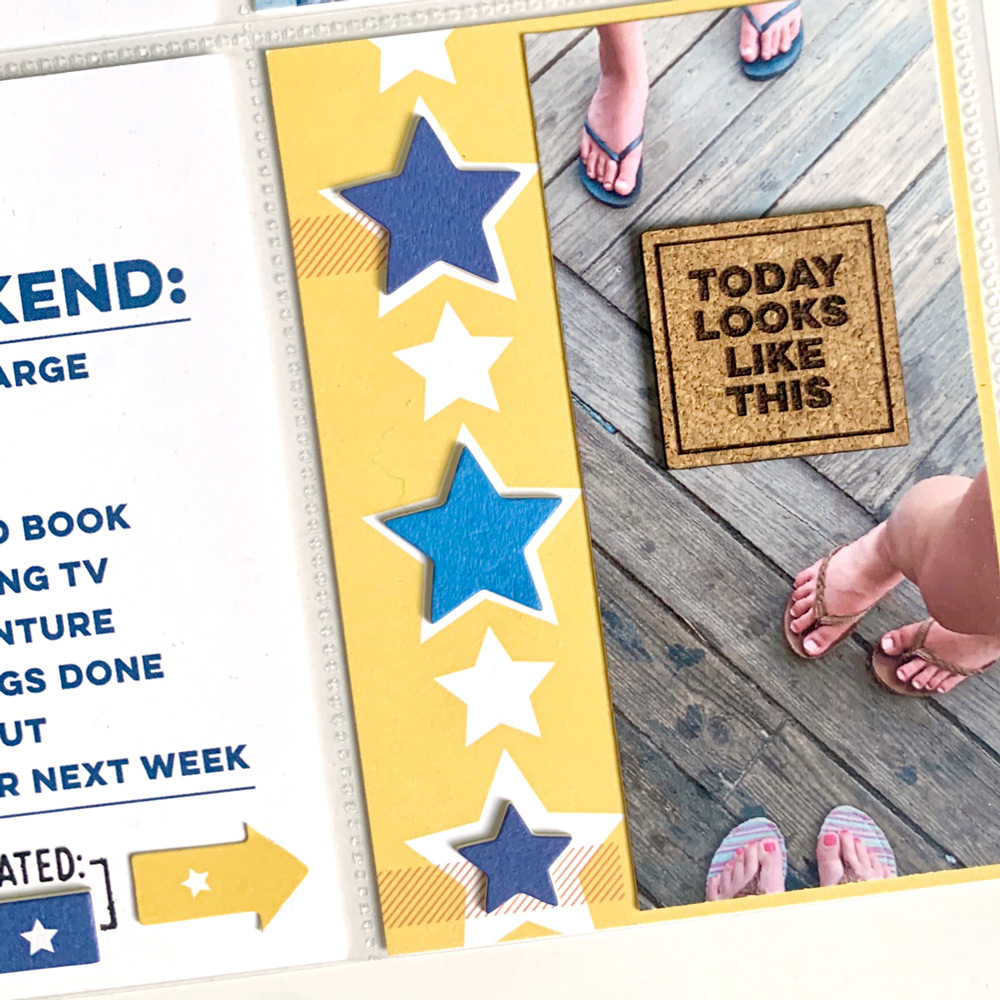
Have you tried the Acetate Star Stickers yet? These have easily become one of my favorite items to use to embellish my layouts. I love that they’re so versatile and easy enough to add to any project. They have adhesive backs, so you don’t need to use any type of glue or tape runner with them. Each sticker sheet has a variety of star colors.

Voila! That’s all I have for today. What’d you think? We’d love to see your projects featuring the Good Times Paper Stackk. Join us, and please do share your projects with all of us at our Elle’s Studio Facebook Group or on Instagram using the hashtag #EllesStudio.

And as always, thanks for reading and letting me share my work here. It’s always a pleasure to be making pretty things with Elle’s products!

June #EllesStudio Spottings on Instagram

Happy 4th of July, friends! We hope you are making lots of sparkly memories today!

Summer is in full swing, and we know you’re having fun outdoors, but we also want you to remember to record the special memories you are creating, too! We love that these six paper crafters did that this month, using some of our products. Take a look!

On the left, Victoria (@bellarose_creates) creating a happy, summer spread using our May and June monthly kits and lots of fun past embellishments. We love how the new kits coordinate so well with our retired products to create such a seamless design! On the right, another pocket page caught our eye by Amanda (@messydeskcrafts) We love those sunset hues that she added to her page using our June 2021 monthly kit, Love This Smile Stamp and Tiny Puffy Shapes and Dots Stickers!

Sometimes you need that perfect alphabet stamp or embellishment to finish off a page, and we think that Rebeca (@rebeca_ruiz01) found that here with our Stanley Alphabet Jr. Stamp, which she cleverly used inside of that sweet banner, and All My Heart Wood Veneers! They created the perfect touches to her page. On the right, we see that Coral (@scrapingmoments) has been having some FUN FUN FUN using products from our Birthday Collection! What a great pocket page spread to record a celebratory day!

We love supplying you with crafty staples! Take a look at the layout on the left by Melinda (@m_sweetman). She created those amazing colorful hearts using our My Heart Metal Die, and we could not love it more! This die is perfect for adding any love to a page! On the right, Ti (@document.aloha) shows us that a tile alphabet sticker is perfect for extending a title using words that you already have on hand. You can find all of our Jane Tile Alphabet Stickers in the shop to help you create an awesome title, too!

Just for sharing their projects, these six paper crafters will each win a $10 gift certificate to the shop! Thank you so much for posting your projects and using the #EllesStudio hashtag, ladies! Please email us at info@shopellesstudio.com to claim your prize!

Will YOU be featured next month? Simply use our products on your next project and post to Instagram using the hashtag #EllesStudio for a chance to be featured here on our blog, and win a gift certificate to the shop! We can’t wait to see what you create!

4th of July Love with Shannon Dombkowski

Hey there crafty friends! It’s Shannon with you today, and happy [almost] 4th of July to my friends in the United States! I’ve always loved the 4th of July. I grew to love it even more in 2008 when my first daughter was born on the holiday! I am super excited to share a layout all about my love for the 4th of July with you. Let’s take a look at the first side.

Supplies: June 2021 Kit, Stars and Stripes Chipboard Stickers, Navy Parker Acetate Alphabet Stickers, 4th of July Wood VeneerPatriotic Acrylic Stars, Good Times Paper StackCelebrate Summer Stamp

While I’m focused on the 4th of July on this layout, you could use this method for any holiday. Most of us have a ton of photos from holiday celebrations so a fun little insert with lots of pockets for photos is a great way to get all of your photos into your album. Let’s look at how I did the second side of the album.

Now for the details. I am all about a huge title taking up a full page. It makes such a bold statement! I knew the 4th of July Wood Veneer had to be a part of my title. I also can’t seem to get enough of the Parker Acetate Alphabet Stickers lately so I knew I had to use those. Here’s a hint that I recently learned about how to make those acetate stickers look their best on your pages: use a bone folder or old credit card or something of the sort to smooth them on. This will make sure the whole alpha or shape is stuck to the page without any air bubbles.

How about using a bunch of 3 x 4 inch tags outside of pockets? As I was flipping through my tags and pulling out the red, white, and blue ones I had thrown them down on my work surface in a messy pile. I liked the way that it looked and decided that’s how they would go on my page. I cut two patterned papers from the Good Times Paper Stack into 3 x 4 inch size to fill in some holes and then added die cuts to embellish. I never would have thought to use the tags this way!

I had a lot to say about the 4th of July. I used clear sticker paper to add my journaling to the physical 3 x 4 inch tag from the June Kit. Then, I typed two more 3 x 4 inch tags worth of journaling! To get it all on my page, I made it int o a flip up. To set that tag apart from the others, I added a scalloped border at the bottom. By differentiating it from the rest, anyone looking at my album will know to flip up to read more.

Finally, let’s talk about the pockets that didn’t have photos. I knew that I wanted to leave some of them open. I put white paper behind these so you can see them better. In one, I made a shaker pocket of sorts. The Patriotic Acrylic Stars look the same on the front and the back so they’re perfect for a pocket like this. I just added stitching to close up the top of the pocket. On the other pocket, I looked for two Stars and Stripes Chipboard Stickers that were the same shape and size. That way, you can’t see the back of one sticker from the opposite side. I just linked up the stickers and stuck them to the outside of the page protector.

As I said, you could do this for any holiday, birthday, day trip, or other event with lots of photos. I hope I’ve give you some inspiration to get those occasions documented! 

Share your 4th of July projects with us! Post on Instagram using the #EllesStudio hashtag or join our Elle’s Studio Facebook Group and share on the discussion board. We can’t wait to see your pages!

Documenting the 4th with Wei Wei Wang

Hi there, Elle’s Studio friends! It’s Wei Wei here, and I am so happy to be with you today using the June 2021 kit and add-ons to share some fun July 4th theme pocket pages! 

I always love July 4th themed scrapbooking supplies—the red, white, and blue color combos are always awesome and very eye-catching! In fact, I’ve never joined the 4th of July festivities before, but I’ve still been inspired by many 4th of July ideas on the internet. For today’s project, instead of documenting fireworks and festivities, I want to use my summertime photos from July 4th from 2020 as well as amazing patriotic movies and songs.

Supplies | June 2021 KitCelebrate This Day Printables, June LabelsSummer Label Stickers, Jane Tile Alphabet Cardstock Stickers – Navy, Stars and Stripes Chipboard Stickers, Acetate Star Stickers, Navy Parker Acetate Alphabet Stickers, Cork Labels4th of July Wood VeneerPatriotic Acrylic Stars, Good Times Paper Stack, Celebrate Summer StampWeekend Stamp, Daily Tabs Stamp

There were so many great red, white, and blue embellishments in this month’s kit and add-ons that it was super easy to pull this theme off. I knew that I wanted to use the great 4th of July Wood Veneer as my big title. I created smaller subtitles by using the Navy Parker Acetate Alphabet Stickers. I also used the colorful striped paper from the Good Times Paper Stack and added a fun little touch by embellishing with those colorful Acetate Star Stickers and the cute Patriotic Acrylic Star

For my main journaling spot, I resized the digital “summer highlight” journaling tag from the Celebrate This Day Printables in Photoshop. Then, I added the day and notes using the Daily Tabs Stamp.

Once I had my photos printed, I started decorating my photos. I stamped “hello weekend” from the Weekend Stamp and added one white Patriotic Acrylic Star on the top of the June 2021 Kit red label and Summer Label Sticker. I also stamped the circle “thumbs up” on vellum, fussy cut it out and stapled to my photo.

I went through the June 2021 Kit and decided to use the “BEST DADD EVER” 3″ x 4″ tag because that soft blue color was perfect for my layout! The Stars and Stripes Chipboard Stickers are my favorite product this month! I used the blue label chipboard sticker to cover the word “MOM”, and then added my title “MOVIE” using navy Jane Tile Alphabet Cardstock Stickers to give it an added pop of color. I also adhered star chipboard stickers around the title. As you can see, I used many stars to bring the whole pages together. 

I used the Celebrate Summer Stamp to create my own journaling tag. I really love the stamping effect. The “currently playlist” banner was cut from June 2021 Kit 3 x 4 inch tag. I also adhered the red Stars and Stripes Chipboard Sticker and red stamped arrow from the Celebrate Summer Stamp to the corner for embellishment. 

To document the movie, I cut the photo in half and paired up the “yes to this” Cork Label with the “THIS WEEKEND RATED” using the Weekend Stamp. For the finishing touch, I made a shaker with the Patriotic Acrylic Stars

Thanks for stopping by today! I hope you’re inspired to create a red, white and blue project no matter what your 4th of July may look like! 

A sneak peek of our July 10th reveal!

Our July kit + coordinating add-ons reveal is almost here and we can’t wait to share with you all the new and exclusive products that will be available soon! Our reveal will be full of the perfect products to document your July stories and take you right into the month of August! This month, our July kit will include 3 – 4 x 6 inch tags, 18 – 3 x 4 inch tags, and 27 die cuts!

Not a subscriber? You can pre-order our July kit now and lock in our $9.99 kit price by starting a subscription today! You’ll want to choose our SUBSCRIBE & SAVE option to get signed up and start your subscription with our July kit. We will then hold your kit and you’ll be ready to bundle and save at our July 10th reveal! Details on how to bundle with your subscription order will be emailed to you once you have purchased this product.

Kit subscribers, don’t forget! Along with being able to bundle any products from our shop that will ship for FREE with your kit during our 24-hour bundling period, starting on the 10th at 8:00 am Pacific each month, our subscribers will also have access to special discounts on select items! These discounted items can be found in our SALE section during our 24-hour bundling period, and you must be logged into your kit subscriber account to see them. Quick note: Our kits and add-ons are available without a subscription each month, too.

This month our kit subscribers will also receive a special BONUS coupon to use at reveal for 20% off all our metal dies! This will include the two NEW dies we’ll be adding to our shop on July 10th! If you haven’t signed up for our kit subscription yet, now is the perfect time! Subscribers – look for your special coupon code in your inbox on July 8th and then again on July 10th.

We are so excited to share all of these new products with you and to see how you use them on your projects! Make sure you set your alarm and mark your calendar for Saturday, July 10th at 8:00 am Pacific! We hope to see you there!

Memory Planner Moments with Melissa Mann

Hello! This is Melissa with you, and I’m excited to share a new spread from my memory planner created using the June 2021 kit and add-ons. I’ve really loved documenting the daily memories and events in a different medium than pocket pages this year. 

Supplies | June 2021 Kit, June 2021 Print and Cut LabelsJane Tile Alphabet Cardstock Stickers – NavySummer Label Stickers, Acetate Star Stickers, Celebrate Summer StampWeekend Stamp, Mini Days of the Week Stamp

One of the biggest challenges for me when creating my weekly spread in a memory planner is not layering too much. I love layers, but I have to find creative ways to layer on these pages as they will not support a heavy load of paper and embellishments. I started off by stamping the date for each day using the Mini Days of the Week Stamp. I used the navy Jane Tile Alphabet Cardstock Stickers to create my header and identify which week I was documenting. Then I used three different shades of blue ink and the Weekend Stamp to add “thumbs up” circles, the small hearts and the small stars across my spread. This created my first “layer.” 

Once this was done, I started to figure out where I wanted to place my photos. I knew I needed to cover a spot where ink had bled through from the other side on a previous week and I had a big ink splotch that I smeared on with my finger by accident when I was stamping the dates in black ink. I got all my photos and 3 x 4 inch tags from the June 2021 Kit down and then my favorite part starts: filling in the blank spots with stickers, embellishments, journaling, and more stamping!

It’s really easy to use a bunch of the small pieces left over from the month such as die-cuts, the Print and Cut Labels, and stickers, like the Summer Label Stickers. I also like to use a small ruler and pen to draw lines to “block” off certain elements in my spread. 

Thanks for stopping by the blog today! Make sure to share your pocket pages or your memory planner spreads that record your everyday memories with us in our Elle’s Studio Facebook Group or by using the #EllesStudio hashtag on Instagram!

Fun Times Documented with Jackie Ashton

Hi, crafters! It’s Jackie here with a pocket page spread to share with you created with the June 2021 kit and add-ons. The hardest part about putting this spread together was selecting the photographs! Once I decided on which ones to use, the spread came together quickly.

Supplies | June 2021 Kit, Celebrate This Day Printables, Jane Tile Alphabet Cardstock Stickers – Navy, Acetate Star StickersNavy Parker Acetate Alphabet Stickers, Cork Labels, Good Times Paper Stack, Celebrate Summer Stamp, Weekend Stamp, My Star Metal Die, Pocket, Frame and Flip Up Metal Die, Knockout Word Metal Die

Here in the UK we are slowly coming out of lockdown, and we are now able to meet up with friends. We had to change our initial plans, but we managed to have a staycation in The Lake District, which was just lovely.

After selecting a few of the photographs and arranging them on my page protector, I grabbed my June 2021 kit and add-ons and was ready to start to put the spread together. I started by selecting a few sheets from the Good Times Paper Stack, one I used to die cut stars using the My Star Metal Die, and for my flip up pocket and the other to cut down one of the papers which matched one of the pocket tags.

I added a small cluster on one of my photograph using the die cut star, and stamped images from the Celebrate Summer Stamp and used them as layers on my photo.

The Navy Parker Acetate Alphabet Stickers were ideal for my title and I added them directly over my photograph.

As I only had one striped pocket tag in my kit, I cut a 3 x 4 inch piece of patterned paper that co-ordinated with it and added a title using the Navy Parker Acetate Alphabet Stickers underneath my photograph.

I love using the Pocket, Frame and Flip Up Metal Die and wanted to add one to the spread. To embellish the front, I die cut the ‘hello’ using the Knockout Word Metal Die, selecting the die cut letters, then adding a smaller photograph and a few stamped details from Celebrate Summer Stamp on the front.

When I was looking at the Celebrate This Day Printables, I decided to add journalling to one of the tags using a tutorial by Meghann Andrew. In her YouTube video she demonstrates a step by step guide on how to do this. I’m such a novice when it comes to using Photoshop, but I found it so easy to follow, and I know it a technique I will use again!

For my final pocket tag, I used the 3 x 4 inch striped pocket tag and added a die cut star with a Cork Label over the top and a stamped phase from the Weekend Stamp.

I really enjoyed putting this spread together, and using the June 2021 kit and add-ons made the process easy. I hope you have found a few ideas to use on your pocket pages using the June 2021 kit and add ons, and don’t forget to pop over to You-tube and watch Meghann’s video on how to add journalling to the printables using Photoshop. It is well worth the watch, plus, you get to see her put a layout together, so win-win!

What adventures are you documenting with our June 2021 kit and add-ons? Share with us on Instagram using the #EllesStudio hashtag and in our Elle’s Studio Facebook Group!

4th of July Fun in Pockets with Sharon Gurley

Hello again, crafty people! It’s Sharon here to share with you my second project using the amazing products from the June release!

Supplies |  June 2021 Kit, June 2021 Print and Cut Labels, June LabelsSummer Label StickersStars and Stripes Chipboard Stickers, Cork Labels, 4th of July Wood Veneer, Good Times Paper Stack, Weekend Stamp, Daily Tabs Stamp

One of the many things I love about Elle’s Studio is how the same monthly kit can give you supplies to document varied topics in different months. This month’s release helped me document holidays in June AND July. Using the kit along with the more patriotic add-ons, I was able to create a 9 x 12 inch pocket page documenting my family’s 2020 4th of July activities. 

Nothing sets a color palette like a patriotic holiday in the U.S. and the June products had so many red, white, and blue options! I knew I wanted my title to use the 4th of July Wood Veneer which I originally placed on a white background. I realized the light wood and the white paper just didn’t offer enough contrast, so the blue striped paper from the Good Times Paper Stack was a perfect replacement. If you ever struggle to use wood veneer in your crafting, change the background paper to a darker color to make it pop! 

One of my favorite tags from the kit was the one that mimics the Patriotic Acrylic Stars from the add-ons. Elle’s tags with space for journaling are the ones that I always find myself using first! I continued my journaling onto a custom made tag with a banner from the Stars and Stripes Chipboard Stickers placed on top of a label from the kit’s die cuts. 

Once my journaling was in, I shuffled my tags around and found that the best arrangement had created two diagonals through my project. The diagonal from the upper right to the lower left spread out the words. The diagonal from upper left to lower right spread out the most concentrated colors of blue, white, and red. It’s always good to take a step back and look at how your pockets look together. I shuffle the tags and pictures until it looks and feels right.

Labels and stamps are some of my favorite products because I use them so much, and I love to combine them as embellishments. The June release has amazing labels everywhere! I used them from the monthly kit’s die cuts, the June Labels, and the June 2021 Print and Cut Labels. Next, came stamping on these labels! Elle has created a series of Tab Stamps that have so many typewriter words and phrases on them that fit perfectly on labels. For this project, I used the Daily Tabs Stamp with labels on three of the nine pockets. My favorite stamped label embellishments are on the title pocket since they bring in more of the color scheme to the title.

I also used the Weekend stamp set to create an embellishment for the photo collage in the lower left pocket. Is anything more fitting than “thumbs up” for a pocket documenting a Facebook event? 

Once again, thank you for taking the time to look at the details of my project! Hopefully, I have helped you see the potential in these wonderful products. Also thank you to Elle and Meghann for giving me this amazing opportunity to guest design!

Hi, I’m Sharon, and I love paper crafting! You’ll usually find me making cards, creating decorations, and scrapbooking in my craft cave (also known as my basement) in the Chicago suburbs. Even at a young age, I kept travel journals and took photos, so when I discovered Project Life in 2015, everything clicked into place. I’ve been documenting my life with my husband and two young children in pockets ever since. It’s truly my favorite crafty project of all time!

Be sure to follow Sharon on her Instagram feed for more beautifully designed projects, including more pocket pages like the one she shared with us today! Thank you so much for inspiring us, Sharon!

Saying Hello to Summer with Michelle Flynn

Happy Summer friends! It’s Michelle here today sharing a summer pocket page filled with sunshine from the new June 2021 kit and add-ons! Did anyone else have the kind of winter that left you counting down until the summer days? This release has all the summer inspiration to document every one of those warm sunshine days! I had so much fun documenting fun summer memories and I am so excited to show you how it came together today!   

Supplies | June 2021 Kit, Summer Highlights 4 x 6 inch Journaling Tags, Summer Label StickersStars and Stripes Chipboard Stickers, Acetate Star Stickers, Tiny Shapes and Dots Puffy Stickers – Warm Tones, Puffy Banners and Border Stickers, Cork Labels, Wood Veneer Borders, You Are My Sunshine Wood Veneer, Weekend Stamp

I started with a 6 x 12 inch pocket page as the opener to my summer documenting and friends, let me tell you that I am loving those Summer Highlights Journaling Tags! They have just the right space for photos, journaling and embellishing! I used it to document the story of this summer trip and I added a photo from one of my favorite TV series, Downton Abbey with the quote, “What is a weekend?” It’s one of my favorite lines and I thought it was the perfect way to begin my layout design. I added a fun little touch by embellishing those 5 stars with the new Acetate Star Stickers! How cute are they? I adhered a quote die cut from the June Kit to the top of the photo to give it an added pop of color and then moved on to my photos. For the first photo, I chose a white star from the Stars and Stripes Chipboard Stickers and added a bit of color on the top of the chipboard star using the purple star from the Acetate Star Stickers and on the next photo I used a fun Summer Label Sticker to accent it.  

One of my absolute favorite pocket tags from the June Kit is the 4 x 6 sunshine pocket tag. I had a photo of the beach taken on the morning we arrived and I was quite disappointed in the photo but I did not want to leave it out because it really is part of the story. I was determined to make it work, so when I saw that sunshine pocket tag I thought it would be an awesome way to give that photo a bit more life. I trimmed into the sunshine rays of the pocket tag so that it would lay directly on top of the photo. I was hopeful that this would help cover up the poor quality of the photo, but still keep the integrity of my memory in my layout. This allowed the emphasis to really highlight those cute sunshine rays and as nervous as I was to cut into this pocket tag, I really love the way it turned out! Bad photo, no problem! Just go for it! The most important part is documenting your memories so let your products inspire you to find creative ways to include those photos and you won’t regret it! I added a final touch in the corner of the sun using the “hello weekend” sentiment from the Weekend Stamp and adore how it turned out!

It felt so good to have the opening layout ready and I moved onto the 9 x 12 inch pocket page. One of the best parts about the monthly kit is the wide assortment of pocket tags. I chose 6 of my favorite tags for this layout and 6 photos, but a 9 x 12 inch page only allows 9 spaces! Exploring how to make it work is one of the creative parts about pocket pages that I really enjoy. I started with the bold and bright “Hello Summer” pocket tag as I just knew that had to be my opening tag from the June Kit. I added a simple, but fun touch using the Wood Veneer Borders and a puffy heart using the warm toned Tiny Shapes and Dots Puffy Stickers. Quick and done with a bold, beautiful but seemingly simple look!

The You Are My Sunshine Wood Veneer is definitely one of those pieces I knew needed a place in this story! I caught a photo of my daughter sitting in this bold and bright chair that just felt like summer outside of one of the beach shops and you can see those silly emoji pillows peeking out from window. She was not aware I was snapping that photo and it was perfect next to this pocket tag and that gorgeous wood veneer. Sometimes the best photos are really those caught in the moment. The wood veneer is so perfect all on it’s own so I adhered it onto that gorgeous multi-colored pocket tag and then used a tag and the Puffy Banners and Border Stickers phrase to finish it up!

Summer is never complete without ice cream and I am definitely a rainbow sprinkle kind of girl! I loved this shot of my ice cream cone and chose that blue and white star border tag to showcase it! I chose that “summer starts now” sticker from the Summer Label Stickers and it added just the right balance of perfection to it!

The next pocket tag I chose was the “this weekend” pocket tag from the June Kit. I love to embellish pocket tags and I used all the things to accent this pocket tag! I chose the blue and yellow arrows from the June Kit and stamped blue stars and the the “weekend rating” using the Weekend Stamp. I added that blue chipboard star for further balance.  

I then moved onto the yellow pocket tag with stars, which I added a photo of us girls in our flip flops on the boardwalk to. I cut the photo narrow so that it would fit inside the white space of the pocket tag. I then used the Stars and Stripes Chipboard Stickers to add further dimension and a Cork Label directly onto the photo.

The final pocket tag I chose was the white pocket tag with journaling boxes that I placed directly in the middle of this 9 x 12 inch layout. I cropped a photo of myself and my husband sitting on the beach and I used the Weekend Stamp and a die cut from the June Kit to accent it. I was still able to show off those fun boxes while using the space for a photo instead of words!

I ended this pocket page layout that has just 9 spaces available, but I was able to use 6 photos and 6 pocket tags!  How awesome is that? Using your products and getting all your photos documented is a definite win and this summer-loving girl is thrilled with this fun release and just as thrilled that I was able to get so much into one little spread for our album!     

Thanks so much for your time with me on the blog today, I had so much fun sharing this spread with you! I just love the bright and beautiful summer colors in this June release and I am super excited to be inspired by your own layouts using these products! Share your creativity using the #ellesstudio hashtag on Instagram and in the Elles’s Studio Facebook Group! Until next time, happy summer and happy creating friends! 

Five On Friday: Dad’s Day with Kim Chaffin

Hello, friends, and happy Friday! It’s Kim with you, and today I am back to share one of my favorite blog post features, Five on Friday! Why do I love it so much? It helps me make decisions. When I have too many amazing options at my fingertips, I easily get overwhelmed in the decision process. Pare it down to only five, and I can begin to see my design coming together. Let’s take a look. 

Supplies | June 2021 Kit, Stars and Stripes Chipboard Stickers, Navy Parker Acetate Alphabet Stickers, Cork LabelsGood Times Paper Stack

With so many beautiful products in the Elle’s Studio June 2021 kit and add-ons, it can be challenging to limit a layout to only five selections. I generally look to my photos and story as a guide. In this case, I liked the way the blue colors from the new products looked with these photos. 

I decided first on the Navy Parker Acetate Alphabet Stickers as a starting point and chose other pieces to coordinate. I loved the way the Stars and Stripes Chipboard Stickers looked with my title. You might think those stickers are for a different holiday, but I never hesitate to use something in an unexpected way if I like the way it works on my project. 

The story was very important to this layout because 2019 was the last Father’s Day that I had with my dad. He passed away last June. I didn’t specifically journal about that on this layout, but it was important to me to document the special nature of this day. I created a separate 3 x 8 inch journaling strip using the coordinating paper from the Good Times Paper Stack. There was also room to add an extra photo here.

The striped journaling tag from the June 2021 Kit was also used to carry out the blue color scheme. Finally, I added the Cork Labels for their neutral color, to add a little texture, and because I loved the sentiments. I adhered those with double-sided sticky tape. 

Five on Friday is an excellent cure for decision fatigue, and I always love the result. I’d love to see what you make with Five on Friday!

Choose only 5 products and show us what you can create! Share on Instagram using the hashtag #EllesStudio or on the discussion board of our Elle’s Studio Facebook Group! We can’t wait to see your project!