MARCH #ELLESSTUDIO SPOTTINGS ON INSTAGRAM

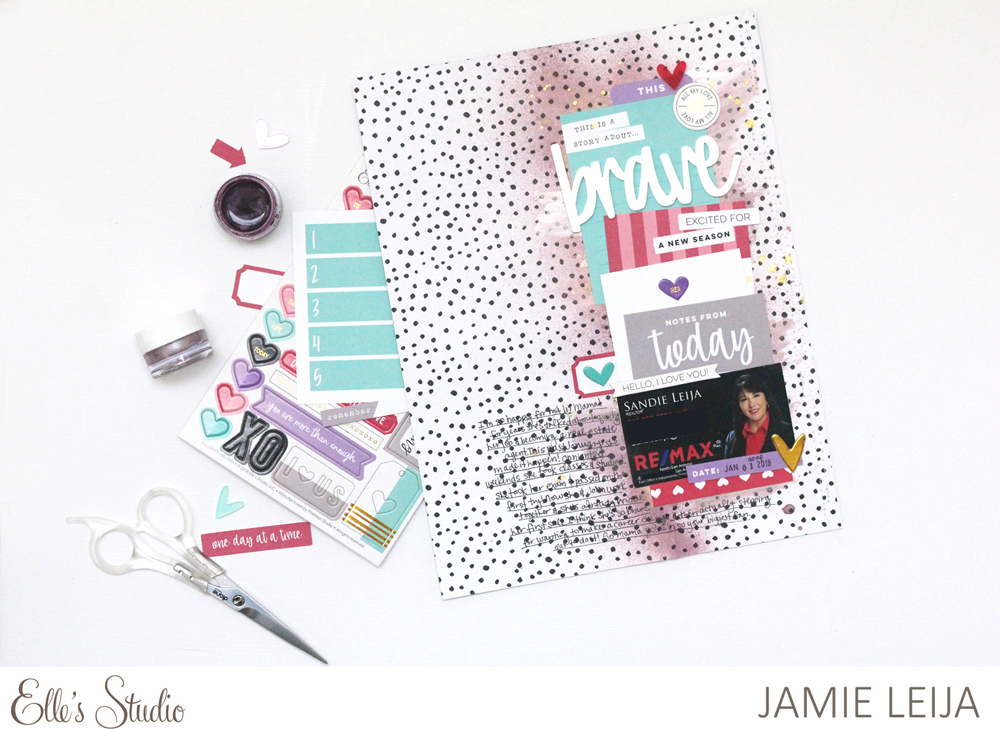
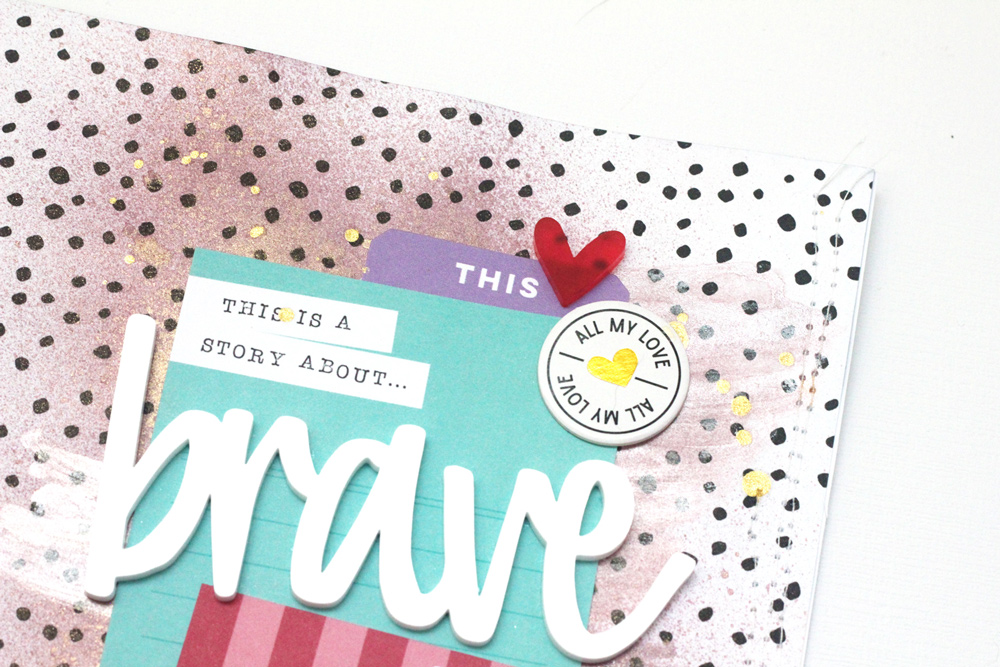
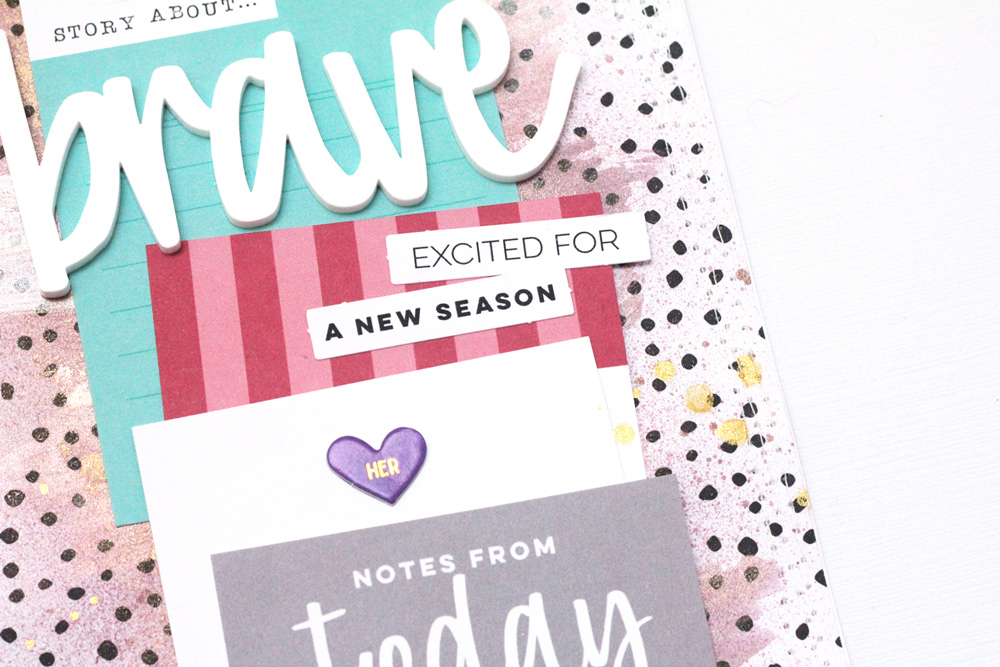
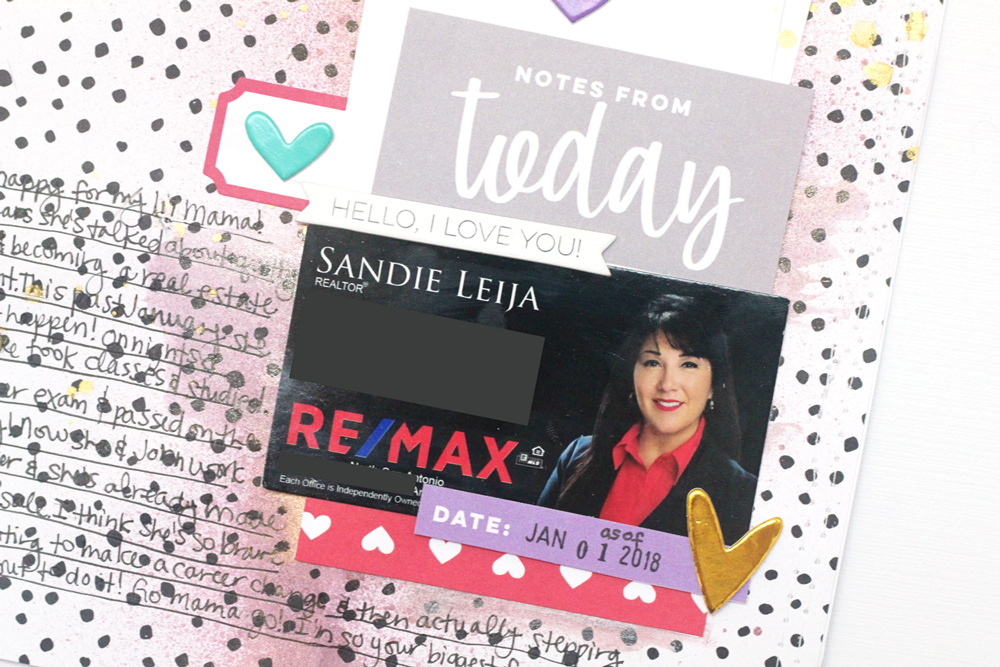
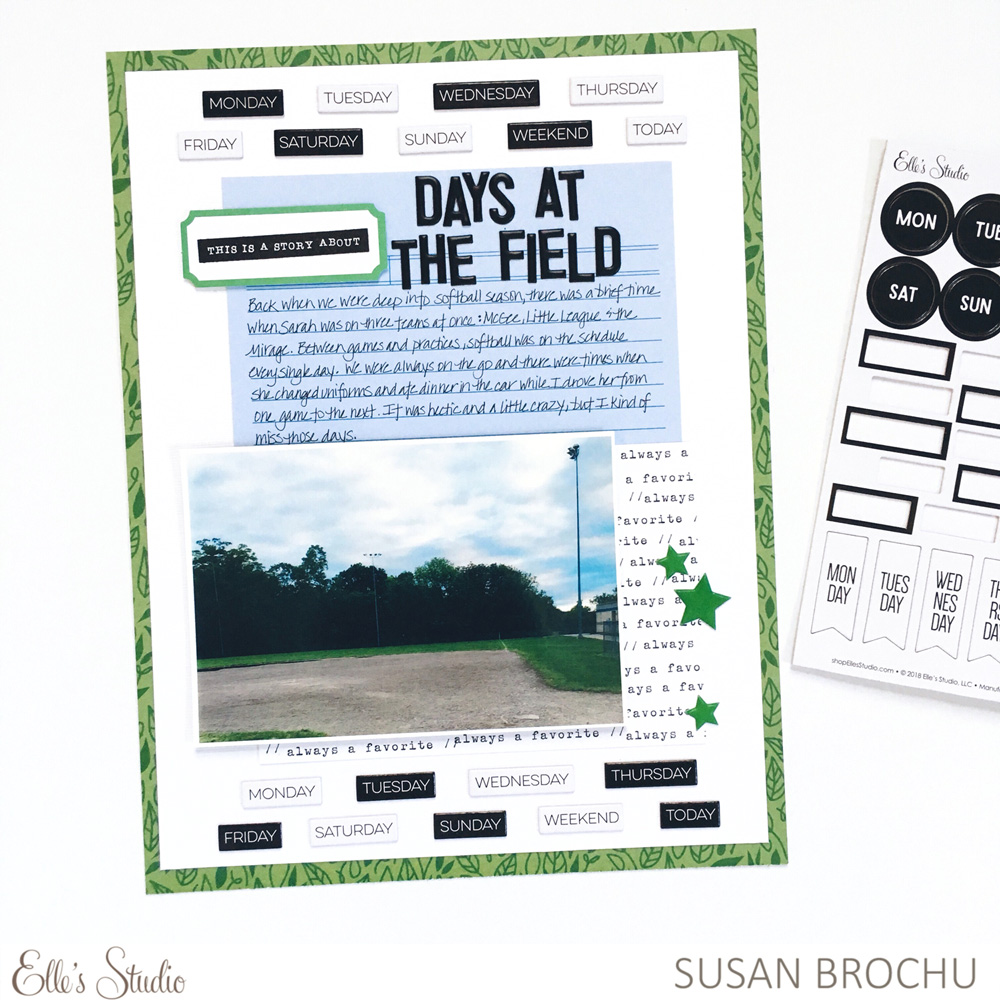
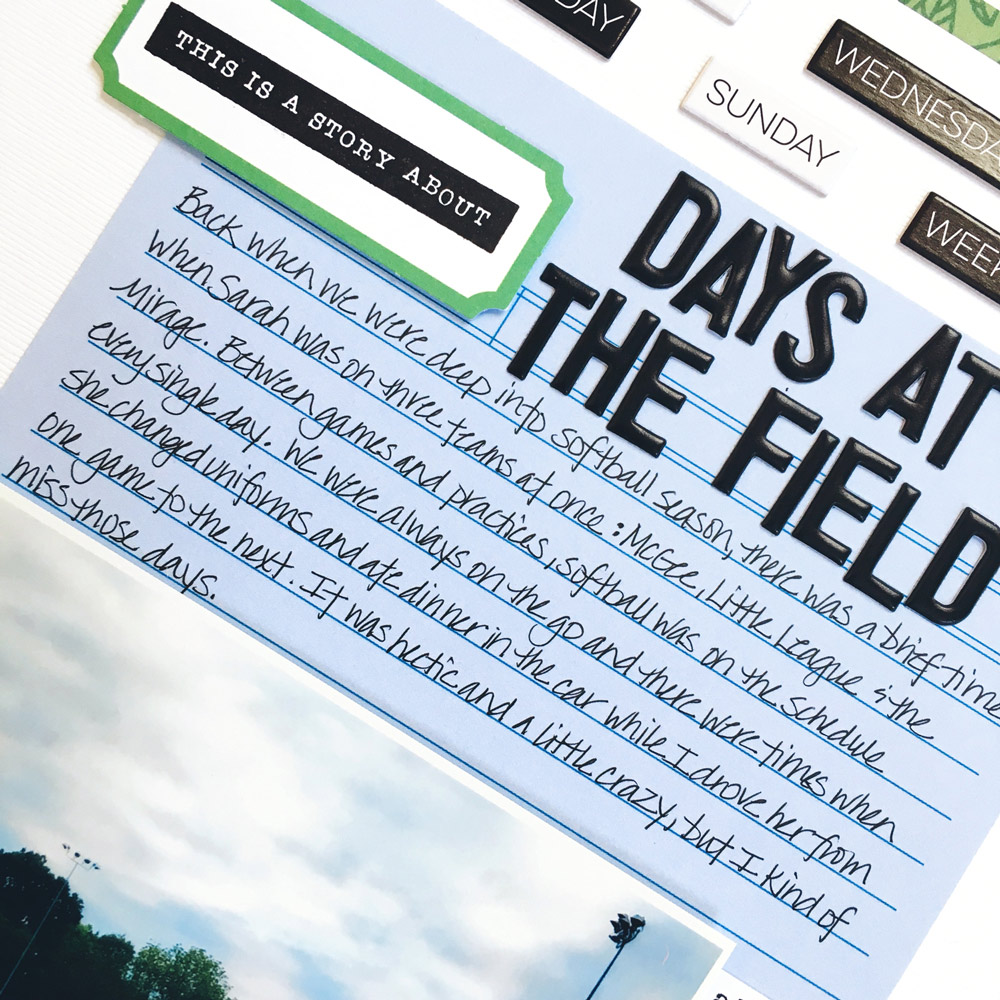
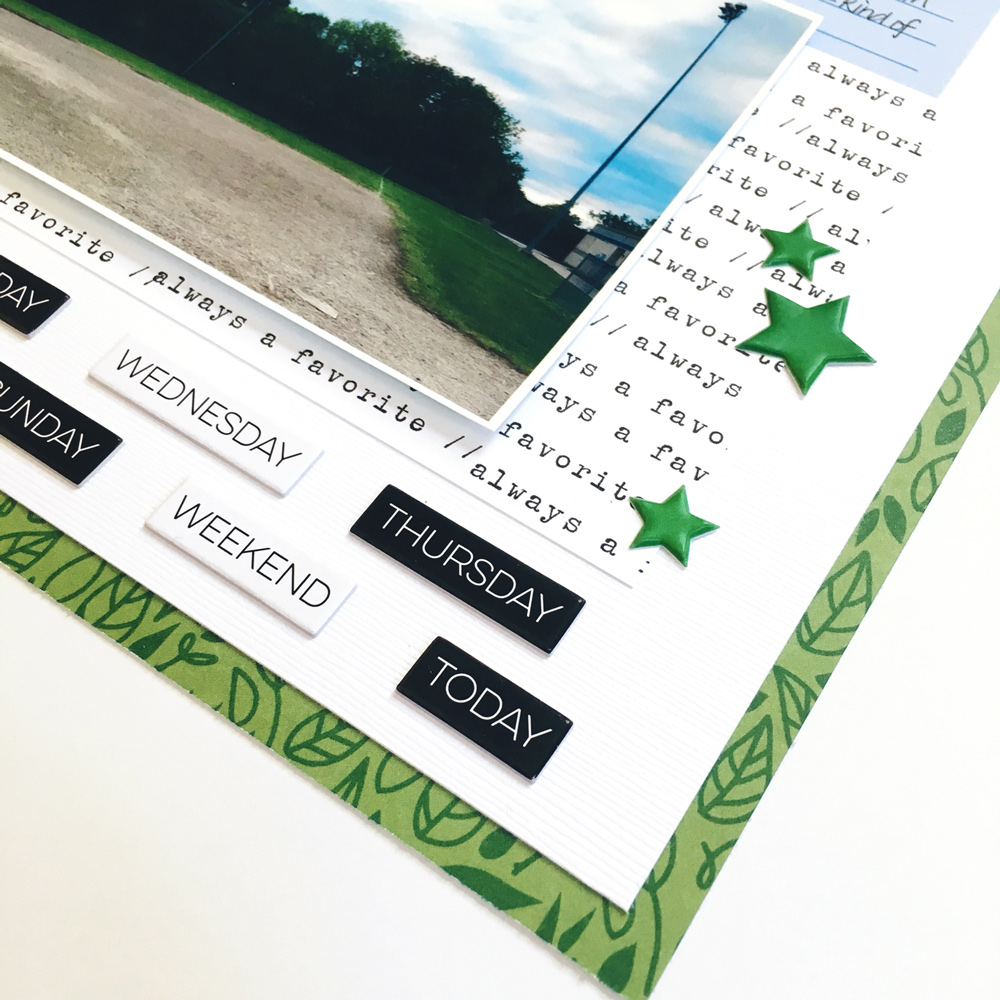
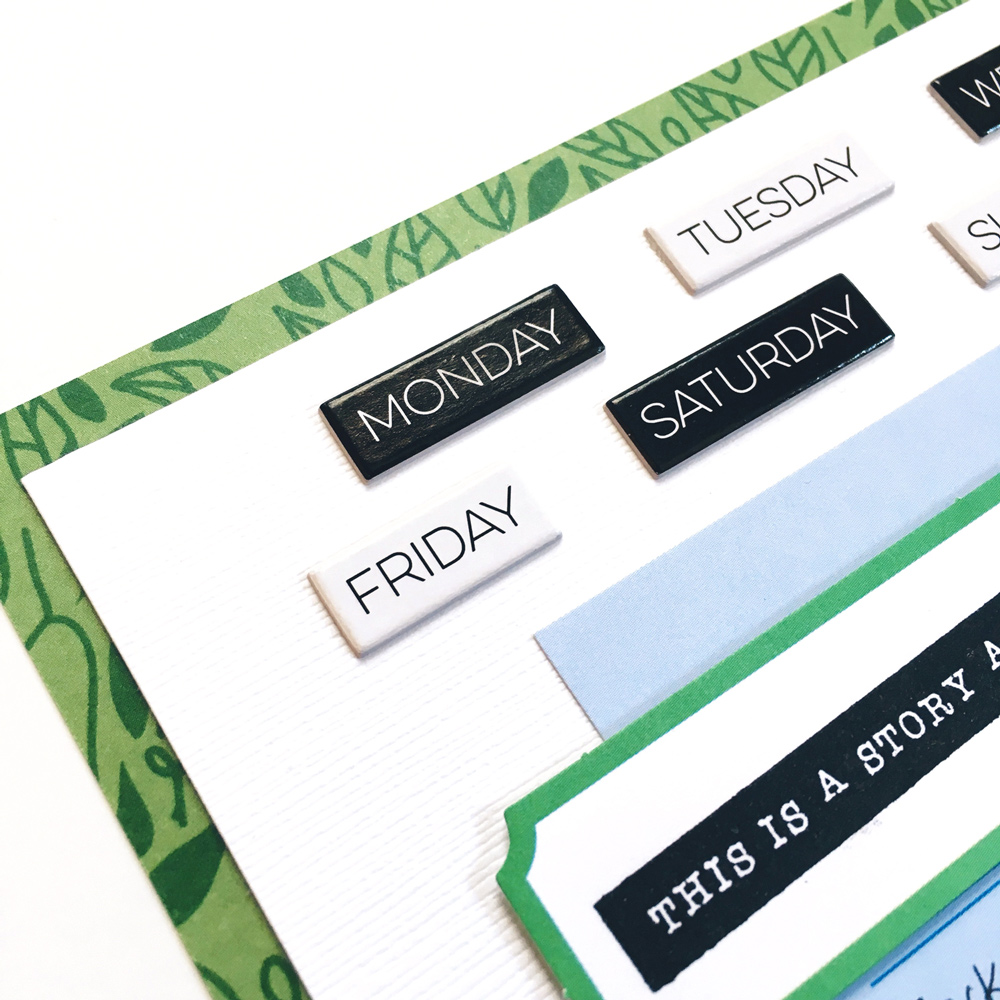
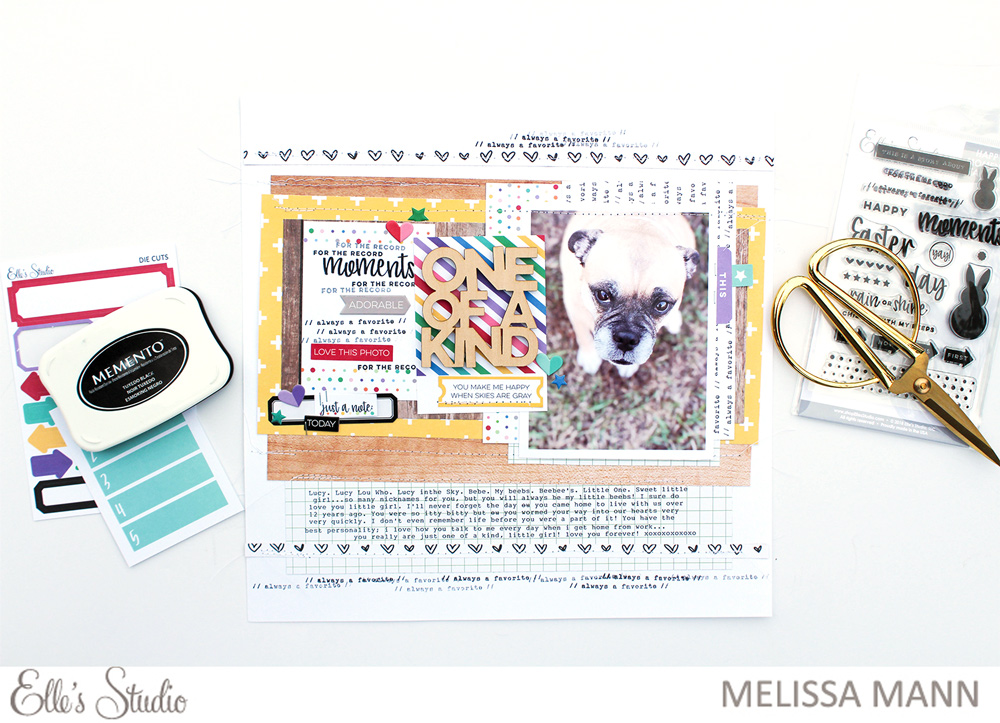
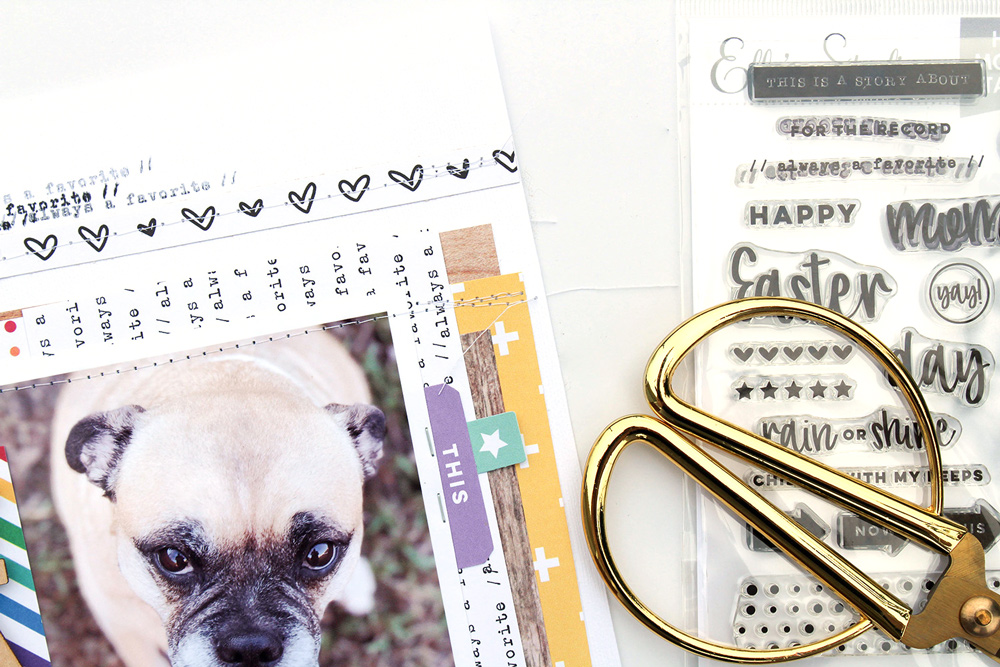
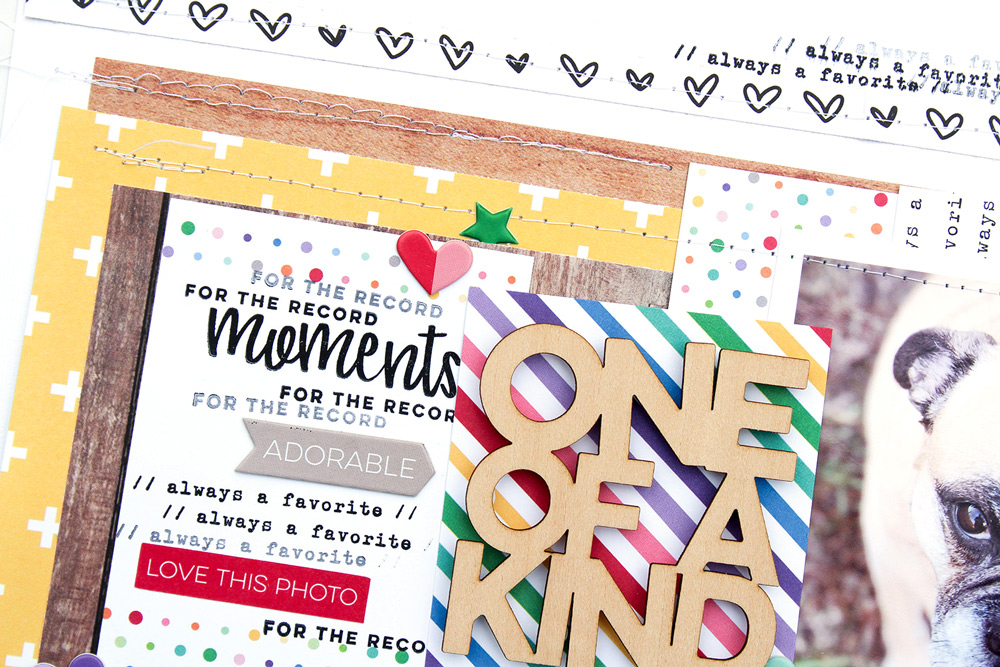
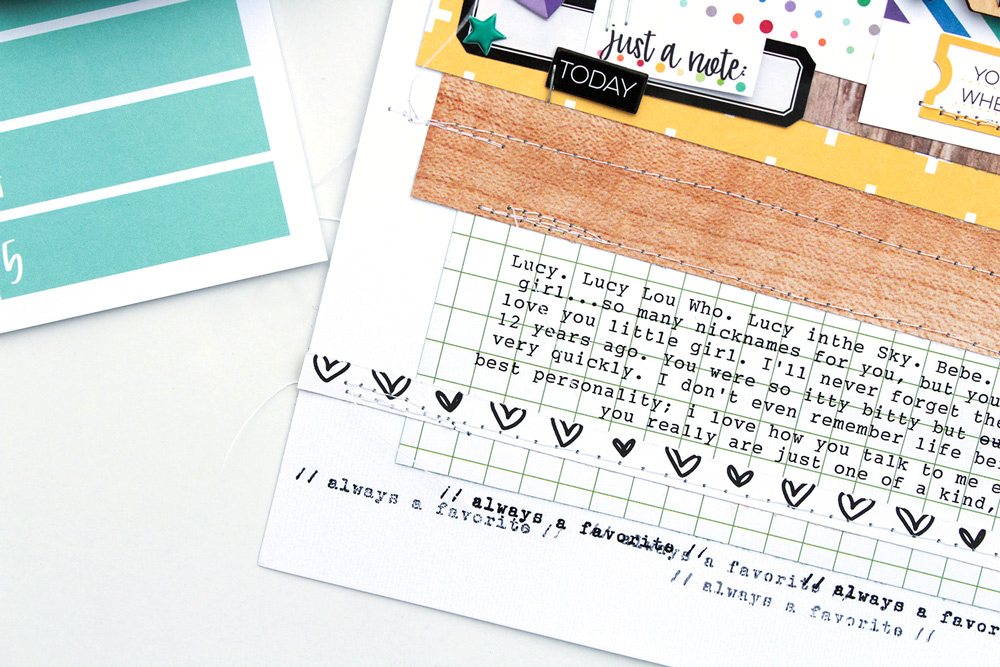
Instagram is a fabulous place to find inspiration for your paper crafting projects, and we LOVE when you use the hashtag #EllesStudio to share your layouts, pocket pages and cards with us! This month, we were so excited to discover these six projects that used the hashtag:


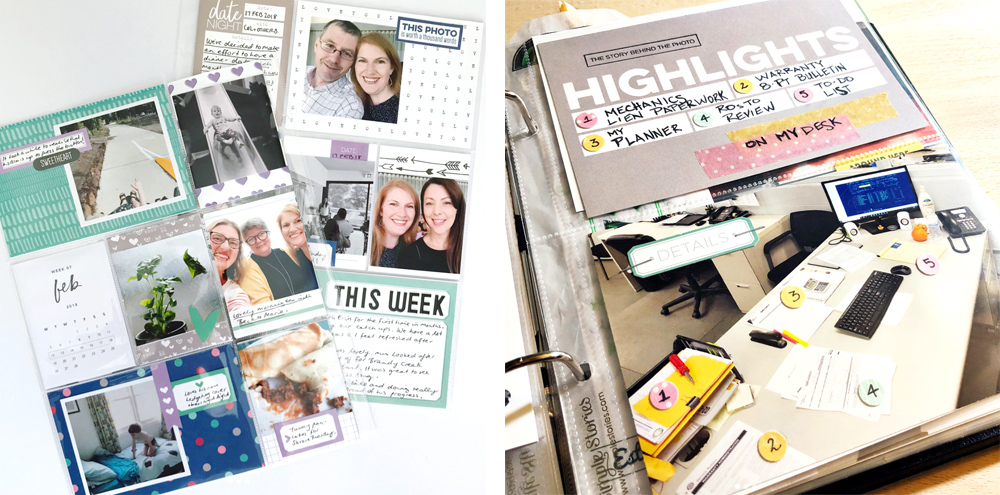
On the left, @theredwren created this double-page spread using our January Kit and puffy alphabet stickers, which she professes to loving! We do, too, Ren! On the right, this “highlights” tag from our sold out Documented journaling tags was perfect for documenting what was in @adriennesinklings ‘ desk shot. Great idea, Adrienne!


@sweetgirldesigns filled in the blanks on this “all I need is” tag from one of our past  monthly kits using our Teal Letter and Number Stickers in such a perfect way on her pocket page. On the right, @brandedavison is showing us that our acrylics are the perfect way to add a quick and awesome title. We love how it stands our against all of that color!


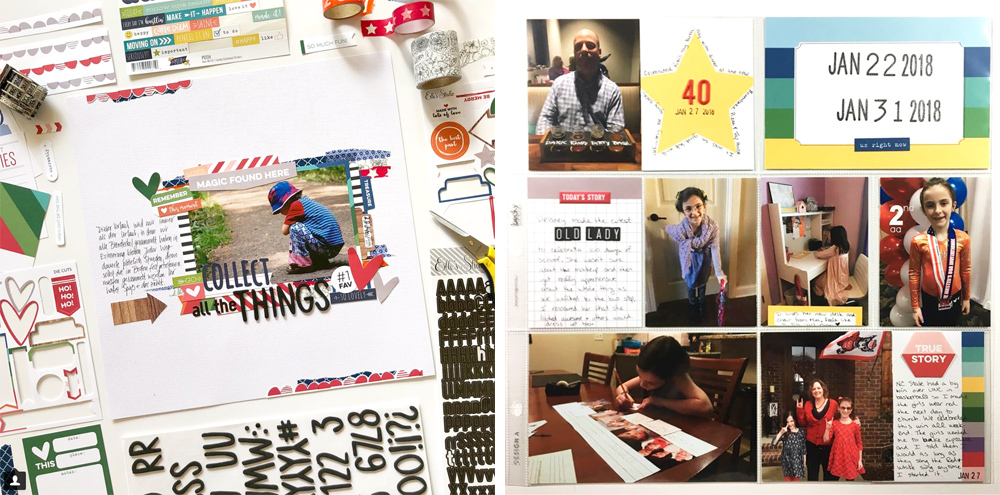
On the left, we love this fun, die-cut frame that @seemownay created on her layout using our November 2017 Kit. What a beautiful photo to frame, too! On the right, @juliep412 created a fun pocket page by pairing our June and December 2017 kits. What a fun and colorful combination, Julie!
 
Just for posting their projects on Instagram using the hashtag #EllesStudio, these six creatives will win a $10 gift certificate to the shop! Thank you so much to all of you ladies for sharing your projects with us this month! Please email us at info@shopellesstudio.com to claim your prize!
 
Have you created something with Elle’s Studio products lately? Upload your projects to Instagram using the hashtag #EllesStudio for a chance to be featured here on the ES blog next month! Until then, have fun creating!

Noteworthy Moments with Nancy Damiano

Every new product in our shop brings with it new documenting possibilities, but we know that your creativity will be so inspired by our newest collection hitting the store next week, Noteworthy. It’s bright, playful colors and everyday themes will have you creating with it over and over again, and today we have Nancy Damiano with us to share her first Noteworthy project with us! Let’s see what she made: 
 
The first thing that caught my eye in the Noteworthy collection is this beautiful sheet of patterned paper with in a grid of colorful journaling tags. I decided to use them as a bold border at the top of my 12″ x 12″ layout, isolating the red, pink, orange and yellow tags.


The colors in the new Noteworthy collection paired perfectly with the colors in my photo and the vibe of the story. To add some texture and interest, I treated each tag as a pocket and tucked similarly hued die cuts, enamel circles and puffy shapes just under the white cardstock border.


Each tag holds a piece of the story and highlights the beautiful, bright colors in this fun collection! I loved creating with Noteworthy, and I know that there are many more layouts using this collection in my future. Thanks for stopping by!


Be sure to get ready for Noteworthy to hit our shop on April 10th at 8am PST! We can’t wait to share this fun, colorful collection with you!
 

A sneak peek of what is coming on April 10th!

Our April kit + coordinating add-ons reveal is next week and we are so excited for you to see all the new products we’ll have in the shop! This month our kit + add-ons will have you ready to document all your everyday real life moments, springtime adventures, and more! Plus, it will take you right into the month of May! April’s kit includes 3 – 4 x 6 inch tags, 18 – 3 x 4 inch tags, and 27 die cuts!

Get ready to pick up our April kit for our launch day special pricing of only $9.99 on Tuesday, April 10th, at 8:00 am PST. After the 10th, our kits go back to their regular price of $11.99. Or, you can lock in the $9.99 price anytime by starting a subscription! And subscribers, don’t forget! You’ll be able to bundle anything from our shop (including the new add-ons) with your monthly kit for FREE (USA subscribers) or reduced (International) shipping!

Along with our April kit and add-ons, our brand new collection Noteworthy will be available in our shop! Get ready to shop the 11 new items in this collection or pick up the entire collection in a discounted bundle that includes FREE alphabet stickers!

Plus, our kit subscribers will be able to add this collection, and anything from our shop, to their box and have it shipped for FREE (USA) or reduced shipping (International) with their April kit!

Not a subscriber? We have just a few spots left were you can start with our March kit now! Or, wait until April 10th to sign up and start with our April kit! With a monthly subscription, you will be guaranteed a kit each month, lock in our launch day special price of $9.99 + shipping, and receive FREE (USA) or reduced (International) shipping on anything added to your box each month during our 24 hour bundling period (starting on the 10th at 8:00 am PST and ending on the 11th at 8:00 am PST). Along with more time to shop, our subscribers will also have access to special discounts on select items during the 24 hour bundling period! These discounted items can be found in our SALE section during bundling, and you must be logged into your kit subscriber account to see them. Quick note: Our kits and add-ons are available without a subscription each month, too.

We have one more sneak peek that we couldn’t wait to share with you:

Our very popular Dated stamp is getting a mini version! This Mini Dated Stamp will also be available on the 10th at 8:00 am PST! We are loving the flexibility of having both sizes that can fit any project we are working on!

Make sure you set your alarm and mark your calendar for Tuesday, April 10th at 8:00 am PST! If you haven’t signed up for our newsletter, make sure you do to receive a reminder of when everything is available for sale!  We hope to see you there!

A Stamped Traveler’s Notebook Spread + Process Video with Jamie Leija

Stamps are great for any kind of project, but when you want to add a lot of visual interest without added bulk for things like greeting cards or traveler’s notebooks, stamps are a must-have tool in your creative arsenal! Today we have Jamie Leija sharing how she’s used our Happy Moments Stamp on a new, colorful traveler’s notebook spread, and she has a process video to share, too! Let’s she how she used the stamp:
 
Hiya! It’s Jamie and I’m excited to share a layout and process video of my latest traveler’s notebook spread. I played with the new Happy Moments Stamp which is so versatile! Don’t let the bunnies fool you, this isn’t just an Easter stamp!


Supplies | March 2018 Kit, Letter and Number Stickers — Pink, Puffy Star Stickers, Happy Moments Stamp
 
I started out by cutting down some white cardstock to use as the base of my layout. The pages of this particular traveler’s notebook are fairly thin and I knew I was going to want to add wet media to this page. So I opted to create on cardstock and paste them in the book.


There’s so many great sentiments in this stamp set. I used a variety of them along with several shades of stamp ink to create my own mini patterns. I turned those into little patterned boxes and used them to create a fun layered background on my page.


When I’m working in my traveler’s notebooks, I really try to keep them as flat as possible and stamping is a perfect solution for that! The only dimensional embellishing I added were a few Puffy Star Stickers.


I put together this video to walk you through this page from start to finish. I had a general idea when I started but this turned out way better than what I’d imagine. Even though halfway through I wasn’t sure I’d even like it!


Have I convinced you yet? The Happy Moments Stamp is super versatile and lots of fun to play with! Grab one before they’re gone!
 

Tracking Steps with Laura Wilson

One of our newest products, the Days of the Week Chipboard Stickers, are perfect for keeping track of daily occurrences in your paper crafting, especially things that you do over and over again. Today we have Laura Wilson to share how she is using these handy embellishments to document her workout routine, and when paired with the Counting Steps Journaling Tags, they make a winning combination! Let’s take a look:
 
Hi! I’m Laura and I’m going to be showing you a layout I made using the Days of the Week chipboard stickers. As soon as I saw these, I knew what I wanted to do with them. These stickers are so fun and I thought they would make a great grid layout highlighting my workout routine! When I paired them with the Counting Steps journaling tags, it became a perfect fitness layout!
 
Supplies | Counting Steps Journaling TagsDays of the Week Chipboard Stickers
 
I’ve been trying to work at getting more steps into my daily routine and trying to do yoga or a workout several times a week. I’m always motivated by scrapbooking, so I thought it would be fun to take a picture of my shoes everyday and document it with the Days of the Week Chipboard Stickers.


This was so easy to do. Everyday for a week, I took a picture of my shoes while walking around the block. To make it a little more interesting, I tried to take photos on a variety of backgrounds. I’m sure the neighbors thought I was a little odd taking pictures at the edge of their driveways and lawns, but the pictures turned out so cool, I think it was worth it!


The Counting Steps Journaling Tags were the perfect match for this fitness layout. I used the “one step at a time” tag in the middle and stapled a little die cut using my tiny attacher. For the bottom corner, I flipped one of the Counting Steps tags over to the step tracker side and using my type writer to add the number of steps I had for each day to the tag.


This layout is super simple, but I love how graphic it is. The fun grid layout of the photos and the cute way to track the steps on the tag made working out a little more fun! These Days of the Week Chipboard Stickers can be fun to capture the same activity for a week or different ones to document the variety of the weekdays. I think a series, like picking the kids up from school, meals for the week, or taking a photo at the same time every day could be really fun!


How are you using your Days of the Week chipboard stickers on your projects?
 

One of a Kind Furry Friend with Melissa Mann

Our One of a Kind Wood Veneer can be used as a layout or pocket page title for so many different subjects—a person you love, a special moment in your life, or even a furry friend! That’s what Melissa Mann is documenting with this wood veneer piece today, and we love what she created! Let’s take a look!
 
Good morning! This is Melissa here on the blog today with a brand new project created from the March 2018 Kit and add-ons!
 
I really loved the big wood veneer that was available this past month with the phrase “One of a Kind”. I wanted to use this as the title for one of my projects and it worked perfectly for this layout about my Lucy girl!


Supplies | March 2018 KitOne of a Kind Wood VeneerDays of the Week Chipboard StickersHeart of Gold Chipboard StickersHappy Moments Stamp,  Live Laugh Love 12″ x 12″ Paper CollectionFamily Fun 12″ x 12″ Paper Collection
 
I started by placing some blocks of patterned paper from the Live Laugh Love and Family Fun collections layered together on the white cardstock. To be quite honest, these papers were some scraps from various projects and decided that the wood grains and yellow tones worked nicely with my photo and would also enhance the grain of the veneer I was using as well.


I typed my journaling on grid patterned paper and slipped it underneath the blocks of other pattern paper. I then stitched all these papers down using my sewing machine. Another small strip of black and white hearts was stitched above and below the main block of paper in the middle of my layout. I laid two 3″ x 4″ journaling tags from the March Kit next to my photo and on the colorful striped tag, I used foam dots to adhere the One of a Kind Wood Veneer to give a little dimension to my title. On the other tag, I used various stickers and stamps from the Happy Moments Stamp and the Heart of Gold Chipboard Stickers.


To complete my project, I slipped various die-cuts from the March Kit and stickers from the Days of the Week Chipboard Stickers and Heart of Gold Chipboard Stickers around my layout. The last thing I did was stamp the “always a favorite” saying at the bottom and top of my layout using the Happy Moments Stamp one more time on my project!


I hope you have enjoyed this layout! And I hope you have enjoyed creating this past month with the March kit and add-ons!
 
Thanks for stopping by!
 

Introducing our new collection: NOTEWORTHY

We are so excited to announce our next new collection: Noteworthy! We can hardly wait to start scrapbooking and documenting all those special memories with these fun and beautiful colors! This collection has 12 x 12 and 6 x 6 papers, labels, journaling tags, die cuts, wood veneers, stamps, puffy stickers, and epoxy stickers!!

Here is the very first look at Noteworthy:


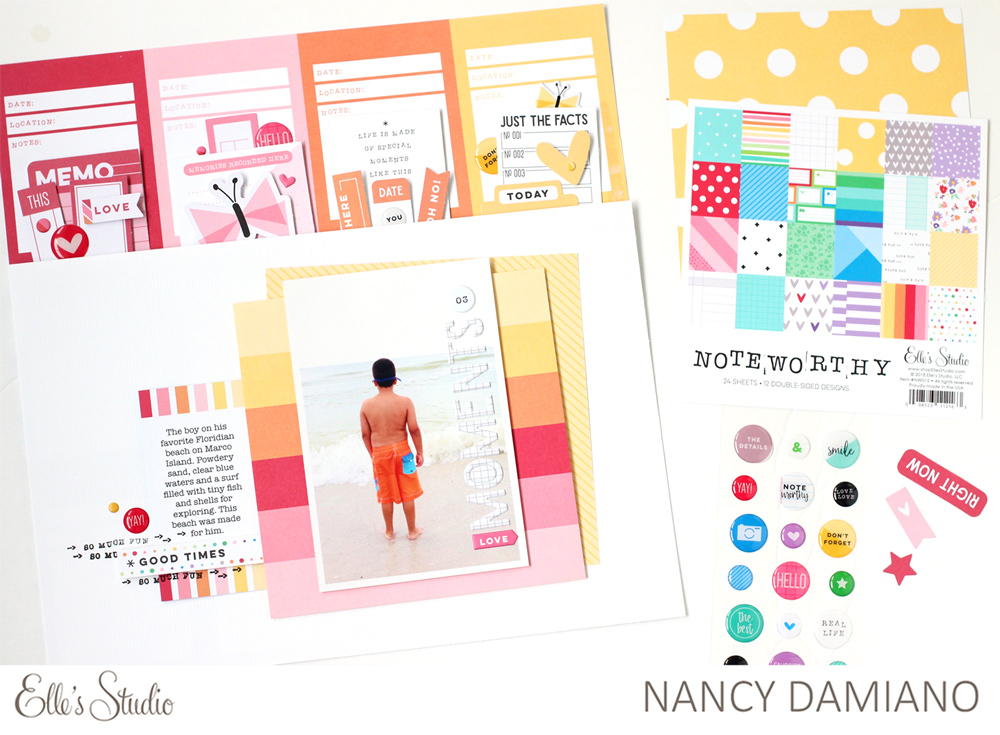
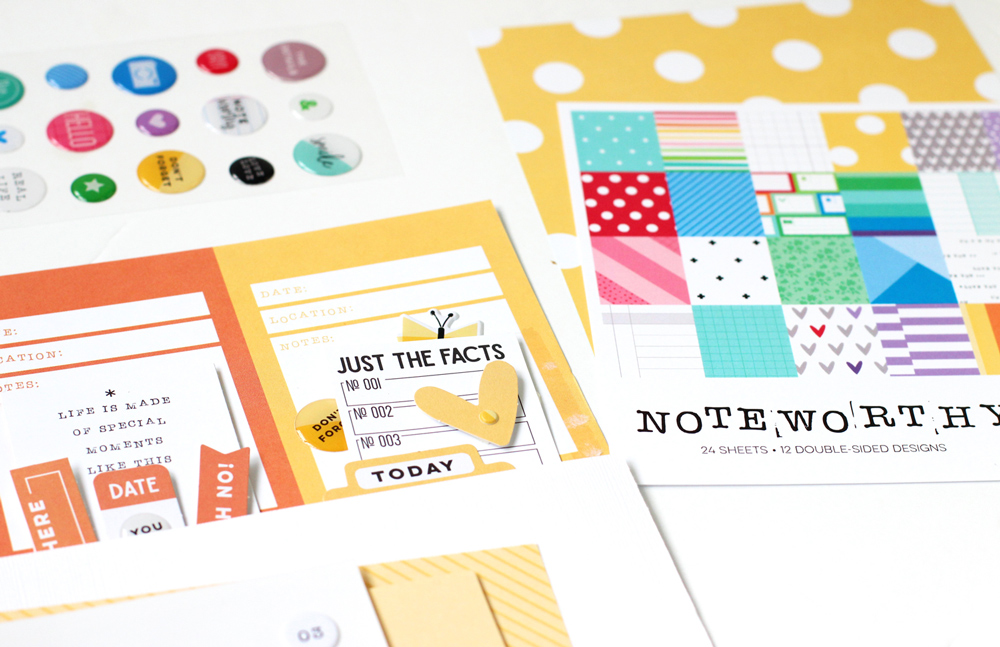
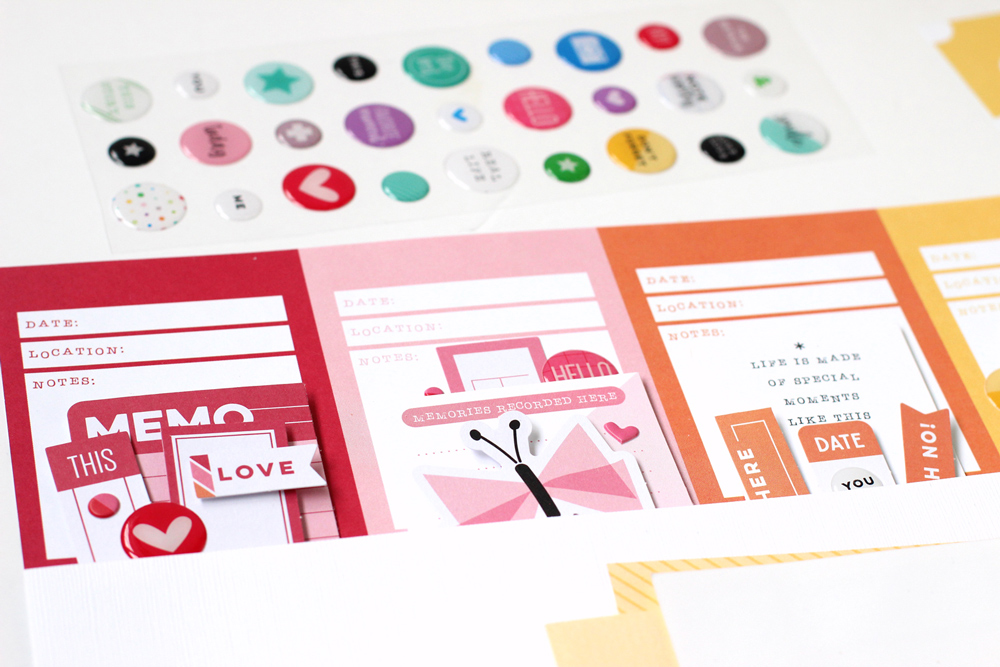
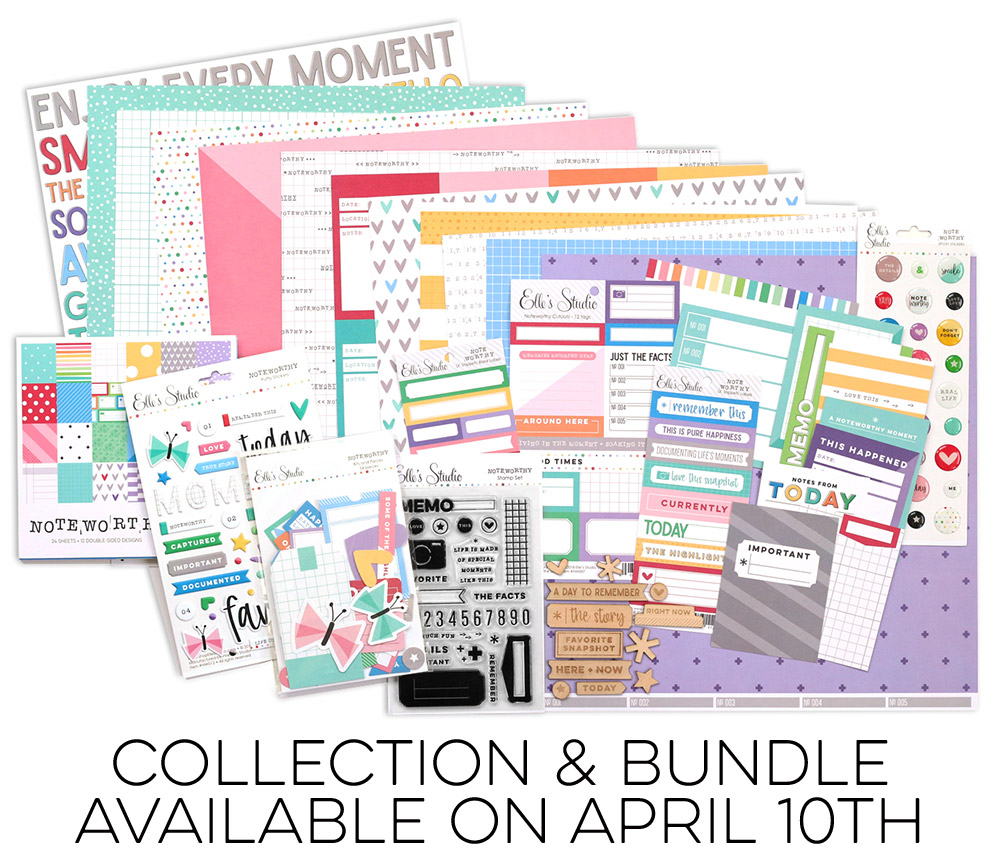
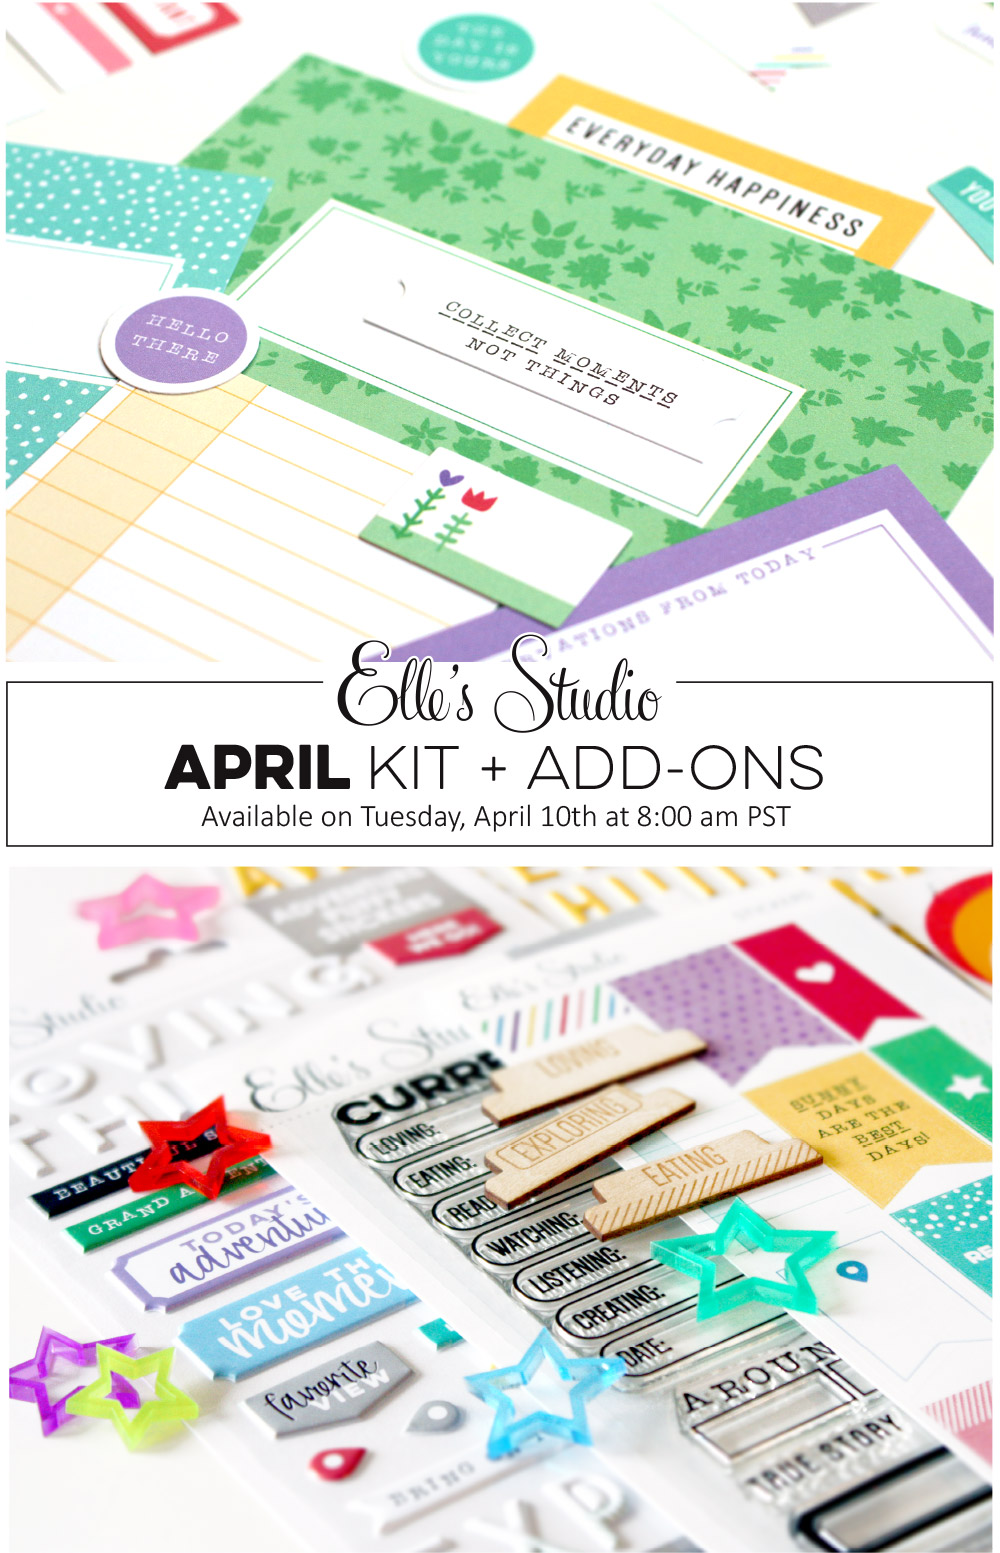
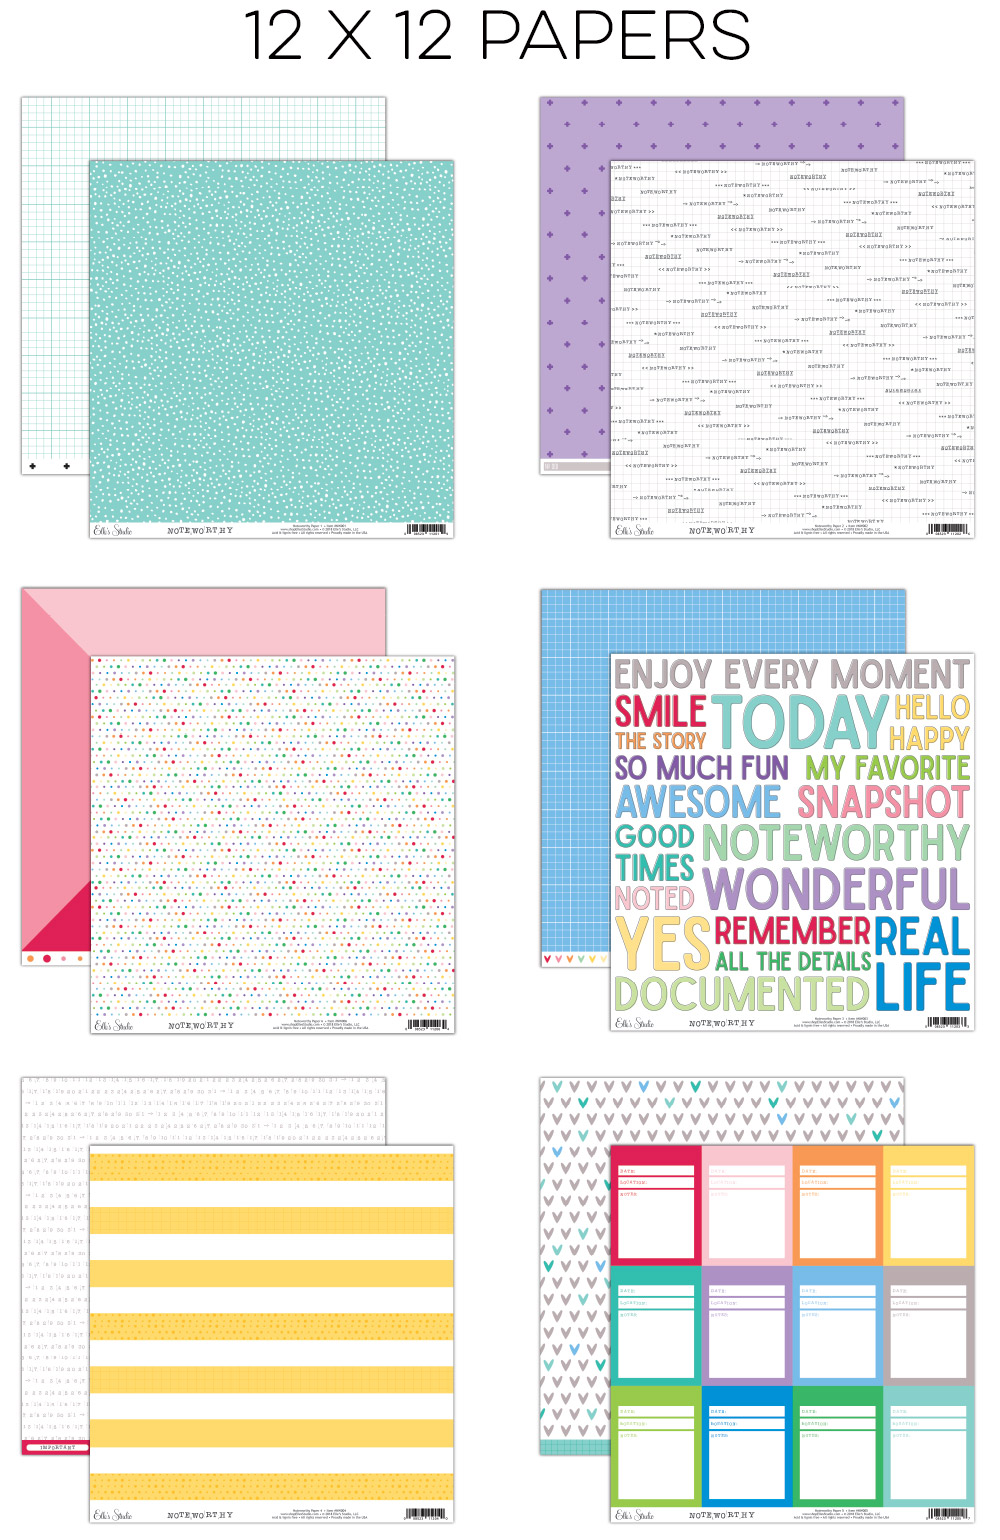
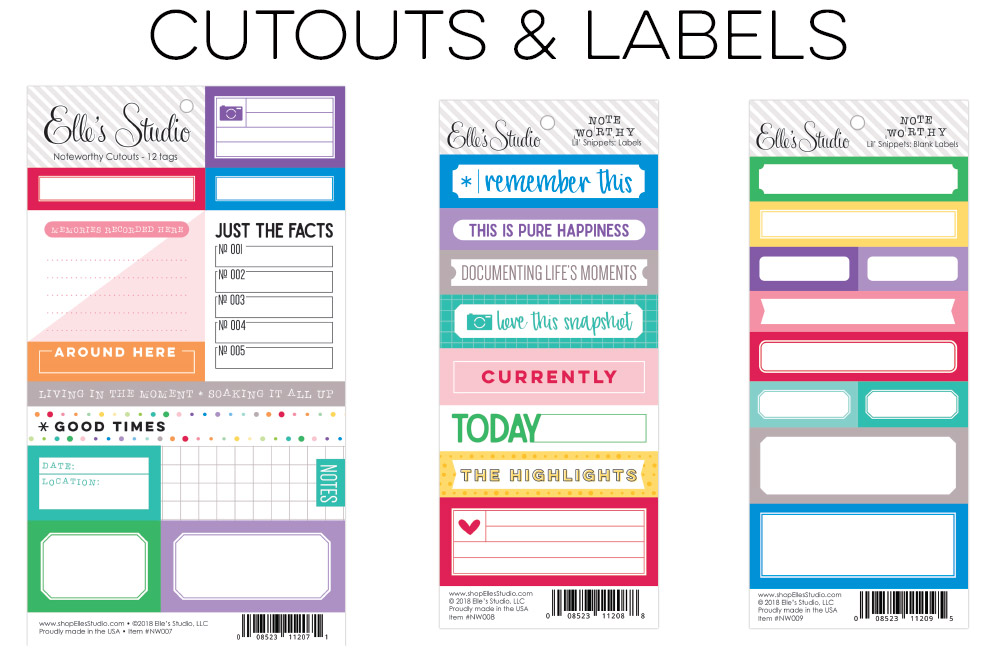
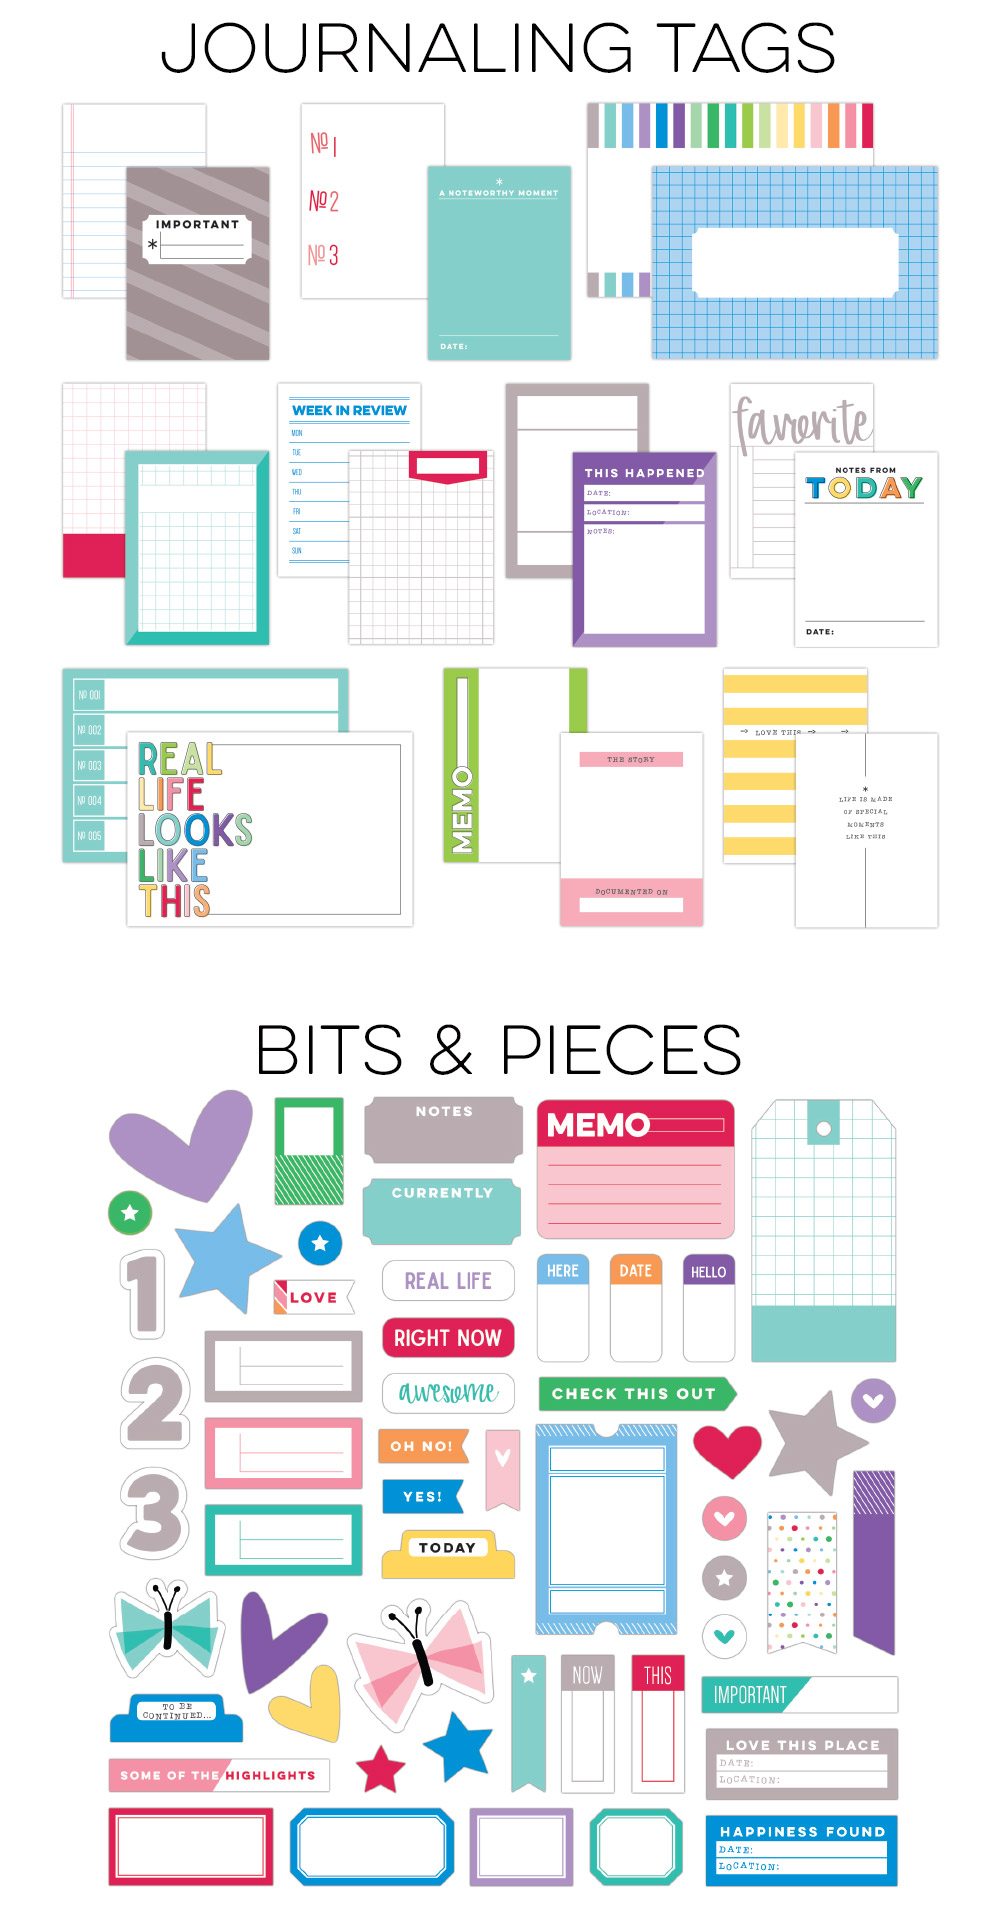
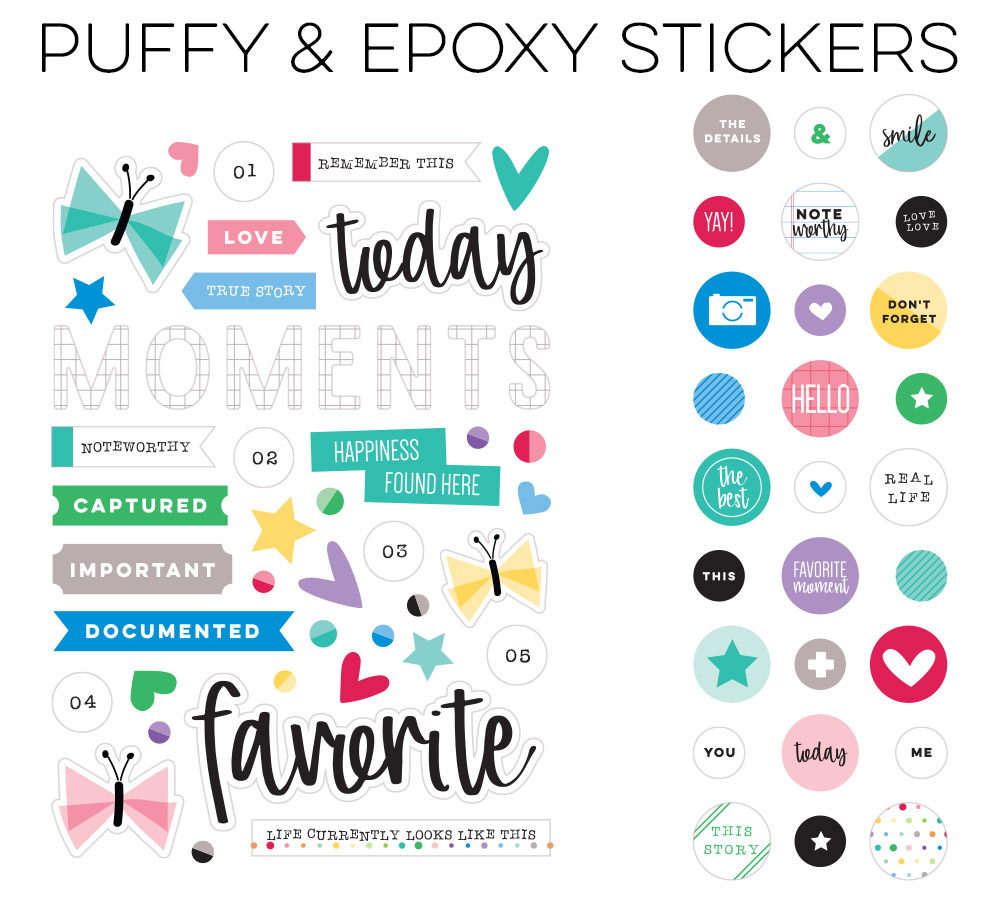
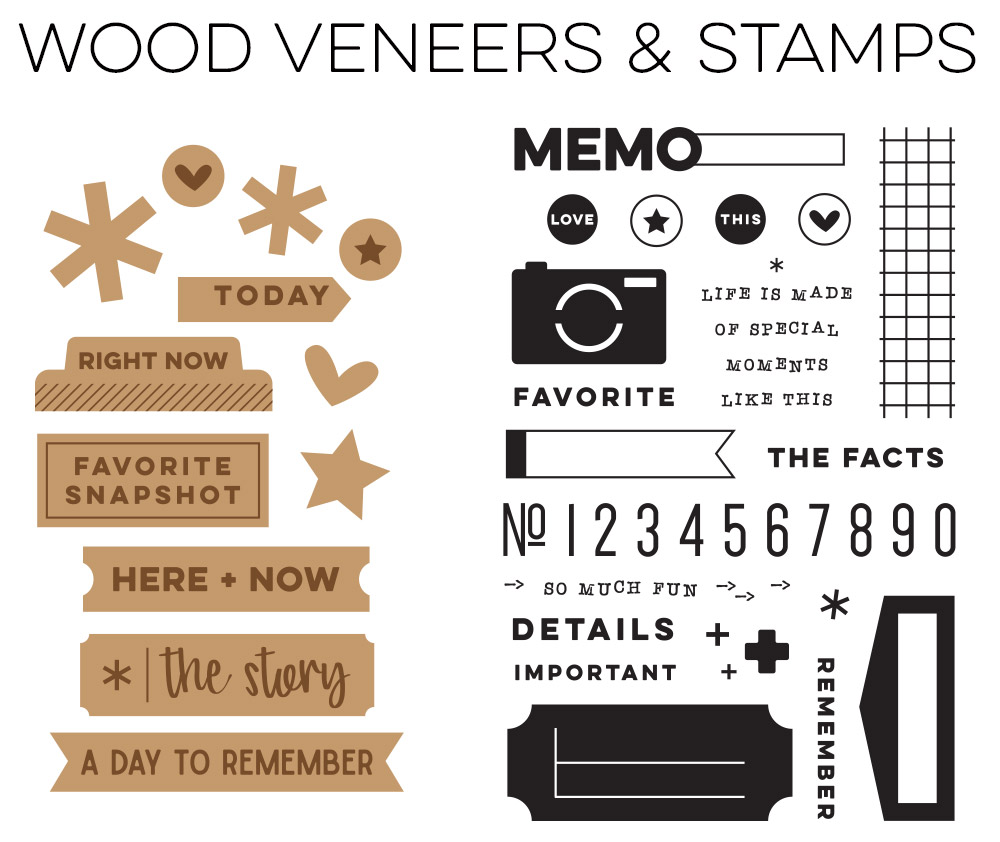
This new collection just started shipping to stores this week and you’ll be able to find it in our shop on April 10th at 8:00 am PST!
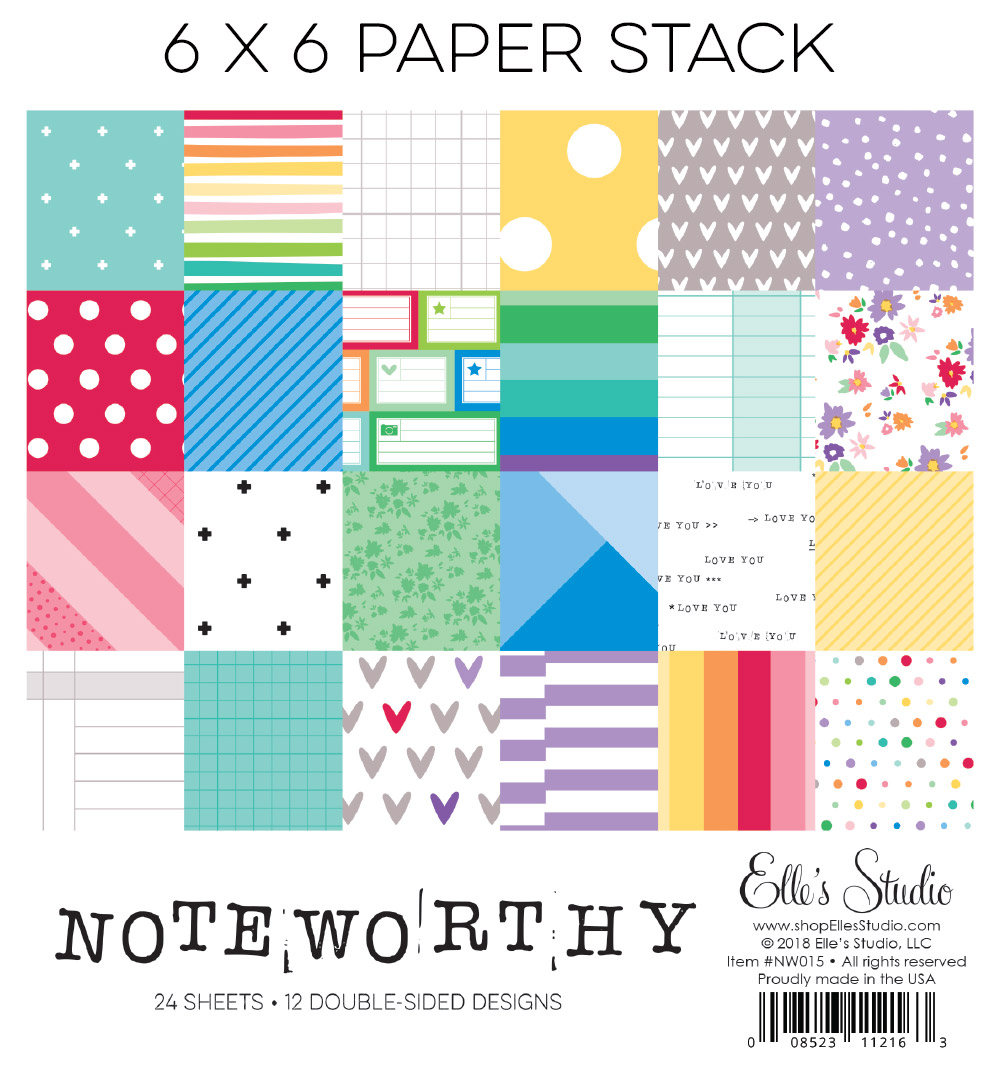
Since this collection will be debuting on April 10th in our shop, that means our kit subscribers will be able to add it to their box and have it shipped for FREE (USA) or reduced shipping (International) with their April kit! If you don’t have a subscription, you can subscribe now and start with our March kit to be guaranteed an April kit and a chance to bundle!

Thank you so much for stopping by on this exciting day – we can’t wait to see what you create with this collection!

Everyday Bravery with Jamie Leija

Even if you don’t have your own story of bravery to tell, maybe you have a story about someone close to you that you want to remember. That’s what Jamie Leija did with the Brave Acrylic on a new layout using our March Kit + extras. Let’s take a look:
 
Hiya! It’s Jamie and I’m excited to share this layout that I created using the March Kit + extras, along with the Family Fun 12×12 Paper Collection and some mixed media!


Supplies | March 2018 KitHeart of Gold ChipboardShapes and Dots Puffy StickersLittle Acrylic HeartsBrave AcrylicFamily Fun 12×12 Paper Collection
 
I’m so proud of my Mama. After years of talking about quitting her job to become a real estate agent, she finally did it! It took a lot of work on her part and I wanted to document this story. Yes, it’s her story. But for me it’s inspiration! I always have the option to change things if I want to.


I started out by using mist and paints on my background paper. I ended up covering a lot of it up, but I still like it peeking out from behind the other parts of my design.


Then, I layered journaling tags and die cuts from the March 2018 Kit along one side of the page. For a photo, I included one of my mom’s business cards, since she’s on it. It’s photo + ephemera combined!


To finish the page, I embellished with the Heart of Gold Chipboard and the Shapes and Dots Puffy Stickers, but my favorite part, and the jumping off point of this layout was the Brave Acrylic.
 
Do you have an everyday kind of bravery story to tell? You might want to grab this acrylic!
 

Journaling Sparks in Product with Susan Brochu

In each reveal, we include products to help you get your stories and photos down on paper, and its an added bonus that some of these products spark the stories that you didn’t even know you needed to get down on paper. That’s what happened with design team member Susan Brochu and the Days of the Week Chipboard Stickers. Let’s take a look at what she documented with them:
 
Hello everyone! I am a big fan of telling stories, big and small, on my scrapbook pages but sometimes I need a little help to spark those story ideas. I love when scrapbook products themselves prompt me to tell a particular story and the Days of the Week Chipboard Stickers did just that! Seeing the days of the week written over and over again on the set got me thinking of things we do on a regular basis. I’ve already scrapped many of our current routines, so I looked to the past and remembered all the hours we spent at our local softball fields one spring. There was my story!


Supplies | March 2018 Kit, Days of the Week Chipboard Stickers, Puffy Star Stickers, Black Puffy Alphabet Stickers, Happy Moments StampFamily Fun 12×12 Paper Collection
 
The light blue 4″ x 6″ tag from the March Kit gave me plenty of room for journaling, and the “this is the story about” phrase from the Happy Moments Stamp combined with the Black Puffy Alphabet Stickers, gave me the opening line to my story.


The “always a favorite” 4″ x 6″ tag from the March Kit made a nice mat for the photo and supports my story as well, since softball was a part of our lives for many years.  I offset the photo to allow more of the sentiment to show and used a few green Puffy Star Stickers to anchor the card to the page.


I placed the Days of the Week Chipboard Stickers that inspired my page above and below my tags and photos, alternating the black and white rectangular pieces.  Having those pieces surround the story and photo reinforces the way softball consumed our lives at the time, and I love that the set included the words “weekend” and “today.” They also help to emphasize the day-to-day impact of softball on our lives that spring.


So the next time you are ready to tell a story, take a closer look at your products.  They just might hold the key to a story you haven’t told!
 

Sketch Day with Daniela Dobson

We love the possibilities that come with a new sketch—not to mention the time saved in coming up with a layout design! Sketches are a total win-win, and today, design team member Daniela Dobson is sharing her take on our latest sketch. Let’s see what she created:
 
Welcome to the Elle’s Studio blog today! It’s Daniela here with a layout created using a new, fun sketch based off of Meghann’s Smoothie Love layout from our February gallery, along with the March 2018 Kit and extras.
 
Here is the sketch that I based my layout on:


And here is my take on the sketch:


Supplies | March 2018 KitMarch LabelsLittle Acrylic Hearts, Teal Puffy Alphabet StickersHappy Moments StampTitle Builder Alphabet StampDated Stamp, XOXO 6″ x 6″ Paper StackLive Laugh Love 12″ x 12″ Paper Collection
 
I created my typical 8.5”  x 11” layout including four photos, printed to look like Instax photos, which I created at home with my printer. This smaller photo size is perfect for a smaller layout like this.


I followed the sketch design pretty closely, adding a few more layers under the photos. The Little Acrylic Hearts are a perfect addition to add touches of soft color.


I always love to include stamps on my layout. For this layout I used the Happy Moments Stamp to add hearts to a March Label, and the “always a favorite” sentiment. I also added to my title with the Title Builder Alphabet Stamp, and the date using the useful Dated Stamp.
 
Thanks for stopping by today. I hope I have inspired you to create a fun layout using this sketch and the March 2018 Kit and extras!