Our newest paper stack, ‘Tis the Season, is the perfect collection of solids and patterns in a small stack to add to any project, and it coordinates perfectly with our November 2019 Kit and add-ons, as well as our Document December collection! Today design team member Amanda-jayne Baldwin is with us to share some great ideas for how to use our 6 x 6 paper stacks on your projects that we know will inspire you to create with layers, color and pattern! Let’s see what she made!
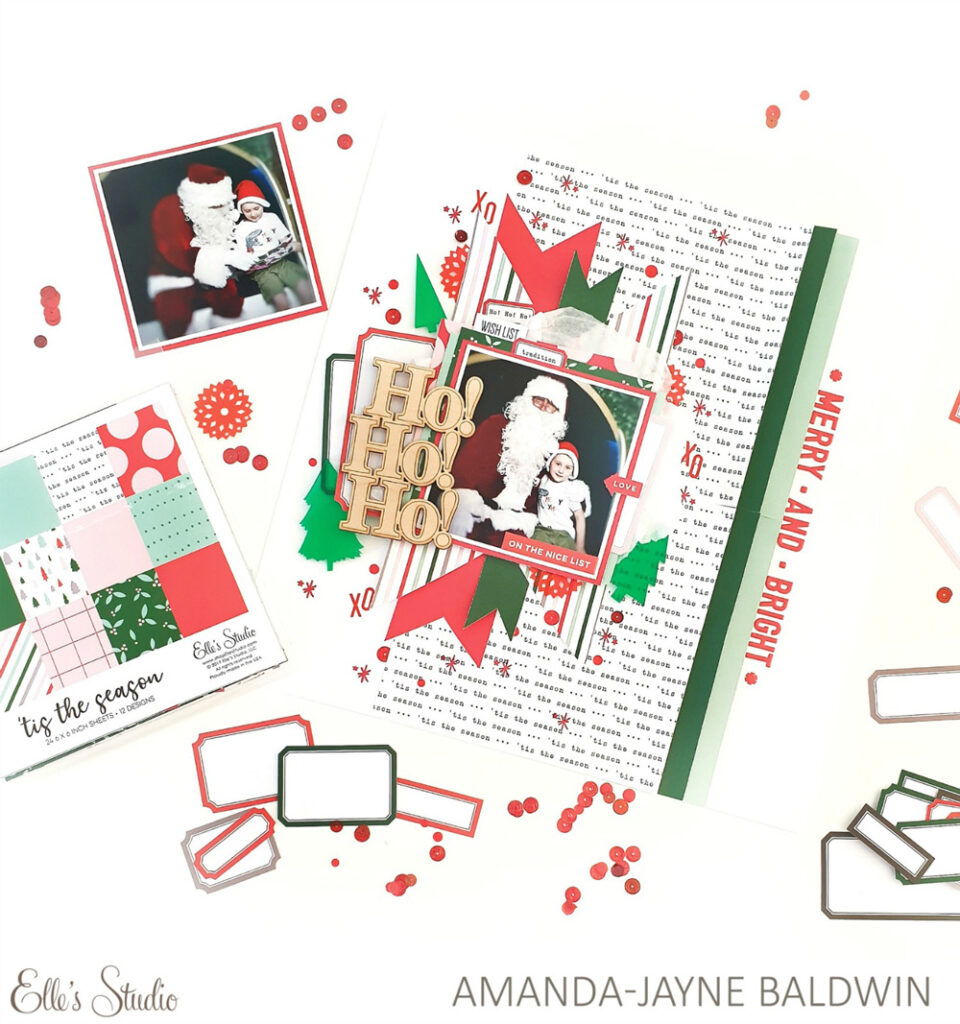
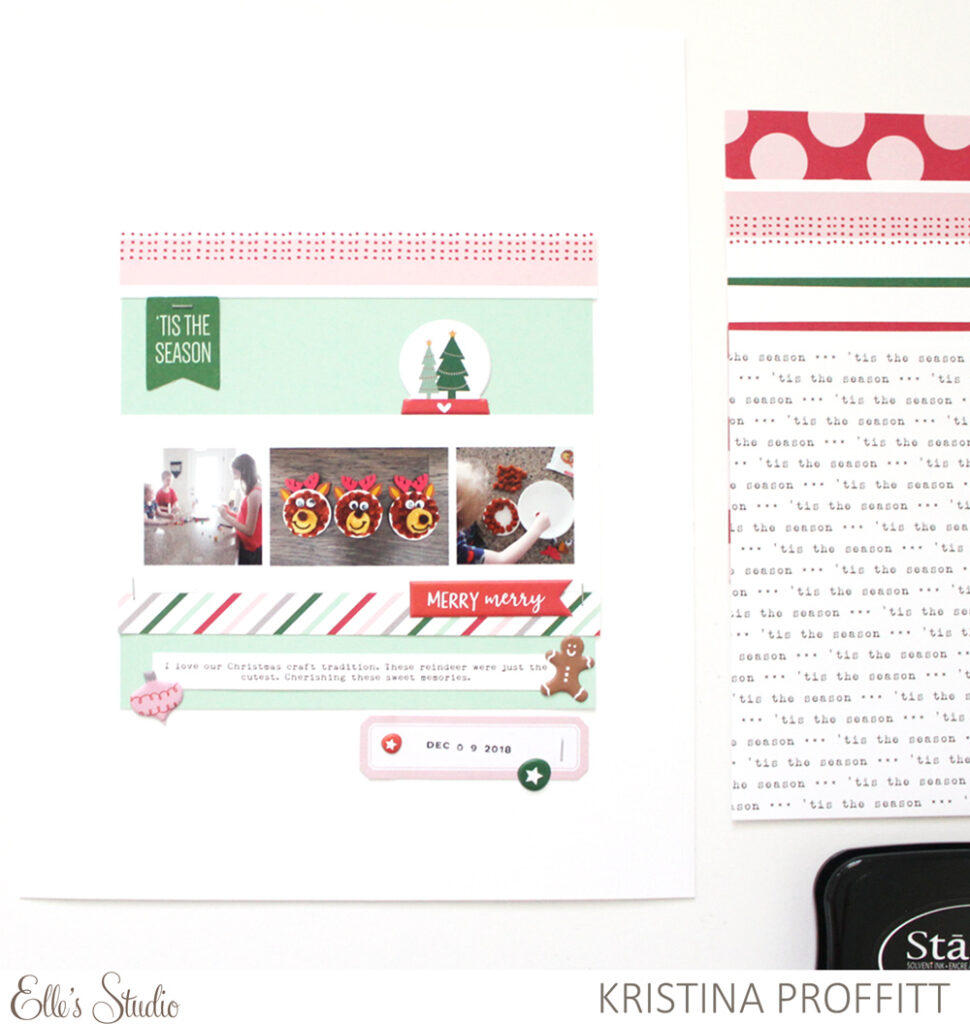
Hi, Elle’s Studio friends! It’s time to bust out the Michael Buble music as “It’s beginning to look a lot like Christmas!” It’s Amanda here, and I am so excited to be preparing for the season of giving! I just love the holidays, and the new Elle’s Studio paper stack, ‘Tis the Season, is perfect for documenting all of our stories with! Whether you trim this paper into pocket size note cards, create greeting cards, include it in your Document December albums, or even craft some holiday decor, this paper pack is simply the best! I used the ‘Tis The Season papers for documenting my son’s visit to see the jolly elf himself! Here’s my layout:
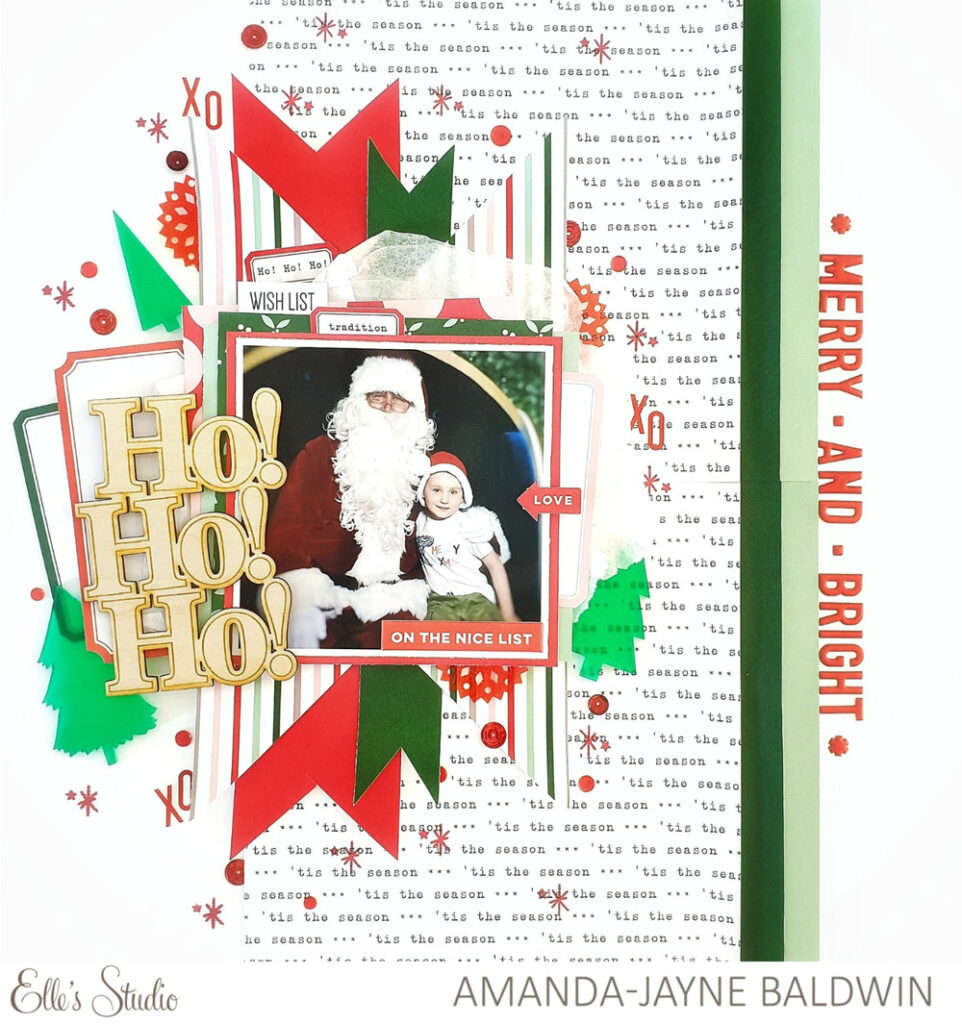
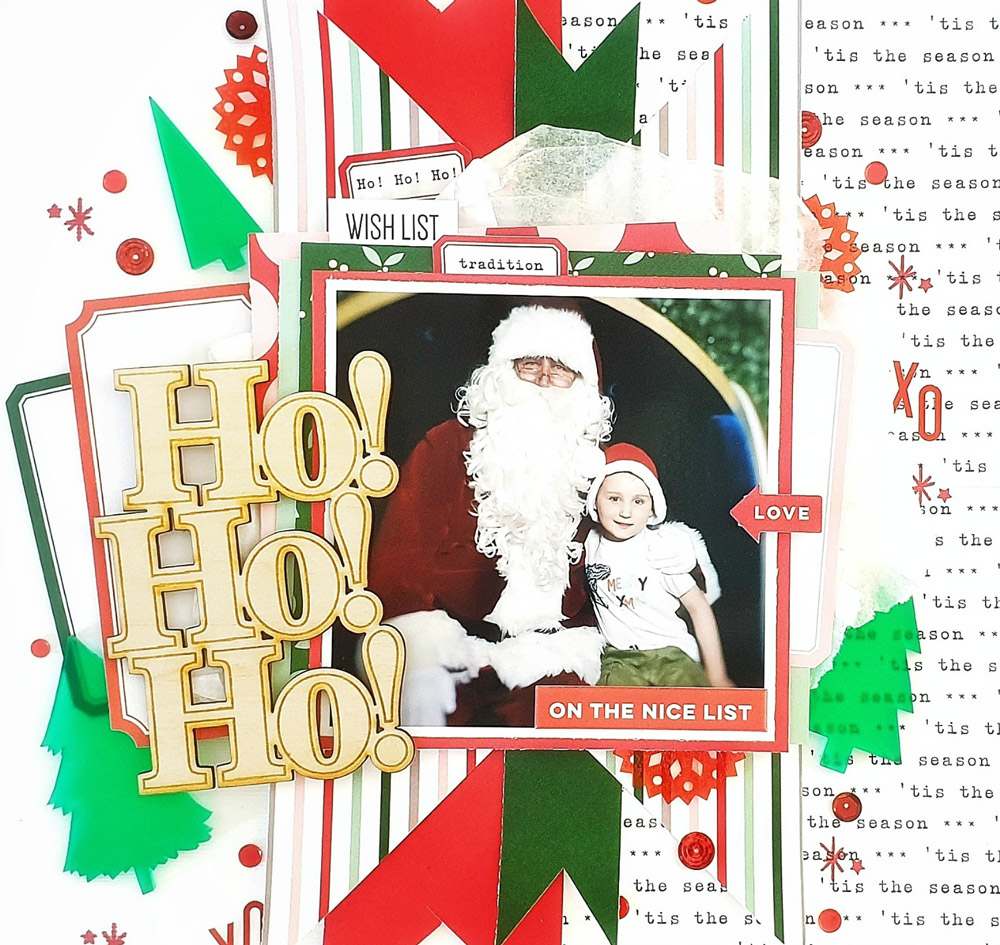
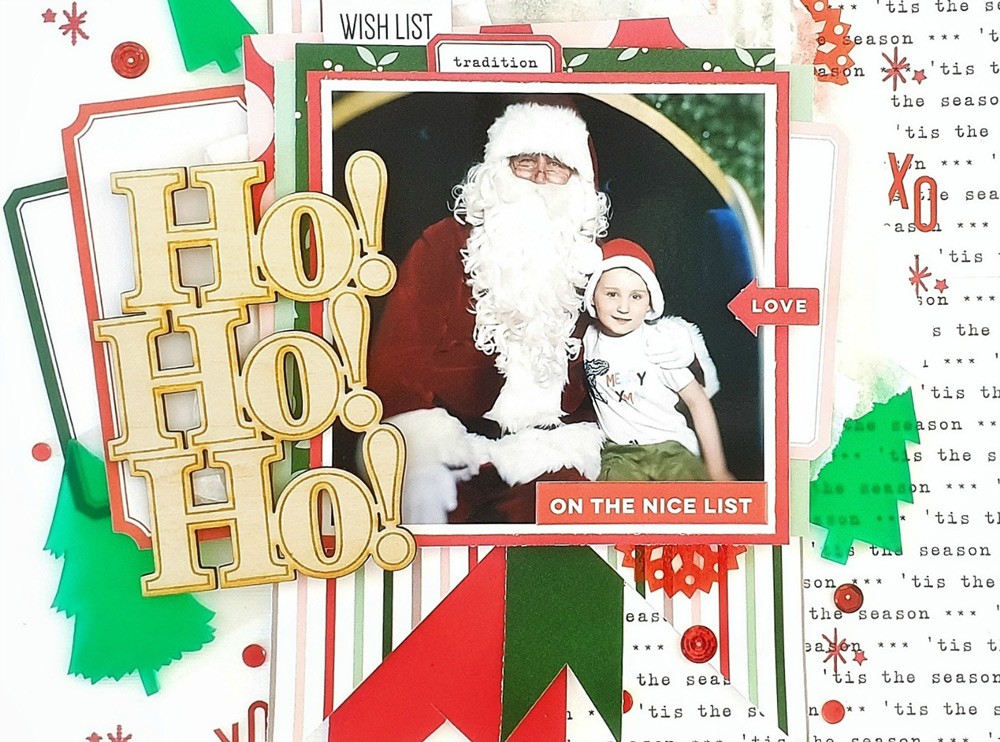
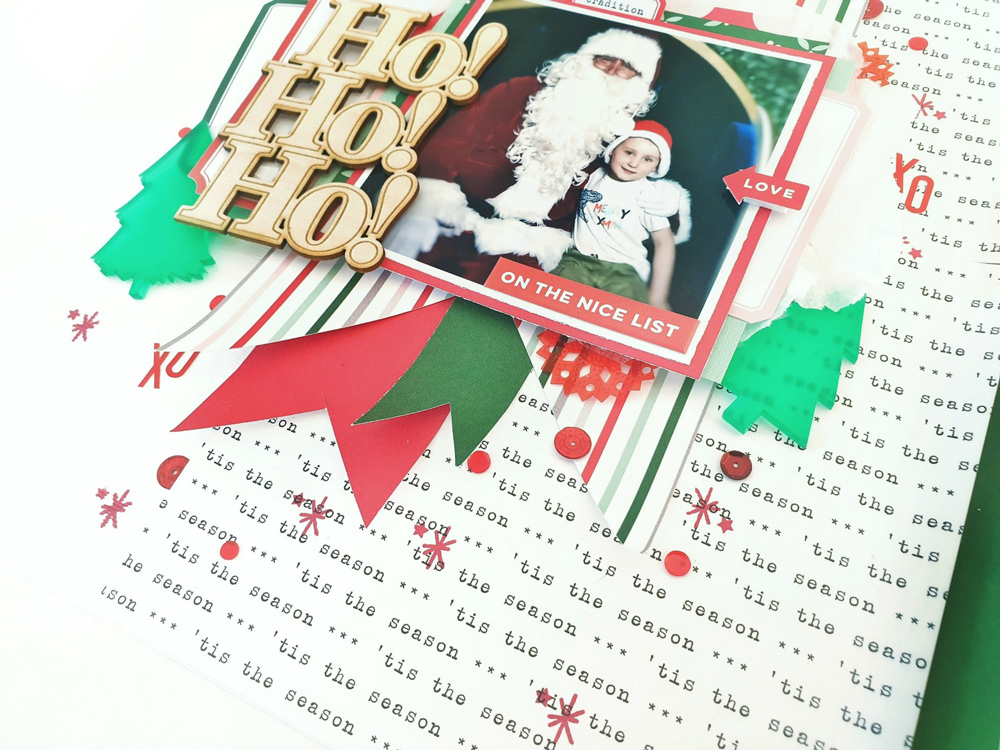
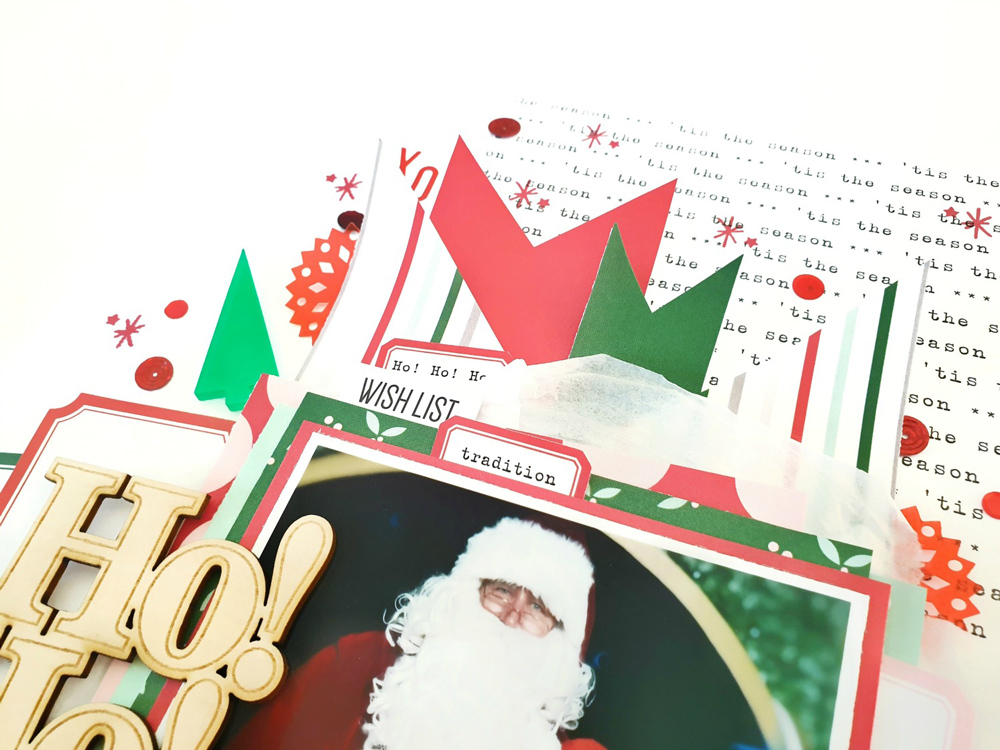
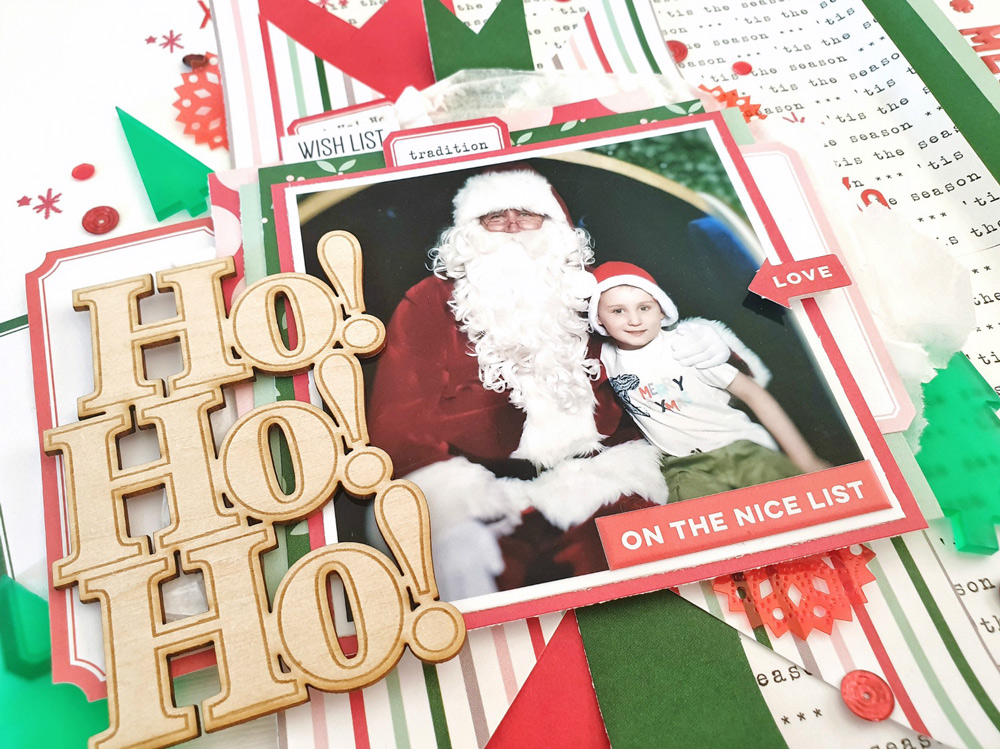
Ho! Ho! Ho! What could be merrier?! Such a cute photo! Let’s take a closer look at my sweet Santa scrapbook page!
So adorable! And just look at all those pretty papers! So many gorgeous designs! It’s well known that I like to maximize the 6 x 6 Paper Stack papers for 12 x 12 scrapbook pages, and for today’s post, I really wanted to share my top 5 ideas on how to do this!
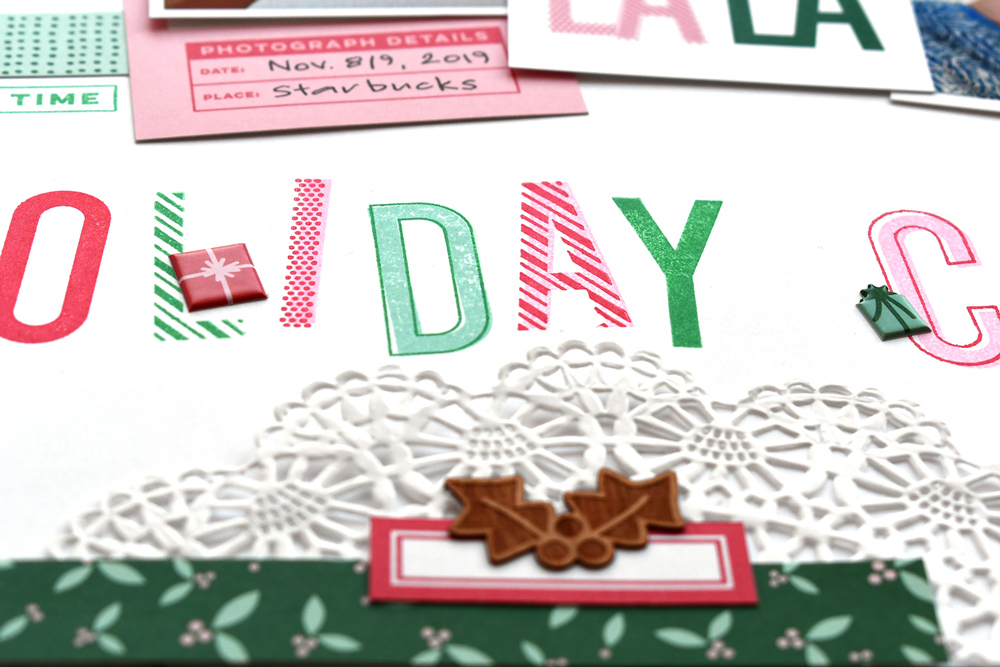
1. Use the bold pattern paper designs to matte your photographs | I always print my photos with a white border and tend to forget how important that pop of contrast is. A striking base for your photo will really direct your eye and draw attention to your most important part of the layout! That red beneath my photo is just stunning!
2. Create paper layers to mount your photograph onto | Layered papers create texture, give shape and add visual interest. They also give us the opportunity to mix and match colors and designs, adding greater elements to the overall page design. You’ll notice that I even add some white tissue wrap in between my paper layers to add further emphasis and interest to my pattern paper cluster!
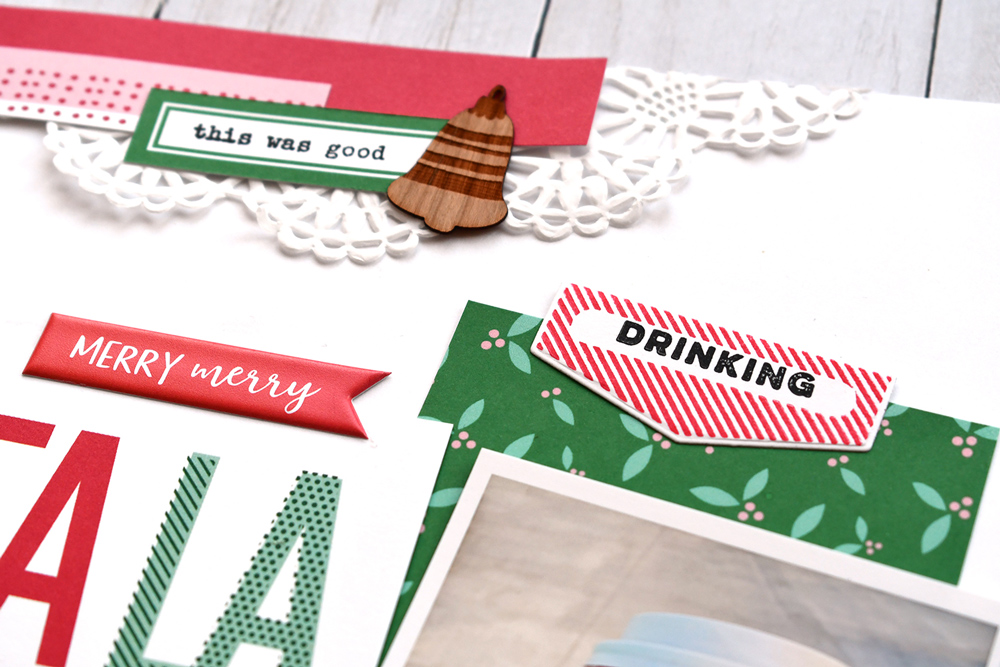
3. Pull out your punches or favorite fussy cutting scissors, for some fun pattern paper shapes | Think rows of pattern paper circles stitched together, concentric paper hearts, or in today’s example, layered dovetail banners! It’s a simple, but effective way to incorporate 6 x 6 papers into our projects!
4. Be an illusionist | Create the impression of larger papers with careful cuts and clever paper placement! I did this two ways with the dovetail banners in my layout. First, for the striped, wide banner, I diagonally cut the 6 x 6 paper from the top right corner to the bottom left corner. I then re-arranged the two cut triangles so that the longest lengths were vertical, and on opposite sides from one another. Next I overlapped one of the triangles over the other and adhered it into place. You can’t see the taped join because it’s all hidden behind my photo cluster! Second, I cut my thinner banners through the centers so that they became two pieces which I then shortened or lengthened beneath my photograph. The trick is just to make sure they align correctly.
5. Build ’em up! | Connect your 6 x 6 papers together to build a longer or wider piece of paper! You’ll see that I joined two sheets of the typed “’tis the season” patterned paper to create a 6 x 12 sheet of paper. I also butted strips of papers together which I then tucked under the folded edge of the 6 x 12 paper. So clever!
That’s just a few of my fave ways to incorporate these smaller papers into my creating. I hope it gives you some inspiration and ideas for our latest ‘Tis the Season 6 x 6 Paper Stack.
How do you like to use your Elle’s Studio 6 x 6 Paper Stack papers? Be sure to share your tips and creations with us in the Elle’s Studio Facebook Group!
Thanks so much for stopping by today!
Comments Off on ‘Tis the Season for a Paper Stack with Amanda-jayne Baldwin | Share This
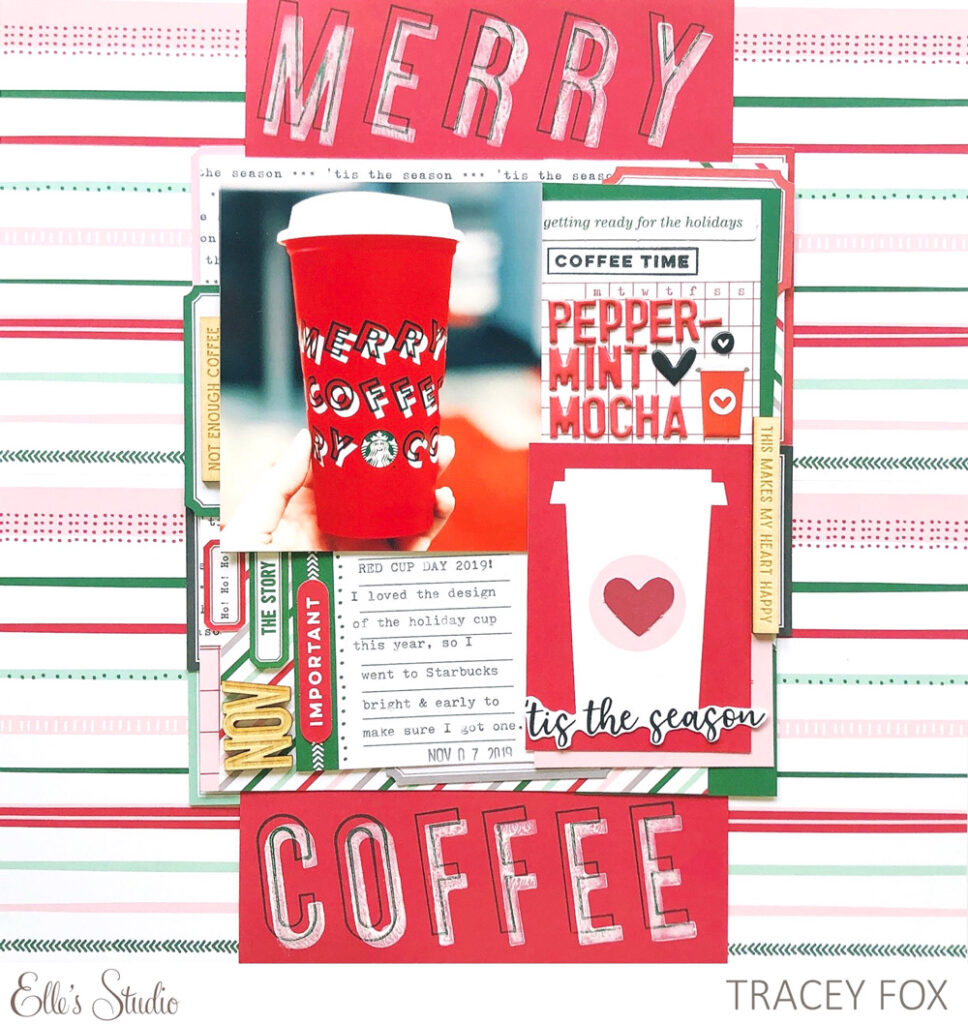
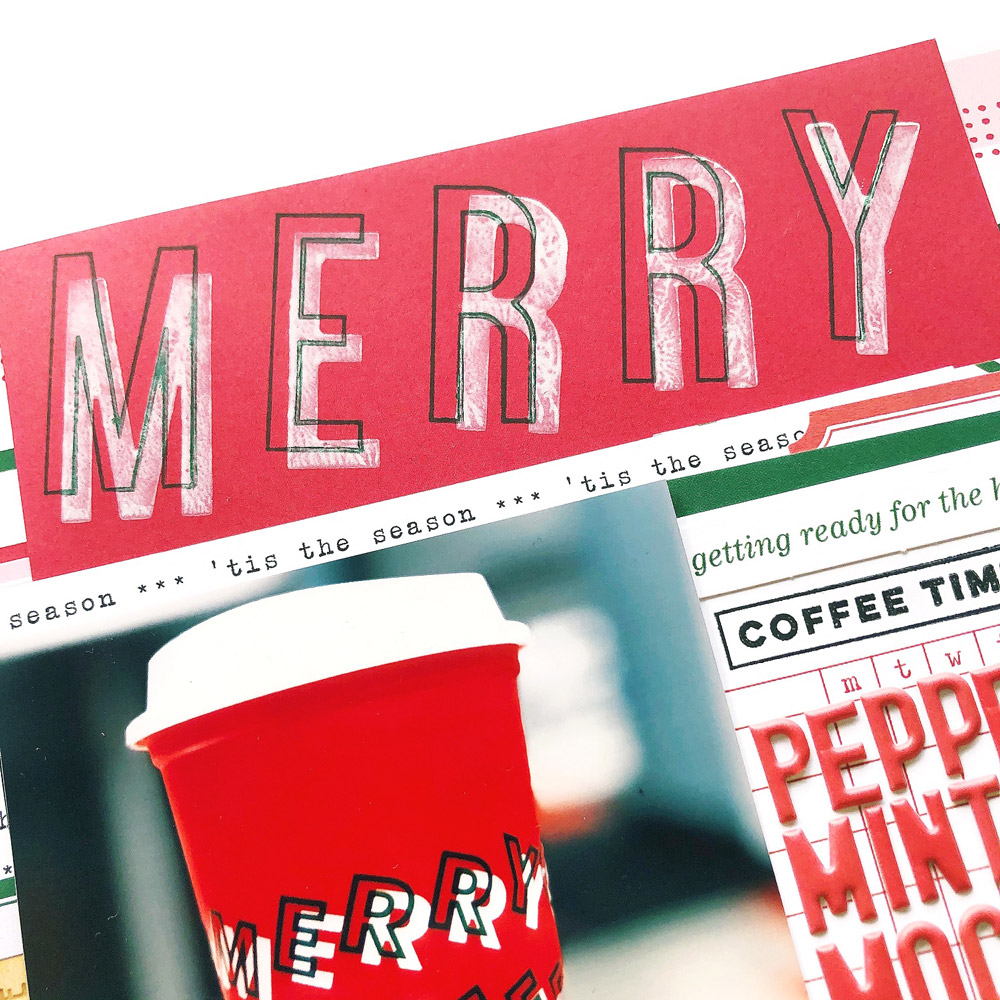
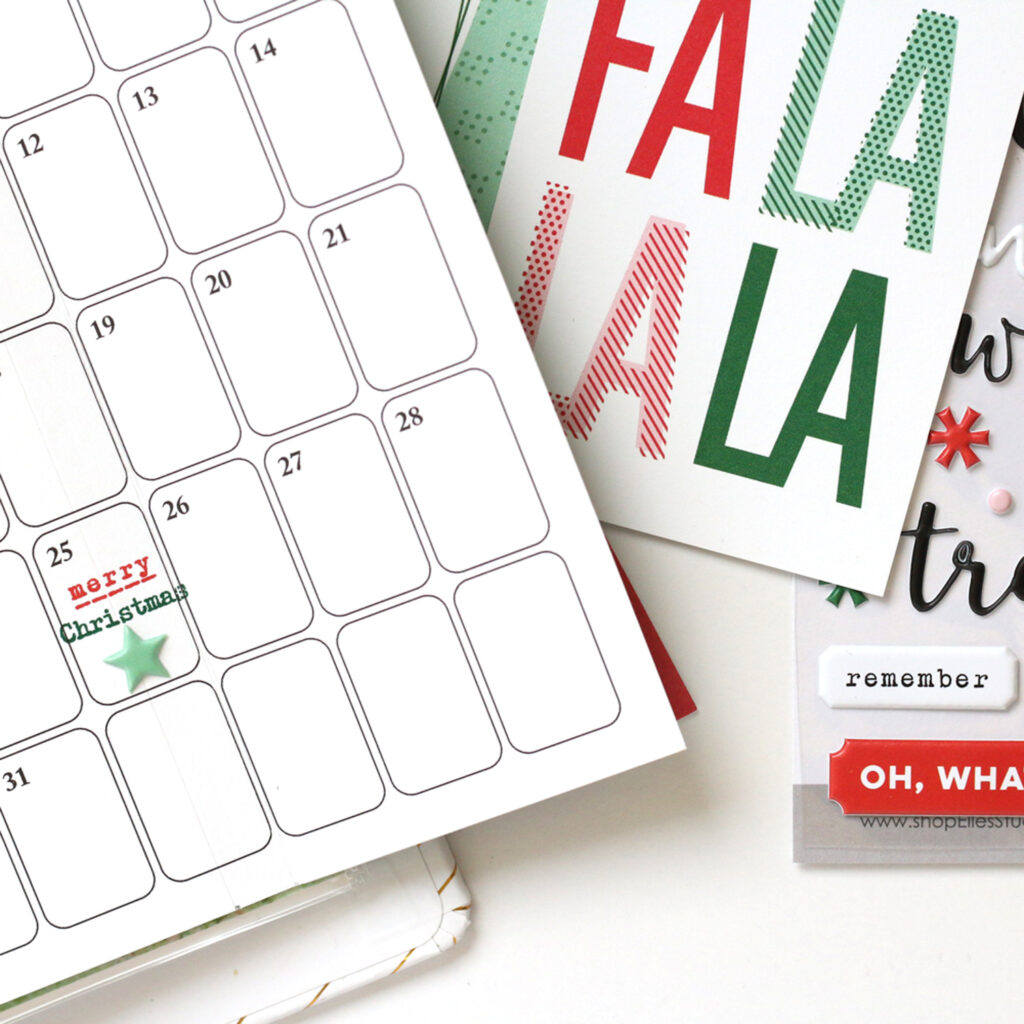
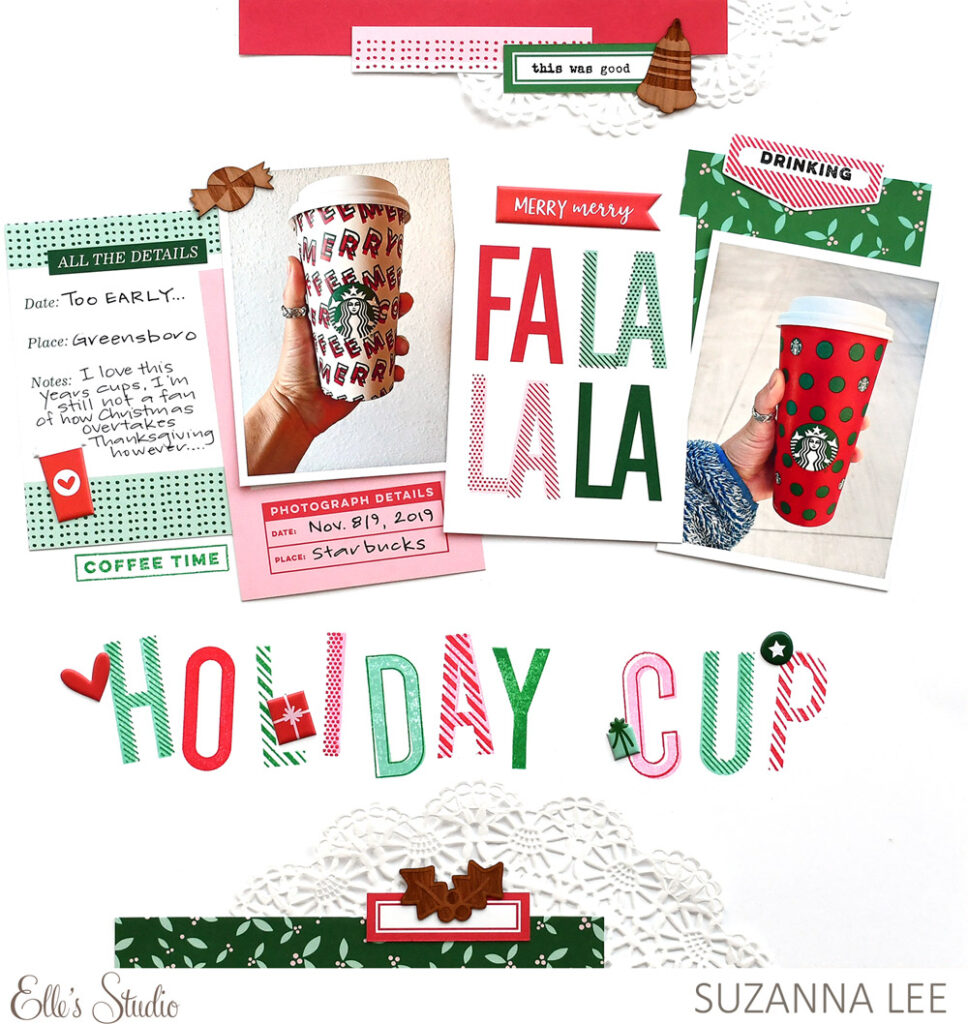
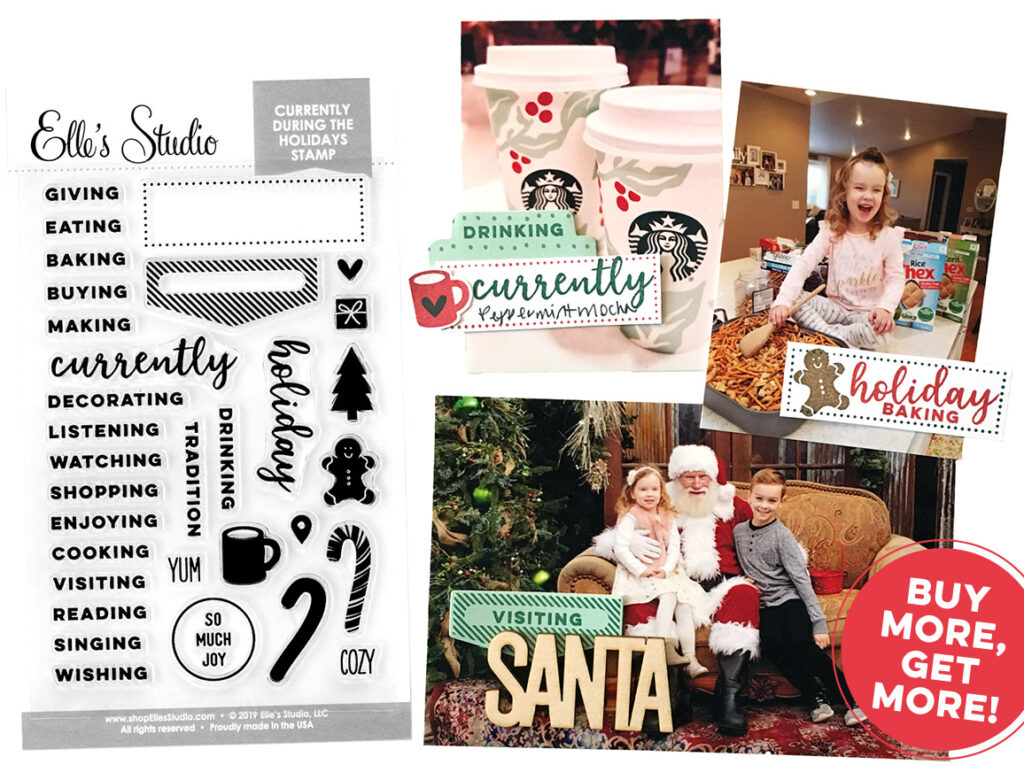
Have you snapped a picture of your merry red cup yet?! If so, we know you will love the way that Tracey Fox documented hers using our November 2019 Kit and add-ons along with our Large Jane Alphabet stamps, included in our Black Friday sale! Let’s look at how she used them in such a bold, graphic way to document her peppermint treat!
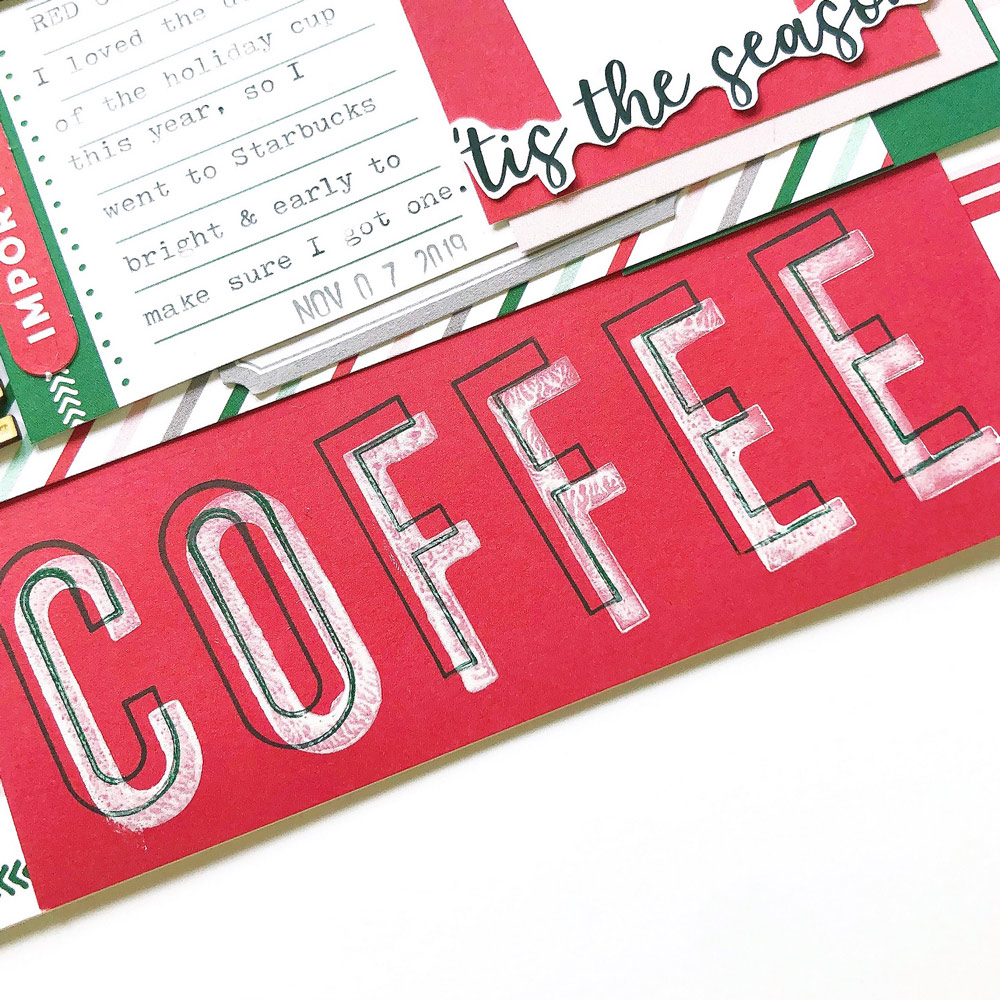
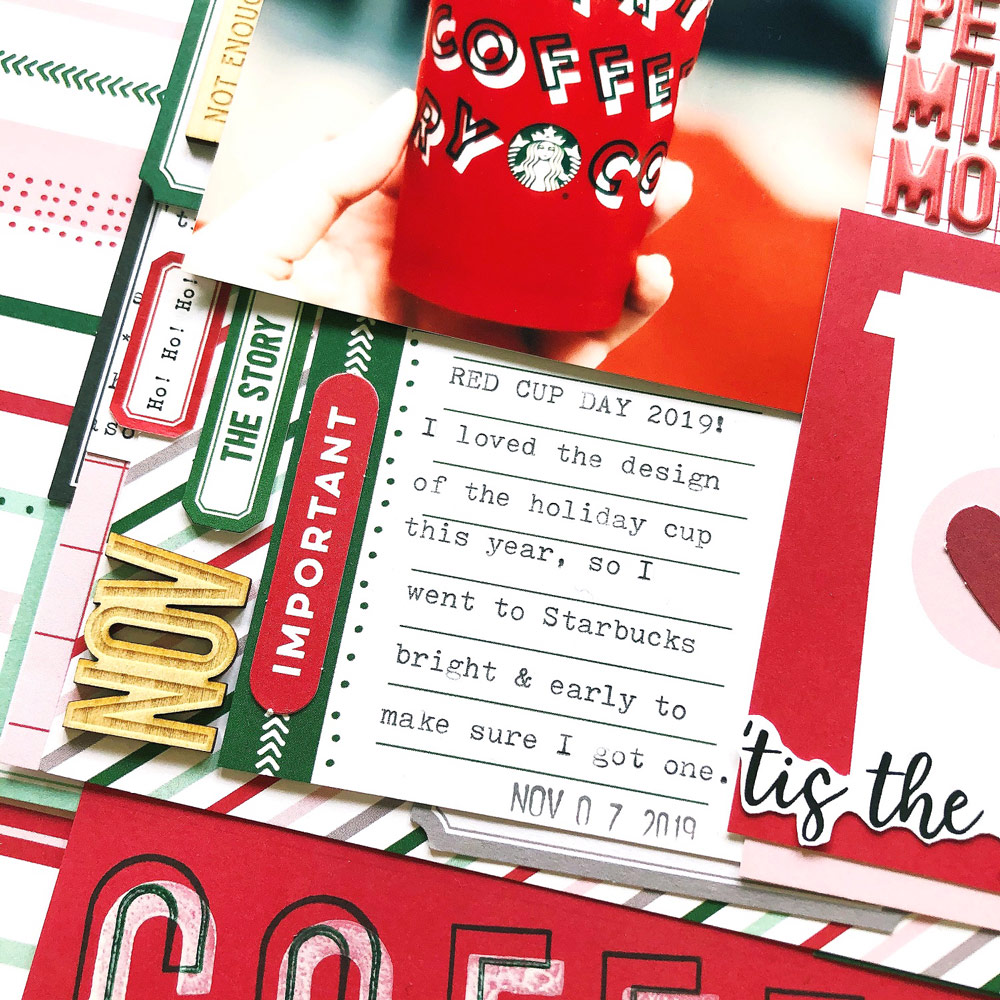
Happy December, and happy holiday beverage season! Have you been inspired by the offset type design on Starbucks’ holiday cups this year? I have—so much so that as soon as I scored my reusable red cup on the first day they were available, I couldn’t resist reaching for my Large Jane Alphabet stamps to create a layout that very day!
To make sure I could achieve my Starbucks-inspired “Merry Coffee” title, I grabbed some white and green ink and practiced with the Large Jane Alpabet solid and outline stamps on some scrap cardstock. When I felt ready to go for it, I grabbed the pretty red paper from the ‘Tis the Season 6 x 6 Paper Stack and stamped out the white letters with the solid letter stamps. Elle’s Studio patterned papers are awesome for stamping, because they absorb even the juiciest pigment inks (like this opaque white ink) really well without smearing. My test scrap cardstock never really dried well and smeared really badly, but after just a couple of minutes of drying on the red patterned paper, the ink was completely dry and ready for me to stamp the offset outline stamps in dark green ink. (Note: This offset stamping effect would also work on a smaller scale with the Stanley Jr. Alphabet Stamp, which is also available in the Elle’s Studio shop. It’s the perfect size for creating this look on pocket cards or in mini albums!)
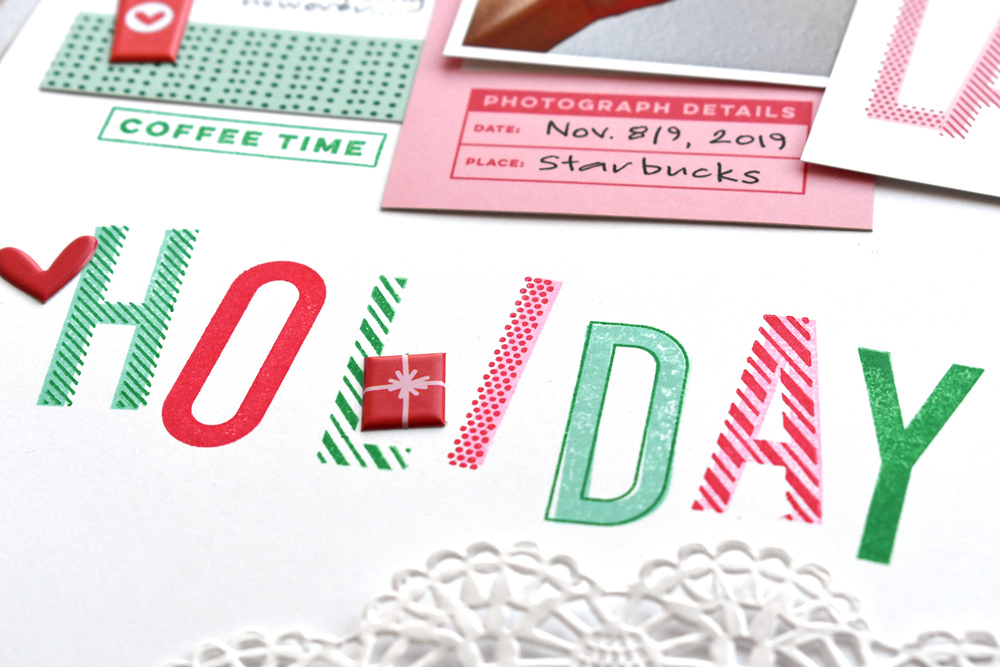
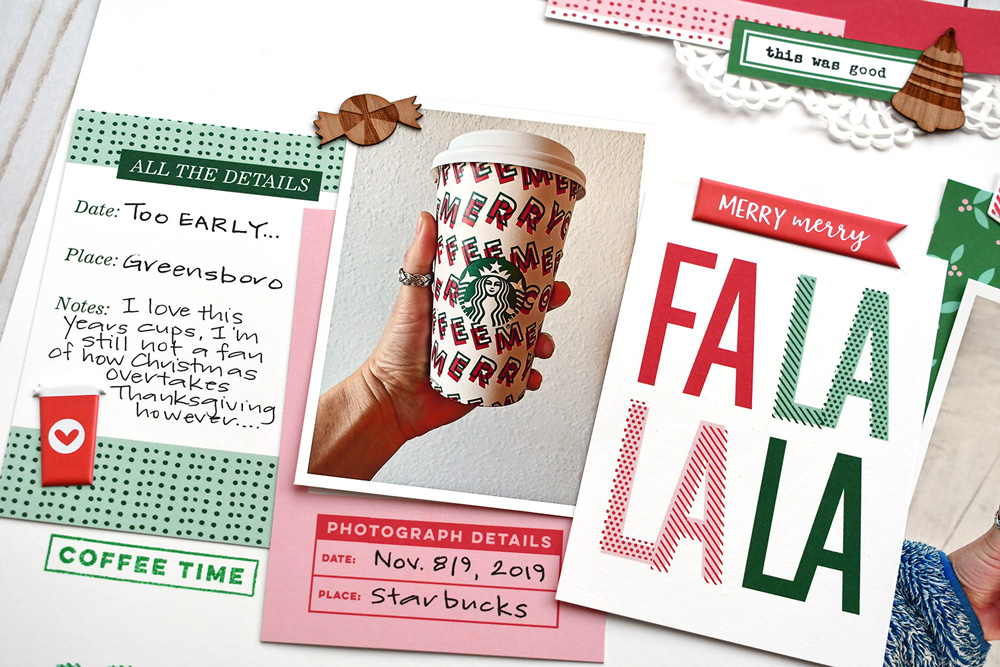
Once my title was done, I set the stamped pieces aside and went to work on the rest of the layout. I cut both sheets of the fun and colorful striped patterned paper from the ‘Tis the Season 6 x 6 Paper Stack in half and adhered them to the sides my background cardstock to create a background, knowing that I would be covering up the center with the rest of my page elements. Using a photo of my Starbucks cup and a few tags from the November 2019 Kit, I created a grid to cover the center of the page. How perfect is that coffee cup tag from the November kit?! I also loved using other tags from the kit, scraps of paper from the 6×6 stack, and the large blank Christmas Die Cut Labels to add some additional layering behind the grid to add color, texture, and interest. With my title adhered to the layout just above and below the grid, the foundation of the layout was complete.
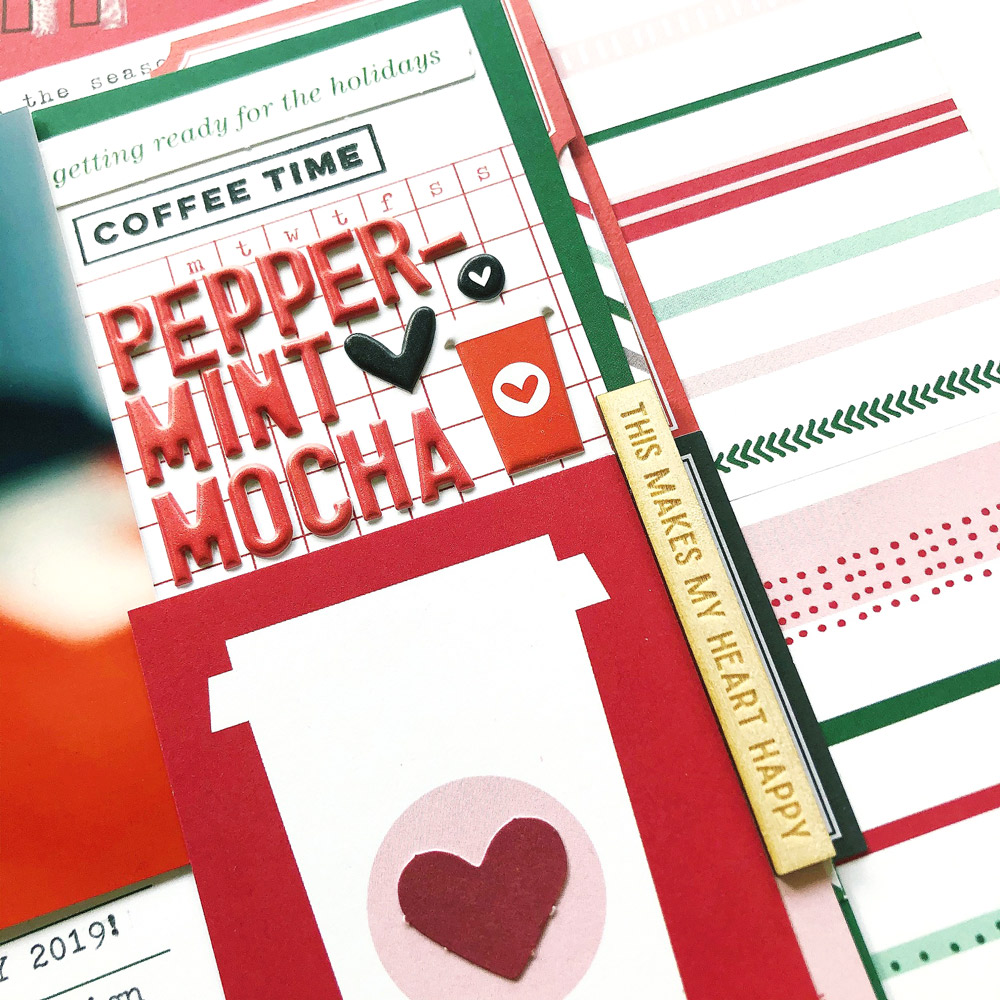
Next, I set out to add journaling and embellishments to the tags in the grid. I spelled out “Peppermint Mocha” using the new Red Puffy Alphabet Stickers and added a die cut from the kit, a few of the Holiday Puffy Stickers, and the “coffee time” stamp from the Let’s Eat Stamp to finish off that tag. In the opposite corner, I typed my journaling on a lined tag and surrounded it with kit die cuts, one of the Tiny Holiday Label Stickers, and pieces from the Wood Veneer Holiday Phrases. I like to add wood veneer embellishments in threes on a layout when I can to help balance the design, so I also brought in the “NOV” wood veneer piece from the Small Months of the Year Wood Veneers to complete the visual triangle.
Finally, I added a die cut heart from the November Kit to the coffee cup tag and finished off that tag by fussy cutting “tis the season” from the cover page of the 6 x 6 Paper Stack and sticking it down at the base of the cup. I can’t resist cutting out the pretty script titles of the paper stacks and using them in my scrapbooks — they are the perfect bonus embellishment!
Are you ever directly inspired by package or advertising design in your documenting? The various styles of the Large Jane Alphabet stamps are so versatile and can provide tons of opportunities to play with different looks on your scrapbook projects and cards. Don’t forget to add them to your collection now during the Elle’s Studio Black Friday sale!
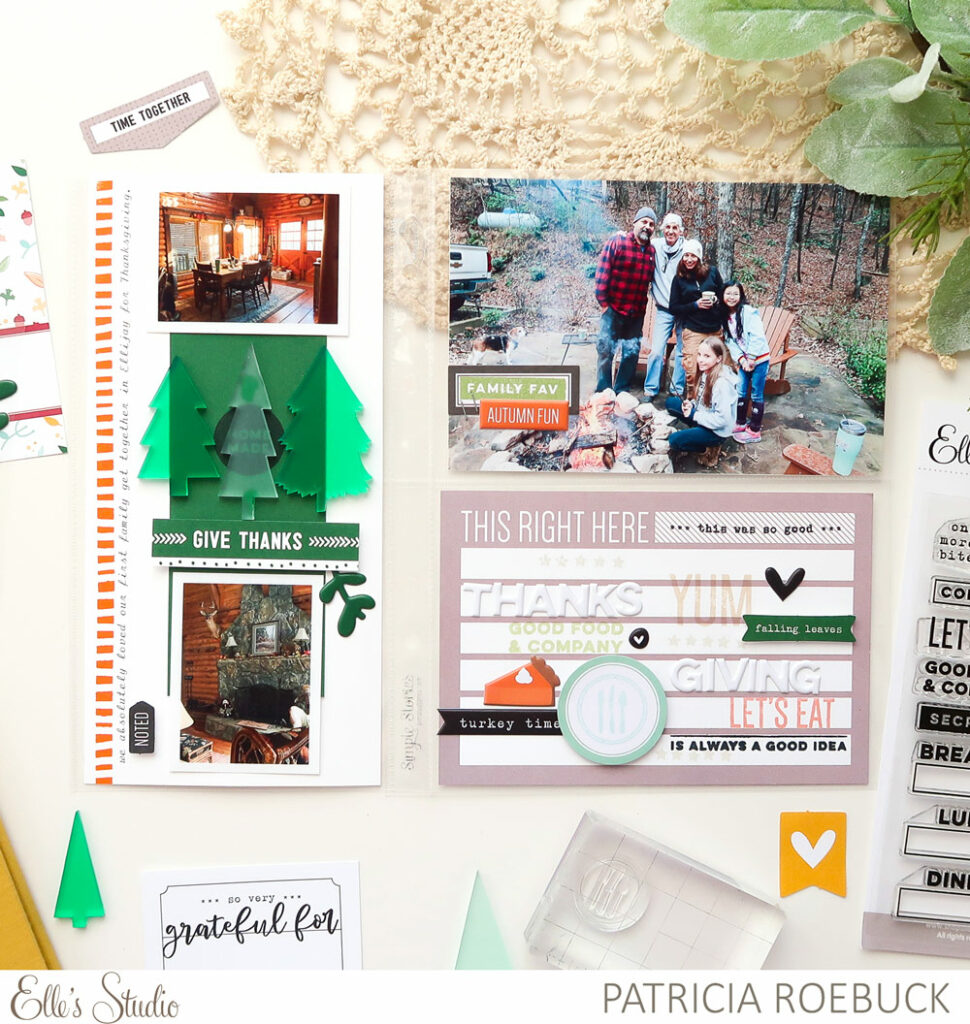
Today we share four more Document December preparation takes with you today from Wendy, Patricia, Tracey and Meghann! With tomorrow being the first day of December, we encourage you to go about this project with the focus on the memories and holiday photos that you’re going to document, but having a few ideas prepared in advance will certainly help you stay on track. Let’s see how these four designers are doing just that in their own ways!
Wendy | I am so ready for Christmas this year! I’m not sure how I will get everything done, but the magic of Christmas is something I am really looking forward to. To really appreciate the magic of the season and not get bogged down with the hustle and bustle I have found a few tricks that worked really well, and I’d love to share them with you!
I have all my supplies corralled and out where I can easily grab them. They are in a plastic divider I found at IKEA with these handy little baskets from Target in my rolling cart from Michaels. This keeps everything accessible and since it is out in the open it encourages me to create a few minutes each day.
Next up, I am all into sparkles and love to add glittery items to my pages, but I don’t always give my items time to dry. So, I grabbed my Stickles and Nuvo Crystal Drops in red, green, white, and gold to decorate my wood veneers from the Document December Kit and the ‘Tis the Season Wood Veneers; this way my items are dry and ready to use when I want them!
Once I have everything arranged and prepped it is time to dig in and see what inspires me this year for my intro page. I always choose my favorite items to set the theme for the year’s album:
One last tip that I have found to be essential to my December Daily is that I document the fun events, pretty sights, and lovely smells but I don’t worry about having a picture for every day. This approach for me allows me to capture everything that is important to our family but it takes the stress off of the project and leaves me with such good feelings as I look back at my finished albums. Merry Christmas!
Tracey | I have a confession to make. I almost never make holiday album pages during the holidays, finding it difficult to carve out time for crafting during the busiest season of the year, so I usually wait until many months later to start in on pages about the previous year’s festivities. But this year is a little different. I have fewer plans and less travel. I also decided not to hand-make my holiday cards like I have done for many years, and most importantly: I couldn’t resist the beautiful Document December 2019 Kit!
I always document the holiday season in an 8″ x 8″ format, and for this year, I chose a mint green album that goes perfectly with the touches of mint throughout the Document December products. The December 2019 Wood Veneer and a patterned paper from the kit perfectly filled the window in the cover of the album.
To keep all of my supplies handy and within reach. I set them up in an IKEA FJÄLLA desk organizer. The compartments help me keep everything sorted and visible, and the whole organizer can be moved if I need to work on something else on my desktop.
I don’t plan to scrap a page for every single day of the season, and I don’t prefer to make foundation pages in advance. Instead, I like to let inspiration from my photos and stories guide me through a completed album that documents the highlights of the holiday season. But since the Document December products coordinate so perfectly, I don’t have any doubts about my ability to quickly put together pretty pages.
Another secret to my success this year will be regularly printing photos on my home printer. Printing on demand at home will allow me to keep up with documenting current memories as I am making them during the holidays!
Thanks for checking out my album and supply setup. I can’t wait for us all to create together as we Document December!
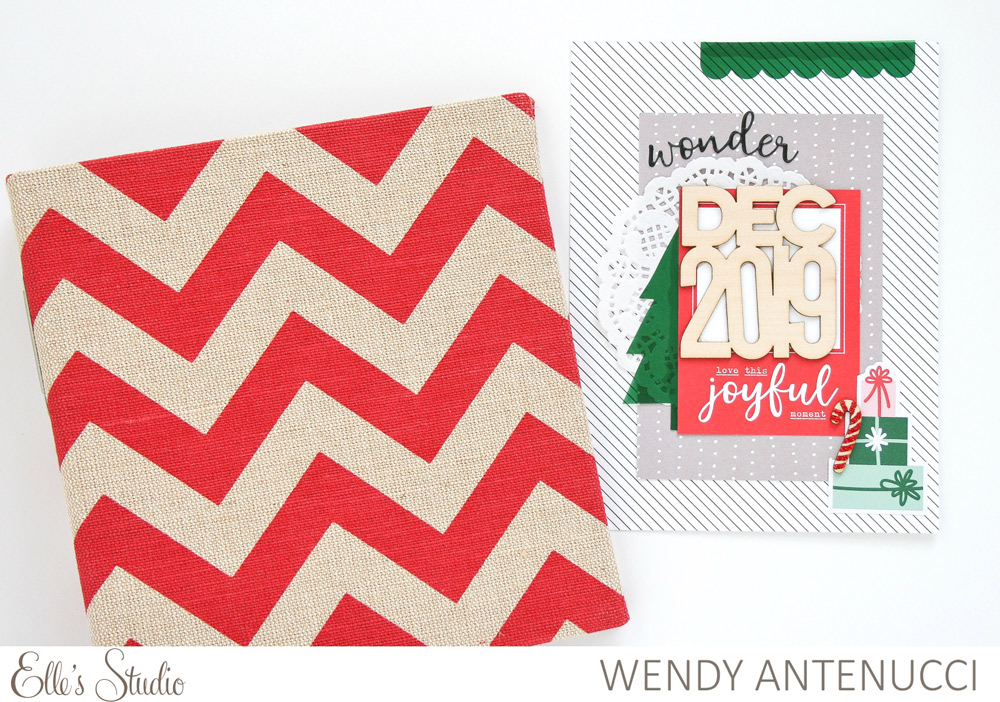
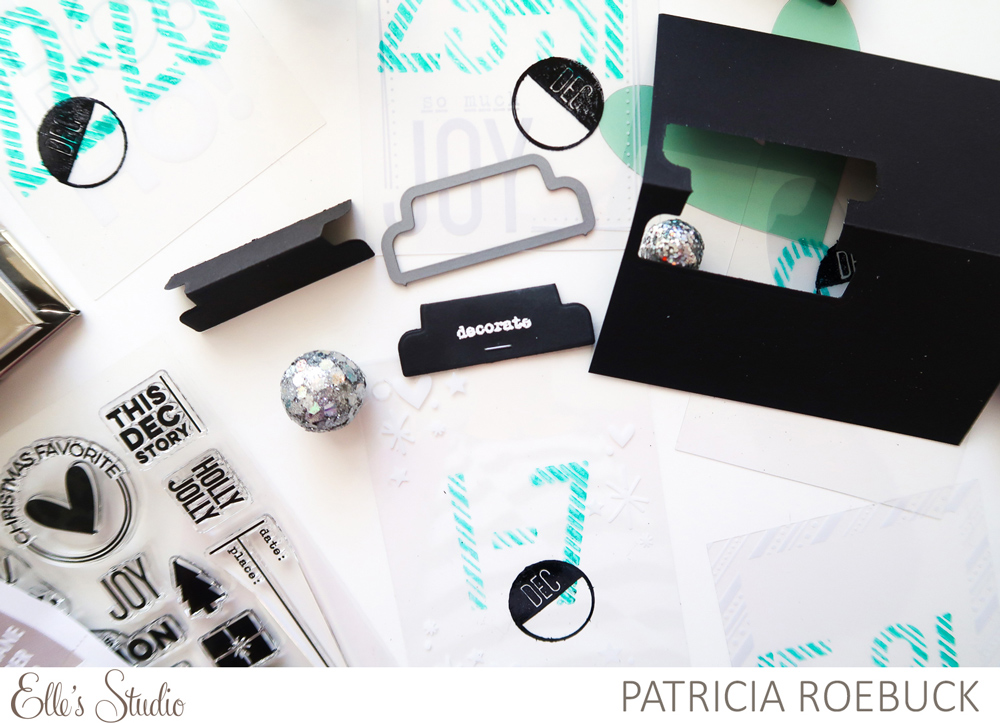
Patricia | Hello Elle’s Studio and Document December fans! Creating a December album helps me to slow down the month and enjoy it a bit more, but to really enjoy the creative part, I have to do some prep work so that when I sit down in the evenings right before bed, I can put a page or two together quickly! I am using a small 4″ x 4″ album this year. I have my cover prepped and ready using the Document December 2019 Kit and extras and it is setting the color theme I will “mostly” use throughout my inside pages. I say “mostly” because I will definitely incorporate the reds and pinks, but be more heavy with greens, grays, and blacks.
I am going to document the entire month and I was instantly inspired by the Good Cheer Acetate Die Cuts and the stamps to create a dated intro divider for each week. To do this I created ‘dividers’ using the 3″ x 4″ tags along with the Large Jane Candy Cane Number and Holly Jolly stamps. I will punch holes and insert these into my album to divide each week. I created a folded tab using the Everyday Tabs Metal Die by just folding a piece of black cardstock, leaving the top of the die to hang off the folded edge as I run it through the die cutting machine! I will emboss in white ink using the Holiday Words Stamp to go along with the overall theme for each week. I also created an opening page to the album using the Christmas Acetate Shapes, found in the Document December 2019 Kit, slipped inside 2″ x 2″ pockets. I used black thread to stitch the pockets closed to go with my color theme, and then stapled the “Hello December” wood veneer from the ‘Tis the Season Wood Veneers to the center.
This year I am using a holiday basket to keep my album and contents together. My desk can get pretty messy with other projects, so this is a great way to grab, create and then put away put away quickly! Keeping it all together also helps me have success at finishing the album!
Meghann | Hello, Document December fans! I can’t wait to kick off this project, but before we go LIVE on December 1st, there are just a few things that I am doing ahead of time:
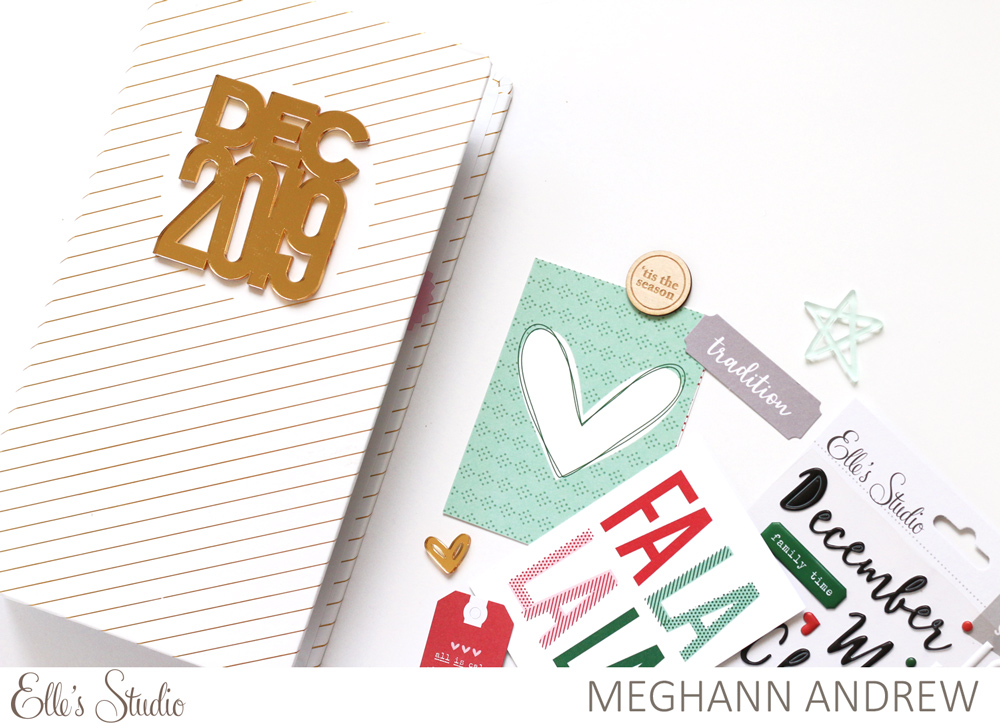
The album | I kept it sweet and simple this year, only adding the Dec 2019 Gold Acrylic to the front.
The cover page | This is one of my favorite parts of creating my Document December album! Again, I’m setting the tone of simplicity here. I added the 25 Wood Veneer to the center of the beautiful red pattern from the Document December 2019 Kit and used white acrylic paint to color in the middle of the numbers. I topped that with the “a season to remember” sticker from the Document December 2019 Kit and a few of the sparkle Wonder Puffy Stickers.
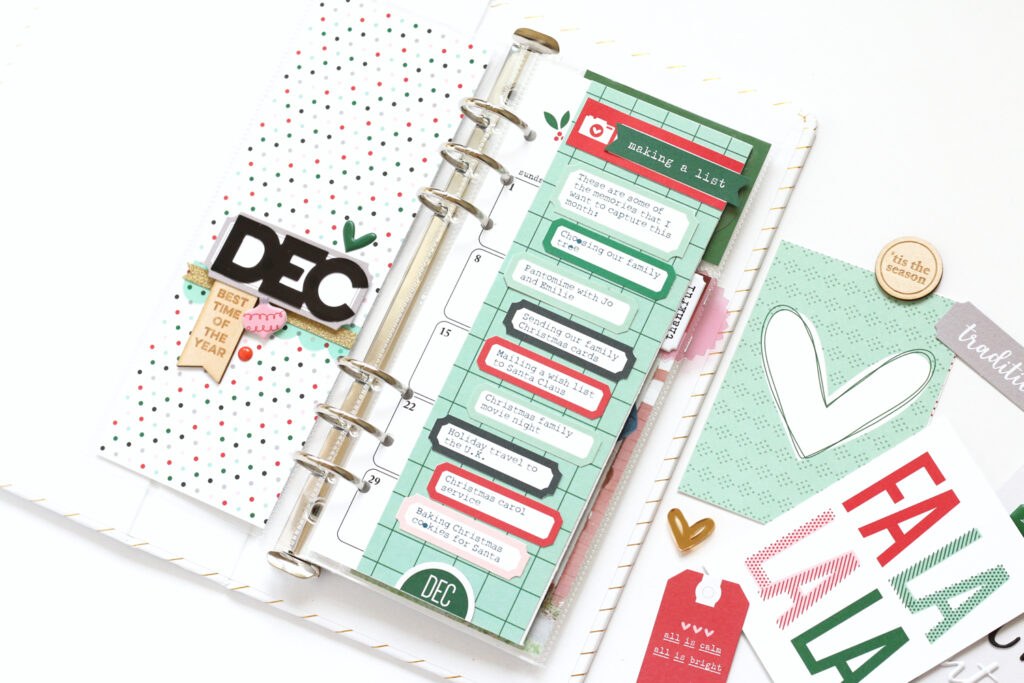
A reminder page | I decided to add a “not to miss” list of our December traditions to capture during the month. I simply added the items to the November Print and Cut File labels that I recolored to match the kit, printed them and adhered them to the mint green grid paper.
The calendar | Opening this “reminder” flap reveals the calendar page, which I will add the highlights of the month to. I have already stamped “Merry Christmas” using a combination of the Holly Jolly Stamp with the Holiday Words Stamp.
The intention page | Sometimes I can get caught up in the “perfectionism” aspect of the holiday, which can let me down, and for the first time, I wanted to set an intention for my holiday: “Celebrating the JOY, leaving the rest behind.” It’s a motto I plan to adopt throughout the month, especially when the rush of the holiday can get overwhelming! Next to it, I added our family photo, topped with the phrase “It’s the most wonderful time of the year,” using the Good Cheer Acetate Die Cuts on top of the solid ‘Tis the Season 6 x 6 Paper Stack green.
All of my supplies are neatly stored on my desk in a wooden organizer, ready for this merry project to begin! I hope you’ve enjoyed seeing how our team has prepared over the last four weeks, and we can’t wait to Document December with you!
Be sure to share how your Document December project is coming together as we begin this project tomorrow! Post on Instagram using the hashtag #EllesStudio, and in our Elle’s Studio Facebook Group!
Comments Off on Prepping Your Document December Project: Week Four | Share This
Our Black Friday sale brings some BIG news: all of our popular Large Jane Alphabet Stamps are on sale! Today, Suzanna Lee is here to inspire us to get a BIG title on our page using these large-impact letters, and we think you’ll love the festive project that she’s created. Let’s take a look!
It’s Suzanna here today and I’m sharing with you a large title layout, using the fabulous Large Jane Alphabet Stamps! There may be lots of great things to look at on this page, but really, the star of this page is the title!
There are so many different sets of the Large Jane Alphabet stamp available in the shop! On this layout, I used the Solid, Outline, Polka Dot, Stripes and Candy Cane. Not only did I mix up colors and shades, but I mixed up the stamps to create my festive, large title!
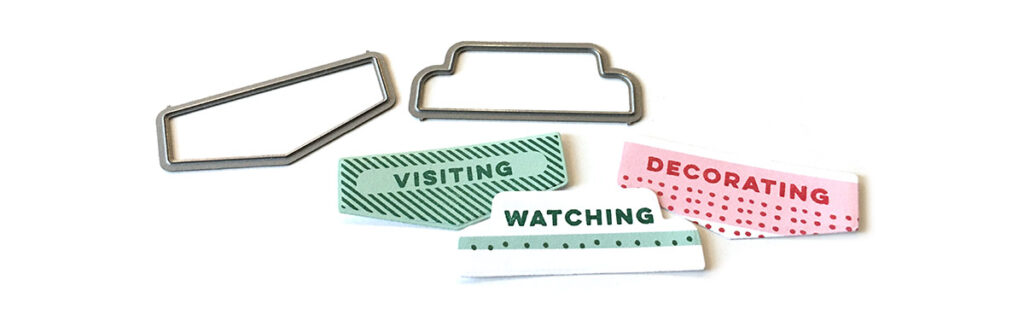
While there is a coordinating Large Jane Alphabet Metal Die (which you really, really do need – Christmas in around the corner!), I felt that being brave and stamping directly onto the cardstock afforded me better use of the stamps. I wanted that teeny bit of “outside the line” look on the top layer which would have been more difficult to get had I used the dies, and this style coordinated perfectly with the look of the Large Jane font on the “fa la la” tag from the Document December 2019 Kit.
So that, my friends, brings me to some GREAT news! The Large Jane Alphas are on sale beginning today as part of the Black Friday sale AND if you spend over $100 you get a special stamp set. See the striped tab up there in the top right hand corner with “Drinking” on it? You can customize the tab with a lengthy collection of words. It also works with the Everyday Tabs Metal Die released earlier this year! BONUS, bonus!
If you love watching process videos, be sure to head over to my personal YouTube channel HERE and see how I added the large-impact stamping on my layout!
Thanks for stopping in today! I hope you find some goodies at the Black Friday sale to make your own large-impact titles!
Our biggest sale of the year has started! Our Black Friday weekend sale runs all weekend long, starting now and will end on Monday, December 2nd at 9:00 pm Pacific or while supplies last. There are a TON of awesome deals and specials – here’s a quick summary:
ITEMS 20% to 90% off: There are 100+ items on sale and prices are already marked, so no coupon code is needed! Some of these items are retiring, too, so once they are sold out, we will not be restocking!
GRAB BAGS: We have FIVE different types of grab bags to choose from during this sale. Our grab bags include:
Scrapbooking Grab Bag– This bag includes some of the following items: journaling tags, die cuts, stickers, wood veneer, puffy stickers, labels, and acrylics. NO 12 x 12 papers or stamps are included in this bag. You can purchase one without receiving duplicate products.
Stamp Grab Bag– This bag includes three 4 x 6 inch stamps. You can purchase two without receiving duplicate stamps.
Sticker Grab Bag– This bag includes a range of our stickers–from flat to puffy! You can purchase one without receiving duplicate stickers.
Journaling Tag Grab Bag– This bag includes twenty 3 x 4 tags and ten 4 x 6 inch tags from our collections and exclusive monthly kits, for a total of thirty tags. You can purchase three without receiving duplicate tags.
Die Cut Grab Bags – This bag includes a variety of die cuts on five 4 x 6 inch sheets from our exclusive monthly kits. You can purchase three without receiving duplicate die cuts.
MYSTERY KITS: Pick up one of our exclusive kits and it will be a mystery on which one you receive! You can purchase three kits without receiving duplicate kits.
MYSTERY 6 x 6 PAPER STACKS: Pick up a 6 x 6 paper stack and it will be a mystery on which one you receive! You can purchase two stacks without receiving duplicates.
This year we will also have a BUY MORE, GET MORE special running during our weekend sale! All orders placed (with physical product that ships) during our weekend sale will receive a FREE gift! The more you purchase, the more FREE gifts you’ll receive:
All orders: journaling tag set Orders over $50: journaling tag set + puffy stickers Orders over $100: journaling tags, puffy stickers, + a brand new, exclusively designed 4 x 6 inch Elle’s Studio stamp shown above!
Free gifts will be automatically added to your package when we pack your order – No coupon code needed. Total must be before taxes and shipping costs, after any additional discounts. Sale and free gift(s) promotion ends on 12/02/19 at 9 pm Pacific.
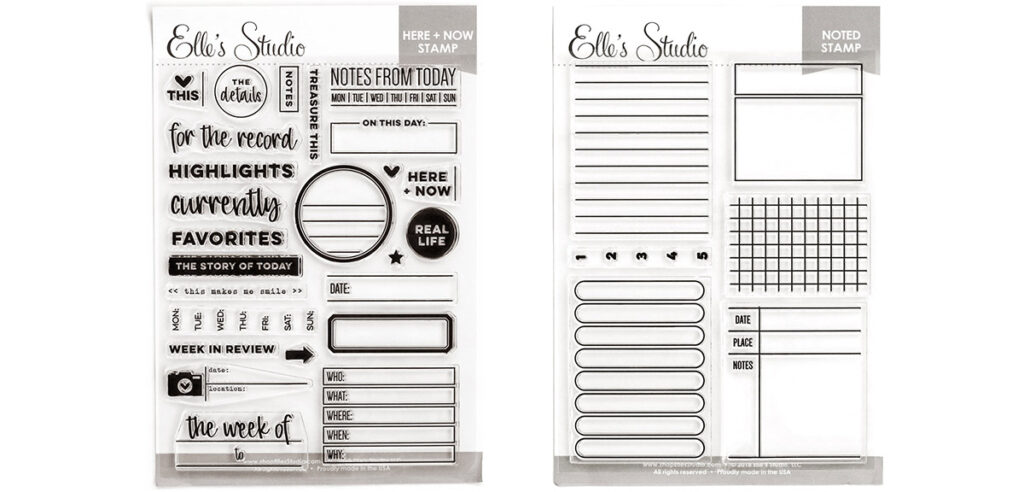
Our new and exclusive Currently During the Holidays stamp (that ships for FREE with every $100+ Black Friday Weekend Sale order) also coordinates with our Everyday Tabs metal die that we just restocked! We have also restocked our Here and Now stamp, along with our Noted stamp!
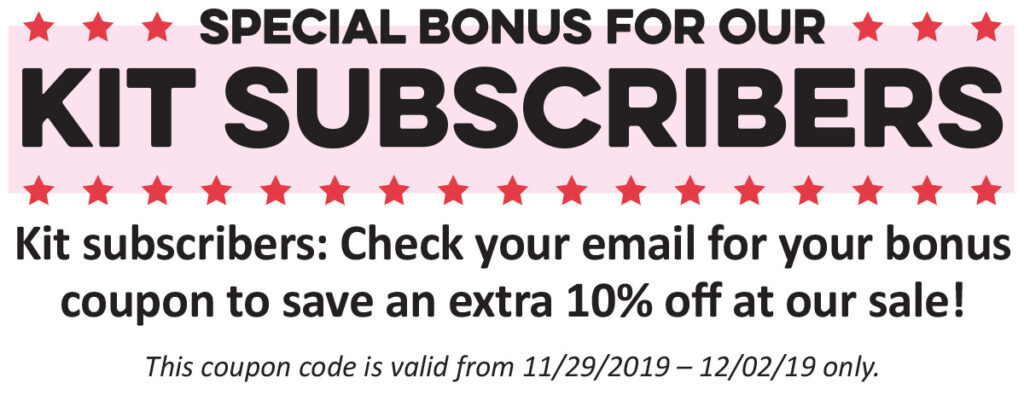
SUBSCRIBER DISCOUNT:Surprise! We have a special bonus for our kit subscribers! You’ll want to check your email (originally sent on Wednesday, November 20th and again on Monday, November 25th) for your coupon code to save an extra 10% off at our weekend sale!
SHIPPING: Our shipping is based on the weight of your cart and our scrapbook grab bags are heavy! If your USA order is over 1 lb., your order will have to ship via Priority Mail due to the Post Office’s rules. Our site will quote you a shipping price before going through checkout.
PLEASE NOTE:Due to an increase in orders during this sale, please allow us extra processing time. Orders will start shipping on Monday, December 2nd in the order that they are received. We will have extra help on hand to process orders as quickly as possible.
Thanks so much for joining us this weekend during our BIGGEST sale of the year!
Comments Off on Our Black Friday Weekend sale has started | Share This
Happy Thanksgiving, everyone! This holiday is one of our favorites – it’s a special day to gather with loved ones and be surrounded by family and friends, make and enjoy tons of delicious traditional recipes, share special memories with each other, and reflect on what and who we are most thankful for!
During this special time of year, we wanted to let you know that we are so very thankful for each and every one of you! All of your support, comments, emails, etc. – they mean so much to us! Your amazing support is what makes it possible for us to continue designing and producing new products, and for that we are forever grateful!
Wishing you all a wonderful Thanksgiving!
Comments Off on We are so very thankful for you! | Share This
One of the most important reasons why we scrapbook is to get our most precious photos printed and in an album, so a stamp that includes photo phrases and little cameras, our new Say Cheese Stamp, is perfect for adding to your projects! Design team Daniela sure thought so, and she’s created a layout based around it! Let’s see what she created.
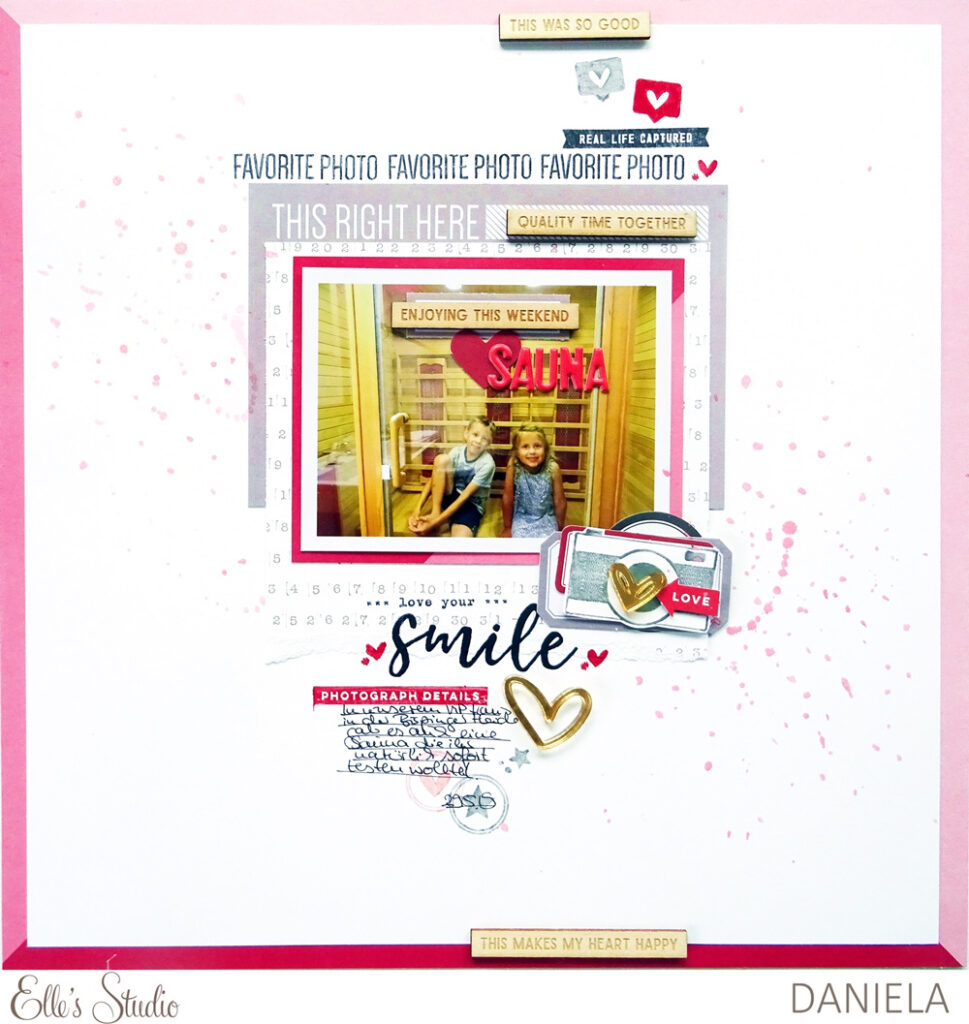
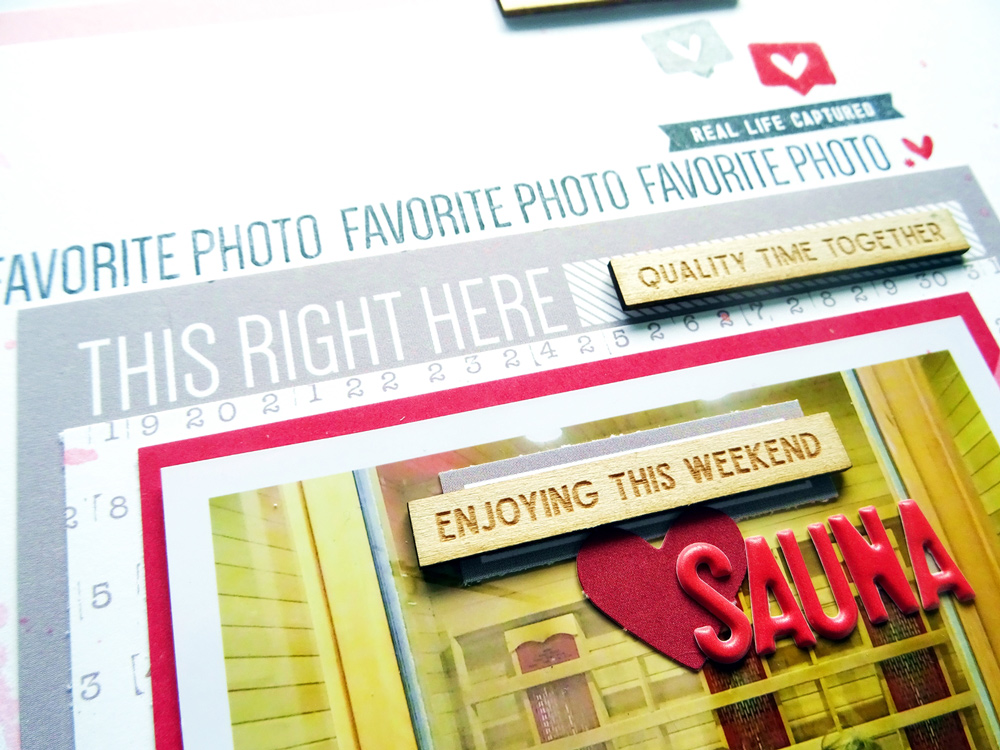
Hi friends! It’s Daniela here with a new layout. I’ve created a page with the Say Cheese Stamp to document a fun memory from one of our weekend getaways. We spent a few days in a nice little bungalow in the woods and there was a little sauna next to the bathroom. Of course, the kids wanted to test it as soon as we got there, but the heating process took a while, so the kids had fun testing the temperature in their pajamas! Let’s take a look at the layout:
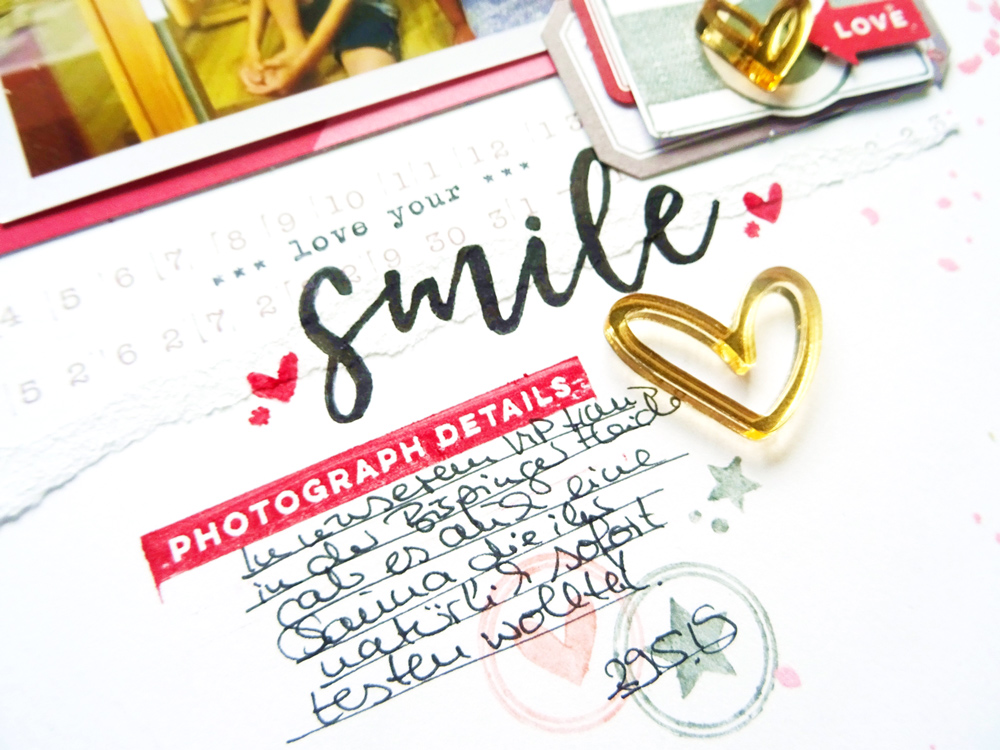
Grey and red are the main colors of this page, and I also used black, red and grey ink. I wanted to have some strong stamped elements and some faint ones. To create a soft look, I stamped on another paper first, before stamping the stars and circles on my layout. The big stamped word “smile” links the big picture element to the journaling, this way, there are no lose elements on the page.
I love that the stamps feature the same font that we find on the tags from the November 2019 Kit. The Wood Veneer Holiday Phrases add more information and function as an additional journaling. I placed the embellishments and the title on the picture, so there are seven different layers in the center of the page.
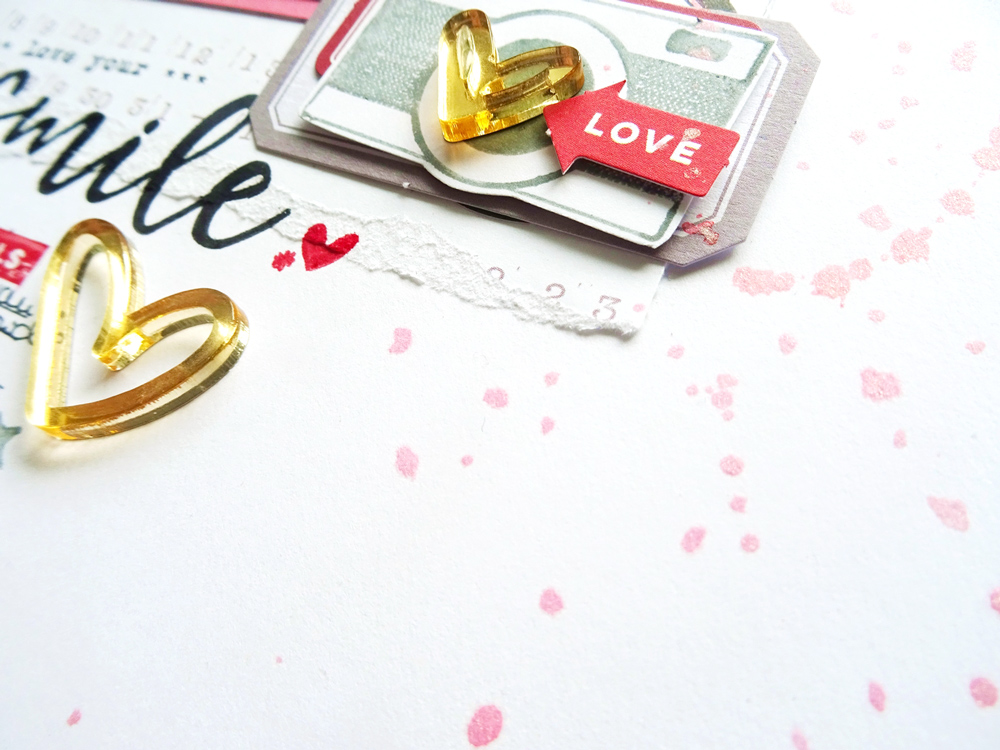
The camera from the Say Cheese Stamp is just perfect to use on all of your projects! I decided to build a little cluster with a grey camera, die cuts and a Hand Drawn Acrylic Heart for additional shine. Some light pink color splashes add the finishing touch.
I hope you feel inspired to document a fun moment using the Say Cheese Stamp! I can’t wait to see what you create with it—don’t forget to tag #EllesStudio when sharing your work on social media!
Thanks so much for stopping by and have a great day!
Comments Off on Say Cheese with Daniela | Share This
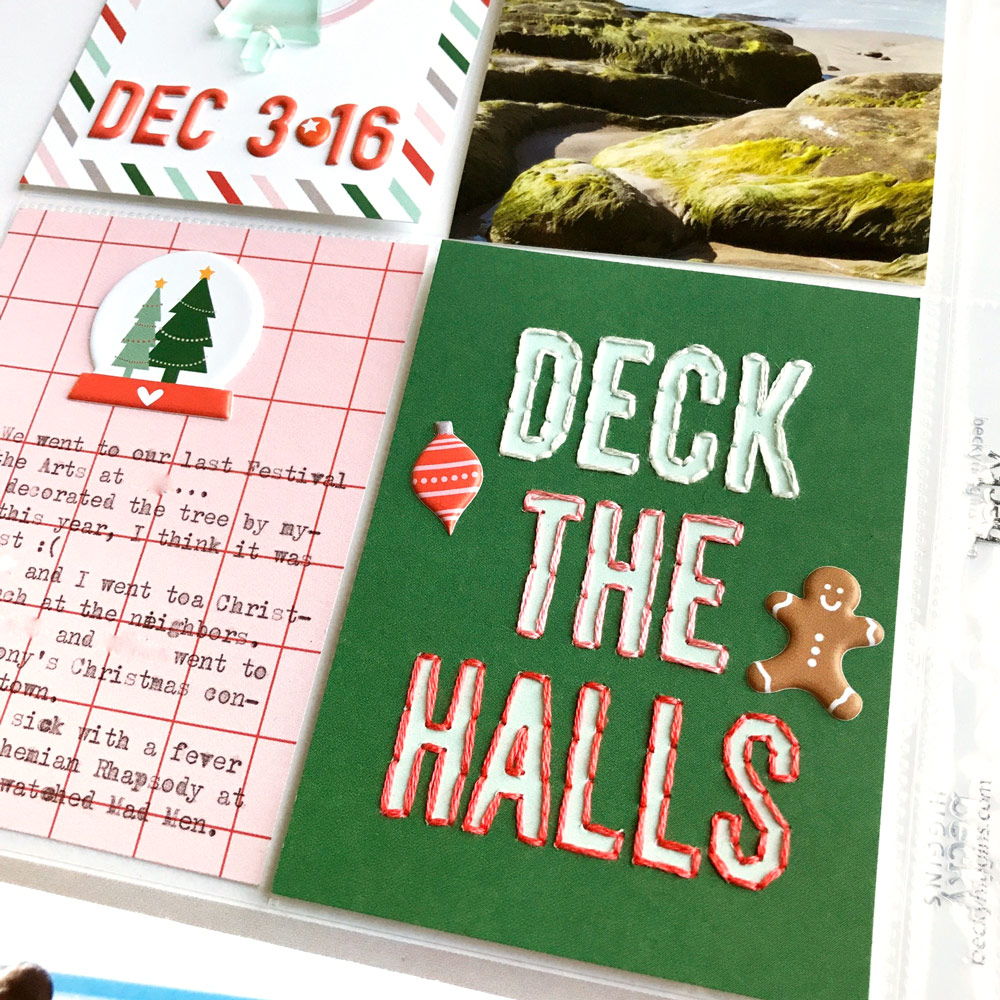
The beautiful array of textures found in our monthly kits and add-ons combine to create a fun visual project that really grabs your attention, and this month, Nathalie has included ALL of our textures from the November 2019 Kit and add-ons in her new pocket page spread. We think you’ll love how she added her own special touches, too. Let’s take a look!
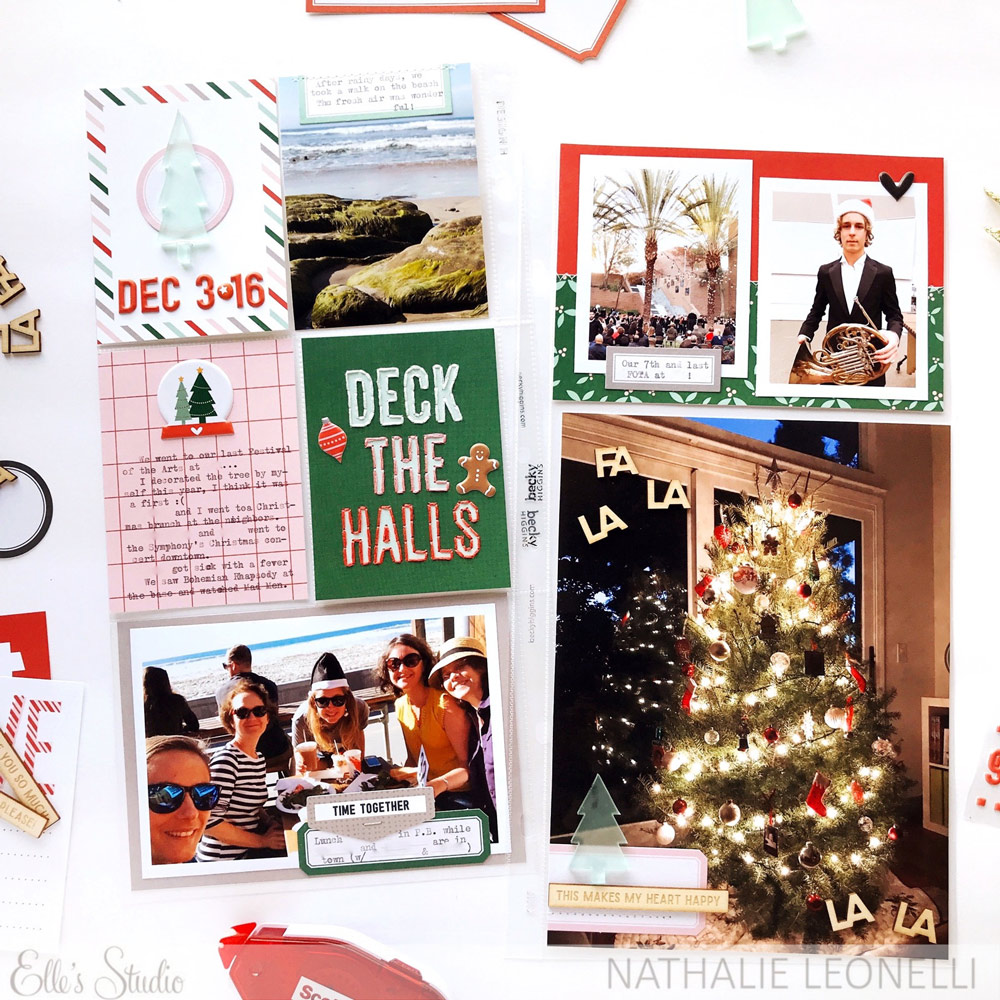
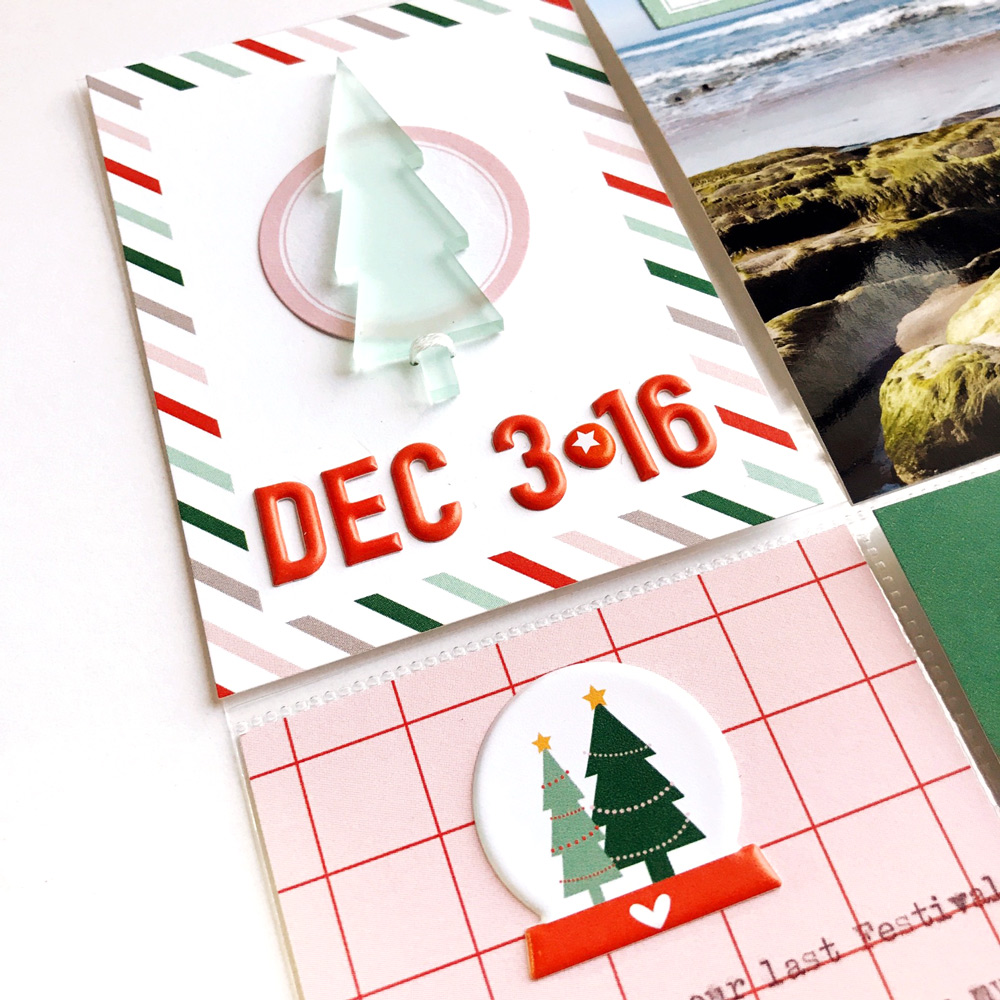
Hello, this is Nathalie and I am happy to be back today to share a December pocket spread for my 6″ x 12″ album. I completed the spread using the November 2019 Kit with a few sheets from the new ‘Tis the Season 6 x 6 Paper Stack, and some extra embellishments also from the November release.
Since you cannot have enough textures in my book, I also added some hand stitching. Anytime I look at a decorative tag like the one below, I think “how can I make it mine?”
I was lucky to have on hand just the right color threads to make an ombré effect that matches the rest of the page. It’s now the focus of my spread and I love it!
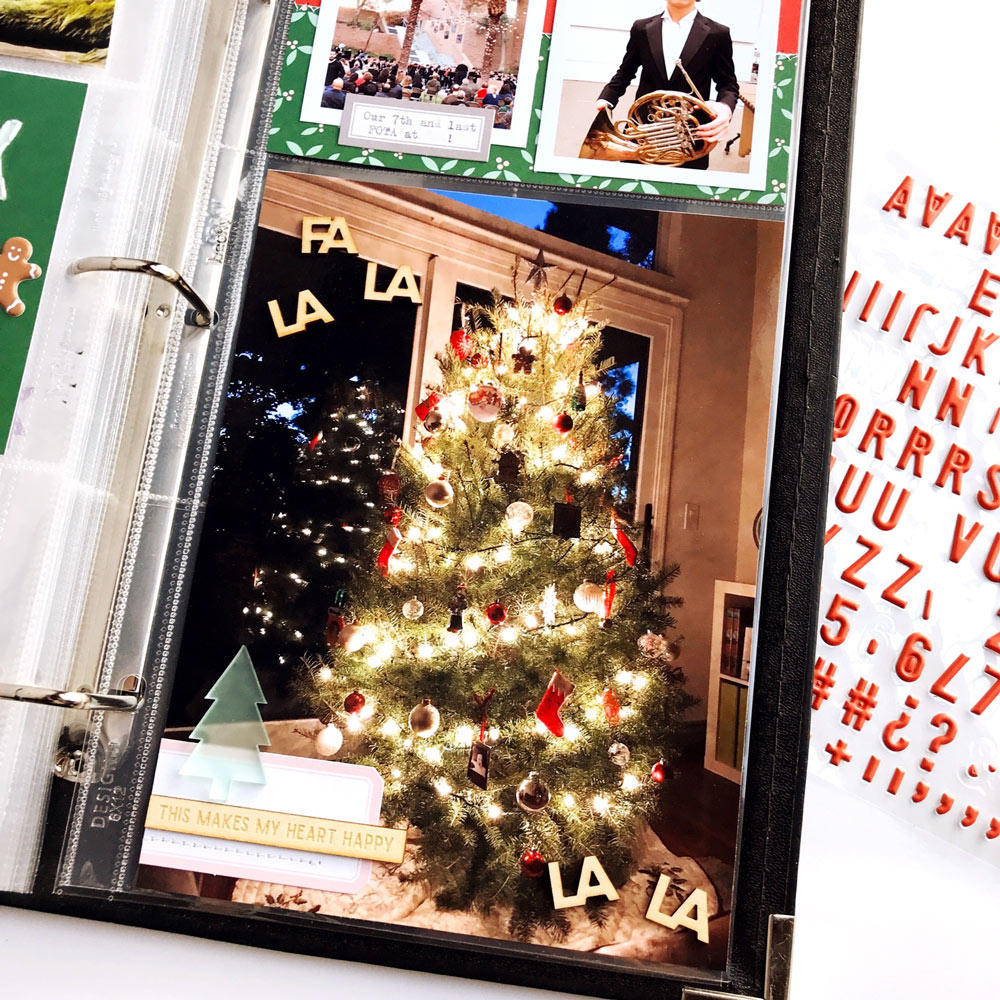
Apart from embellishing tags, another way to catch the focus is to make a statement with an enlarged photo:
This is a technique I don’t use nearly enough, but it was an obvious choice for my Christmas tree photo, which I printed to 6″ x 8″. The fun Fa La La Wood Confetti added a festive touch and their size is perfect to add directly on photos.
Today we welcome our November guest, Meg Gundlach, back to the Elle’s Studio blog for her final post with us. She is sharing a beautiful new pocket page spread with us, and her take on how she is tackling a new December memory-keeping project: one that goes back a few years! We know you will love not only how she recorded it, but her simple and stress-free frame of mind for this busy time of the year!
The scrapbook world is in full holiday mode! The phenomena of documenting your December in a specific album continues to grow every year and I’m certainly not immune to the allure of new holly jolly products. Even though I feel like my celebrations are perfectly well documented in my weekly pocket pages, I was really drawn to the idea of a special scrapbook that comes out at Christmas to reminisce about past holidays. In that spirit, I started an album in 2013 with the objective of making a couple pages a year to hold only seasonal memories, and today I’m sharing a new spread that I created using the merry November 2019 Kit and add-ons!
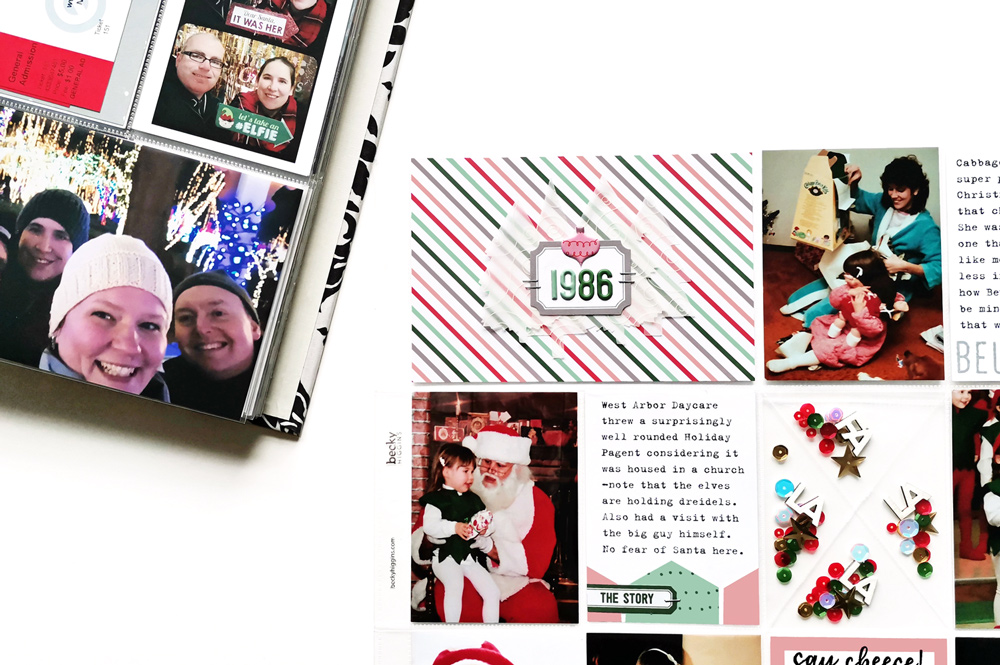
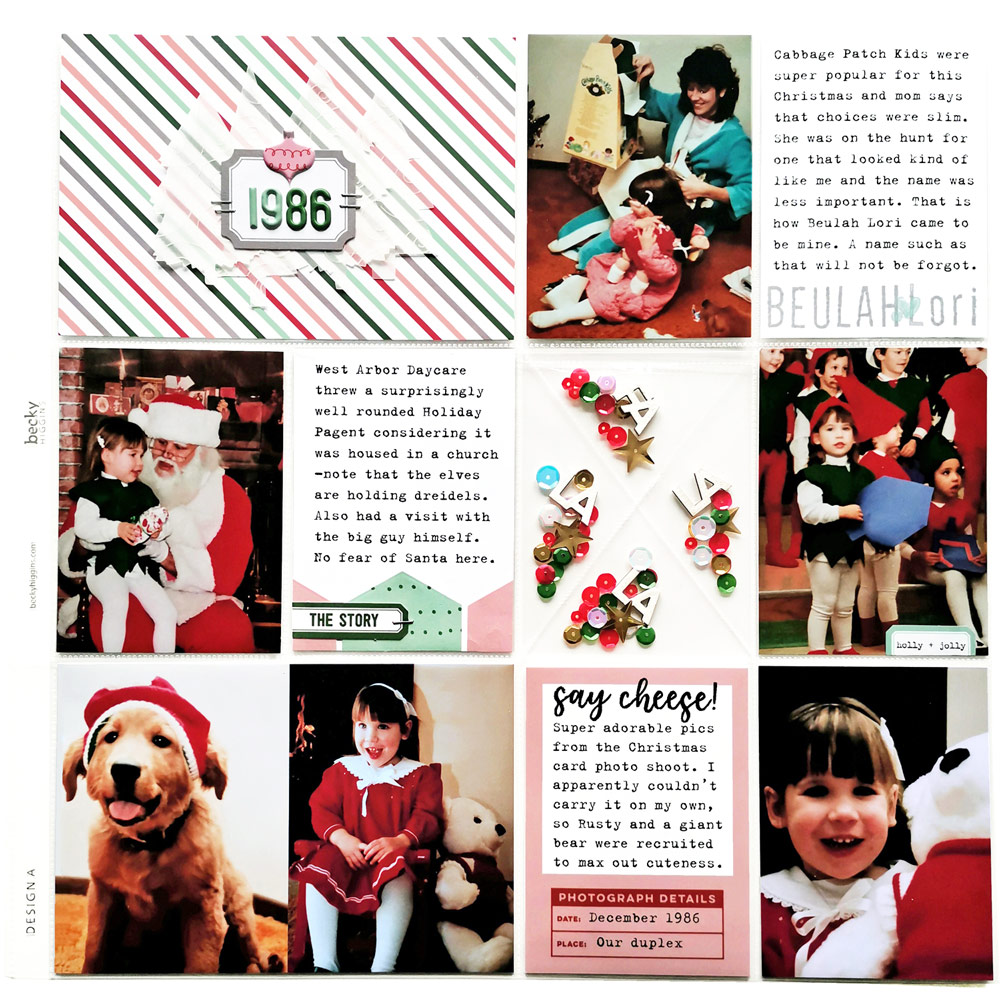
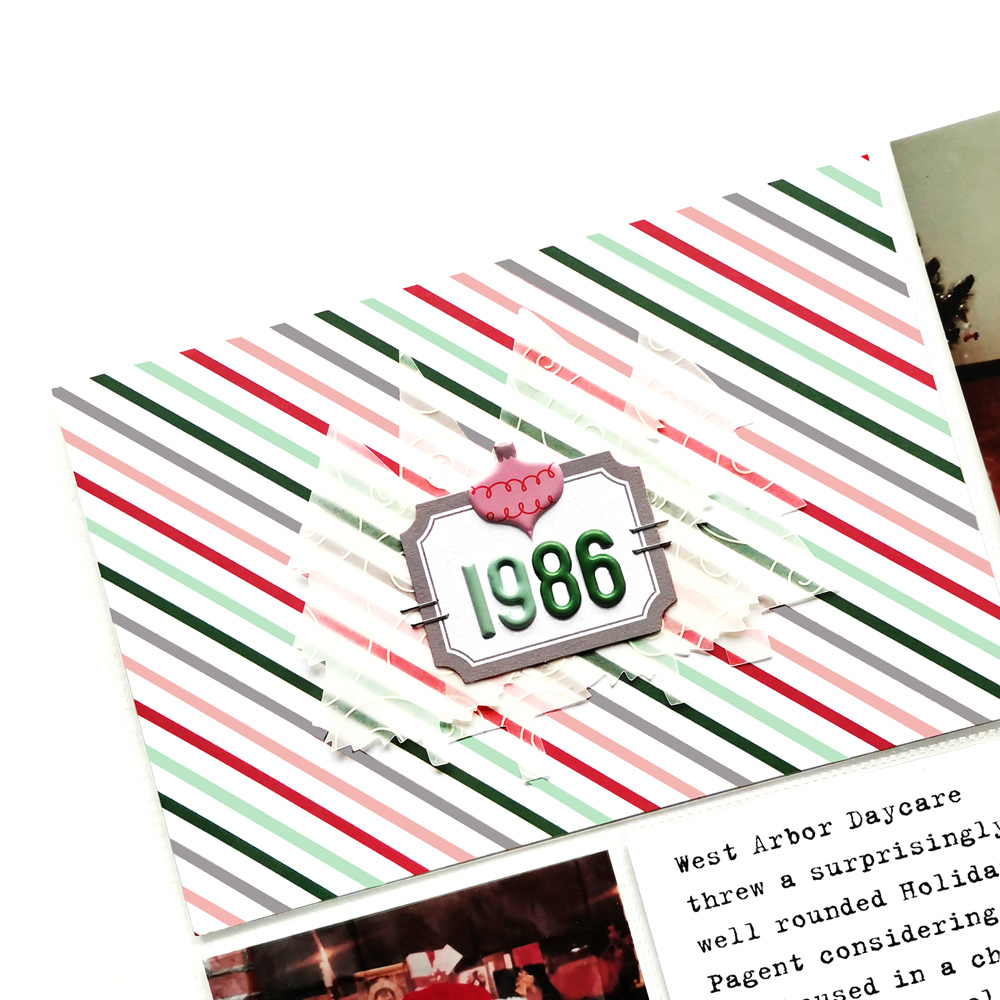
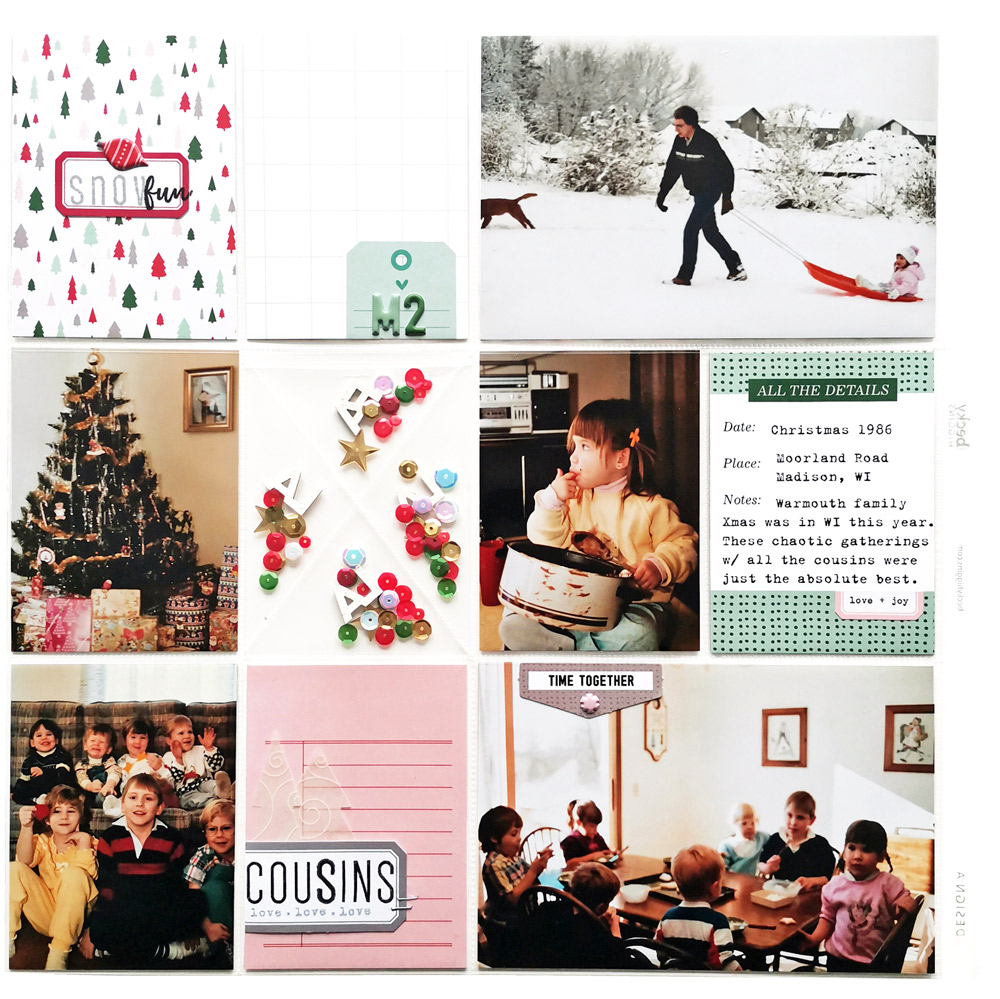
I originally intended to start the album in 2006, the year I moved to the United Kingdom and met my partner. Despite the fact that I’ve not yet completed those years, collecting the photos and memories together was so much fun I decided to roll it back to my first Christmas in 1984! The ‘early years’ volume will likely have only one page (front and back) per year, allowing the 22 years to fit in one album. Because these holidays are pre-digital, I’ve been slowly collecting, organizing, scanning, and printing photos for this ongoing project. I have no expectation that this album will be completed anytime soon, but I’m really enjoying the process. An added bonus is that I get to draw my mom into this project for assistance in identifying pictures and details. Family bonding win!
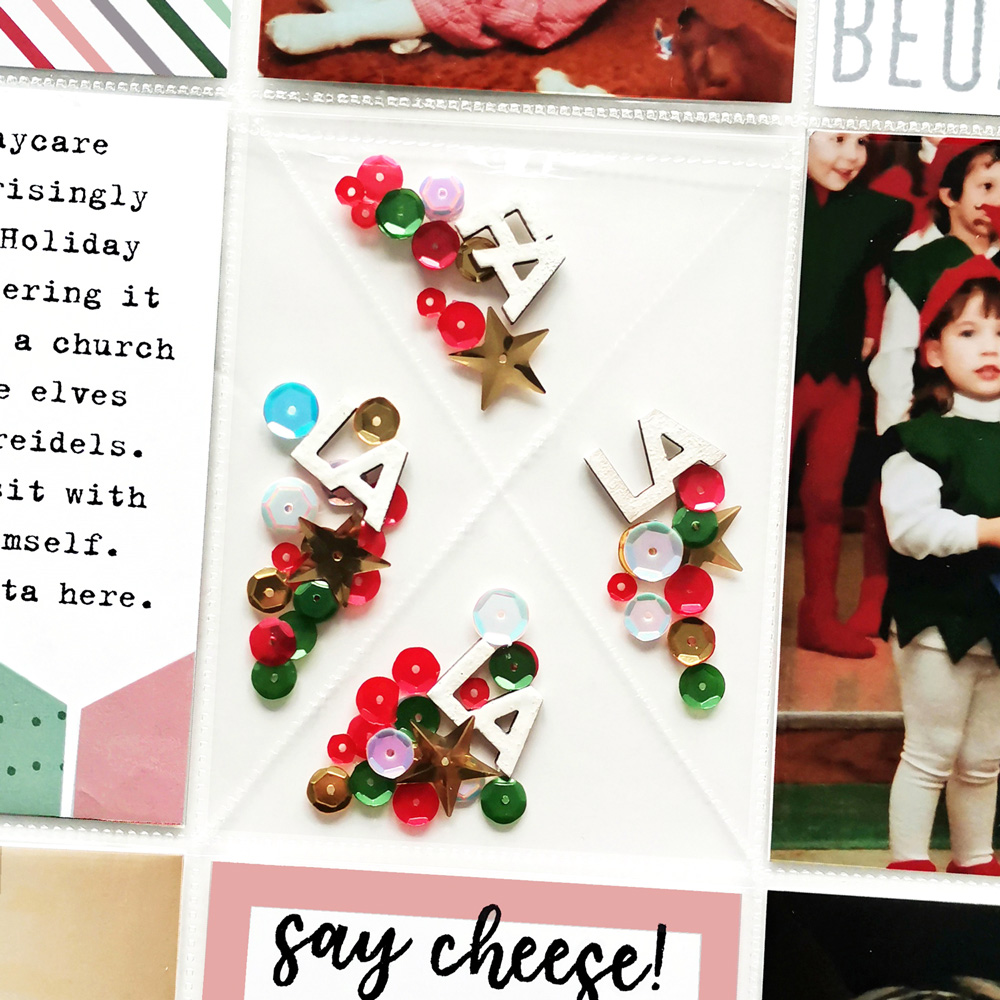
One of the things that most draws me to December documenting is that the albums lend themselves to trying out new or creative techniques. Even though my album is a much more condensed version I still take the opportunity to find inspiration and play. As soon as I saw the Fa La La Wood Confetti in the November release, I knew I had to make a shaker pocket and the 1986 page seemed as good as any to jump into this project. Because the words have a natural order and I am OCD, I split the elements into segments.
I am definitely guilty of not using my big toys often enough so I made a point of pulling out my Silhouette digital die cutting machine to use with the November Cut Files. Because my title card is simply the year, I decided to cut a forest of vellum trees to add some interest and bulk to the label. You may also spot some leftover trees tucked behind the ‘cousins’ Christmas Die Cut Label on the rear of the page.
The very nature of this album dictates some of the same elements appear year after year and I am totally embracing that. In addition to the obvious inclusion of the year, each page also notes my age (as a child) and the location where Christmas was spent. Pages for more recent years include photos of new ornaments and intentional bits of ephemera: our card, favorite wrapping papers, packaging, etc.
There are so many awesome December project types to choose from these days and it can feel overwhelming to complete it in real time each year. By adapting a concept that appealed to me into an achievable format, I am allowing myself to participate without the additional stress. Plus, I get to keep adding to my Christmas product stash—it’s the best time of the year!
Hi! I’m Meg but you may know me better online as TravelScrapSleepRepeat. Born and raised in Wisconsin, I moved to the United Kingdom in 2006 for grad school and have been roaming ever since. Shortly after arriving in Wales I met my partner Ken and since we both work in archeology/cultural fields, we have the opportunity to travel a lot. In between these adventures I print my photos and play with pretty things. I will never be ‘caught up’ and I’m totally cool with that—always chasing the next experience!
Thank you so much for inspiring us with your pocket pages this month using the November 2019 Kit and add-ons, Meg! It has been such a pleasure to have you use ES products on your beautiful, colorful pages! Be sure to share how Meg has inspired you—post your project on Instagram using Elle’s Studio November goodies with the hashtag #EllesStudio!
By now, your November 2019 Kit and add-ons box has landed on your doorstep, and we have inspiration from our design team to get you in the mood to make this week your most creative yet—before the beginning of December arrives! Let’s take a look at the gorgeous projects—from traveler’s notebook spreads to pocket pages—that our talented team is sharing with us this week!