Title Builder in pockets? Yep, you’ve got that right! Title Builder stamps also work perfectly in pockets, and whether you’re creating a sweet and simple title tag, or getting a bit more creative with your stamps, we think you’ll love what design team member Junell Kruzel has to share with us today!
Hello, hello my friends! It’s Junell on the blog today. It’s hard to believe that we’re thinking about Christmas time already, but all of the Elle’s Studio holiday goodies just have me buzzing with excitement for the season! Have you seen the brand new Title Builder Vol. 5 collection yet? It’s called “The Merriest” and it is filled with holiday words that you can mix and match to create your own titles and sentiments! There are even stamps with just suffixes, such as -al, -iest, -y, and -ful to help you create your own words in the manner you wish to use them. So clever!
Supplies | Title Builder Vol. 5 The Merriest Stamp, The Merriest Chipboard Stickers, The Merriest Puffy Stickers, Holiday Shapes Metal Die, Wonder Paper Stack
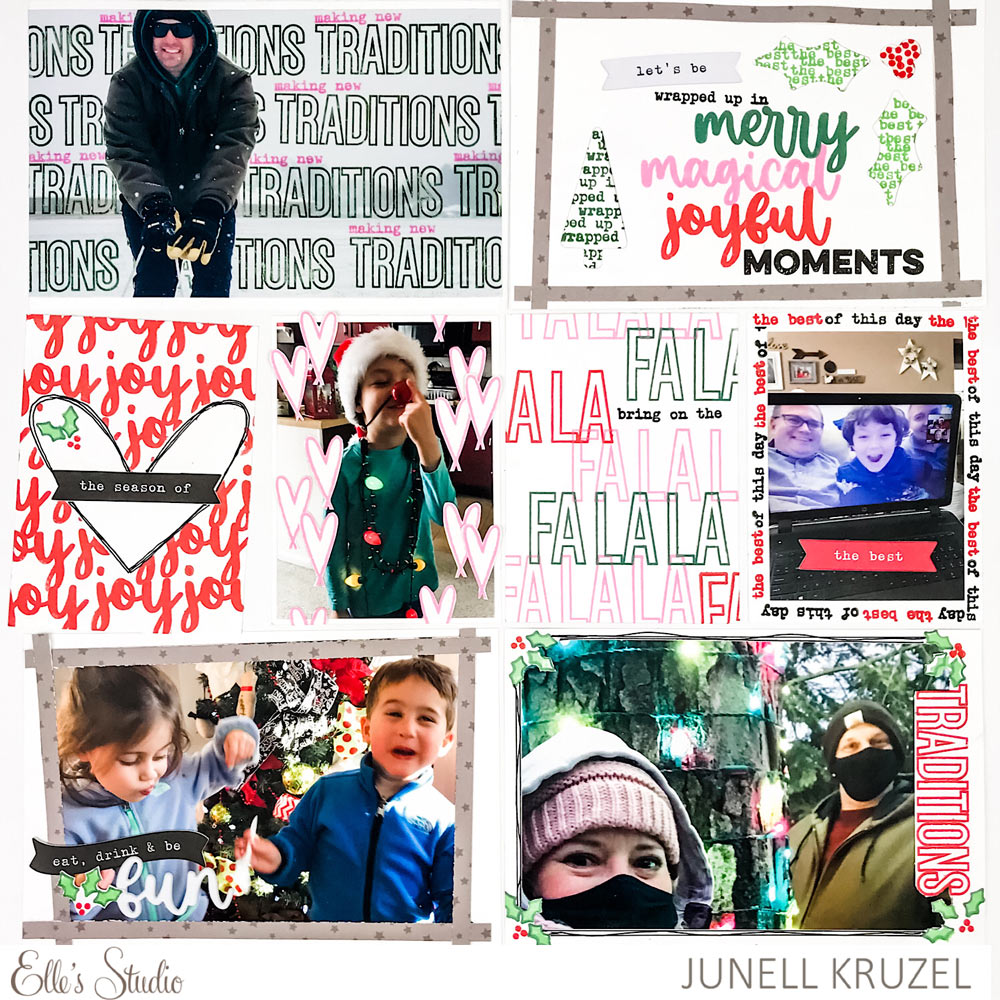
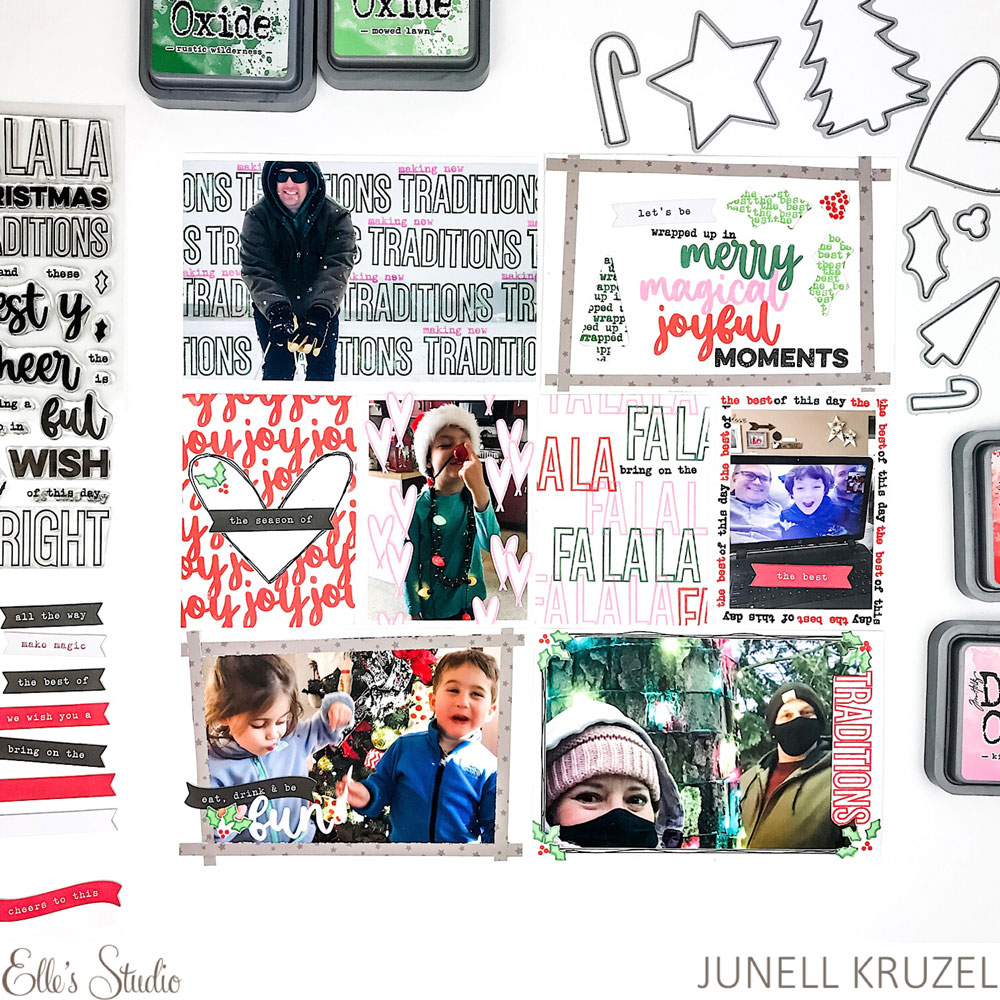
For my pocket page spread, I really wanted to showcase the Title Builder Vol. 5 The Merriest Stamp and all the different ways you can use it along with the most used stamping techniques I create with. For this page I only used four Distress Oxide colors: Kitsch Flamingo, Candied Apple, Rustic Wilderness, and Mowed Lawn. Let’s jump right in!

I’m starting right off with my favorite masking technique on the top, left 6 x 4 inch photo. I just love how it kind of gives the photo a 3D effect. And it’s pretty simple to achieve!
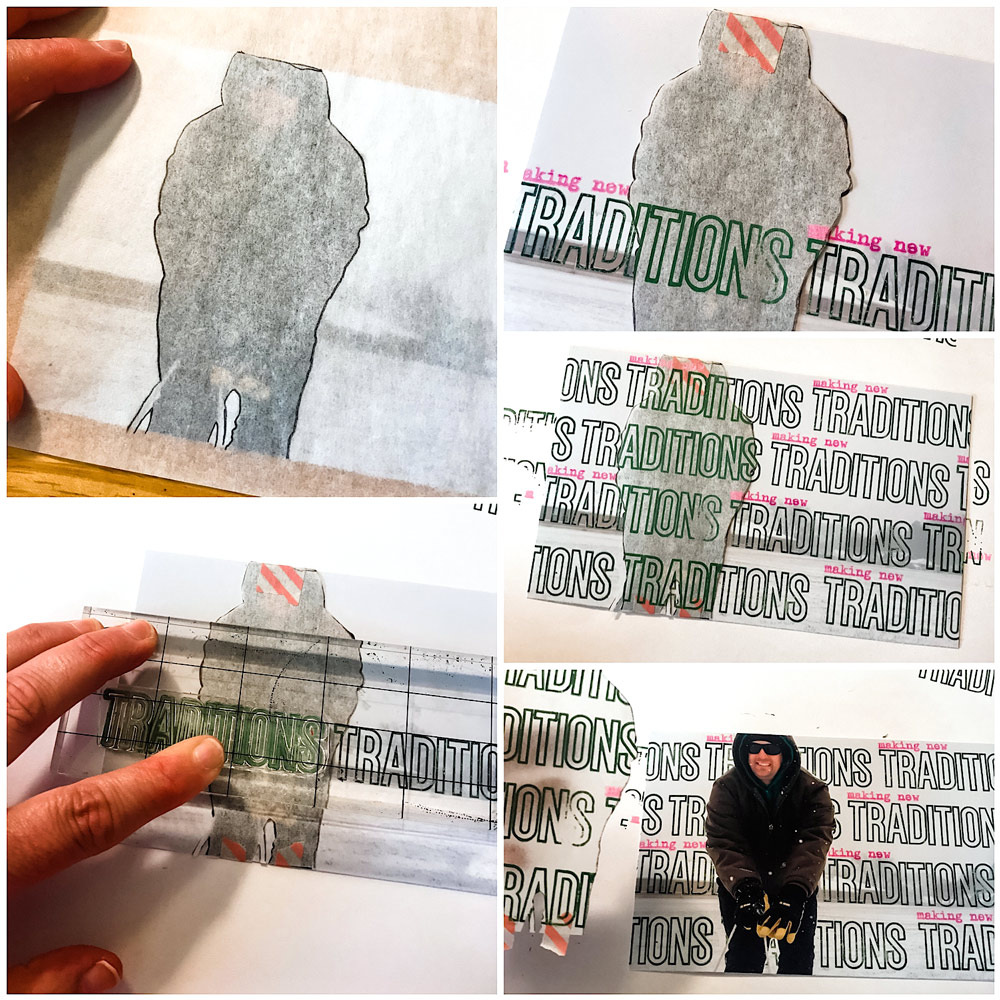
First, I laid a piece of tracing paper over my photo and used a pencil to trace an outline of my husband. This is where I do not want the stamping to go. I then cut it out and used washi tape to tape it back over the picture making sure the tape didn’t touch my photo, just the tracing paper and the back of the photo.
Once I figured out what stamp I wanted to use from the Title Builder Vol. 5 The Merriest Stamp, I inked it up and started my stamping on the horizon line in the photo. I continued repeat stamping over the photo and tracing paper until the photo was covered. Because I used Distress Oxide, I had to let it dry for about 20 minutes. I did not want it to smear after doing all that stamping! Once I was positive the stamping was dry, I carefully removed the washi tape and tracing paper from the photo and was left with a pretty cool photo! I just love how this looks!
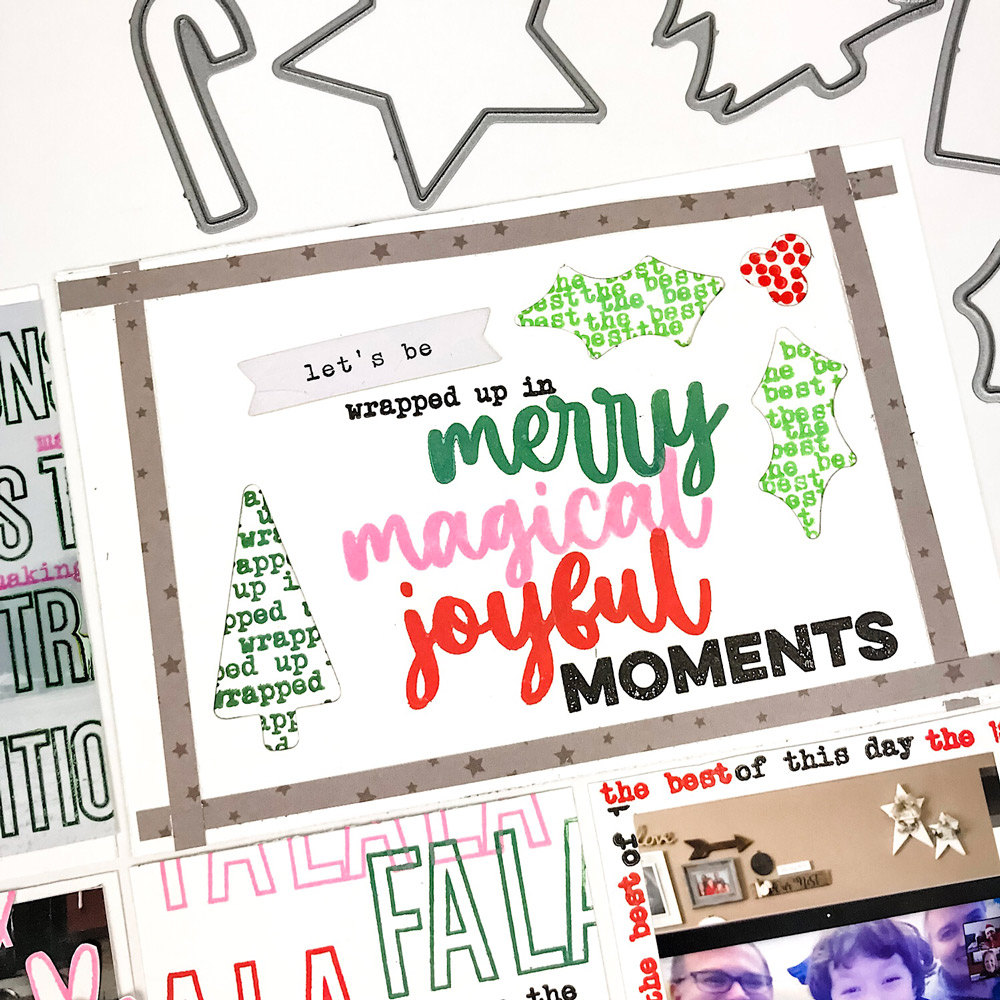
For the title card on the top right, I used The Merriest Chipboard Stickers and the Title Builder Vol. 5 The Merriest Stamp to create my title. I then had the idea to use the Holiday Shapes Metal Die to cut out shapes from the background, stamp phrases on paper and then layered it up behind the cut outs. It adds dimension and shadow for a unique look!
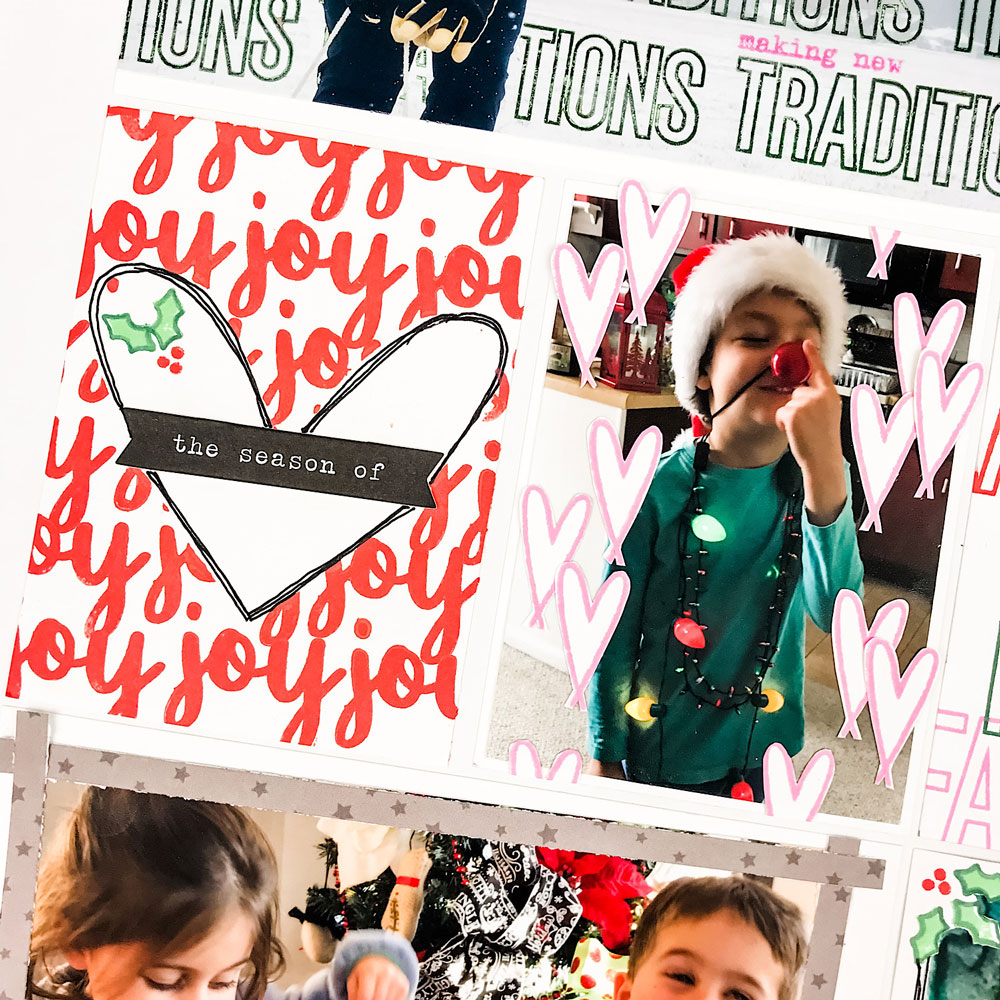
For the first 3 x 4 inch tag on the left, I used the masking technique again. I had an acetate heart in my stash that I lightly adhered before stamping across the entire tag with the word joy. I removed the acetate heart to reveal a white heart shape. I then added a banner from The Merriest Chipboard Stickers and did more stamping to add the holly leaves and berries.
The second 3 x 4 inch tag on the right is so cute! To create it, I stamped several hearts from the stamp set and then fussy cut them out and added them directly on top of the photo. Quick and easy.
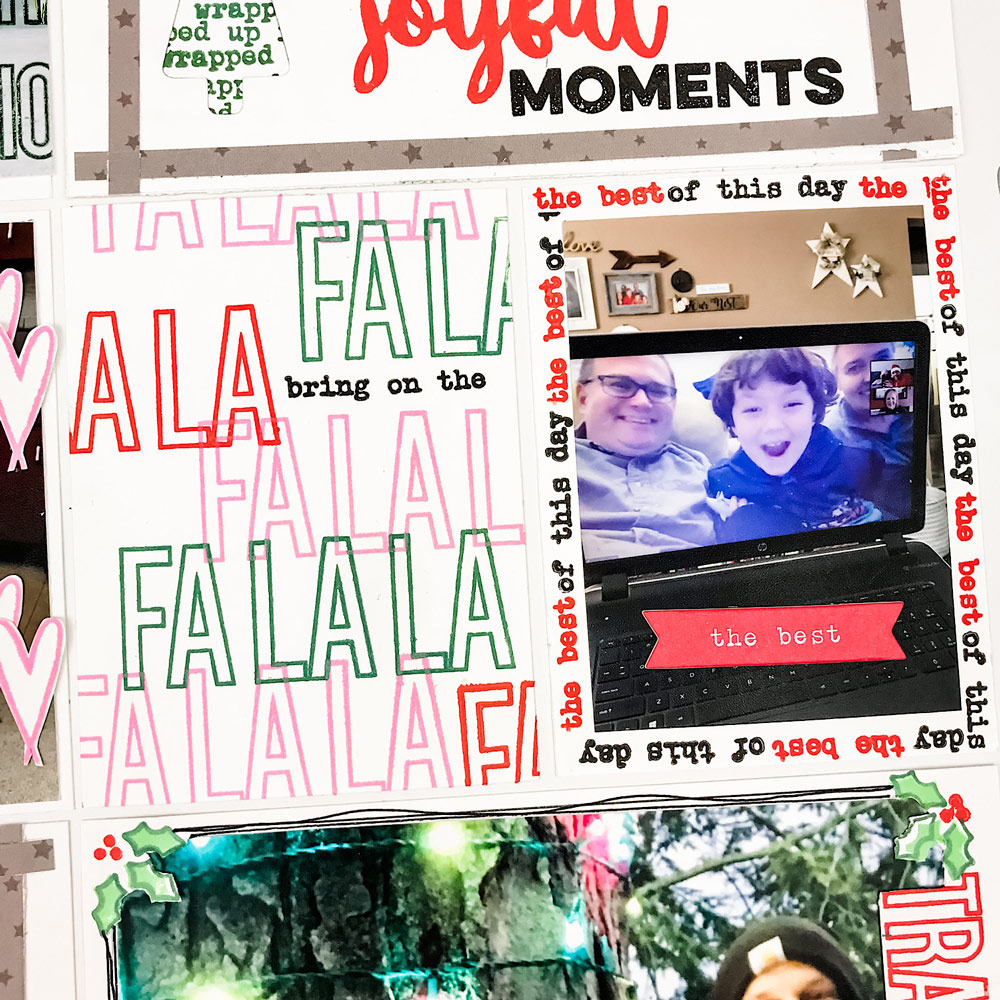
On the next tag, I created my own design with repeat stamping in different colors making sure to overlap them just a little to make it more interesting.
One of my favorite things to do with word stamps is create a border, so I did that with my last 3 x 4 inch tag. I alternated two different stamps to get the phrase I wanted. The first part “the best” actually comes from a stamp that says “are the best”. I very carefully used washi tape to mask off the word “are” to make it work. (I also could have cut the stamp apart, too.) I alternated between two colors to stamp my border.
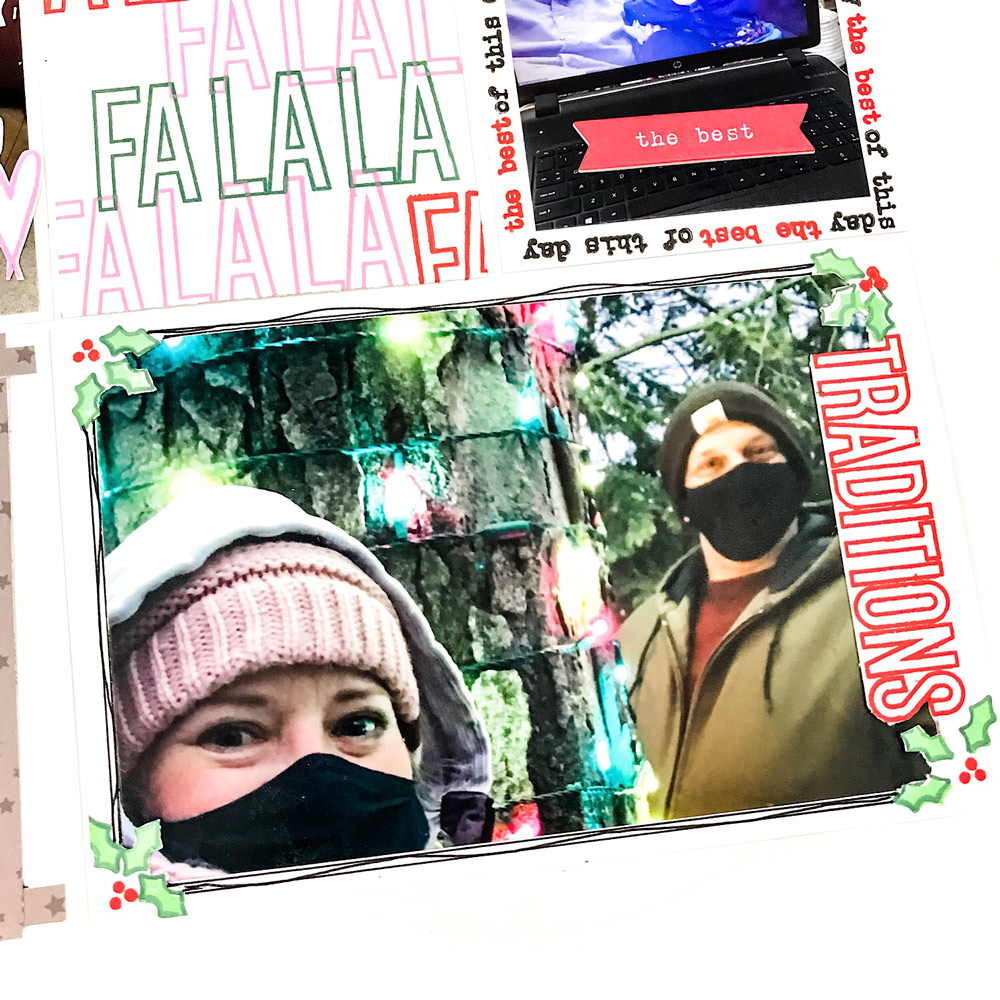
For the bottom right 6 x 4 inch photo, I stamped the word “traditions” vertically and also stamped holly sprigs in each corner. Instead of placing my photo over the top, I used an exacto knife to cut out the center and then slipped the photo underneath. I used a black pen to create doodles to add a border (and cover up some slips of the knife!)
These are the tried and true (and easy!) techniques I use when stamping. It was so fun playing with the new Title Builder Vol. 5 The Merriest Stamp to create my own sentiments and phrases! It will be in heavy rotation during Document December!
I cannot wait to see what you create with this set. What is your favorite stamping technique? Let me know! I’m on Instagram at @junell.kruzel and you can share with all of us, too, in the Elle’s Studio Facebook Group! Thanks for reading!