
Hello there! Are you ready for more fun with cards? Today, we are showing you some fun ways to use tabbed tags. My super talented friend, and DT member Christa agreed to play along today and look at the beautiful card she made! I LOVE how she combined several tags here:

love how to:
- Cut the pink chevron paper down to 5″ x 5.5″
- Cut the black chalkboard paper down to 4.5″ x 5″ and layer centered on top of the previous patterned paper
- Cut the blue and pink large tabs to 3″ x 3.75″
- Layer the “You & Me” small tab directly over the black chalkboard tab, leaving the tab showing
- Under the black tab, layer the blue cut tab on the left so that the tab and a small portion of the card are showing.
- Do the same with the pink cut tab, layering it to the right of the smaller tabs
- Angle the adhered tabs slightly to the left, keeping it within the black chalkboard paper
- Cut the word “Love” from the Note Tags and adhere it onto the top tab
- Cut the “I Adore You” from the Cut Outs and adhere on the left side of the tabs.
- Mist a chipboard or wood veneer heart with red mist and adhere in the center of the “O”
- Use the You and Me stamps and stamp “XOXO” along the “V” with red ink
- Adhere all of this onto cardstock cut to 5.5″ x 10″ opening on the right side
For my first card, I binded 2 small tabbed tags with washi tape to create the base. As I was working on it I realized this would make a great mini album as well! Cool huh? Also on this card, there is a sneak peek tag from our monthly kit that will be launching on Friday, May 10th at 8:00 am PST – make sure you are on our newsletter list 😉
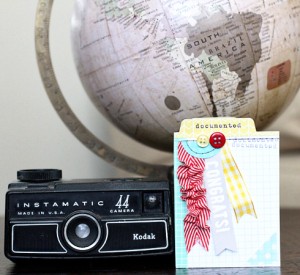
congrats how to:
- Select two tabbed tags the same size
- Bind them with washi tape
- Sew along the sides to secure
- Layer tidbits, tags and ribbon
- Add a vellum photo corner for balance
- Embellish with buttons
For the next card, I wanted to create a mother’s day card that was fun and trendy (and not at all girly) so this is what I came up with:
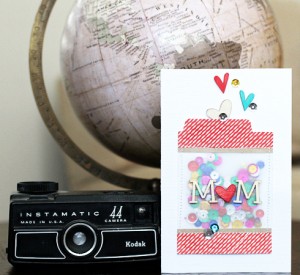
mom how to:
- Cut off the middle section of the ‘best day ever’ tabbed tag
- Replace with vellum
- Attach to a white card base
- Fill the pocket with sequins
- Sew along the edges to secure the pocket
- Add wood veneer letters, hearts and sequins
- Color some of the hearts with ink pads
Supplies:
|
|
|
|
|
|
|
|
|
|

Comments