Merry Christmas!

Wishing you a very Merry Christmas from all of us here at Elle’s Studio! We hope you all have a wonderful holiday season surrounded by the ones you love! Don’t forget to pull out your camera and document those special moments so you can treasure them for years to come!

Merry Christmas!

Documenting the Ordinary Days of December with Andrea Gray

Our newest product in the shop is not just for documenting the holidays, and today we have design team member Andrea Gray with us to show off a new pocket page spread that documents the ordinary days of December. Let’s see how it came together.
 
Hey crafty babes! It’s Andrea here today and I’m sharing a colorful 6″ x 8″ double spread in my December album. The best part about the December 2017 Kit and extras is that they are still perfect for documenting the non-Christmas events as well as the traditional holiday details.


Supplies | Document December 2017 Kit, December 2017 Kit, Vellum Holiday Shapes, Large Wood Veneer NumbersChristmas Puffy Heart Stickers, Puffy Heart StickersDocument December Stamp
 
This december card was perfect to sit opposite a 4″ x 6″ black and white photo, but it needed a little pick-me-up. I added “happy” and the number border from the Document December Stamp, plus a cluster of puffy heart stickers in the corner.


I needed a punch of yellow to balance out the yellow hoodie in one of the photos so I cut out the star from a 3″ x 4″ tag in the December 2017 Kit and layered it with a large wood number onto the “oh, what fun” tag from the Document December 2017 Kit.


With a 4″ x 6″ tag and a 2″ x 2″ photo, there’s a lot of leftover room for journaling and embellishing!


Simple little layers of circles and word strips add that little bit of color in the corner of a black and white photo and tell a bit about the fun the kids had that day.


This is how it all came together! I hope you’re having fun documenting your December—even the regular days!

Inspired by a Die Cut with Jamie Leija

Sometimes you need some inspiration to tell a story, and that inspiration can come from so many different places—including amazing product! Today we have Jamie Leija with us, sharing how she was inspired by one of the small die cuts in the December 2017 Kit! Let’s see what she created!
 
Hiya! It’s Jamie and today I’m sharing a layout based on a die cut. Does that ever happen to you? The products inspire the stories you tell?


Supplies | December 2017 KitTwinkle Puffy Stickers, Winter Wood Veneer Words,  Family Fun 6″ x 6″ Paper StackFamily Fun 12″ x 12″ Paper Collection
 
In the December 2017 Kit, there was one little, green die cut that reads “under the tree”. I’m pretty sure this refers to presents, but I instantly thought of the photos of my cat hanging out on the tree skirt, eyes all big. He’s ready to wreck havoc!


I created my own version of a Christmas tree using a ton of patterned, punched circles. I’ve had this idea in my head for awhile and I’m glad I was able to make it come together. I punched circles from the kit’s journaling tags and also the Family Fun 6″ x 6″ Paper Stack. I arranged them in a loose triangle and then machine stitched a real triangle over top.


For embellishment, I made sure to include the “under the tree” die cut. I also added green and white puffy stickers from the Twinkle Puffy Stickers. I like sticking with a monochromatic color scheme. For the tree base, I added one of the Winter Wood Veneer Words. It’s a loose interpretation of a tree, but I really like it!


I wanted to add more white to the layout, so I printed my journaling out on white cardstock and added journaling strips below the photos, which completed the page. A whole page from one tiny die cut. Don’t you love it when that happens?

From Sketch to Finish Vol. 3 Inspired with Neela Nalam

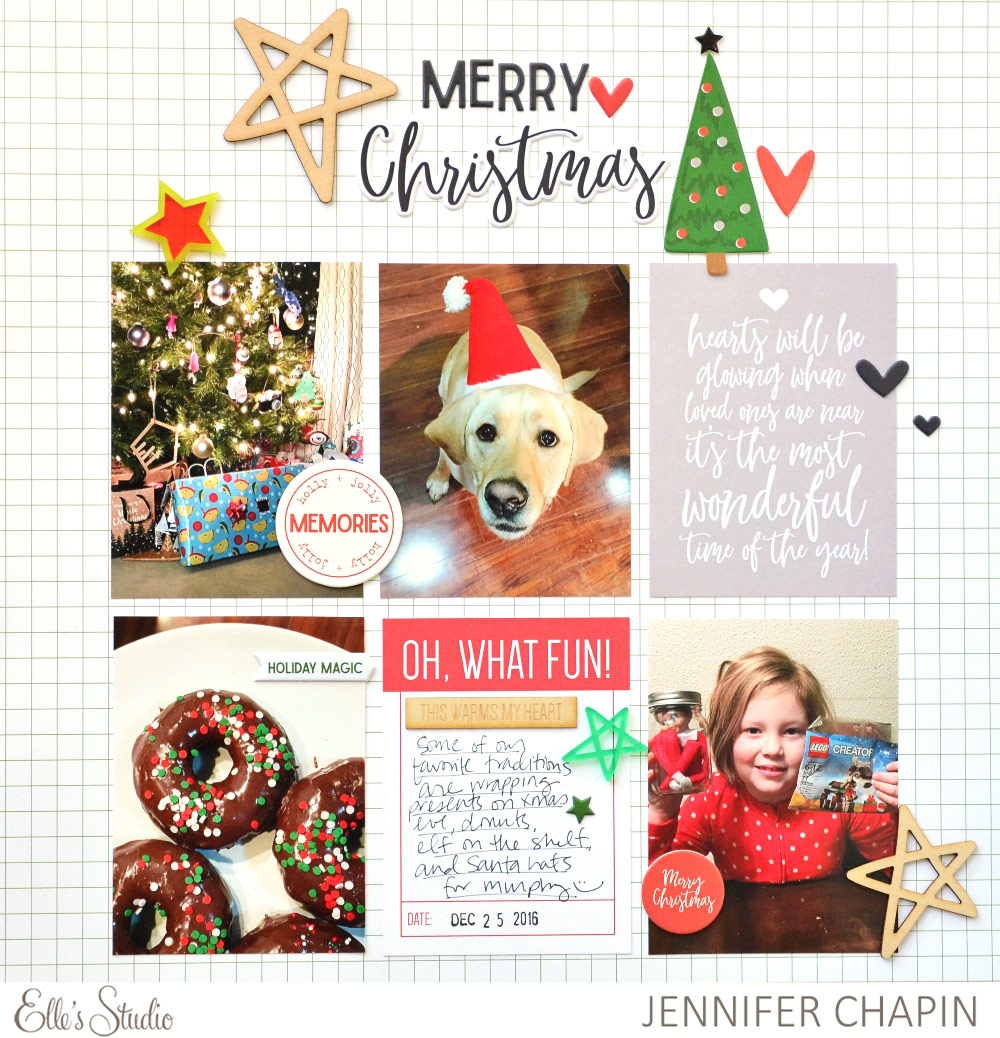
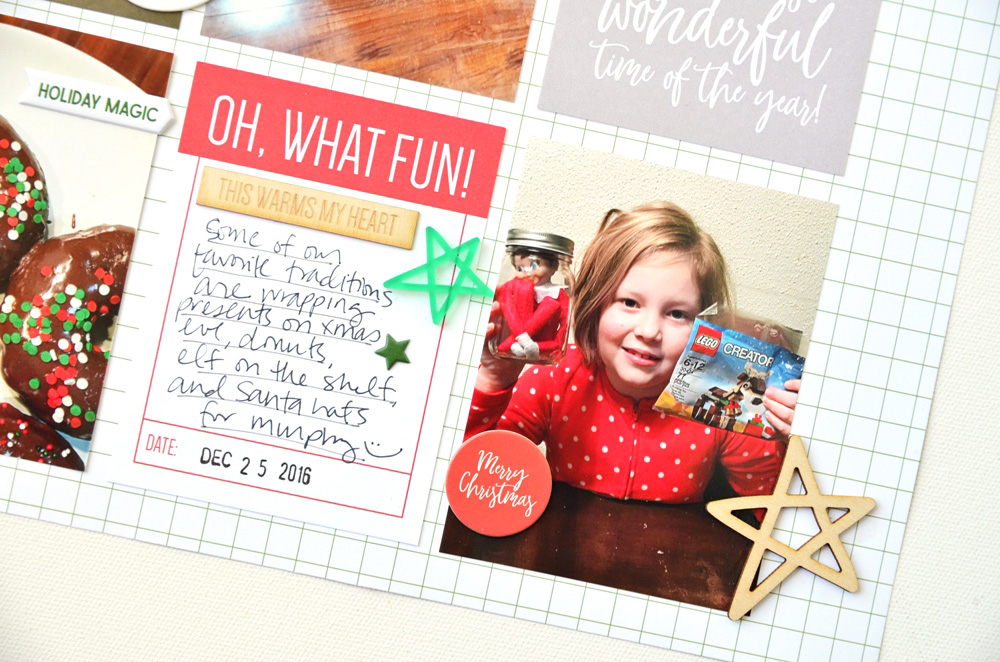
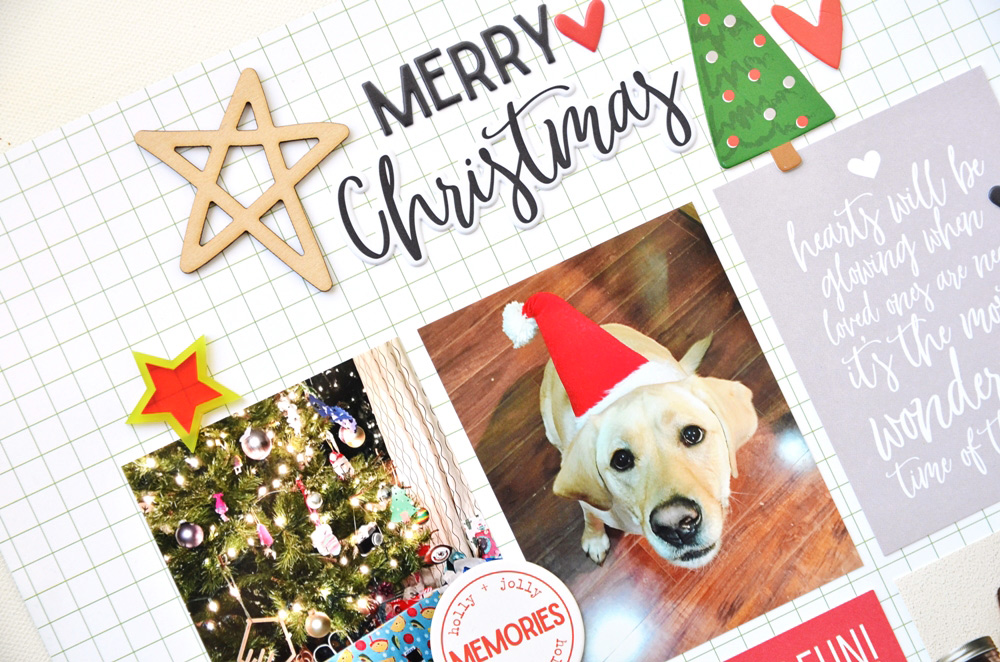
With the busy holiday season upon us, we may not have a lot of time, or creative mojo to create. That’s when a sketch can come in handy! Today, Neela Nalam is sharing how she was inspired by our latest sketch class, From Sketch to Finish Volume 3, and we love the festive layout that she created! Let’s take a look!
 
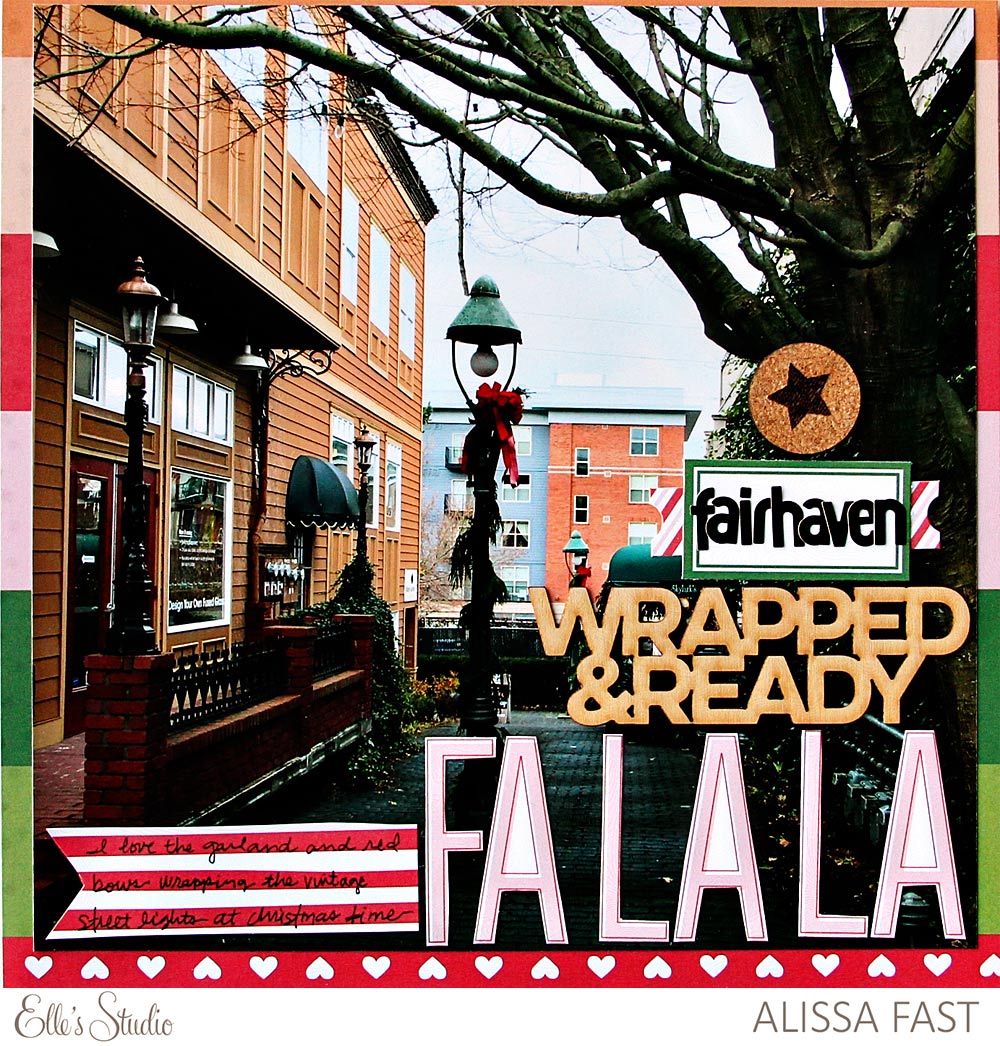
Friends, have you had a chance to check out the From Sketch to Finish Volume 3 class here at Elle’s Studio? I was blown away by all the wonderful sketches in the class, the amazing contributor inspiration, and the 6″ x 8″ exclusive stamp that goes along with this class is something else, too! Today I’m here to share a new layout, inspired by one of the sketches in the class.


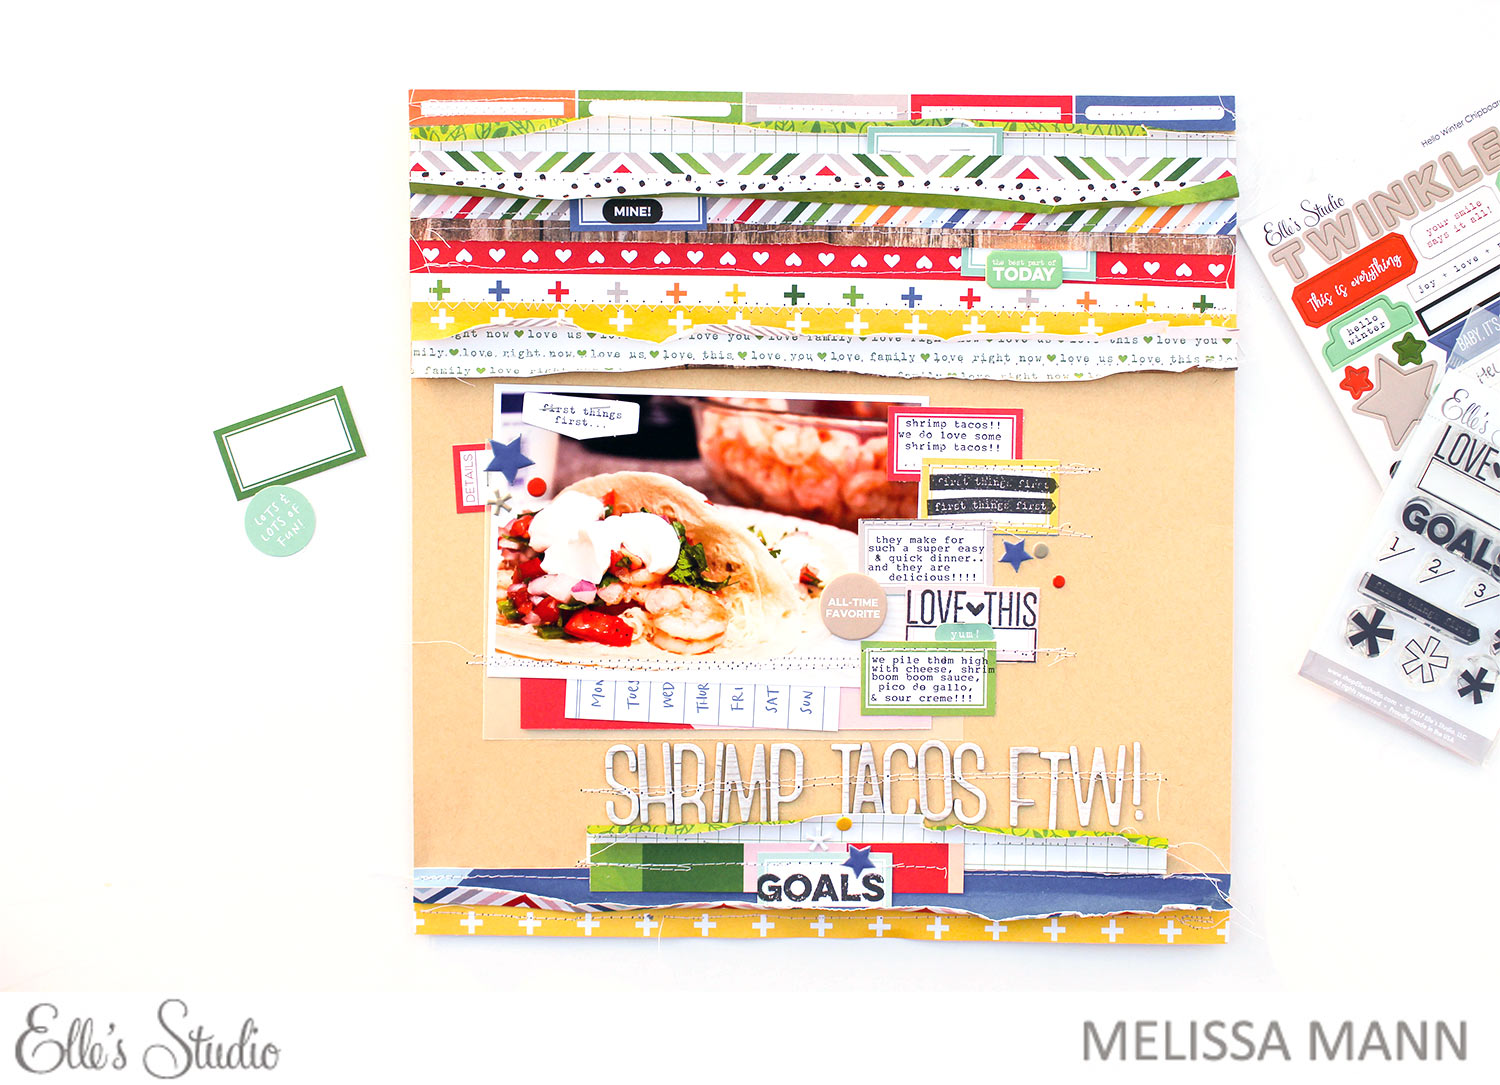
Supplies | From Sketch to Finish Volume 3 class with stamp, ‘Tis the Season Wood Veneer Labels, Green Puffy Alphabet StickersFamily Fun Bits and Pieces, Family Fun Puffy Stickers, Family Fun 6″ x 6″ Paper Stack, Family Fun 12″ x 12″ Paper Collection 
 
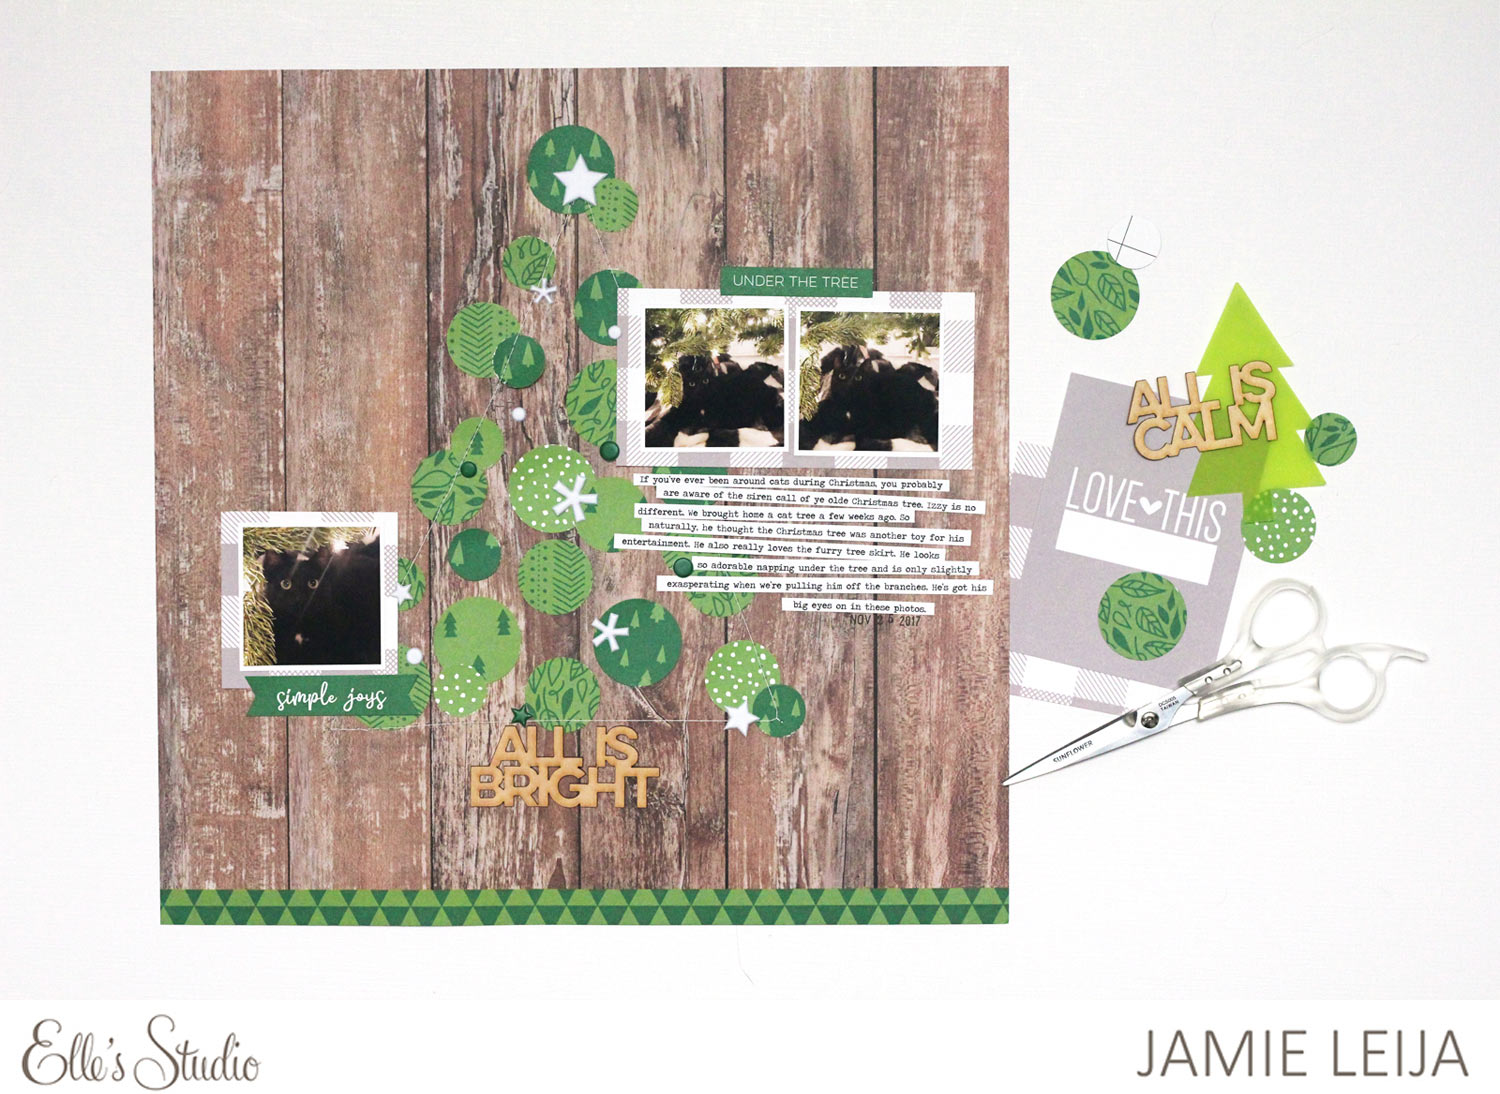
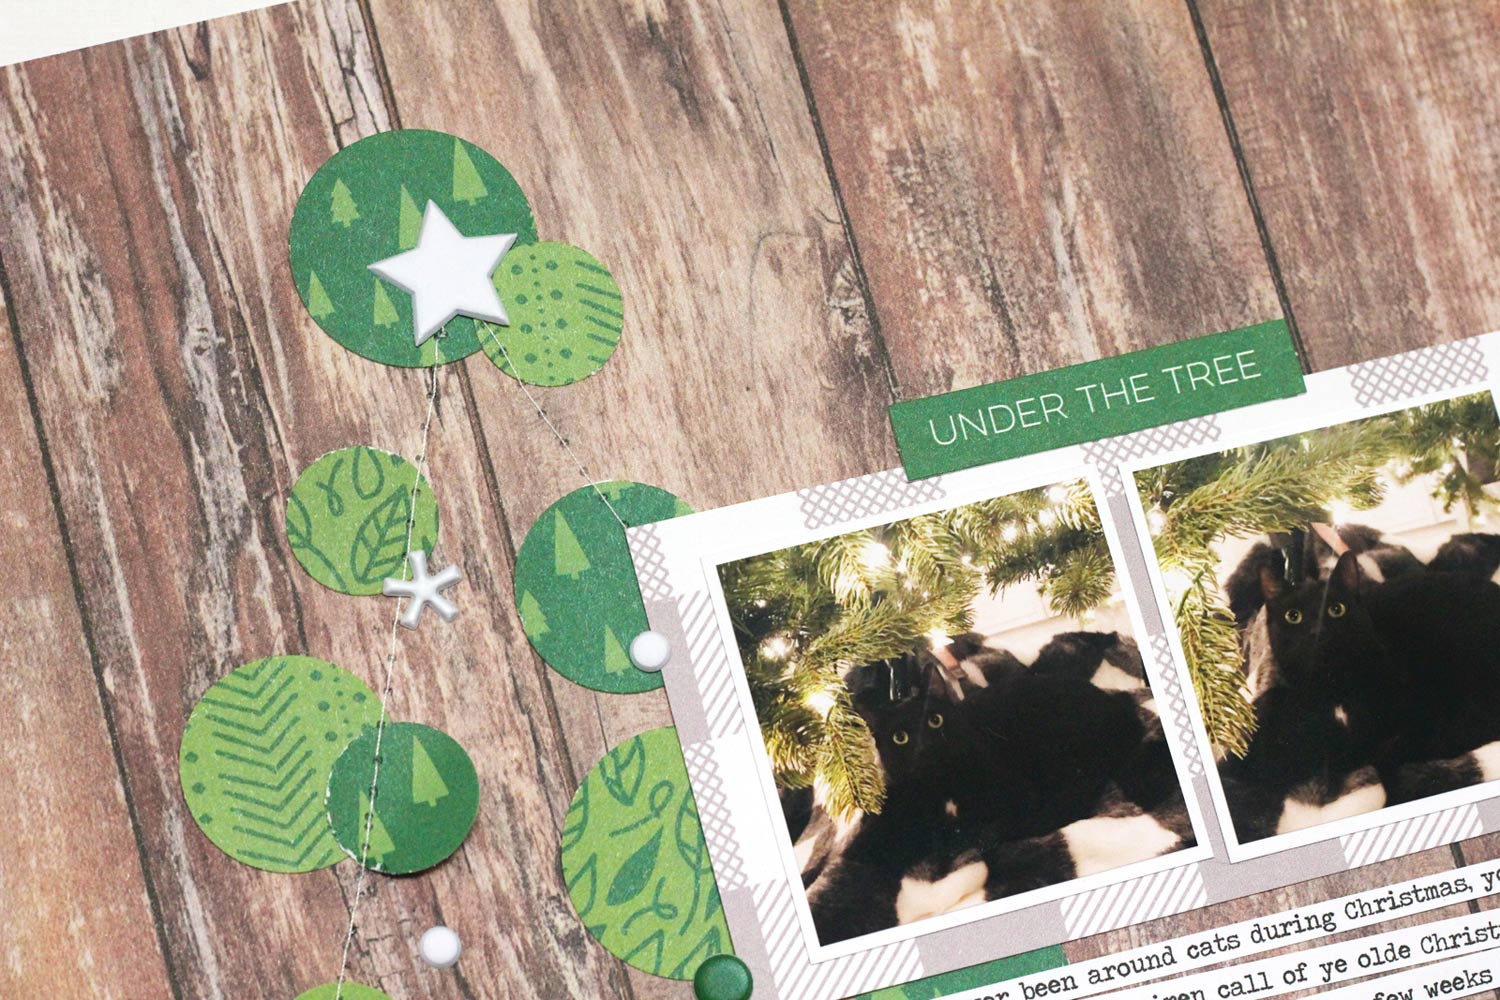
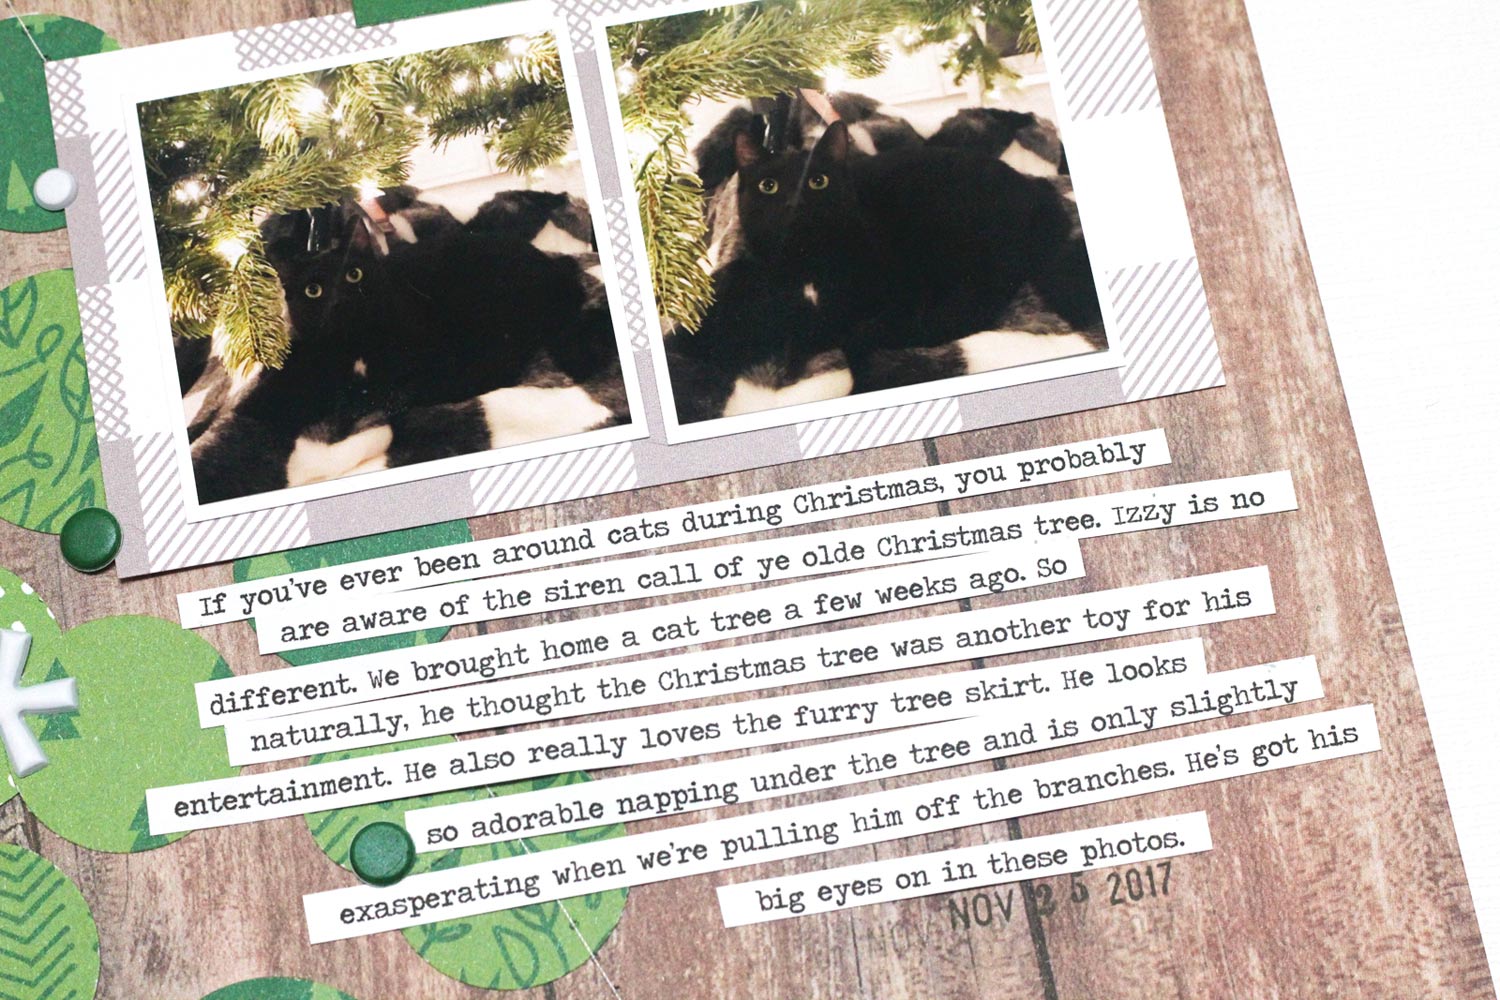
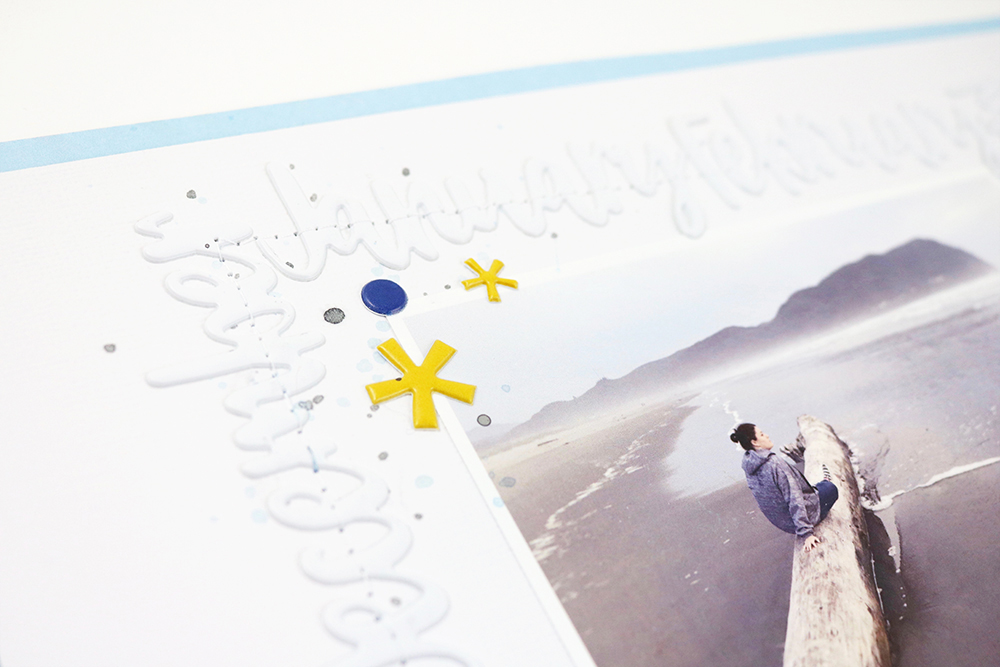
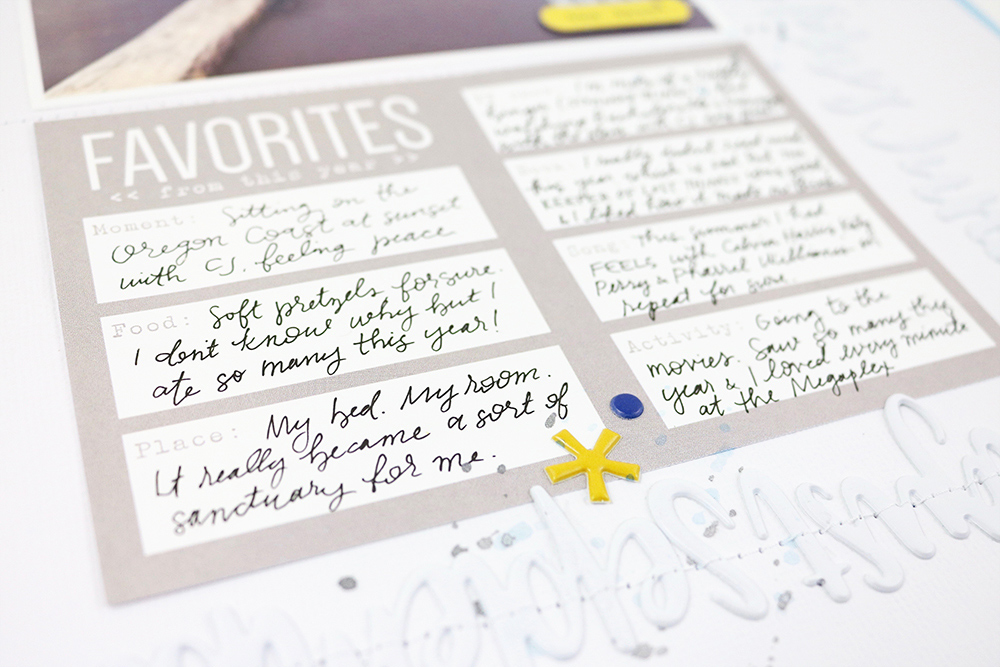
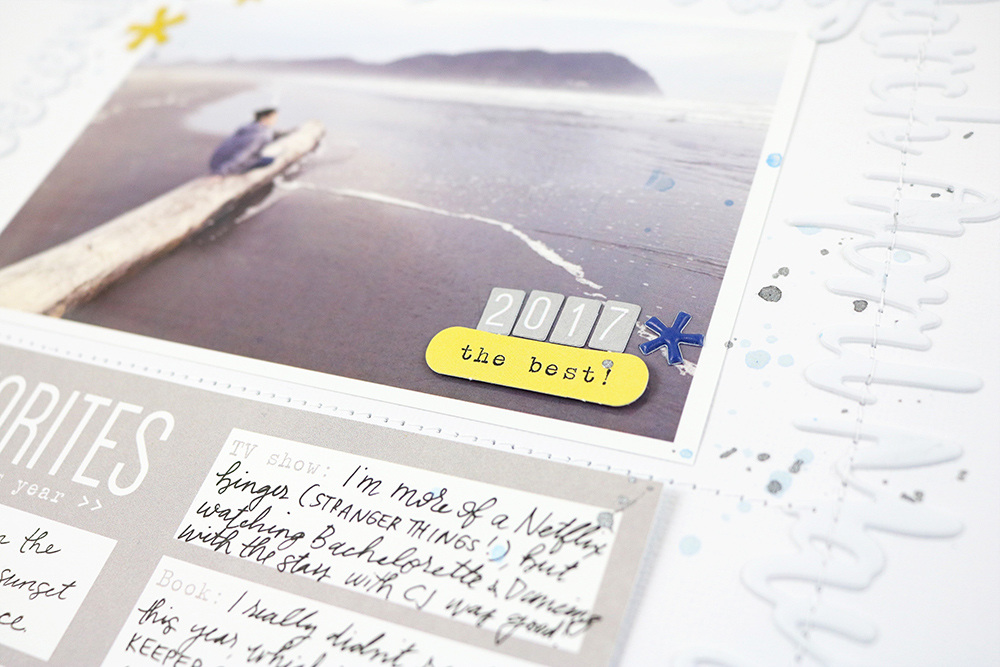
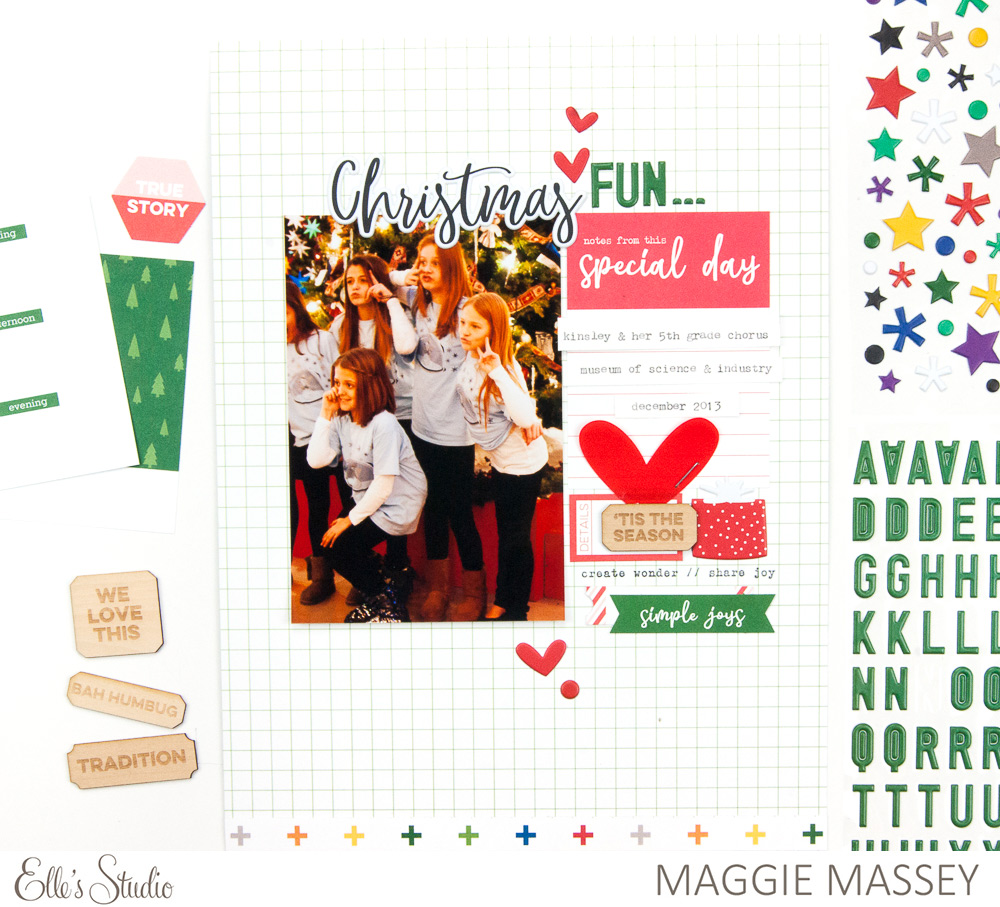
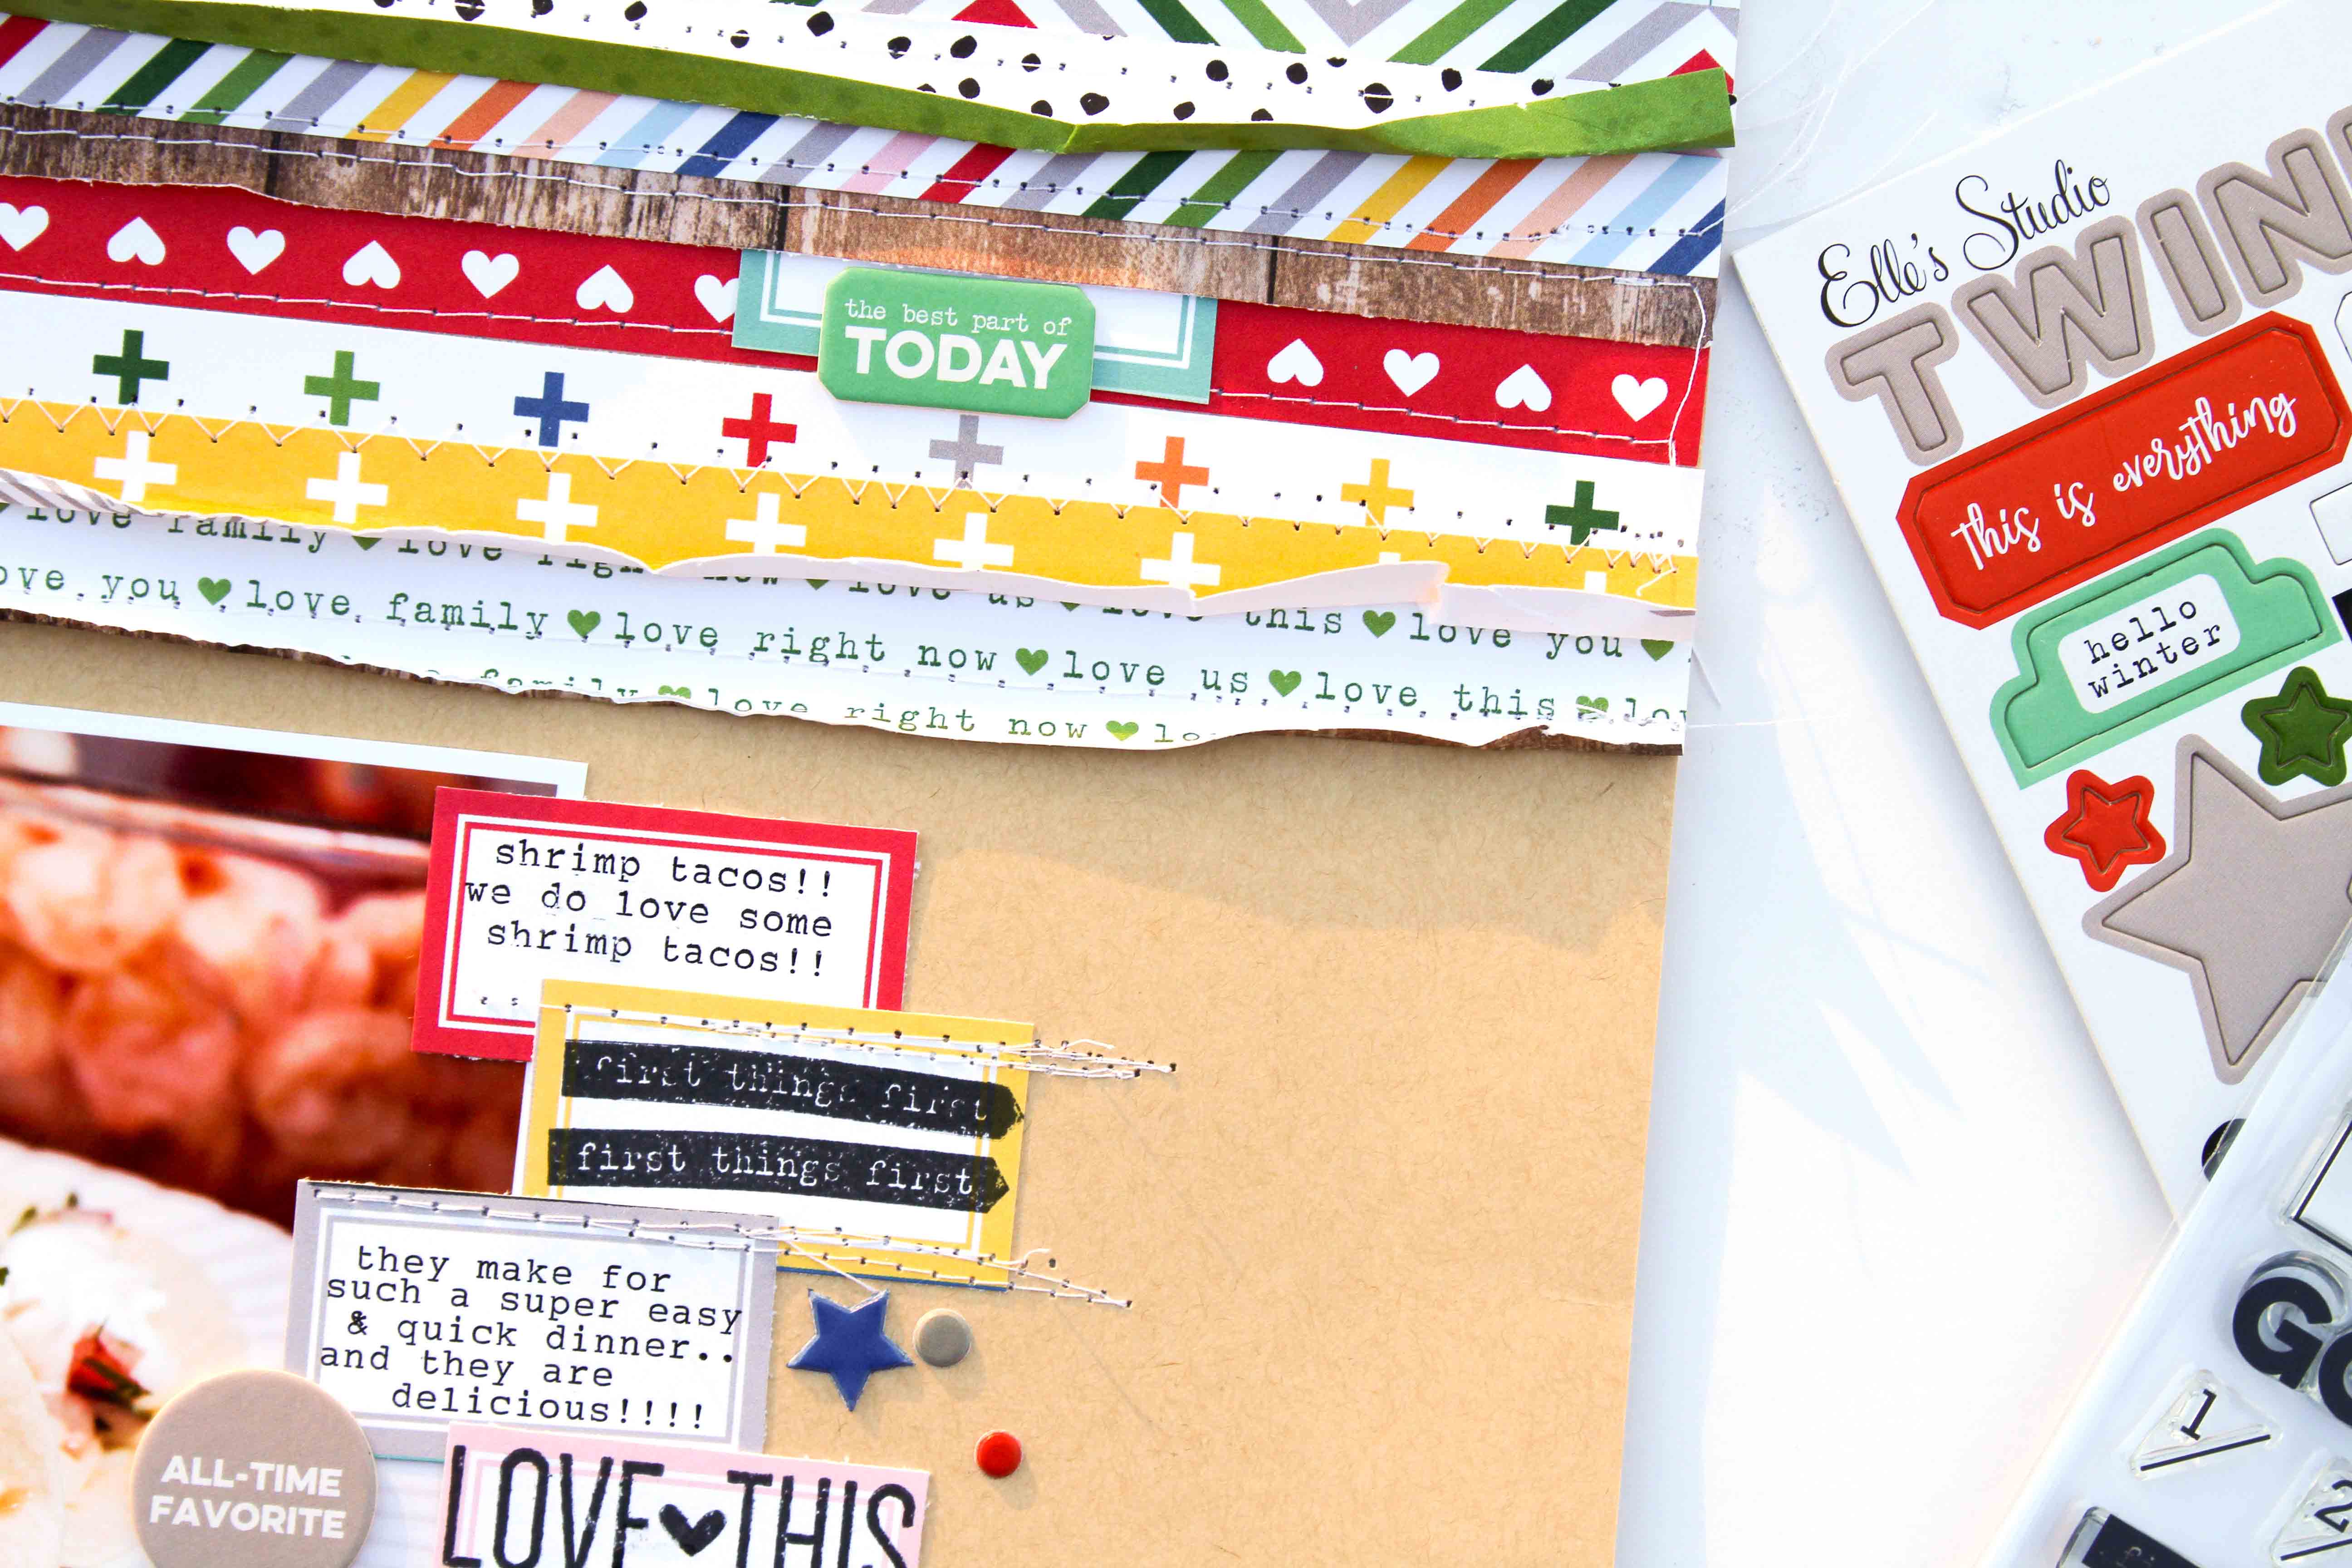
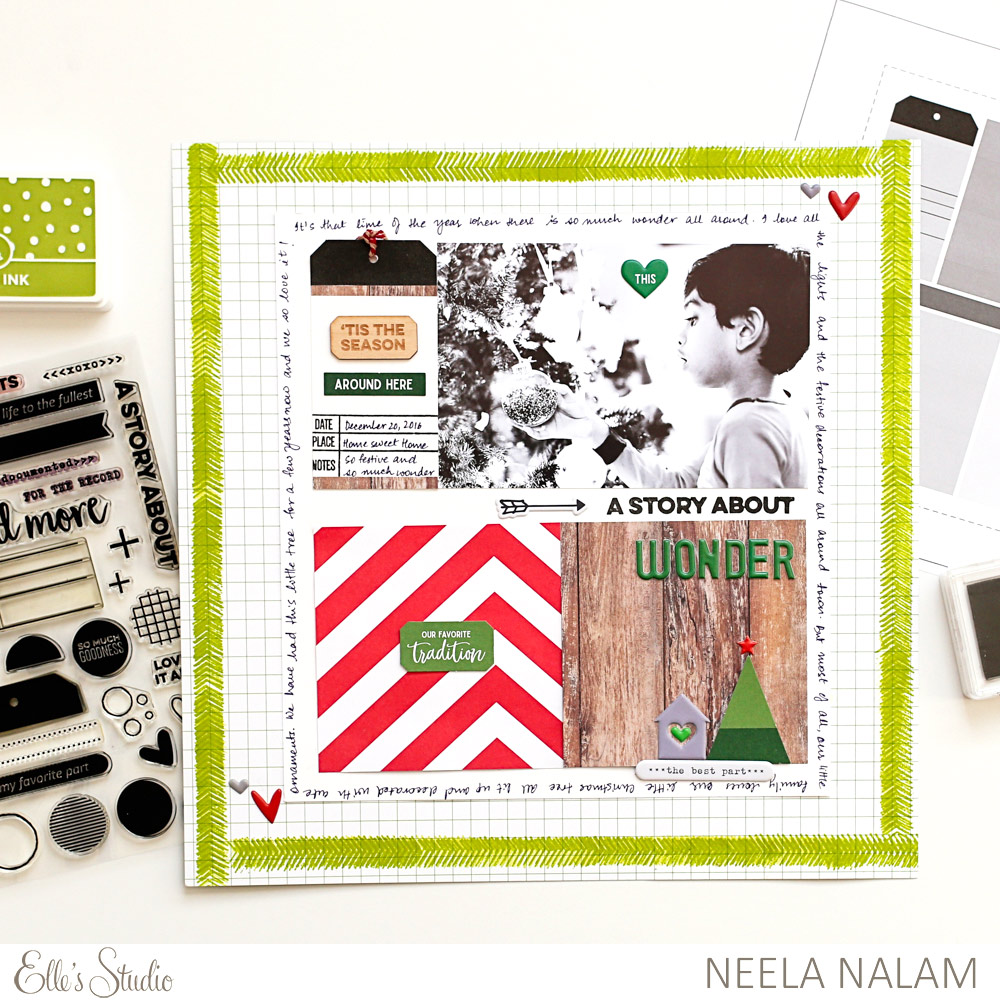
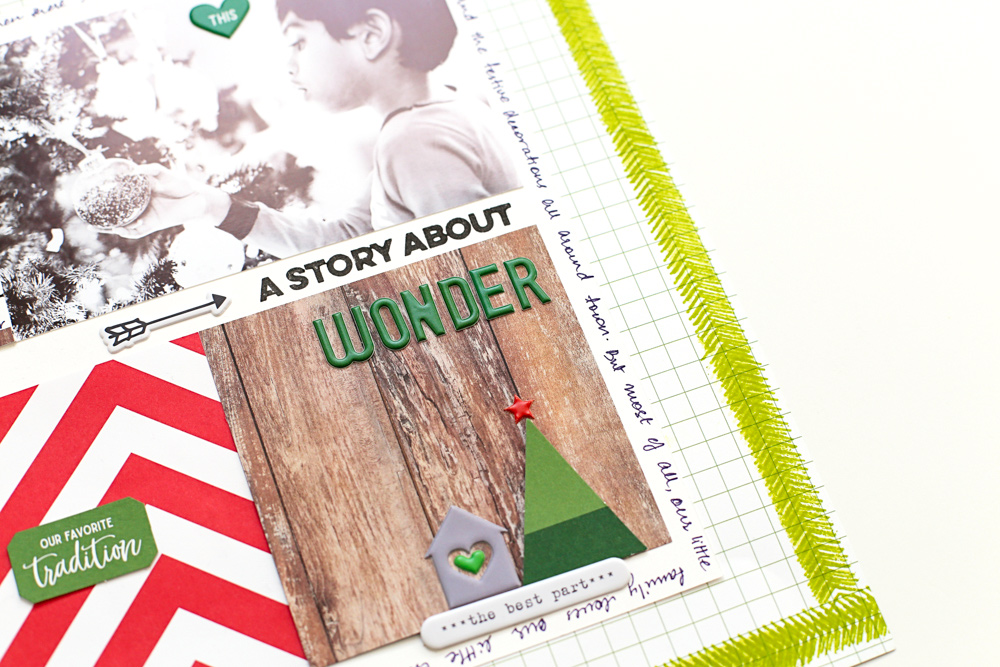
Using sketches to start my layouts always makes it so much easier to complete my project. A lot of times, I end up drawing a sketch on a notepad before starting my project, but it is super easy to be stuck in a rut with your own creations sometimes. At such times an inspiration from a sketch is all you need! You can use it as a jumping-off point or follow it to the smallest detail. To create this project I picked a simple sketch from one of the thirty that are provided in this class. I don’t use too many tags on my projects and absolutely wanted to pick one with tags (there are multiple sketches with tags in this class, by the way). I stamped on the details of the tag with the awesome exclusive class stamp and added a wood veneer piece from the ‘Tis the Season Wood Veneer Labels and a Family Fun Puffy Sticker. I decorated the photo with a single puffy heart sticker.


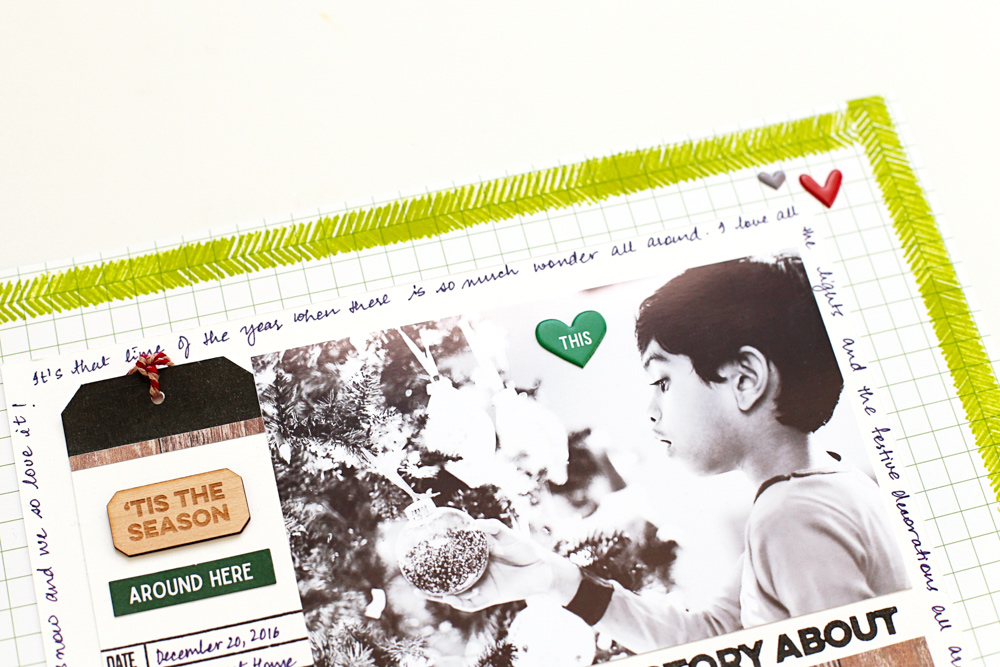
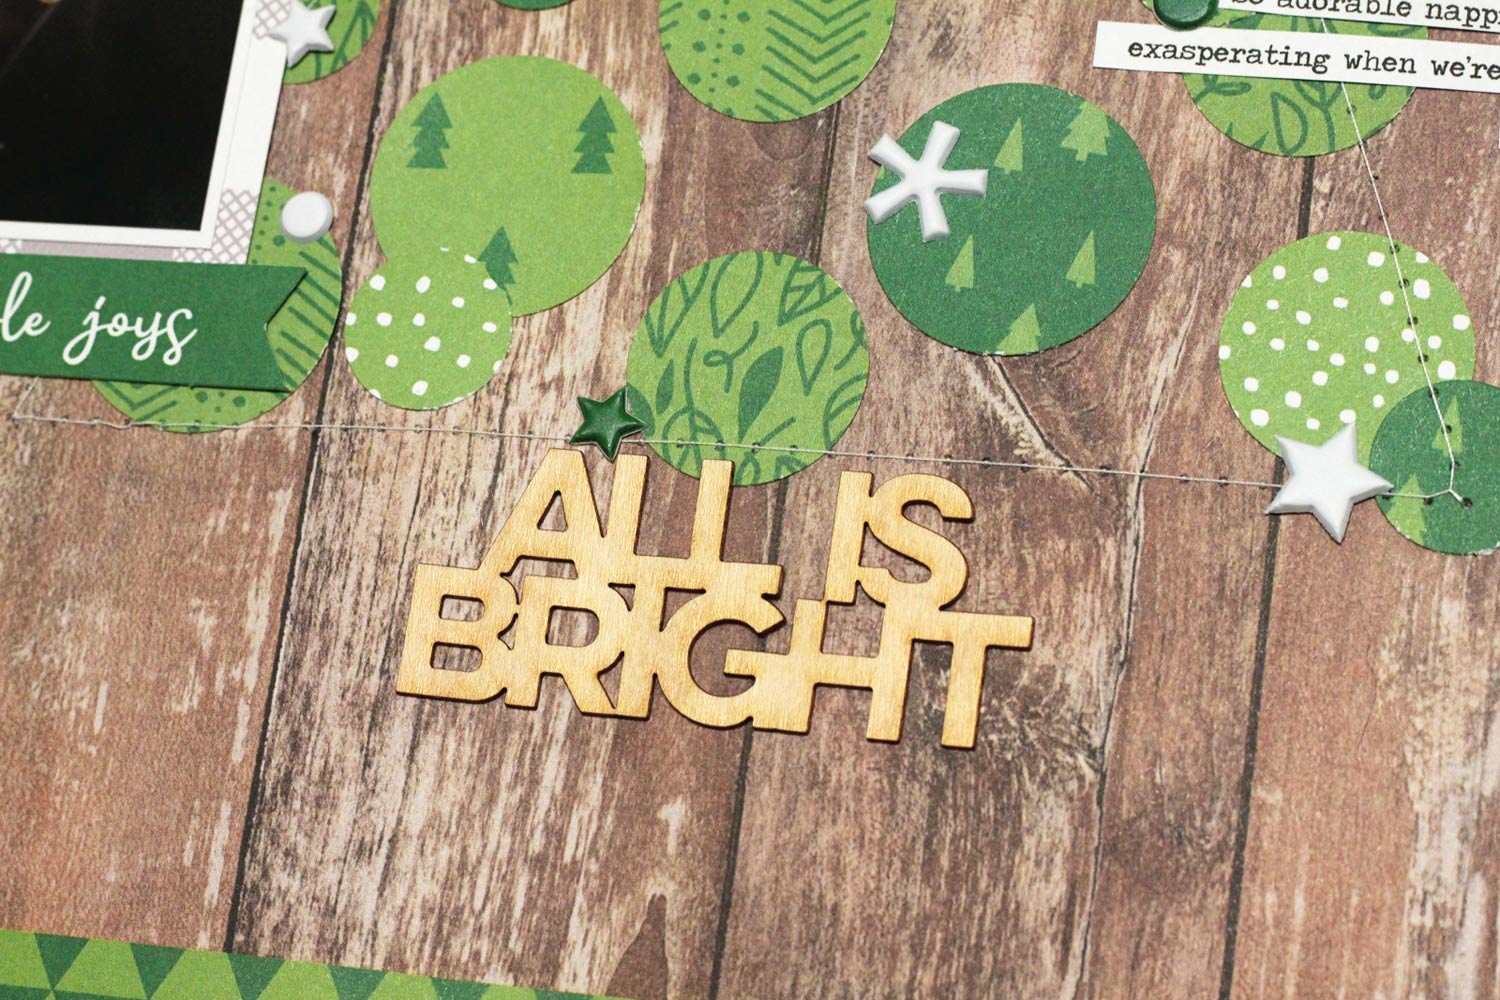
One of my favorite parts of this project was to use the chevron stamp from the exclusive class stamp to mimic Christmas tree fronds as a border along the edge of the layout.


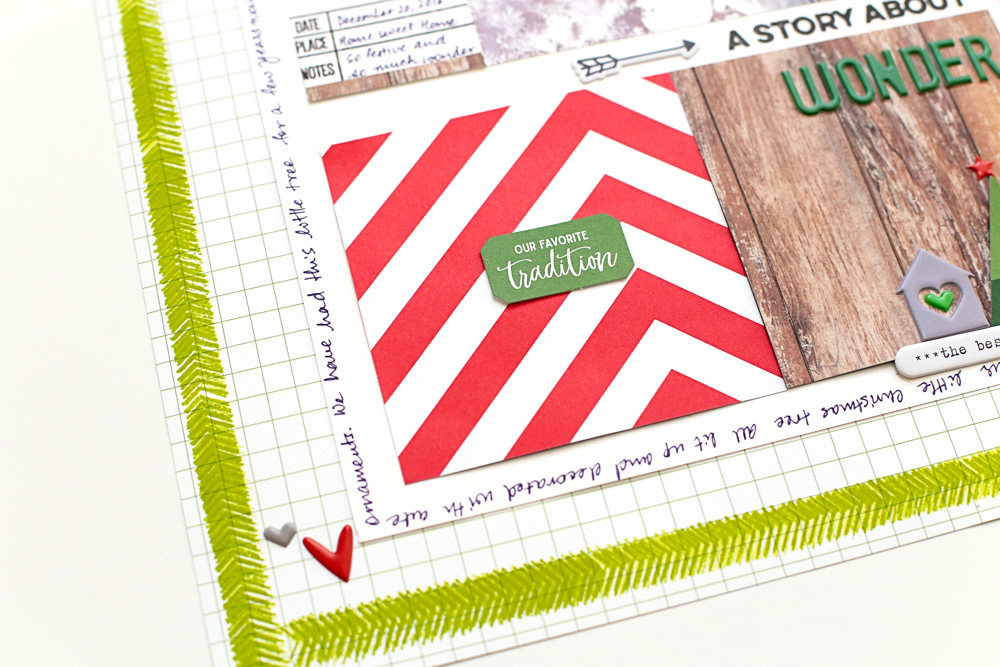
Another favorite on this project are the papers from the Family Fun 6″ x 6″ Paper Stack. I love the wood grain and the chevron papers and they were perfect to use for a Christmas layout.


I loved going through the sketches in this sketch class, and I know I am going to use it again and again to spark ideas for my layouts. Make sure you check it out today, while the exclusive class stamp is still in stock!


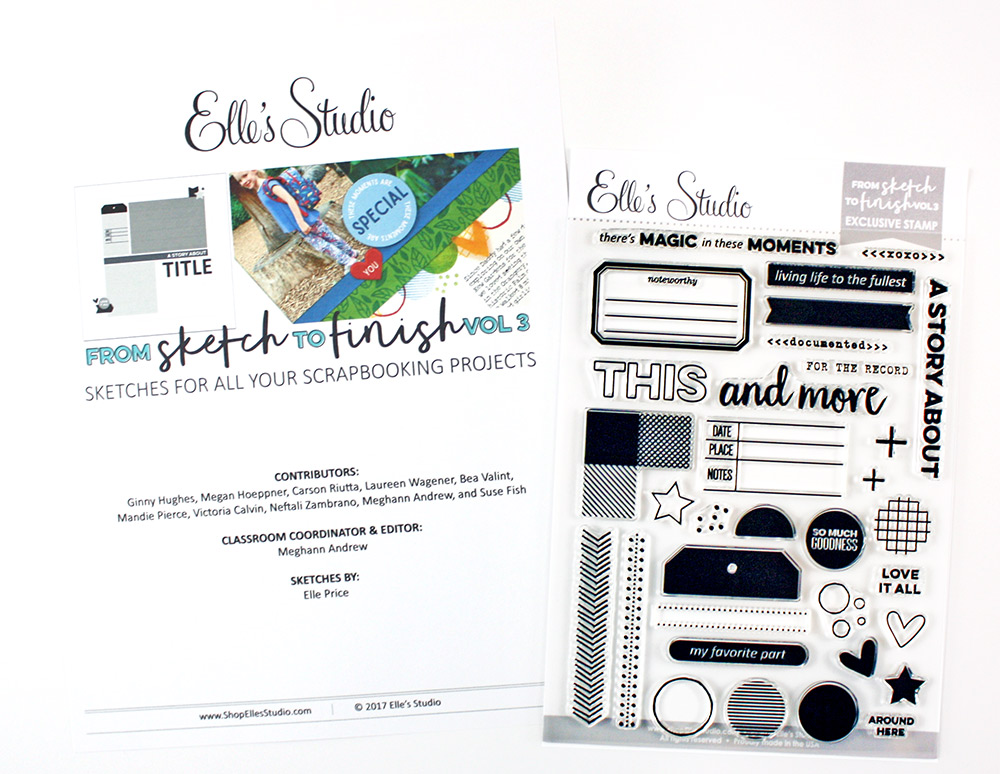
Our newest class, From Sketch to Finish Volume 3 is available with or without the 6″ x 8″ exclusive stamp, but only while supplies last. Have you been inspired by our newest class like Neela? We’d love to see what you’ve created! Please share your layout on Instagram using the hashtag #EllesStudio so that we can see your work, have a chance to be featured here on our blog and win a $10 gift certificate to the shop! 

Documenting A Favorite 2017 Moment + Process Video with Jen Schow!

Even though we still have a few days left in 2017, it’s not too early to document your favorite moments from this year! Today we have Jen Schow with us to share how she’s documenting her most favorite from 2017, and we love how she used our products to tell her story! Let’s see what she created.
 
Hey there! It’s Jen Schow to share a layout with you using the December 2017 Kit + a few of the coordinating products. I love that the kit has some holiday stuff, some new year’s stuff, and a few things for a year-in-review kind of project. I decided to document my 2017 faves using the 4″ x 6″ grey journaling tag from the kit.


Supplies | December 2017 Kit, Twinkle Puffy Stickers, Monthly Puffy Stickers, Light Gray Cardstock Alphabet Stickers
 
I started by printing a photo that matched my “favorite moment” of the year and stacked the photo and journaling tag together. I knew almost immediately that I wanted to work with the Monthly Puffy Stickers into my layout—the whole package!


I created a rectangle around my photo with all of the month stickers and I like the impact they have, while still being subtle because it’s a tone on tone look.


I wrote all of my favorites on the journaling tag and sprinkled a few Twinkle Puffy Stickers in yellow and blue in three areas around the layout to direct your eye through the important parts of the page.


I finished with the “the best” die cut and date using the new Light Grey Cardstock Alphabet Stickers and a little bit of spray mist. I kept it super simple and it only took me about 30 minutes to create! You can see it all come together in this process video:


I hope you’ll consider documenting your favorites from 2017!

December Design Team Inspiration: Volume Three

We’re back with another round of inspiration from our design team, using the December 2017 Kit and extras! You may just want to add these new products to the presents under the tree after you see these projects. Let’s take a look! 


Goodbye 2015, Hello 2016 by Neela Nalam – supplies used | December 2017 KitHello Winter ChipboardVellum Holiday ShapesTwinkle Puffy Stickers, Puffy Heart StickersLight Gray Cardstock Alphabet Stickers, Teal Puffy Alphabet Stickers, Stanley Jr. Alphabet Stamp — Solid


All is Calm by Daniela Dobson – supplies used | December 2017 Kit, December 2017 Digital Cut FileDocument December 2017 KitDecember 2017 Labels, Vellum Holiday ShapesHello Winter ChipboardWinter Wood Veneer Words, Twinkle Puffy StickersFamily Fun 6″ x 6″ Paper StackStanley Jr. Alphabet Stamp — Solid, Stanley Jr. Alphabet Stamp — Outline


All is Bright by Allie Stewart – supplies used | December 2017 Kit, December 2017 Digital Cut File, Document December 2017 KitHello Winter ChipboardWinter Wood Veneer WordsTwinkle Puffy Stickers, Family Fun 6″ x 6″ Paper Stack


Parents by Melissa Mann – supplies used | December 2017 KitVellum Holiday ShapesTwinkle Puffy StickersHello Winter ChipboardSky Blue Puffy Alphabet Stickers, Teal Puffy Alphabet StickersFirst Things First Stamp, Thank You StampFamily Fun 6″ x 6″ Paper Stack


Baking Day by Laura Hager – supplies used | December 2017 KitDocument December 2017 KitDecember 2017 Labels, Twinkle Puffy StickersWhite Puffy Alphabet Stickers, Dated StampHoliday Plans Stamp
 
Watch out here for new blog projects from our design team this week! We can’t wait to see how you use your new December goodies! Share on Instagram using the hashtag #EllesStudio!

A Document December Kit Layout with Jen Chapin

Hi everyone! It’s Jen here, and today I am sharing a quick layout I created with the Document December 2017 Kit. I love the mixture of paper, journaling tags and embellishment included in this kit—it really is perfect for any kind of holiday documentation you could choose.


Supplies | Document December Kit, Family Fun 12″ x 12″ Paper Collection
 
I had some photos from last year that I wanted to scrapbook, and I decided to print them at 3″ x 4″ so that I could easily pair them with journaling tags from the kit.


I arranged my photos in a three-photo by two-photo grid, then added a few journaling tags to the page. I did some quick handwritten journaling, then added some wood veneer stars and other stickers to the page.


I placed the title directly on top of my grid, using the beautiful puffy stickers from the kit, as well as a chipboard tree and large wood veneer star. In just a few minutes I created a cute layout, which was simple and easy with this great kit!
 
I hope you and yours have a very merry holiday season. Have a great week!

December Design Team Inspiration: Volume Two

With your kit packed and on its way, let’s look at another round of inspiration from our design team! You’re sure to get some ideas for how to use your supplies once they arrive from these special projects. 


Wrapped and Ready by Alissa Fast – supplies used | December 2017 KitDecember 2017 LabelsWinter Wood Veneer Words, Cork CirclesLetter and Number Stickers – Black, Family Fun 12″ x 12″ Paper Collection


Christmas Tags by Candace Perkins – supplies used | Document December KitMonthly Puffy Stickers, Wood Veneer Snowflakes, Cork Circles, Letter and Number Stickers – White, Family Fun 6″ x 6″ Paper Stack


Thank You Cards by Jamie Leija — supplies used | December 2017 Digital Cut File, Twinkle Puffy StickersThank You Stamp,  Family Fun 6″ x 6″ Paper Stack


Christmas Fun by Maggie Massey – supplies used | December 2017 KitDocument December KitVellum Holiday Shapes, ‘Tis the Season Wood Veneer LabelsTwinkle Puffy StickersGreen Puffy Alphabet StickersChristmas Puffy Heart StickersFamily Fun 12″ x 12″ Paper Collection


New Year by Nancy Damiano – supplies used | December 2017 Kit, December 2017 LabelsHello Winter ChipboardVellum Holiday ShapesTwinkle Puffy Stickers, Holiday Plans Stamp, Document December Stamp
 
We will share one last round of inspiration from our 2017 design team in the next few days. Until then, search the hashtag #EllesStudio to find even more to inspire you, using the December 2017 Kit and extras! 

Documenting Time with Daniela Dobson

Our newest stamp, the Time Stamp, records any important time that you want to document on your project, and it coordinates with two other popular stamp sets in our shop—Dated and Days of the Week Stamp! Today, Daniela Dobson is with is to share a layout that uses all three to document a weekly occurrence in her household! Let’s see what she made. 
 
Welcome to the Elle’s Studio blog today! It’s Daniela here, highlighting the brand new Time Stamp, along with the Dated and Days of the Week Stamps—which coordinate so perfectly!


Supplies | December 2017 Kit, Vellum Holiday Shapes, Twinkle Puffy Stickers, Winter Wood Veneer Words, Little Acrylic Stars, Time Stamp, Dated Stamp, Days of the Week Stamp, Holiday Plans Stamp, Family Fun Acrylic, Family Fun 12″ x 12″ Paper Collection, Document December Kit 
 
I started by layering tags, patterned paper and stamping on the left side of the page. I used Time, Dated and Days of the Week Stamps by documenting the time and days my son has basketball practice, using black ink for all my stamping. I added a star from the Holiday Plans Stamp between the 2017/2018 years, stamped with the Dated Stamp.


For the title, I used the Winter Wood Veneer Words and red letter stickers from the Document December Kit.


To finish the page, I added strips of washi from my stash and scattered Twinkle Puffy Stickers and Little Acrylic Stars across the page.

Creating Texture with Melissa Mann

There are many ways to create texture on your layout, and today Melissa Mann is sharing how she used product from our newest exclusive kit and Family Fun collection to create a fun, dimensional page. Let’s take a look!
 
Good morning! This is Melissa with you and I’m sharing a new project I created using the December 2017 Kit and add-ons!


Supplies | December 2017 Kit, December 2017 Labels, Hello Winter Chipboard, Twinkle Puffy Stickers, First Things First Stamp, Family Fun 12″ x 12″ Paper Collection
 
One of the things I love most about the Elle’s Studio monthly kits is that even if they are partially themed for a certain holiday or moment, you can still create everyday layouts or cards with them. The kits are chock full of goodies that can be used for capturing the everyday moments of life. While this month was filled with themed items for Christmas and the New Year, I was still able to create a project that was not holiday themed in the least!


I love layers and texture in my projects and I created a ton of that with some super-duper distressing of the pattern paper from the Family Fun 12″ x 12″ Paper Collection that is found at the top and bottom of my layout.


I had a lot of fun layering strips of pattern paper and stitching it down, wrinkling it up, tearing it up, and I only broke one needle on my sewing machine during the process! Don’t be afraid to “rough” up your projects – I love doing this with paper that is two sided, because you get even more “layers”!
 
Thanks for stopping by this morning and taking a peek!